iBorg Posted October 5, 2010 Posted October 5, 2010 I don't really understand the wheel and tire. Actually it looks great! MIke
aksarben Posted October 6, 2010 Author Posted October 6, 2010 Where did you get the racing parts from? The gauge and switch panel look really good. I could use something like that. The steering wheel is from a diecast Viper, the dash is from the Camaro kit. Everything else I made myself. I made the digital readout from stock plastic, printed the face on brochure paper. The switch panel and fuse panel are both from stock plastic. The switches are small bits shaped and glued to photo etch bolt heads. The guages are also printed on brochure paper for the glossy-ness, then placed in sectioned aluminum tube. The petals are drilled DrPepper can material, set on paper clip stalks and the vent is the old coiled craft wire wrapped with plummer's tape trick. Thanks for looking
dwc43 Posted October 6, 2010 Posted October 6, 2010 The steering wheel is from a diecast Viper, the dash is from the Camaro kit. Everything else I made myself. I made the digital readout from stock plastic, printed the face on brochure paper. The switch panel and fuse panel are both from stock plastic. The switches are small bits shaped and glued to photo etch bolt heads. The guages are also printed on brochure paper for the glossy-ness, then placed in sectioned aluminum tube. The petals are drilled DrPepper can material, set on paper clip stalks and the vent is the old coiled craft wire wrapped with plummer's tape trick. Thanks for looking That does look really good. I would a swore I was looking at some Autometer gauges when I first saw that. I figured you bought it somewhere or stole it from a kit. Great job on that. I may have to give it a try at making my own gauges like that. What did you use to cut the aluminum tube? I don't think I can cut it that short with the cutter I have. Guess I could try to sand it down or drill a hole to set it in. I don't know how I would hold on to it if I tried a Dremel.
aksarben Posted October 7, 2010 Author Posted October 7, 2010 (edited) DW, I drill the holes in the aluminum first with just a pin vise, then I cut the shape of the petal around the holes. I score the metal first with an exacto, then fold along the score and it snaps right off. The aluminum is thin enough though that a good pair of scissors will cut it fine as well. Steve Edited October 7, 2010 by aksarben
aksarben Posted October 7, 2010 Author Posted October 7, 2010 Here is an update, shot of the seat, from a diecast nascar. The belts and hardware are from a set made for 1/32 WWII fighter aircraft models, the scale looks more like 1/24 to me so I tried it out. I think they worked out great.
dwc43 Posted October 7, 2010 Posted October 7, 2010 DW, I drill the holes in the aluminum first with just a pin vise, then I cut the shape of the petal around the holes. I score the metal first with an exacto, then fold along the score and it snaps right off. The aluminum is thin enough though that a good pair of scissors will cut it fine as well. Steve Thanks. I'll give it a shot sometime in the future and see how it turns out. Belts look good too.
aksarben Posted October 8, 2010 Author Posted October 8, 2010 (edited) What did you use to cut the aluminum tube? I don't think I can cut it that short with the cutter I have. Guess I could try to sand it down or drill a hole to set it in. I don't know how I would hold on to it if I tried a Dremel. Just realized that I didn't pay attention to your question, sorry. I thought that you were asking about the foot petals. Duh I don't have a tube cutter, I just roll the tube along my mat with an exacto blade, until it gets through the metal. It's hit and miss most of the time as sometimes you don't end up in the same groove you start out in and it cuts in a "corkscrew" path. If you set a larger diamiter tube around the one you are cutting, it helps as a guide. Just takes practice and a few attempts to get it right. Steve Edited October 8, 2010 by aksarben
Plasticfanatic Posted October 8, 2010 Posted October 8, 2010 This is truly an amazing project and the amount of detailing and fabrication for the conversion is superb, love that engine indeed!! Can't wait to see more of this project!! ps/ the Volvo and Challenger racer concepts are AMAZING!!!!
dwc43 Posted October 8, 2010 Posted October 8, 2010 Just realized that I didn't pay attention to your question, sorry. I thought that you were asking about the foot petals. Duh I don't have a tube cutter, I just roll the tube along my mat with an exacto blade, until it gets through the metal. It's hit and miss most of the time as sometimes you don't end up in the same groove you start out in and it cuts in a "corkscrew" path. If you set a larger diamiter tube around the one you are cutting, it helps as a guide. Just takes practice and a few attempts to get it right. Steve Thanks for clearing that up for me.
Romell R Posted October 8, 2010 Posted October 8, 2010 (edited) Simply OUTSTANDING! And since you have already created a master piece out of the camaro I guess I'll do the charger. Great job on this keep up the awesome work! Edited October 8, 2010 by Aftashox
Eric Stone Posted October 8, 2010 Posted October 8, 2010 This is looking great so far, and I almost hate to ask, but wouldn't a LeMans type racecar (especially a supercharged one) be running long tube headers? All the work done so far is looking awesome.
aksarben Posted October 8, 2010 Author Posted October 8, 2010 Thanks Romell, do you mean the Challenger? Although the Charger might look cool done up like this as well. This is looking great so far, and I almost hate to ask, but wouldn't a LeMans type racecar (especially a supercharged one) be running long tube headers? All the work done so far is looking awesome. I agree that a racing team would want the most power they could get and I started on making some for this from solder, but ran out of room because I'm running the pipes out the side of the car and just couldn't work it out right. Thanks for your comments. Steve
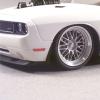
aksarben Posted October 8, 2010 Author Posted October 8, 2010 I've started the wheel well extensions. First I glue a strip of plastic around the inner radius of the well, the width of the extension, then glue the outer panels to them. I didn't take a photo of the inner radius pieces but here are the outer panels. Next I glue the top panels to both the body and the outer pieces, shaping around both a little at a time. Once dry, I trim the top pieces outside of the outer panels. This is all stock plastic, no putty.
Models by Bear Posted October 9, 2010 Posted October 9, 2010 Wow that really is awesome very good work watching and waiting for more cool tricks
jhuntsman Posted October 9, 2010 Posted October 9, 2010 man this car is looking good. you really have a good imagination and know how to put it on plastic. the thought to use for sale signs for scratch building never even crossed my mind. looks like im making a trip to the store tomm.......
RodneyBad Posted October 9, 2010 Posted October 9, 2010 Engine and Dash looks Awesome.. Great looking Body work. Fender extension looks Super.. Excellent work.. Can't wait to see the finish..
davyou5 Posted October 9, 2010 Posted October 9, 2010 You are definitely an artist at what you do, I can't wait to see more .
aksarben Posted October 10, 2010 Author Posted October 10, 2010 Dave, Glenn, Bear, Fred, huntsman, Rodney and David, wow, thanks for all of your acknowledgement, it means allot. I have the bodywork completed, here are some progress shots..
RatRod Posted October 10, 2010 Posted October 10, 2010 Man, this is awesome!!! I'll be watching as well!!!
Jamez Posted October 11, 2010 Posted October 11, 2010 I have wanted to see this done since the car was released. Looks AWWSOME!!! What thickness of plastic are you using?
seeker589 Posted October 11, 2010 Posted October 11, 2010 I am really lovin' the flares so far. Your fabrication tolerances are outstanding! SO tight! Are you still using the "ForSale" sign plastic?
LAone Posted October 11, 2010 Posted October 11, 2010 uuuummmmm wow! i had to take a lot of double looks on your progress. the body work is awesome.
davyou5 Posted October 11, 2010 Posted October 11, 2010 (edited) I know I definitely cannot wait to see this one Finished! I really love how you can piece all of that together perfectly . Edited October 11, 2010 by davyou5
Recommended Posts
Create an account or sign in to comment
You need to be a member in order to leave a comment
Create an account
Sign up for a new account in our community. It's easy!
Register a new accountSign in
Already have an account? Sign in here.
Sign In Now