mopar01lee Posted September 24, 2011 Author Share Posted September 24, 2011 ok i know its been longer than a day but heres the upodate..... little mock up for ya...... ok here is a close up of the MAS rear spring set up..... thats it for now .... later days ... Davin Quote Link to comment Share on other sites More sharing options...
crowe-t Posted September 24, 2011 Share Posted September 24, 2011 (edited) Davin, This looks great so far. The suspension and chassis are nice and detailed. Edited September 24, 2011 by crowe-t Quote Link to comment Share on other sites More sharing options...
Harry P. Posted September 24, 2011 Share Posted September 24, 2011 It's looking pretty good! One suggestion... carefully clean up the edges of the foil trim around the windows. Use a brand new blade. Also you might try and burnish out some of the wrinkles in the foil with the side of a toothpick. Other than that it's looking nice (and I'm being picky about the foil trim... but since you're doing such an elaborate build-up, it's worth your time to clean up those edges a bit). Quote Link to comment Share on other sites More sharing options...
mopar01lee Posted September 24, 2011 Author Share Posted September 24, 2011 hey thanks harry... im fairly new to the BMF as this is the 2nd car ive used it on ..lol i will giv the toothpick a try... thanks for the comments fellas. later days ... Davin Quote Link to comment Share on other sites More sharing options...
highway Posted September 25, 2011 Share Posted September 25, 2011 It's looking pretty good! One suggestion... carefully clean up the edges of the foil trim around the windows. Use a brand new blade. Also you might try and burnish out some of the wrinkles in the foil with the side of a toothpick. Other than that it's looking nice (and I'm being picky about the foil trim... but since you're doing such an elaborate build-up, it's worth your time to clean up those edges a bit). Davin, another little tip to add to what Harry said with the BMF, I use a Q-Tip when I burnish my foil. It helps to push the foil a little deeper into the molded depressions around the window trim and also helps give a cleaner edge when you cut the foil. As an added bonus, it also helps to polish the foil some for a little more shine. Quote Link to comment Share on other sites More sharing options...
Chuck Most Posted September 26, 2011 Share Posted September 26, 2011 What Mr. Brownlee said. A soft pencil eraser will do the same, too, but you can't beat a cotton swab (Q-Tip) for bringing out the shine. Quote Link to comment Share on other sites More sharing options...
mopar01lee Posted September 30, 2011 Author Share Posted September 30, 2011 (edited) thanks for the tips and the comments fellas ..... i will try them when it gets closer to being done... now for a small update.. been goin slow had a death in the family , but was ableto get a lill done.. im not going to do a full brake sys. i will do as much as possiblelike full front lines ... hears the start also been doin some engine detail like .... p/s lines ..plug wires.. battery cables.. an a alt wire when done ... started on a spare tire for the trunk as well drill lug holes ... thats it for now thanks for looking later days .. Davin Edited September 30, 2011 by mopar01lee Quote Link to comment Share on other sites More sharing options...
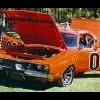
mopar01lee Posted September 30, 2011 Author Share Posted September 30, 2011 oh heres a lill tast of my next build when the general is done ... hint .. mix a 73 cuda with parts from a 06 srt8 magnum.. Quote Link to comment Share on other sites More sharing options...
Deckerz Posted September 30, 2011 Share Posted September 30, 2011 Coming along very nice man, if your new project is anything close to the detail of this build i look forward to it Quote Link to comment Share on other sites More sharing options...
mopar01lee Posted November 8, 2011 Author Share Posted November 8, 2011 Not a lot to update but if you want some eye candy shots of were she is at right now .. here they are .. it is getting closer i swear...lol i added larger rear tires to it for my own look.. thanks for lookig later days ...Davin Quote Link to comment Share on other sites More sharing options...
crowe-t Posted November 8, 2011 Share Posted November 8, 2011 Davin, The General looks great so far! Quote Link to comment Share on other sites More sharing options...
RodneyBad Posted November 8, 2011 Share Posted November 8, 2011 Dang!! That looks Cool.. Great work so far. That's the Money Shot. Quote Link to comment Share on other sites More sharing options...
bandit1 Posted November 8, 2011 Share Posted November 8, 2011 hey davin i just saw this and i thought you would like to know about it! (possible to own number 1) http://www.barrett-jackson.com/events/scottsdale/2012-sneak-peek/69-charger/ Quote Link to comment Share on other sites More sharing options...
Flyboyz1011 Posted November 9, 2011 Share Posted November 9, 2011 I just sent these pics to my mother-in-law. She literally said "Is he selling it? It could go for about 40k." I let her know it wasn't a real car. She doesn't believe me. Keep up the amazing work. Quote Link to comment Share on other sites More sharing options...
4bangen Posted November 9, 2011 Share Posted November 9, 2011 I'm impressed. Quote Link to comment Share on other sites More sharing options...
Beavis Posted November 10, 2011 Share Posted November 10, 2011 top notch detail work you got on this ride my dude, cannot wait to see it finished jumping Quote Link to comment Share on other sites More sharing options...
mopar01lee Posted November 11, 2011 Author Share Posted November 11, 2011 Thank you guys for the very kind words ..... i can see my efforts are doin the car justice.. lol JK. No for real thanks for the comments fellas .. more will come soon later days .. davin oh send your mother in law the build pics .. she might believe you then ..lol.. Quote Link to comment Share on other sites More sharing options...
GeeBee Posted November 11, 2011 Share Posted November 11, 2011 Very nice build, your work is very impressive, can't wait to see it finished ..... Quote Link to comment Share on other sites More sharing options...
towguy76 Posted December 24, 2011 Share Posted December 24, 2011 You may have already gotten past this point in your build, but i thought i would let you know that the seats are different in the 68 than the 69. Plus the side lights are different. The 68 has round ones and the 69 has the rectangle ones. The other difference is in the dash but you cant tell in the kit. Quote Link to comment Share on other sites More sharing options...
towguy76 Posted December 24, 2011 Share Posted December 24, 2011 Read some more posts, i see all the nitpicking and realize my post may sound like those. Am not trying to nit pick myself. Was just giving a little helpfull info incase you didnt have it already. As for the build posts i have seen so far, looks cool. Quote Link to comment Share on other sites More sharing options...
Wheels Posted December 24, 2011 Share Posted December 24, 2011 Great looking General Lee!! Quote Link to comment Share on other sites More sharing options...
moparmagiclives Posted December 24, 2011 Share Posted December 24, 2011 I picked up the new 1/16 scale hoping to do a similar build, Great job, Very good building techniques. And very clean. Quote Link to comment Share on other sites More sharing options...
Dirkpitt289 Posted December 29, 2011 Share Posted December 29, 2011 Very very impressive build Quote Link to comment Share on other sites More sharing options...
mopar01lee Posted December 30, 2011 Author Share Posted December 30, 2011 thanks guys .... heres a lill update .. finished the door jams an lower jams , and added side moldings or scuff trim. lill engine detaile .. it slanted i kw .. trin to fig out how to install the gear box with it attached to the motor with the power steering lines .. till next time later days Davin.... Quote Link to comment Share on other sites More sharing options...
Mr. Moparman Posted December 30, 2011 Share Posted December 30, 2011 Hmmmm. Really your only option in this case would be to pull the motor.There is no way to do it unless you totally disassemble the car to expose the back side of the chassis. Quote Link to comment Share on other sites More sharing options...
Recommended Posts
Join the conversation
You can post now and register later. If you have an account, sign in now to post with your account.
Note: Your post will require moderator approval before it will be visible.