

Deckerz
-
Posts
415 -
Joined
-
Last visited
Content Type
Profiles
Forums
Events
Gallery
Everything posted by Deckerz
-
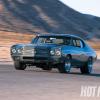
Stance mockup, im not using the viper wheels now i think they look a bit silly, in my opinion it should have deep rims so i got some random tyres i had from a chevelle kit, i have had the rims for these though so may have to contact revell about these. Anyway after some hard sanding on the front end to get the blending im going for i decided to take a break and see how it looks at the stance i want with the engine too, i get the feeling more modification is going to be needed to the hood slightly to clear the supercharger!
-
Thanks man progress is slow but im getting there, i have ran into a slight problem though, i have lost the valve covers for the engine , i put a coat of primer on the body to see where im at with it and there still seems to be quite a bit of work but onwards and upwards!
-
Its been a while since my last post, between work, my child and everything else life has been chucking at me this past year ive only been able to do bits as and when i can but slowly things are getting back on track. A little body work has been done, mainly getting the shape right and smoothing, also some work on the engine, im focusing on that right now to get all the little details done, fuel rails, realistic exhaust manifold pipes ect.
-
So i have a dual project starting, an old viper GTS which is going to be near enough standard except some extra detailing under bonnet, realistic exhaust pipes and viper srt-10 acr wheels (wheels pictured just to mockup), it will be painted pink with black stripes and wheels. Second is a 71 plymouth gtx i call the gtx-s, all the front and back bumpers and grills will be smoothed to the body to update it a little, the engine will be a supercharged viper engine, paint is yet to be decided but i am thinking of a patchy snakeskin effect.
-
I got the rear clip of a 41 willys coupe through the post, it needs cutting and trimming but this is a rough mock up. Il have to put a piece of styrene tube across to keep it solid while I do what I thinks going to be the hardest bit to do. I need to embed the truck bed into the fap but still leaving enough room for the wheels.
-
Bonnet and underside done, starting in the door now then its just finishing the body off. Im waiting for a old willys coupe to come through so I can do the bed of the truck, im going to be using the rear arches of the coupe and mould them to the truck bed as I don't really like the standard arches for the truck and I think the coupe arches will set it off a lot better especially with the big tyres tucked inside.
-
A little update, i've rusted one door and done the hood and other door in primer, there is still sanding and another coat of primer for both then il add the black to the hood and rust and rust the primed door. I still have more rust to do for the rest of the body too. I have decided for the interior that at some point in its past it has been sealed so im deciding to use black underbody sealant applied by hand, it has a brownish tinge to it already which will help but il add just a sprinkle of rust within. Id say even though this build seems complicated because of the rusting details, to be honest its the opposite because I don't have to worry about tiny imperfections in the paint work
-
Thanks guys i appreciate the positve feedback so soon! Thanks for the Suggestion Steven, to be honest that's exactly what i was going to do in a way, i was going to get a little pot of tamiya base coat, mix a bit of it with the rust and a tiny bit of salty water to make a rusty paint/paste and hand paint the inside with a fine brush, hopefully while drying the rust will oxidize a bit more and cause rust runs, we'll see how things go though haha.
-
Thanks buddy, all the body panels will be to match except the hood which will be gloss black with rust to look like its been replaced and a door in primer again with rust on to look like it was replaced too but not painted for a long time. Possibly an old decal here and there. All underneath though will look brand new and a surprise is in store for the engine.
-
I decided to build this 41 willys pickup truck, I have limited supplies at the moment but that's not stopping me, I couldn't decide on a colour so I decided to rust it, not with all this fancy stuff for rust effect, this is genuine rust sanded off an old brake disc I have. I started by sanding the body as usual then rubbed rust powder all over the body. I then clear coated the body and sprinkled the dust hear and there and built it up. I still have more to do but thought id show how it stands.
-
Hes around 7 months old now and hes just not learning, i swear he still doesn't know his name and we've tried all sorts to stop his bad habits and get him taught but he won't have any of it, hes awful with me and my girlfriend but won't go near our daughter. I guess all we can do is keep on trying but when hes no longer a puppy and hes still doing it we will just have to get rid of him. At least i know now to put all my parts back in boxes even if i only pop out for a minute.
-
Has anybody got a dog? Is that dog annoying? Does that dog chew anything in sight? Well my dog is called Alf and i am not very happy with him, i mated an AMT quad cam 426 Hemi to the transaxle gearbox of a revell Ferrari Enzo, it took ages to get everything straight, filled and detailed to look as if it was meant to be together, luckily i hadn't finished building the engine, it was literally the block with cylinder heads and gearbox. Just as i finally decide what to use the engine in, the dog decided to get hold of it and now all that remains is the cylinder heads and a lot of chewed plastic. Now i have to find a new 426 doner block and a Enzo engine. Thanks Alf.....
-
A few little things have been done, I had trouble with the rear bumper with panel lines and general fitting so I've decided to glue as I've dine what I can, just waiting for some putty and il smooth the bumper into the body. I also cut the grill part out of grill leaving the surround which il will put some mesh behind and some new headlights. Finally ive been able to decide on the ideal ride height!
-
Ive decided to work on the interior for a bit until a few bits turn up, as im going for a sort of race car that could be used everyday. I decided to cut out the rear seats and I used some 0.25mm styrene sheet to cover the bench I just need some putty to tidy everything up, a roll cage will be built too, im not going for a completely stripped out look just most of it haha. The dash will be slightly modified just to compensate for satnav as ive got a few decals. Also there will be a unique paintjob for the body but im keeping that a secret until the time comes....
-
Okay so this is going to be my rival build looks like you're off to a good start man!
-
As you can see un the previous pictures the rear wheel sat slightly on the outside of the wheel arch but I wanted it sitting inside, the only problem was it wasn't possible with the stock chassis so some modifications needed to be done, here is my progress, all I need to do now is put some putty on and sand smooth. As you can see I tried saving as much of the inner fender as I could.
-
What is the best way to cut out a grill?
Deckerz replied to Deckerz's topic in Model Building Questions and Answers
Im wanting to remove the grill to leave the surround then put some mesh behind the surround, ive been using my blade the slowly etch through the grill but I can only manage to do the top and bottom, where the grill curves round my knife isn't capable. -
So im building a 71 gtx but the rear wheels I want to put on don't quite fit in the arches so how do I go about making them wider on the chassis? Thanks!
-
I am wanting to cut the grill part out of my 71 gtx grill but I don't know what is the best way of doing it, I've been told to sand down the back so the plastic is thin enough to cut it out easily with a blade and shouldn't damage the surround. I dont have a rotary tool at the moment so thats sort of off the table. What would you guys recommend?
-
The kit turned up and I got right to it. I found an viper engine from the ram vts kit in my parts box, although it had the transmission cut off im currently bonding a new one to it, some srt10 wheels and tyres, racing bucket seat I believe to be from a amt nascar kit fit beautifully, and a big supercharger thats currently missing the front but its only because it wasn't sitting straight. Heres some photos from earlier just mocking up. I've stripped the chrome of the front and rear bumpers as they'll be painted the same colour as the body, im thinking maybe a silver, the wheels will be gloss black or gun metal.
-
Thanks for the positive feedback already guys, just waiting on the srt 10 engine but in the meantime il start work on everything else.
-
I thought id build something else along side my Holy Moly 41 project, I've figured as the 41 will take a lot of time as im only contructing the chassis at the moment. On the side I decided to build this beauty, a 71 Plymouth GTX. Some of you might wonder about the V-X, simply its v10. I plan on doing a trade with someone for a viper srt-10, once I have that il stick a supercharger on it. The kit is due to arrive tomorrow and then this can begin.
-
Kit came in by courier this morning so did a little mockup, the rear track is wider than expected but I might just make it work and perhaps make some flares for the front wings to allow for a slightly wider front track but il have to get some white glue out, fix bits together and see what needs alteration. I had some wheels laying around from a diecast model which has just been stored for a few years but they're ideal for this build, for the rears ive used the same wheels but ive placed in inside a bigger rim and its fits snug. The ride height is only for the mockup, once together it will sit a bit lower. Now I gotta go to work so next update will be tomorrow.
-
Thanks for the suggestion bud but the whole reason for using the enzo transaxle is so I can use the entire suspension setup too just to make it a little easier. It will be the enzo front and rear setup with a custom chassis joining it all.
-
Just a quick add on the project, ive been playing around a bit editing here and there and this (if all goes as it should) will be what it looks like when done.