vintagedragfan Posted March 25, 2012 Author Share Posted March 25, 2012 Totally agree.......looks FANTASTIC. as usual John, really appreciate your kind words! Quote Link to comment Share on other sites More sharing options...
vintagedragfan Posted March 25, 2012 Author Share Posted March 25, 2012 That thing is just mega eye candy. This build is AWE......, No thats not it . FANTAS.......No gotta find a better word. MAGNI......Still not good enough WONDE.......No! ....Ok how about! thanks so much fella's, Rom you do have a way with words my man, LOL Quote Link to comment Share on other sites More sharing options...
vintagedragfan Posted March 25, 2012 Author Share Posted March 25, 2012 This think is so right in so many ways....almost makes me want to give up this hobby and start building 1:1.........potted plants. Amazing work! Mike I know how you feel, I felt that way about a year ago! then I decided I was going to try and do some of these cool things myself, be patient, and have fun! thats what its all about man! let me know if I can help you out, thanks! Quote Link to comment Share on other sites More sharing options...
vintagedragfan Posted March 26, 2012 Author Share Posted March 26, 2012 it must be gas pedal week, here is the one I made this weekend as well as the clutch pedal and brake lever, the clear has to dry before I can put the rivits on the wood grips thanks for looking! Quote Link to comment Share on other sites More sharing options...
Mooneyzs Posted March 26, 2012 Share Posted March 26, 2012 Bill.... Awesome job on the Gas Pedal and Break handle.. I am loving both of them... did you use printing plate or k&S aluminum sheet? and how thick?. and is that real wood on the handle too?. Keep up the awesome work. Quote Link to comment Share on other sites More sharing options...
tyrone Posted March 26, 2012 Share Posted March 26, 2012 SWEETNESS..... Quote Link to comment Share on other sites More sharing options...
vintagedragfan Posted March 26, 2012 Author Share Posted March 26, 2012 Bill.... Awesome job on the Gas Pedal and Break handle.. I am loving both of them... did you use printing plate or k&S aluminum sheet? and how thick?. and is that real wood on the handle too?. Keep up the awesome work. SWEETNESS..... thanks guys, Chris it is K&S aluminum, .015 thick on the gas pedal and brake lever, the clutch is .060 aluminum rod with .015 knurreled pad, thanks for the comments Quote Link to comment Share on other sites More sharing options...
Mooneyzs Posted March 26, 2012 Share Posted March 26, 2012 Bill thank you for letting me know what you used. I need to see if I have some of that .015 thick aluminum and If I don't I will need to pick some up for my brake and chute levers. Quote Link to comment Share on other sites More sharing options...
Romell R Posted March 26, 2012 Share Posted March 26, 2012 it must be gas pedal week, here is the one I made this weekend as well as the clutch pedal and brake lever, the clear has to dry before I can put the rivits on the wood grips thanks for looking! AH HA! Looks like you have a minature woodworker under your employ also . Hes done a great job with that brake lever. I wonder what he'll charge me to refinish the cabnets in my 1/16th scale garage dio LOL! keep up the outstanding work Bill your an inspiration to us all Quote Link to comment Share on other sites More sharing options...
jerry clayton Posted March 26, 2012 Share Posted March 26, 2012 make ###### sure that the rivets are in the correct direction!!!!!!!!!!!!!!!!!!!!!!!!!!!!!!!!!!!! really, looking good and I am flattered that all you guys work so hard to make these things like they were----I was happy that Revell made these cars as it sorta captured the history of the art work in the body work and paint jobs----but that wasn't good enough for many who have worked so hard to do it exact scale to the original sizes---Revell had came to me about the wheel base---they wanted to just some of the same stuff for both our car and Tony Nancy's car but they weren't the same wheel base----I told them it was such an honor that they would do our car it was fine to alter the wb. Tony must have said the same thing---I remember seeing Tony's car at the JC Penney cataloque outlet store for $6------- Quote Link to comment Share on other sites More sharing options...
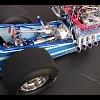
tbusch Posted March 26, 2012 Share Posted March 26, 2012 (edited) Some more pics of the California Charger http://www.jalopyjou...28509&page=1600 Scan down about 3/4 ways on the page Notice Scoop on Injectors note: their are 1600 pages of old time drag racing on that site, careful because it is addicting to scan thru it. tb Edited March 26, 2012 by tbusch Quote Link to comment Share on other sites More sharing options...
jerry clayton Posted March 27, 2012 Share Posted March 27, 2012 the scoop on the injectors in those photos was from after we had set an altitude record with the supercharger the first night we ran the side wings--so those pics were later on in the year 1971 or possibly early 1972--- and after reading my post about the rivets, I hope it didn't come across wrong--I was trying to be funny concerning Bill's awsome detail work--- And speaking of details---Bill, which end of the barrel valve linkage do you have the left hand threads on?????????? Quote Link to comment Share on other sites More sharing options...
vintagedragfan Posted March 27, 2012 Author Share Posted March 27, 2012 Bill thank you for letting me know what you used. I need to see if I have some of that .015 thick aluminum and If I don't I will need to pick some up for my brake and chute levers. N.P. Chris anything I can do to help out a fellow modeler! Quote Link to comment Share on other sites More sharing options...
vintagedragfan Posted March 27, 2012 Author Share Posted March 27, 2012 hey Rom that little dude ain't cheap bro! LOL Quote Link to comment Share on other sites More sharing options...
vintagedragfan Posted March 27, 2012 Author Share Posted March 27, 2012 make ###### sure that the rivets are in the correct direction!!!!!!!!!!!!!!!!!!!!!!!!!!!!!!!!!!!! really, looking good and I am flattered that all you guys work so hard to make these things like they were----I was happy that Revell made these cars as it sorta captured the history of the art work in the body work and paint jobs----but that wasn't good enough for many who have worked so hard to do it exact scale to the original sizes---Revell had came to me about the wheel base---they wanted to just some of the same stuff for both our car and Tony Nancy's car but they weren't the same wheel base----I told them it was such an honor that they would do our car it was fine to alter the wb. Tony must have said the same thing---I remember seeing Tony's car at the JC Penney cataloque outlet store for $6------- the scoop on the injectors in those photos was from after we had set an altitude record with the supercharger the first night we ran the side wings--so those pics were later on in the year 1971 or possibly early 1972--- and after reading my post about the rivets, I hope it didn't come across wrong--I was trying to be funny concerning Bill's awsome detail work--- And speaking of details---Bill, which end of the barrel valve linkage do you have the left hand threads on?????????? oh you are funny all right Jerry! you gotta gimme a break, you know how hard it is to find a rivit gun and a left handed tap and die that small?? hehheh Quote Link to comment Share on other sites More sharing options...
vintagedragfan Posted March 27, 2012 Author Share Posted March 27, 2012 Some more pics of the California Charger http://www.jalopyjou...28509&page=1600 Scan down about 3/4 ways on the page Notice Scoop on Injectors note: their are 1600 pages of old time drag racing on that site, careful because it is addicting to scan thru it. tb thats good stuff Terry! thanks for the info ! Quote Link to comment Share on other sites More sharing options...
vintagedragfan Posted March 27, 2012 Author Share Posted March 27, 2012 after going through this entire build thread, mine is going back into its box, outstanding work. oh no Christopher, don't do that, I felt the same way a year ago man, just decided to do my best, you never know till you try bro, thanks for looking! Quote Link to comment Share on other sites More sharing options...
vintagedragfan Posted March 28, 2012 Author Share Posted March 28, 2012 (edited) here are a couple small updates, I got the brake lever done and here it is mocked up, sorry for the bluury pic, just couldn't get the camera to focus on the lever!also got the oil gauge finished and installed I used Pro Tech 1/25 gauge set, cut out the tach and put it in aluminum tubing after beveling the edge and installing a back, then cleared over the front, and added a Pro Tech chrome fitting, thanks for looking! Edited March 31, 2012 by vintagedragfan Quote Link to comment Share on other sites More sharing options...
John Teresi Posted March 28, 2012 Share Posted March 28, 2012 Bill......very nice. Quote Link to comment Share on other sites More sharing options...
gasser59 Posted March 28, 2012 Share Posted March 28, 2012 (edited) Very nice indeed. Lovin' this build although I still believe its a 1:1 scale. LOL Edited March 28, 2012 by gasser59 Quote Link to comment Share on other sites More sharing options...
Mooneyzs Posted March 28, 2012 Share Posted March 28, 2012 Bill... that is just gorgeous work my friend! Great Job! Quote Link to comment Share on other sites More sharing options...
Romell R Posted March 28, 2012 Share Posted March 28, 2012 Quote Link to comment Share on other sites More sharing options...
vintagedragfan Posted March 28, 2012 Author Share Posted March 28, 2012 Bill......very nice. thanks so much John! Quote Link to comment Share on other sites More sharing options...
vintagedragfan Posted March 28, 2012 Author Share Posted March 28, 2012 thank you guys really appreciate it! Quote Link to comment Share on other sites More sharing options...
Romell R Posted March 28, 2012 Share Posted March 28, 2012 I never really know what to say when you post im always in awe of your work , each post is like putting a freashly BBQ'ed steak in front of me all I can do is salivate and crave the next piece. What can I say that hasnt already been said? Oh well maybe nobody has said "GREATGOBBLEDEEGOOP! that build is OUTTASITE!" LOL! Quote Link to comment Share on other sites More sharing options...
Recommended Posts
Join the conversation
You can post now and register later. If you have an account, sign in now to post with your account.
Note: Your post will require moderator approval before it will be visible.