DANB Posted February 20, 2012 Share Posted February 20, 2012 Gday, picked up my 4th model for the year, the AMT 66 Nova, ive only just opend the box and i can tell its going to be an awsome build. Cant wait to get stuck in. Color will be Pearl white, i wanted to use the graphics out of the box and white is one of the only colors guaranteed to look great with them. Keep an eye out for more updates! Dan Quote Link to comment Share on other sites More sharing options...
DANB Posted February 20, 2012 Author Share Posted February 20, 2012 I really need to start using a primer, i figured the Pearl white would be solid enough to just spray on, nope. Might have been fine if the casts where white, but meh, sanded it back smooth, will pick up something from the hobby store tomorrow to use as a base, probs just a gloss white. This morning at the hobby store I also checked out those stands you guys use for spraying the bodies, $38.00! What a rip lol hopefully i can find something on the net. These little engine stands with short motor are such a cool addition too. Quote Link to comment Share on other sites More sharing options...
Erik Smith Posted February 20, 2012 Share Posted February 20, 2012 Hey Daniel - that is a great kit. The blue plastic, though, is really tough to cover with white. Primer should help but watch out for some bleed through (hopefully not). As far as stands go - $38? I use two things - a coat hanger, bent to shape, taped to a book and old bottles with tacky stuff (rubbery stuff to hold up posters). I think my current bottle is some rice vinegar or something I pulled out of the ridge that had been there way too long. You don't need to spend money on the stand. Quote Link to comment Share on other sites More sharing options...
DANB Posted February 20, 2012 Author Share Posted February 20, 2012 Yeah, the only issue i have is the body moving when you spray it, do you just tape them to the hangers or something? for 38 bucks i reckon you would have to be prety serious about the hobby lol Quote Link to comment Share on other sites More sharing options...
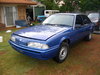
stulee11 Posted February 20, 2012 Share Posted February 20, 2012 hi ya mate looking good so far ... the only thing i can say with this kit is the front wheels do need to be realined... i did this kit not to long ago and yes it is an amazing build but i didnt sort out the front wheels and they sit to far in at the top as you can see here good luck with it i will be following this one for sure stu Quote Link to comment Share on other sites More sharing options...
DANB Posted February 20, 2012 Author Share Posted February 20, 2012 Cheers mate, whats with amt and wheel fitment issues! Grr! I was actually thinking of doing mine that color blue as well! Like the Chevelle off that old Catch me if you can movie lol Would be sweet to try and raise that rear axle up a smigeon too, sits abit too high, imo. We will see how we go aha. Quote Link to comment Share on other sites More sharing options...
stulee11 Posted February 20, 2012 Share Posted February 20, 2012 Cheers mate, whats with amt and wheel fitment issues! Grr! I was actually thinking of doing mine that color blue as well! Like the Chevelle off that old Catch me if you can movie lol Would be sweet to try and raise that rear axle up a smigeon too, sits abit too high, imo. We will see how we go aha. lol i know i wanted to drop her a little bit at the back but being as this was my 8th model ever... i thought it best to wait till i am a bit more experenced lol...i was told to open the rear wells up a little bit to so they fit the size of the wheels but maybe another build... i cant wait to see yous done !!! if you want any other pics of mine just ask and i'll post um for ya Quote Link to comment Share on other sites More sharing options...
Dr. Cranky Posted February 20, 2012 Share Posted February 20, 2012 It looks like you are enjoying putting this one together, it's a great kit. Quote Link to comment Share on other sites More sharing options...
crazyjim Posted February 20, 2012 Share Posted February 20, 2012 Donn Yost suggests a length of pipe to hold the parts while spraying. Why am I saying this? I paid good money for the DVD. ALWAYS prime first (that's my rule anyway). Take 2 paint stirrers. Put them togther. Insert a Bic lighter or other piece of round stock (dowel pin, AA battery, etc.) near one end. Wrap rubber bands around stirrers on both sides of round piece. Wrap some masking tape around the outward tips of stirrers. Bingo. Bango. You have an adjustable body holder. Quote Link to comment Share on other sites More sharing options...
Deathgoblin Posted February 20, 2012 Share Posted February 20, 2012 I made my paint stand. Bought a wooden plaque from Hobby Lobby and some heavy gague copper rods. drilled 2 holes on each corner and bent the rods into a U shape and inserted them into the holes on the plaque. the rods are stiff enough to hold a body and will bend to adjust to about any size I need. Good Looking Nova so far, by the way!!! Quote Link to comment Share on other sites More sharing options...
JunkPile Posted February 20, 2012 Share Posted February 20, 2012 If you remove floor from interior tub it will expose actual floor pan. Looks real good with bare bones interior for drag version. Good luck and have fun. Quote Link to comment Share on other sites More sharing options...
Modellpularn Posted February 20, 2012 Share Posted February 20, 2012 (edited) If you can find Tamiya's Fine Surface Primer, spend those 38 bucks on primer instead! Or some more paint. As for paint stands, I've always used old bottles, that I stick either double sided tape on top of the cap. Always keep the cap! Or regular masking tape, maybe 5 inches long. Stick the two ends together, so it looks like a loop. With sticky side out. Then stick the tape loop to the cap, and down the sides. Make another loop of tape, and place it in a cross on top of the first one. Now you should have a good place to stick the body, inside the roof. Prep the body by sanding away all those pesky tiny mold lines. And other flash that might be present. Also check the wheel wells, and sand away the fine mold lines on the inside. All these preparations will make a world of difference when the model has been painted. Also, when you have sanded the body, clean it with some dishwashing soap, rinse many times. Dry the body, make sure NO water is left anywhere! 'Cuz it will appear when you spray.... Murphy you know..... Then blow away the last tiny dust particles. Now you can paint. Edited February 21, 2012 by Modellpularn Quote Link to comment Share on other sites More sharing options...
Guest Posted February 20, 2012 Share Posted February 20, 2012 You can make a good paint stand out of a wire coat hanger easily. I've used one for several years. And yes, it's best to tape your body to it. That way you can turn it in any direction while painting and not worry about it coming off. These models will set fairly low out of the box in the rear,but you will need to lengthen the rear fenderwells some to make room for those tires or use slightly smaller ones. Quote Link to comment Share on other sites More sharing options...
stulee11 Posted February 20, 2012 Share Posted February 20, 2012 i to use a wire coat hanger and it works just fine. As for the rear fender wells on the one i did in that picture i didnt do anything to them and the tyres went in fine with no problems. Quote Link to comment Share on other sites More sharing options...
DANB Posted February 21, 2012 Author Share Posted February 21, 2012 Wow cheers for all that feedback guys, appreciate it. Ill put an empty beer bottle aside tonight and see how we go for a stand tomorrow arvo. Ive almost got the the interior done, and the motor is looking prety complete as well. Ill see if i can get some really small guage wire and heat shrink tomorrow too, and try to run ignition leads on the spare motor from the Dart i did. Ive never done it before, so I dont really want to wreck this one lol. Quote Link to comment Share on other sites More sharing options...
DANB Posted February 21, 2012 Author Share Posted February 21, 2012 If you remove floor from interior tub it will expose actual floor pan. Looks real good with bare bones interior for drag version. Good luck and have fun. Mate! i was hoping the interior was more like the 68 dart i did with the full sheet metal interior and half cage, but, using your advice, i have mocked up something that looks prety killer. It doesn't look nearly as good in the photos as it does in real life Cheers JunkPile. Quote Link to comment Share on other sites More sharing options...
DANB Posted February 21, 2012 Author Share Posted February 21, 2012 (edited) Ive decided to make another change to the car that will give it that real track car theme, i was going to color code the engine bay white like you would on a proper car (Not black like on typical gm ######), but instead im going to paint all the sheet metal panels in the same aluminium Metalcote as the interior. Should look sweet. Edited February 21, 2012 by DANB Quote Link to comment Share on other sites More sharing options...
JasonFL Posted February 21, 2012 Share Posted February 21, 2012 I love the nova, the stance you have it at just looks mean! Looking good, can't wait to see it done. Quote Link to comment Share on other sites More sharing options...
Dirkpitt289 Posted February 21, 2012 Share Posted February 21, 2012 Nice looking build so far. I like the look and stance of this kit. Nice engine stand also Quote Link to comment Share on other sites More sharing options...
DANB Posted February 22, 2012 Author Share Posted February 22, 2012 I cant wait to see it done either, ive only got a few hours to get to the hobby store this arv so hopefully i can get time and get some paint on the body, that's all i wanna do haha! Quote Link to comment Share on other sites More sharing options...
Casey Posted February 22, 2012 Share Posted February 22, 2012 (edited) Painting tips here: http://www.italianhorses.net/Tutorials/PerfectPaint/paint.htm Edited February 22, 2012 by Casey Quote Link to comment Share on other sites More sharing options...
DANB Posted February 22, 2012 Author Share Posted February 22, 2012 Cheers for that Casey it was a good read, im not sure im taking this hobby THAT seriously yet, but im always willing to try out new things. I bought Primer, white and more white Pearl at the hobby store today as well as some black heat shrink and Red 30 guage wire from AutoParts. This model might be getting more details then first planned! Quote Link to comment Share on other sites More sharing options...
JunkPile Posted February 22, 2012 Share Posted February 22, 2012 Nice job so far. Ain't this fun? With floor removed cage can be custom built to cover all the cut lines at rear and sides to tidy things up if necessary. Quote Link to comment Share on other sites More sharing options...
DANB Posted February 22, 2012 Author Share Posted February 22, 2012 Finished the interior, looks great i reckon. The red is horrid yeah but it is to match the decals that will be on the body. I ran a power/ground wire from the battery, tried to make it look like 0 Gauge but i might have failed with that one. I also threw a heap of parts box bits together to make another motor, a blown 440 an torqueflight in a Nova?. Well im not evan sure where that motors going at this stage. Quote Link to comment Share on other sites More sharing options...
DANB Posted February 22, 2012 Author Share Posted February 22, 2012 Nice job so far. Ain't this fun? With floor removed cage can be custom built to cover all the cut lines at rear and sides to tidy things up if necessary. Yeh mate i was thinking of building a cage but im not so sure on what material i should be building it from? Some aluminium tube would be sweet but its very dear, something like 12 bucks for just a few short rods if i recall correctly. Quote Link to comment Share on other sites More sharing options...
Recommended Posts
Join the conversation
You can post now and register later. If you have an account, sign in now to post with your account.
Note: Your post will require moderator approval before it will be visible.