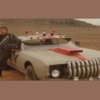
kruleworld Posted April 19, 2012 Share Posted April 19, 2012 I felt like starting a new model so i went through my stash and found i had two 71 GTXs. i'm going to build one as a fairly stock daily driver, (the other will be a hotted up muscle car). i did the paint in Export Chrome Yellow and clear coated it. after painting the chassis i weathered it with acrylics and added some detail paint. the engine i want to look tired, so that was weathered too. i added some extra detailing to the engine, like ht leads. same with the interior, i kept it in good condition, but gave it a coat of dust to make it look more used. I dropped the nice rims in favour of some steelies with dog dish caps i took from a 68 charger kit. The build up of the chassis revealed a problem with the rear axle alignment, the wheels are too far back and too low. i added 3mm riser blocks to the rear of the leaf springs and removed the locating tabs so i could move it forward 1mm. work on detailing the engine, adding a few more cables Quote Link to comment Share on other sites More sharing options...
martinfan5 Posted April 19, 2012 Share Posted April 19, 2012 Wow, that is looking nice, great job on the weathering, I would like to learn how weather one day, this is going to look great when its finished, and you cant go wrong with steelies Quote Link to comment Share on other sites More sharing options...
The70judgeman Posted April 19, 2012 Share Posted April 19, 2012 Looking good so far....love the "Plain Jane" look of steelies too. Quote Link to comment Share on other sites More sharing options...
Bridgebuster Posted April 19, 2012 Share Posted April 19, 2012 Nice work! What did you do to simulate the simulated wood in the interior? Quote Link to comment Share on other sites More sharing options...
Austin T Posted April 19, 2012 Share Posted April 19, 2012 Can you post a tutorial on how you weathered the chassis and interior Quote Link to comment Share on other sites More sharing options...
wraith Posted April 19, 2012 Share Posted April 19, 2012 Looking good so far! I have one I started the other day as somethinh to work on while giving another project a lil brake. I slightly widened the rear wheel wells for a wider tire. I basically removed the fron part of the rear wheel well and pushed it inward till it match the rear part of it and it was straight. I also had to add some blocks in the rear to get it higher and I lengthened the rear part of the chassis about 5mm and also extended the rear frame rail farther back. Personally I am very happy i did that as it looks better. The chassis just seemed to short and didn't fit up against the rear valance good enough for me. enough of my wip! KEEP UP THE AWESOME WORK! The steelies look perfect on it! Quote Link to comment Share on other sites More sharing options...
Dr. Cranky Posted April 19, 2012 Share Posted April 19, 2012 Oh, I am loving the combination of the weathered parts with the smooth body. Excellent. Quote Link to comment Share on other sites More sharing options...
Brizio Posted April 19, 2012 Share Posted April 19, 2012 NIce! Very nice! I like the weatered job you did on engine and chassis. Quote Link to comment Share on other sites More sharing options...
crazyjim Posted April 19, 2012 Share Posted April 19, 2012 Looks most excellent. Is there a switch somewhere to turn down the bright color? Quote Link to comment Share on other sites More sharing options...
imatt88 Posted April 19, 2012 Share Posted April 19, 2012 Sweet. Quote Link to comment Share on other sites More sharing options...
kruleworld Posted April 19, 2012 Author Share Posted April 19, 2012 (edited) Can you post a tutorial on how you weathered the chassis and interior Nice work! What did you do to simulate the simulated wood in the interior? the wood and weathering were both done with a weathering set of acrylic paints, "Dust and Rust" diorama set by Lifecolor. i did the wood by painting light rust then after it dried i did a thin coat of dark rust. the chassis/engine was done with a mix of the rust colours and flat black. just paint different tones on different parts to add subtle variety. Thinning the paint also helps to run the color into cracks and detail. the gas tank was done by mixing silver acrylic paint with various rust tones and flat black (grease from the diff tends to collect on the front of the gas tank). Edited April 19, 2012 by kruleworld Quote Link to comment Share on other sites More sharing options...
Rusty Sierra Posted April 20, 2012 Share Posted April 20, 2012 This is great! needs a big scratch on the drivers side door where some jerk keyed it. Quote Link to comment Share on other sites More sharing options...
Recommended Posts
Join the conversation
You can post now and register later. If you have an account, sign in now to post with your account.
Note: Your post will require moderator approval before it will be visible.