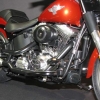
bbsbase Posted April 26, 2012 Posted April 26, 2012 (edited) Caught by his wonderful models John Teresi showed in another forum I came to MCM-forum. I was looking a while to all the great models shown here and I think it ´s time to show you my latest WIP. Years ago I made a Fat Boy from Tamiya (nearly OOB). Over the years it gets a new handlebar and red position lights, but no special features. Three years ago I get a new Fat Boy and decided to make it as the very first version of the Fat Boy from 1990, the Gray Ghost. After this was done I have two equal models on the shelf. Not very interesting. Then I saw a boober style Softail in the net and I planned to rebuild the blue version of my Fat Boy into that bobber. The only different is that the real bike based on the Twin-Cam engine and the model based on the Evolution-Engine. Everything of the Fat Boy has to stripped down, using a screw driver, a scalpel and a photo etched saw. What you see here is the work of around one and a half year. Yes, I ´m not a quick builder. But the finish of this build is in sight To make the bobber look right I had to flex the fender struts from the metal frame. I was a little bit anxious to do so, because it was the point of no return. The upper part of the frame had to be filled with Bondo because of a big gap between the two halfes of the frame. After that was finished I sprayed the upper part of the frame with filler. Chrome won ´t bring you home Edited April 26, 2012 by bbsbase
cobraman Posted April 26, 2012 Posted April 26, 2012 There is a section for "other" models. Don't have to be a car to be here.
bbsbase Posted April 26, 2012 Author Posted April 26, 2012 (edited) Thanks for the worm welcome. Big Boyz Anything to do with big scale models: 1/8, 1/12, or 1/16 SORRY it ´s 1/6 Edited April 26, 2012 by bbsbase
Brendan30 Posted April 26, 2012 Posted April 26, 2012 model is a model keep it going! I may learn something from what your doing to apply to a model car
old-hermit Posted April 27, 2012 Posted April 27, 2012 (edited) One in every crowd !!!! This is "Model Cars" Magazine Don't let the naysayers get you down Ulrich, keep posting your build. I like it. . Edited April 27, 2012 by old-hermit
JunkPile Posted April 27, 2012 Posted April 27, 2012 Sorry for being a Jerk, just having one of those days
Craig Irwin Posted April 27, 2012 Posted April 27, 2012 I would have thought than any vehical model would be fully welcomed, not just in the other models section.
bbsbase Posted April 27, 2012 Author Posted April 27, 2012 Thank you old-hermit, Brendan and Eric for motivation. I ´m here for fun and modelling. After the frame was prepared the engine and drive train was installed again. For the solo seat I had an old seat from the Tamiya Harley Davidson Police Bike. I cut the apron from the seat and put thin leather on it. I made the rear mounting bracket for the seat from 0.5 mm brass plate. For measurement I first made a template from paper. This bracket is mounted with 2 mm hexagon sockets. The front brackets are made from 0.3 mm brass. The frame part is soldered with a base plate and the pivot for the bracket which is mounted under the seat Also the exhaust was done at this time. I took flash bonder repair putty for this parts with some styrene pipe of the right diameter. I put a little amount of the putty into one end of a styrene pipe and roll it between two laminated sheets of wood (by moving the upper sheet), with a second pipe parallel to the pipe with the putty, till the putty have the same diameter than the Pipes. Before this step, I wetted the sheets that the putty can ´t stick at the sheets. Then I put the pipe with the putty end to the front cylinder and gave the exhaust the right shape. This new exhaust got a bracket from brass and was screwed to the frame where the footrest was mounted before. Then I made the rear exhaust the same way. I had to work quickly at that point before the putty is hardened. Afterwards I took a black band which is used normally for seams at clothing, I don ´t know the English name for it, and put it around the two new exhaust pipes. The end of the pipes I covered before with BMF. At that point I registered it might be better to took polished aluminium tube than styrene tube. Next time. I put a little dust on the pipes with gray chalk powder. Then I made covers from copper for the pipes after templates from paper. The holes in the cover are milled with the dremel tool. Free hand. For better handling, only after this milling I cut the cover to proper size.
old-hermit Posted April 27, 2012 Posted April 27, 2012 I took flash bonder repair putty for this parts with some styrene pipe of the right diameter. I put a little amount of the putty into one end of a styrene pipe and roll it between two laminated sheets of wood (by moving the upper sheet), with a second pipe parallel to the pipe with the putty, till the putty have the same diameter than the Pipes. Before this step, I wetted the sheets that the putty can ´t stick at the sheets What a great idea, thanks for the 'how to' .
eviltwincustoms Posted April 30, 2012 Posted April 30, 2012 Very cool build! No need to move this thread because we have had others post their bikes in here as well. I say as long as it is a large scale, continue to keep posting updates right where you are at! Bikes are a rare breed, and I love seeing what builders can do with them.... Keep those updates coming.
Jantrix Posted April 30, 2012 Posted April 30, 2012 What a great idea, thanks for the 'how to' Seriously, that is friggin brilliant.
bbsbase Posted April 30, 2012 Author Posted April 30, 2012 (edited) Thank you all for the kind words. I continue this thread with the next steps. That are the fenders of the bobber. My plan was to make them from ONE old fender of a side car. There is enough material for both of the bobber. For the rear fender it works great, he got the needed shape and mounting brackets from styrene. But the rest part for front fender I can ´t use for this model. It has a hole in it for the tail light and the fender did not get a good shape after filling this hole. So I took the nice front fender from the Fat Boy and cut it down to the proper size. I cut off the mounting pins from the fender and placed them that way, the fender comes down more to the tire. The fender from a side car. The original Fat Boy front fender perpared to cut. The finished rear fender. The covers of the front fork have deep sink marks on them. I filled them with putty. For those who can ´t work with allclad and wanted chromed covers is this a great penalty. In the past I thought, that wheels OOB are delicate enough in scale 1/6 and it is not worth the work of spoking the wheels with wire. But it is. I took .6 mm steel wire (because of lack .7 mm steel wire) for the spokes. I made the nipples from .5 mm² core end sleeves. The rims get a template to make the holes for the spokes. To make the tires fit on the spoked rims, they had to be reworked. Also a point of no return. The tires of the Fat Boy have a collar that will be pressed into a groove of the disc wheels. This collars have to be cut away to fit on the new rims. And after the tires were filled with kitchen towels (an advice from a friend of a German Forum) they fit proper to the wire wheels. The hub with the template. Wire and core end sleeves. Not finished but strong enough for free handling. Handmade spoked rims vs OOB Now it may take a little more time til the next update, because many small things have to be scratchbuild, like the aircleaner, the signal lights, the rear light, licence plate bracket, decals and so on..... Thank you all for your your interests and looking. Edited April 30, 2012 by bbsbase
rmvw guy Posted April 30, 2012 Posted April 30, 2012 The work you did on the wheels is incredible! I love the spoke wheels. The exhaust is pretty cool also. Can't wait to see more!
bbsbase Posted May 31, 2012 Author Posted May 31, 2012 (edited) Some of you might be waiting for progress on the bobber and here it is. I added a little detail to the carburator and made a new base for a small air cleaner with ports for the breathers on the cylinders. I made these parts from flat and round sheet. Before these parts are glued together I made a few testfittings on the engine. The airfilter is made from sheet. I made a base and on this I glued a second for the height in the middle. Both had the contours of the finished part. Between these parts I filled the room with putty. All was sanded and polished a few times. To finsh the carb I glued a small flat strip and a half round strip on top of the cleaner and put a little bit filler at both sides of the stripes. And again sanding and polishing to the end result, that the carb can get his chrome. And the bike gets it color (custom mixed Vallejo with the gun) with self made decals and a few coats of clear gloss (Gunze can). All parts are sanded (at the end with 12000 grit) and polished. Now the bike is nearly finished, the only thing still missing is the rear light. I want to make a simulated LED light. Testfitting the base for the new aircleaner The license plate mount missing his rear light Edited May 31, 2012 by bbsbase
RatRod Posted June 1, 2012 Posted June 1, 2012 I love it!!! This is one fantastic build, love them Harleys.
rmvw guy Posted June 1, 2012 Posted June 1, 2012 Your Harley has really come to life! Nice work, I love it! I really like your spoke wheels they are just crazy. All the other details are just so realistic, now I want to hear it run. LOL
superado Posted May 7, 2014 Posted May 7, 2014 (edited) Hi bbsbase, I saw your project on the Scale Motor Cars forum and again wanted to congratulate you for your build! About the spoked wheels you made; you also pictured OOB spoke wheels, which kit did those come from? I'm planning to do some conversion on the most recently released Tamiya Fat Boy (Harley Davidson FLSTFB - Fat Boy Lo ITEM# 16041), but I would need to track down OOB spoke wheels that would fit the tires in the new kit. Thank you in advance. -Ray Edited May 7, 2014 by superado
Recommended Posts
Create an account or sign in to comment
You need to be a member in order to leave a comment
Create an account
Sign up for a new account in our community. It's easy!
Register a new accountSign in
Already have an account? Sign in here.
Sign In Now