rustybill1960 Posted June 14, 2013 Posted June 14, 2013 I am Loving this Chas, just lovin' it!! Thank You fro sharing Later Russ
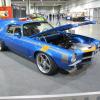
Chas SCR Posted July 17, 2013 Author Posted July 17, 2013 Brute Force getting the roll cage done and fitted into the floor. Seats need just a little bit more shapping at the top and the rear grab bar section made.
Chas SCR Posted July 17, 2013 Author Posted July 17, 2013 This work was done yesterday and now I figure out how to post pics using a different program! Yes I'm back on "Brute Force and doing the frame connecters and putting them in after Bob pointed that out to me at Columbus this weekend.
rustybill1960 Posted August 9, 2013 Posted August 9, 2013 Still an eye full of candy Chas! Thank You for keeping it going! Later Russ
Chas SCR Posted August 27, 2013 Author Posted August 27, 2013 Like the real car the motor area is a very tight fit, The LSX427 motor that is now sitting it it and ready to start being painted and put together. The block, heads and special valve covers was made from a 3d printer that I have and fits every thing real nice.
TFchronos Posted August 27, 2013 Posted August 27, 2013 Very nice craftsmanship going on here. Can't wait to see more.
Art Laski Posted August 28, 2013 Posted August 28, 2013 Great update, Chas! Nice to see you employing some new technology on this one. -Art
beeRS Posted August 28, 2013 Posted August 28, 2013 Nice work. Keep it up - look forward to seeing more.
Chas SCR Posted September 3, 2013 Author Posted September 3, 2013 "Brute Force" now has the trunk lid done and rear spoiler work done. This work was all done using the 3d machine and getting the right angles for the rear trunk part.
Chas SCR Posted September 9, 2013 Author Posted September 9, 2013 Called on one of the best at his game! Tom Nungester did the rim rings for "Brute Force
manzo70 Posted September 17, 2013 Posted September 17, 2013 wow, this thing is awesome man, really cool build! Looks like you've put a lot of time & skill into this so far, can't wait to see the result!
Chas SCR Posted September 26, 2013 Author Posted September 26, 2013 Tom was able to do both front and rear rings to the correct offset that I needed for the car. He also added a set in that are hi polished and a set of the brush aluminum ones.
richcrabman Posted September 26, 2013 Posted September 26, 2013 BLAH_BLAH_BLAH_BLAH! I'm so sick with envy.........this is one awsome build. I'd luv a resin copy of that rear axle and engine for my 69.
Chas SCR Posted September 27, 2013 Author Posted September 27, 2013 got the valve covers done and put on the motor and now ready to wire it up and get it all done so that part will be complete other then the bolts put into them.
vintagedragfan Posted September 27, 2013 Posted September 27, 2013 making some progress Chas, looking good man
exesivefire Posted September 27, 2013 Posted September 27, 2013 looking good! those wheels are a work of art...
itsclayyoo Posted September 29, 2013 Posted September 29, 2013 I love this build. I CAN'T WAIT to see the brute finished!
Chas SCR Posted October 2, 2013 Author Posted October 2, 2013 valve cover bolts are added and front cover bolts. All done with the .25mm acorn nuts from R&B Motion. The rim centers are now painted and clear coated with the aluminum spinner cap. Thank you every one for looking and thank you to Bill Davis and Mark Jones for keeping me going with there great builds!
Chas SCR Posted October 3, 2013 Author Posted October 3, 2013 oil pan and trans pan bolted on and shows the drane plug bolt. The white parts are the duel coil packs, as it is one set of 4 for each side of the motor down by the motor mounts. Here are the rims in there rings. The back two are one each of the polish and brush aluminum look. I have to get with Bob and see what one we are putting on the car
Recommended Posts
Create an account or sign in to comment
You need to be a member in order to leave a comment
Create an account
Sign up for a new account in our community. It's easy!
Register a new accountSign in
Already have an account? Sign in here.
Sign In Now