beeRS Posted March 10, 2013 Share Posted March 10, 2013 Andy - That's gonna be a real nice custom. Can't wait to see it complete. Show us pics of the chassis mods when you've done them. Quote Link to comment Share on other sites More sharing options...
bandit1 Posted March 10, 2013 Share Posted March 10, 2013 Hey just fyi...dont know how it is for everyone else but im getting the "Picture has been moved/deleted" box! Quote Link to comment Share on other sites More sharing options...
bpletcher55 Posted March 10, 2013 Share Posted March 10, 2013 ANDY ,love the color and motor.keep going! Quote Link to comment Share on other sites More sharing options...
Custom Hearse Posted March 10, 2013 Share Posted March 10, 2013 The interior is really well detailed! Nice work Andy! Quote Link to comment Share on other sites More sharing options...
PowerPlant Posted March 10, 2013 Share Posted March 10, 2013 That interior looks super clean. I also like the color Quote Link to comment Share on other sites More sharing options...
JasonFL Posted March 10, 2013 Share Posted March 10, 2013 Wow! B-E-A-Utiful color. Keep it comin Quote Link to comment Share on other sites More sharing options...
scalemodelworld Posted March 10, 2013 Share Posted March 10, 2013 Looks just beautiful Andy. I love the detail in the dash. Quote Link to comment Share on other sites More sharing options...
Modlbldr Posted March 10, 2013 Share Posted March 10, 2013 Love the interior. That dash is one of my favorites for a custom car. Just has a beautiful look with the right amount of chrome and paint detail. What tires and wheels are those? I need a set for my 51 Chevy build. Later- Quote Link to comment Share on other sites More sharing options...
vaughn Posted March 10, 2013 Share Posted March 10, 2013 Really nice !!! Quote Link to comment Share on other sites More sharing options...
Albie D Posted March 10, 2013 Share Posted March 10, 2013 Sweet sled. Looking great so far. Quote Link to comment Share on other sites More sharing options...
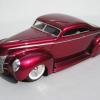
Ajay Posted March 11, 2013 Author Share Posted March 11, 2013 Thanks for all the comments guys, Tom, the tyres are from the Galaxie 48 Chevy kit, the rims are the steelies from the Revell 49 Mercury together with Modelhaus Dodge Lancer hubcaps - hope that helps. Cheers Andy Quote Link to comment Share on other sites More sharing options...
kennb Posted March 11, 2013 Share Posted March 11, 2013 great look to it,,,the interior is dynoooooooooomite! kenn Quote Link to comment Share on other sites More sharing options...
berr13 Posted March 12, 2013 Share Posted March 12, 2013 Really like the chop and paint, and I think that interior looks outstanding!! Quote Link to comment Share on other sites More sharing options...
vintagercr Posted March 12, 2013 Share Posted March 12, 2013 Very nice work! Quote Link to comment Share on other sites More sharing options...
IMPALA SS 427 Posted March 12, 2013 Share Posted March 12, 2013 Epic chop, the lines flow smoothly, I love the colour... Quote Link to comment Share on other sites More sharing options...
CrazyGirl Posted March 12, 2013 Share Posted March 12, 2013 this is crazy cool ,,, i see this stuff and it just brings up tons of questions ,, like how you did that to the roof and what glues and fillers , and the engine paint , spray or brush , the interior is amazing Quote Link to comment Share on other sites More sharing options...
Ajay Posted March 18, 2013 Author Share Posted March 18, 2013 (edited) Hi all, managed to get the chassis up on four wheels I've had to take some liberties with the suspension to get it too sit this low. Basically axles are just glued to the frame - not very pretty but then I don't plan on displaying it upside down !. Not too much more to do now so hope to have it finished over the weekend. Thanks for looking. Andy Edited March 19, 2013 by Ajay Quote Link to comment Share on other sites More sharing options...
drifterdon Posted March 19, 2013 Share Posted March 19, 2013 Great looking build Andy. Can't wait to see the finished kit. Your interior is flawless. Quote Link to comment Share on other sites More sharing options...
mnwildpunk Posted March 19, 2013 Share Posted March 19, 2013 Love the color that flathead is beautiful. It flows like water amazing Quote Link to comment Share on other sites More sharing options...
Ajay Posted March 20, 2013 Author Share Posted March 20, 2013 (edited) this is crazy cool ,,, i see this stuff and it just brings up tons of questions ,, like how you did that to the roof and what glues and fillers , and the engine paint , spray or brush , the interior is amazing Thanks Anne & sorry for the delay in replying. For the chop I started by cutting off the door pillars and then made two cuts A/B and then removed a slice from the rear pillars. With the door pillars gone I could then gently bend down the roof to meet the loweedr rear pillars. The resulting gap in the top of the roof was filled in with Evergeen plastic sheet and Tamiya Epoxy filler. The slanted door pillars C and rain channel were added with sheet plastic and the door line scribered in. I normally use Humbrol liquid cement. Hope above makes sense but this picture may help. The engine was sprayed with the same paint as the body through an airbrush. Cheers Andy Edited March 20, 2013 by Ajay Quote Link to comment Share on other sites More sharing options...
freakshow12 Posted March 21, 2013 Share Posted March 21, 2013 I love this. Great job and the perfect color! Quote Link to comment Share on other sites More sharing options...
Recommended Posts
Join the conversation
You can post now and register later. If you have an account, sign in now to post with your account.
Note: Your post will require moderator approval before it will be visible.