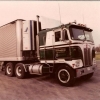
KJ790 Posted October 31, 2013 Posted October 31, 2013 A couple days ago I started a new build. I started with a Great Dane dry van and added a scratch built a 70's style Carrier reefer unit. This trailer is going to be my first attempt at weathering a model. This is not going to be a show truck, this will be a working trailer that is nearing retirement. Here's the front end so far:
tbill Posted October 31, 2013 Posted October 31, 2013 yes, looks great so far, we all know after a few good NY winters and that could be a two year old trailer looking like that.
Custom Hearse Posted October 31, 2013 Posted October 31, 2013 Looks realistic! You're doing some excellent weathering!
kilrathy10 Posted October 31, 2013 Posted October 31, 2013 Oh, yeah...That's gonna look pretty slick....Very nice weathering, indeed....
Pavel A. Posted October 31, 2013 Posted October 31, 2013 KJ, I like it. Very well. Good work on weathering.
KJ790 Posted November 1, 2013 Author Posted November 1, 2013 Still have to plumb all of the air lines, add some lights, and add the spare tire carrier, but it is getting closer.
kilrathy10 Posted November 1, 2013 Posted November 1, 2013 Man, that is looking very good....Great overall look to it.....That is some fine weathering....
olsbooks Posted November 2, 2013 Posted November 2, 2013 Nice job. I would not be surprised to see "test dirt...do not wash" or some snide remarks written in the grime on the back doors. This needs to go behind Q Tips (John S) tired looking IH Transtar 4070A! Well done! Any weather secrets you wish to share?
KJ790 Posted November 2, 2013 Author Posted November 2, 2013 Thanks a lot guys! Made a little more progress today, just a few more touches left. Here's what I quickly learned about weathering on this project: 1. A little goes a long way (I actually ended up doing more than I wanted to, but you don't realize it until it is too late) 2. After painting everything and before starting to weather, I sprayed everything with a matte clear finish to take some of the shine off. 3. For an overall aged look, I went with a watered down dark acrylic wash. I moved my brush up and down on the sides so any streaks would be vertical, as rain and dust tends to streak vertically in real life. 4. For rust streaks I started by dry brushing an orange streak vertically from the "source" of the rust. Then I mixed a little brown with the orange and dry brushed that color over the orange, keeping the darker color closer to the "source". Then I added more brown to the mixture and continued this process a few times each time layering a slightly darker color on the rust streak. 5. I found out rather quickly that many very light coats of slightly different shades of grey, brown, and orange gives a much more realistic look than slathering on thick layers. In the tires I did a quick white wash followed by a light brown wash to make the tire tread pop a little more.
Custom Hearse Posted November 2, 2013 Posted November 2, 2013 That is really great work! Thanks for the info on how you weathered it!!!
Bowtienutz Posted November 5, 2013 Posted November 5, 2013 Outstanding job KJ hope to see it and meet you at the Fulton model show at the end month. Will you be there?
Recommended Posts
Create an account or sign in to comment
You need to be a member in order to leave a comment
Create an account
Sign up for a new account in our community. It's easy!
Register a new accountSign in
Already have an account? Sign in here.
Sign In Now