mrmike Posted February 16, 2014 Posted February 16, 2014 Hey Tony, long time, no hear! Your Torino is looking really good and I am looking forward to seeing more.
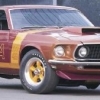
bogger44 Posted February 17, 2014 Author Posted February 17, 2014 Thanks for the compliments guys. Yes, I haven't been around much Mike. I got pretty burnt out with the hobby for awhile, and while I did continue to check out all the builds going on, I was more of a lurker than anything and didn't post much. I really liked your 5.0 notchback, and I'll have to go catch up on your progress on the 'Cuda. I had a pretty quiet weekend, so I actually managed to accomplish quite a bit on the Torino the last couple days. First up was knocking out the BMF, never one of my favorite things to do. Luckily there isn't a whole lot on these cars. Those hashes were fun! Started work on making some shackles out of Evergreen to pick up the rear. I will sand and clean them up before paint. Up front, the kit wheelbacks wouldn't work, as the Cragars are too deep to allow them to seat properly. So I just added some Evergreen to the retainers and mounted them directly to the wheels. I also turned my attention to the exhaust. Surprisingly, I only had to trim the front pipes a little, and do some slight bending, to line 'em up with the headers. I'll be adding aluminum tubing for the exhaust tips later on. Lastly, I did a mock up to check ride height, and took a couple pics for a little teaser. I'm liking it!
Curt Posted February 17, 2014 Posted February 17, 2014 This is really coming together nicely! I'm impressed...
bogger44 Posted February 18, 2014 Author Posted February 18, 2014 Thanks Donald and Curt. No real update tonight, just added some dullcote to the headliner.
bogger44 Posted March 5, 2014 Author Posted March 5, 2014 (edited) I finally have another small update on the Torino. I haven't spent a whole lot of time at the bench lately, but did manage to install the glass, interior, and chassis to the body. Next up was starting to button up the engine bay. Routed the heater hoses and hooked up the cable that runs from the solenoid. I still need to add the cable from the battery to the solenoid, as well as the ground wire. I'm starting to see the finish line in sight, for the most part just small stuff left. Most pieces are painted and ready to go...... Radiator and core ready to be assembled/installed Grille/front fascia Tailight assembly Laser stripes Side mirrors/door handles Photo etched emblems and rocker panel trim Install rear suspension Make some aluminum tubing exhaust tips I guess that's a bigger list than I thought it was lol. More to come...... Edited March 5, 2014 by bogger44
A.R.C. Posted March 5, 2014 Posted March 5, 2014 I love the old fastback Torinos. This is looking awesome Tony.
bogger44 Posted March 6, 2014 Author Posted March 6, 2014 (edited) Thanks much guys, glad you are enjoying, and liking, my build. I love the old fastback Torinos. This is looking awesome Tony. Same here. Torinos are one of my favorites of the era, especially the 70-71's. Here's some update pics from today.... Pretty much finished up the engine bay. Just a couple paint touch-ups in a few spots, and adding the caution fan and firewall decals (as long as they cooperate). Installed the front valance and grille. And the most tedious job, attaching the tiny photo etched GT and Torino emblems. To get the GT letters applied to the body as evenly and straight as I could, I positioned them the best I could on the benchtop, then took a piece of scotch tape and carefully pressed it onto the letters. Then I used a sharped toothpick and applied a few tiny dabs of superglue to each letter. Then carefully lined them up above the hashes, and pressed them onto the body. After a few minutes, I slowly pulled the tape away and wallah, I was happy with the results. I used the same process for the Torino script on the quarters as well. Edited March 6, 2014 by bogger44
1 bad55 stan Posted March 6, 2014 Posted March 6, 2014 Very nice detail work,good idea on the gt badges..Sharp looking model..
Baugher Garage Posted March 6, 2014 Posted March 6, 2014 OK I hafta ask. Where did you get a photoetched GT and how much did that cost??
bogger44 Posted March 7, 2014 Author Posted March 7, 2014 Thanks guys. OK I hafta ask. Where did you get a photoetched GT and how much did that cost?? Yep, like Fred said, it's included in the kit. It consists of the GT and Torino emblems, Gt badge on the grille, and rocker panel trim.
Custom Hearse Posted March 7, 2014 Posted March 7, 2014 Looks great. I need to pick up one of those pro modeler kits and see if I can find someone who makes a 71 conversion parts. Keeping an eye on this build!!!
bogger44 Posted March 10, 2014 Author Posted March 10, 2014 (edited) Thanks you guys. Looks great. I need to pick up one of those pro modeler kits and see if I can find someone who makes a 71 conversion parts. Keeping an eye on this build!!! If there is someone who makes conversion parts for a 71 I'd be in for a set, too. I truly am getting close to finishing this one up. I applied the laser stripe decals last night. Luckily they laid down pretty nicely. Only one of the smaller ones on the front fender gave some issues. Also added the front bumper and chin spoiler. I've buttoned up most of the rear as well. Suspension, tailight assy, and bumper have been added. That p.e. lattice work on the tailights were a pain. Not real happy with it, but looks ok I guess. Of course, after I glued the assy to the body, a small part of the lattice popped free just off the middle on the right. Not sure if I'm going to attempt to glue that spot again or leave as is. It isn't too noticeable. The traction bars are painted and ready to be slapped on. Still left to do are the side mirrors, door handles, exhaust tips, and a license plate for the rear, and that should be a wrap I believe. Finished pics should be coming soon.... Edited March 10, 2014 by bogger44
mrmike Posted March 10, 2014 Posted March 10, 2014 Looking good Tony! I just picked up another Torino Cobra kit from an estate auction sale and I plan on something similar to what you have done here.
bogger44 Posted March 11, 2014 Author Posted March 11, 2014 Thanks Mike, I'll be looking forward to seeing your Torino build in the future. I've gotten her finished, pics are being posted down in the Under Glass section.
freakshow12 Posted March 11, 2014 Posted March 11, 2014 I have built several of these and my truck for the tail lights setup is this. I paint the honeycomb pe part flat black ( as it should be) then I take some semi gloss clear and use it as glue to hold it on then spray the whole assembly with it. Works every time
bogger44 Posted March 12, 2014 Author Posted March 12, 2014 Thanks for those tips, Fred. I'll have to remember that. Yeah, I had a brain fart there by not painting the honeycomb black.
freakshow12 Posted March 12, 2014 Posted March 12, 2014 No biggie. Car turned out nice. I actually paint the backside of the light black too on this car. It darkens the red up just enough.
Recommended Posts
Create an account or sign in to comment
You need to be a member in order to leave a comment
Create an account
Sign up for a new account in our community. It's easy!
Register a new accountSign in
Already have an account? Sign in here.
Sign In Now