Mopar - D Posted January 12, 2014 Posted January 12, 2014 John this sounds like a great build but you know what they say "Seeing is believing" a picture would be nice.
FASTBACK340 Posted January 12, 2014 Author Posted January 12, 2014 OK… not much to see because I'm starting the fender-lip mod now. Then the roof comes off. I'm making some concessions here: I'm probably not going to modify the rear interior panels to convertible-spec. Someone will do that in the aftermarket and that will make it easier in the future. But for now, I need a high body count. Here's some shots of the basics going together. Engine block is shot. Now to mask the bell housing & transmission. The floor & dash are painted, the chassis is primered. The engine compartment is badly twisted on mine so I'll have to clamp it and epoxy the joints. I don't want it being an issue later. Once the body is cleaned up it should roll together nicely. After seeing Randy's 2 builds I can't wait to see if mine looks as good! Great inspiration those builds were! ?
Mopar - D Posted January 13, 2014 Posted January 13, 2014 John thanks for the pictures good luck on the chassis.
FASTBACK340 Posted January 17, 2014 Author Posted January 17, 2014 (edited) Sorry for the long time between updates, but I haven't had the time recently….. Being I'm off today I got some time at the bench this morning. An empty, quiet house works wonders! Engine is painted, now to detail. The chassis is painted too. We're getting there! After I run a few errands I'm going to finish foiling the `68. --------------------------------------------------------------------------------------------------- WOW! What ^%$#$%^ pictures! I'll try & do better next update! Edited January 17, 2014 by FASTBACK340
FASTBACK340 Posted January 17, 2014 Author Posted January 17, 2014 Good Lord…. I've been foiling and cutting and spraying and sealing and getting cross-eyed and now I'm tired & hungry…... We do this why? ⚠
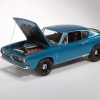
FASTBACK340 Posted January 18, 2014 Author Posted January 18, 2014 OK…. another update, but on the `70 this time. I have all the engine pieces painted. I just have to detail and assemble, the fun part for me. Aside from the obvious missing pieces, I plan on adding ignition, fuel, alternator, engine harness wiring, clutch & transmission linkage. Stealing more ideas by not painting the interior panels white. Here you can see the engine compartment painted that subtle shade….. Aside from the already mentioned shortcomings, this is still a NICE kit. Most of the issues can be remedied. As soon as I finish this one I'll be looking for reference material for the S&M car. When does that come out? Thats it for now. Nap time, I'm headed into Manhattan tonight with the boys for dinner & a concert.
Skypower Posted January 19, 2014 Posted January 19, 2014 I will be watching this closely so I can learn, it would be great if you could post some pics of the those processes. Looks sweet so far.
FASTBACK340 Posted January 19, 2014 Author Posted January 19, 2014 I will be watching this closely so I can learn, it would be great if you could post some pics of the those processes. Looks sweet so far. OK Rob, here you go! This is how I make a dip stick. Take a length of Radio Shack wire wrap and pull off a short section of insulation. Now slip on a small photo etched ring or nut over the wire end to simulate the stopper. It's so small no one will see the hex head if you use a PE nut (and if they do notice, ask they to go away….) Now we make the finger-loop with the smallest, pointiest tweezers you can find. Now we test-fit it into the correct location for the dipstick in the block for proper length Then is we forget, like your author did, you paint it block color (Hemi orange) and mount it. Or do the first three steps BEFORE you paint the engine…..like Chrysler did back on the assembly line. OK, enough for now. I'm headed out for the evening, but let me leave you with the next task: adding shift linkage, and fabricating a clutch Z bar for the clutch linkage. Can you imagine…. Revell didn't include a Z bar!?!?!
FASTBACK340 Posted January 22, 2014 Author Posted January 22, 2014 (edited) This is a self-explanatory picture. Nothing more than a piece of detail wire and some scrap photo-etch and a piece of plastic. This is the type of detail you try and build and stop when it looks OK. While not 100% correct, it will look good when done. I just painted the Z bar for the clutch linkage. The reverse linkage is purely for the picture. That one has to be cut & fit after the power train is installed. The rod goes under the trans crossmember. And I have to move the 1-2 linkage up a bit to clear the speedo cable. Forgot to explain the picture I posted in the last installment. The Z bar is the pivot that turns forward motion of stepping on the clutch rotate and push back against the clutch fork, This bar mounts between the bell housing and the drivers frame rail. I fabricated this from a piece of wire-core Plastistruct with a pair of Evergreen tabs made from some .010 sheet. Took a bit to figure out the geometry and width, but it all goes together when the power train goes in too, like the reverse linkage. A little knowledge is dangerous. I know what it should look like, and now I'm making emergency brake cables and adding fuel/hydraulic plumbing….. Edited January 22, 2014 by FASTBACK340
stump Posted January 22, 2014 Posted January 22, 2014 John, superb mate, just superb work going on here. And a HUGE thanks for posting pics AND explaining about that "Z-bar". Saved pics for reference. I admit, I had know idea when you asked if my headers cleared it. I absolutely LOVE the colour too.....think I'll need another kit, just so I can have this colour on my shelf.
FASTBACK340 Posted January 22, 2014 Author Posted January 22, 2014 OK gang, small update that took a while to complete. This afternoon I installed the starter w/wiring and did the ignition cables & distributor. Wiring a Hemi has always been a thrill as I've always wished I owned one. If I hit the lotto, the small block will be yanked out of my car faster than you can say 572 Crate Hemi. The first items I needed were wire looms. The photo etched pieces I had I didn't like, so I made what I needed. I start by scribing a line on some .010 sheet and use the scratch-line as a guide for drilling the holes in a row. Then nothing more exotic than a black Sharpie to make the piece of plastic look like the real piece of plastic…. Now we test fit the loom onto the wires…. Now I cut some short lengths of spark plug boot to add to the end. Now we start threading the boots on and using a DOT of ZapGap to secure them in the valve covers. And hopefully it will look semi-convincing as plug wires. After the ends are good & dry I'll use tweezers and gently tweak the wires so they have a realistic droop. Spark plug wires NEVER look like they're starched! I think I'm going to paint some suspension pieces for the `70 and go finish my `68 Barracuda. I figure if I'm in the right frame of mind, I "could" have the `68 done by the weekend. I hope….. Thanks for following along and for the builders whom requested some step-by-step procedures, I hope this is helpful.
FASTBACK340 Posted January 22, 2014 Author Posted January 22, 2014 I forgot to give credit for the pre-wired Parts by Park distributor. Initially I was going to use one of Replicas & MIniatures distributor and vacuum advance pieces ( which are OMG beautiful….), but I didn't have black ignition wire. The Mopar guys would have revoked my Man Card if I used any other color….
Skypower Posted January 22, 2014 Posted January 22, 2014 Just incredible work, thank you for posting the steps for us, really helps a lot rather than I did this and that. What do you use for plug boots and detail wire, I need to add that stuff to my bench. Thanks again. Bob
FASTBACK340 Posted January 23, 2014 Author Posted January 23, 2014 OK, I am now officially shot-to-Hell…. I'm cross-eyed, tired, and I want a cup of Hot Chocolate. Tonight I made an engine harness. If your worried about your alternator not "floating" and it's anchored down, it may as well do it's job. While we're in there we'll power up the coil and add the coolant temperature sensor wire. Stuff is getting real. I start with a small diameter piece of tubing (same size as the spark plug boots) and an assortment of detail wire. Some of these are thinner than a hair. No joke…. Also pictured is a resistor I found that looks like a fuel line with a filter. The next step is to take a straight pin and pierce the side of the tubing where I want the coil wires to exit. Once I penetrated the skin, I removed the pin and inserted the two wires. As the tubing collapses it grabs the wires. Nice, clean, neat. I added a second hole behind this for the temp. sensor. In the end are the three wires for the alternator. Since those three wires are too thick, I stripped the insulation off and inserted the bare wires. Again, nice, clean, neat. And no adhesives. That's the trick with super detailing. Engineer as much as possible that will clip, snap, or bind in place. Adhesives make the mess…. Here's a better shot of the "fuel line". Before I install this, I'll hit it with a rag with some lacquer thinner to knock the gloss off the tubing. If not, I'll dull-coat it. I still have to add the alternator adjustment bracket and clean up some of the wash I applied to the block to bring out some details. And install the fuel line. That's it for tonight. I never touched my `68 Barracuda because "it's so close to being done why rush it…" slacker mind-set I must do something about tomorrow. I. Must. Finish. That. Car. G`nite……...
FASTBACK340 Posted January 23, 2014 Author Posted January 23, 2014 Just incredible work, thank you for posting the steps for us, really helps a lot rather than I did this and that. What do you use for plug boots and detail wire, I need to add that stuff to my bench. Thanks again. Bob Aside from the commercially sold products from Detail Master or Pro-Tech, I'm one of those guys that will autopsy dead electronics and harvest organs. I'm always looking for items I can re-purpose. I also search for my model materials they way I BBQ. If it looks like what I want (wire, bracket, steak….) it's done.
Skypower Posted January 23, 2014 Posted January 23, 2014 Thanks again John for sharing some of your trade secrets and how too's. I will be tearing into some of my old electronics that I have laying around for some unknown reason. Maybe I can find some good stuff who knows. Thanks.
FASTBACK340 Posted January 23, 2014 Author Posted January 23, 2014 From spinning wrenches for over 35 yrs. I'm just adding what's missing. This is what turns a fun build into the "forever build" guys always belly ache about. They start with good intentions, and then turn into monsters. Don't you think I'm approaching the point where I should stop the ridiculous detailing and FINISH the darn thing?!? My "quick build" `68 Barracuda has been sitting for DAYS waiting for about 4 hours worth of assembly, which I could have done already. I'm regretting having two builds at once….. I really want to see "my" car finished. But the `70 is going to be sexy eye candy.
blunc Posted January 23, 2014 Posted January 23, 2014 I have a suggestion for your wire looms (I do them myself also), try strips of evergreen instead of sheet evergreen. It will save you some time cutting them out.
FASTBACK340 Posted January 23, 2014 Author Posted January 23, 2014 (edited) I have a suggestion for your wire looms (I do them myself also), try strips of evergreen instead of sheet evergreen. It will save you some time cutting them out. I know, but I didn't have any thin strips wide enough, I still had to cut... Edited January 23, 2014 by FASTBACK340
stump Posted January 24, 2014 Posted January 24, 2014 Ok ok.....John, stop it,.... please.....you're making me go cross eyed. Nah, seriously, I LOVE what you're doing, and adding such great photos to help us other guys along the way.....priceless. You know I'm gonna have to try and add some of this stuff now, right...... Oh, and hey, I hear ya about the "forever builds"..................I got a few of those.
bryan_m Posted January 24, 2014 Posted January 24, 2014 wow! thats lookin really good john! the trans linkage and the clutch arms are a great detail! very nice work. cheers bryan
Recommended Posts
Create an account or sign in to comment
You need to be a member in order to leave a comment
Create an account
Sign up for a new account in our community. It's easy!
Register a new accountSign in
Already have an account? Sign in here.
Sign In Now