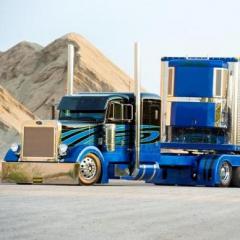
Petetrucker07 Posted September 1, 2014 Posted September 1, 2014 (edited) This is my current project. Its just about done. I need to stretch the front frame rails at the motor mounts so the new bigger motor will fit. Gonna try to do some detailing ive never done.braided lines, pre wired distributor, brake lines and what nots. The color is duplicolor metal specs blue. Sportsman pro tires, convo rims. Did a little kit bashing on this 1. Edited September 6, 2014 by Petetrucker07
Petetrucker07 Posted September 6, 2014 Author Posted September 6, 2014 Ive never done it before, but heres my ?. How would i go about body droppin this kit, i want the motor sittin higher, the bug catcher closer to the roof line. Any tips and help would be appreciated.
bob29579 Posted September 16, 2014 Posted September 16, 2014 Add some spacers at the mounts, where the motor meets the frame. That will lift the motor.
Agent G Posted September 16, 2014 Posted September 16, 2014 Normally you'd want to channel the body over the frame to get the look you're after. Trouble is at this stage of the build it would mean tearing apart the interior to chop it down as well. It would be a terrific amount of work and mess at this point what with everything painted and put together. Aside from raising the engine I'd scrap the plan until my next build. G
IceMan Collections Posted September 16, 2014 Posted September 16, 2014 (edited) Getting the engine to sit as high as you want might require both spacers and channeling the body. I don't see the firewall installed and you have tires holding up the front end so I'm thinking you have not assembled it yet. It's still not a bad time to make he mods you want. The Revell kits require a little bit of work. Here's a modification I did to an older build of mine. The chassis comes from that same kit you're using. Then just add a floorboard to cover the chassis. I have a few more pics I can share with you if you want to PM me as well. Edited September 16, 2014 by iceman-555
Petetrucker07 Posted September 17, 2014 Author Posted September 17, 2014 Its just mocked up right now. The interior is painted but not glued into place. Since i need to stretch the front end out a little, it wouldnt be a big deal to channel it. The interior is just painted with rattle can, so cuttin it down is no big deal. Thanks for the tips, anymore would be appreciated!
IceMan Collections Posted September 17, 2014 Posted September 17, 2014 The front shouldn't really affect the channeling since it's the body that has to "hug" the rear of the chassis. I took one of my Revell 32s and if I lay the body over the chassis alone the body drops low enough to get the stance you're looking for. You just need to modified the interior to get it to do that. This chassis I posted is also extended? And of course chop the firewall since it's what also lays on the chassis.
Jantrix Posted September 17, 2014 Posted September 17, 2014 At the risk of sounding unsupportive of a fellow builder. Don't try to do too much to the model. Many a model has met its untimely end at the hands of a builder who tried to chop-channel-section-narrow-pancake having never tried any of it before. My advise - stretch the frame, complete the model. On the next one, channel the body over the frame. One the next one, chop the top, etc, etc. It's a baby steps approach to learning advanced techniques. This is a point I've brought up again and again for many builders. Please see the link below in my sig line, Walk Then Run.
Speedfreak Posted September 17, 2014 Posted September 17, 2014 From my own personnel experience I would say that Rob is right on the money.
Recommended Posts
Create an account or sign in to comment
You need to be a member in order to leave a comment
Create an account
Sign up for a new account in our community. It's easy!
Register a new accountSign in
Already have an account? Sign in here.
Sign In Now