fun9c1 Posted January 19, 2015 Author Posted January 19, 2015 Per Steve's suggestion, I added a little more turquoise to the motor, and did it by a method I've never tried before which is drybrushing. I also tried adding a little grime by drybrushing also. And tried adding a little "chipped paint" to the breathers by dabbing a little silver and patting it with a paper towel then a little drybrush with black. This is fun trying to make it look a little used!
StevenGuthmiller Posted January 20, 2015 Posted January 20, 2015 Looks great Rob! Looks like every motor in every Mopar I've ever owned! Maybe that's why I like to build mine "showroom stock". This looks far too familiar to me! Good job! Keep up the good work! Steve
John Goschke Posted January 20, 2015 Posted January 20, 2015 Coming along nicely, Rob. The weathering is a great touch. These early '60s Johan Mopars are usually pretty good as far as proper stance and wheelbase length. The main problem is the kit wheel backs yield a too-narrow track width. Adding a spacer behind the wheel back collar and the chassis to space the wheel out farther is the solution. Or using an AMT wire axle wheel back with a longer collar works well also.
fun9c1 Posted January 24, 2015 Author Posted January 24, 2015 So I figured I can't do the usual testors silver for the exhaust manifolds on a daily beater. This is my first time ever attempting other than just painting them silver and I couldn't be happier with the way they turned out. What I did was make a paste out of salt and water, and after trying different methods to get it on there, ended up just taking a pinch and dabbing some on with my fingers. Then once dry, painted them good ol' Rustoleum brown primer. When that was dry, I drybrushed a little testors flat tan on it, then when that was dry, drybrushed just a little Artist's Loft "lamp black" oil paint. Hopefully tonight or tomorrow I'll have some pics of the body of a well used 15-20 year old '62 Chrysler. I've washed it in preparation for paint and have it sitting by the woodstove to dry off thoroughly before painting.
StevenGuthmiller Posted January 24, 2015 Posted January 24, 2015 The engine looks great Rob! I would never guess that you had not done this before. Terrific job! Don't put that body too close to the stove! Steve
mustang1989 Posted January 24, 2015 Posted January 24, 2015 I like that interior and the engine weathering! Sharp!!
fun9c1 Posted January 24, 2015 Author Posted January 24, 2015 (edited) Thanks guys. That interior is not mine, though. I wish it was! I haven't really started my interior yet. I did start it but it looks like *** so I'm going to strip it and start over. Wish I still had all that old brake fluid... I'm having fun trying to make this look old and worn. Thanks Steve, for the push to do the engine and not make it a curbside model! Edited January 24, 2015 by fun9c1
StevenGuthmiller Posted January 24, 2015 Posted January 24, 2015 Thanks guys. That interior is not mine, though. I wish it was! I haven't really started my interior yet. I did start it but it looks like *** so I'm going to strip it and start over. Wish I still had all that old brake fluid... I'm having fun trying to make this look old and worn. Thanks Steve, for the push to do the engine and not make it a curbside model! Sorry about the interior pics Rob. If I knew how to delete them from this thread I would. I don't want to interfere with your build. No need to thank me for using the engine. I just figured, if it has one, why not use it. Even if it's not detailed up. You may be surprised. You may decide the work you did on the engine was your favorite part of the build. It's happened to me. Steve
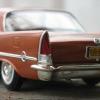
fun9c1 Posted January 24, 2015 Author Posted January 24, 2015 Just laid down the original factory Sapphire Blue Poly that in about 15 years (later tonight or tomorrow in our world) some high school kid is going to not like and is going to cover up with black primer from rattle cans. Then a few years after that, his primer will be wearing off and some of the original paint and some rust wil be showing... At least that's what I've been planning. I do really like this color, though. It's gonna be hard to mess it up! But I'm gonna try to stick to the plan.... Keeping it a safe distance from the woodstove.
72 Charger Posted January 25, 2015 Posted January 25, 2015 looking great . I like the color but I like the plan too
fun9c1 Posted January 27, 2015 Author Posted January 27, 2015 (edited) Man as much as I loved looking at this with a nice coat of paint.... I grabbed myself by the nuts and stuck with the plan (sort of). I may nix the black primer idea. I shot some red primer (rust) over the top of it (left the sides pretty much alone as nature would do) and I'm lovin the look. After the primer was dry I hit it with one of those 3M "SandBlaster" 180 grit things (like a thin sponge but sandpaper) to bring back some of the "original" paint, and it's just the look I was looking for. In the beginning I messed up the roof and hood a little, but the beauty of this type of look is I can shoot a little more primer on it and try again. Now I'm thinking this body is almost done because I love this look. I may tinker with it a little more, though. I'm also liking these torquethruster type wheels. I stole these wheels from a 1/24 Monogram Talledaga I built 20 years ago and don't have much interest in (except as a junker- it looks pretty cool with no wheels and a ton of dust on it). I've also done some weathering on the chassis, firewall, and exhaust. She ain't done yet but my work is closed tomorrow due to the nor'easter here and some more will get done tomorrow. It's 2am and I want to keep working on it. Do I have a mental problem? Oh yeah, by "body almost done", I mean the paint part. It will be BMF'd and emblems painted and weathered also. More tomorrow! Edited January 27, 2015 by fun9c1
DeeCee Posted January 27, 2015 Posted January 27, 2015 Great start on that weathering mate., like the engine all grubbied up too.
fun9c1 Posted February 7, 2015 Author Posted February 7, 2015 I finally got what I think is just enough done to post another.........post. I scratchbuilt the carbs since none came with the kit. Nothing fancy just something. Did some weathering on the firewall, glued that on and did a little weathering to the whatever you call that part on the same plane as the radiator. What i really like is how the hood insulation came out. It's some black felt with alot of drybrushing. And thanks to Steve Millberry for the headlights!!!! They will get detailed in the near future... Still trying to decide what wheels to use. I'm still thinkg old-school slotted mags for the '80s look but not 100% decided... Thanks for looking!
Tom Geiger Posted February 8, 2015 Posted February 8, 2015 Looking pretty good! That's what I'd call a Western car, one that the sun beat down on the upper surfaces, damaged the paint and it rusted. Those don't have rust on the lower surfaces. A rust belt car is just the opposite, rust on the lower surfaces, rust through on floors. Tops fairly clean.
fun9c1 Posted February 8, 2015 Author Posted February 8, 2015 Thanks Tom, yeah I'm going for the "left outside in Arizona" look. My 1:1 cars are rust belt cars just as you described complete with rust through the floor! I have to take pics outside sometime soon. There is a little more blue on the car than shows in these pics, I guess because of the flash.
StevenGuthmiller Posted February 8, 2015 Posted February 8, 2015 Personally, I think I'd go all the way with the "barn find" look & go with rusty steel wheels & grimy white walls. Looking terrific so far! Steve
fun9c1 Posted February 8, 2015 Author Posted February 8, 2015 It just dawned on me today that I have an old, half-started 20 years ago with a lousy paint job Revell/Monogram '55 Chevy Street Machine that has the exact wheels I wanted so I did this mock-up and I really like it. I'm thinking I'll add a little rust to the wheels, and I'd like to remove the paint on the raised letters and either leave it off or re-do it. Will brake fluid work on tires or will it wreck them? I also need to space the front wheels a little farther apart.
John Goschke Posted February 8, 2015 Posted February 8, 2015 Looking pretty cool. Remember those wheels are actually supposed to represent slotted aluminum "mags" from the dark days of the '70s so they're not going to "rust" like steel, just get real dull with maybe some grey corrosion in the recessed areas.
Tom Geiger Posted February 8, 2015 Posted February 8, 2015 Looking pretty cool. Remember those wheels are actually supposed to represent slotted aluminum "mags" from the dark days of the '70s so they're not going to "rust" like steel, just get real dull with maybe some grey corrosion in the recessed areas. Dullcote is your friend here. Spray the chrome and it will be fine.The aluminum doesn't rust but 'chalks out' so light grey and flat white accents would be appropriate.
fun9c1 Posted February 8, 2015 Author Posted February 8, 2015 Thanks guys. I had forgotten that those were aluminum!
fun9c1 Posted February 8, 2015 Author Posted February 8, 2015 OK, I tried something on the back wheels less permanant than paint. I scraped some white and dark gray chalk up, put a bunch of it in 2 or 3 tbsp of water, mixed it up good and dunked the wheels in, took 'em out and let them dry and it doesn't look half bad! It doesn't show up in the pix that much but it takes the shine off, and makes a couple of "crusty" spots. You can see the diff between the front and back wheel: I also couldn't wait to put my scratchbuilt wipers on even though that should probably be one of the last things I do... I put one a little higher than the other like it probably would be on a 1:1.
Tom Geiger Posted February 8, 2015 Posted February 8, 2015 OK, I tried something on the back wheels less permanant than paint. I scraped some white and dark gray chalk up, put a bunch of it in 2 or 3 tbsp of water, mixed it up good and dunked the wheels in, took 'em out and let them dry and it doesn't look half bad! It doesn't show up in the pix that much but it takes the shine off, and makes a couple of "crusty" spots. You can see the diff between the front and back wheel: You are doing a lot of good things on this model. First, inventing a new way to weather tires is cool. This is the reason we are on the board. Someone looks at a task from a slightly different perspective, and we have a new technique! I also like your wipers and that you have the eye for detail that led you to putting them at different angles. That's the kind of stuff that makes a model look realistic, especially when doing a car that's less than showroom perfect. I also will put my headrests at different heights, and with bucket seats I'll push the drivers seat all the way back. Just little details that really take no special talent or effort, but make a big difference in the overall look of your model. Back when I did my'55 Chevy pickup with the Christmas Tree sign on it, the great master Joe Cavorley was looking it over. He proclaimed that my wipers were too shiny. So I told him that you could put new wipers on an old truck! And yes that same truck had a brand new battery and cables. And my next beater truck had a bright blue Pep Boys water pump! It's all in the details.
moparfarmer Posted February 8, 2015 Posted February 8, 2015 You got to do something with the glass..If a car is that bad with surface rust and such the glass will not look like new..What to do? I don't know..I like what you have done but I'd have left it nice and shiney..Just me I guess..Keep it going, your doing very well and looks real..
peekay Posted February 8, 2015 Posted February 8, 2015 This thing is coming along great! Love that weathering.
StevenGuthmiller Posted February 8, 2015 Posted February 8, 2015 (edited) You got to do something with the glass..If a car is that bad with surface rust and such the glass will not look like new..What to do? I don't know..I like what you have done but I'd have left it nice and shiney..Just me I guess..Keep it going, your doing very well and looks real.. A nice little crack or two in the windshield is easily achieved with an exacto knife. Could give it a once over with some fine sandpaper in a swirled motion to give it a weathered look. & then there's always masking off the area where the wipers travel & "grundging" up the rest of it. Just a few ideas. Steve Edited February 8, 2015 by StevenGuthmiller
Recommended Posts
Create an account or sign in to comment
You need to be a member in order to leave a comment
Create an account
Sign up for a new account in our community. It's easy!
Register a new accountSign in
Already have an account? Sign in here.
Sign In Now