LMDAVE Posted February 4, 2015 Author Share Posted February 4, 2015 I started my first foil attempt. One thing that I'm very disappointed in is the foil that is to be remove is either leaving residue or interacting with the clear coat and not coming up easy. I'm afraid it could be the clear coat. I'm using MINWAX acrylic Clear spray. The foil I'm using is EZ Chrome. I've been rubbing the area with water & Qtip right after and it seems to help. Of course, cutting the foil perfect is tricky. I don't seem to see the mold line to find where to slice good. Im afraid if I push down too hard on the part to be removed that it'll increase the amount of residue I'm seeing. Anyway, this is the job halfway done. Quote Link to comment Share on other sites More sharing options...
microwheel Posted February 4, 2015 Share Posted February 4, 2015 Hi Dave, Really nice work so far on your Firebird. I haven't ever used, or even know much about EZ chrome foil, but I have never had a problem with Bare Metal foil leaving a residue or interact with any of the clear coats I have used. Also Bare Metal Foil lays down nicely and can be burnished with a tooth pic or q-tip revealing even the slightest of trim lines for trimming away excess. Don't know if you've ever tried BMF or not, but if not give it a try sometime. Quote Link to comment Share on other sites More sharing options...
LMDAVE Posted February 4, 2015 Author Share Posted February 4, 2015 (edited) Thanks, I just ordered some BMF to try. Will probably have to wait a week or so to get it though. This EZ Chrome does say "A more aggressive adhesive makes it easier to get the job done fast" Edited February 4, 2015 by LMDAVE Quote Link to comment Share on other sites More sharing options...
Tom Geiger Posted February 5, 2015 Share Posted February 5, 2015 Of course, cutting the foil perfect is tricky. I don't seem to see the mold line to find where to slice good. Im afraid if I push down too hard on the part to be removed that it'll increase the amount of residue I'm seeing. Wait until you get the Bare Metal Foil. You should never have to press harder than if you were tracing it lightly with a pencil. BMF is very thin and cuts easily. Quote Link to comment Share on other sites More sharing options...
rv1963 Posted February 5, 2015 Share Posted February 5, 2015 Your interior looks great, I think it's your foil that is the problem.When you start again make shore you use a new blade to trim your foil, just use that new blade for the foil only nothing else. Quote Link to comment Share on other sites More sharing options...
tbill Posted February 5, 2015 Share Posted February 5, 2015 yes, BMF is awesome, cuts with just the weight of the blade, and leaves no residue. from what I see of what you've done so far with your current product, BMF will be a breeze for you to work with and you'll love it. Quote Link to comment Share on other sites More sharing options...
rsxse240 Posted February 5, 2015 Share Posted February 5, 2015 Very nice build so far! I really like the idea of printing on marbleized wood grain. You could scale up or down to get the texture just right. Print on a decal or like you did and just cover it with celo-tape for a perfect gloss that won't mar up! I'm borrowing that next dash board I build! I think when I scaled the wheels out that came in this kit, they were like 13" at the outer edge of the rim which would make them essentially an 11 in rim (measured at the bead seat) and sadly makes them WAY too small for a car of that size. I actually used these wheels in a 1/32 kit and made it like a protouring style, turned out great! Quote Link to comment Share on other sites More sharing options...
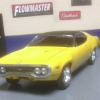
LMDAVE Posted February 5, 2015 Author Share Posted February 5, 2015 Thanks for the advice on BMF. I decided to finish this one off with the EZ Chrome and save the BMF when it comes in for my next 2 builds. The EZ chrome went on a little easier this time. I"m wondering if I just didn't let the acrylic clear cure long enough. After another day of curing the chrome peeled off easier without residue, but still hard to press down and see lines. So, here's where I'm at with it: Quote Link to comment Share on other sites More sharing options...
mustang1989 Posted February 5, 2015 Share Posted February 5, 2015 Lookin' good bro!! The BMF looks good. Quote Link to comment Share on other sites More sharing options...
LMDAVE Posted February 5, 2015 Author Share Posted February 5, 2015 (edited) Thanks, but that's not the BMF yet, that's the EZ Chrome. I'll be using BMF on my next build. Also, I attempted to scratch build seat belts for the first time. I think I got the scale off a little bit though, so may have to take these up and re do them. Edited February 5, 2015 by LMDAVE Quote Link to comment Share on other sites More sharing options...
Bumblebi Posted February 5, 2015 Share Posted February 5, 2015 The build is looking really awesome, that color is very similar to a Camaro '68 (the Firebird '68's sister car, badge engineering ftw) I built a few years ago, but yours is looking much better! Quote Link to comment Share on other sites More sharing options...
my80malibu Posted February 5, 2015 Share Posted February 5, 2015 It is comimg together nicely, lots of detail Your building in to it, I would consider redoing the seat belts, and if your into kit bashing. The AMT 69 cougar has the T shift handle, like the one shown in your picture. Is there a roll bar in the original car? Quote Link to comment Share on other sites More sharing options...
LMDAVE Posted February 5, 2015 Author Share Posted February 5, 2015 This is a 2 in 1 kit, so there are supplemental parts if you want to make a drag model (wider smooth back tires, roll bar, different ram air hood), but I'm building as original instead of drag. Yeah, I'm going to redo the belts. Quote Link to comment Share on other sites More sharing options...
LMDAVE Posted February 6, 2015 Author Share Posted February 6, 2015 (edited) Finally got my flocking material so I can assemble the interior. Edited February 6, 2015 by LMDAVE Quote Link to comment Share on other sites More sharing options...
slusher Posted February 6, 2015 Share Posted February 6, 2015 Coming along nicely Dave. I was reading another post and a fellow member suggested burnishing the masking tape with a round paint brush end and that would also work on rubbing down and burnishing your foil... Quote Link to comment Share on other sites More sharing options...
rv1963 Posted February 7, 2015 Share Posted February 7, 2015 You are doing really good work on this kit, my favorite part is the interior, well done. Quote Link to comment Share on other sites More sharing options...
LMDAVE Posted February 7, 2015 Author Share Posted February 7, 2015 (edited) Thanks! Moved on to engine work...still waiting on my spark plug wire to finish it up. I stuck with the traditional color of the Pontiac 400 engine, with a close match on Pontiac blue. Edited February 7, 2015 by LMDAVE Quote Link to comment Share on other sites More sharing options...
LMDAVE Posted February 7, 2015 Author Share Posted February 7, 2015 (edited) and added the spark plug wires today this is a 1:1 pic of the original engine I'm going for: Edited February 7, 2015 by LMDAVE Quote Link to comment Share on other sites More sharing options...
LMDAVE Posted February 8, 2015 Author Share Posted February 8, 2015 Moving right along to the rear end....can start to see the light at the end already approaching this first build. Quote Link to comment Share on other sites More sharing options...
Recommended Posts
Join the conversation
You can post now and register later. If you have an account, sign in now to post with your account.
Note: Your post will require moderator approval before it will be visible.