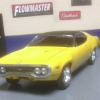
LMDAVE Posted February 10, 2015 Share Posted February 10, 2015 Starting this kit as my second build. I plan to make it look like the Camaro shown on the right: I'm not very pleased with the quality of this kit right off. The molds have an extensive amount of shaving and trimming needed. The lack of chrome rims is OK because I was going to paint them Aluminum anyway. Already shaved the body pretty good and put a coat of primer on. Quote Link to comment Share on other sites More sharing options...
tbill Posted February 10, 2015 Share Posted February 10, 2015 cool, I will be following this build as well as your other one Quote Link to comment Share on other sites More sharing options...
microwheel Posted February 10, 2015 Share Posted February 10, 2015 Hi Dave, nice subject your working with here. The Baldwin Motion version of this kit had alot of flash and clean up work as well. Don't let it discourage you though. These kits do build up nicely, just remember that you might have to do a little sanding and shaving on the dash and upper and lower edges of the front glass to get the body interior and chassis to all line up and sit correctly. Test fit everything alot for that reason and you should end up with a pretty decent build. Quote Link to comment Share on other sites More sharing options...
LMDAVE Posted February 10, 2015 Author Share Posted February 10, 2015 (edited) QUESTION: What is the best way to make the small rectangular turn signal covers (Amber and Red)? There isn't any clear plastic ones provided in this kit, and there is molding into the body. Just painting it will look silly....not sure if there is a decal of it or not. BUt if I cut out the small molding, what is a good scratch method of making them? Edited February 10, 2015 by LMDAVE Quote Link to comment Share on other sites More sharing options...
JTalmage Posted February 10, 2015 Share Posted February 10, 2015 use some baremetal foil in those spots, then use a metallic red or turn signal amber and paint that over the BMF and leave just enough unpainted to show the chrome bezel the light is in. Quote Link to comment Share on other sites More sharing options...
microwheel Posted February 10, 2015 Share Posted February 10, 2015 use some baremetal foil in those spots, then use a metallic red or turn signal amber and paint that over the BMF and leave just enough unpainted to show the chrome bezel the light is in. Ditto. It's what I did as well Quote Link to comment Share on other sites More sharing options...
LMDAVE Posted February 10, 2015 Author Share Posted February 10, 2015 Cool, I like the idea of that, could either of you post a picture of the result of doing that? I don't think the 70 camaro had a chrome bezel though, but would like to see how it comes out. Quote Link to comment Share on other sites More sharing options...
microwheel Posted February 11, 2015 Share Posted February 11, 2015 Here is a link to my 70 1/2 Baldwin Motion Camaro in the Under Glass area. It's basically the same body with the BM options. http://www.modelcarsmag.com/forums/index.php?showtopic=95918#entry1307641 It will show you how it looks using BMF and turn signal amber and stop light red from testors. Quote Link to comment Share on other sites More sharing options...
LMDAVE Posted February 11, 2015 Author Share Posted February 11, 2015 Here is a link to my 70 1/2 Baldwin Motion Camaro in the Under Glass area. It's basically the same body with the BM options. http://www.modelcarsmag.com/forums/index.php?showtopic=95918#entry1307641 It will show you how it looks using BMF and turn signal amber and stop light red from testors. Thanks, that's an outstanding build, Jim! So, do you clear over the finished amber/red foil ? Quote Link to comment Share on other sites More sharing options...
LMDAVE Posted February 11, 2015 Author Share Posted February 11, 2015 (edited) Painted the rims and tire lettering (I may have to do a second pass of white over the letters). Also, might try a light blackwash on the rims. Edited February 11, 2015 by LMDAVE Quote Link to comment Share on other sites More sharing options...
microwheel Posted February 11, 2015 Share Posted February 11, 2015 Thanks, that's an outstanding build, Jim! So, do you clear over the finished amber/red foil ? I haven't on my builds, but some here on the forums might. I just haven't ever seen a need to. Quote Link to comment Share on other sites More sharing options...
Mr Stock Posted February 11, 2015 Share Posted February 11, 2015 Ill be following this one Dave, I have this exact kit in my stash, I must admit the orange plastic makes me a bit nervous for painting Lol. Like your idea on the colour. Quote Link to comment Share on other sites More sharing options...
slusher Posted February 11, 2015 Share Posted February 11, 2015 Wheels and Tires look great. What did you paint the wheels with?? Quote Link to comment Share on other sites More sharing options...
LMDAVE Posted February 11, 2015 Author Share Posted February 11, 2015 Wheels and Tires look great. What did you paint the wheels with?? Thanks, I had some Rustoleum Aluminum spray paint, so that worked out well. Quote Link to comment Share on other sites More sharing options...
Scale-Master Posted February 11, 2015 Share Posted February 11, 2015 Good start. But if you really want to capture the personality of the car, the wheels should be a gray color (see photo of white car in first post) with a chrome beauty ring.Factory paint was Ditzler code DDL32961, I use Tamiya TS-42 Light Gunmetal to replicate it on my models. Quote Link to comment Share on other sites More sharing options...
LMDAVE Posted February 11, 2015 Author Share Posted February 11, 2015 Good start. But if you really want to capture the personality of the car, the wheels should be a gray color (see photo of white car in first post) with a chrome beauty ring. Factory paint was Ditzler code DDL32961, I use Tamiya TS-42 Light Gunmetal to replicate it on my models. Would you foil the outer rim for that chrome? I considered the chrome darker look doing that, but just took the liberty of going with an aluminum rim. Hated how uncircular the plastic mold of the outer lips was. I smoothed out most of them. Quote Link to comment Share on other sites More sharing options...
espo Posted February 11, 2015 Share Posted February 11, 2015 Just some thoughts. As mentioned the OEM wheels on this would have been a gray or as Chevrolet used to call it Argent. The color was more of a semi-gloss and the trim rings were more of a brushed aluminum finish. Just depends on how close you want to get. In later years , around the '77 Z-28's they started painting the wheels the same color as the body. Many good ideas on the running lights. I have had good luck with bare metal foil but used Tamaya clear yellow and clear red. A dab of clear afterwards might help protect the finish. Quote Link to comment Share on other sites More sharing options...
Scale-Master Posted February 11, 2015 Share Posted February 11, 2015 Would you foil the outer rim for that chrome? I considered the chrome darker look doing that, but just took the liberty of going with an aluminum rim. Hated how uncircular the plastic mold of the outer lips was. I smoothed out most of them. Foil could work, but it was (as mentioned) not a super bright chrome. But in scale foil would look good. I'd suggest foiling them before painting, then wiping the paint off the foil, it has a raised edge that should make it relatively easy. I machined the outers on these (from the same kit you have) but I didn't copy the Camaro style beauty ring. Quote Link to comment Share on other sites More sharing options...
Maindrian Pace Posted February 11, 2015 Share Posted February 11, 2015 Those look fantastic. Quote Link to comment Share on other sites More sharing options...
LMDAVE Posted February 12, 2015 Author Share Posted February 12, 2015 (edited) Those are very clean detailed rims you have there Scale-Master! I darkened the inner rim up a bit with a darker Steel paint I had, but not near enough to show the rim bezel contrast and don't have it shining like yours. I also sprayed a little clear over it. Guess I'll stick with this Edited February 12, 2015 by LMDAVE Quote Link to comment Share on other sites More sharing options...
LMDAVE Posted February 14, 2015 Author Share Posted February 14, 2015 Haven't updated much on this because the first trail of paint was a disaster, and I destroyed the black rally stripe decals. So, I'm in the process of striping the body. SO, I'm left with a set of white decals, and I changed my mind on original color. I'm going with this: QUESTION: When putting on the large stripe decal which over laps the removable hood and front cap. When is the best time to make the cut on the decal. After is dries with a razor knife? I tried when it was just installed and didn't have good results. Quote Link to comment Share on other sites More sharing options...
Belugawrx Posted February 14, 2015 Share Posted February 14, 2015 I've had good results waiting until they are dry, cutting them and then re-applying decal solvent to get them to wrap into the crevice Quote Link to comment Share on other sites More sharing options...
Scale-Master Posted February 14, 2015 Share Posted February 14, 2015 (edited) Those tail lights look really nice, and I concur with Bruce about the decals.To be factory correct the centers of the inboard lights should be white, they are the back up lights. Edited February 14, 2015 by Scale-Master Quote Link to comment Share on other sites More sharing options...
microwheel Posted February 14, 2015 Share Posted February 14, 2015 Nice Color choice Dave, And I agree with the others on here concerning the decals. Let them set for a bit, and then use a NEW exacto blade to make any cuts you need to make to them. Then a coat of decal set to get them to wrap under. Quote Link to comment Share on other sites More sharing options...
LMDAVE Posted February 15, 2015 Author Share Posted February 15, 2015 OK finally got the paint finished and decals applied. I just need a protective clearcoat and polish before getting to the BMF. Hope with the stripping I didn't remove too much of the plastic trim lines for guides. Quote Link to comment Share on other sites More sharing options...
Recommended Posts
Join the conversation
You can post now and register later. If you have an account, sign in now to post with your account.
Note: Your post will require moderator approval before it will be visible.