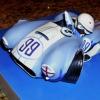
cobraman Posted February 14, 2015 Posted February 14, 2015 This bugger was finally dry ! Only took a month ( almost ) ! Still has a sort of rubbery feel to it but I got tired of it sitting around. Got a couple of bumps and bruises from being in the box and moved around. Anyway, I removed the emblems and handles and the wipers. The parts box donated the hood scoop. I used the chopped top that came in the kit and I molded on the racing front end. The push bar was scratch built. Parts by Parks supplied the aluminum wheel discs. The yellow was not clear coated which is not normal for me but to be honest I just wanted this thing done. Comments pro or con are always welcome.
TheRX7Project Posted February 14, 2015 Posted February 14, 2015 Looks slick. I love the exhaust coming out of the fender.
bobthehobbyguy Posted February 14, 2015 Posted February 14, 2015 Looks good. As far as no clear coat most salt flat cars are built for speed. Any isses with the kit itself?
cobraman Posted February 14, 2015 Author Posted February 14, 2015 As an old kit it still goes together pretty good. If you use the chopped roof you need to be careful in cutting off the stock one. I was a little off on one of my cuts and had a little trouble with the window glass. I ended up cutting it apart and trimming it to fit. That was my fault and not the fault of the kit.
wayne swayze Posted February 14, 2015 Posted February 14, 2015 Good to see it finally finished Ray! It looks great! Too bad the paint turned out to be such a headache. But you got other stuff built in the meantime, and I think that's great!
DumpyDan Posted February 14, 2015 Posted February 14, 2015 Good looking Study, really like the little Studebaker decals
Crazy Ed Posted February 14, 2015 Posted February 14, 2015 The World's a better place with more Cars from South Bend Ind. being built! Well done Ray another really nicely done Saltslinger. Oh and I figured out what your Paint problem was! You accidently painted it with Plasti-Dip
cobraman Posted February 14, 2015 Author Posted February 14, 2015 Thank you very much fellows. I was happy to finish this one.
Mikevango Posted February 19, 2015 Posted February 19, 2015 Hey ray, I'm putting this one together right now as a 50s custom. I don't really know where the shroud should go on the radiator. If I put it where I think it goes the radiator hose won't connect. Do you have a photo of your engine bay I could see? Yours came out awesome by the way!
cobraman Posted February 19, 2015 Author Posted February 19, 2015 I didn't use the shroud. It does get placed so it sticks up a bit above the radiator top is I remember right.
Mikevango Posted February 19, 2015 Posted February 19, 2015 Ok. Thanks. I'll figure it out. I thought I'd ask.
Recommended Posts
Create an account or sign in to comment
You need to be a member in order to leave a comment
Create an account
Sign up for a new account in our community. It's easy!
Register a new accountSign in
Already have an account? Sign in here.
Sign In Now