Madd Trucker Posted September 27, 2014 Share Posted September 27, 2014 looking good so far love the old Autocars have one on the bench my self Quote Link to comment Share on other sites More sharing options...
Mopar - D Posted September 27, 2014 Share Posted September 27, 2014 Terry really like your added details. What resin front tires did you use. Quote Link to comment Share on other sites More sharing options...
Superpeterbilt Posted September 27, 2014 Author Share Posted September 27, 2014 Terry really like your added details. What resin front tires did you use. They are my own casting. Just something I whipped up on a lathe, and moulded them. They are made to fit the AMT spokes. Quote Link to comment Share on other sites More sharing options...
Truck parts Posted September 29, 2014 Share Posted September 29, 2014 Great job so far Quote Link to comment Share on other sites More sharing options...
Sam I Am Posted October 4, 2014 Share Posted October 4, 2014 Terry, I think you must suffer from a touch of OCD. lol Awesome attention to detail !! Quote Link to comment Share on other sites More sharing options...
Car Man Posted October 5, 2014 Share Posted October 5, 2014 more please Quote Link to comment Share on other sites More sharing options...
Superpeterbilt Posted October 5, 2014 Author Share Posted October 5, 2014 (edited) Terry, I think you must suffer from a touch of OCD. lol Awesome attention to detail !! Im not suffering, I find it very enjoyable. Let me just say that I dont go to this kind of detail on all of my builds. Maybe 1 out of 10, I go overboard. Sometimes I just want to complete a vision, sometimes I want to see every nut, bolt, hose, wire, and linkage. It just depends on the truck. With this one , I have no idea how Im going to finish it. I just pulled the kit out and started working. 99% of the time I know exactly how I want it to look when its done. This is that other 1%. Edited October 9, 2014 by Superpeterbilt Quote Link to comment Share on other sites More sharing options...
Superpeterbilt Posted July 18, 2015 Author Share Posted July 18, 2015 Ok, time to get this dude finished. It was put aside to finish some work for a show last year. Now it's almost show time again, and I want to enter this. I don't really have a whole lot of work left except to just put all of the sub assemblies together. I finished up the dump box with some minor mods. The cab guard sides are scratch built and raised a little higher than box stock. The sides of the bed are taller also. A mistake in the kit is that the diamond plate on the front fenders should wrap over the sides. I started by filing down sections to wrap it with thin styrene diamond plate sheet. I also filed down the stirrups in the front bumper as they are way too thick. On the 1:1 the stirrups are just bent round bar. Quote Link to comment Share on other sites More sharing options...
Old Buckaroo Posted July 18, 2015 Share Posted July 18, 2015 Terry - I am really happy to see this one back. A little late to chime in but have you ever tried using thick foil embossed over your diamond tread with a q-tip to make pieces for what you just did ?I use to make roofing tin like that all the time for use on my model RR. Quote Link to comment Share on other sites More sharing options...
DRIPTROIT 71 Posted July 18, 2015 Share Posted July 18, 2015 Really liking this one! Quote Link to comment Share on other sites More sharing options...
gatorincebu Posted July 18, 2015 Share Posted July 18, 2015 Terry, I am really like the changes you have made here! Will be watching to see what you do to finish this one out. Be Well Gator Quote Link to comment Share on other sites More sharing options...
Superpeterbilt Posted July 19, 2015 Author Share Posted July 19, 2015 Terry - I am really happy to see this one back. A little late to chime in but have you ever tried using thick foil embossed over your diamond tread with a q-tip to make pieces for what you just did ?I use to make roofing tin like that all the time for use on my model RR.Thanks Sean I will give that a try. This diamond plate that I am using is super thin and wraps curves very easy. I've used it to do the same thing to Mack DM fenders.Really liking this one!Thanks BrianTerry, I am really like the changes you have made here! Will be watching to see what you do to finish this one out. Be Well GatorThanks Gator.These kits are like gold to me. They are the most prized of all the ones I have. This is the first one I've built box stock(with upgrades), so I want to do it right! Quote Link to comment Share on other sites More sharing options...
anarximis Posted July 19, 2015 Share Posted July 19, 2015 i wish they would bring the kits back onto the market id love to get my hand on one Quote Link to comment Share on other sites More sharing options...
Tesla Posted July 19, 2015 Share Posted July 19, 2015 This is looking real nice Terry. I like the mods you've made throughout this project! Quote Link to comment Share on other sites More sharing options...
Superpeterbilt Posted July 20, 2015 Author Share Posted July 20, 2015 Thanks guys. Today's update is a 2nd truck. I started this one awhile back also. I want them to have matching paint jobs, so I'm doing them together. The 2nd truck is an Autocar DC10464-OH. It's a pit fendered forward axle model. It's built on a junk Raod Boss chassis. I spent the day building a new dump body for it. Using scraps from the junk box, I fashioned a lighter duty box from the other truck. The cab guard is scratch built. On the other truck I removed the flat section from the front of the fenders. The main reason am I doing this is to add the mounting bracket and bolt detail. A plus to this is separating the paint colors. I then attatched the flat fender sections to the front bumper. I added tabs under the fender front to locate these pieces on final assembly. Styrene added for brackets. Quote Link to comment Share on other sites More sharing options...
gatorincebu Posted July 20, 2015 Share Posted July 20, 2015 Terry, I like the modified front bumper , and the set forward axle. You modified dump body looks good. I may do my own version of that on one. Be Well Gator Quote Link to comment Share on other sites More sharing options...
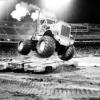
Superpeterbilt Posted July 20, 2015 Author Share Posted July 20, 2015 Thanks Gator! I got the rear wheels in for the Big Dude today, straight from New Jersey.I was going to use kit rears, but it needs some 6 spokes. What do you think! Quote Link to comment Share on other sites More sharing options...
guitarsam326 Posted July 21, 2015 Share Posted July 21, 2015 Spokes all the way! Lookin good Terry! Quote Link to comment Share on other sites More sharing options...
gatorincebu Posted July 21, 2015 Share Posted July 21, 2015 Thanks Gator! I got the rear wheels in for the Big Dude today, straight from New Jersey.I was going to use kit rears, but it needs some 6 spokes. What do you think! Oh yeah! Now that is the way to go! Love them big heavy spoke wheels and nobby tires! Be Well Gator Quote Link to comment Share on other sites More sharing options...
Tesla Posted July 21, 2015 Share Posted July 21, 2015 The rear wheels look awesome! Perfect choice Terry Quote Link to comment Share on other sites More sharing options...
Superpeterbilt Posted July 22, 2015 Author Share Posted July 22, 2015 I gave the cab a light sanding throughout. I highlighted the mould seams in pencil that need to be sanded off. This small section above the windshield And these seams on the cab corners After sanding it has a nice satin patina I puttied the groove at the lower cab front. This is only for the set back axle Autocars Quote Link to comment Share on other sites More sharing options...
Superpeterbilt Posted July 22, 2015 Author Share Posted July 22, 2015 I also started adding the nuts to the U bolts on the suspension. I cut apart the walking beams on the other truck, so I can make them functional. This will force me to make the driveshafts telescope, and the U joints semi functional. Quote Link to comment Share on other sites More sharing options...
DRIPTROIT 71 Posted July 22, 2015 Share Posted July 22, 2015 Now that's a truck that looks like it means business!!! I Like!!!! Thanks Gator! I got the rear wheels in for the Big Dude today, straight from New Jersey.I was going to use kit rears, but it needs some 6 spokes. What do you think! Quote Link to comment Share on other sites More sharing options...
Bennyg Posted July 22, 2015 Share Posted July 22, 2015 Very nice work. I love the springs. Ben Quote Link to comment Share on other sites More sharing options...
guitarsam326 Posted July 22, 2015 Share Posted July 22, 2015 Im diggin the color Terry, shes gonna look good ! Quote Link to comment Share on other sites More sharing options...
Recommended Posts
Join the conversation
You can post now and register later. If you have an account, sign in now to post with your account.
Note: Your post will require moderator approval before it will be visible.