Wolfangel Posted November 18, 2022 Posted November 18, 2022 I should have been posting this as I went along, but I didn't. So....here are some pictures of the process. The car is finished....I just wanted to show a few pictures I took along the way. These pictures are of when the chassis was actually completely done....but I decided to pull the front suspension off of it and redo the tires (going from MH Racemasters to Goodyear) along with adding chrome valve covers and redo the spark plug wiring. 1
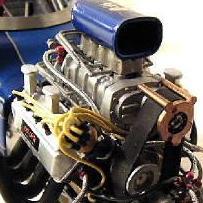
Wolfangel Posted November 18, 2022 Author Posted November 18, 2022 (edited) And here is the finished product. This is my FIRST time ever doing a 1/24 scale model to this level of detail. The details are as follows......spark plug wires, fuel lines, brake lines, sheet aluminum chassis side panels, aluminum strips on fuel cell, parachute release cord and chute cables tied to the frame, seat belts made from tape and tied to the frame rails, scratch built injector lines, headers braces, photo-etch throttle linkage, tire decals front and rear, modified the interior "tins" to sit body lower. This took me about a week and a half to build and I am very happy with how it came out. Edited November 18, 2022 by Wolfangel 4
cobraman Posted November 18, 2022 Posted November 18, 2022 Looks great ! Done in a week and a half ? Did you not sleep ?
sflam123 Posted November 19, 2022 Posted November 19, 2022 BEAUTIFUL!! The paint on that is PITA to mask off esp. at the nose. Fantastic job!
Altered Ego Posted November 19, 2022 Posted November 19, 2022 I am impressed with how this turned out and even more impressed with some of the details. However, like cobraman, I am completely blown away that this only took a week and a half!
Dragline Posted November 19, 2022 Posted November 19, 2022 Very nicely detailed build. I know the paint scheme on this one is tricky. You did a bang up job.
Wolfangel Posted November 20, 2022 Author Posted November 20, 2022 On 11/18/2022 at 5:16 PM, cobraman said: Looks great ! Done in a week and a half ? Did you not sleep ? 23 hours ago, sflam123 said: BEAUTIFUL!! The paint on that is PITA to mask off esp. at the nose. Fantastic job! I did sleep yes.....I just work really efficiently. I can actually build 2 models a week sometimes. This is my 20th build for this year. The way I did the masking was......I cut out the decal that goes on the whole side of the car.....used that as a template for masking off the white. It worked perfect and actually came out better than I thought it would.
Zippi Posted December 2, 2022 Posted December 2, 2022 Nice looking Funny Car. I loved watching these run back in the 60's when I was a kid. Nice detail work and the paint looks pretty kewl. A+ on this one Marcus.
geemoney Posted December 5, 2022 Posted December 5, 2022 LOVE IT! i got this for christmas with a Spin welder...i sorta remember chopping the top and attempting to "weld" it back on with the Spinwelder.......
1974 Tom Mongoose FC Posted May 17, 2024 Posted May 17, 2024 I have this exact model. My box says it's a 1974 but all of the others that I'm seeing is labeling them as 75's. Forgive my ignorance, but I am curious if mine is worth anything. Thanks in advance!
sflam123 Posted May 18, 2024 Posted May 18, 2024 FANTASTIC!! Nice work on the detailing of the fuel and the wiring! Exceptional build!
Recommended Posts
Create an account or sign in to comment
You need to be a member in order to leave a comment
Create an account
Sign up for a new account in our community. It's easy!
Register a new accountSign in
Already have an account? Sign in here.
Sign In Now