stulee11 Posted October 28, 2011 Posted October 28, 2011 hi everyone i was just wondering if anyone had any gd tips or hints on using BMF for the first time
Foxer Posted October 28, 2011 Posted October 28, 2011 Adding to what Jacen said, I also use a round toothpick to burnish and get the foil into tight places. You just have to be careful not to tear the foil.
David G. Posted October 28, 2011 Posted October 28, 2011 (edited) Patience. Be prepared to re-do things on occasion. Practice on an old car body a bit to get the feel for how the foil handles. David G. edit; Don't try to do too much in one sitting. This stuff may wear you out more than you realize. Edited October 28, 2011 by David G.
stulee11 Posted October 30, 2011 Author Posted October 30, 2011 can BMF be clear coated or do i put it on after clear coat ????
imatt88 Posted October 30, 2011 Posted October 30, 2011 (edited) Stu, Great question! I, too, am new to BMF, and I would also like to know What part of London are you from? Are you an Eastender, or from the west side? Cheers, Ian Edited October 30, 2011 by imatt88
MrObsessive Posted October 30, 2011 Posted October 30, 2011 I personally put it on after clearcoat if I put on clear at all. Contrary to popular belief, Bare Metal Foil DOES NOT need to be cleared at all! If one takes their time, and burnishes it properly, BMF should need NO clear coat. I have cars that I foiled 15+ years ago that are still OK with no clear over them. One other tip that no one's mentioned but is VERY important------BMF is only as good as your paint underneath. BMF will NOT cover over a bad paint job or body work that is substandard. Having said this, it's important that your paint is rubbed out and is as smooth as possible. I've seen nice builds that have been otherwise marred by BMF that is very wrinkly, from the paint underneath not being rubbed out properly. ...........And yes, I've put BMF over waxed paint jobs. If you take your time and burnish your foil properly, your BMF should go over a waxed paint job and look fantastic when done well. Hope all this helps!
stulee11 Posted October 30, 2011 Author Posted October 30, 2011 thanks for the tip . i am from east end a place called "canning town" you no it ????
Howard Cohen Posted October 31, 2011 Posted October 31, 2011 I use Microbrush applicators from Alpha Abrasives (makers of Flexifile) to get into all the nooks and crannies and name plates and emblems with BMF. They work much better than qtips, leave no strands and come in different sizes. For burnishing, I use the side of a flat toothpick. I never put clear over BMF, I put the clear under it. Like Bill said, a smooth finish makes the BMF better. I put on a good coat or two of Treatment Model Wax as it gives a smoother surface for the BMF. I did a small demo this past NNL East showing how easy it is to do BMF. Also, I use stainless steel surgical blades for BMF as they have a cleaner, sharper edge and will last longer...and when you cut yourself, and you will, the cut is cleaner and easier to mend, but it still hurts
stulee11 Posted October 31, 2011 Author Posted October 31, 2011 lol thanks for that mate i aint looking forward to losing digits lol but i am going to give it a good few trys on old shells before i try on my charger . But thanks to everyone for all the hints and tips i will upload pics here for you all to see how its going and to try and help me in making it better
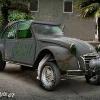
stulee11 Posted November 1, 2011 Author Posted November 1, 2011 here as promised my first attempt at BMF i dont think its to bad really but you know the drill any comment welcome sorry for the picture quality my excuse is its crappy quality so it makes my work look that little bit better lmao . thanks for looking in
bigmikevee Posted November 1, 2011 Posted November 1, 2011 Hey Stu, Your results are looking great, for around the windows, just try one side at a time, I see the point Roger made, and quite a good one at that, but if you just make thin strips and make your joints/seams in the corners, you will save a ton of foil, and only Superman ( or someone looking at your car from three inches away ) will see the seams. Keep up the good work! Mike
sbrown313 Posted February 13, 2012 Posted February 13, 2012 Hello Gentlemen. I'm new to this forum and I thought I'd open this topic back up with a tip that I use. For window treatment, I start first at the bottom window trim. Cut strips just wider than the trim and longer than the opening. Position BMF 1 scale inch above bottom trim. Burnish and trim off excess. Second, cut side BMF taller and wider than the trim to be covered. Position BMF to slightly overlap the bottom trim. Burnish and trim off excess. Trim top just below top inside corner. The top piece is cut and positioned to slightly overlap the 2 sides. Burnish and trim off excess. Now if anyone wants to do a closeup inspection, they will see that the foil most likly resembles a 1:1 chrome trim job. For side trim I try to follow the same guidelines. Check a real 1:1 if possible and see where the trim overlaps and follow that example.
Bastardo Posted February 14, 2012 Posted February 14, 2012 Check this out: http://www.briansmodelcars.com/tutorials/tutorial/16 I've used thet method a few times and it rocks
Recommended Posts
Create an account or sign in to comment
You need to be a member in order to leave a comment
Create an account
Sign up for a new account in our community. It's easy!
Register a new accountSign in
Already have an account? Sign in here.
Sign In Now