ModelcarJR
-
Posts
1,648 -
Joined
-
Last visited
Content Type
Profiles
Forums
Events
Gallery
Everything posted by ModelcarJR
-
Thanks, All! I appreciate your comments! ?
-
Just finished. Paint is Tamiya Coral Blue and Krylon Satin Ivory. PE grill and other PE. I struggled with the BMF on the exterior but got it on. Wheels are from the Revell 68 Dodge Charger (two sets of front wheels). Thanks for looking! ?
-
Thanks, Dennis! I appreciate your comment. Picked this one up at a Model and vendor show for $20. So this one is done, except I just noticed that I didn't dot the door locks and air cleaner nut with some chrome. There are a few things I wish I did better but overall, good paint, foil, nice wheels and a few pieces of PE. Thanks for looking!
-
Thanks, Bob! It looks better not so close up. I've also finished the back. Only a few more pieces and it will be done! Thanks for looking! ?
-
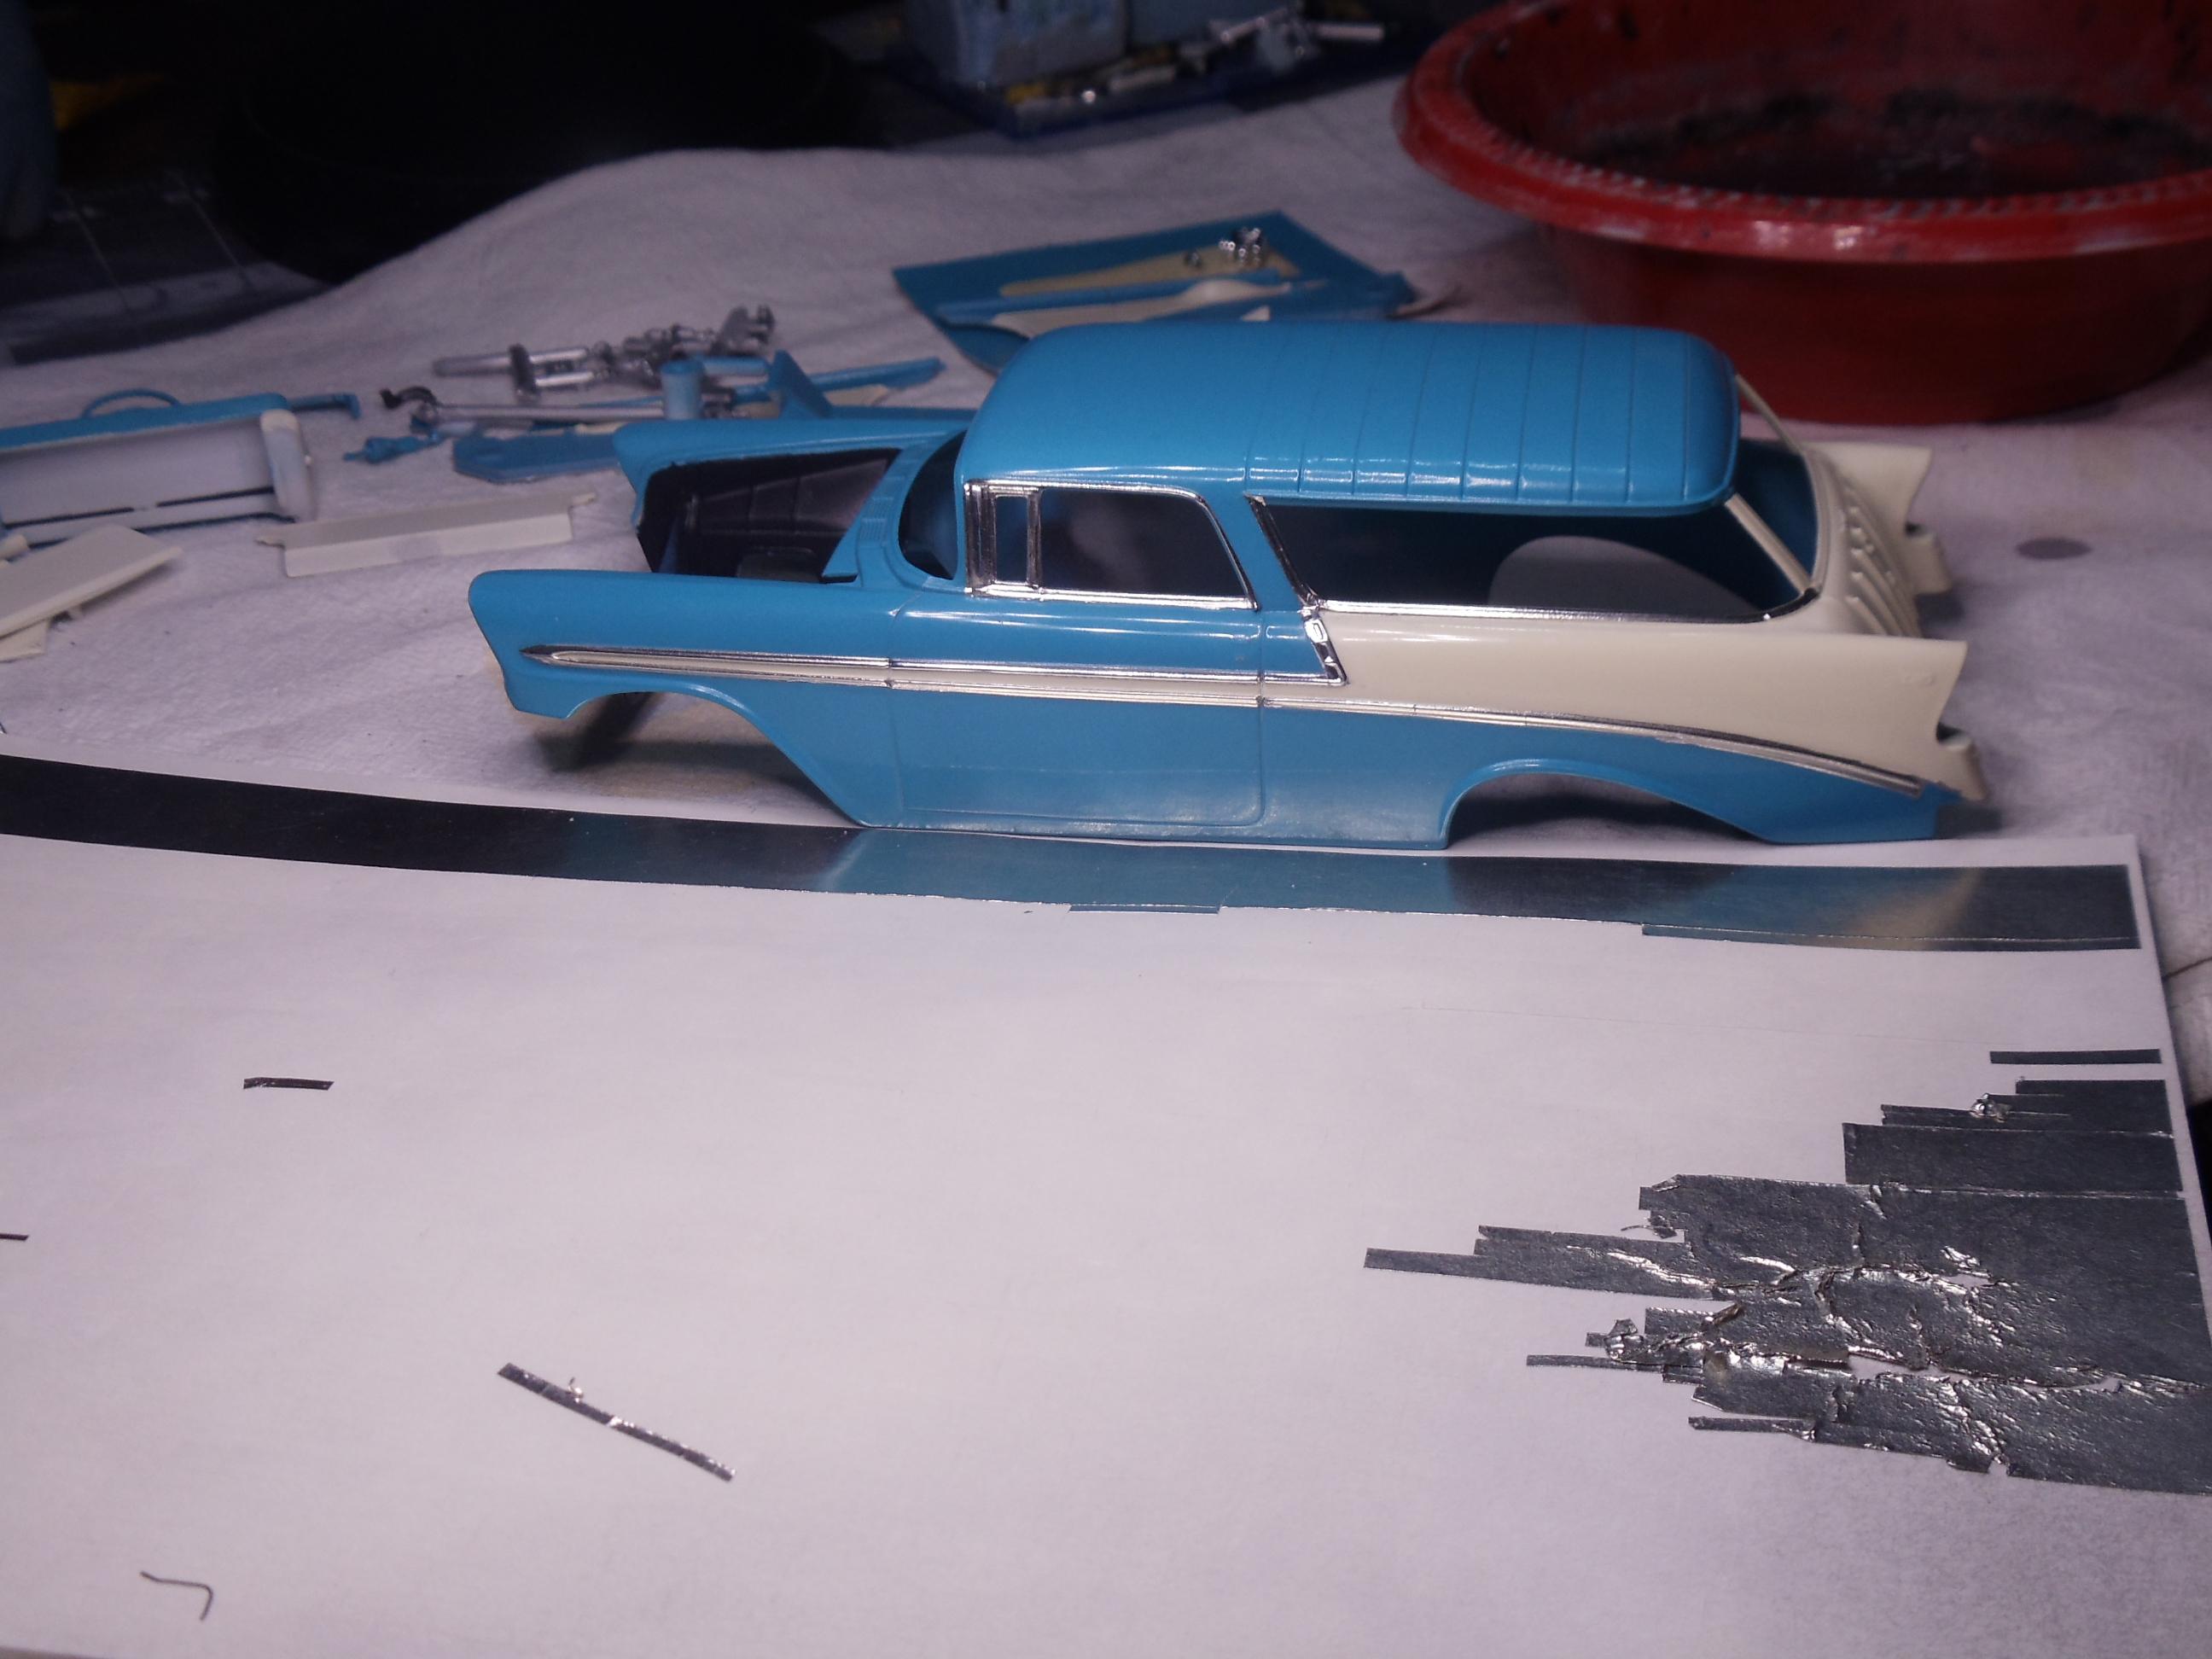
Thanks, Bob, Carl, and David! I appreciate your comments! Carl, the center of the dash is a chrome piece in the kit. The dash is actually 3 pieces - not an easy assembly. It took the better part of two days but I finally got the front end and engine compartment finished. I couldn't save the finish on chrome trim bar at the bottom of the grill so I had to remove it, sand it down and then foil it. My new foil has no glue on it so I had to use a piece of damaged foil that was given to me last week. In addition to the PE grill, I also added PE to the hood using the hood V and Chevy badge with a decal from the kit. Overall, it turned out pretty well and adding the grill was one of the things I wanted to accomplish in this build. Thanks for looking! ?
-
Thanks, Rusty, Rick and David. I appreciate your comments! David, I think I'll try your approach. It only seems to be affecting the left side so apparently the rear suspension wasn't assembled perfectly square or the chassis isn't centered. So I am going to adjust spring on the left side and hope that takes care of it! Its now assembled and on wheels. Next i want to try to use the PE grill that I have for it so I have chopped up the grill. My approach will be to glue on the two turn signal buckets, position the splash pan and then mount the PE grill. Finally, I received a package today from Model Roundup. II have been unable to find the 69 Chevy Chevelle in stores over the last six months so I broke down and bought it online. In addition, I purchased some BMF and it was so nice to see that it was shipped in the right size box and that two pieces of cardboard actually were taped together with the BMF inside. I really appreciate their attention to detail and sent them an e-mail to that effect. Now I'll have half a chance at getting the BMF off the paper and on to a model. Thanks for looking!
-
Thanks, Bob! I appreciate your suggestion! I'm just not going to wire this one. Finished the interior yesterday, found some wheels to use, and mocked up the body on the frame and interior. Hopefully, I can push the body back a bit to get a better rear wheel position. Next time I take a picture of the clock dial and look at it on my computer while I am positioning it. Looks like my naked eye didn't get it right! Thanks for looking! ?
-
Thanks, Carl and Jeremy! I appreciate your comments! I'll get to this one after I finish the Nomad. I managed to get two kits painted before we went into the bad weather so that I could continue building during the cold snap. Thanks for looking! ?
-
Thanks, Carl, Jeremy and Bob! I appreciate your comments! Not much done yesterday but I did get the engine together. One of the few Chevy engines that are actually red. I didn't add plug wires this time as if they are routed correctly youa won't see much of them. So this one will be box stock, although I may add some wheels. Still want to add another coat of clear and chrome the wing nut on the air cleaner, Thanks for looking!
-
Thanks, David and Joe! Nothing ventured, nothing gained! Sounds like the Duck tape product is the same thing. My BMF is on order, but I have managed t get both the 56 and the 65 Chevys with the sheet I have. Now I am completely out! Thanks for looking!
-
Finished the foil - not good foil but foil. I hope it won't fall off. Had to use a little white glue on the wheel openings. Chrome pen in spots. I need to give the hood a light coat of paint before I foil it, but will have to wait until it warms up. Thanks for looking! ?
-
Finished the foil with a little bit to spare. I bought some Metal Repair Tape at Ace Hardware that is manufactured by Duck Tape but I don't think it will work as it is too thick and doesn't conform to irregular surfaces or curves very well. I've had several Molotow pens but the tip has clogged on every one of them before I can use half the ink. So I'll just pump some ink out and brush on the interior trim. Thanks for looking and Happy New Year!
-
Thanks, Carl! I appreciate your comment! I rubbed out the paint today and aside from some tiny irregularities at the base of the left B pillar and around the window trim it looks pretty good. I'll work om it a little more and start adding some foil. Some more foil may be here by the end of next week. Thanks for looking and Happy New Year!
-
Thanks, David! I appreciate your comment! I think this time it was just too much paint and it was from the bottom of the can that had too much metallic in it. So after 3 days in the purple pool and one day in oven cleaner, I finally got the paint off, at least most of it. I picked the rest of the paint spots off and then washed the entire body and hood a couple of times with some seasoned 400 grit sandpaper. In the meantime, I bit the bullet and drove the 40 miles downtown to the only hobby shop in Houston that I am aware of that carries Tamiya paint. I made that trip every weekday for 15 years when I was working and I can report that it hasn't gotten any better. Then I went back to my tried and true method: 1. One coat of gray primer (O'reilly Brite Touch manufactured by Sherwin Williams). Wait an hour. 2. Two coats of Tamiya Light Blue Metallic 10 - 15 minutes apart. Each coat is one pass back and forth (2 passes) on each unpainted surface, i.e., bottom, middle and top of each body side. Let dry about 45 minutes and then make sure that hood matches fenders by putting hood on body. 3. Two coats of Tamiya Clear 10 -15 minutes apart. Same method as above. 4. Done. Rub out tomorrow - 16 to 20 hours later. This time carefully under magnification. Here are the results in photos: Initial result from paint removal: Better Best Final painting results:
-
Thanks, David, Jim, and Mike! I appreciate your comments! David, that sounds like a good idea. My wife just happens to be at a store close to an Ace hardware so I've sent her on a mission. We'll see if they have that tape here. Mike, the only thing I dislike about using the matte aluminum foil is that it has a tendency to roll up on itself so its a real hassle to use especially in thin strips for trim. Its almost impossible to unravel and then lay it down without breaking or knotting it up. I don't know if I'll have enough in this sheet to finish the 56. Thanks for looking! ?

-
Thanks, Bob and David! I appreciate your comments! I visited a hobby shop today and they were out of BMF. But the owner rummaged in the back and found a sheet that was damaged and she let me have it! I'll see what I can do! Finished rubbing out the body today. No problems this time and I am not going to push it any finer, especially with the rumble strips on the top and the strips for chrome on the tailgate. Thanks for looking! ?
-
Thanks, All! I appreciate your comments! Mike, the paint is Tamiya Coral Blue, TS-41. I prefer this color over TS-23 light blue because the light blue is too dark, more a medium blue to me. I finished painting all the other parts, including the interior and giving the body two coats of clear. Hopefully, I can rub it out carefully tomorrow without incident. I also found my previous build of this kit from about 15 years ago. Its MCW Dusk Plum and Ivory. Thanks for looking! ?
-
While I am waiting for the purple pond to do its thing on the 65 Chevy, I turned my attention to this Nomad that I had already started while working on the 65. I have built this one before and wanted to build it again. Got the body all taped off and painted. I'll add a couple of clear coats tomorrow, weather permitting. Its not Nassau Blue or Twilight Turquoise but its kinda in between, Coral Blue. I also used Krylon Satin Ivory. Thanks for looking! ?
-
Thanks, Charlie! I appreciate your comment! I'll be looking for yours on here! I can't seem to keep a Molotow pen from clogging up and that's why I don't use it. Also unless you clear it or something it will dull if any fingers touch it. So I use the pen just for touch-ups usually with a brush because the pen doesn't work.
-
Well, the funny thing about touching up paint is that sometimes it works out well sometimes it don't. This time it didn't. I started rubbing through layers and I was at the end of the can and there is too much metallic in the bottom of the cans. So its in the purple pool now and I'll have to order another can of paint. Be back in about 10 days if the weather permits. ?
-
Thanks, All! I appreciate your comments! I didn't realize it was a 66 but now that you mention it it did have the rectangular taillights instead of the round ones. The color is close enough for me. I got it rubbed out but burned the right front fender and rubbed out the edge of the beltline on the driver's door. So I had to touch it up and rub it out again. Then I noticed that the hood didn't blend in well, so another touchup. Now I need to rub it out again. I'm hoping this is it. I certainly have enough paint on it! Thanks for looking!
-
Thanks, James! I appreciate your comment! Got almost everything painted today - just ran out of daylight. Primer, then a silver base coat on the body and Tamiya Light Blue Metallic. two coats and one coat of clear. I'll rub it out tomorrow and then maybe another coat of clear. We'll see how it goes. I'll finish the other parts and then probably work on another body or two to get ahead a little while we have some good weather. Thanks for looking and Merry Christmas!
-
I started this kit after seeing the Chevy Christmas commercial. I have a convertible that is built and I thought about re-building it but opted for the Foose hardtop kit. This one will be painted Light Blue Metallic with a white interior, similar to the Chevy commercial. Here is where I am starting; parts are sorted into piles and the body and body parts are mounted on stands and ready to paint and other parts sorted into piles for black, silver, engine, interior. There are no parts that are chromed that need to be stripped. I am ready to start primer then color. Thanks for looking and Merry Christmas!
-
Thanks, Anthony and Carl! I appreciate your comments!
-
I've built this one totally box stock. I didn't add any plug wires, heater hoses or even a radiator hose. Its been a long time since I built a model with screws to hold the chassis to the body - since about when I was 10 -12 years old! This one is done except for fixing a couple of spots of foil around the wheel openings. I like the subject but the molds are very old!