

pandamonium2112
-
Posts
201 -
Joined
-
Last visited
Content Type
Profiles
Forums
Events
Gallery
Everything posted by pandamonium2112
-
NOW THIS IS A COOL IDEA !
pandamonium2112 replied to CrazyGirl's topic in Tips, Tricks, and Tutorials
A little added safety would be to hold it in down in a bucket of sorts, so if the bottle gets loose you may be able to keep it from going through your T.V. -
1/16 Re-Charger (Updated 5-29-13)
pandamonium2112 replied to pandamonium2112's topic in WIP: Model Cars
After a quick review of yesterdays work, I figured out there would be an issue with the ride height. The block that cups the axle needed to be taller which translates to a lower ride height. So back to the drawing board. Since I wasn't 100% pleased with how it turned out anyway. I spent the whole morning scratch building all the parts to redo the rear suspension. Here's what I came up with. With the help of a hand full of pins, I got it temporarily held together. I think it turned out a lot better and looks a bit more realistic. The rebuild saddle blocks dropped the whole car 3/8 of an inch. I finally glue the new tubs in place last night so it would be dry to work with today. Here's a couple views of it all sitting in it's perspective place. Now that I have a measurement I can get to work on the Coil over shocks and mounts. Here's the battery, nitrous tanks and fuel cell (I may scratch build a new one out of aluminum) What do you thick, the plastic just looks to cheesy All added up it doesn't look like a lot but it took all day to build. I'm going to have to break down and make a run to Salt Lake City to the hobby store that carries the "Alclad Paint Line" to use anything else on this built would be a constant source of regret to me after all the work that will go into it.. -
1/16 Re-Charger (Updated 5-29-13)
pandamonium2112 replied to pandamonium2112's topic in WIP: Model Cars
Well I got most of the rear suspension done today. Forward leaf spring mounts are all formed. Shackels got modified. Worked over the leaf springs for the final time then put it together with pins to see the fit. I started gathering tubing and springs for the 4 coil over shocks on the rear but have to wait on construction till the rear end is solid so I can get the length correct. Here's the leafs layed over the axle. I think this is going to work. -
Question about editing my post?
pandamonium2112 replied to pandamonium2112's topic in Model Building Questions and Answers
Thanks a bunch.. -
1/16 Re-Charger (Updated 5-29-13)
pandamonium2112 replied to pandamonium2112's topic in WIP: Model Cars
Thanks for the photo Greg. Yes shock absorbers, sometimes I can type faster than I can think. The old shocks from the kit won't be re used (they don't look real enough and 2 got broken anyway) I would like to build some with coil overs on them, more just for looks. In the photo, that's just a single post sticking up with the shocks bolted on. I wonder what the other end that brace at the top is bolted to? Thanks again for the photo.. -
I want to edit my topic by adding "Updated (Date)" I can't figure out how to get there. Can you tell me what I have to do? Thanks!
-
49' Mercury Speedster.. It's Done 5/4/13
pandamonium2112 replied to BKcustoms's topic in WIP: Model Cars
Simple yet sweet. Some of the slightest alterations bring the greatest results. This build is awesome. Keep going -
1/16 Re-Charger (Updated 5-29-13)
pandamonium2112 replied to pandamonium2112's topic in WIP: Model Cars
So....not a ton of progress but I was able to get a little bench time in. It's funny that as soon as I decide to do another build that the honey-do list appears. I was able to cut down the new tubs and contour them to fit inside the body. I ran a bead of glue around the inside now that I am sure of the fit. Next will be some primer and bondo to fill in the gaps (which I anticipate will be few) I started to sand and form the leaf spring mounts and soaked the chrome off of the shackels. Been wondering about the coil overs though (Sorry for the lack of photos). The original kit had a pair on each side (total of 4 on the rear and 4 on the front) I want to keep the same design but not so sure of my confidence in scratch building them. If any one has some photos I would appreciate them for reference. The issue is that they will be shorter than the originals. While waiting for glue to dry I started on the battery and nitrous tanks that will go in the trunk also.. Hopefully I will have the whole weekend to play around...Weather man says "SNOW" tomorrow...Sounds like a basement day to me All traced and ready to cut Cut and ready for a trial fit. I guess it'll work? This is what i'm shooting for.. Pretty wicked view of the what second place would see. Minus 200 hundred pounds of chrome... Leaf spring mounts roughed in.. Starting on the nitrous bottles.. Soaked the chrome off the shackels. Not sure if I can use them or have to build new ones. They are pretty thick for a realism.. More to come.. -
1/16 Scale Army Vega Funny Car - Finished 10/14/2018
pandamonium2112 replied to Mooneyzs's topic in WIP: Drag Racing Models
Flipping back and forth on those 2 photos. You nailed this one right on the mark! You still got a ways to go but your attention to detail has just proved itself. Can you see the finish line? -
I'm pretty sure not. But I think you could take an old one to "Ricks Restoration" and he could customize it for you. I would even suggest one of those squeaky horn mounted on the handles. The possibilities are endless.... "Growing old is inevitable. But growing up is optional"
-
Wow! I missed the start of this one? Must have had my head under a Charger.. Very nice concept. This is going to be SWEET. What kind of Metal is that? sheet aluminum? I've been working with soda cans for quite a while now. they work out nice.. Can't wait to see how it turns out!
-
1/16 Re-Charger (Updated 5-29-13)
pandamonium2112 replied to pandamonium2112's topic in WIP: Model Cars
Thanks for the feed back. James: I'm trying not to go Pro Street with this build as I stated earlier in my post. Trying to land somewhere around "Garage Modified" with the work coming out nicely. You know. "That one guy in your city that no one will tangle with because of that Purple Charger he cruises in on Sat night" The next project is going to be a lot more "Pro Streetable" A 1/16 57 Chevy 2 door Rag Top with a blown Alcohol and Nitrous fed funny car engine in it. Should be pretty wild. Gregory: Yes I haven't forgotten about the shackles. I thought that they would fit differently than they do so i'm going to re-do 2 of the leaf spring mounts. Thanks for those reference photos though. That first one is a sweet build. What are you putting it under? -
Ok maybe there is a doubt at whether it's your B-Day or not.. So If I just say Happy Birthday right now. I'm sure i'd be right sooner or later..Yes?
-
1/16 Re-Charger (Updated 5-29-13)
pandamonium2112 replied to pandamonium2112's topic in WIP: Model Cars
Lots of progress today. I started by using the old wheel tubs to make a jig out of wood for the new tubs. Then cut some styrene, layed them out on the block and carefully heated them with a torch till they bent. A test fit proved they would work nicely. Then I cut 2 more strips to fill the gap. They came out quite well. I'll be using the old tubs to scribe the angle on the new tubs so they form tightly to the body on the inside of the trunk since the lid is hinged and i'll be putting some detail in it also, probably the battery and a nitrous bottle also be able to see the top of the fuel cell in there too. I also started working on the new leaf spring mounts. A little bit of cutting and sanding should get them ready. That's all the progress for now, won't be able to get more bench time in till Monday. 16 hour shift tomorrow -
This has turned up some interesting comments. Just like Crazy Girl had stated about buying a lathe and a mill. Purchasing a tool I feel is different in that it can be used over and over again on many models and if she gains some mad skills, could be turned into a money maker by taking orders for custom work for other builders and it can be used for other hobbies too. I also like the book ends view point. With the money I generally put into any given kit I think I would find myself somewhere in the paperback section LOL. So it would appear that most of us are in the same general area that we spend more money on tools and finishing supplies that get used over an extended time. Like Chris and Richard said too. I still have stuff that was bought as far back as 2000 when money wasn't such a touchy subject and am now using up. Outside of the average $20.00 kit I've only made one purchase of $175.00 for a 1/12 scale Lamborghini and I felt like I should see a shrink for that one at the time. The Love and Enjoyment of the hobby should be the prime target, like southpier (Joe) said that the money isn't always proportionate to the finished product or the enjoyment of seeing the build completed. Thanks for the comments so far. I hope that more people jump into this one.
-
I for one try to scratch build everything I can or find some little trinket that looks like what i'm trying to create and modify it. I do this mostly due to a tight budget but I really enjoy the art of creativity. To me, that's what modeling is all about. My build space is full of gadgets that I have found everywhere I go. I picked up a piece of window screen off the ground the other day to incorporate into the grill of a 1/16 57 chevy. I will go to a second hand store and find a bag of odd stuff for under $5.00 that will go on 6 different builds. My biggest cost of add-ons for most builds are in "Distributor cap, Wire Looms, Brake Discs and Paint. In reading through alot of posts, some builders are sinking major amounts of dough in their builds. Don't get me wrong, these are some incredible creations and the realism is fantastic. But at some point I look at it and think to myself (wouldn't a 1:1 car cost as much) in an irrelatively loose figure.Outside of having a yard or garage big enough to store the 1:1's in. If you don't feel comfortable answering this than please don't. But what is the average $ amount you will put into a kit?
-
69 GTX, medium blue metallic *Finished*
pandamonium2112 replied to JasonC's topic in WIP: Model Cars
Looks good so far. I agree with the exhaust color, nice realistic look. Good call on the interior (dull coat over gloss) gives off the semi gloss look. You can also shoot flat colors and put a clear gloss over it for a slightly different matt finish. Answer to the distributor question: I get mine from www.detailmaster.com The kit comes with the capability of wiring for a 4, 6, or 8 cylinder engine. As far as wire goes. I have drilled out box stock distributors with a tiny bit and used motor winding wire from Radio Shack. It comes in a variety of colors and is a pretty good replica of a 6mm plug wire set. Keep building. You got the basics down. Now just find all the tricks that the masters use..... -
1/16 Scale Army Vega Funny Car - Finished 10/14/2018
pandamonium2112 replied to Mooneyzs's topic in WIP: Drag Racing Models
Still on the money Chris and looking incredible! Sorry, but that resin head looks like a German soldier with a gas mask on....LOL I have no doubt that some paint will change that perspective quickly though. This build has inspired the "Re-Charger" in "On the workbench" Keep a smile.. -
1/16 Re-Charger (Updated 5-29-13)
pandamonium2112 replied to pandamonium2112's topic in WIP: Model Cars
Thanks for the input on the paint job. It's what I had felt all along. It's gorgeous when polished and a definite "Street Sleeper" look. It's why I left it that way when I built it. Final answer is: Keep the paint. Austin. The story on the destruction: I had 2 teenage daughters at the time of the build,and it seemed like the boys who dropped by to visit had just as hard a time keeping there hands off my displayed models (this is only 1 of 6 that were destroyed) as the 2 daughters. Still to this day I can't say which one suffered the most. The models can be rebuilt but the innocents of a couple of girls is lost forever. Does that answer your question? So. I got some time on the car after the "Honey Do" list was handled. First task was to shorten the rear axle. Then see if it was going to work out. I am trying to keep the old school approach on this car by moving the leaf springs inward and building another set of coil overs then re-fit the shackles rather than building a pro stock set up to replace the suspension. I cut the old tubs out and am making a mold out of wood to bend some new styrene tubs (only wider) to replace the stock ones but keep the same depth. Here's some photos. Stock rear hardware. Looks like it's all going work out. -
1/16 Re-Charger (Updated 5-29-13)
pandamonium2112 replied to pandamonium2112's topic in WIP: Model Cars
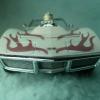
Thanks for the comments so far. Yes that rear stance bothered me from the day I built It, just didn't care to do anything about it at the time, it was just a box, stock build. That and scratch building a new front suspension will be the only extreme modifications. The plans from here is to add more detail (wiring, linkage, fluid lines, disc brakes and some interior work) bringing it to a more realistic level. I need some honest feedback on the paint job though. It's a beautiful color Purple gold flake. I polished the hood and it came out beautiful. During the re-build I won't have to cut into the body at all. But do you think I should. Leave it alone? Add some graphics? Complete re-paint? -
1/16 Re-Charger (Updated 5-29-13)
pandamonium2112 replied to pandamonium2112's topic in WIP: Model Cars
This is the rear height i'm shooting for. The front end will fall in later. There's a lot of work ahead on this one. I'll post more photos as progress continues.. -
You can check out all the photos of this build on my Photo bucket page http://s1214.photobucket.com/ After building the MPC Street Charger back in the 90's it made it to one model contest and took a ribbon only to suffer demise at the hands of a teenager. It has lived in a box till now. I decided to give it a major overhaul. My skills have improved enough to do it justice. The kit was pretty cool and fun to build but there was some things I never really liked. The width of the rear axle for one was going to change so I could lower it with the wheels tucked up in the wells. This is what i'm starting with. Here's the progress so far. After stripping all the paint from the under body, I cut the frame away to allow dropping the body height. Then I cut out the wheel wells.
-
Okay. Guess i'll post my mug now.
-
Zep Industrial Purple After looking all over town and not finding CSC. I stopped into the Home Depot and found "Zep Industrial Purple" It is a concentrated package. I put some sacrificial parts in for a test run. Chrome: Clean in 2 minutes (Including the nasty under coating) Paint: Clear coat gone in 2 minutes. 3 layers of paint gone in 2 hours. Gold spray paint held out the longest (24 hours on that) Over all: Love it. $10.00 for a gallon. I left an old hood in it for 5 days and it had no side affects on the plastic.
-
The car turned out beautiful. I share your love of the 68. The interior is superb. Outside of the car though. Your eye for photography and placement of the subject brought it to life..Wonderful