

pandamonium2112
-
Posts
201 -
Joined
-
Last visited
Content Type
Profiles
Forums
Events
Gallery
Everything posted by pandamonium2112
-
We're all crazy so i'm pretty certain you are too. But, Crazy and genius live together. Sain people don't put their neck on the line for an idea. This project is looking quite nice. Roll with it..Can't wait to see the end result.
-
Nice to meet you Tim. This place is a gold mind of craftsmanship. I know you'll enjoy yourself..
-
Glad to see you climb on board neighbor. Can't wait to see your rides..
-
Are We Model Hoarders?
pandamonium2112 replied to mrmike's topic in General Automotive Talk (Trucks and Cars)
I can't honestly say i'm a model hoarder. Because i hoard all kinds of other stuff too. I only have 50 unbuilt in box kits and 16 kits bagged in ziplock from yardsales and 2nd hand stores. I collect lots of other trinkets along with electronics and R/C's. My problem is i love to tinker with just about anything, especially if it's broken. I'll take an item apart just to see how it works, save maybe a few interesting items from it (I've made some cool wall art) then throw it away and file the knowledge. Every year i go through my hobby room, garage, shed and clean out the stuff i know i'll never work on or is beyond repair. It's hard, but i told myself i have to do it. If i didn't, i think i could become as bad as the people on T.V. -
Anyone have any good snow pictures today?
pandamonium2112 replied to rmvw guy's topic in The Off-Topic Lounge
Here ya go. It's really an R/C but i customized it like a model. -
Failed tutorial - but still kinda cool
pandamonium2112 replied to Jantrix's topic in Tips, Tricks, and Tutorials
This has turned out to be a fasinating post. I've enjoyed following it. I'm going to give this a try also. I'll share my results in a later post, On Bench or Under Glass -
Another project completed a while back. Enjoy.
-
Thank you for the great comments. The Keg is scratch built out of some old rims, the wagon and cooler of ? came from a MPC Meister Brau 3 engine pulling tractor. I thought they looked better sitting next to the Jeep. Here's a pic of the puller.
-
They are the MK8d 1/20 scale AMT (re-release) kits, I bought them because i remember how detailed they were and knew i could get a good project out of them. if your thinking of getting one, don't hesitate (Buy 2 or you'll regret it) The body fits over the engine like a glove, snaking it over the roll bar is a little tricky. The bodies have score lines in them and extra parts should you choose to cut it up and be able to remove sections at a time. I did this on the first one i built and it didn't turn out good, it never sat together very well, i could probably compensate for that now with my building skills but choose to just leave it in 1 piece. Thanks for the comments, i enjoyed sharing them with you.
-
Looks like I have to work tomorrow
pandamonium2112 replied to Agent G's topic in General Automotive Talk (Trucks and Cars)
I posted this in "weeklt humor" but it fits better here. -
You are definately on your way. You're gonna be turning out some nice projects soon. I agree, the posting pics was hard for me to figure out also. I tried Photo buc but it was to confusing so i found a link to "Fotki" it was much easier to work with. You'll figure it out
-
Welcome back! Modeling is a great hobby. Nice choice for the first builds, they turned out well. And i just read the "Walk, don't run" post also. I too fell victim to this and drove myself crazy because things didn't turn out "Perfect" My catch phrase is this though "Some days you just gotta glue the tires on, who cares if it doesn't roll" Can't wait to see more of your builds..
-
I like this. Nicely done.
-
Weekly Humor
pandamonium2112 replied to Mercman's topic in General Automotive Talk (Trucks and Cars)
I found a chuckle in this one.. -
OK, i'm having a little trouble here. I've never scratch built anything like this (to scale) and i have all the dimensions but for the life of me, i can't seem to figure out how to do the math to convert to 1/25. Must be old age or a brain cramp.. Can you help out an old fart?
-
I got one of these kits when i was a youth and when they re-issued them, i had to get a pair of them. The second time around was a much funner build because of my increased skills. Although they aren't perfect, i really tried to figure out a way to make the brake cooling ducts more realistic (didn't know about Alex Kustov's trick) I think they turned out pretty good. I used about every trick i had and customized what i could, including alot of scratch building..Enjoy.
-
This build is a few years old and kept hidden in it's box. But i got it out and did some photo's. Figured i'd share it with you.
-
Out of The Box In Shoebox In-Work Model Storage
pandamonium2112 replied to Skip's topic in Tips, Tricks, and Tutorials
Excelent idea, i keep hanging onto the box it came in and store them in it. But this idea is better, i can cut the box art and put it in the bottom and a cloth over that..Thanks for sharing this. Off to Wally World on payday. -
Thanks for the complements everyone. That was one of the easier builds for me, i don't even think i used the instructions. I rebuilt the 1:1 from the ground up and knew every inch of it by heart. (Sigh) i miss those days..
-
The Mailman woke me up this morning "Ding Dong" and in my blurry vision i see this on my door step. I should have the other one on the 26th..
-
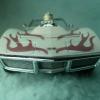
I finished this one a couple of years back but recently added some details to it, so ifigured i'd share it with you. It's a replica of the one i used to own, if not for that faitful encounter with a Ford Escort at 60 mph, i believe i would still own it. Enjoy.
-
Failed tutorial - but still kinda cool
pandamonium2112 replied to Jantrix's topic in Tips, Tricks, and Tutorials
I think it's an awsome idea and the paint is still pretty cool. After reading the tutorial though, i got a few ideas to pass on to you. 1. I think a base coat of paint before the water trick might help a little. 2. Draw a line about 5-6 inches up from the bottom of the bucket and cut with a sharp jig saw. you won't loose so much paint to the sides of the bucket before the water drains off. 3. can you coat the sides of the bucket with something so the paint won't stick but also won't absorb into the paint itself? Keep working on it though, we didn't get the light bulb on the first try! -
Awsome build. You captured the whole thing in fine detail so well. My first glance at it i could feel the cold, it's that good. Thanks for sharing
-
Like my post said, Can't rely on Santa so i ordered mine from E bay also, got the first one today, the second one should be here on the 26th
-
You really pulled it off ! Great imagination and Vision. Turned out awsome. I've now changed my X-Mas wish list, i just want an elf now.. Merry Chritmas, can't wait to see what you come up with next..