ScaleDale
-
Posts
696 -
Joined
-
Last visited
Content Type
Profiles
Forums
Events
Gallery
Everything posted by ScaleDale
-
'49 Merc Pro Mod (Update October 19)
ScaleDale replied to ScaleDale's topic in WIP: Drag Racing Models
Paint update. So this is where I am with my multi tone paint idea for this build. I made a shield of sorts out of scrap plastic and mesh. I fastened that to the styrofoam block that the test body Chevy was on and sprayed it with the first coat of color, a light yellow. The rig looked like this. After the second coal of orange, it looked like this. Then I finished it with a hotter orange. All of this was with one coat only and thicker than I will use on the Merc. No sanding either. It looks OK, but took three days and would need to be sanded and repeated several times over. I have two airbrushes and may go it freehand and do three coats at one time, sand and repeat. Then I can adjust where the color transitions are if I want to. Suggestions? Dale -
.020 fuel line and resin fittings?
ScaleDale replied to MitchP's topic in Car Aftermarket / Resin / 3D Printed
Chris: Thanks. It was right there. I kept trying to find out what "AN" stood for. At RB Motion I assumed it was "anodized". Dale -
Model Building Live Streams
ScaleDale replied to slowlylearning's topic in General Automotive Talk (Trucks and Cars)
A live stream of me sanding and fitting parts from something like my Pro Stock or Pro Mod projects would contain too much "colorful language" to be family friendly. Plus, I can get really weird when I'm frustrated and I wouldn't want anyone to see that. TL;DR: no Dale -
.020 fuel line and resin fittings?
ScaleDale replied to MitchP's topic in Car Aftermarket / Resin / 3D Printed
Fuel lines are either 3/8 or 1/2 depending, The 3/8 is for performance street/strip carbs. Here are some links to Summit Racing Equipment :http://www.summitracing.com/parts/aei-11202/recommendedparts http://www.summitracing.com/parts/aei-17202/overview/ I keep finding -6 AN as a measurement but can't find a definition for it. Dale -
'49 Merc Pro Mod (Update October 19)
ScaleDale replied to ScaleDale's topic in WIP: Drag Racing Models
I'll look that up. I think it was a box frame with tube reinforcements up front. easier to build than a modern tube frame. By the way, my mistake on Canada. It's Quebec that is French Canadian. But I did go to a race in Ontario and the announcer did speak French in the '60s. Dale -
Here's Larry Morgan's car from the Northwest Nationals here in Kent, Washington. The side of the rear window is parallel to the top plane of the side accent window. Since the car is narrower at the roof line the window flares out. Your photo is the Cunningham MasterCam car. I have other shots of it under cover like yours but not that exact one. They were done with a wide angle lens which exaggerates parallel edges. My collection of shots of that car include interior and dash photos. Want them? EDIT: Changes in Pro Stock The top photo is Larry Morgan's 2013 car (ignore the paint, these cars are cameleons) and the lower one is his 2010 car. Dale
-
.020 fuel line and resin fittings?
ScaleDale replied to MitchP's topic in Car Aftermarket / Resin / 3D Printed
^^^ I ordered some nuts and bolts today and they shipped in an hour. That's service! Dale -
'49 Merc Pro Mod (Update October 19)
ScaleDale replied to ScaleDale's topic in WIP: Drag Racing Models
Merci, John. Good to see our friends from French speaking Canada joining in. I live in Washington State and we have a lot of active drag racers from British Colombia who come down for the bigger races here. I remember going to a race in Ontario when I was in High School and the announcer spoke only French. I have a non professional background in photography and graphic design and I use both of them in these kinds of projects. For the chassis, I took pictures of the body of my Merc and removed the background in PhotoShop. Then I added a copy of a Chris Alston ChassisWorks Pro Mod Avenger 1:1 chassis that I had scaled to match the wheelbase of the Merc and blended the two together. Then I took that package and imported it into a drawing program called Illustrator and traced over the Alston chassis to create one that was matched to the Merc body contours and removed the Alston version. I used different colors for the sections so that I didn't get confused by all the parts of the chassis. Here's the Alston chassis followed by my version for this model. James: Thanks. Iron Horse is in my reference file for this along with a casino PM that's my avatar. I'm from Toledo, originally. Ever get out to the drags at Norwalk? I got a ticket for "excessive noise" out that way once. Never drive a Mustang in a small town. Dale -
.020 fuel line and resin fittings?
ScaleDale replied to MitchP's topic in Car Aftermarket / Resin / 3D Printed
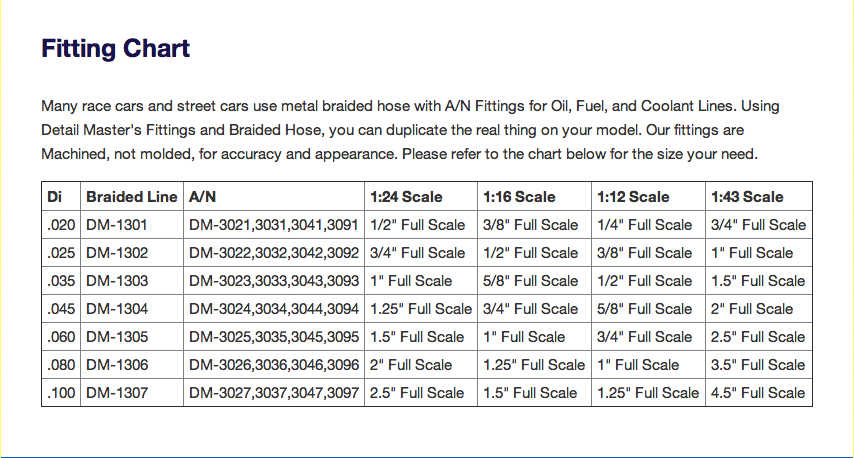
Your screenshot missed the top line where the scale references are. Here. The first column is for 1:24 scale. Your line is 1/2 inch in full scale. I'll see what real fuel line is and check back. EDIT: I checked your Ebay link out and can't figure it out either. No mention as to what large is... Hate that... EDIT: These are more expensive, but better quality. I use their rod ends and miniature hardware for the suspensions in some of my builds. RB Motion: http://www.rbmotion.com/index.php?route=product/product&path=68_111&product_id=254 Note: 8 pieces = 4 finished connectors. Dale
-
'49 Merc Pro Mod (Update October 19)
ScaleDale replied to ScaleDale's topic in WIP: Drag Racing Models
Niko, Carl, Brett and Sonny: Thanks for the compliments. Having a good pattern and solvent proof work surface made assembling this chassis a lot easier than I thought. Once I had a section matched to the pattern I could cut several pieces of rod the same length on a razor blade guillotine cutter called a Chopper. The cement I used was Plastic Weld from Plastruct. It's really aggressive and melts the rod so that it really does weld the sections together. It dries super fast, too. So quickly that it's not really usable for other model building. If you apply it to two surfaces and hold them together, it's dry before contact. I dip the end of a rod in it to tack it in place and then add a drop to seal the bond. This is where the glass came in so handy. When I did this on the Mustang, the paper of the pattern became sealed to the rod. No so with the glass. Thanks again! Dale -
'49 Merc Pro Mod (Update October 19)
ScaleDale replied to ScaleDale's topic in WIP: Drag Racing Models
Hi, again. Like I said earlier, I'm way behind on posting this and have the chassis finished, so here it is. With the extra width of the Merc body, I was able to add a second frame rail and keep the engine bay nice and wide. The pin isn't torture or styrene acupuncture, it marks a shock mount point... One of my lessons from the Pro Stock build was to completely finish the chassis before painting it. I neglected to add suspension mounts to that one and kept having to scrape paint and brush things up. This time I kept at the details. The vertical struts mount a 4 link suspension. And this is the front suspension mount. I scratch built the lower control arms and used sheet styrene for the upper mount points. Much cleaner than before. I like to have the main components constructed before taking on the chassis just to be able to fit things just right. Having the body done allowed me to fit the frame space wise and the engine and suspension were invaluable in finishing the chassis with no real surprises. The motor is a Blown Alcohol Pro Mod Mish Mash. A Chrysler block with a blower from another kit topped with a hat from Competition Resins and backed up to a Lenco transmission hacked off the Chevy engine in the 55 Pro Sportsman kit. Add Ford valve covers and what do you get? A blown alky Pro Mod Ford BOSS 500! The rear axel, front strut and Pro Mod 4 link are from Scott at Future Attraction. I scratched the coil over. I'll post the body tomorrow. Thanks for your time. Dale -
Say hello to my home town for me. I was born and raised in Toledo. I can't believe how much model building seems to be going on in Ohio these days. Great to see! Dale
-
How Do I Do a Three Color Fade?
ScaleDale replied to ScaleDale's topic in Model Building Questions and Answers
Thanks for the tips and pics. You guys are ace painters! Dale -
'49 Merc Pro Mod (Update October 19)
ScaleDale replied to ScaleDale's topic in WIP: Drag Racing Models
Here's an update on my build. This is the setup I came up with for the chassis construction. The chassis is a modification of the one I used for the Pro Stock Mustang resized for the '49 Merc body. This time I put the pattern under glass to keep the cement that I used rather liberally from sealing the paper to the plastic of the frame rods. That was a problem before and it helped a lot. The pattern is cut into sections as I build the frame one part at a time. The red is the main floor seen from the top, the blue and orange are the roll cage and tail piece and the black is the main side view. This helps keep me organized. To make the bends of the roll cage, I made a form from wood using a small saw and power sander. I taped two pieces of styrene rod together and taped them to the form and used a heat gun to form the curves. I only messed this up once, so I consider it a big success. Having two pieces taped together allows me to create both sides as nearly identically as hot plastic will allow. The resultant base cage with the floor from a Jukebox Ford installed. I'll post more tomorrow, as the body and frame are finished now. Dale -
How Do I Do a Three Color Fade?
ScaleDale replied to ScaleDale's topic in Model Building Questions and Answers
Thanks, all. I checked my paint stash and the yellow and orange I have are Tamiya TS and the red is a Testors One Coat Lacquer. I think the Tamiya is a cut (synthetic) lacquer like Youst uses. Will these fight with each other? Dale -
How Do I Do a Three Color Fade?
ScaleDale replied to ScaleDale's topic in Model Building Questions and Answers
Mike: Looks nice! did you do that free hand or with a mask of some kind? That's kinda what my two tone looked like. I used cardboard strips to shield the sides while I sprayed the top part. Dale -
Resin question on Mopar hood scoops
ScaleDale replied to Green Duster's topic in Car Aftermarket / Resin / 3D Printed
Competition Resins, too. Go over to the Resin and Aftermarket forum and check out the directory. Dale -
Pretty much. Anytime I write anything anywhere I assume I'm speaking to an audience and want to present myself in a certain way. I may deviate from that to a degree if I want to remain in character talking to a bunch of racers or such, but I proofread and correct all my posts. Follow me around and see how often you see that "edit" thing at the bottom of my posts. I can't see just typing away and hitting send. Dale
-
Castrol and ford dumping Force
ScaleDale replied to Dragfreak's topic in General Automotive Talk (Trucks and Cars)
I don't think it's possible for anyone to compete in any of the nitro categories without a hemi of some sort. Unless Chevy follows Ford and develops a hemi for drag racing then you won't see them in the winners circle. A Chevy big block can run with anything on gas or alky, but it just can't take the abuse of nitro. That is the opinion of a professional observer. Dale -
Team Aruba has (or had) an Extreme Pro Stock Mustang. Here's a link to a bunch of reference pics. http://www.bing.com/images/search?q=team+sruba+racing&FORM=HDRSC2 Dale
-
How Do I Do a Three Color Fade?
ScaleDale replied to ScaleDale's topic in Model Building Questions and Answers
I have the 55 Chevy Pro Sportsman that I use as a test subject. I'll torture that again. Yes, I have an airbrush for this and shoot decanted paint. The colors I have are all Tamiya TS. I did a top to bottom fade in two colors on a car using a mask. I put the car body on a piece of styrofoam and mounted the mask to it like curtains. That let me handle the model and mask as one unit while I painted it. I'll give it a shot with free handing and see how it goes. On the Chevy, of coarse... Dale -
"It doesnt doesn't matter what generation your you're from(.) every Every generation has slang words. Doesnt It doesn't matter if you grew up in the 50s or the 90s(,) every generation has their language. But if u you want to start on my generation the then why was were the sixtys full of idiots and Drugheads. drug heads?" I went to school in the '50s and '60s, taught Elementary school for most of my working life earned several degrees and smoked pot. All that and not only can I type a paragraph, but I can edit yours as well. Dale
-
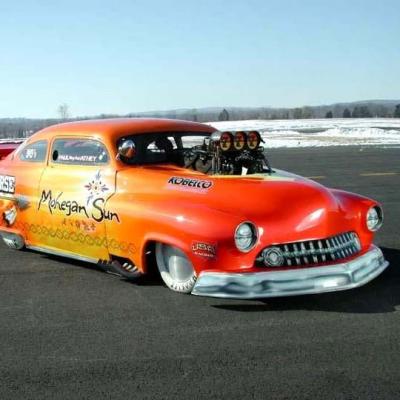
Like it says... I'm working on a Pro Mod 49 Merc and want to have it in a three color faded paint style. I'd like the nose in hot yellow fading to deep orange for the front door section and deep red at the back. Kind of like it's a missile on fire or a meteor entering the atmosphere. My thought is to build a shield of cardboard, maybe with an edge of screen, to slide over the car as I paint in stages. Do the whole car in the yellow, cover the front and spray the orange, move it and finish with the red. Any Ideas? Maybe like this? Dale
-
All paint likes a primer coat. It helps it to stick to the surface better. I've had brush paint on bare plastic just flake off. Now I primer everything, including parts I brush paint. Dale
-
'49 Merc Pro Mod (Update October 19)
ScaleDale replied to ScaleDale's topic in WIP: Drag Racing Models
Thanks. This is kinda my version of Scotts What Have I Gotten Myself Into thread... I started this as a sideline while I tied up the odds and ends on the P/S Mustang, and I'm way behind on my posting. The body work is way challenging trying to get it all smoothed out. Shouda just hacked out the middle. Live and learn. Dale