vincen47
-
Posts
1,656 -
Joined
-
Last visited
Content Type
Profiles
Forums
Events
Gallery
Everything posted by vincen47
-

Western Star 4900 FA plow truck
vincen47 replied to BK9300's topic in WIP: Model Trucks: Big Rigs and Heavy Equipment
Absolutely fantastic progress, even if it takes more time than expected. The results are obviously worth it. And I agree, sometimes you don’t notice issues until you post the photos here on the forum, and look at them later. That’s often been the case for me. Another reason why the forum is helpful. -
Kenworth Challenge Mixer
vincen47 replied to Rbray47's topic in Model Trucks: Big Rigs and Heavy Equipment
She’s a beauty! -
Lonestar - Hot Rod custom
vincen47 replied to LOBBS's topic in WIP: Model Trucks: Big Rigs and Heavy Equipment
I understand that exact feeling. -
Lonestar - Hot Rod custom
vincen47 replied to LOBBS's topic in WIP: Model Trucks: Big Rigs and Heavy Equipment
Block looks good, but the pics I’ve seen for lonestars have the oil pan flipped around with a rear sump for front axle clearance, being an axle-forward truck. ST’s instructions, along with a lot of other pictures online, probably show the engine oil pan set up for a set back axle truck, which is the case with the majority of trucks on the road today, but not the Lonestars and other long-nose trucks. I wish I would have thought about it ahead of time, but only remembered when you mentioned the clearance and using the kit oil pan. It’ll probably still fit, though. The kit instructions has the Maxxforce set up that way, which is incorrect, but it fits. -
Soprano Carting Service Leach Packer
vincen47 replied to Scott Eriksen's topic in Model Trucks: Big Rigs and Heavy Equipment
Excellent, I really like this build! I may have to take a look through that mag (for the articles). -
Kenworth Hustler garbage truck
vincen47 replied to Rbray47's topic in WIP: Model Trucks: Big Rigs and Heavy Equipment
Excellent start on a unique scratch building project. -
Kenworth W-925 (mild custom)
vincen47 replied to Gary Chastain's topic in WIP: Model Trucks: Big Rigs and Heavy Equipment
Looks great, love the fenders. What chrome will you use? -
Kenworth W-925 (mild custom)
vincen47 replied to Gary Chastain's topic in WIP: Model Trucks: Big Rigs and Heavy Equipment
I was thinking the same thing…”Man, his workbench is so clean”. Mine looks like arts and crafts time at a day care center. -
Kenworth W-925 (mild custom)
vincen47 replied to Gary Chastain's topic in WIP: Model Trucks: Big Rigs and Heavy Equipment
I’m way down state in Monroe. Nearly Ohio, but I have family in northern Michigan, and I head up there to camp and visit as much as I can. I’m going to the St. Ignace truck show next weekend, highly recommended, if you can make it. -
Kenworth W-925 (mild custom)
vincen47 replied to Gary Chastain's topic in WIP: Model Trucks: Big Rigs and Heavy Equipment
Oh that’s too bad that Trains and Things is closing. I don’t go to TC very often, but I’d always stop by there when I did. I’m fortunate to have a few good hobby shops within a reasonable drive, living down state. Great progress on the project. Looking good. -
Western Star 4900 FA plow truck
vincen47 replied to BK9300's topic in WIP: Model Trucks: Big Rigs and Heavy Equipment
It continues to impress and inspire! -
Farm Floater Truck 1/24th scale
vincen47 replied to Randy D's topic in WIP: Model Trucks: Big Rigs and Heavy Equipment
Your metal fabrication skills are mind blowing. -
Lonestar - Hot Rod custom
vincen47 replied to LOBBS's topic in WIP: Model Trucks: Big Rigs and Heavy Equipment
I took a look in both the Prostar and Lonestar kits just now, and both kits have the dash with the push button shifter, and both kits have the Eaton Ultrashift/Autoshift transmission shift pack motors (part #149). But, the Prostar also has a floor shifter as if it were a manual transmission. It could be omitted of course, to correct the issue. If someone wanted a manual transmission in either kit, simply omit the shift pack on top of the tranny, and add a traditional floor shifter in the cab. To go the extra mile, put another cup holder where the push button shifter is on the dash. -
Lonestar - Hot Rod custom
vincen47 replied to LOBBS's topic in WIP: Model Trucks: Big Rigs and Heavy Equipment
Oh and yes, the transmission from the kit will work well. It’s an Eaton 13/18 speed transmission. The 13 and 18 speeds are virtually identical, externally. One of them, I don’t remember if it was the Prostar or Lonestar, has a electronic push button dash shifter for the ultrashift transmission (an automated manual) and the other has a traditional floor shifter for a manual tranny. They’re interchangeable, and it’s possible that both kits include both options. I’d have to look at the kits this evening to be sure. The only difference on the transmission itself, is the presence, or lack of, the autoshift motors on the top of the transmission, and what type of shifter lever you choose to put in the cab. The Autoshift motors (shift pack part #149) are a separate part in the kit. Here’s the real part below: Of course, when it’s assembled, you can’t see it. But, if you’re like me, you know if it’s there or not.
-
Lonestar - Hot Rod custom
vincen47 replied to LOBBS's topic in WIP: Model Trucks: Big Rigs and Heavy Equipment
Looks like a well detailed casting. With the timing cover and front emblem, it’s a cm 2350, the last version of the ISX15, before they changed it to the X15. It makes it about 2014-2018 model year. There was some overlap of a couple years between the introduction of the X15 and the discontinuation of the ISX15, when you could order either engine. They were nearly identical, just updated electronics, emissions, etc and a new emblem. So, it’s the same engine A&N offers. For reference photos, look for and google a 2015 or 2016 Cummins ISX 15 engine. There should be plenty of material, even ones in Lonestars. -
Peterbilt 379 RV
vincen47 replied to vincen47's topic in WIP: Model Trucks: Big Rigs and Heavy Equipment
Thanks, I appreciate it. My plan is to seal the gaps around the doors with tape on the inside. Though the gaps are very narrow, I know that paint has a way of getting into everything. I’ll seal the front seam in the roof from the inside as well, where it meets the front cap. The rest of the roof friction fits tightly downward onto and over the walls, so I hope all goes well with that. -
Peterbilt 379 RV
vincen47 replied to vincen47's topic in WIP: Model Trucks: Big Rigs and Heavy Equipment
I appreciate it! -
Cross Country Hauler 359
vincen47 replied to Rbray47's topic in Model Trucks: Big Rigs and Heavy Equipment
Nice choice in paint, really beautiful. -
A truly fine build. Excellent detail and finish. Glad to see it under glass.
-
Peterbilt 379 RV
vincen47 replied to vincen47's topic in WIP: Model Trucks: Big Rigs and Heavy Equipment
Thank you! I appreciate it. -
Peterbilt 379 RV
vincen47 replied to vincen47's topic in WIP: Model Trucks: Big Rigs and Heavy Equipment
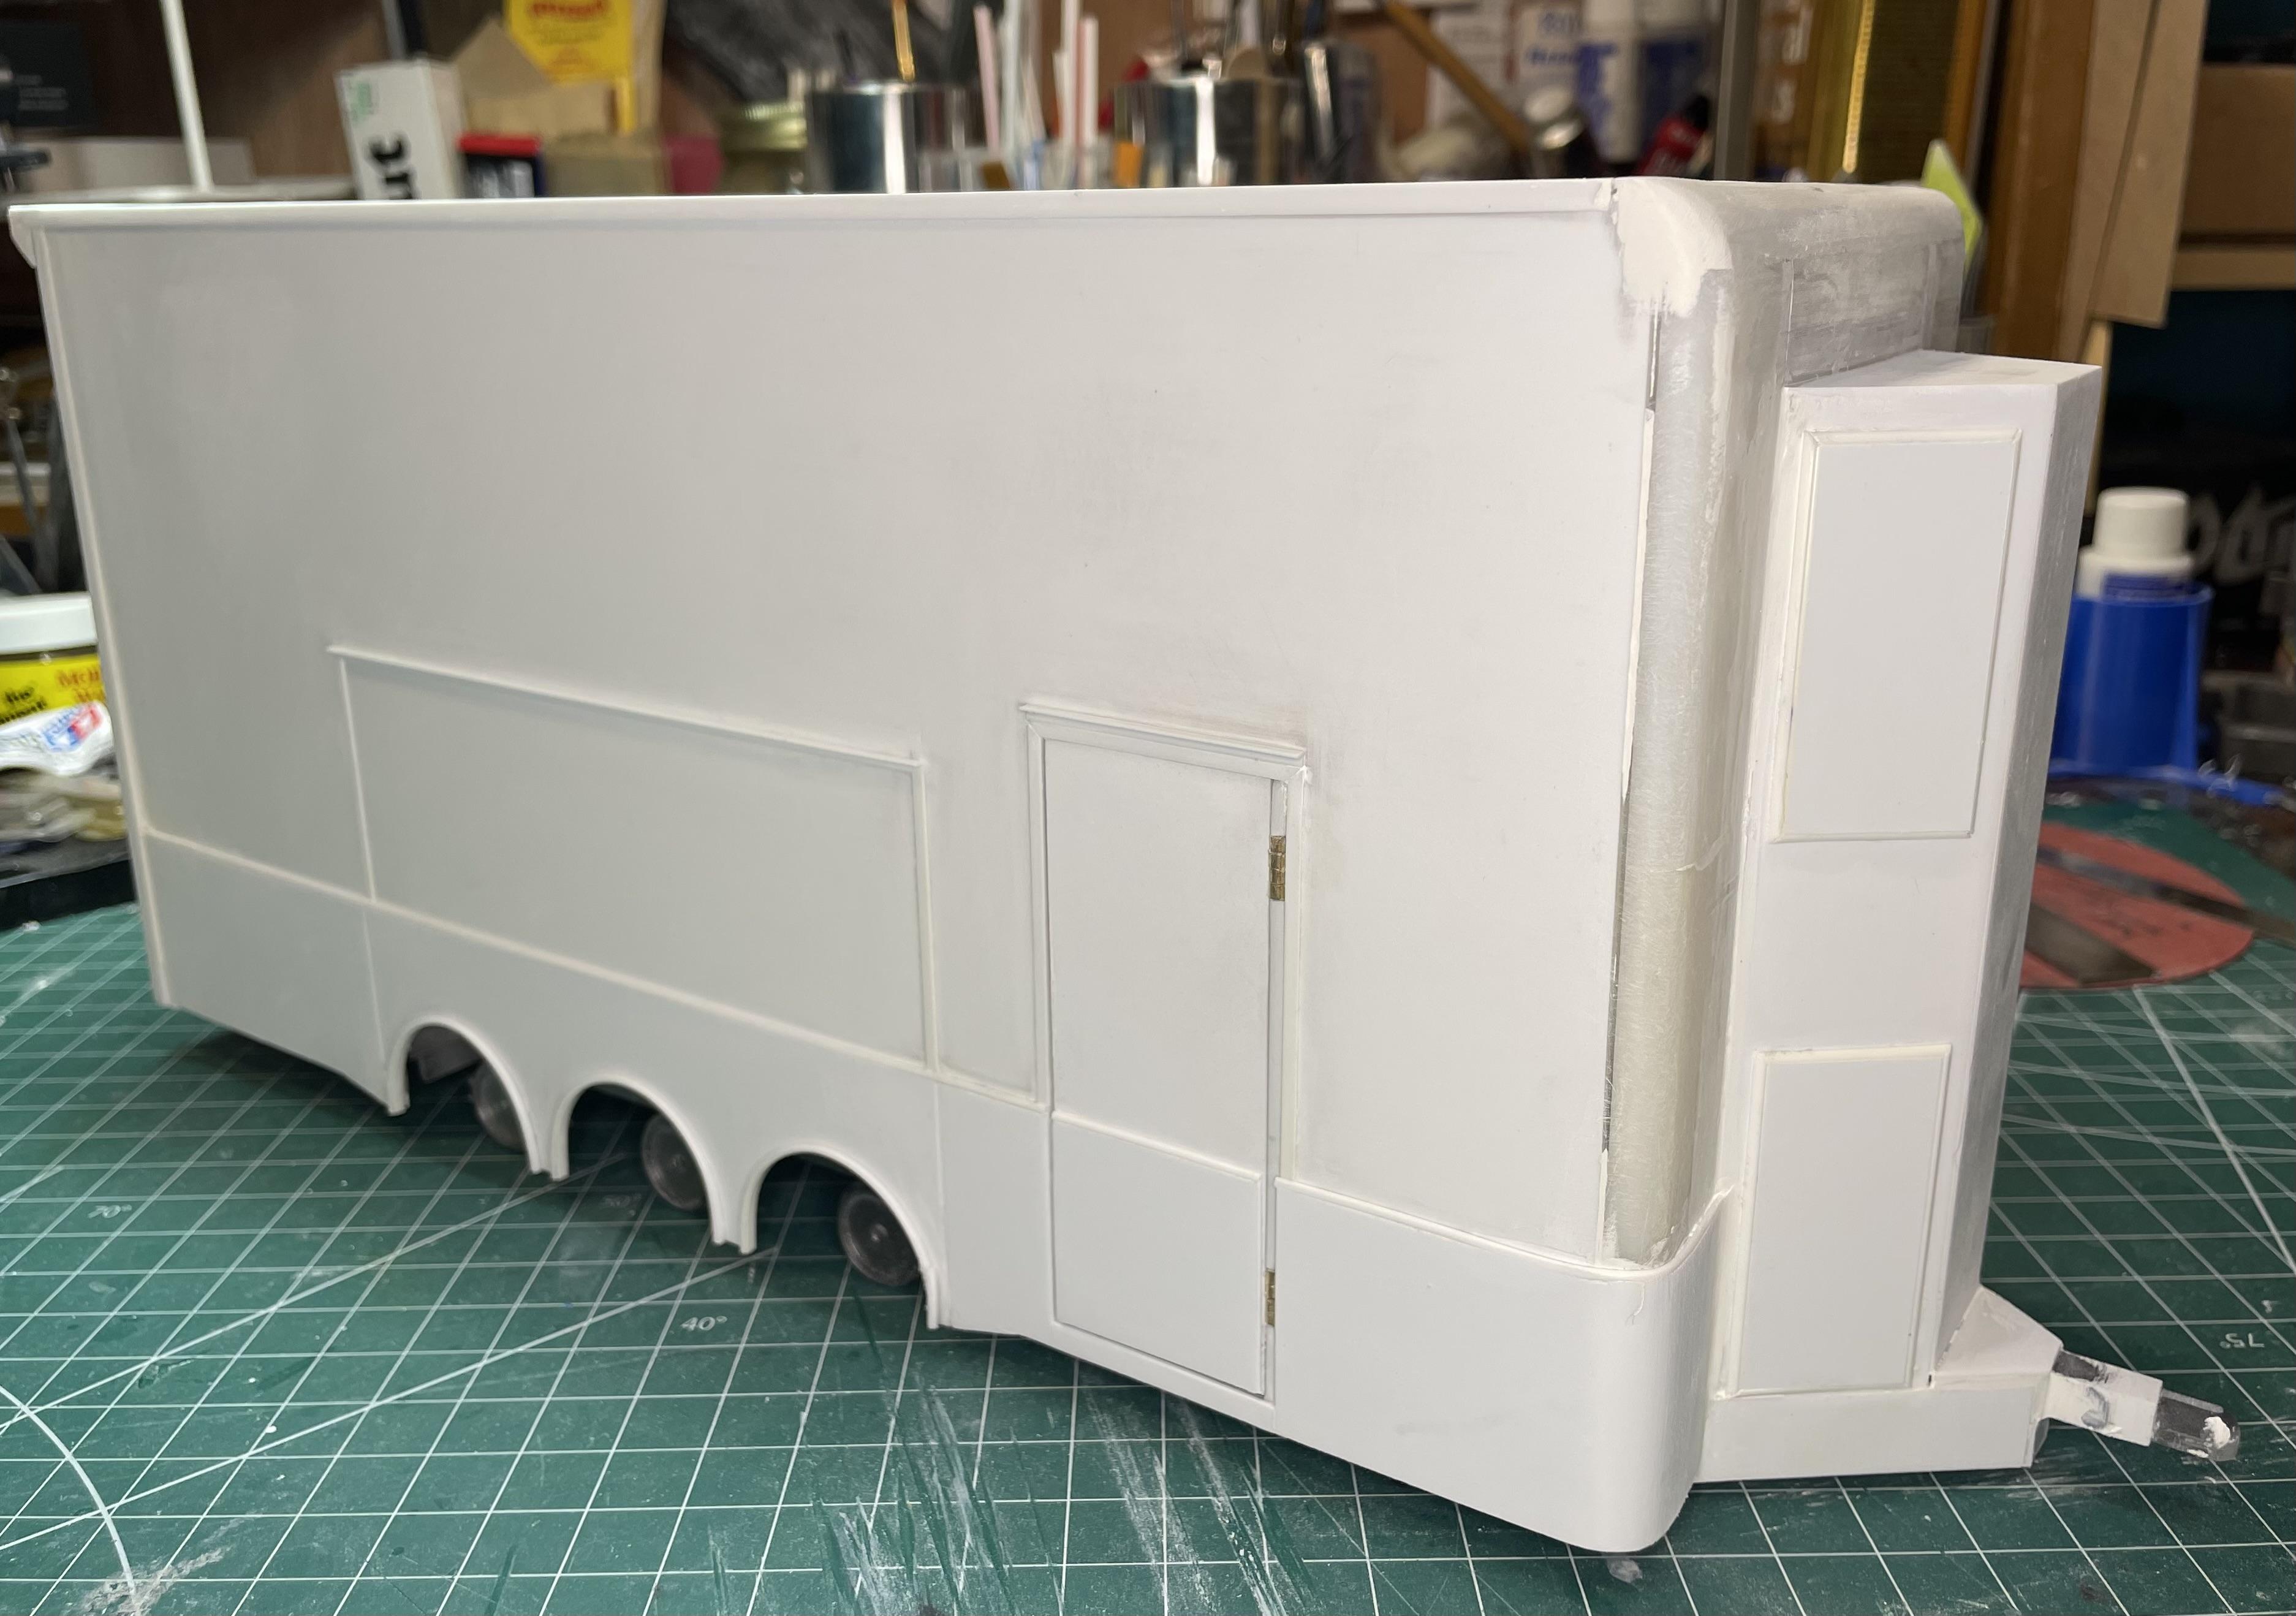
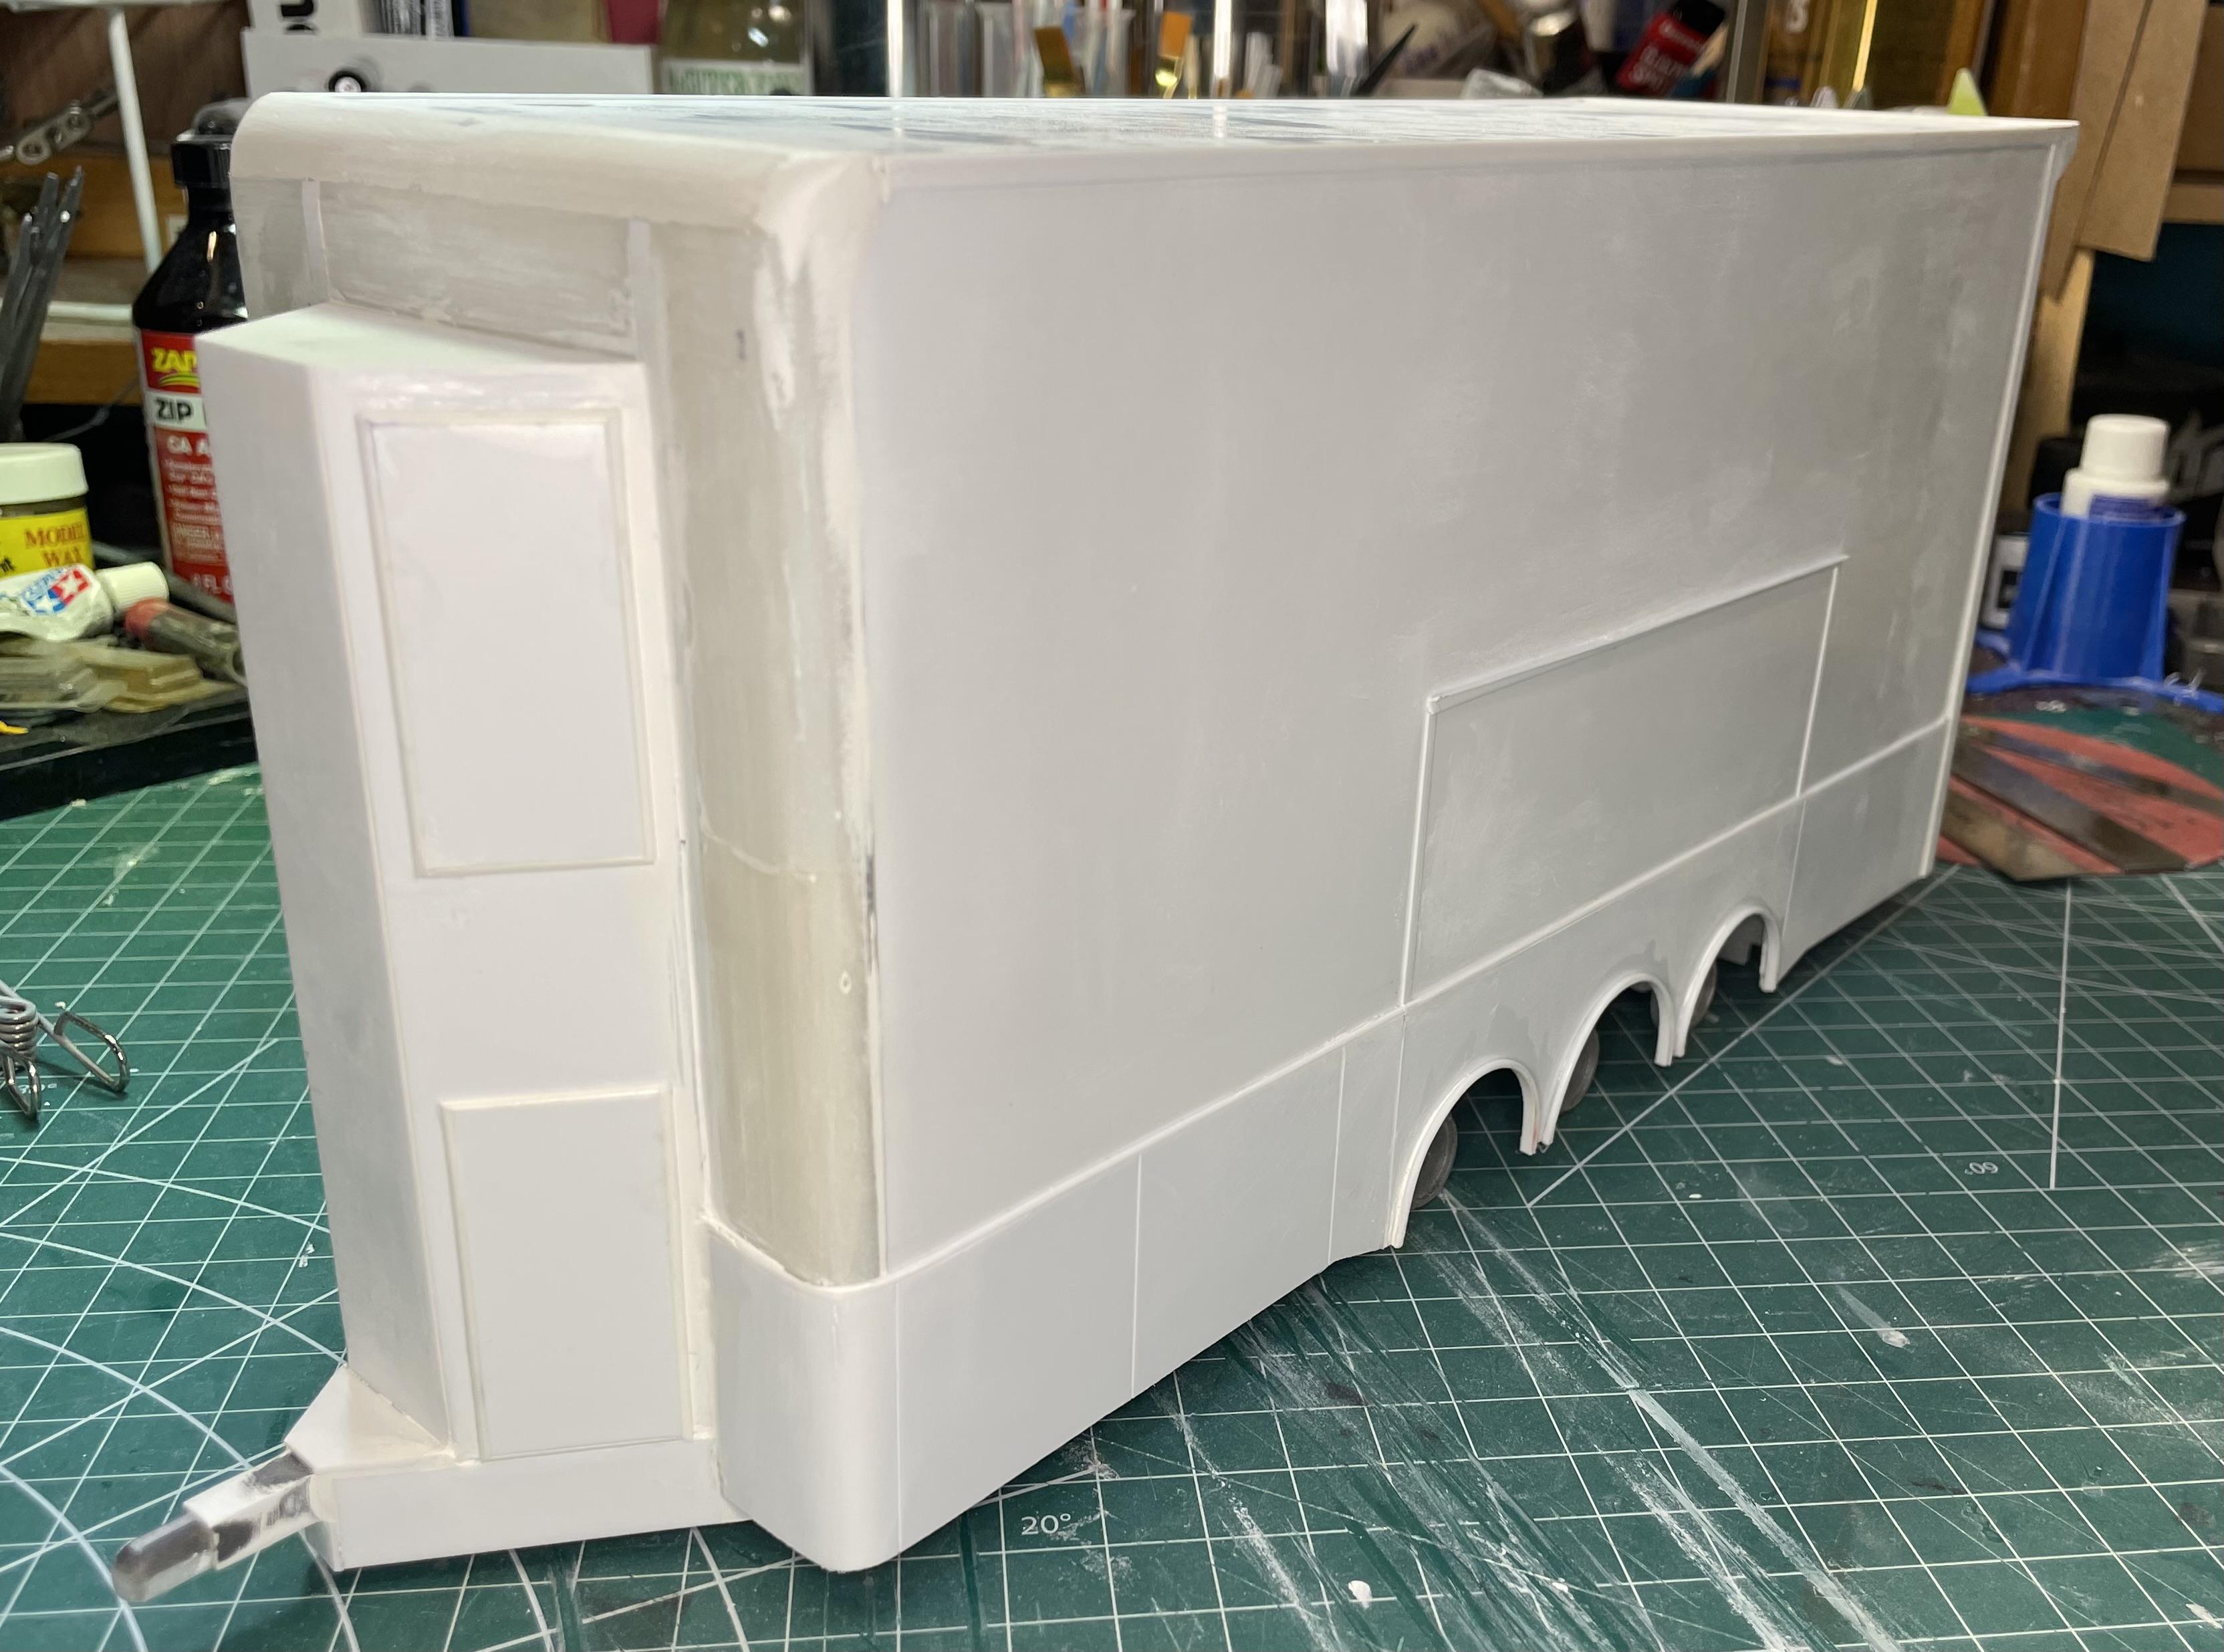
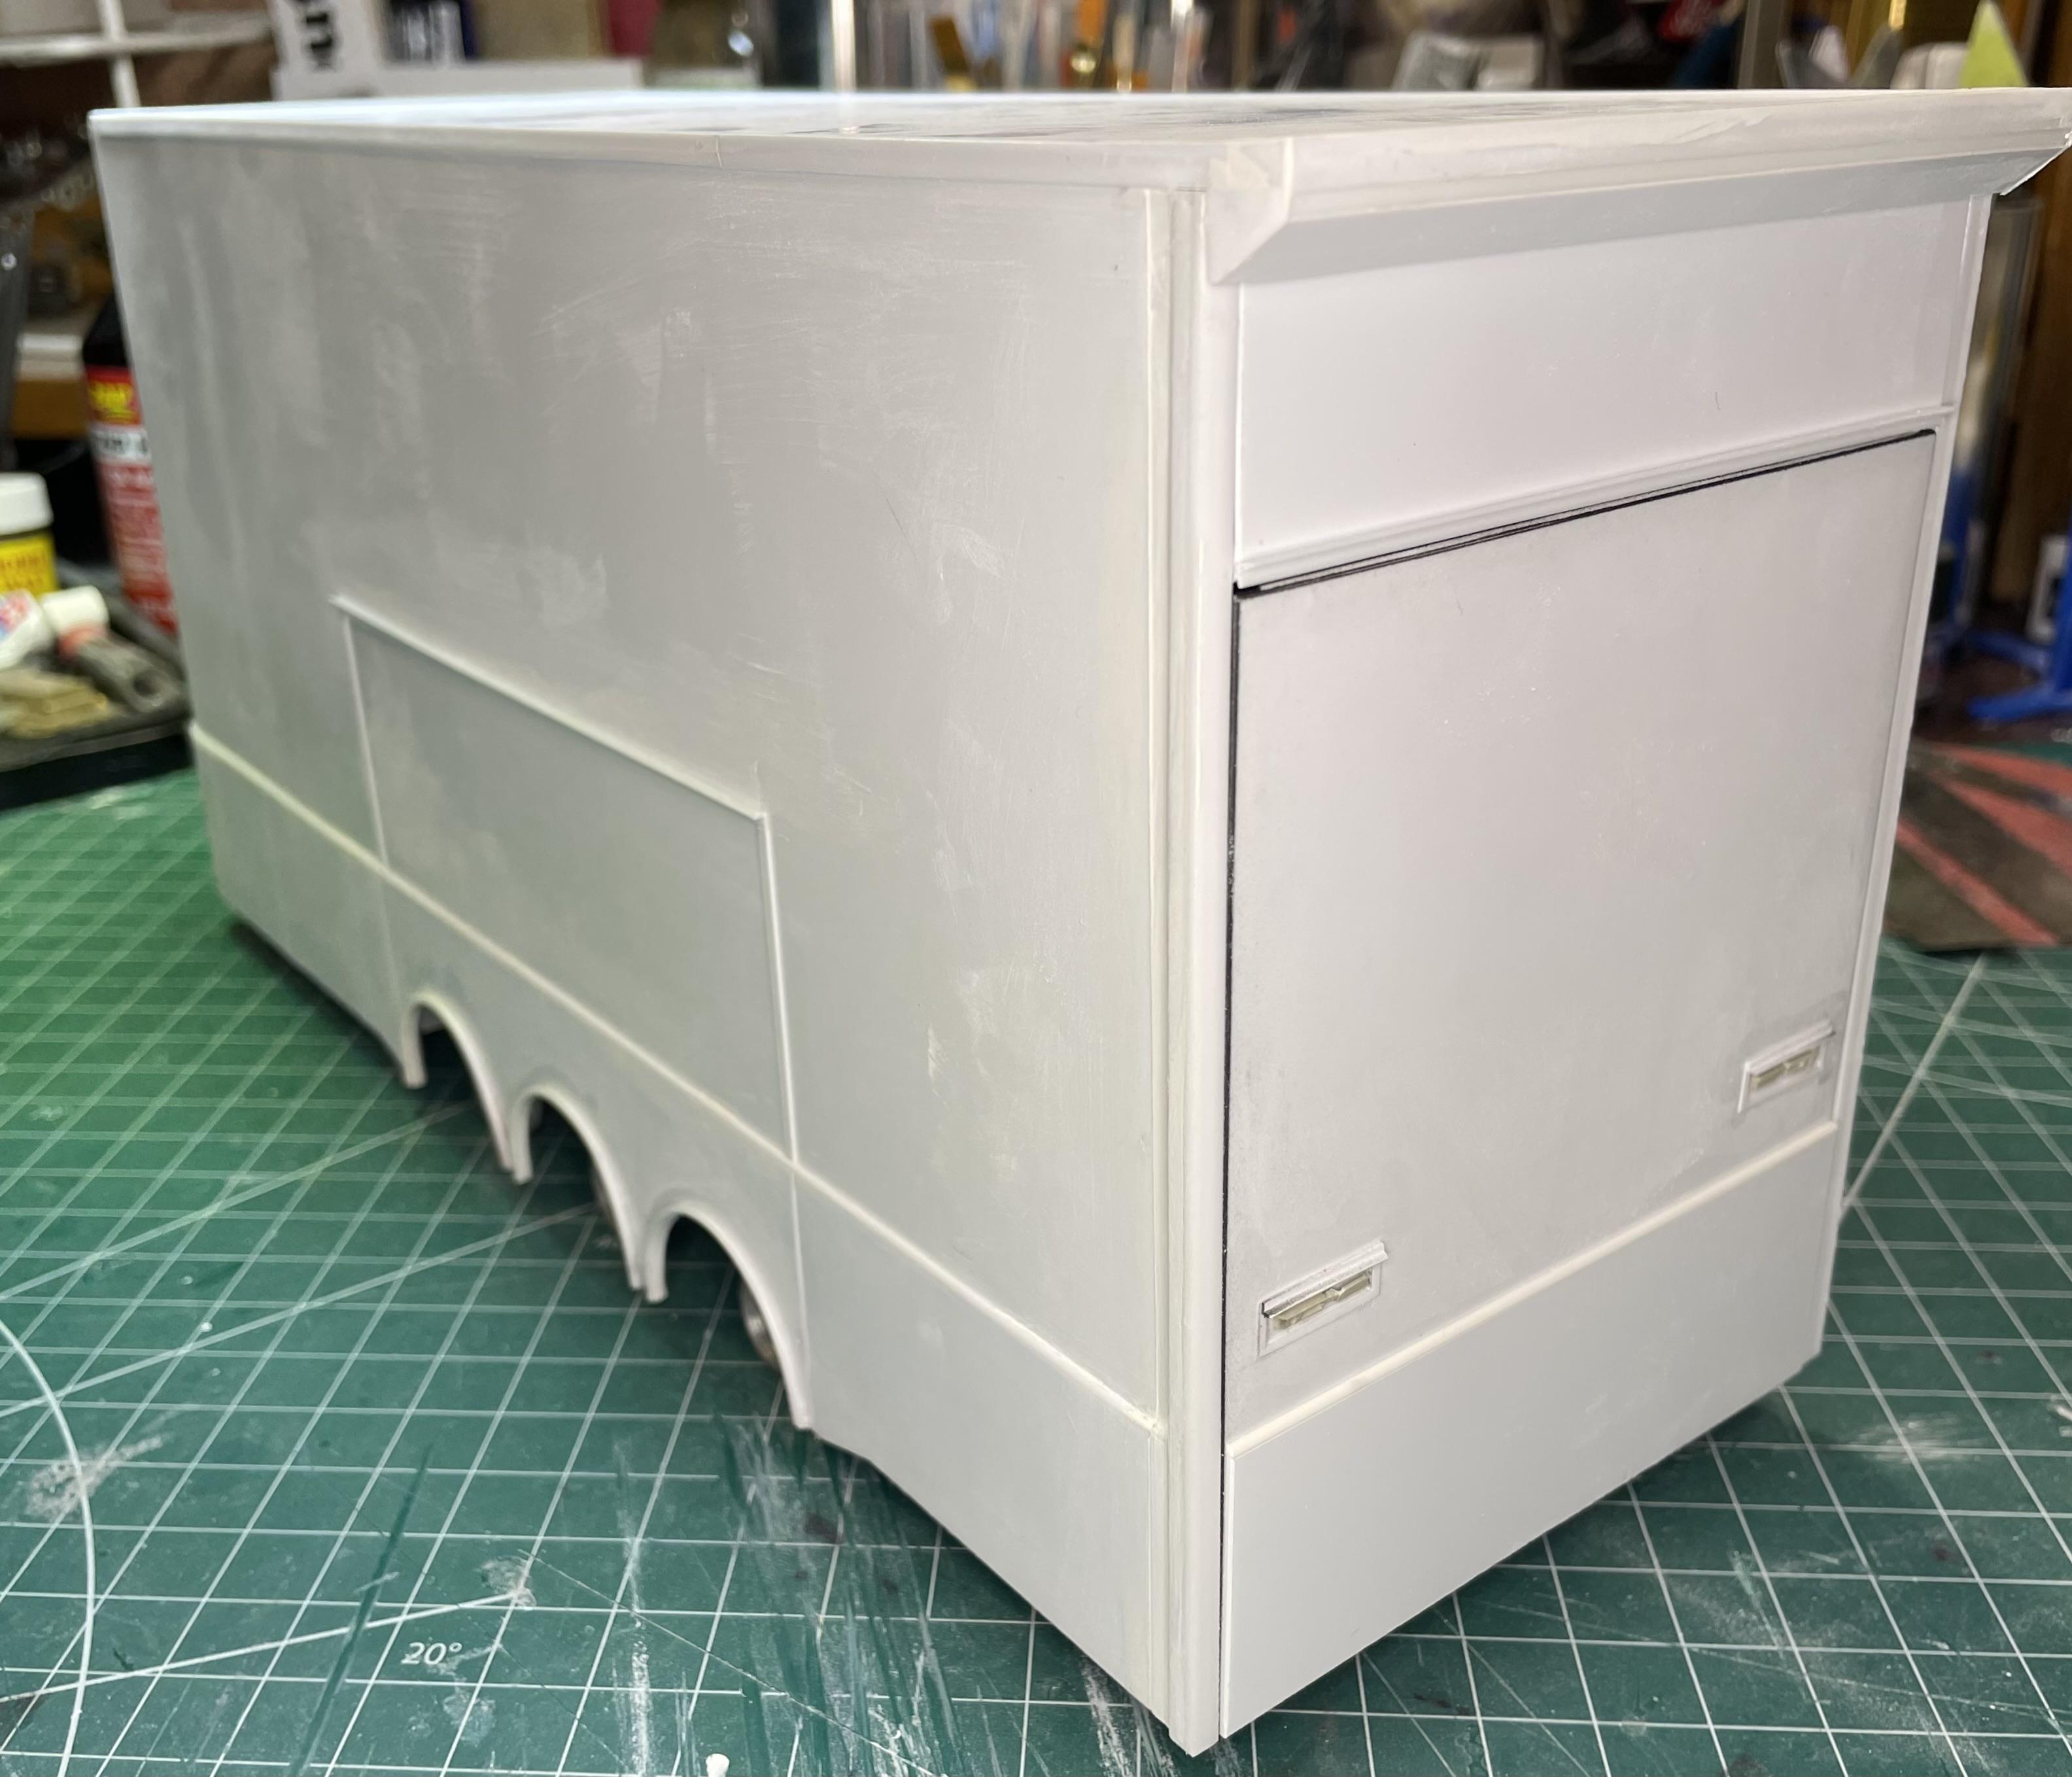
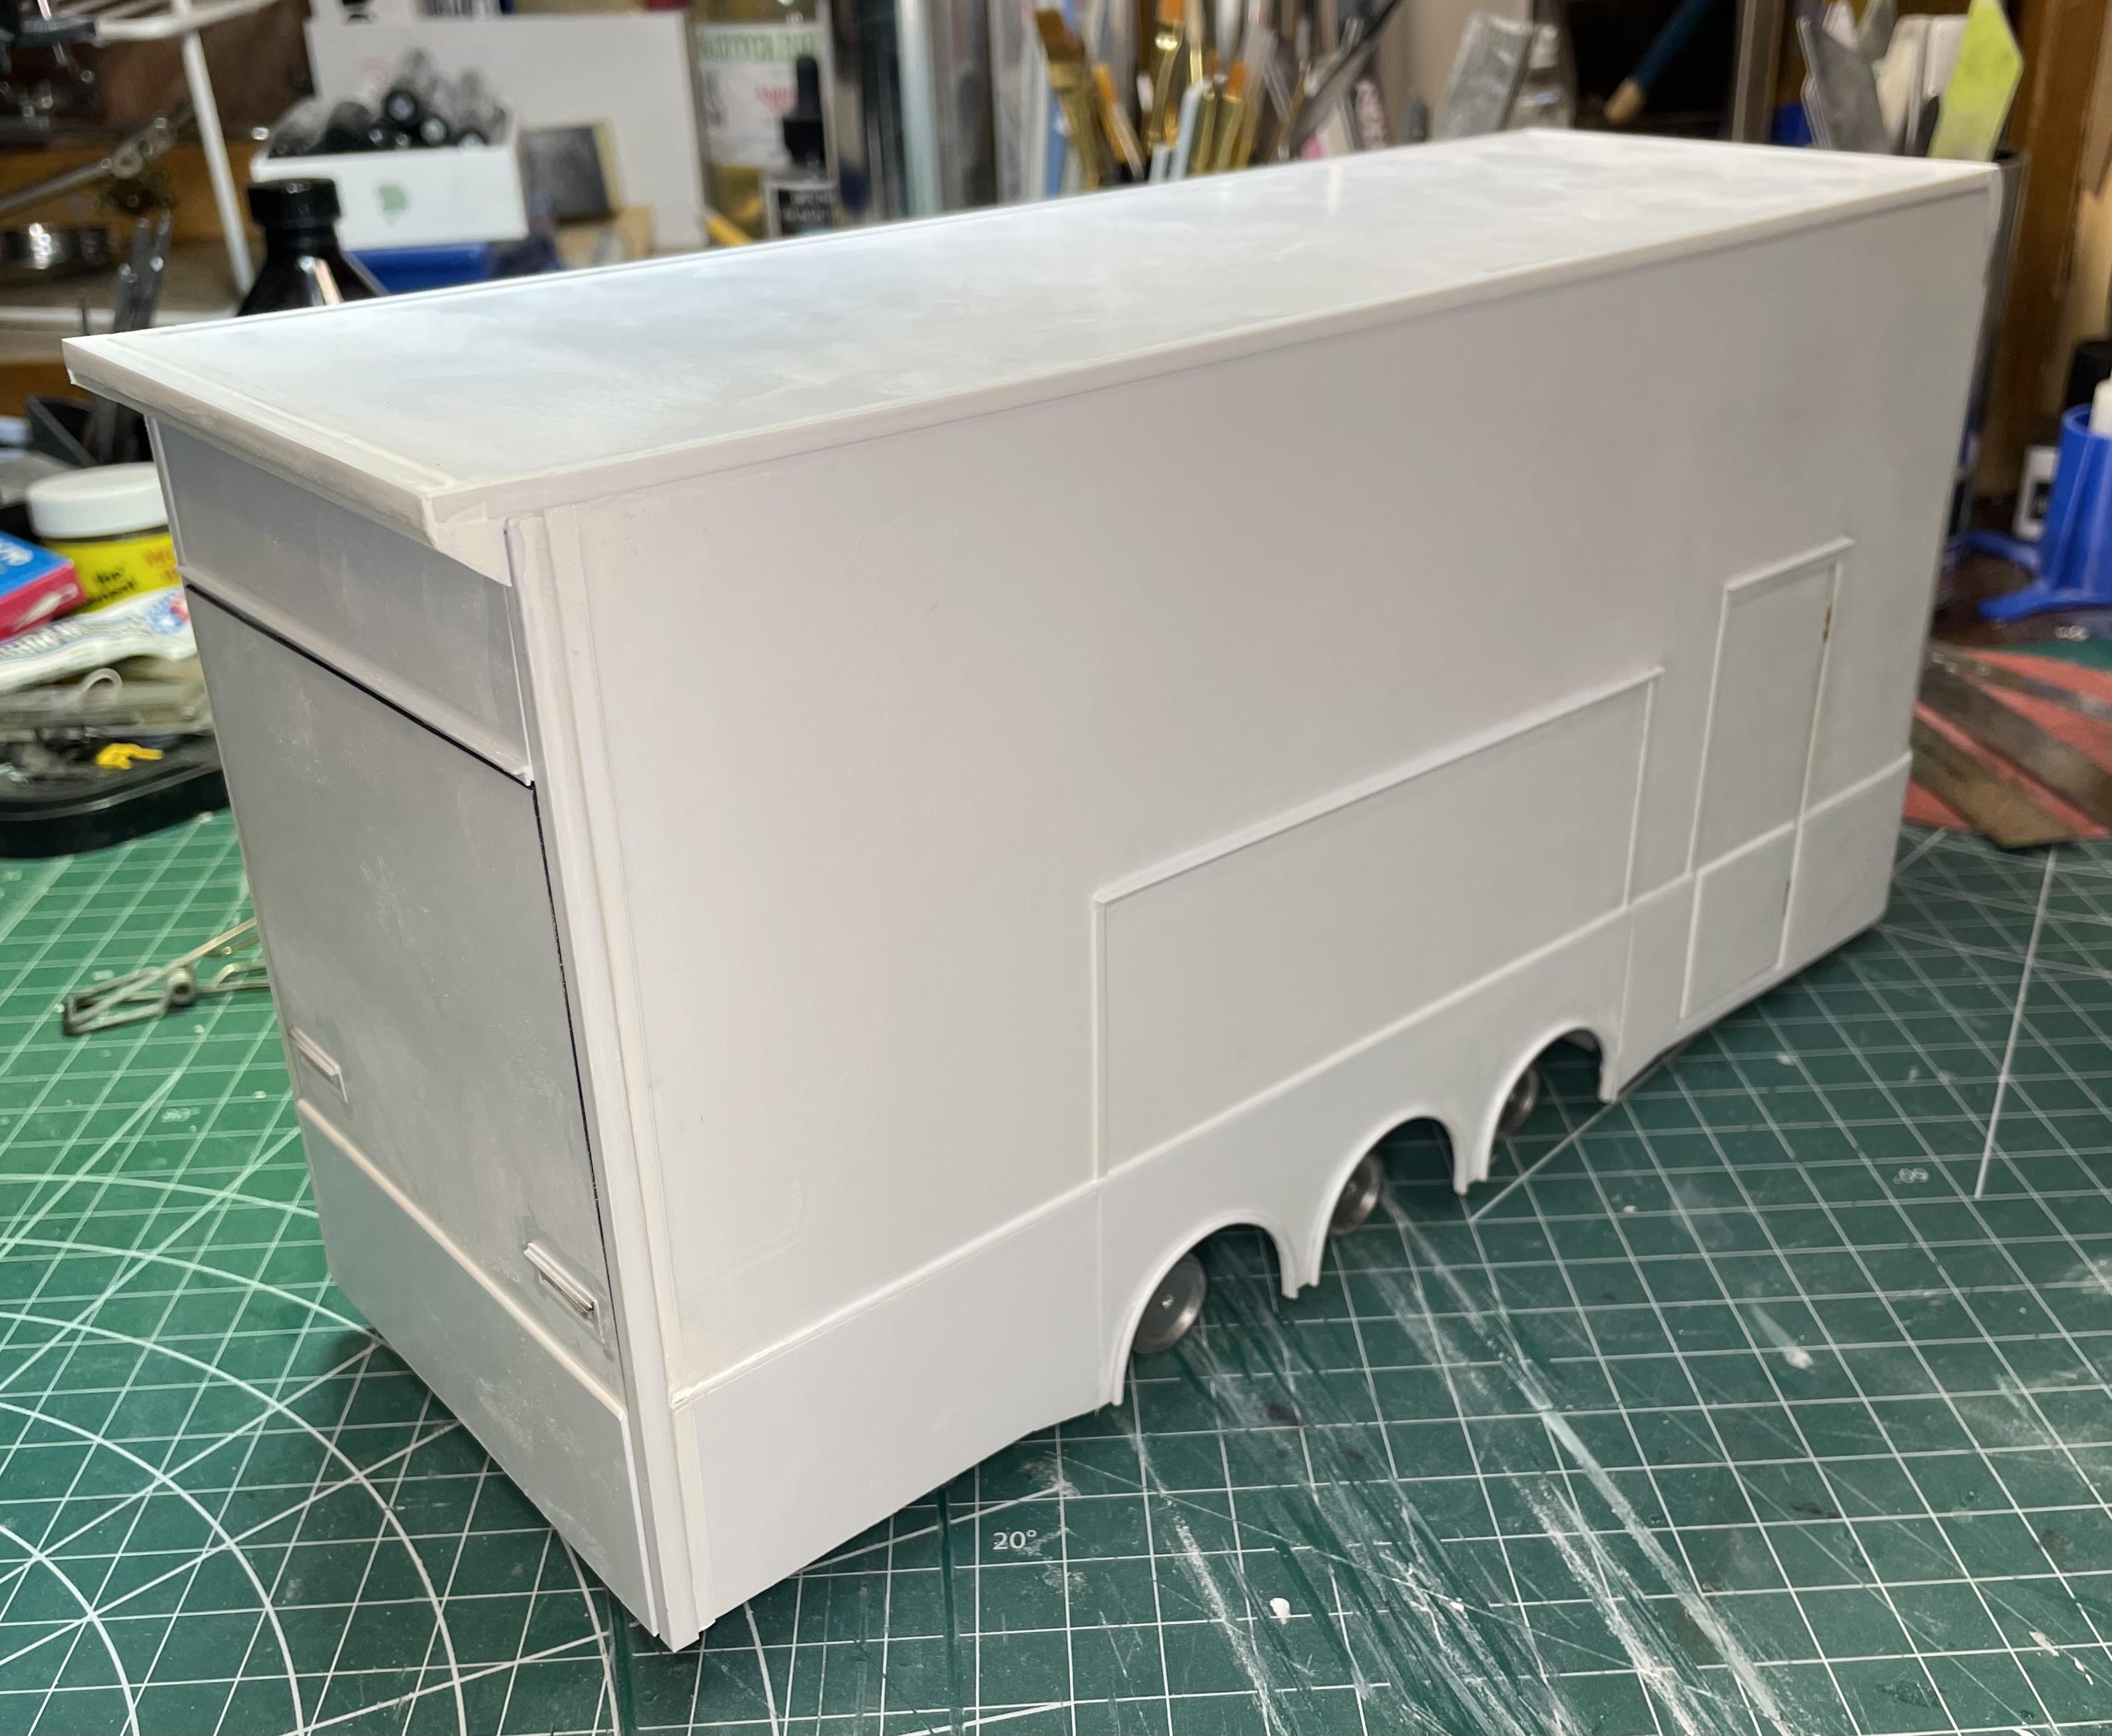
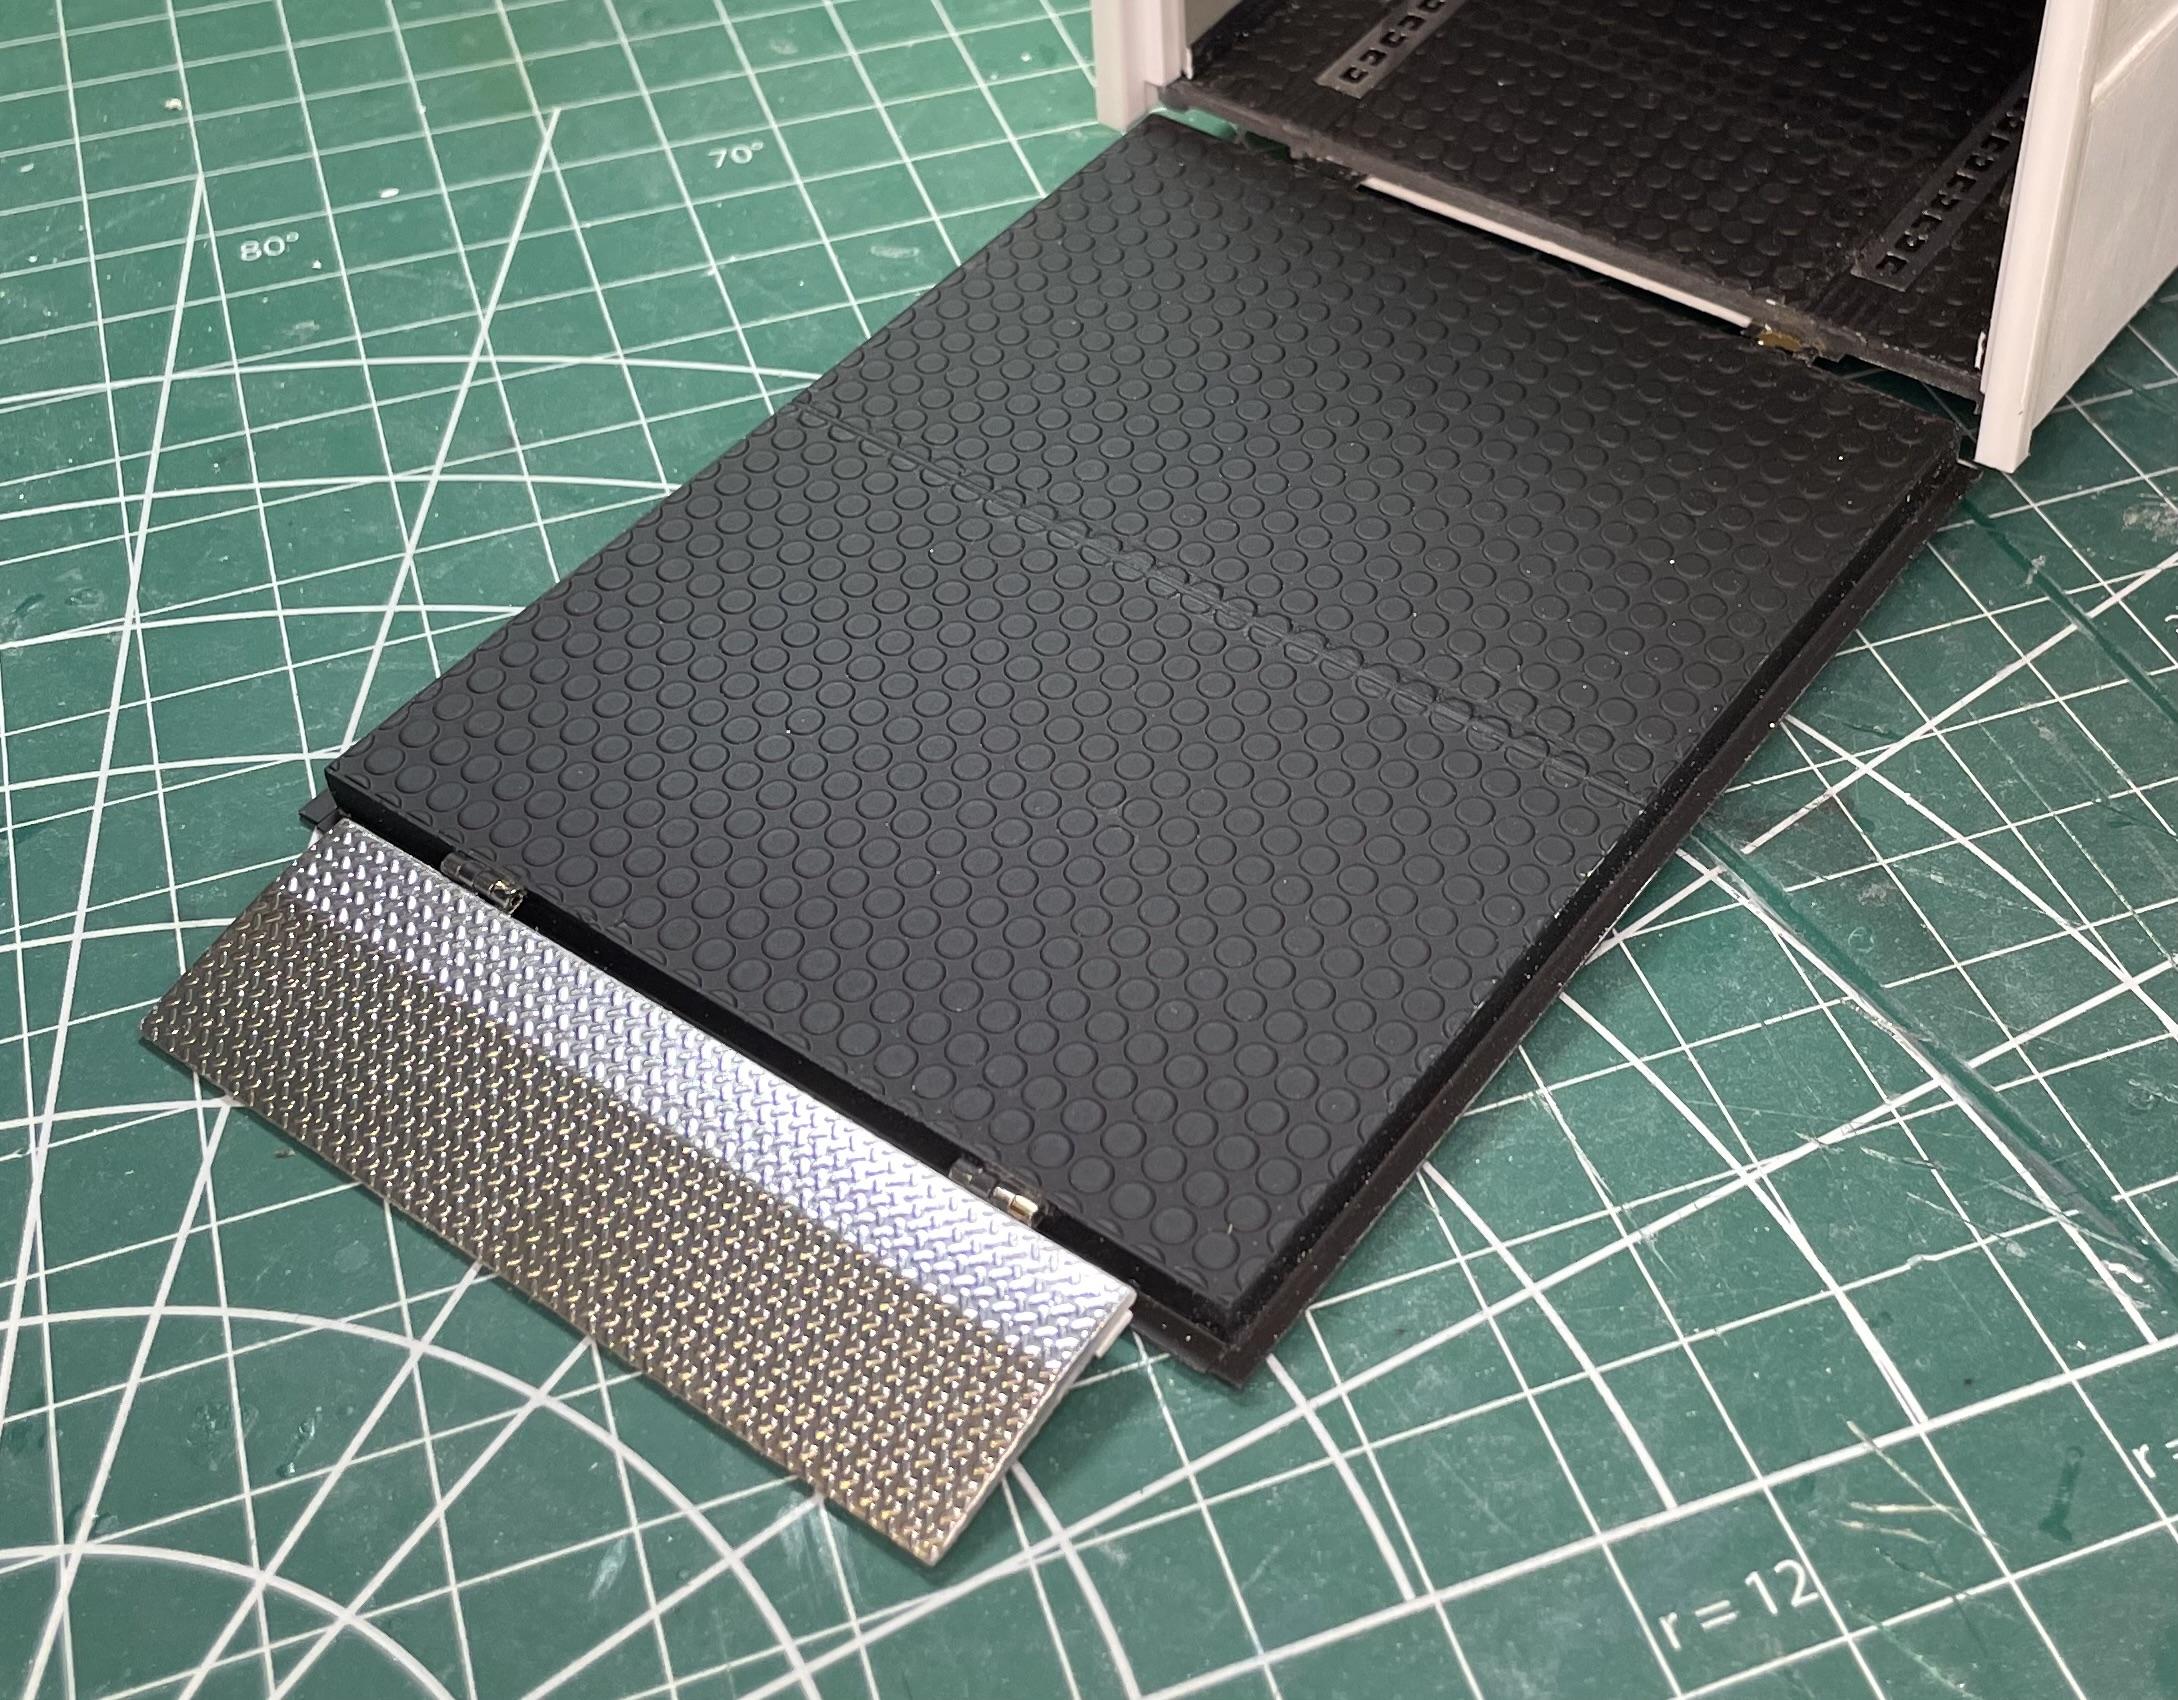
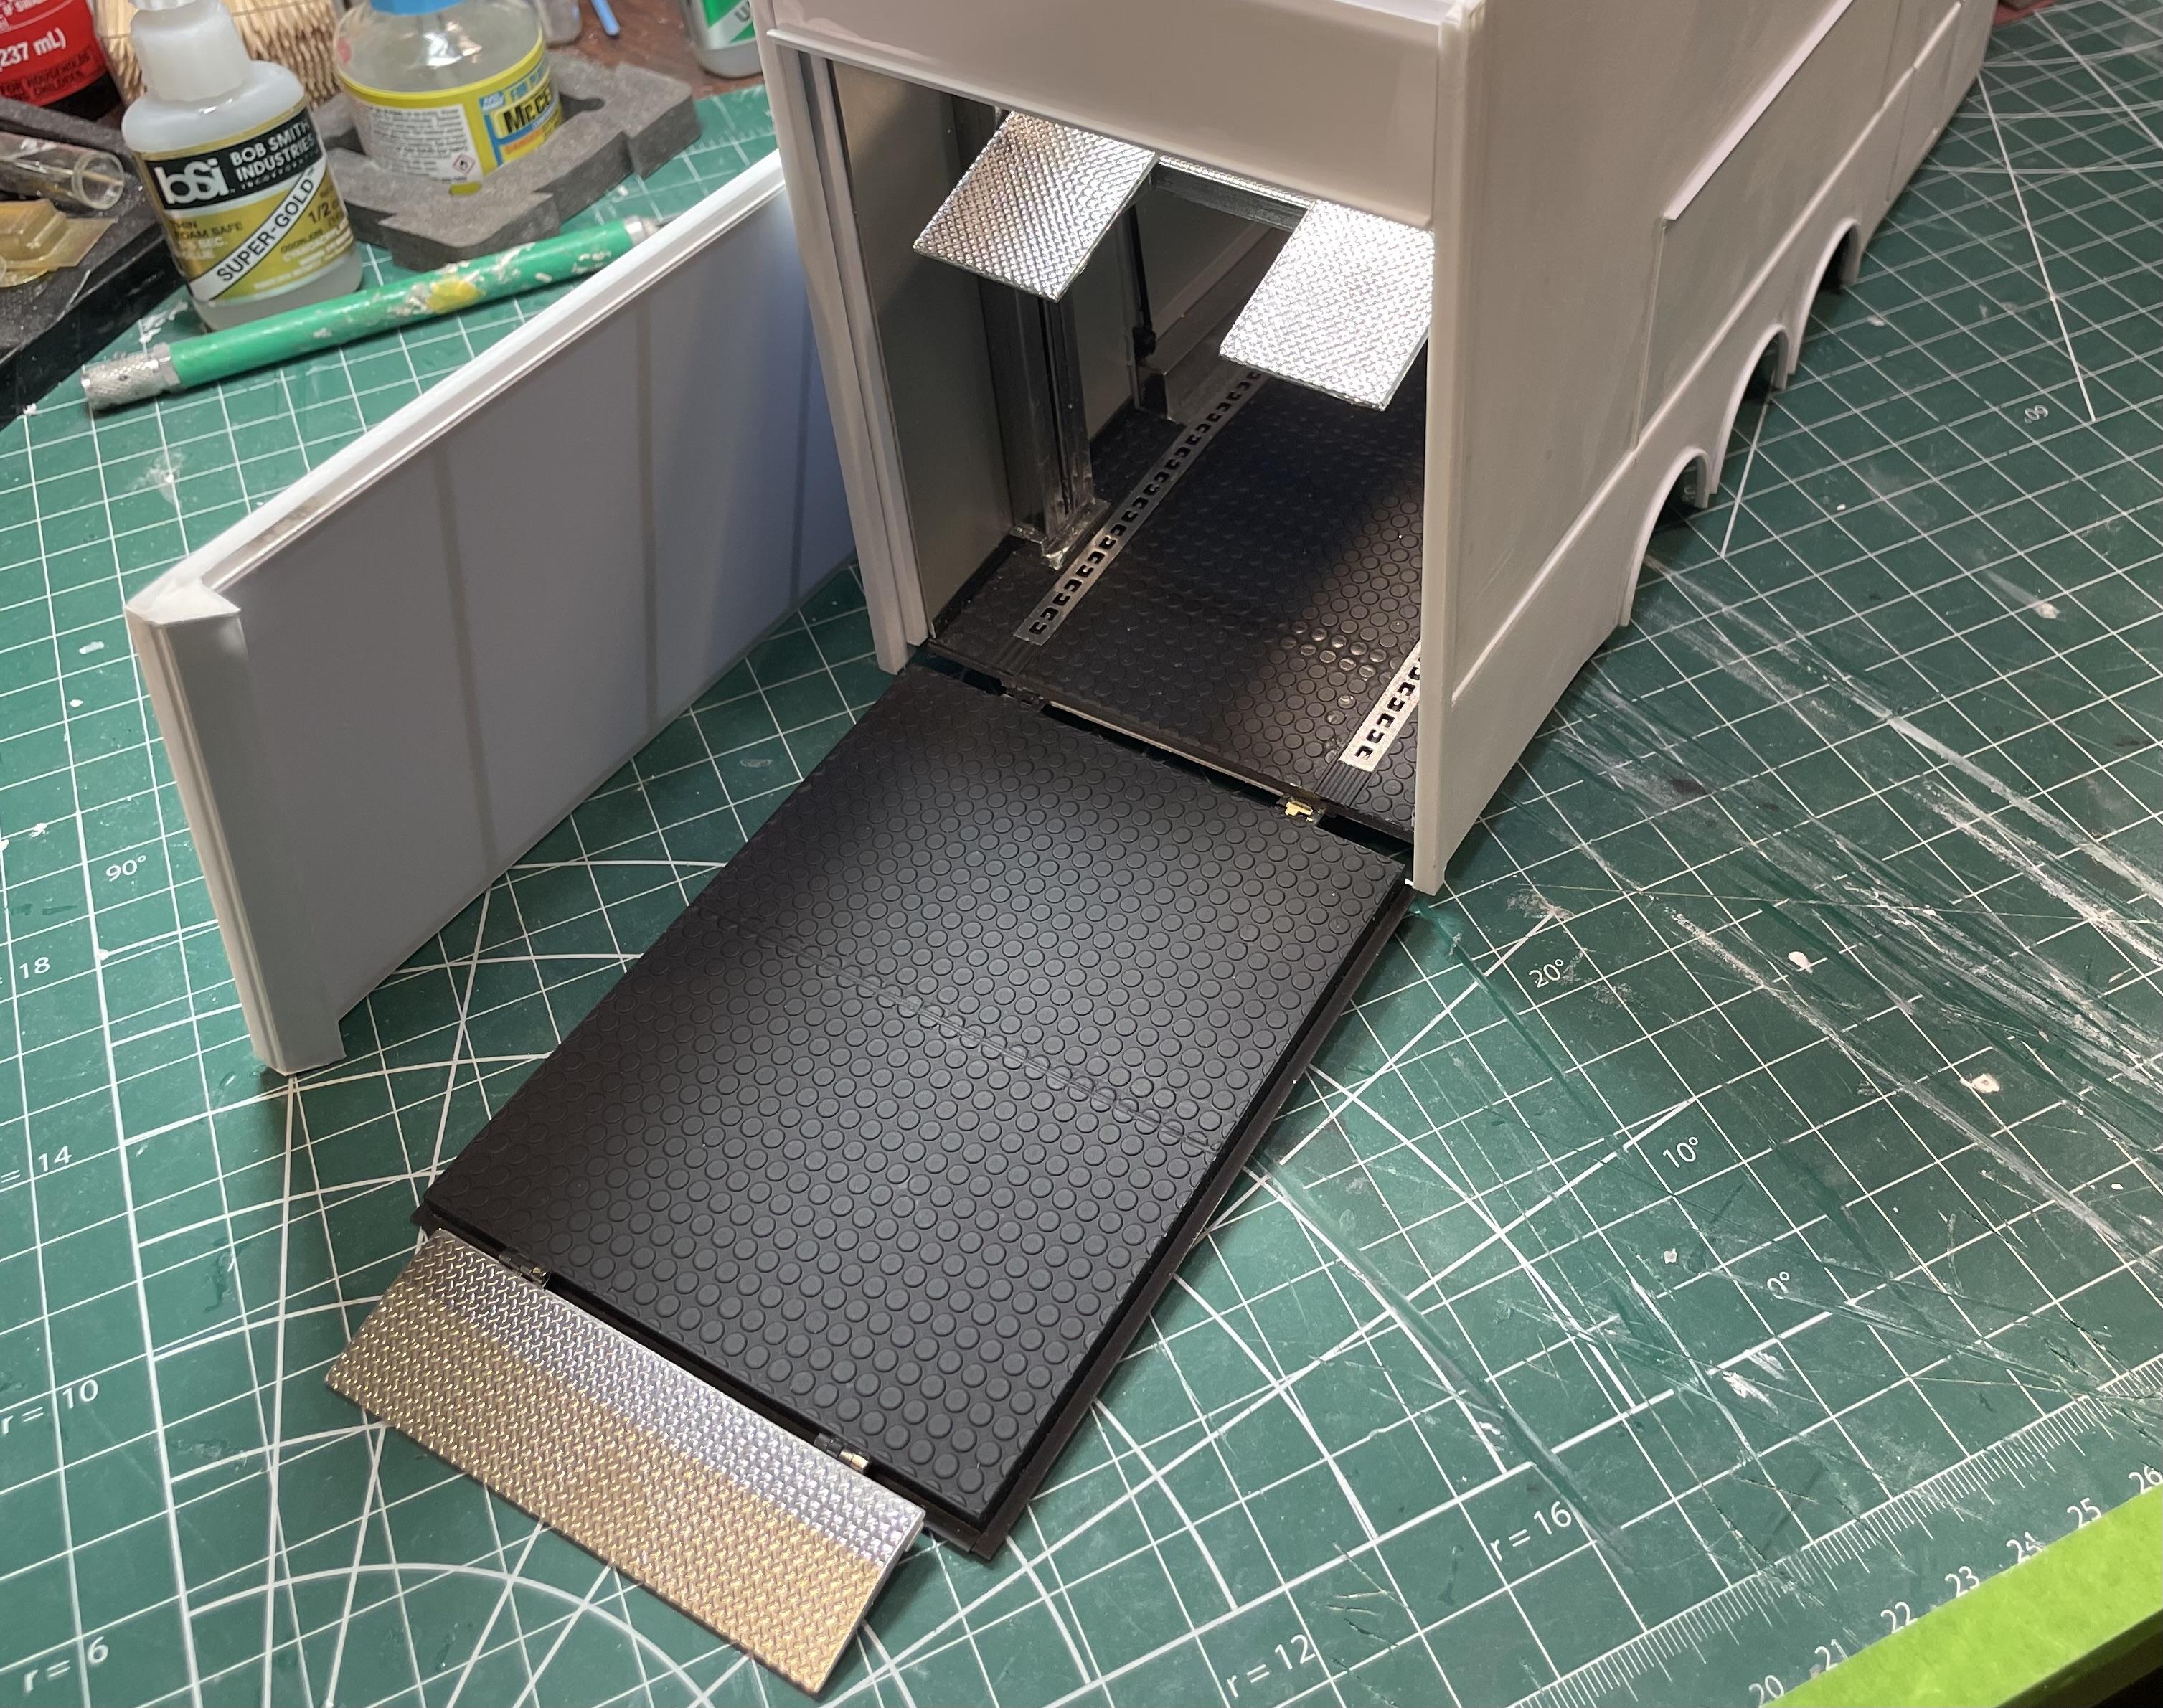
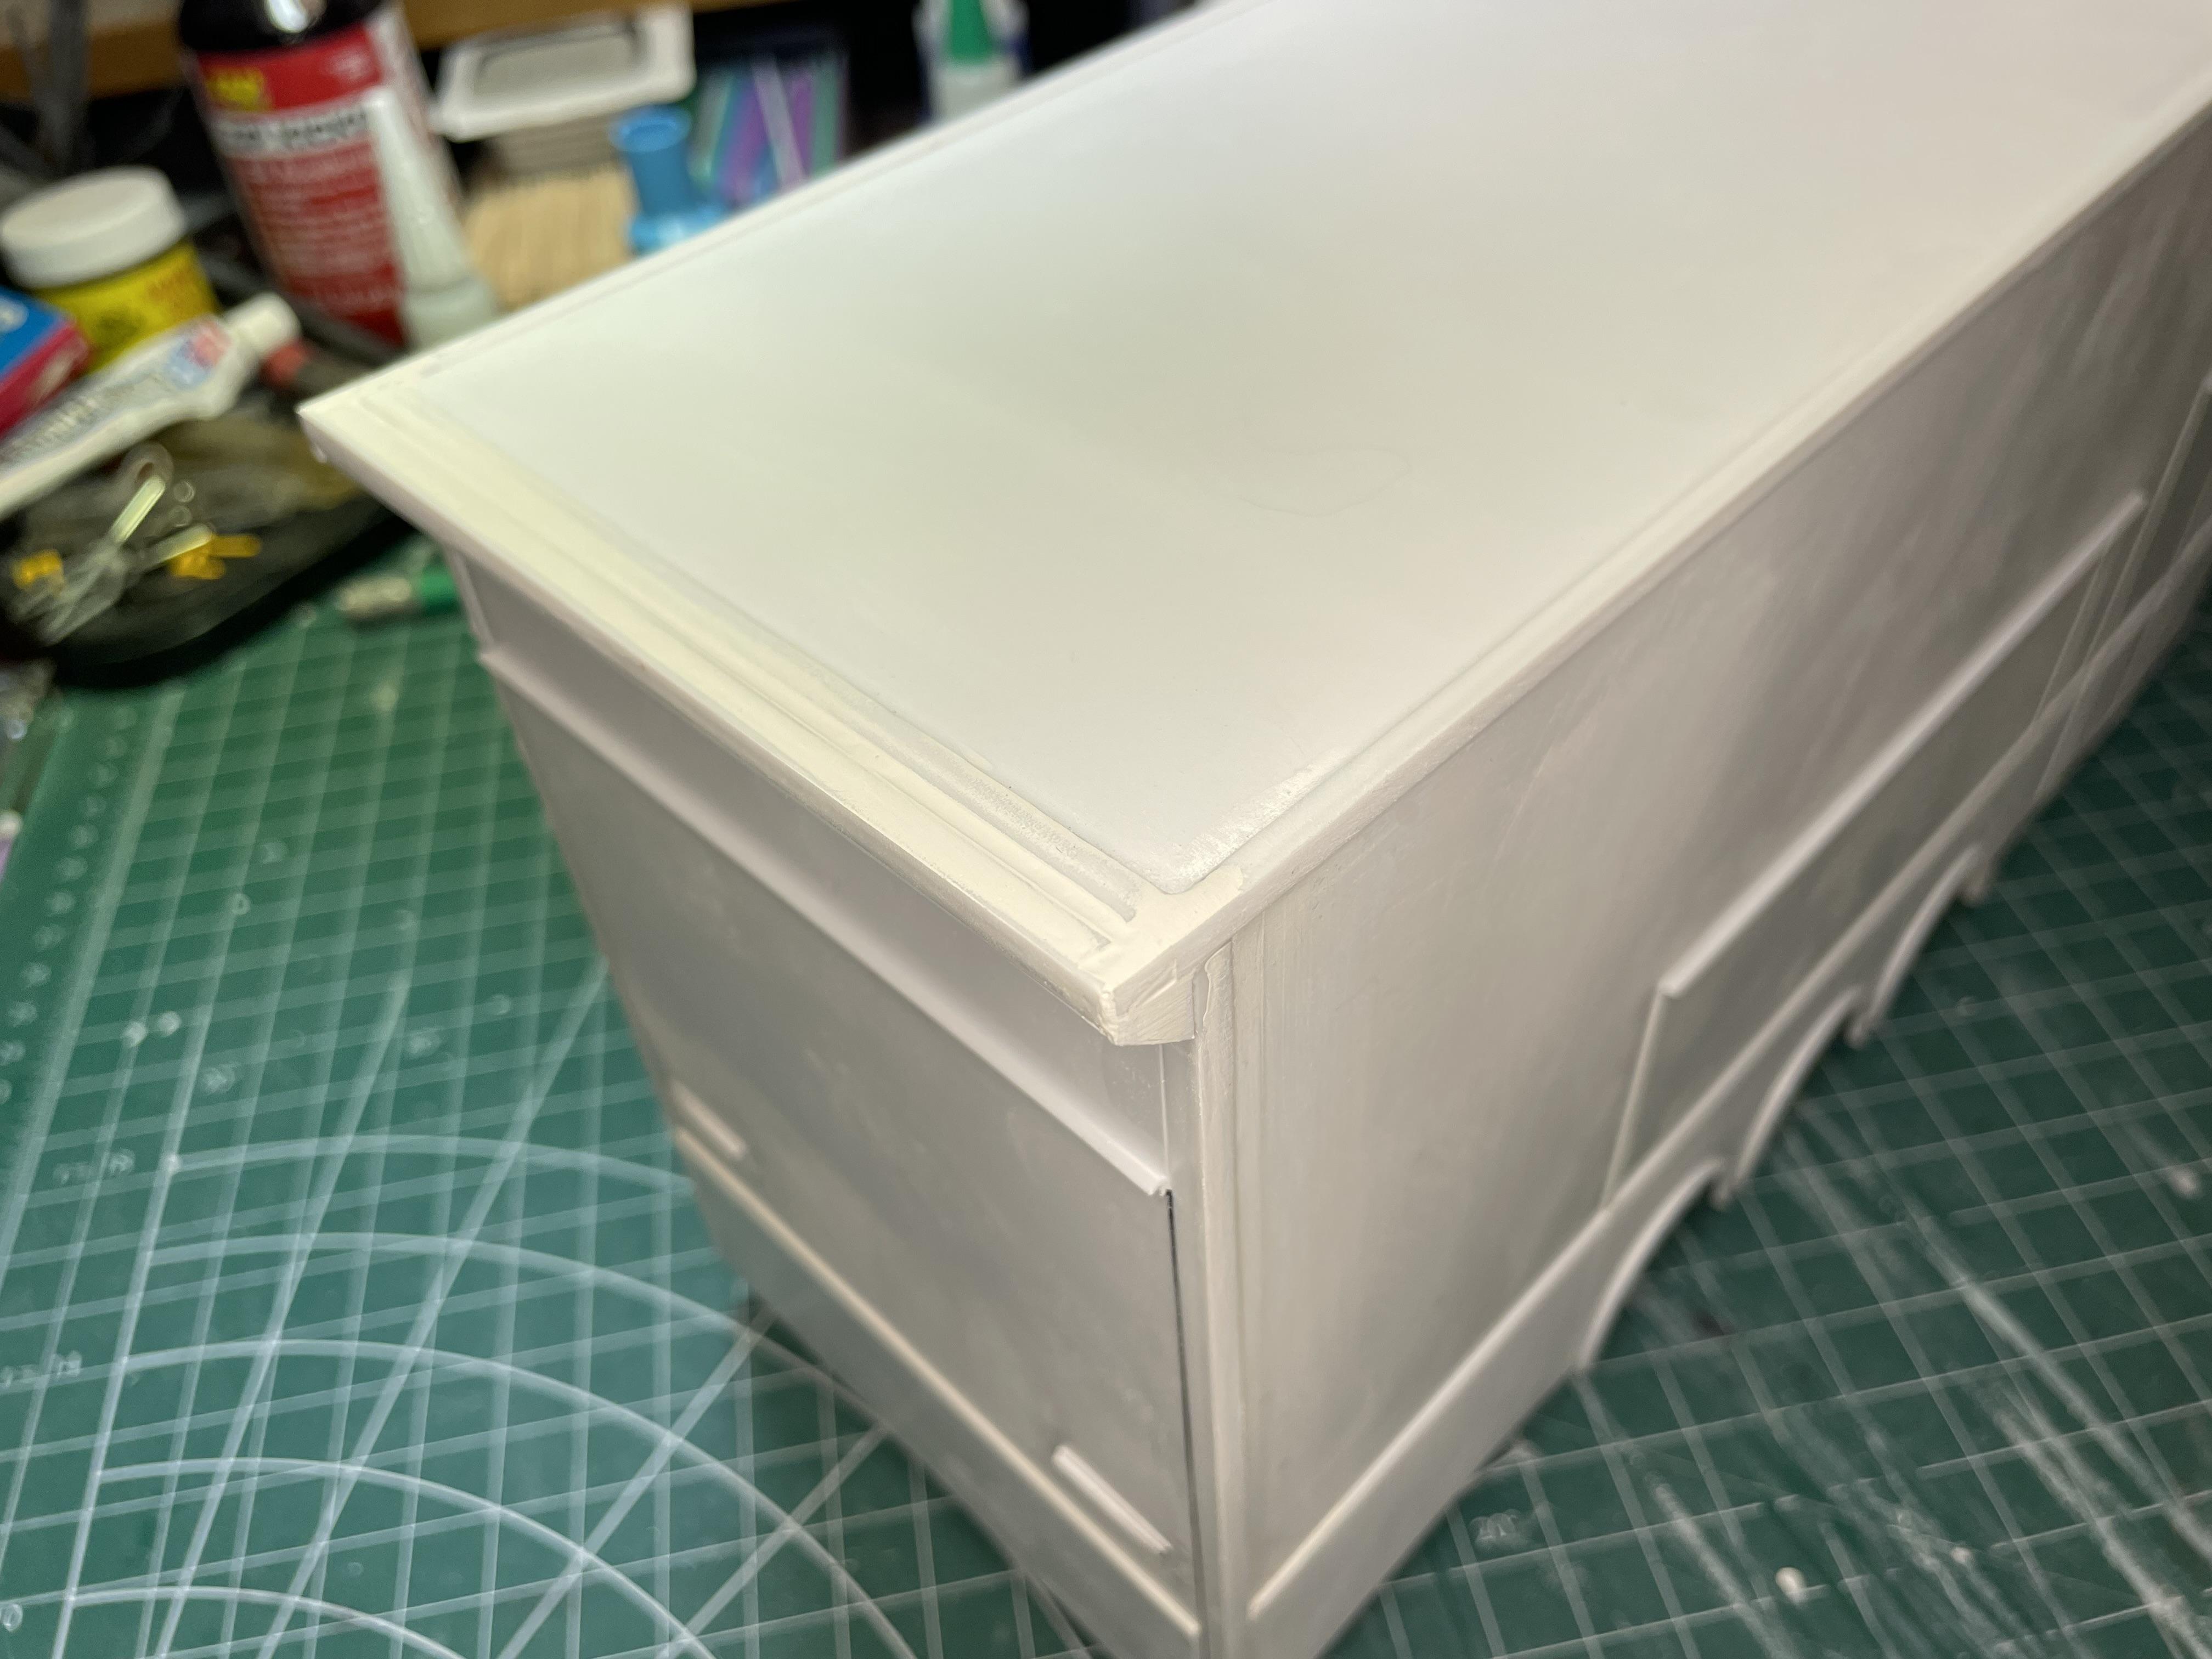
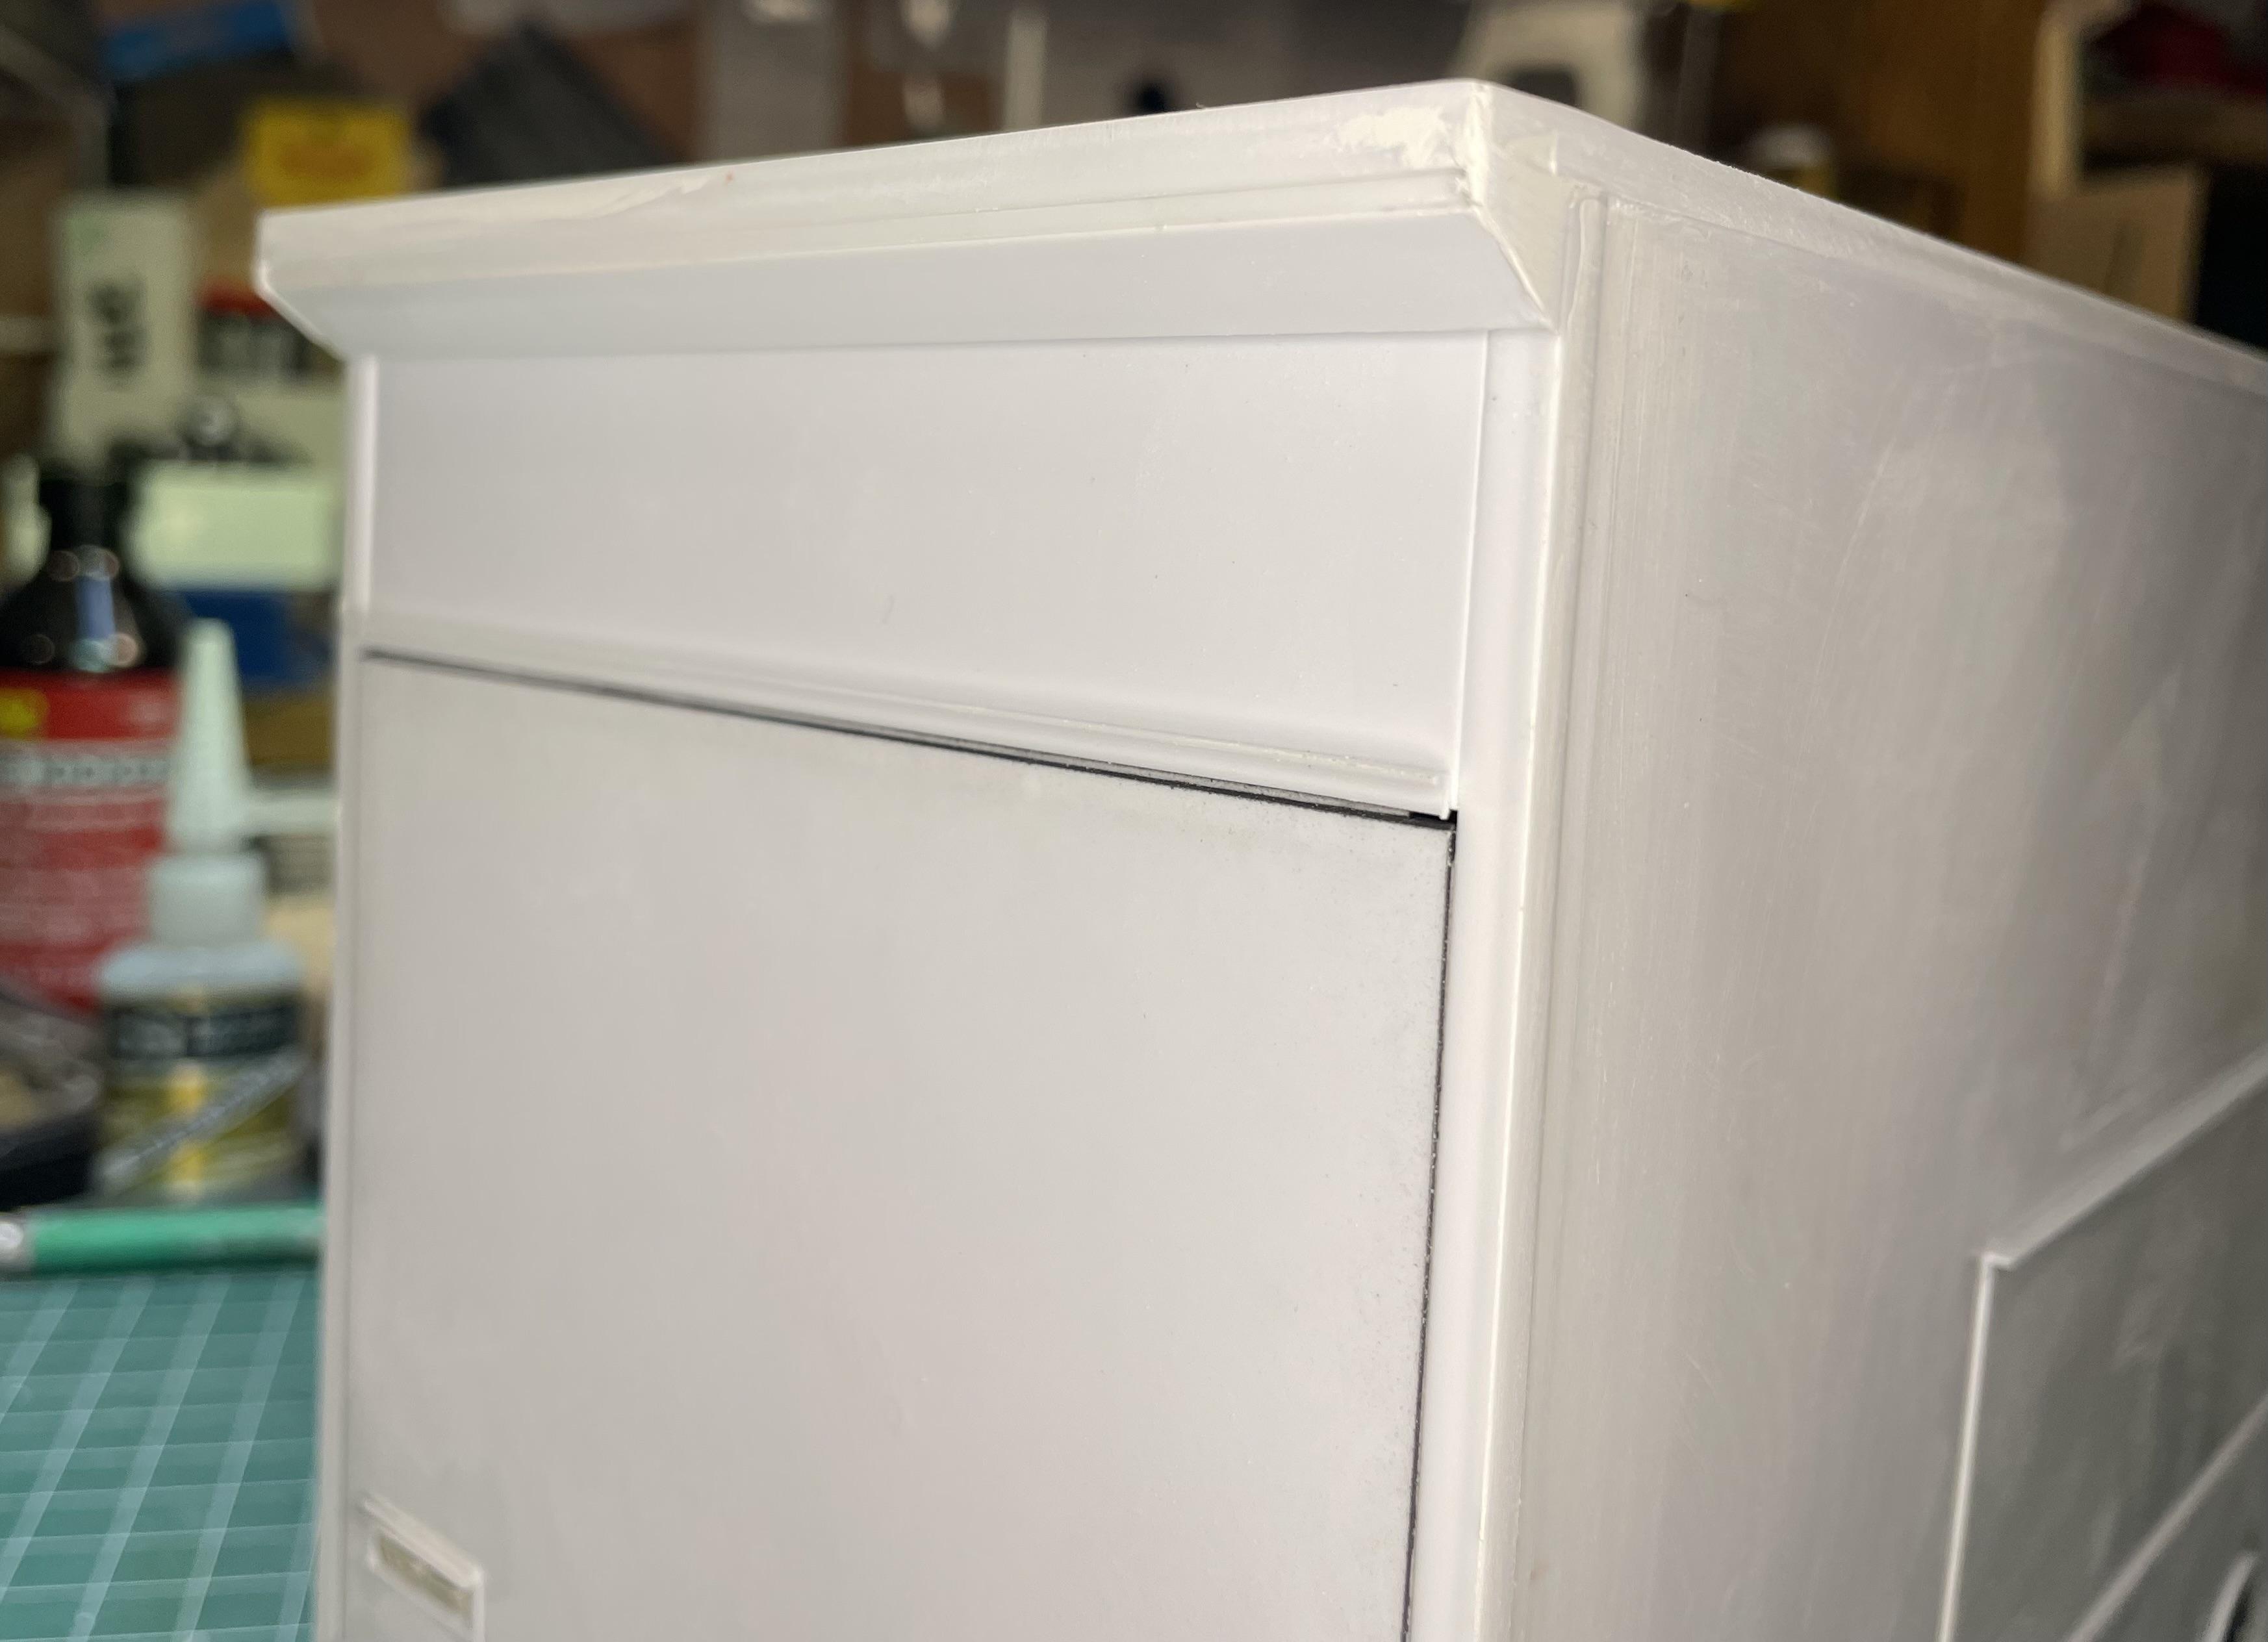
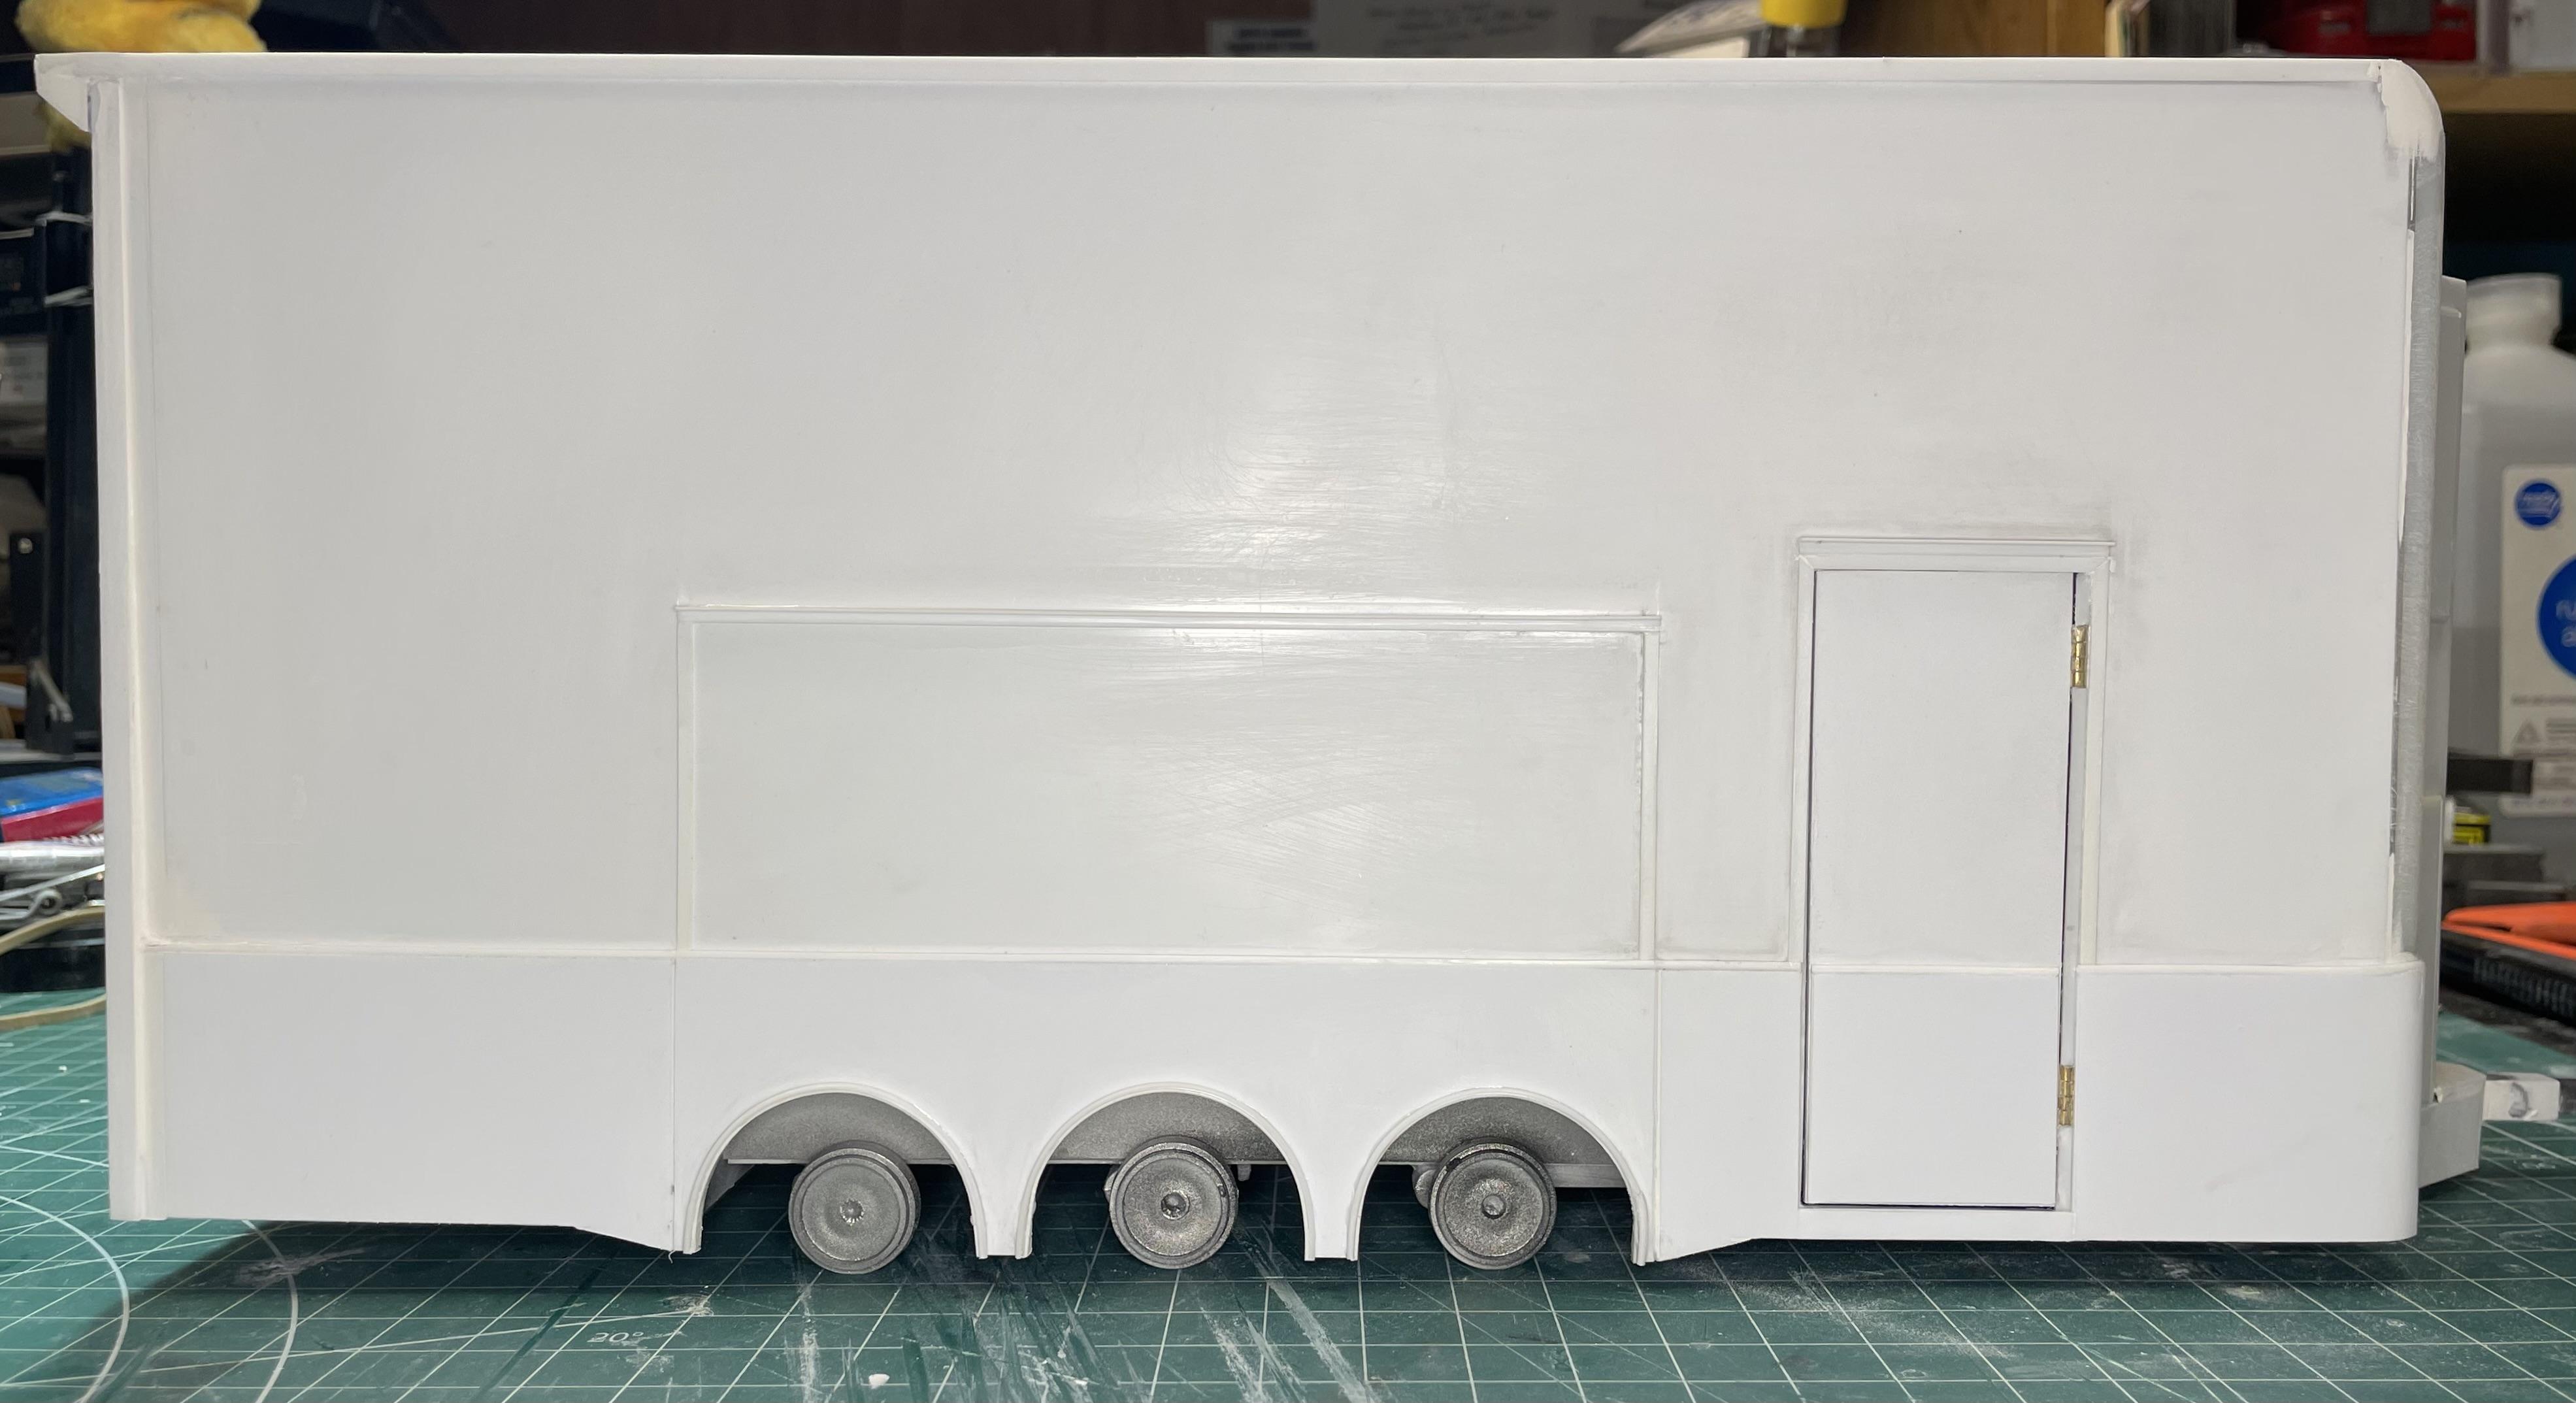
Here’s the latest update…The stacker exterior is now mostly complete, just lacking finish body work and details. More filling and sanding before the primer coats. I made the removable roof and operating rear ramp door. I also made the tongue-mounted generator and AC/heat pump unit with access doors. The roof has channels that fit snug over the side panels. The door has a hinged diamond plate transition ramp that folds inward along with recessed handles. Next update, I should have it in primer. Thanks for watching.
-
Lonestar - Hot Rod custom
vincen47 replied to LOBBS's topic in WIP: Model Trucks: Big Rigs and Heavy Equipment
Yes, a new contender, and that’ll be accurate for a Lonestar, if it’s indeed what’s pictured in the photo. I don’t have the ST Supply X15, but based on the image, it looks like the late generation cm2450 X15, made starting about 2018/2019. The Lonestar wasn’t discontinued until the 2024 model year (the last ones were made in December 2023), so that’ll make for an accurate late model 2019 and up Lonestar. Most importantly, it’s not a Maxxforce, as you said 😄. Any EGR-Equipped ISX-15, ISX15, or X15 will be accurate. -
1970 Ford C 600
vincen47 replied to Biggu's topic in WIP: Model Trucks: Big Rigs and Heavy Equipment
Simply amazing. A unique, well-crafted, and thoughtful build. Excellent details. Something you can spend some time looking over, and still not catch everything the first time. -
Western Star 4900 FA plow truck
vincen47 replied to BK9300's topic in WIP: Model Trucks: Big Rigs and Heavy Equipment
Wow what a difference the photo stacking makes. That photography is incredible. Takes an already impressive and exceptional model to a higher level. -
Peterbilt 379 RV
vincen47 replied to vincen47's topic in WIP: Model Trucks: Big Rigs and Heavy Equipment
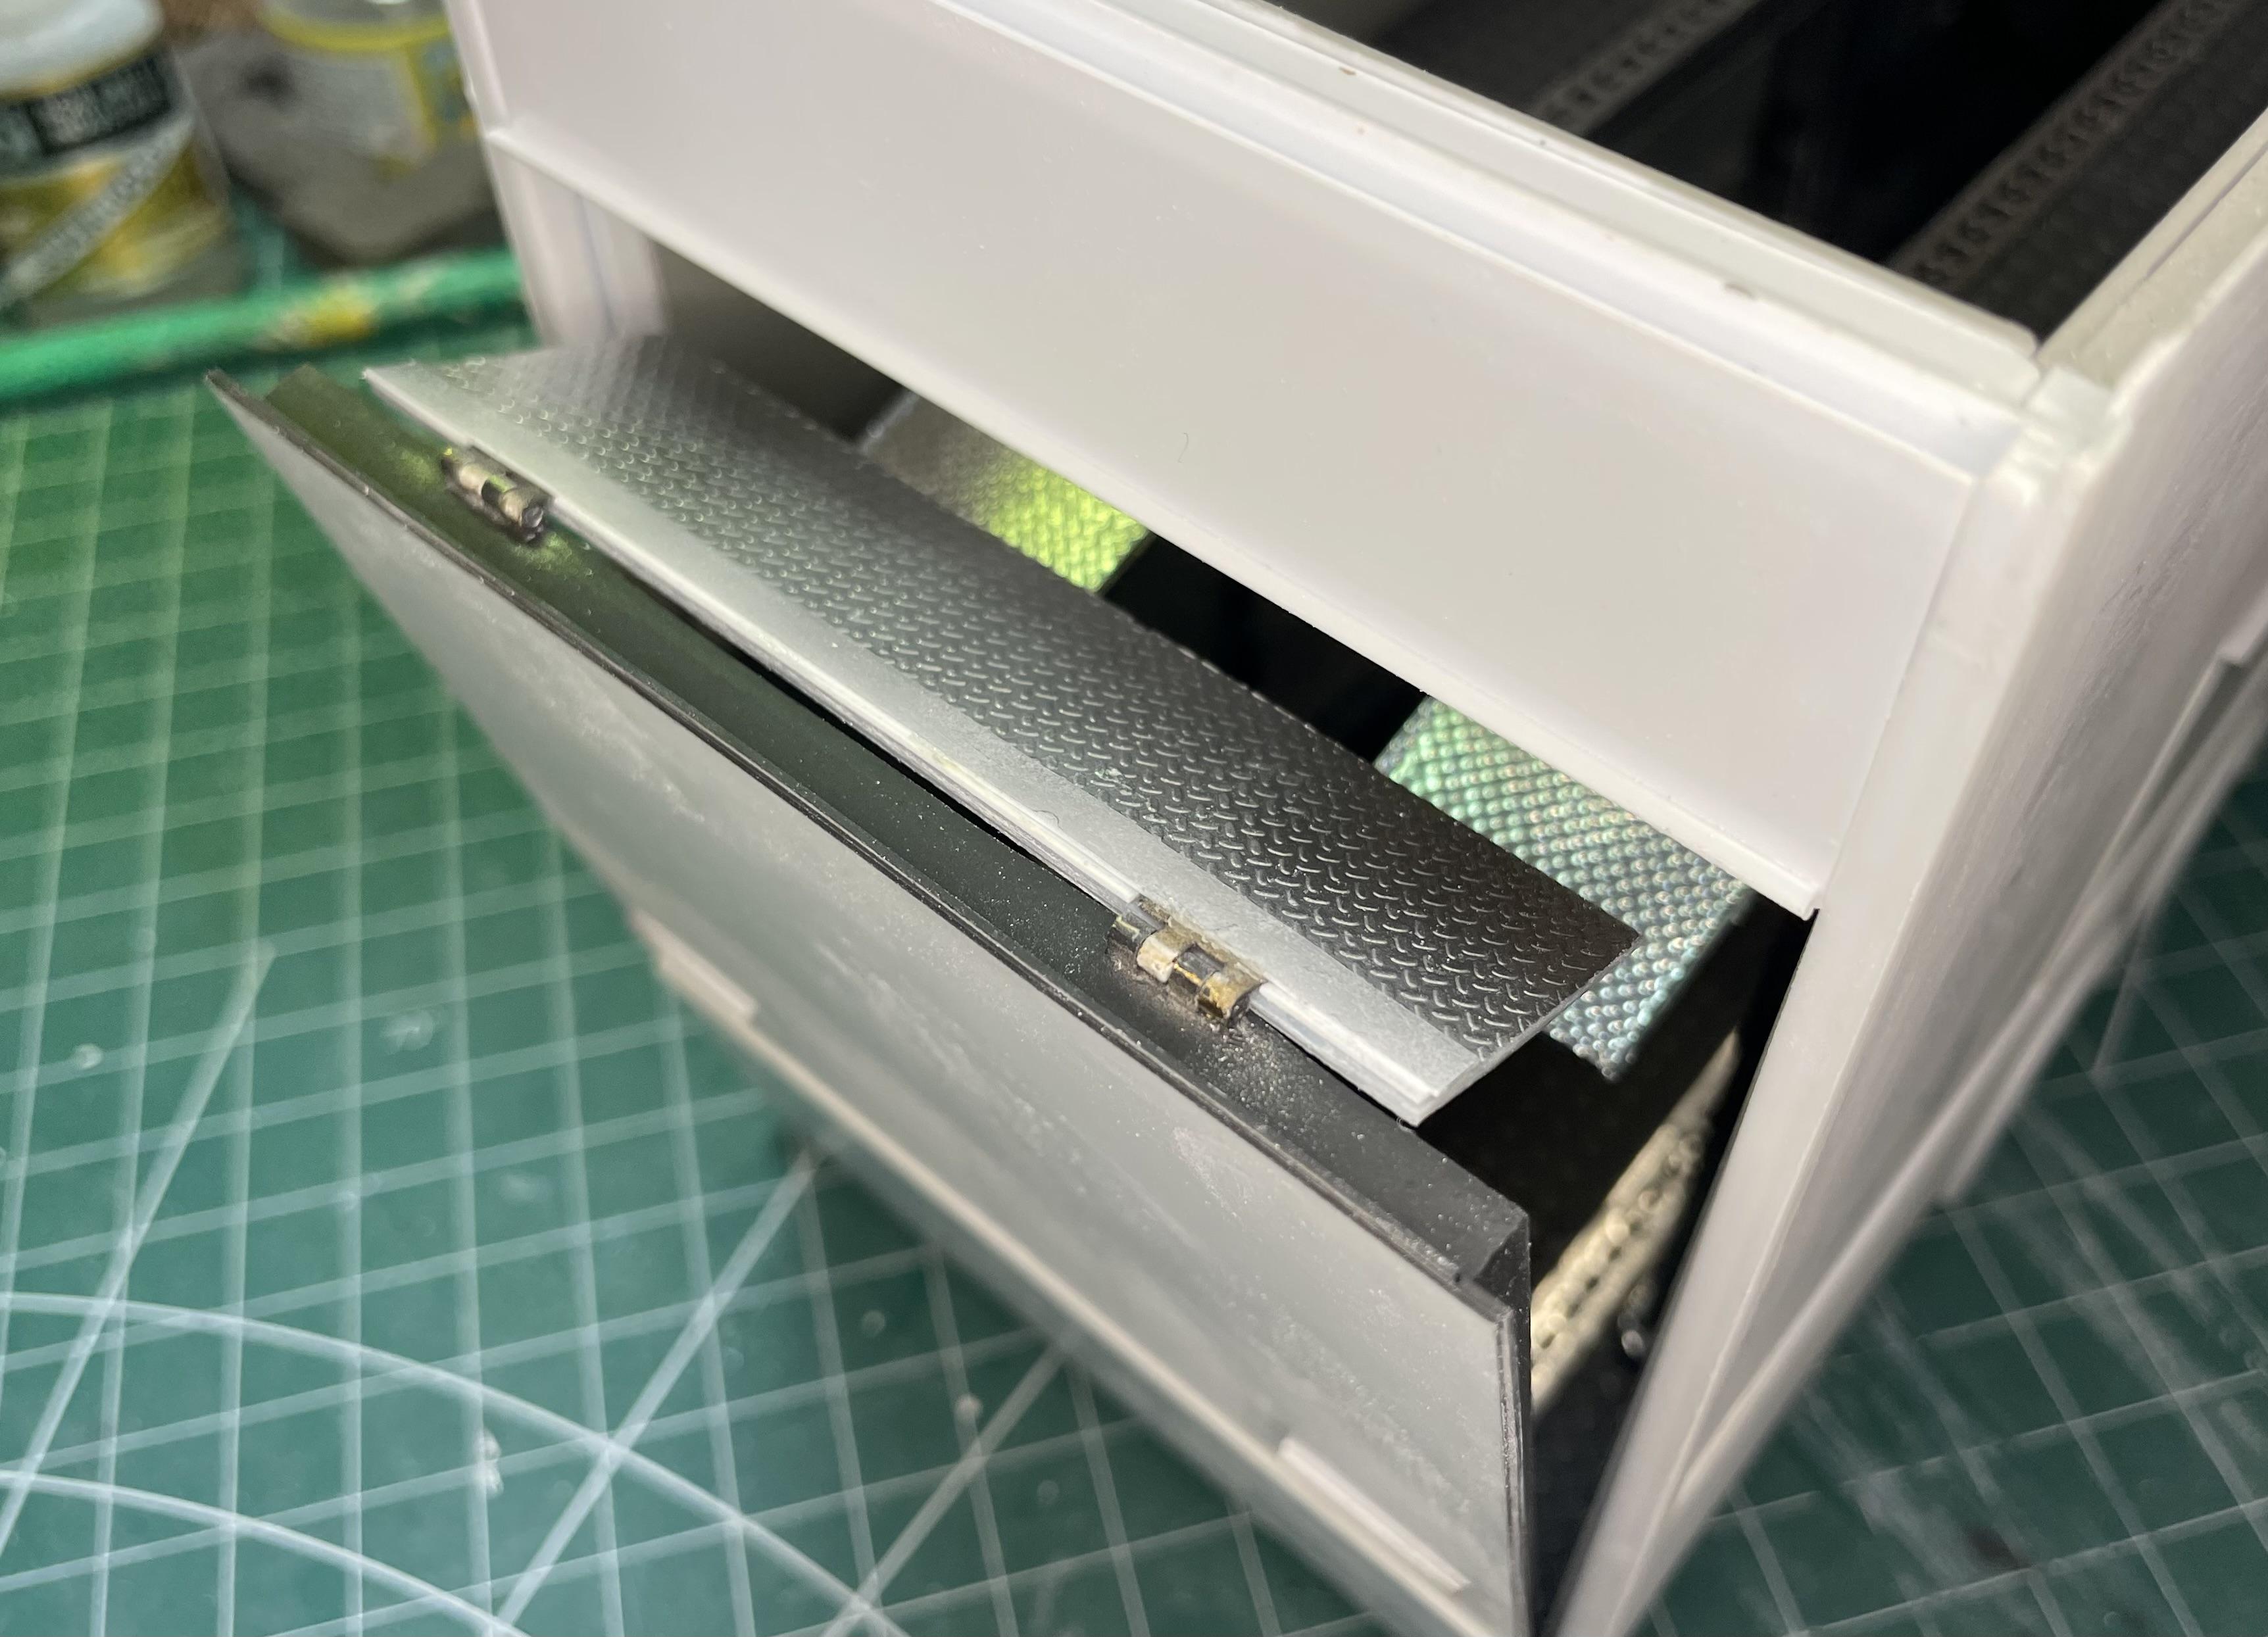
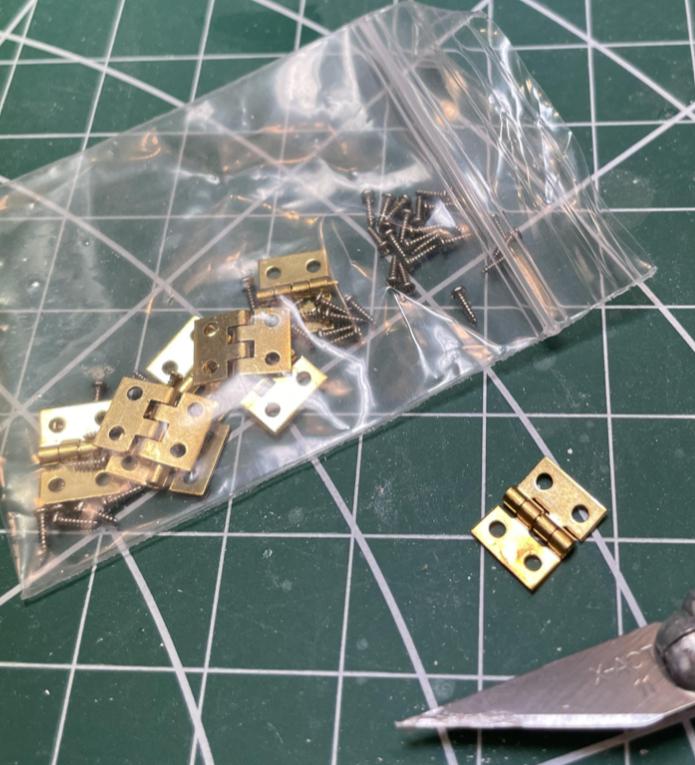
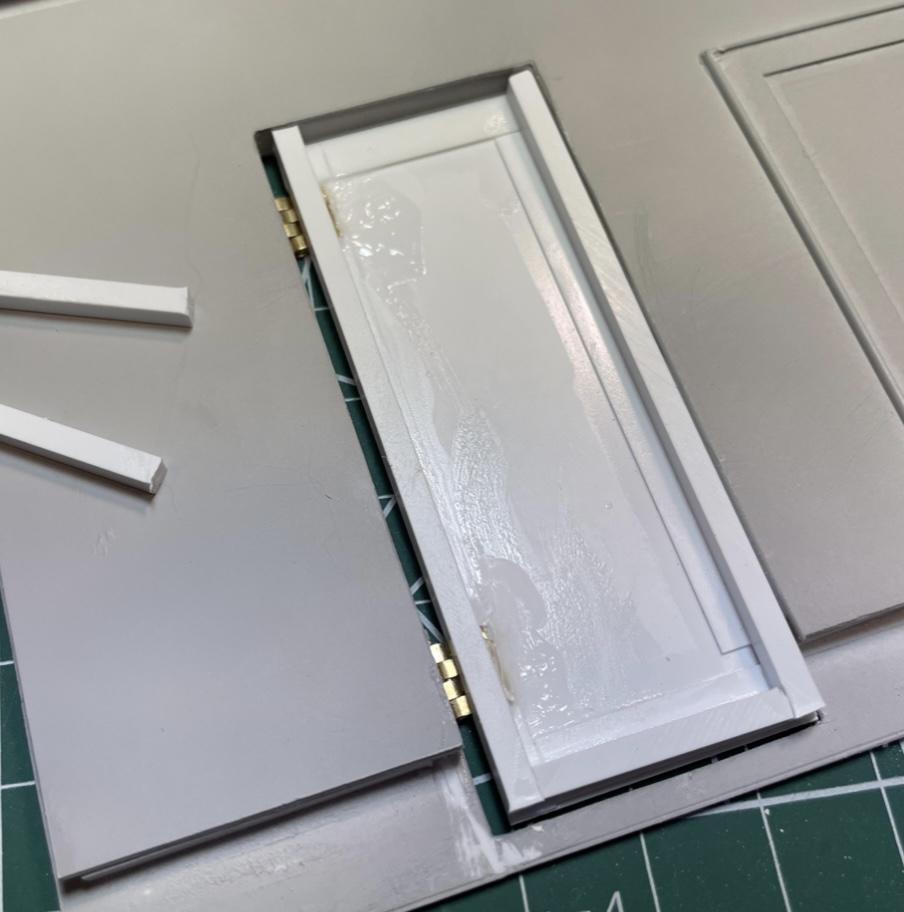
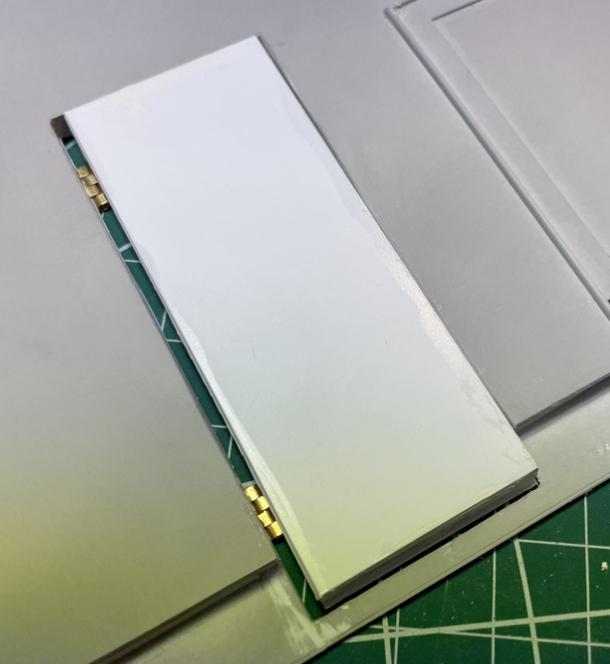
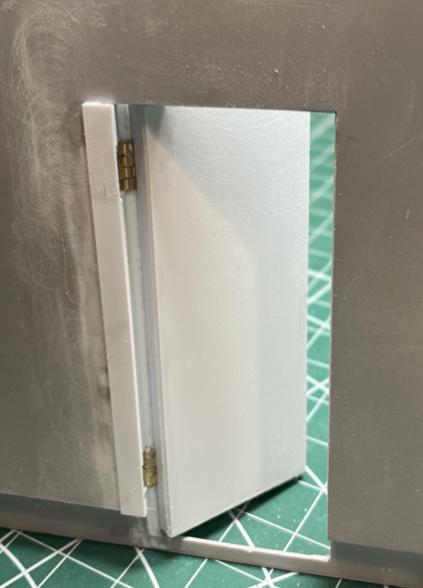
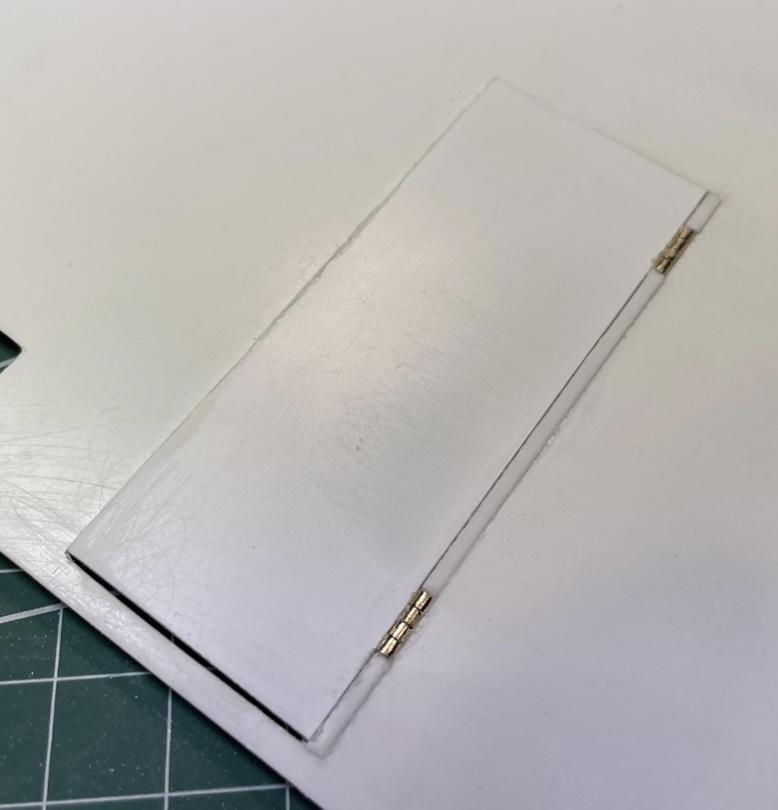
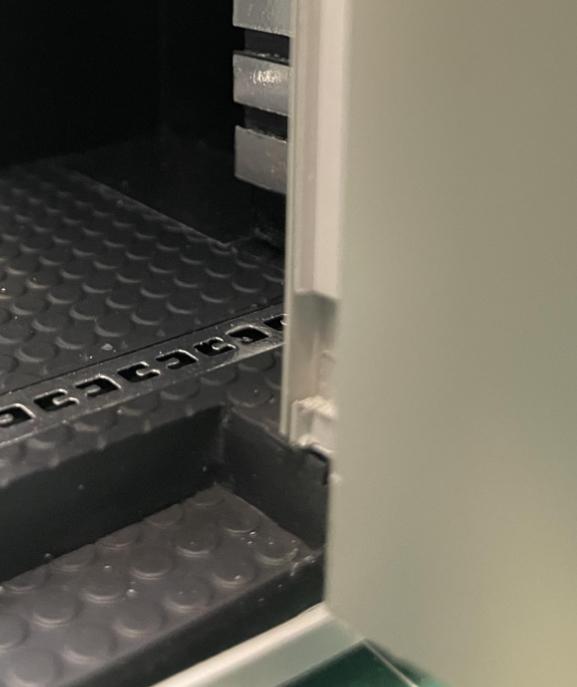
It was my first time making an operating door like this, so I experimented a bit with some scrap plastic to see if the hinges would work. I originally thought I’d try piano hinges, but I started with small brass dollhouse hinges I got on eBay. I had to figure out how to orient the hinges to allow the door to fully open and close yet not have the hinges stick out too far beyond the outside wall. I wanted as close to a scale look as possible. Then I used CA glue to attach them to the existing door frame and the outer door skin. I cut the door narrower than the door frame to allow a gap for the hinges. I covered the gap later. Then I layered on the framework for the door using the same square styrene rod I used for the “studs” for the rest of the trailer walls, and some thin strips that matched the thickness of the brass hinge plate. The trailer walls are a sandwich of .040” sheet on the inside and outside of the studs. Then, the inner door skin was added. Now I just had the gap around the hinges to fill from the outside with styrene strip and cover over on the inside (like door frame casing). With each step I made sure the door would still operate before any glue was applied. There was some trial and error. In the last photo below, you’ll see that the interior casing leaves a void behind it to allow the door to close. You can see a notch in the inside frame where just out of sight, is the hinge. Hope this helps. Thanks for checking it out.