vincen47
-
Posts
1,654 -
Joined
-
Last visited
Content Type
Profiles
Forums
Events
Gallery
Everything posted by vincen47
-
Peterbilt 379 RV
vincen47 replied to vincen47's topic in WIP: Model Trucks: Big Rigs and Heavy Equipment
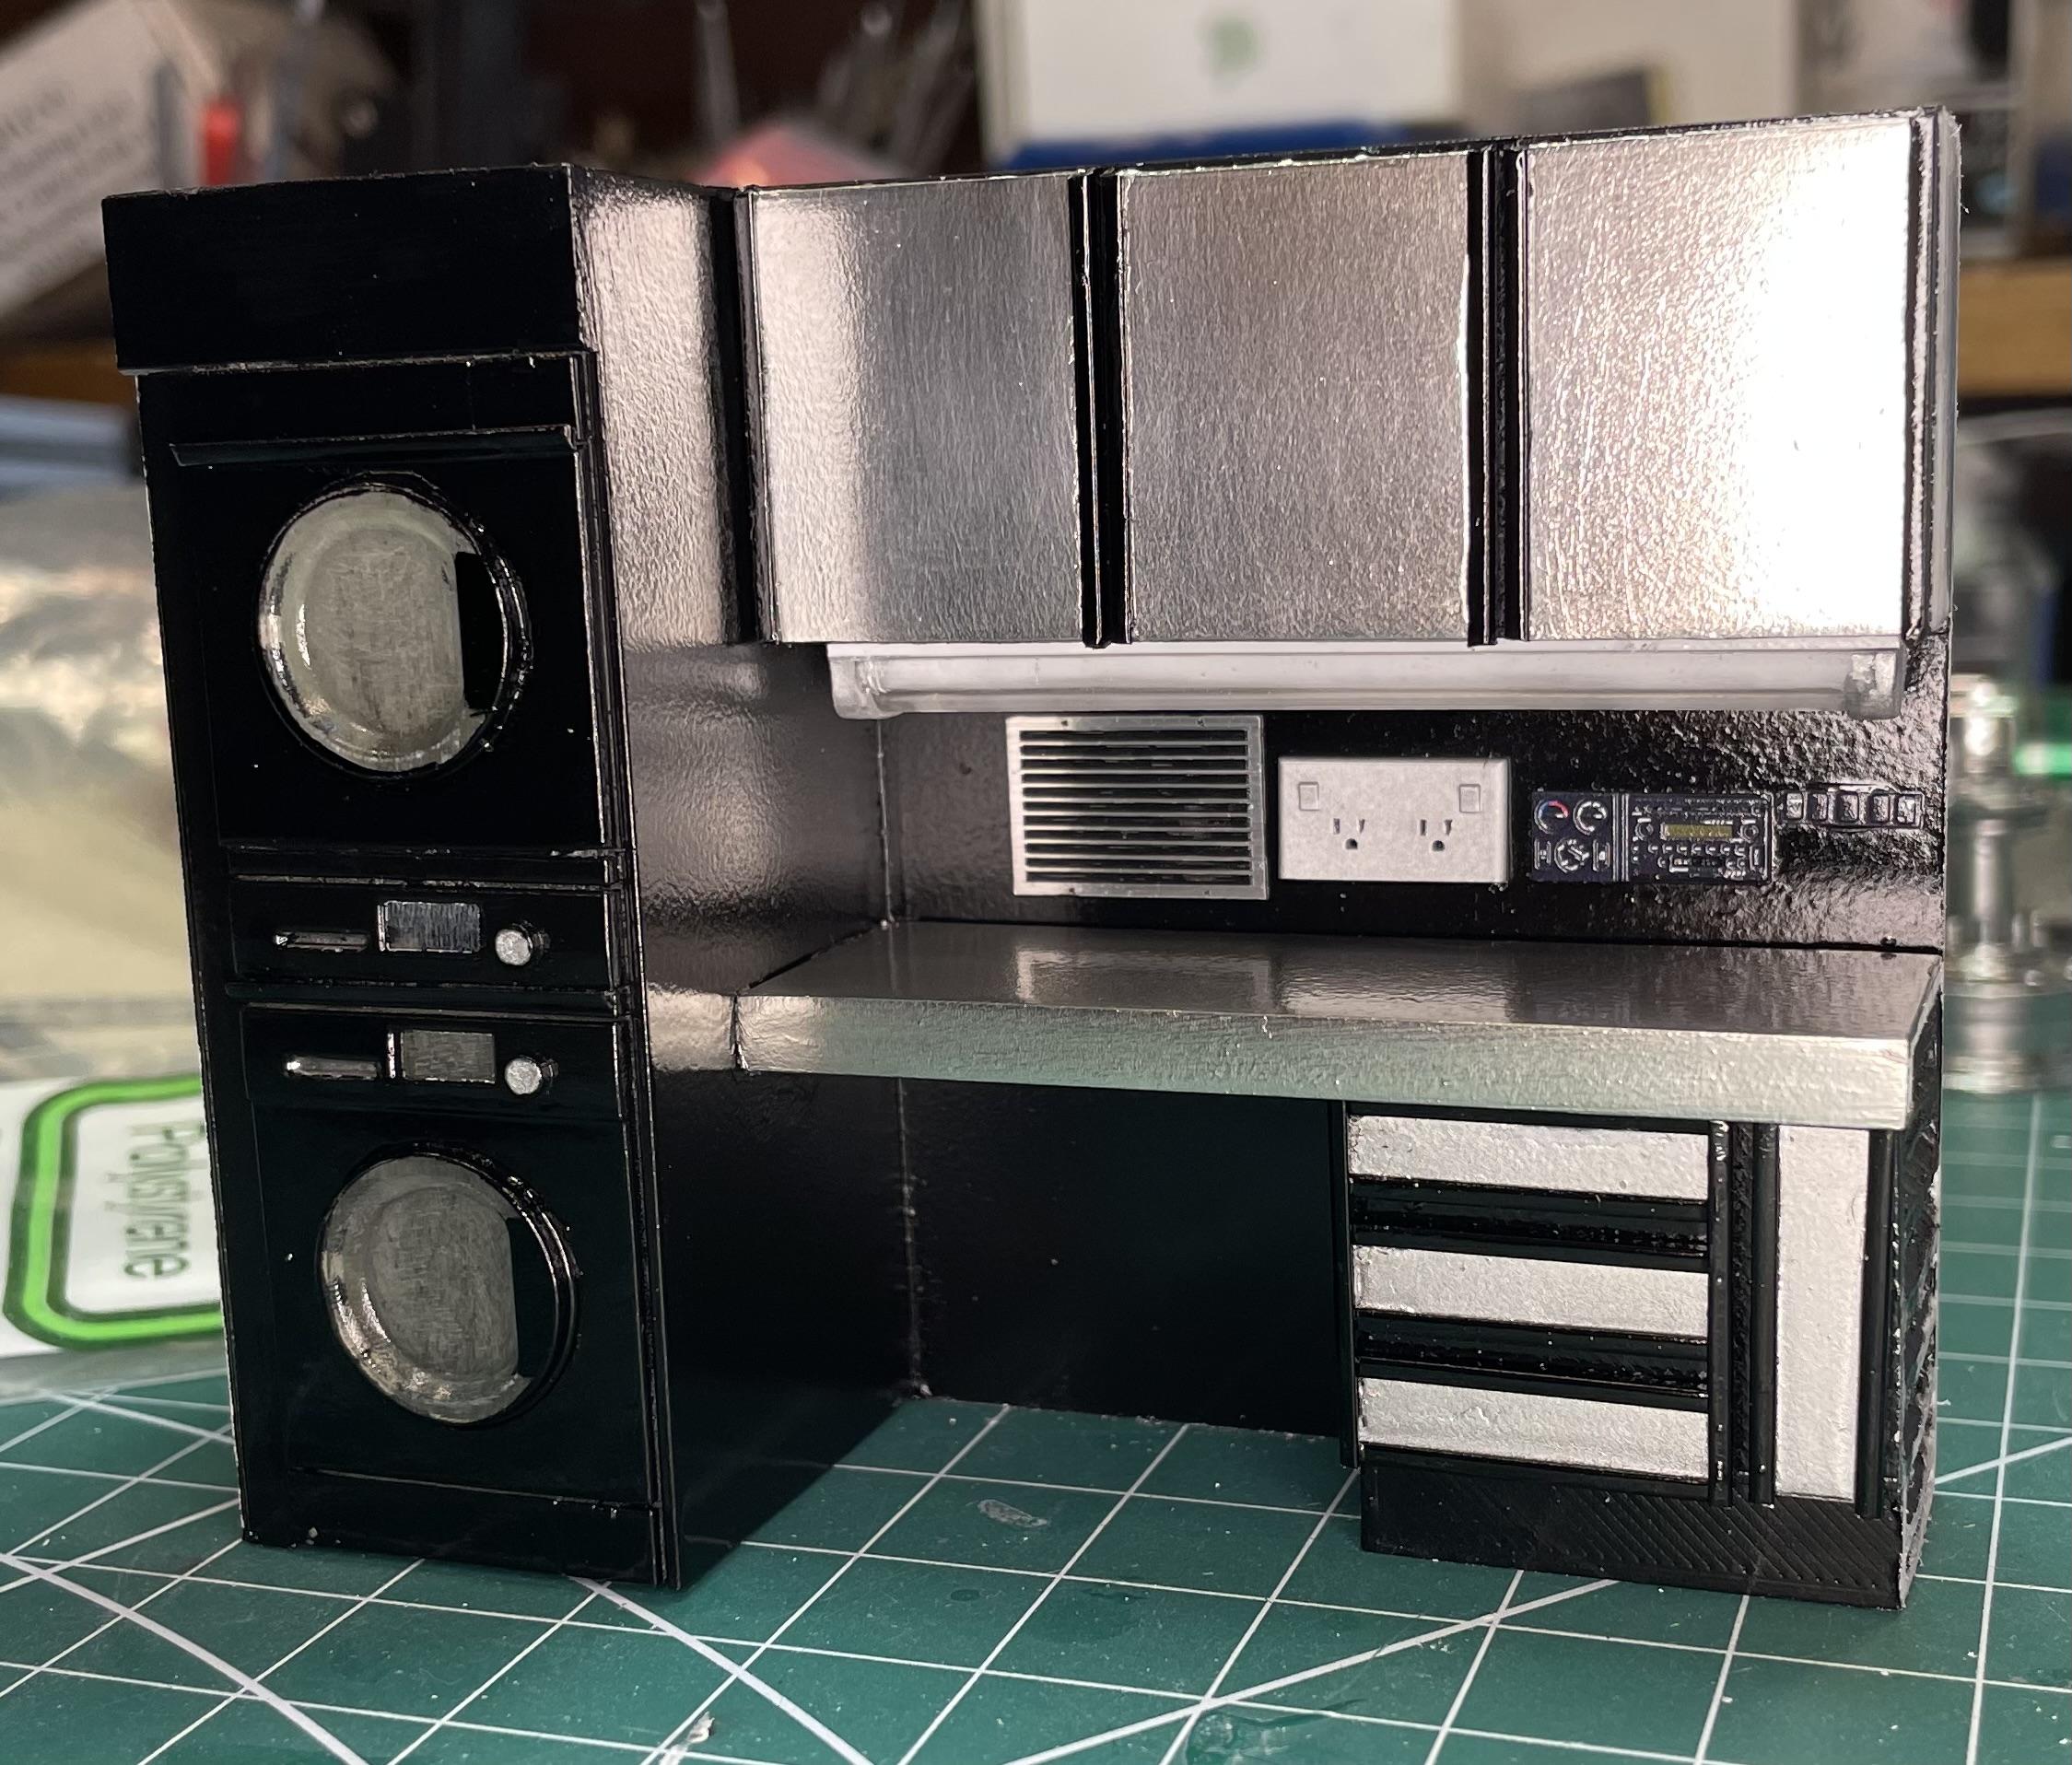
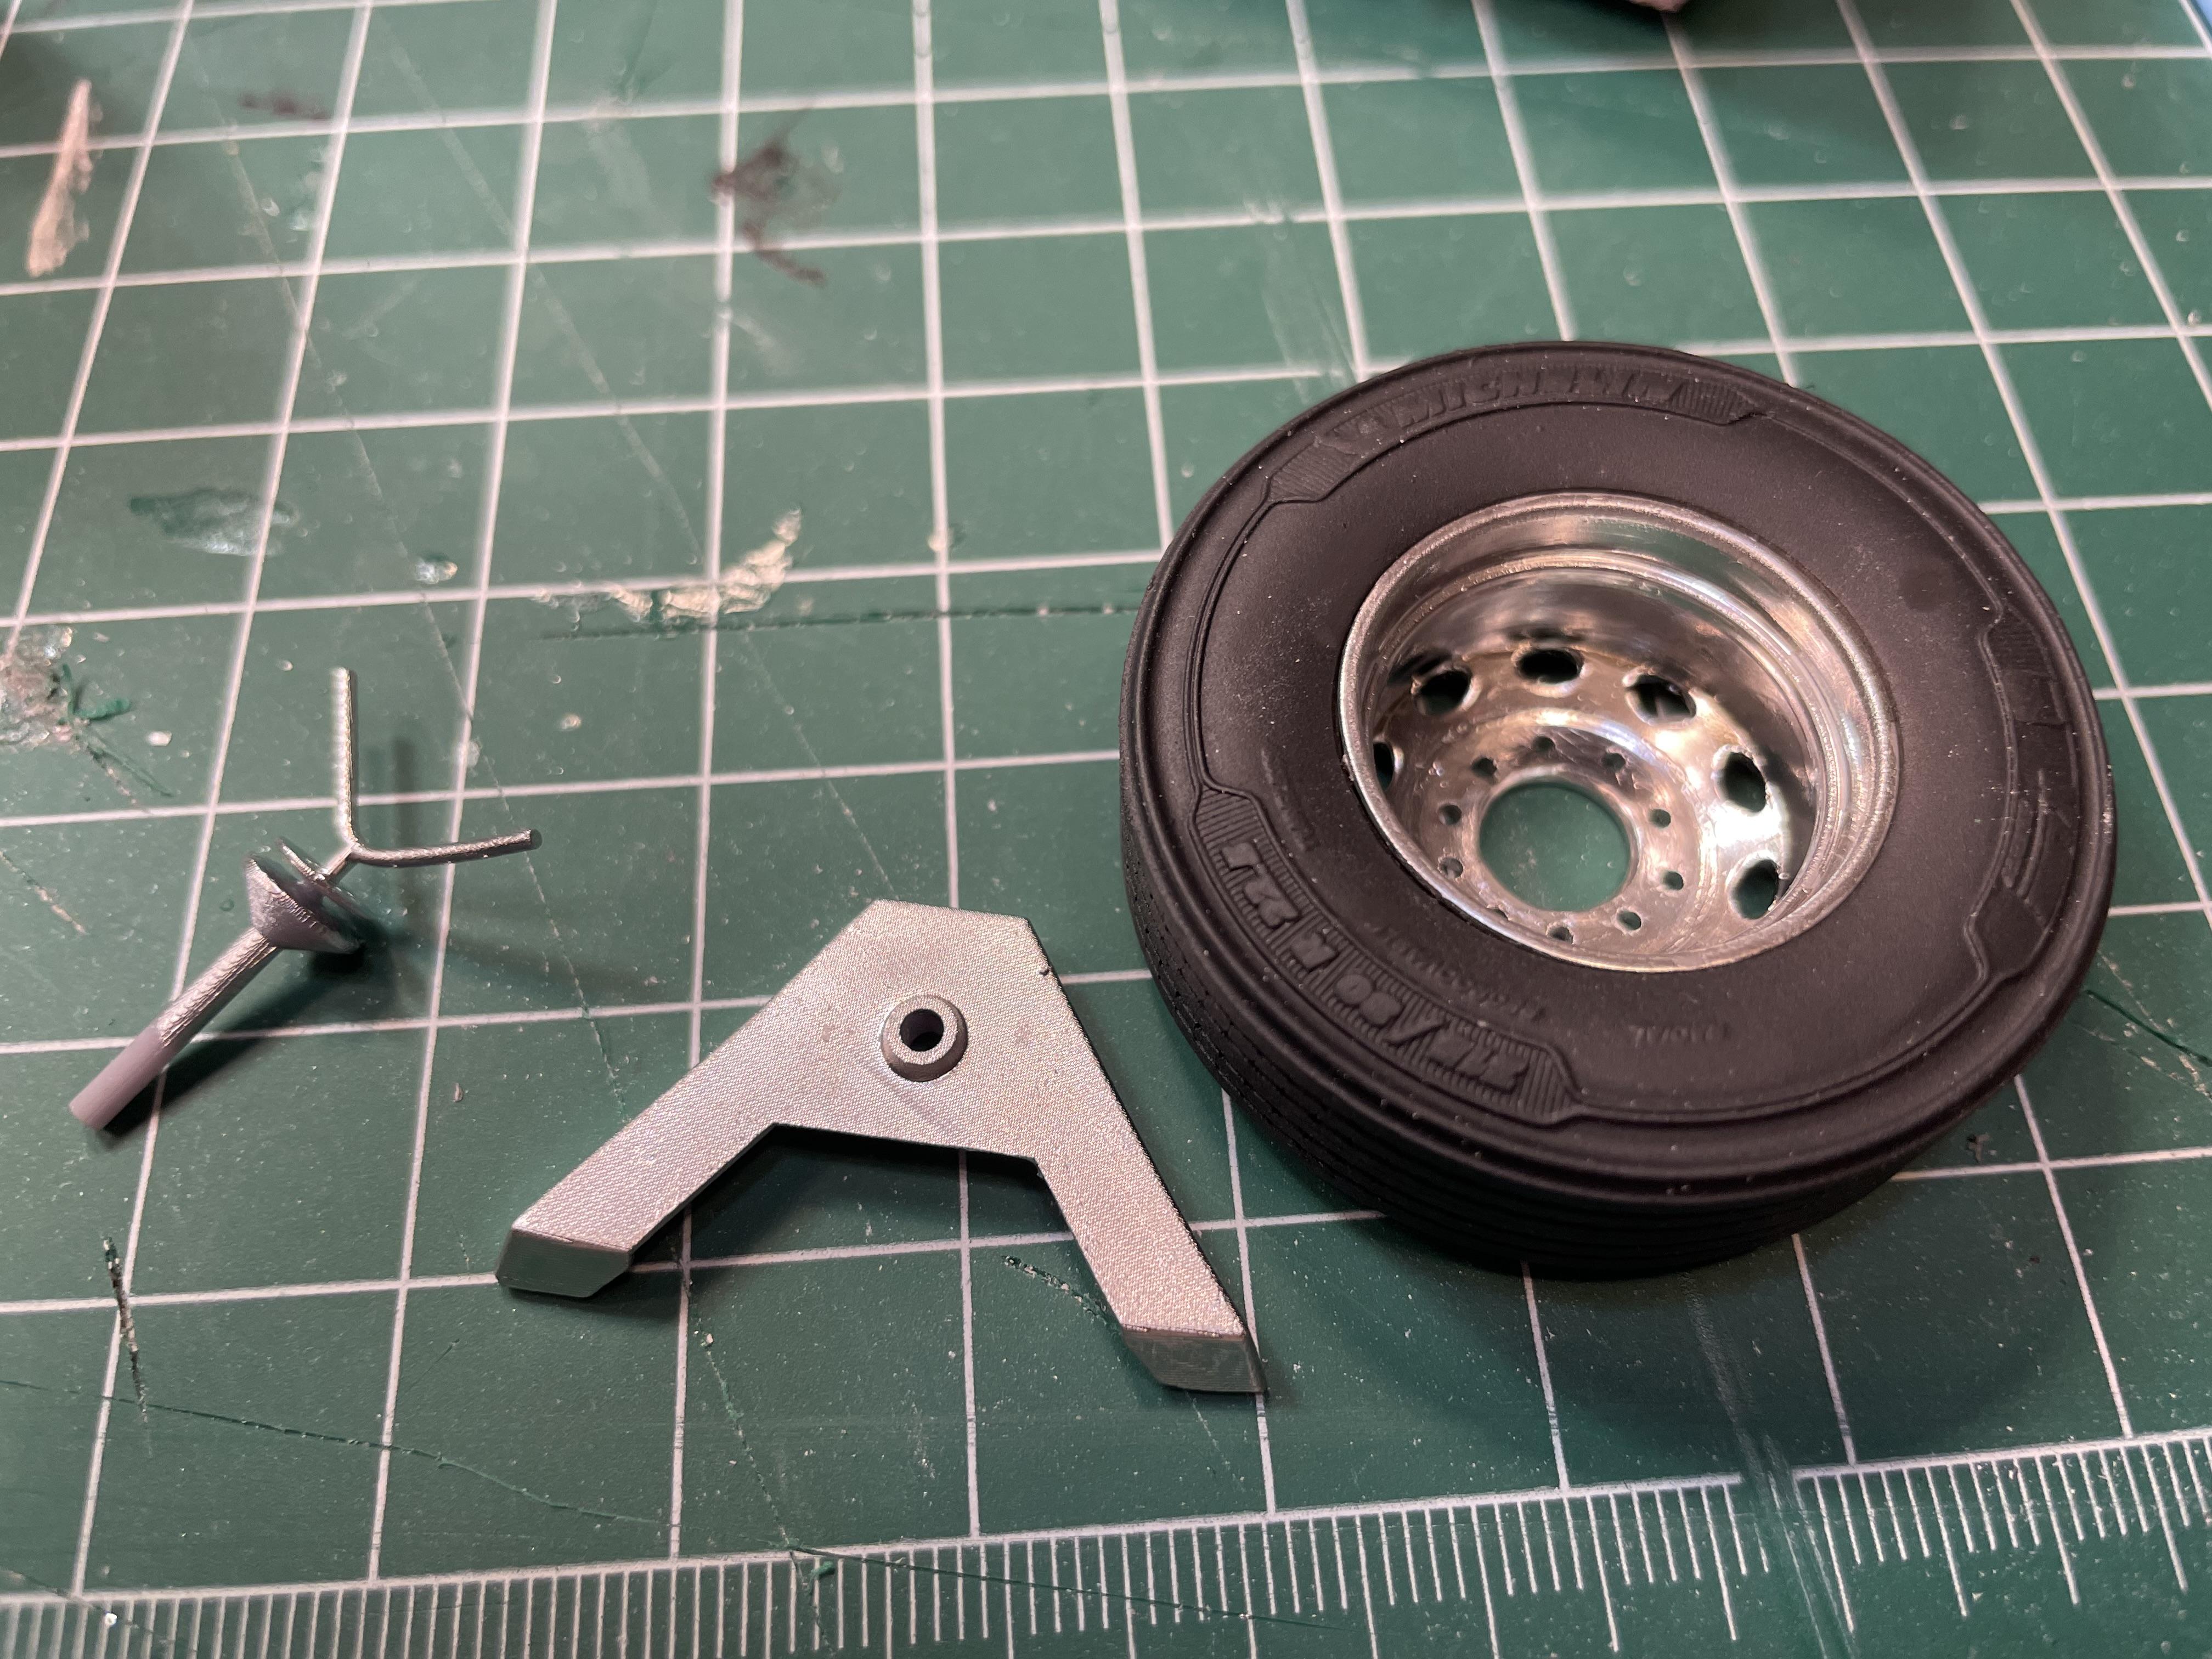
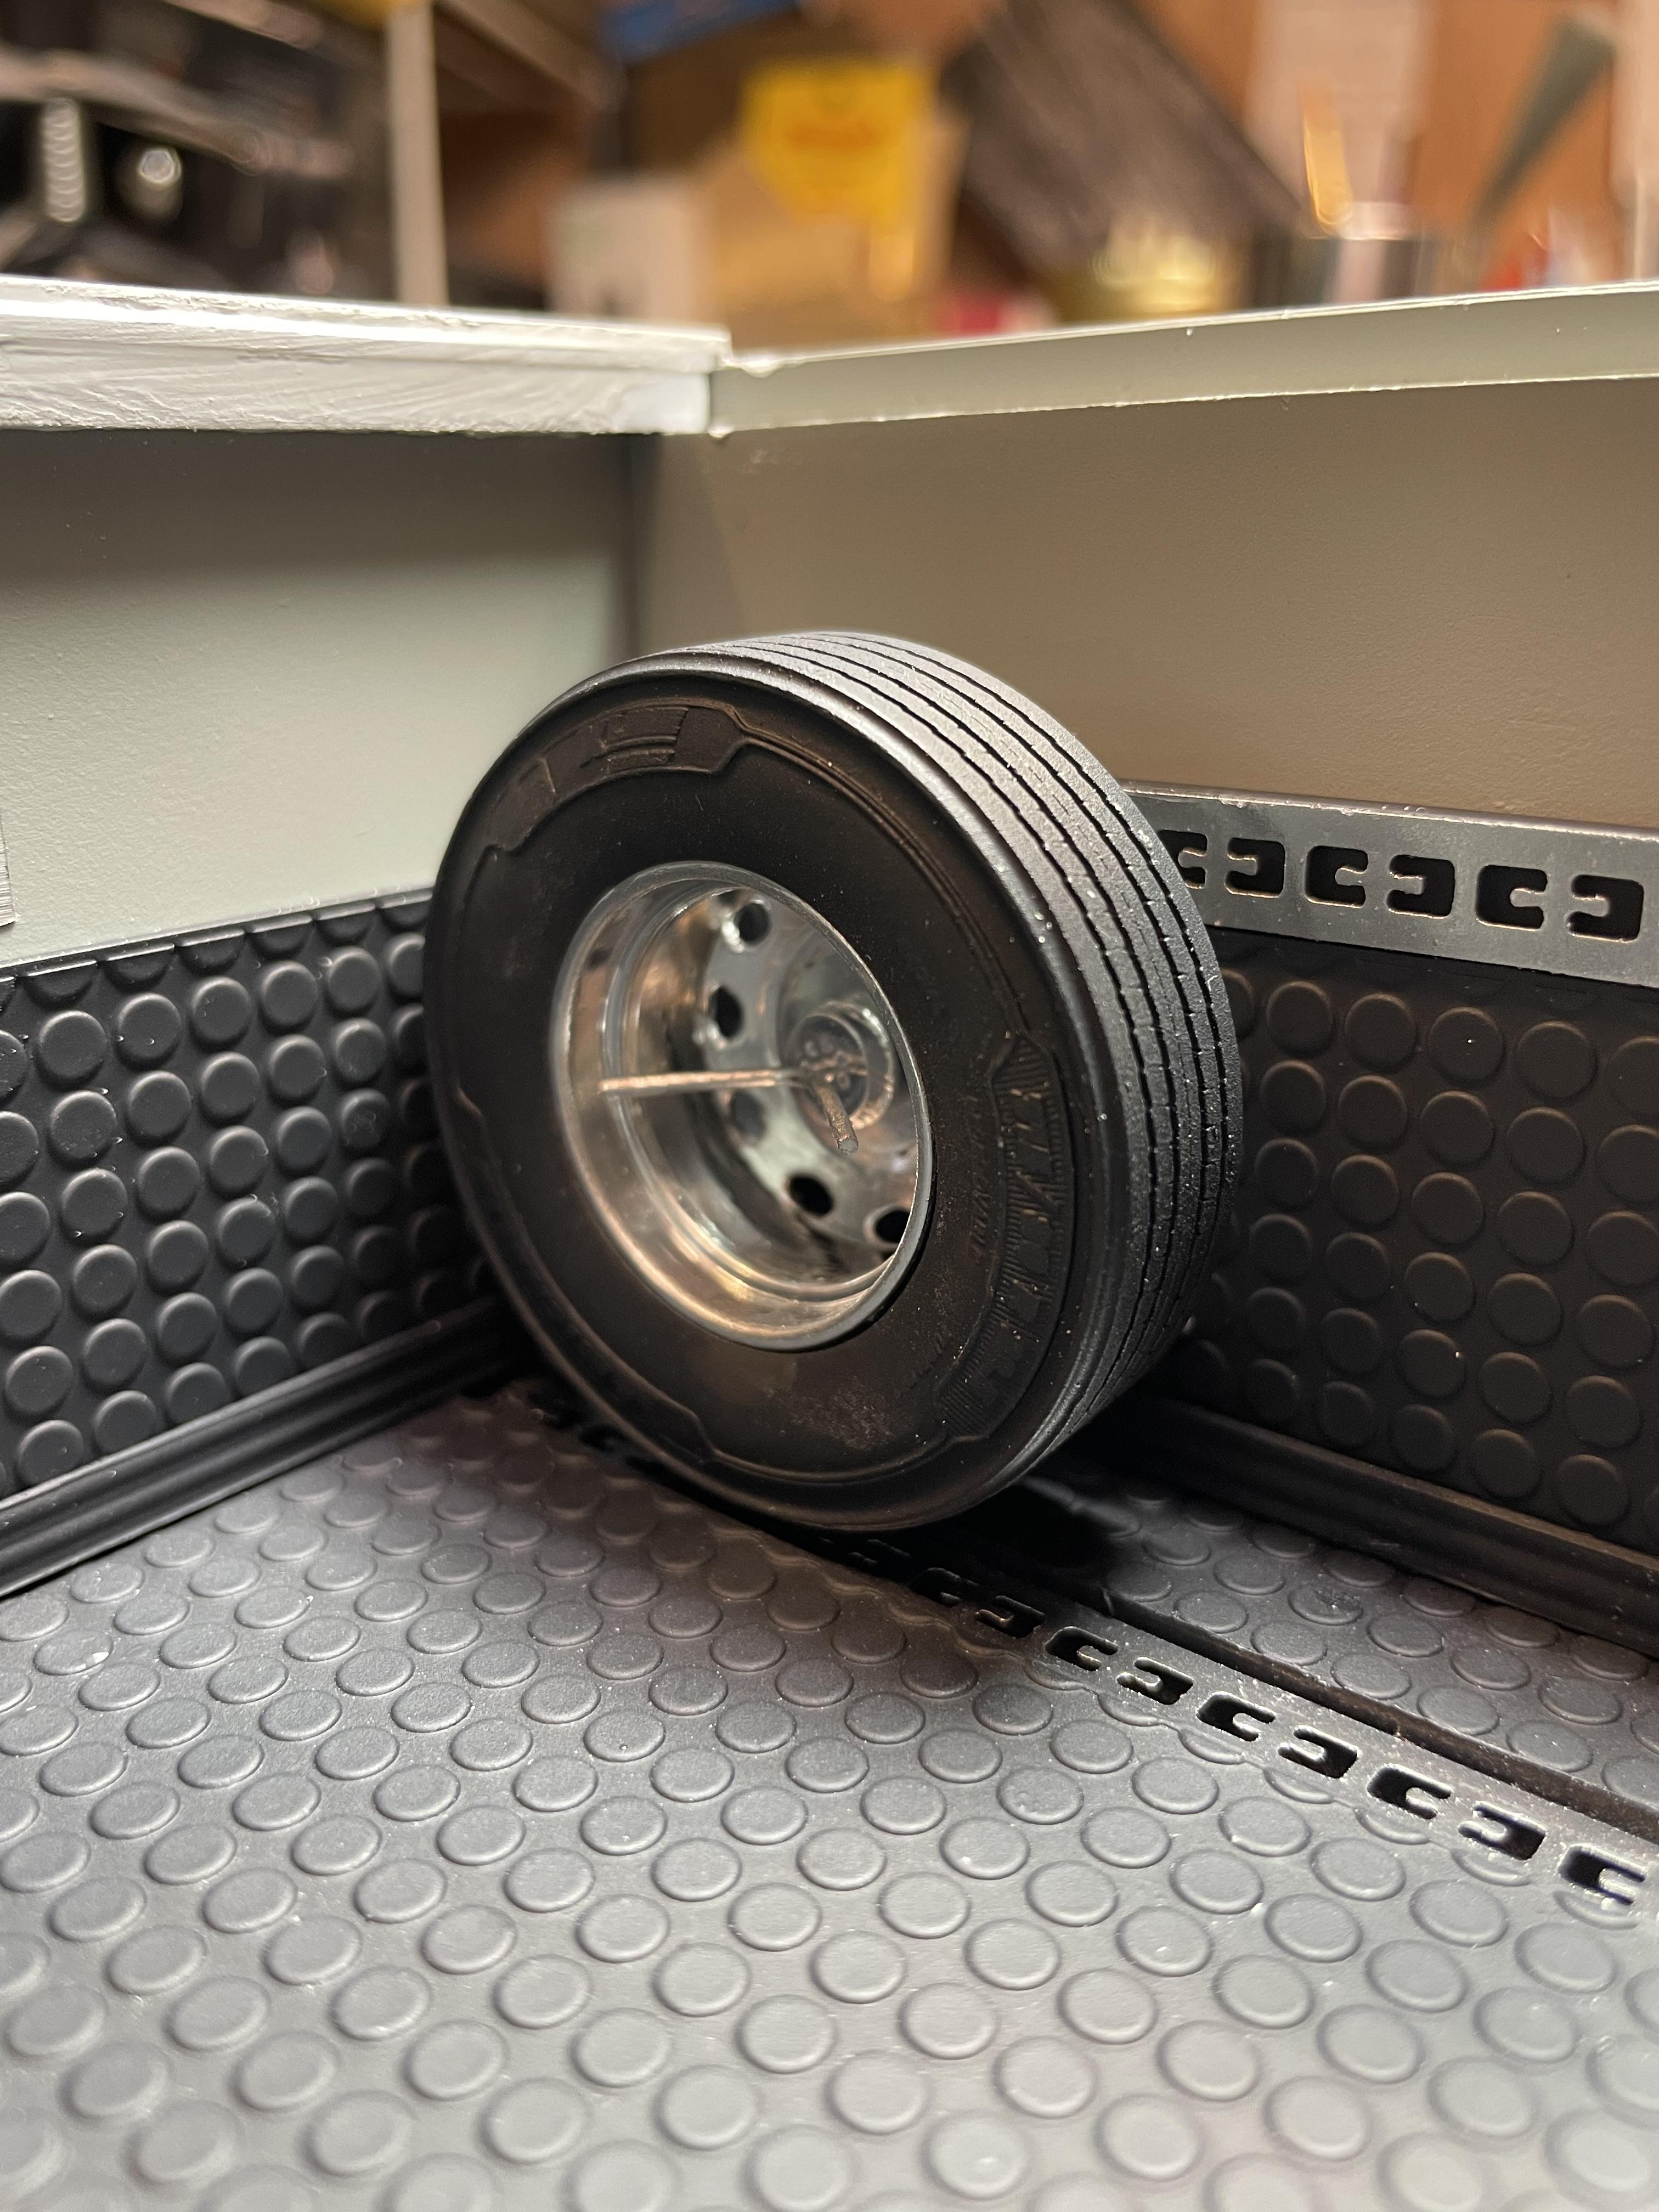
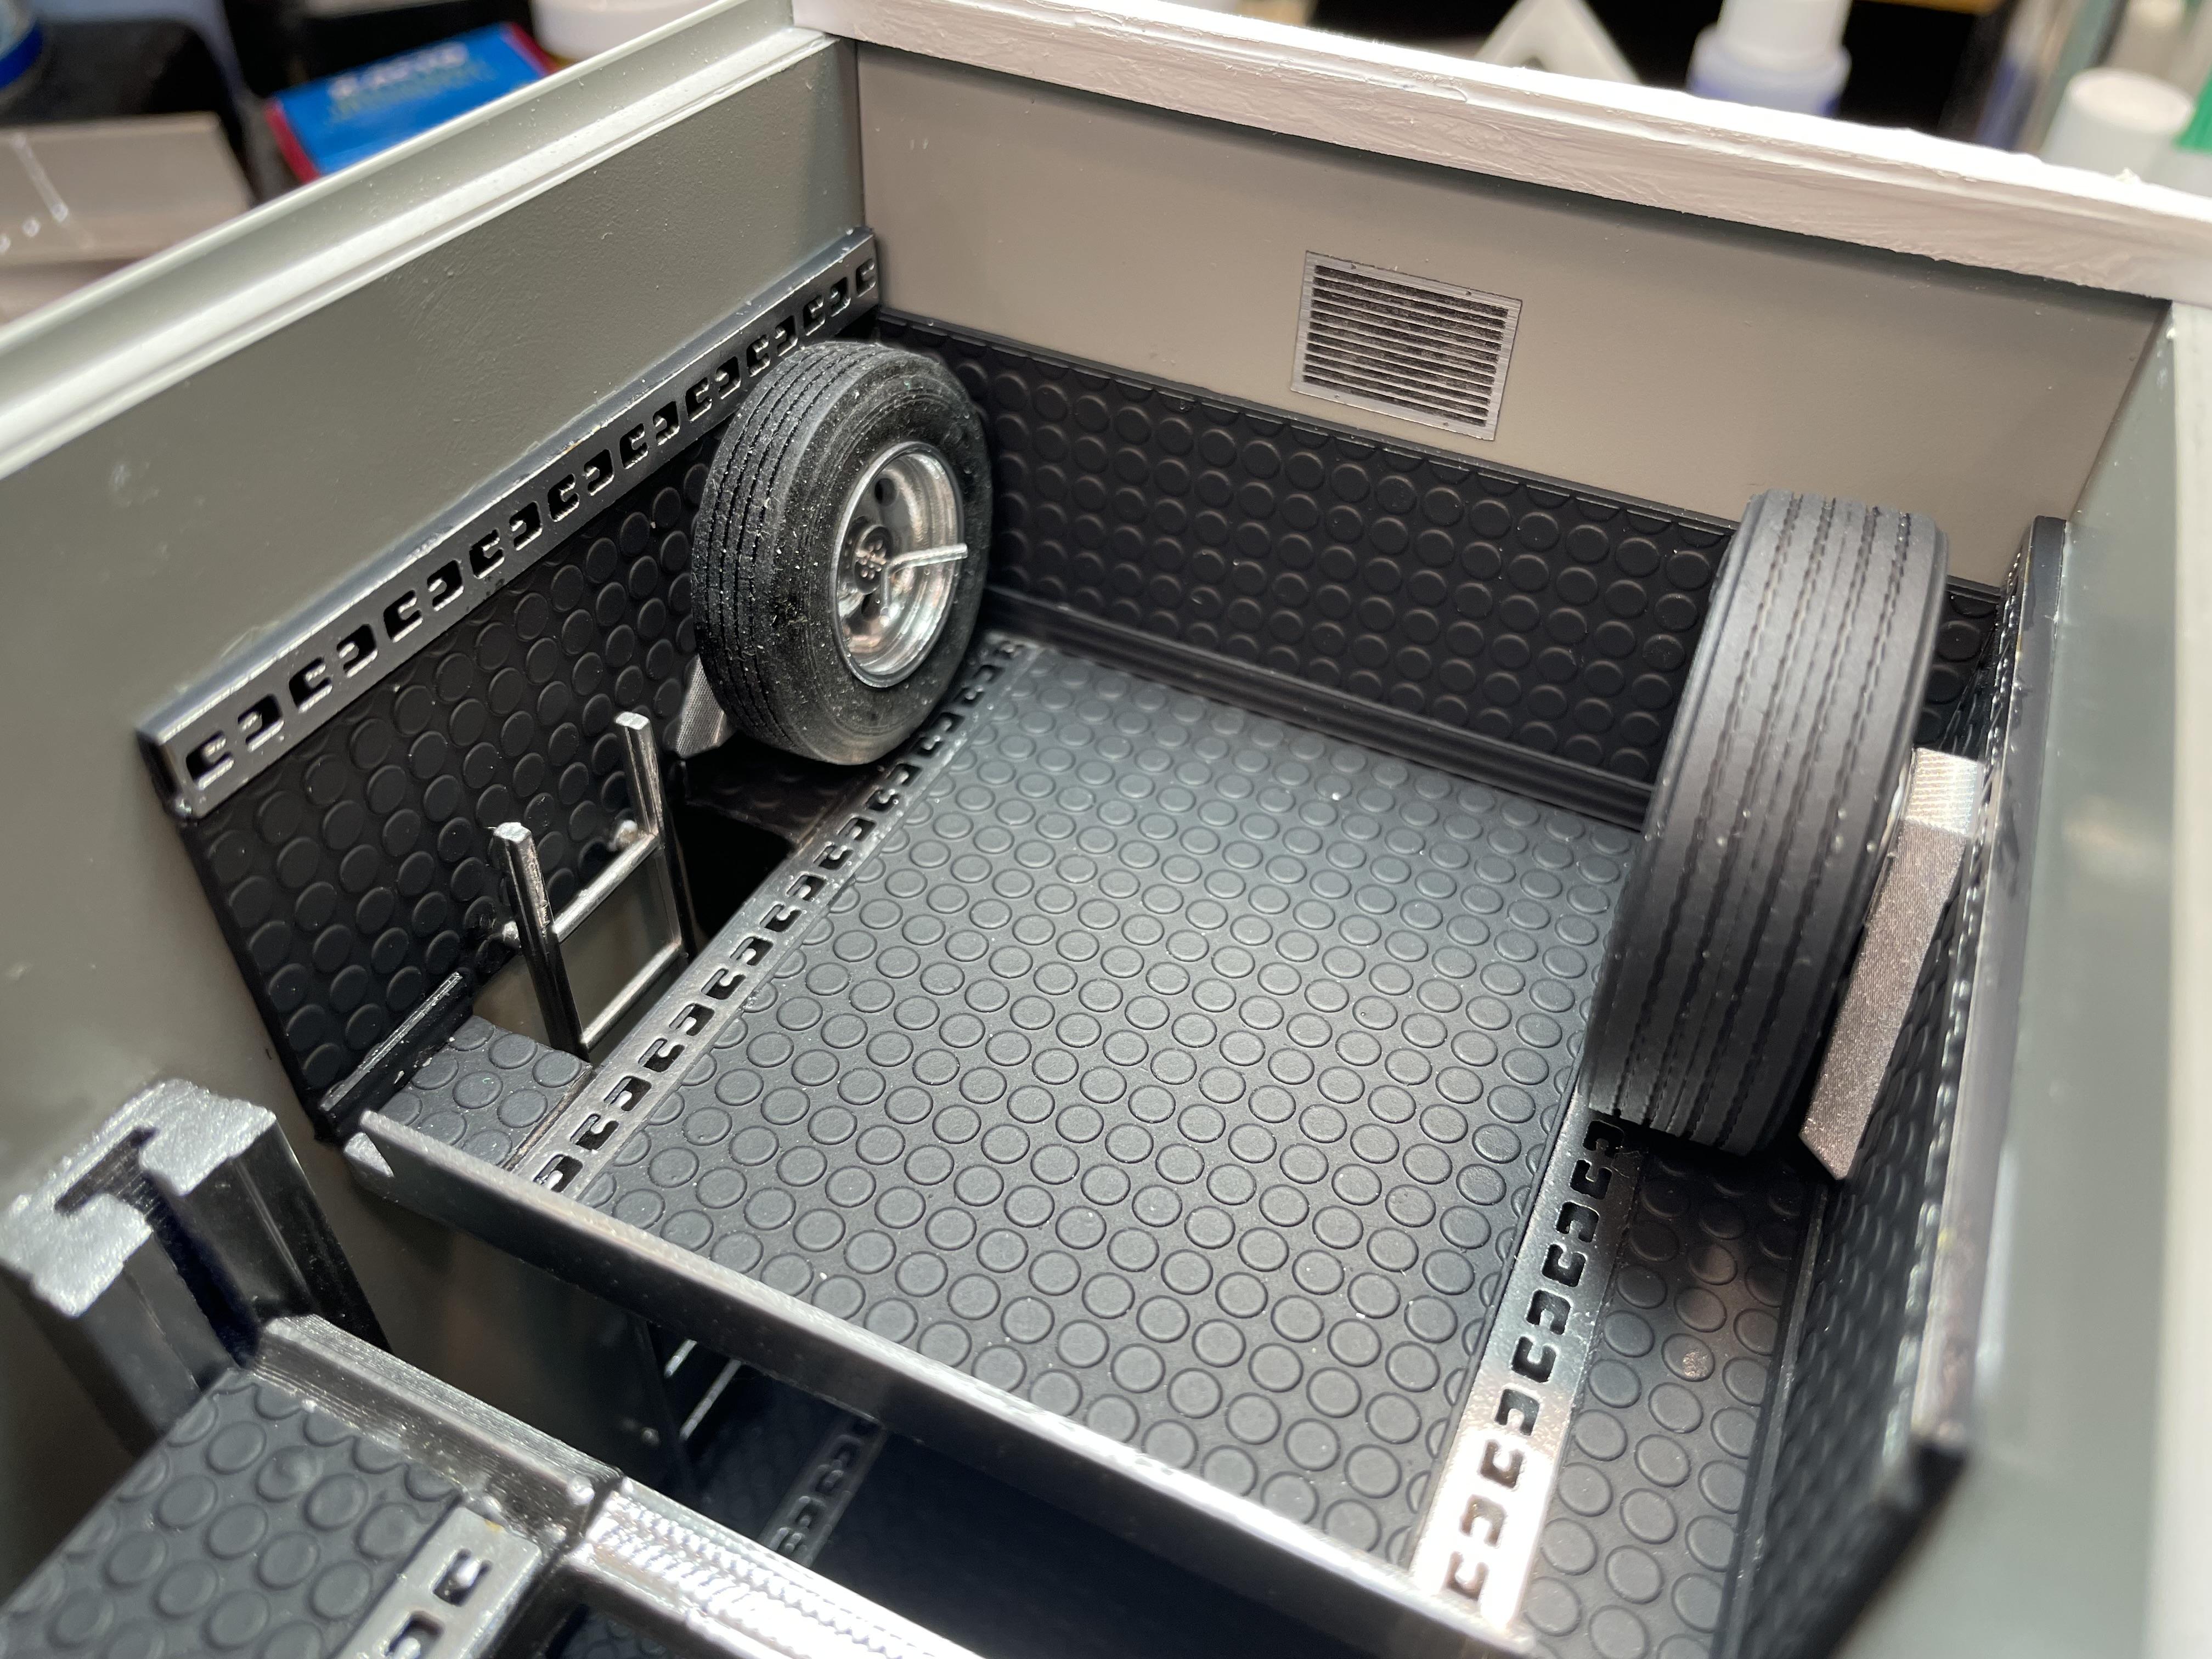
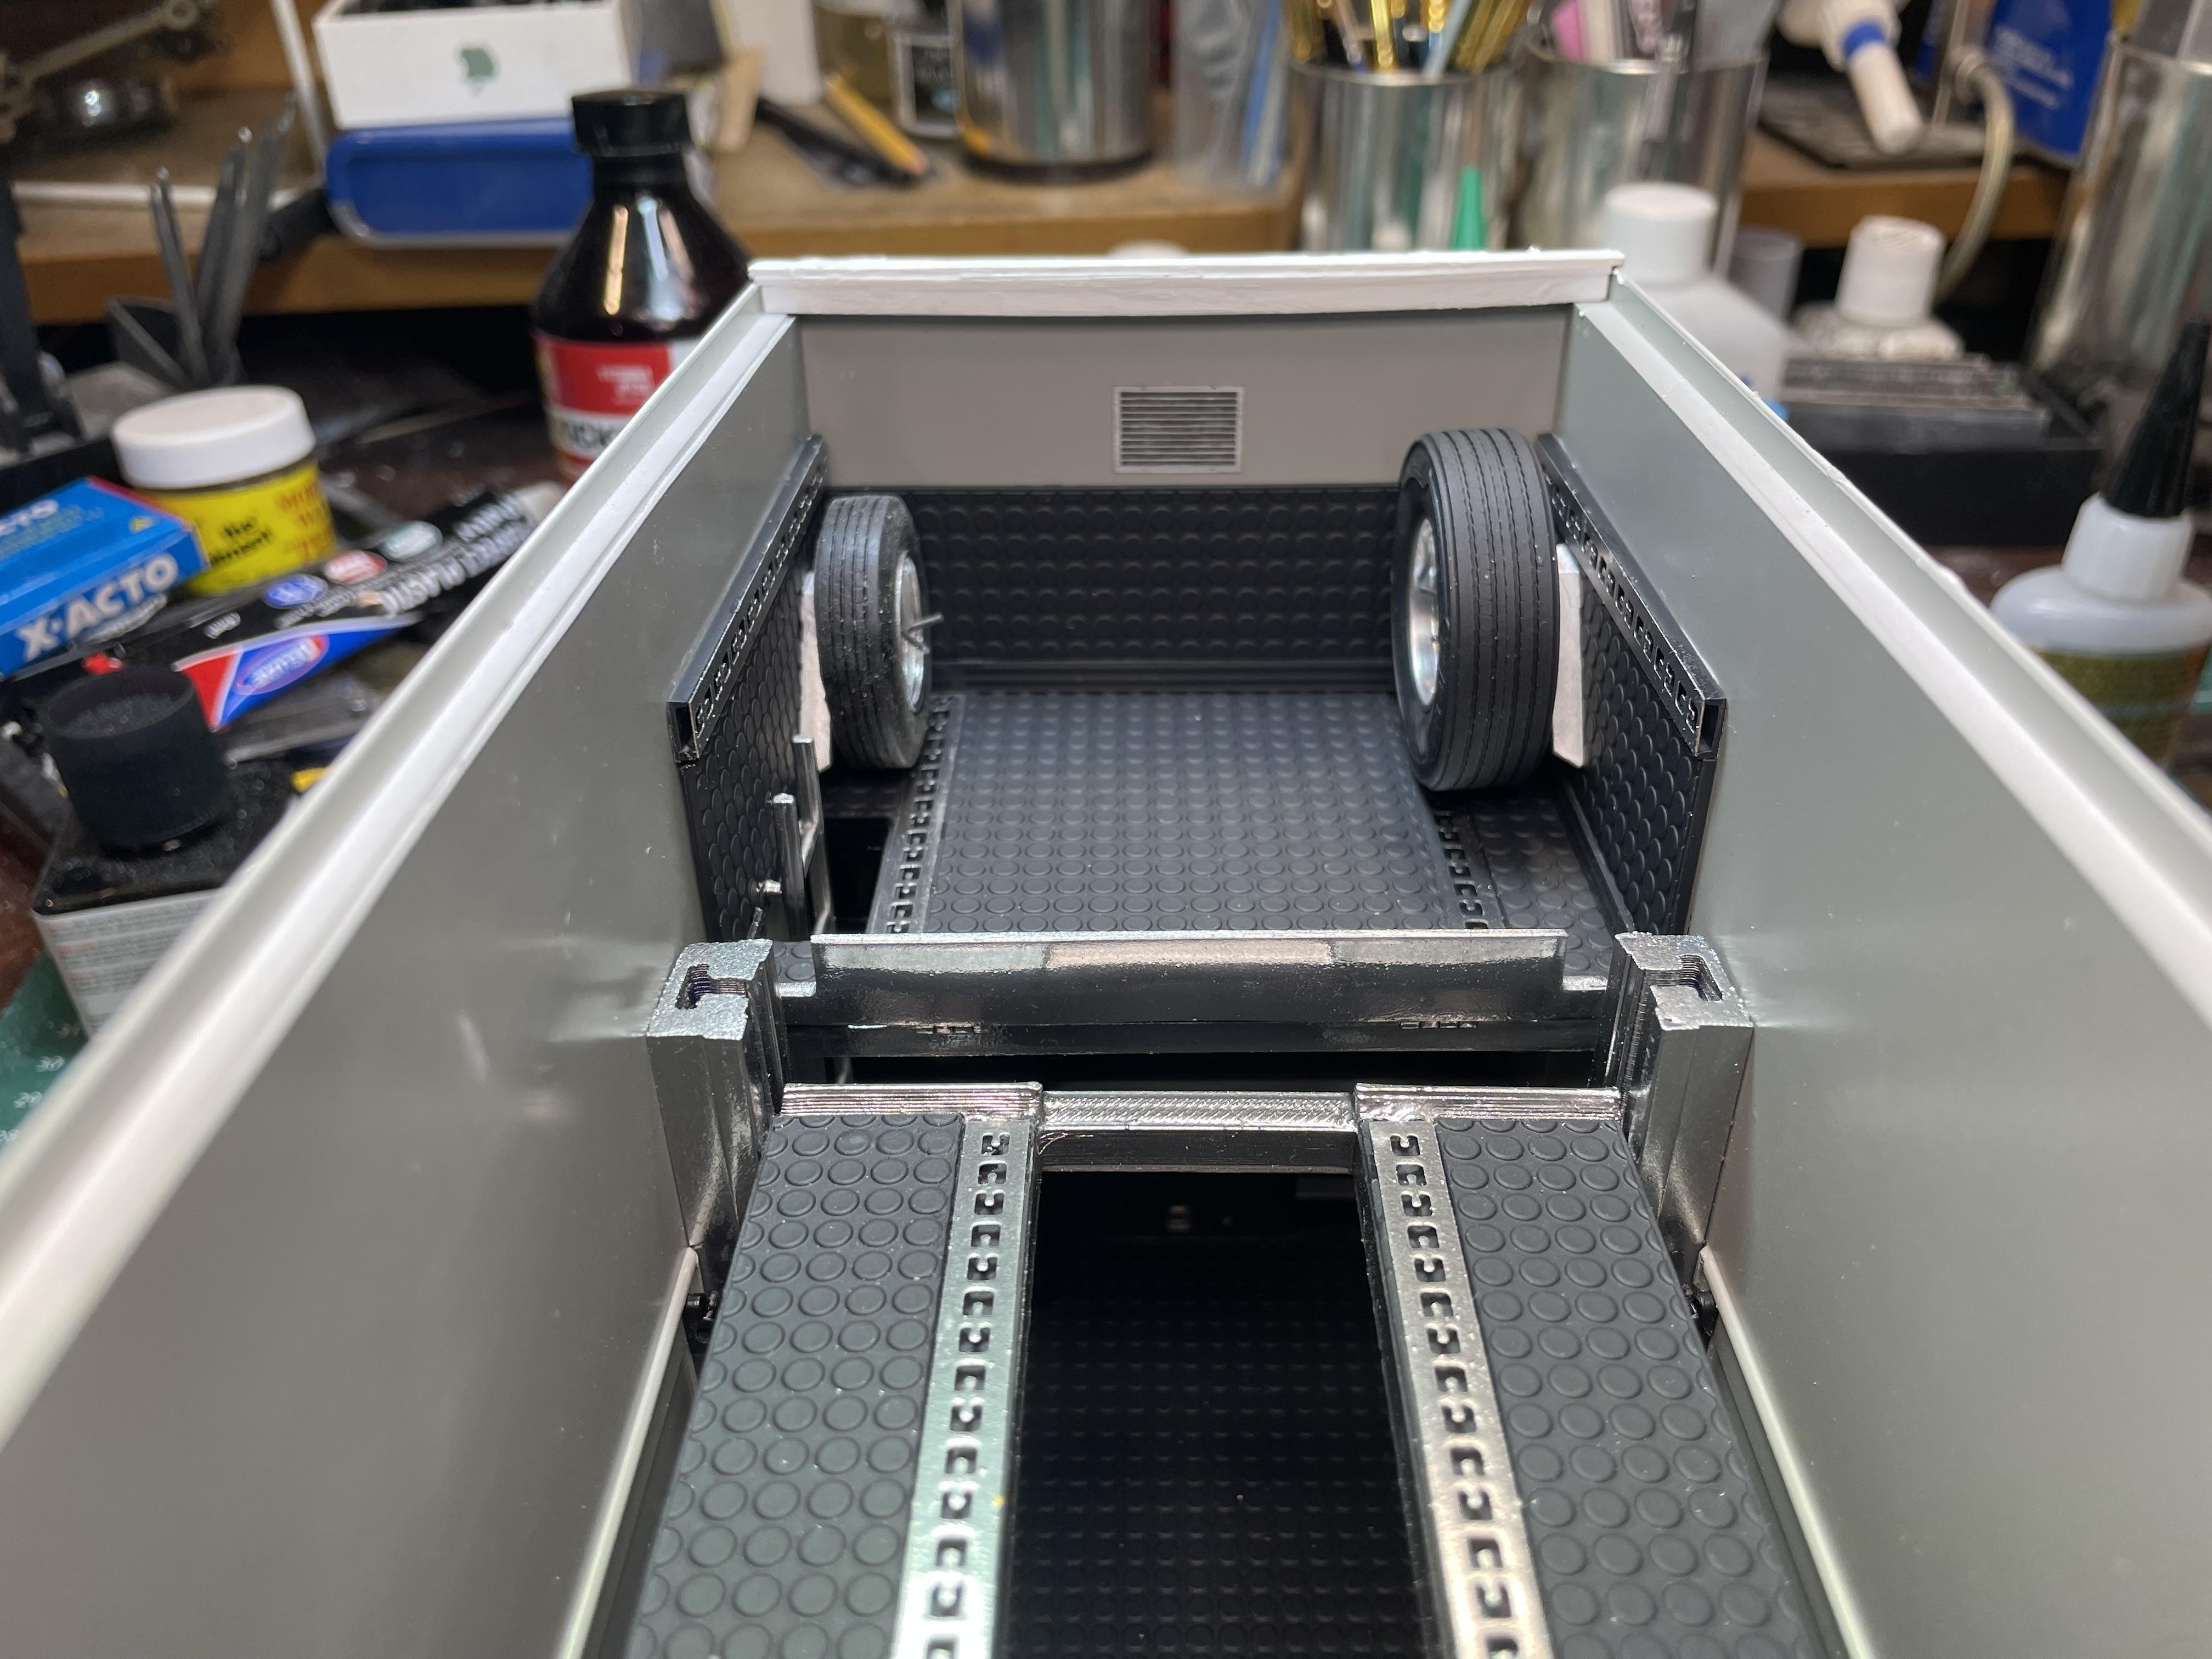
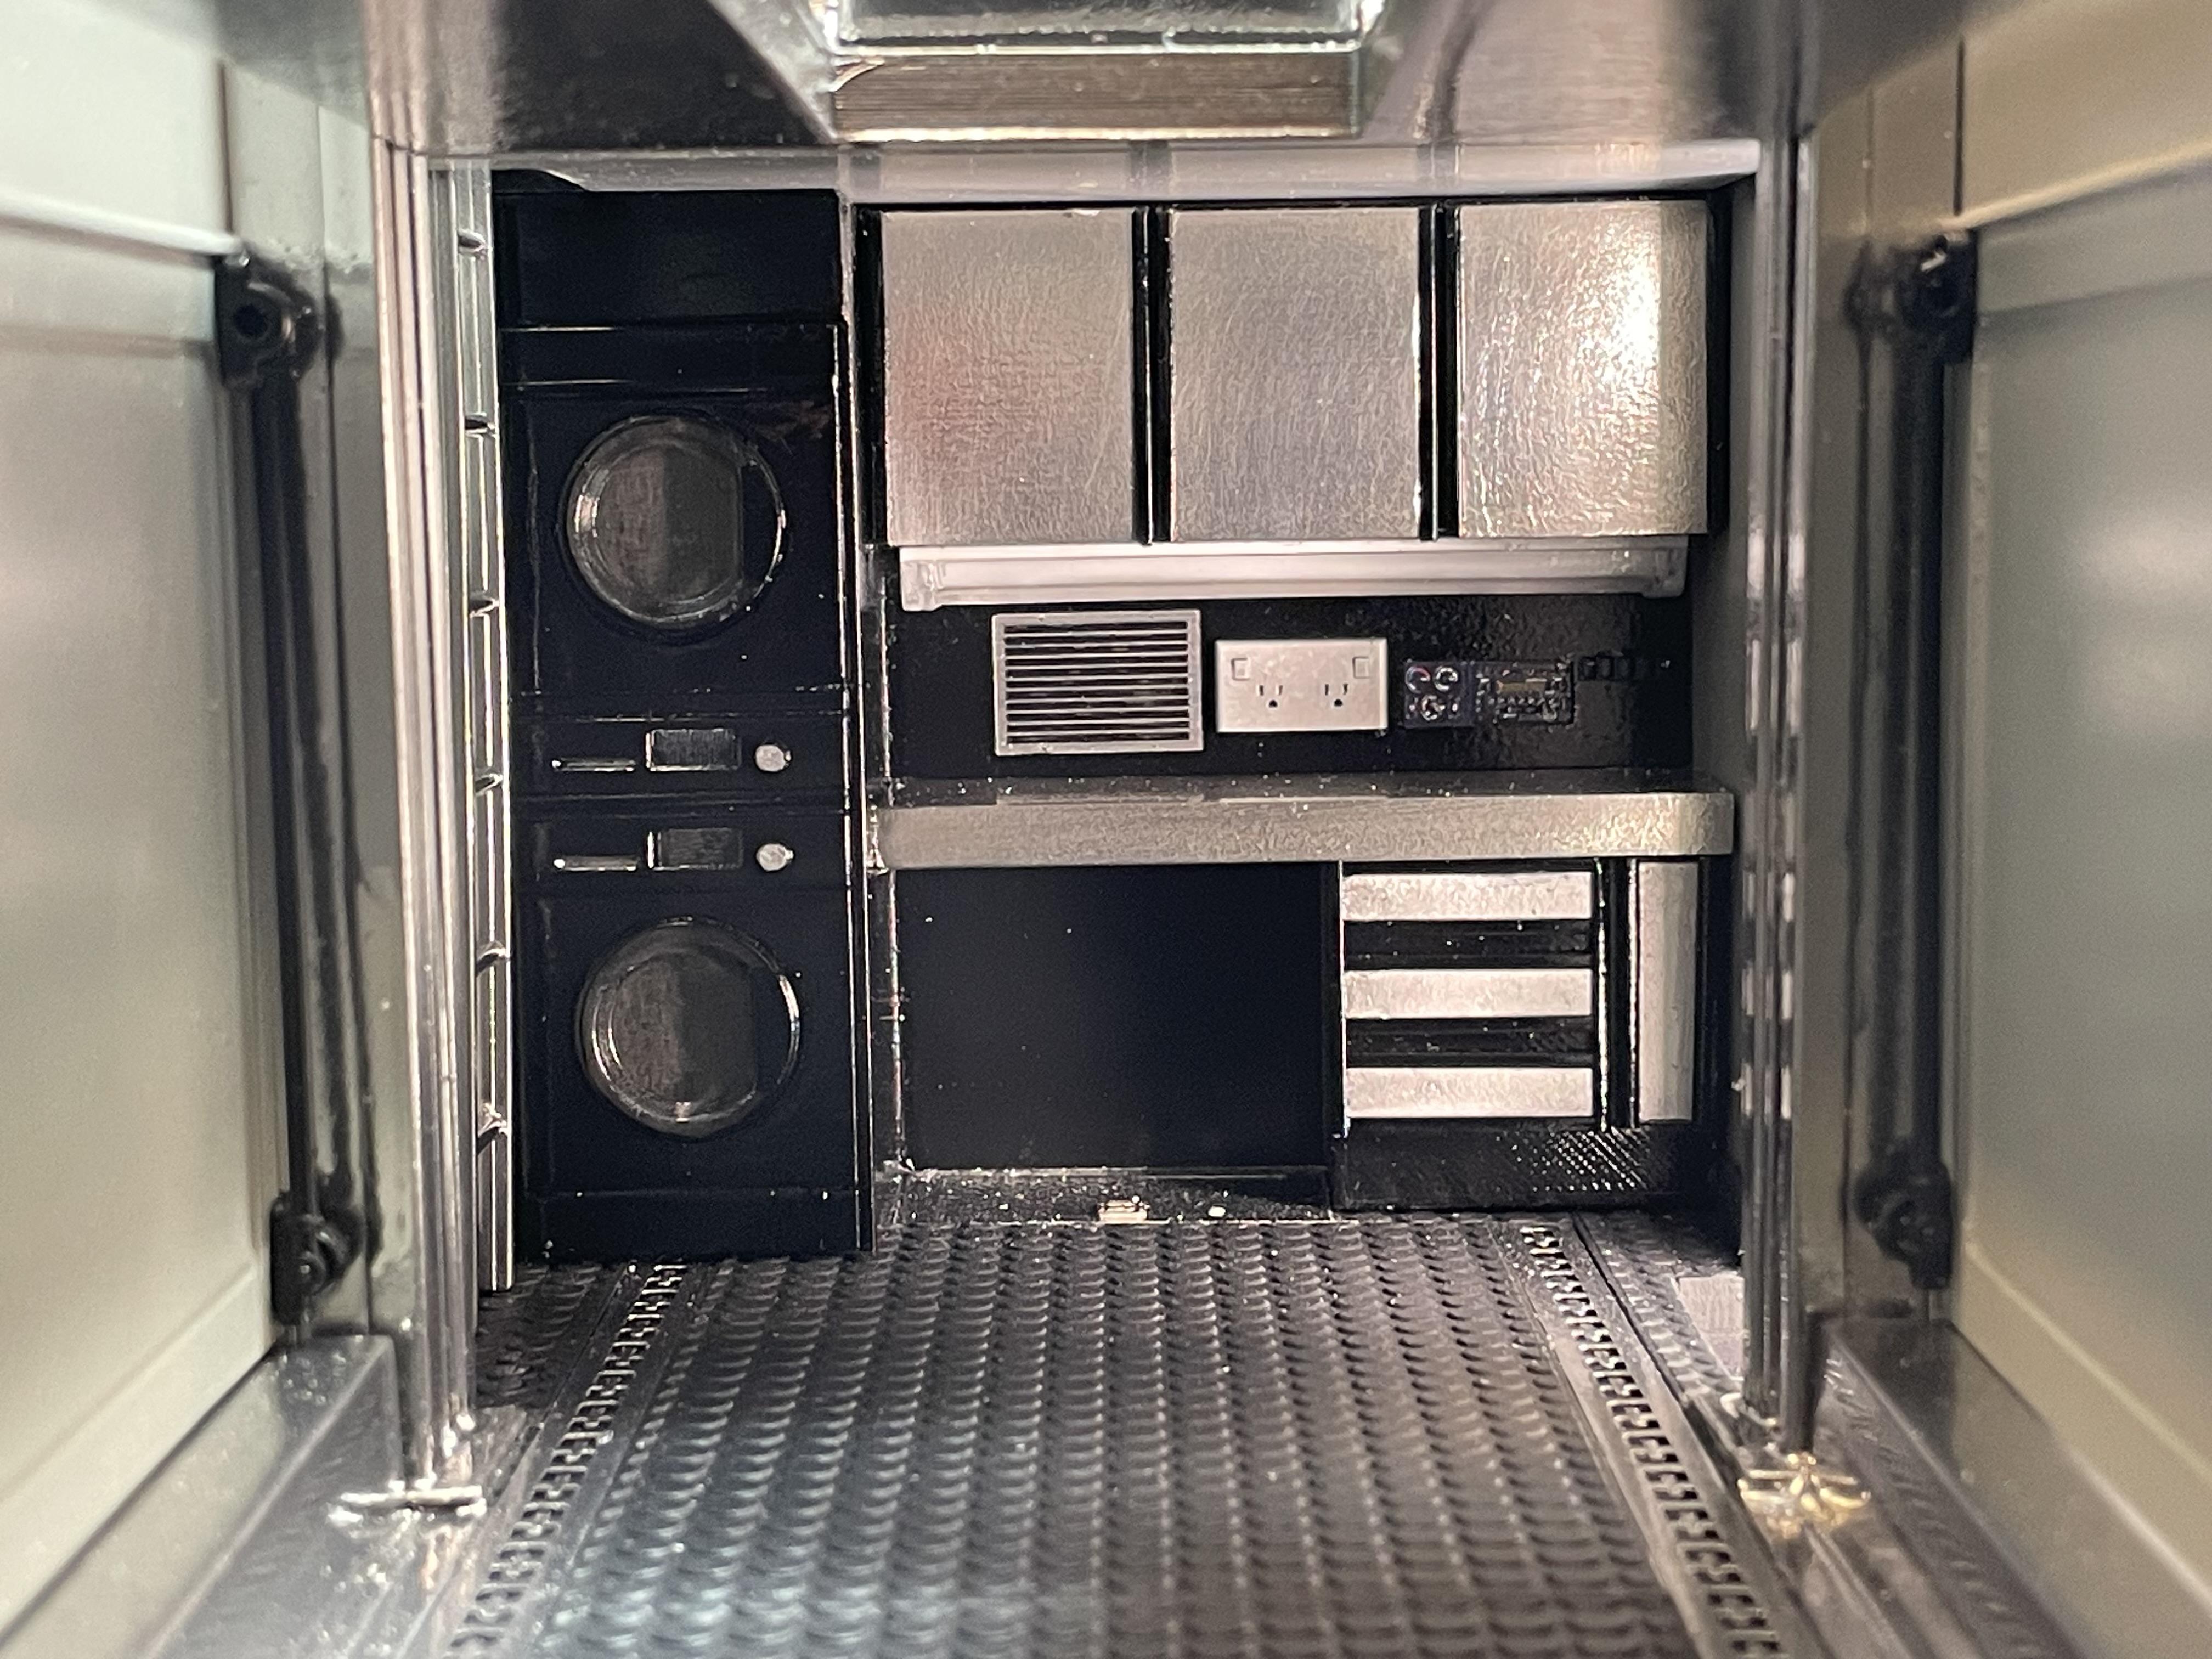
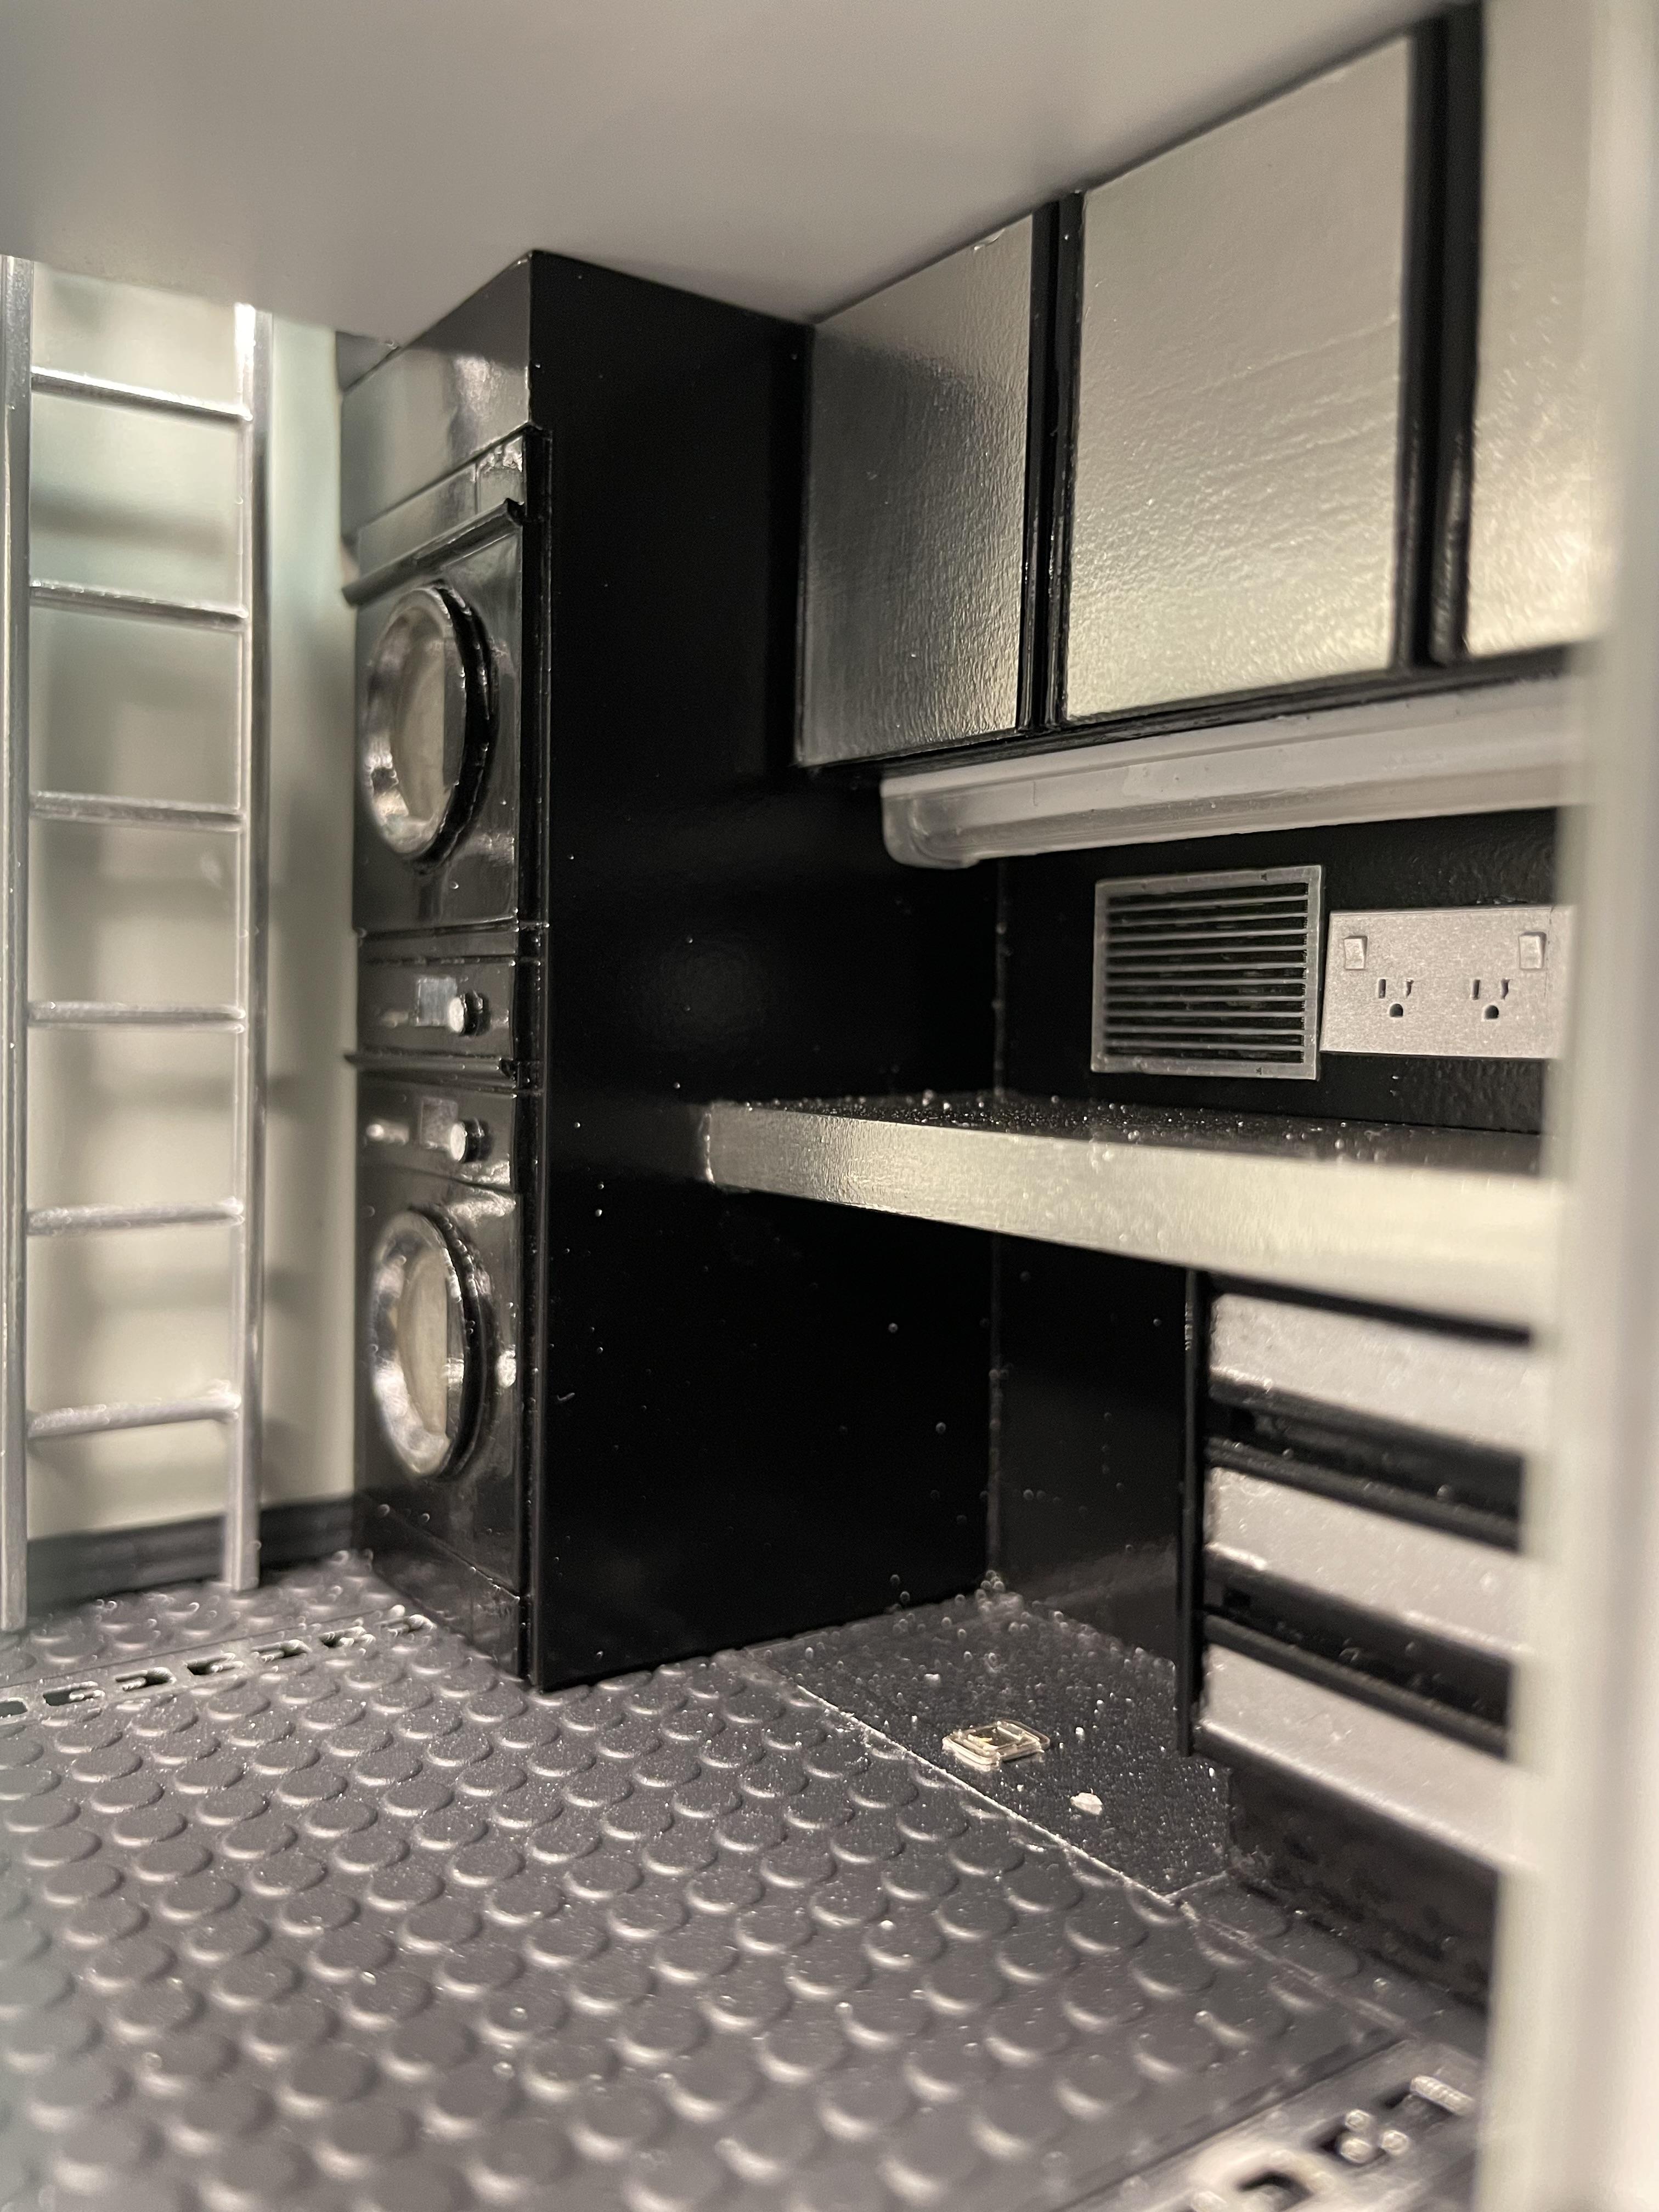
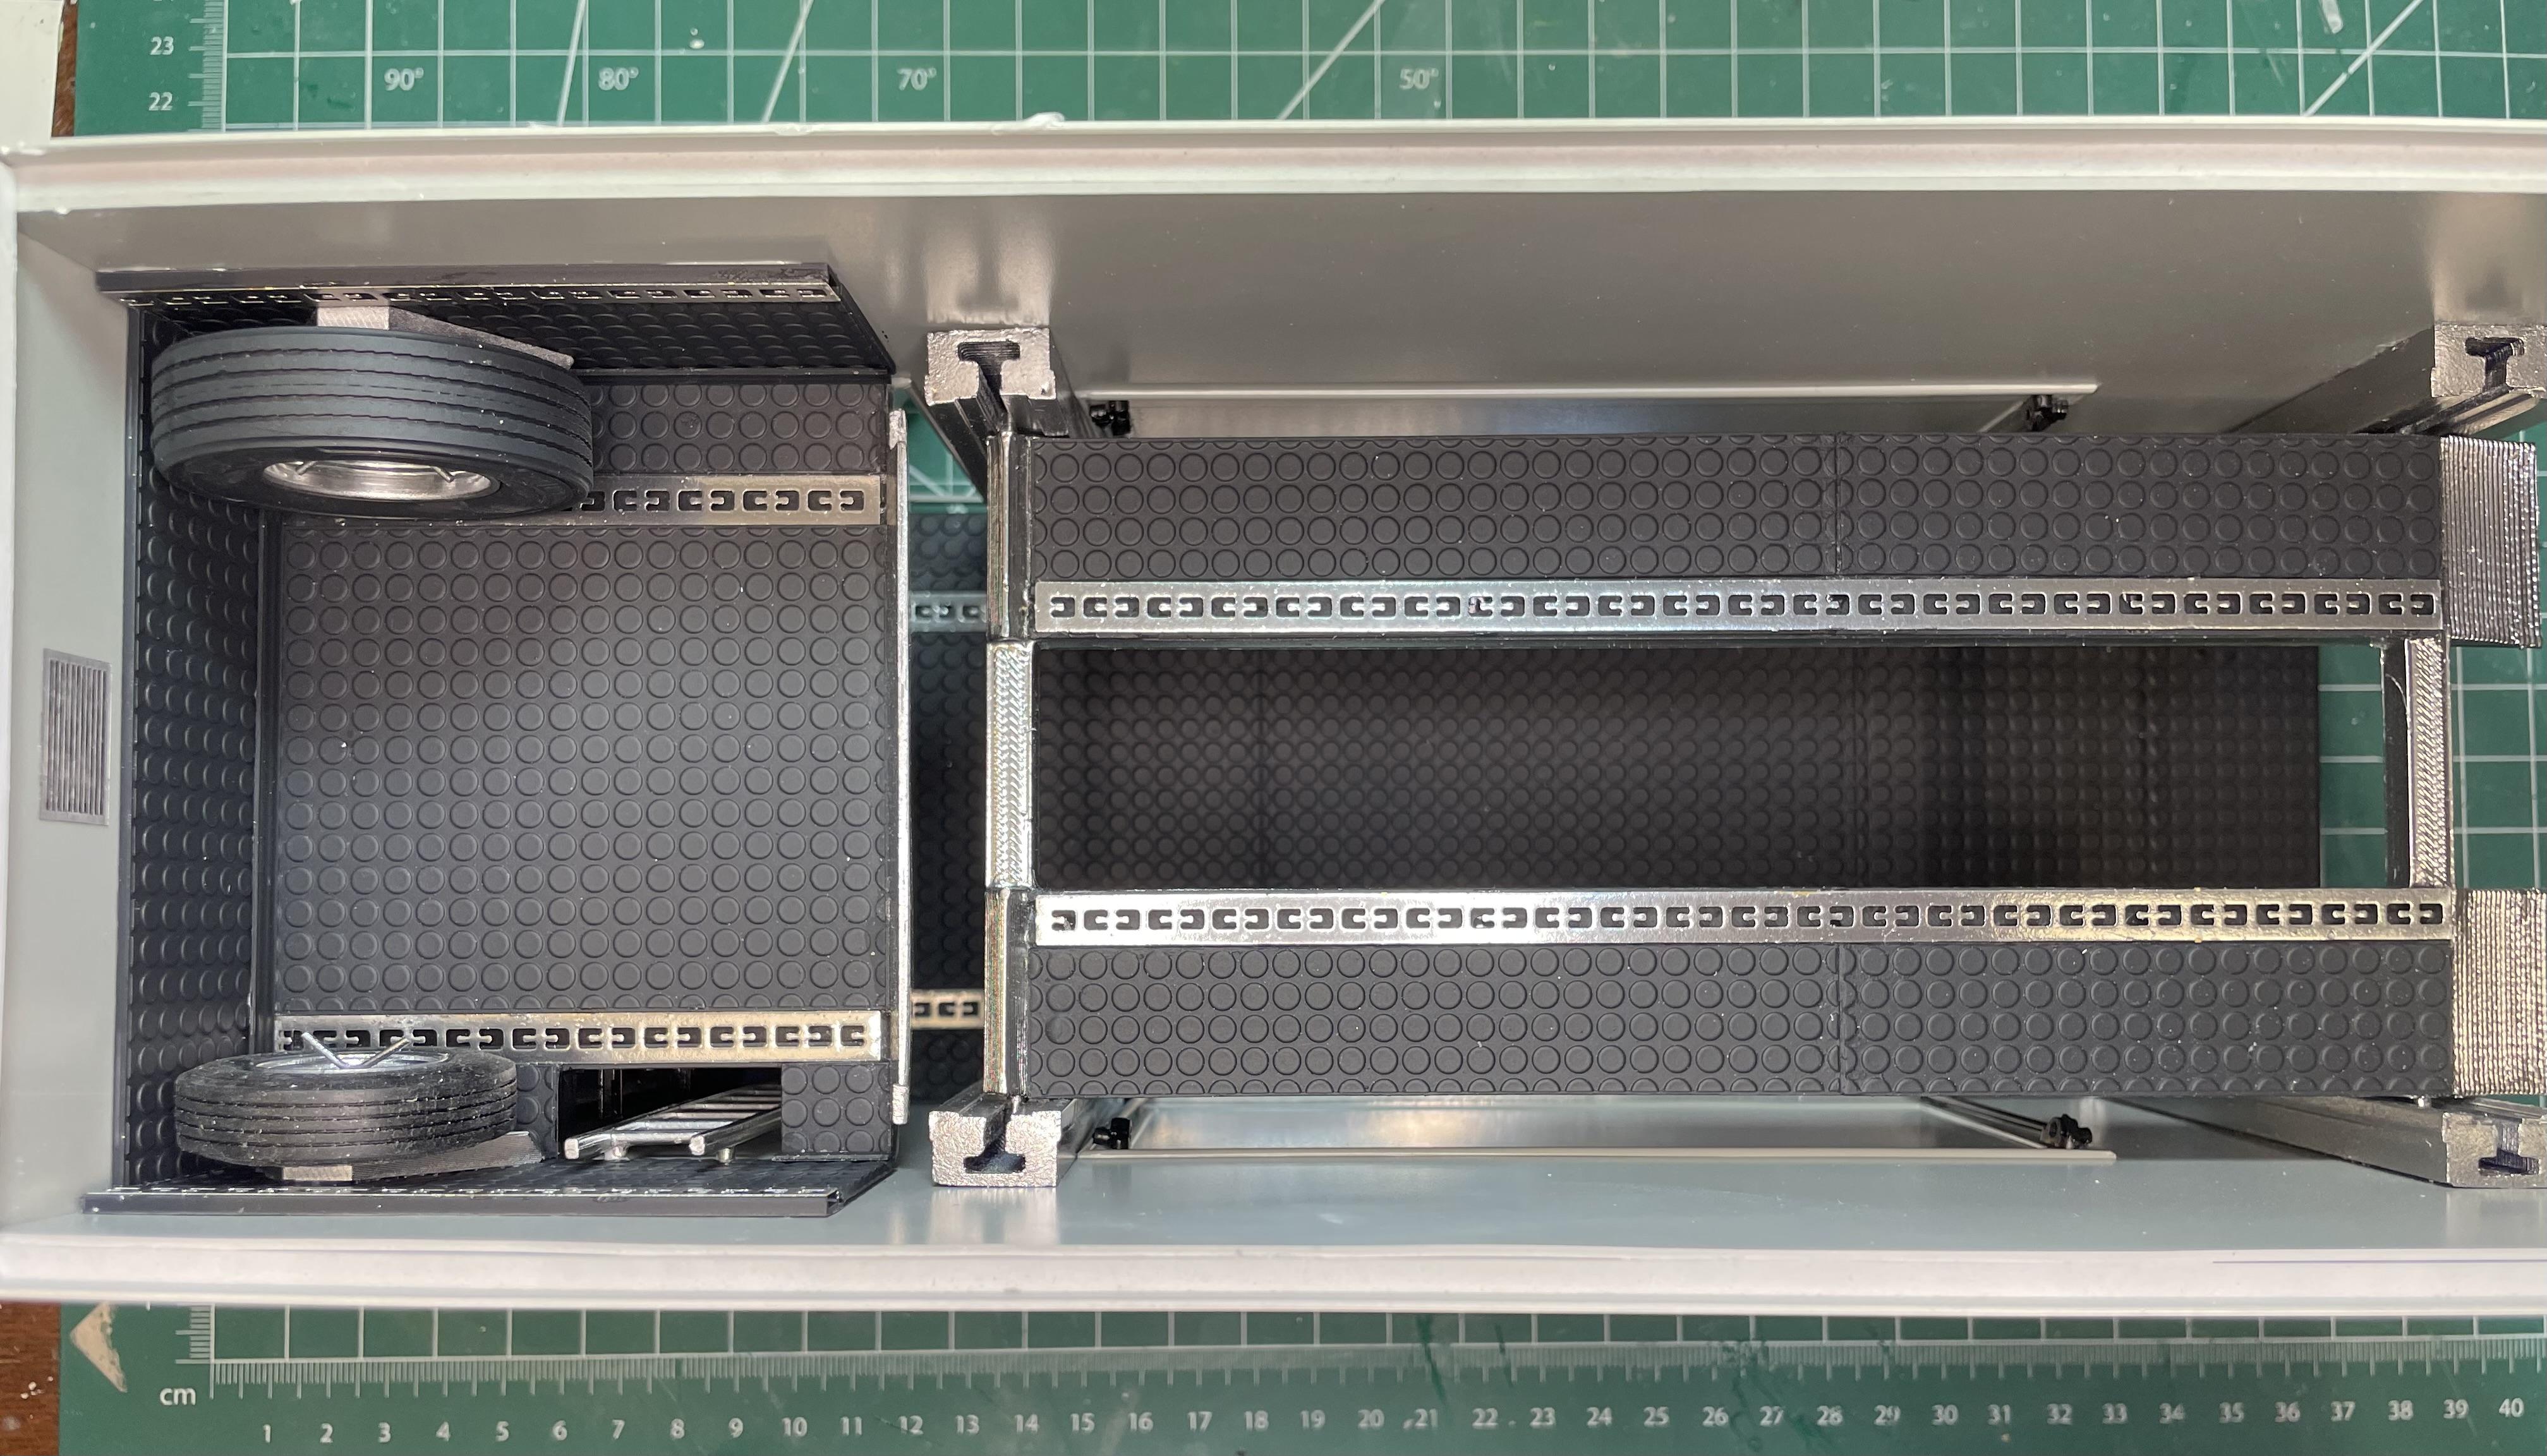
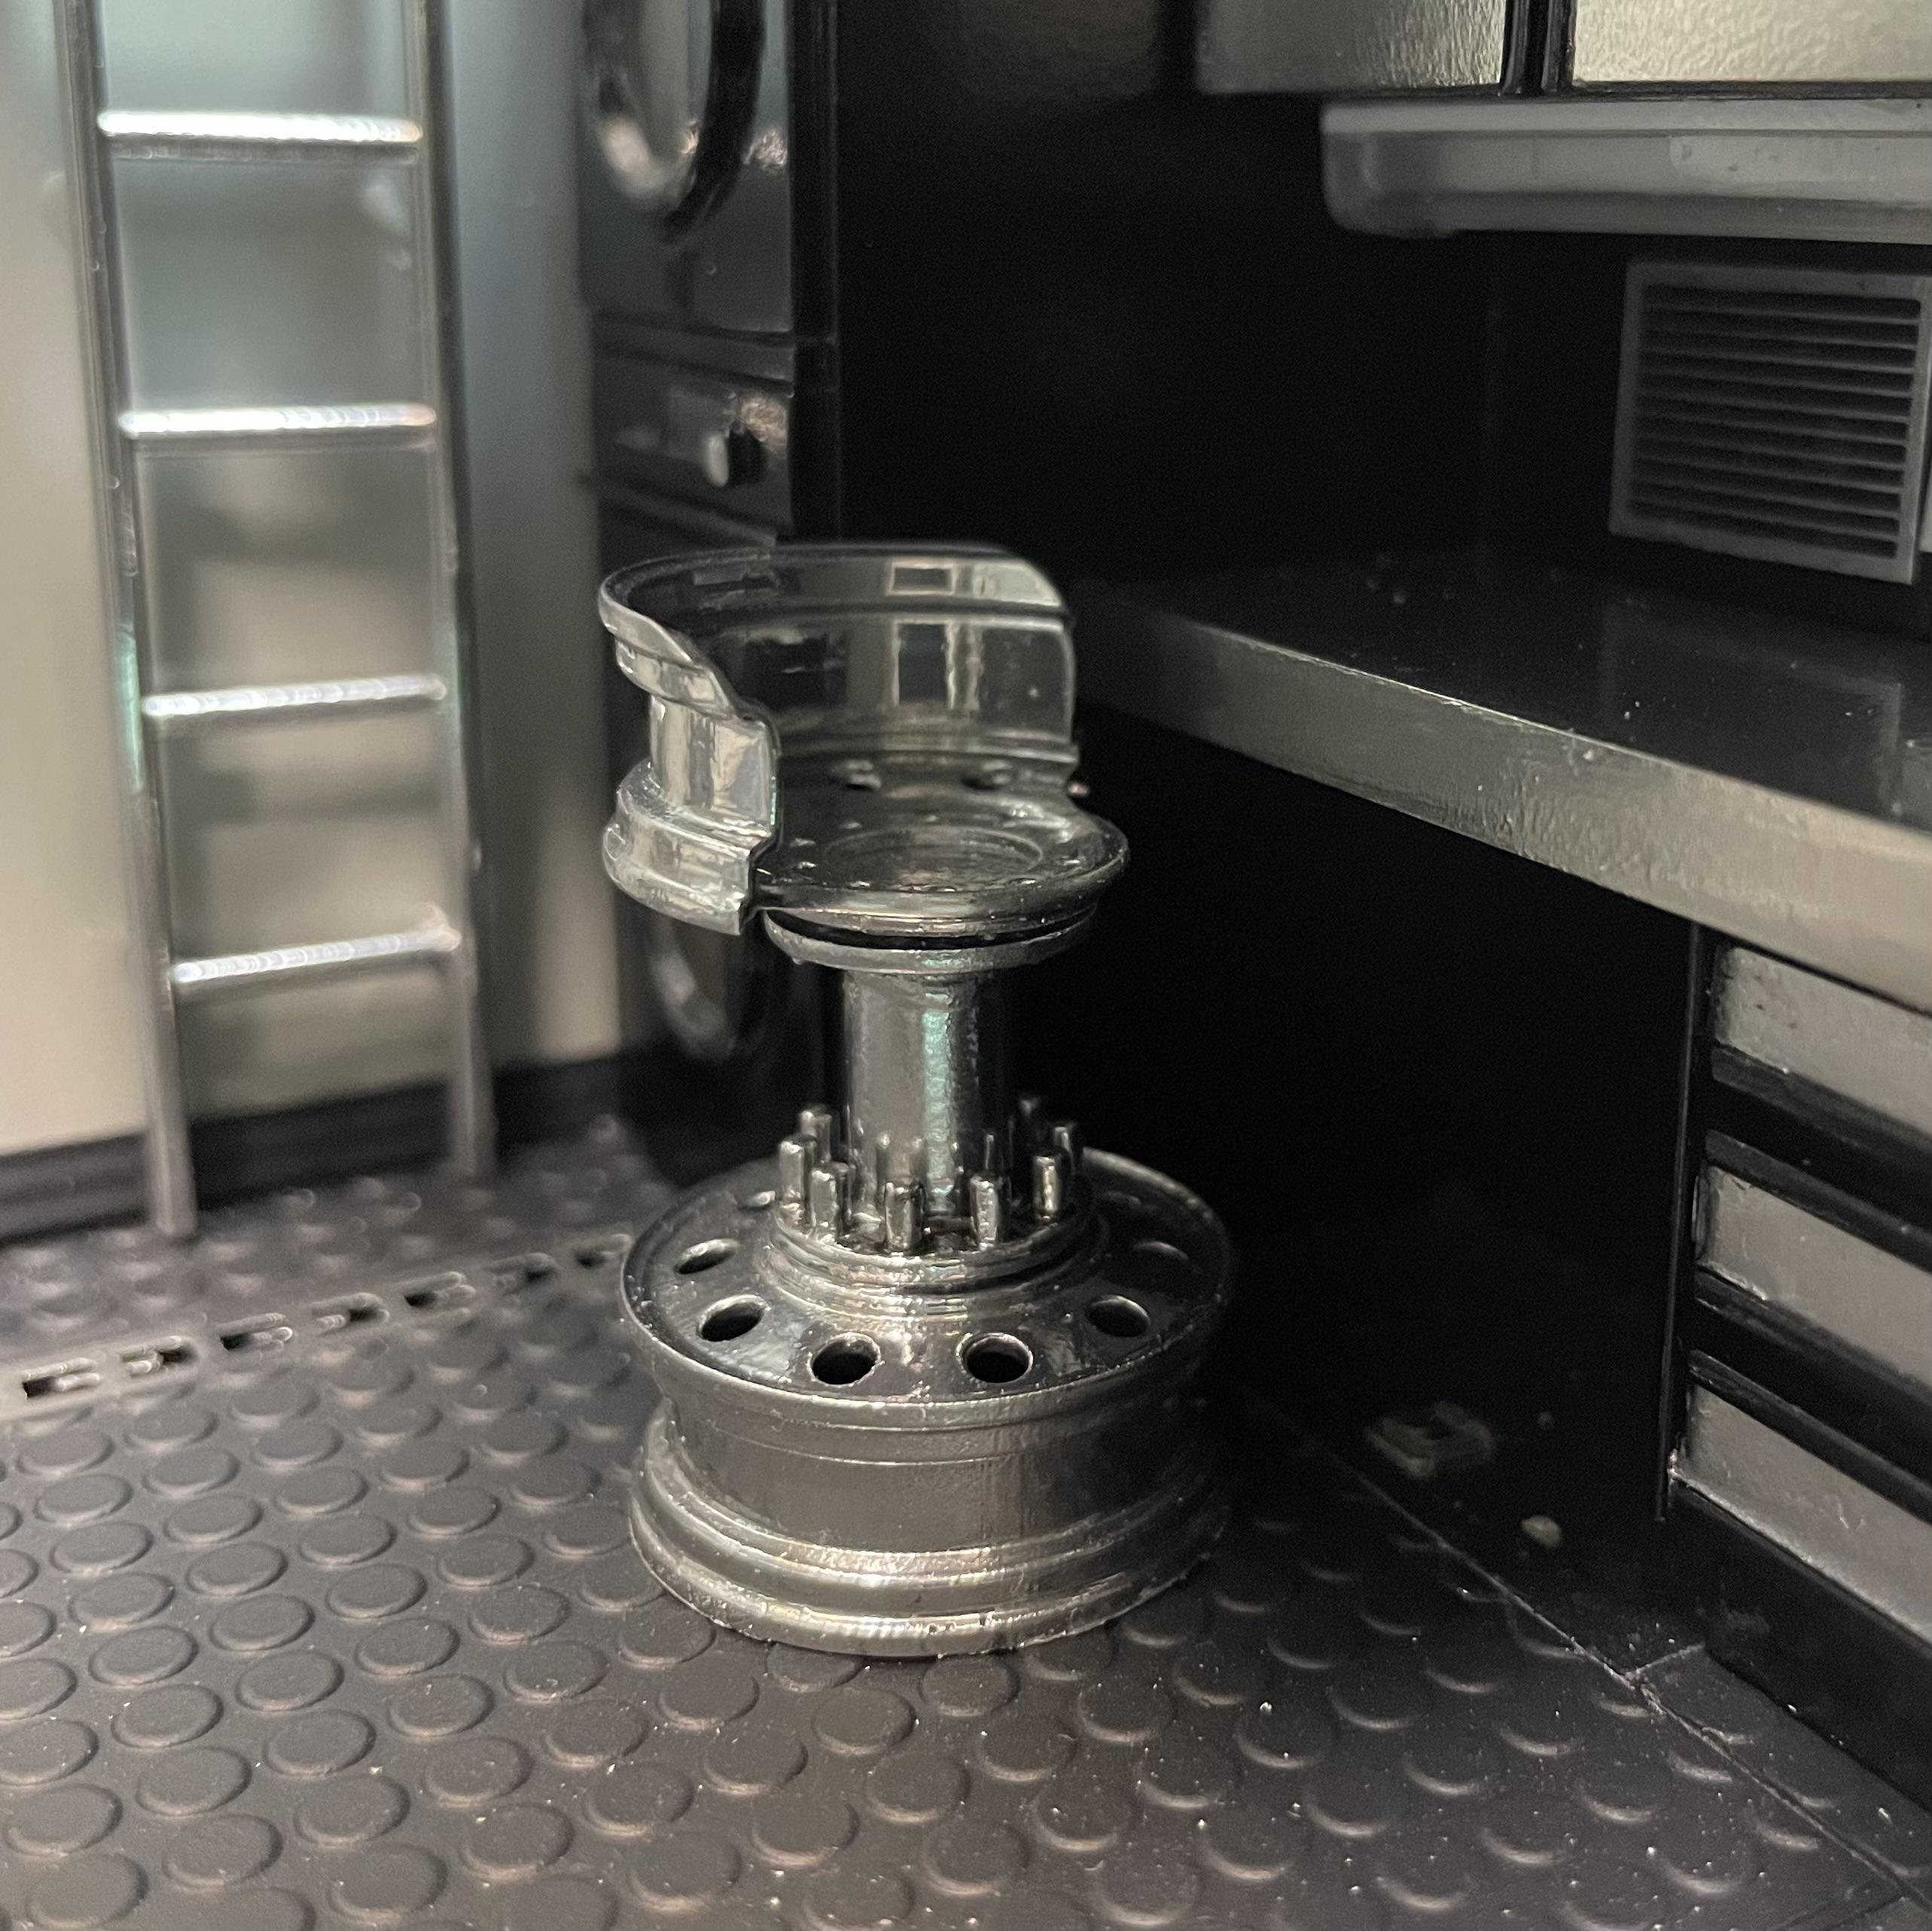
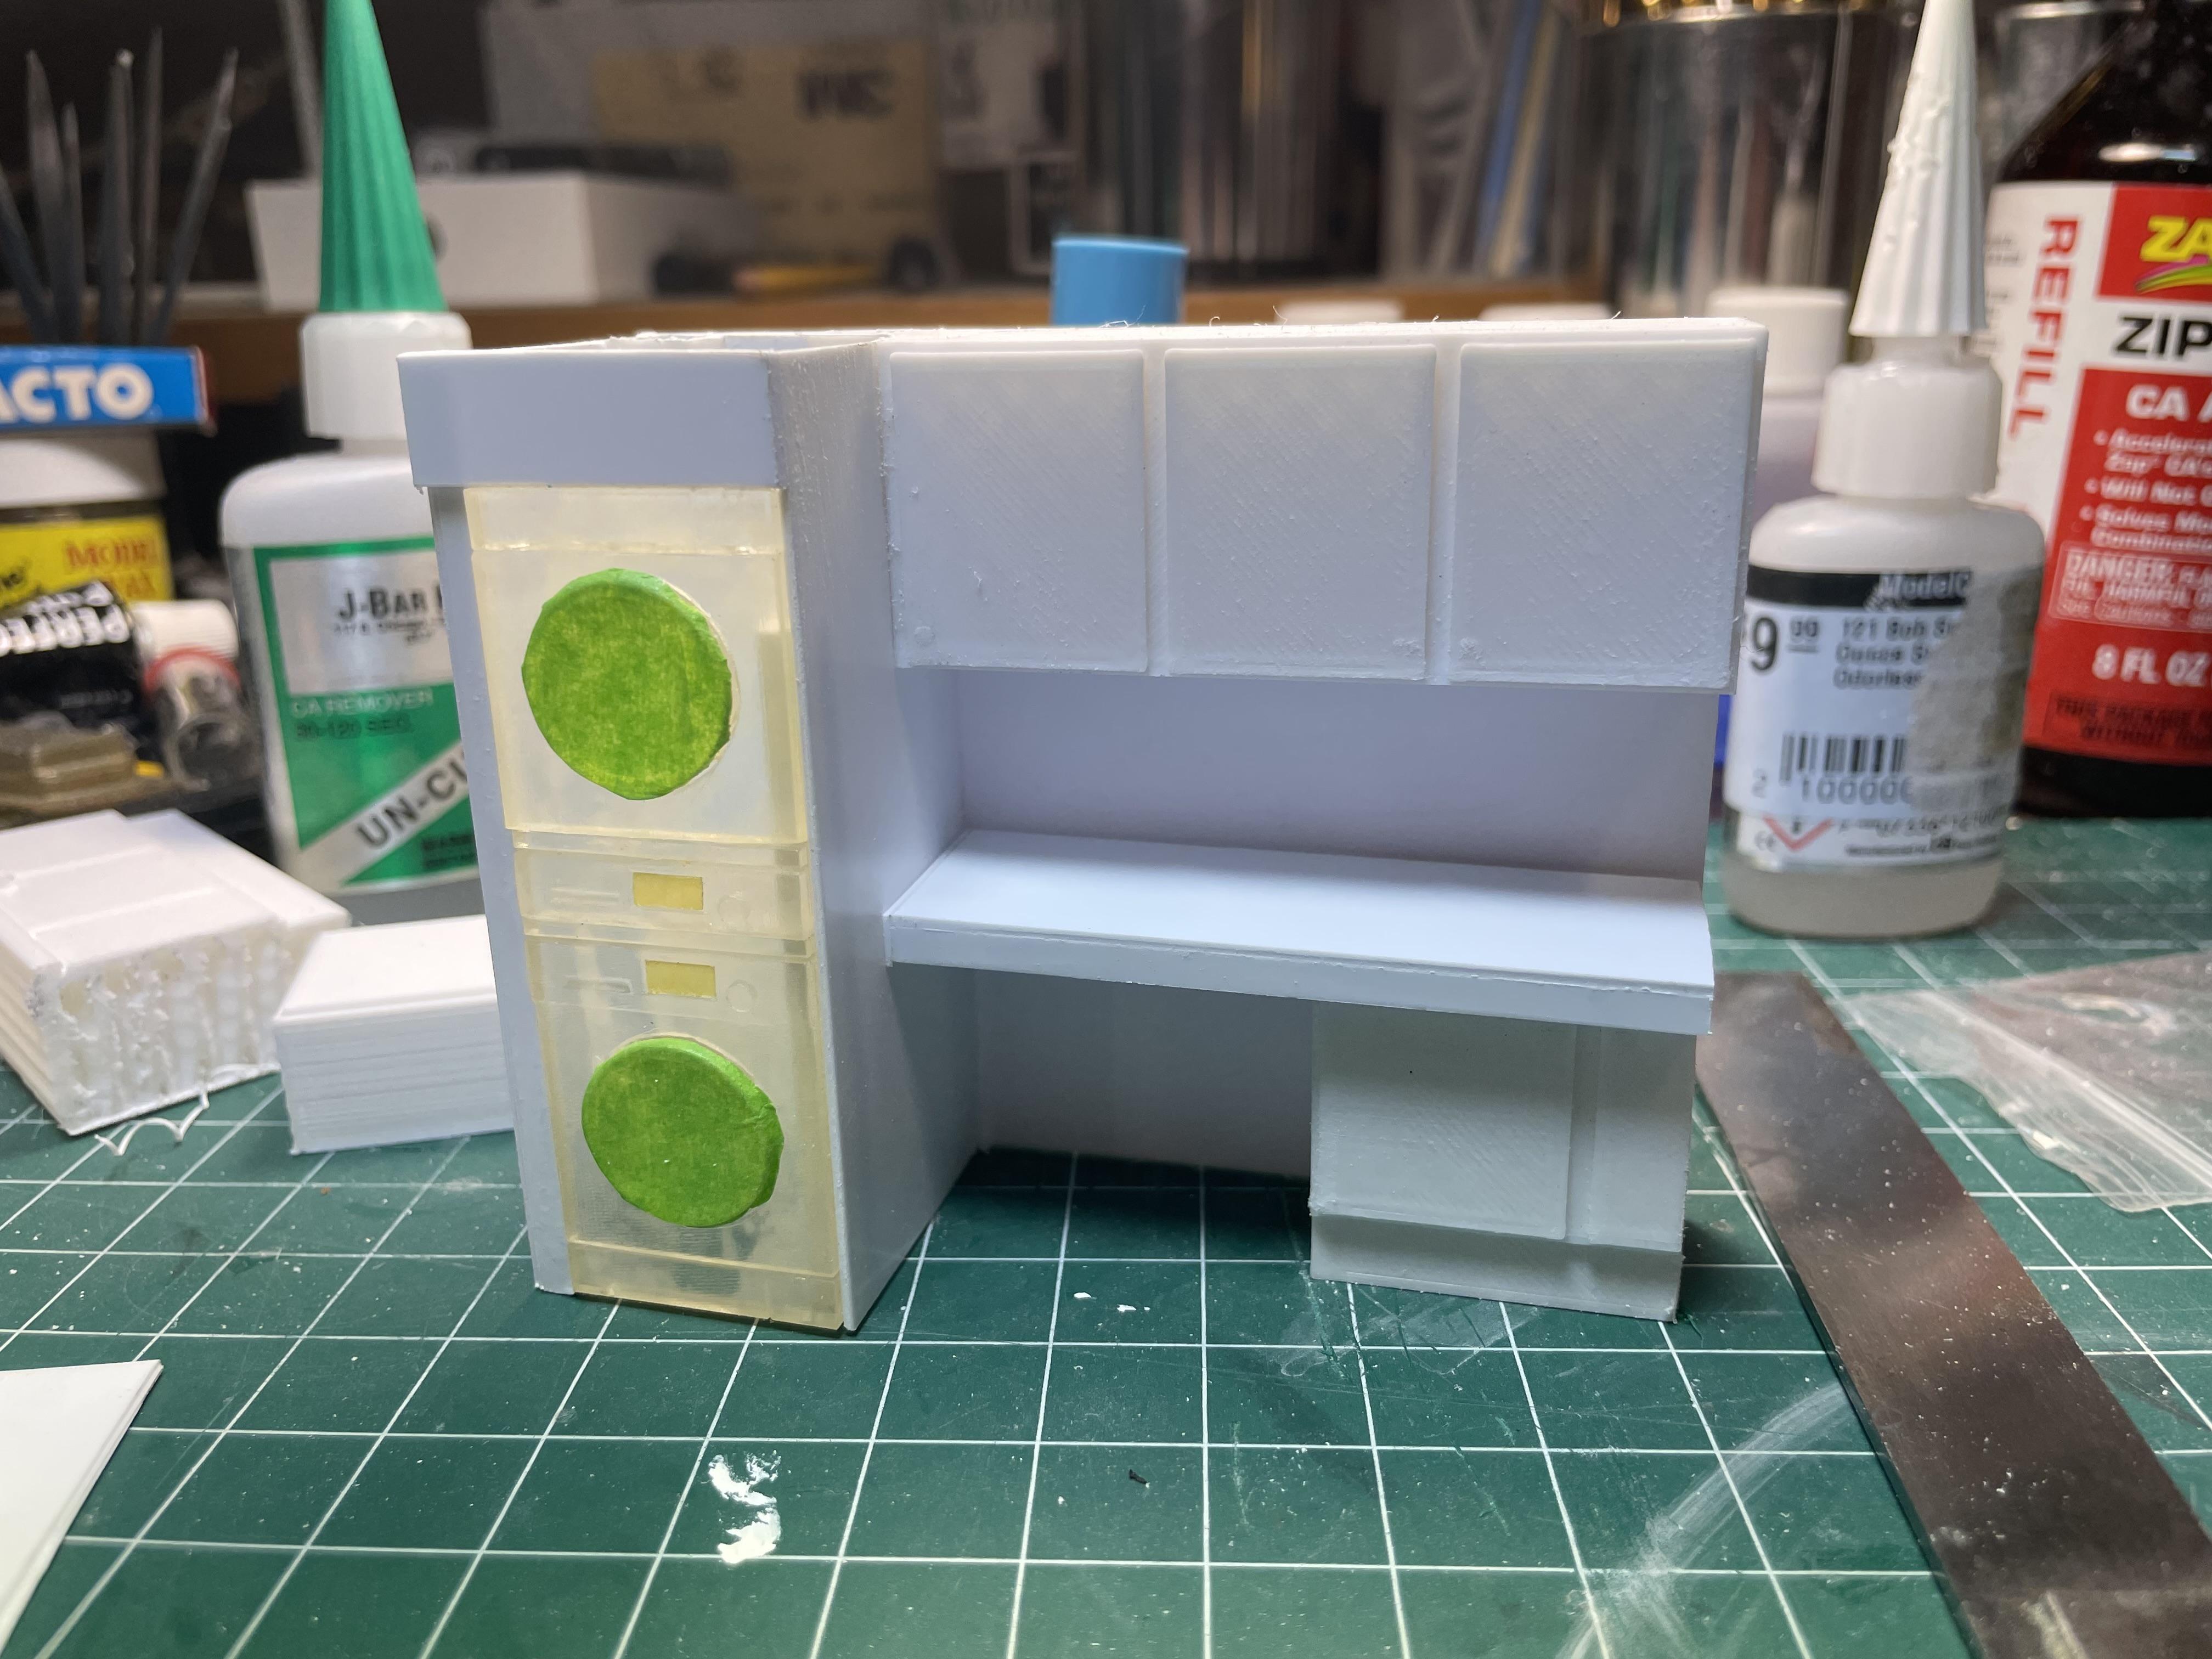
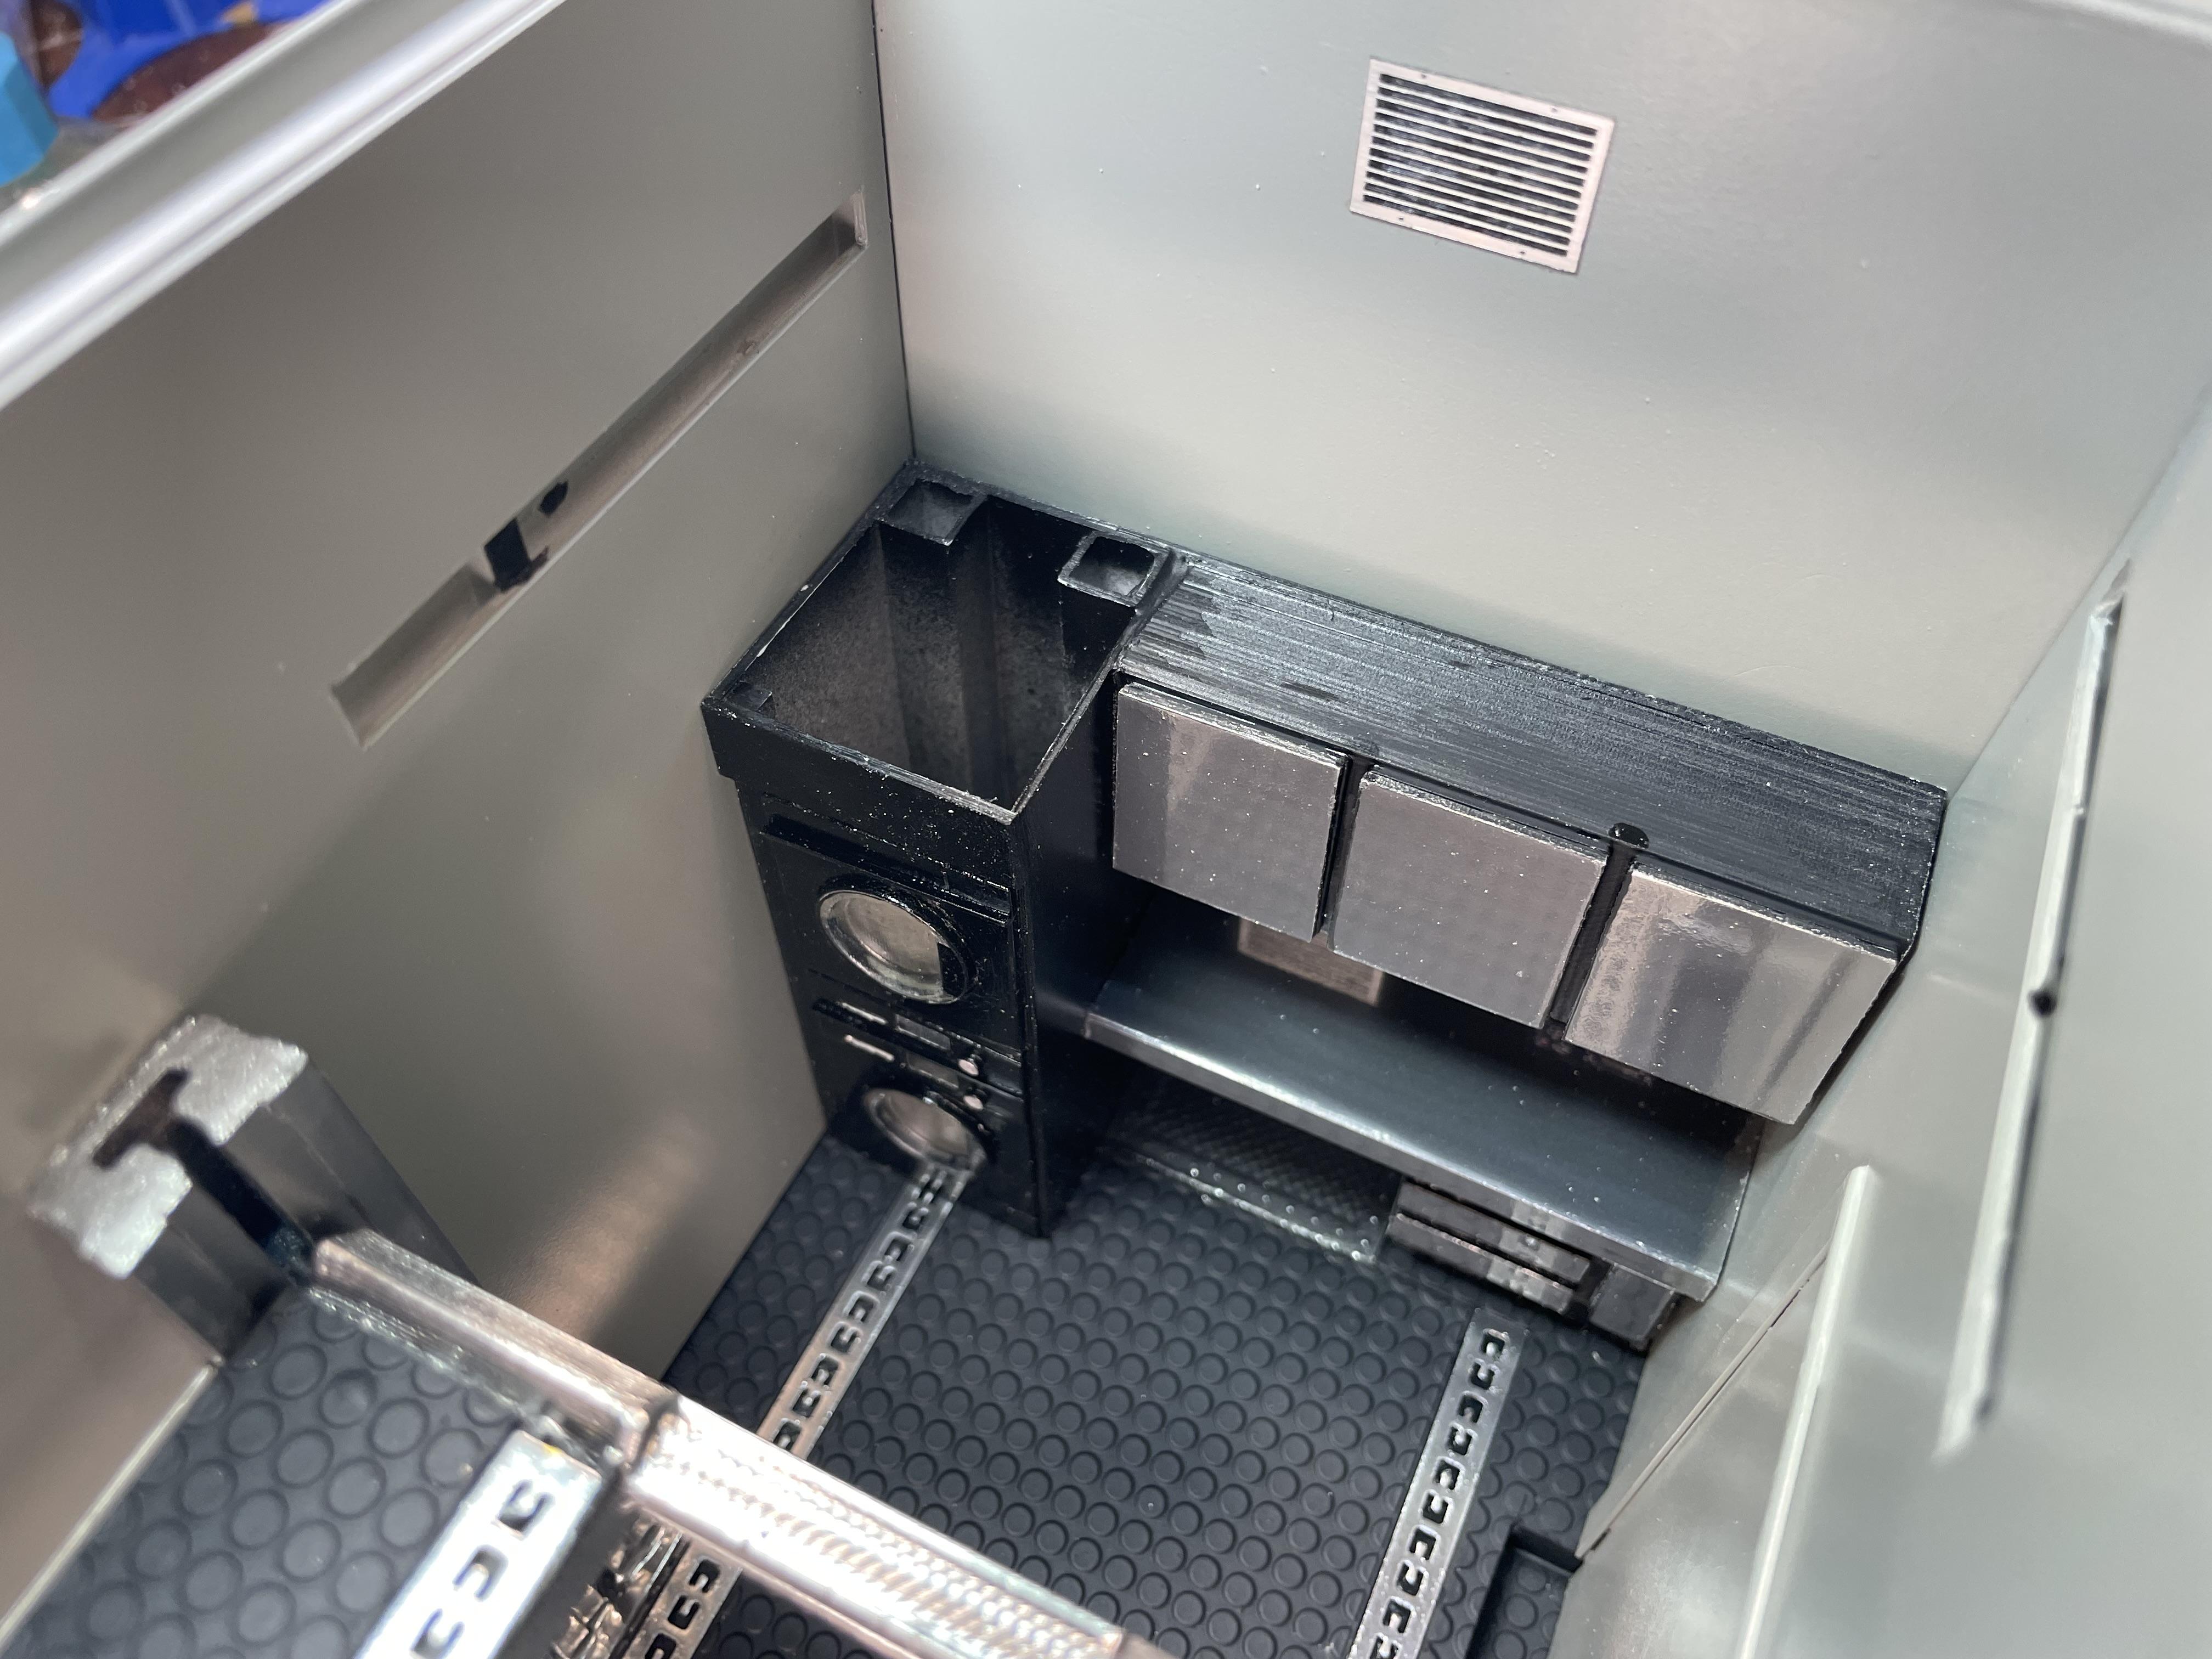
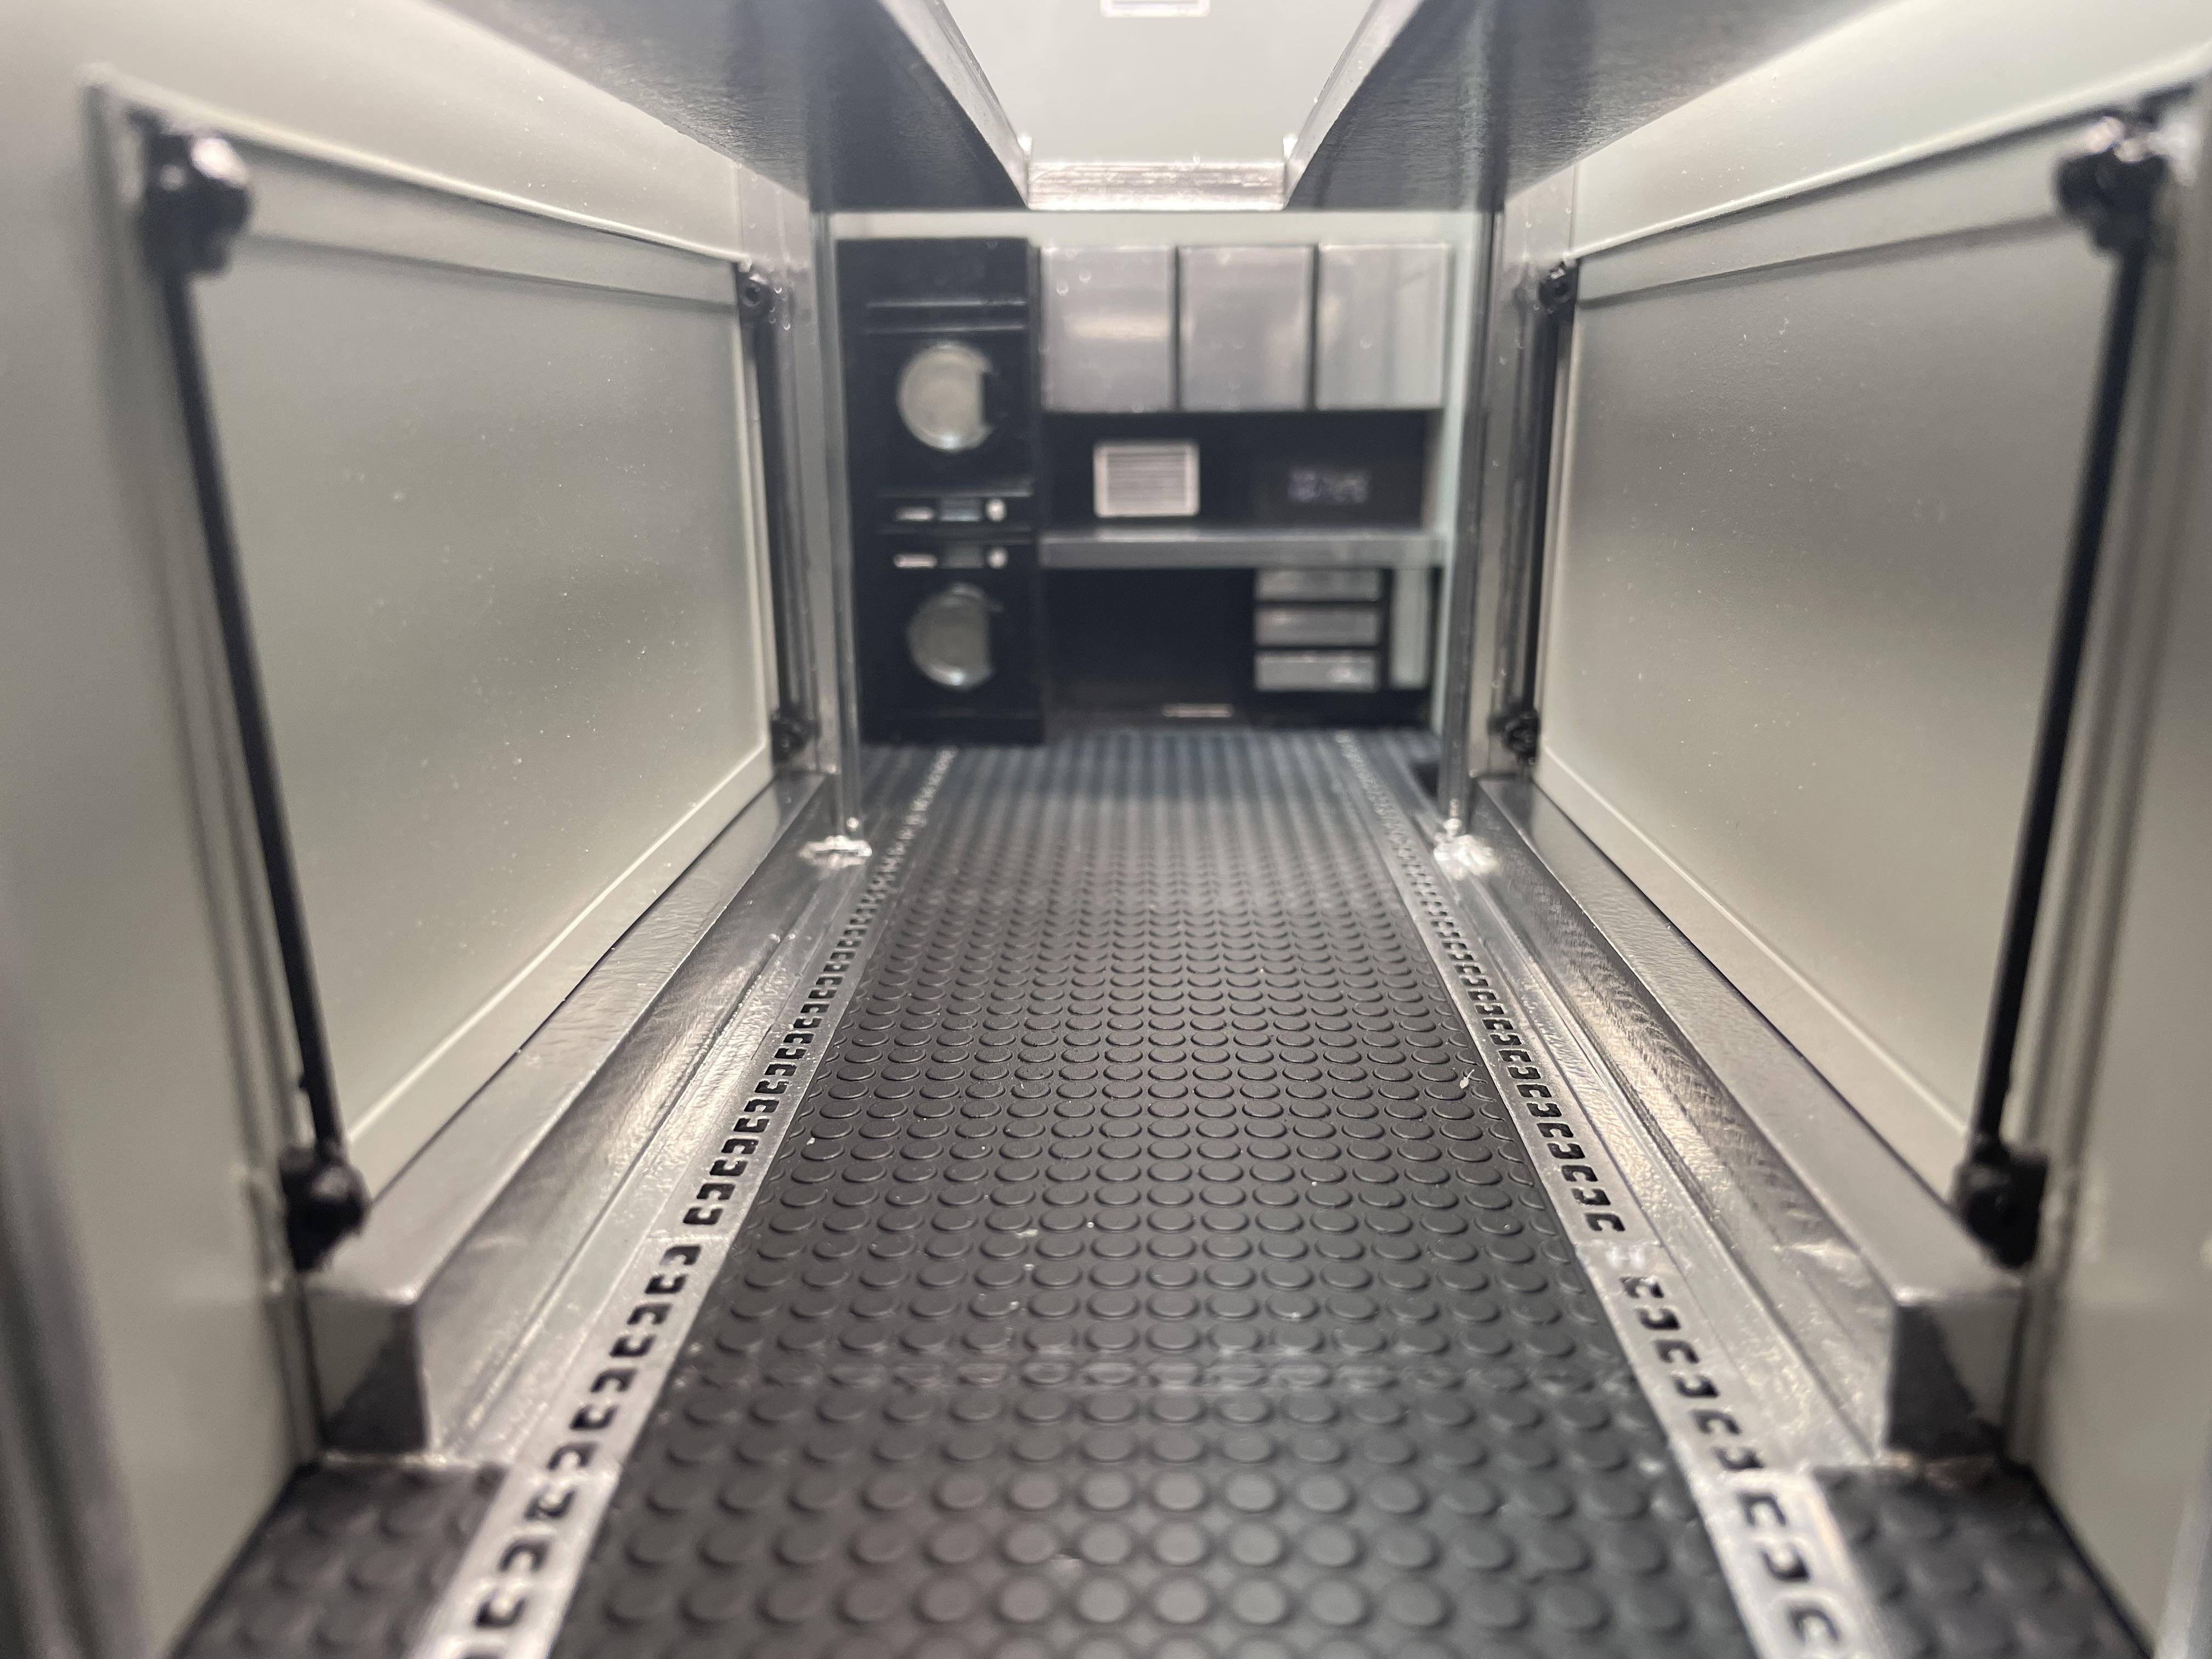
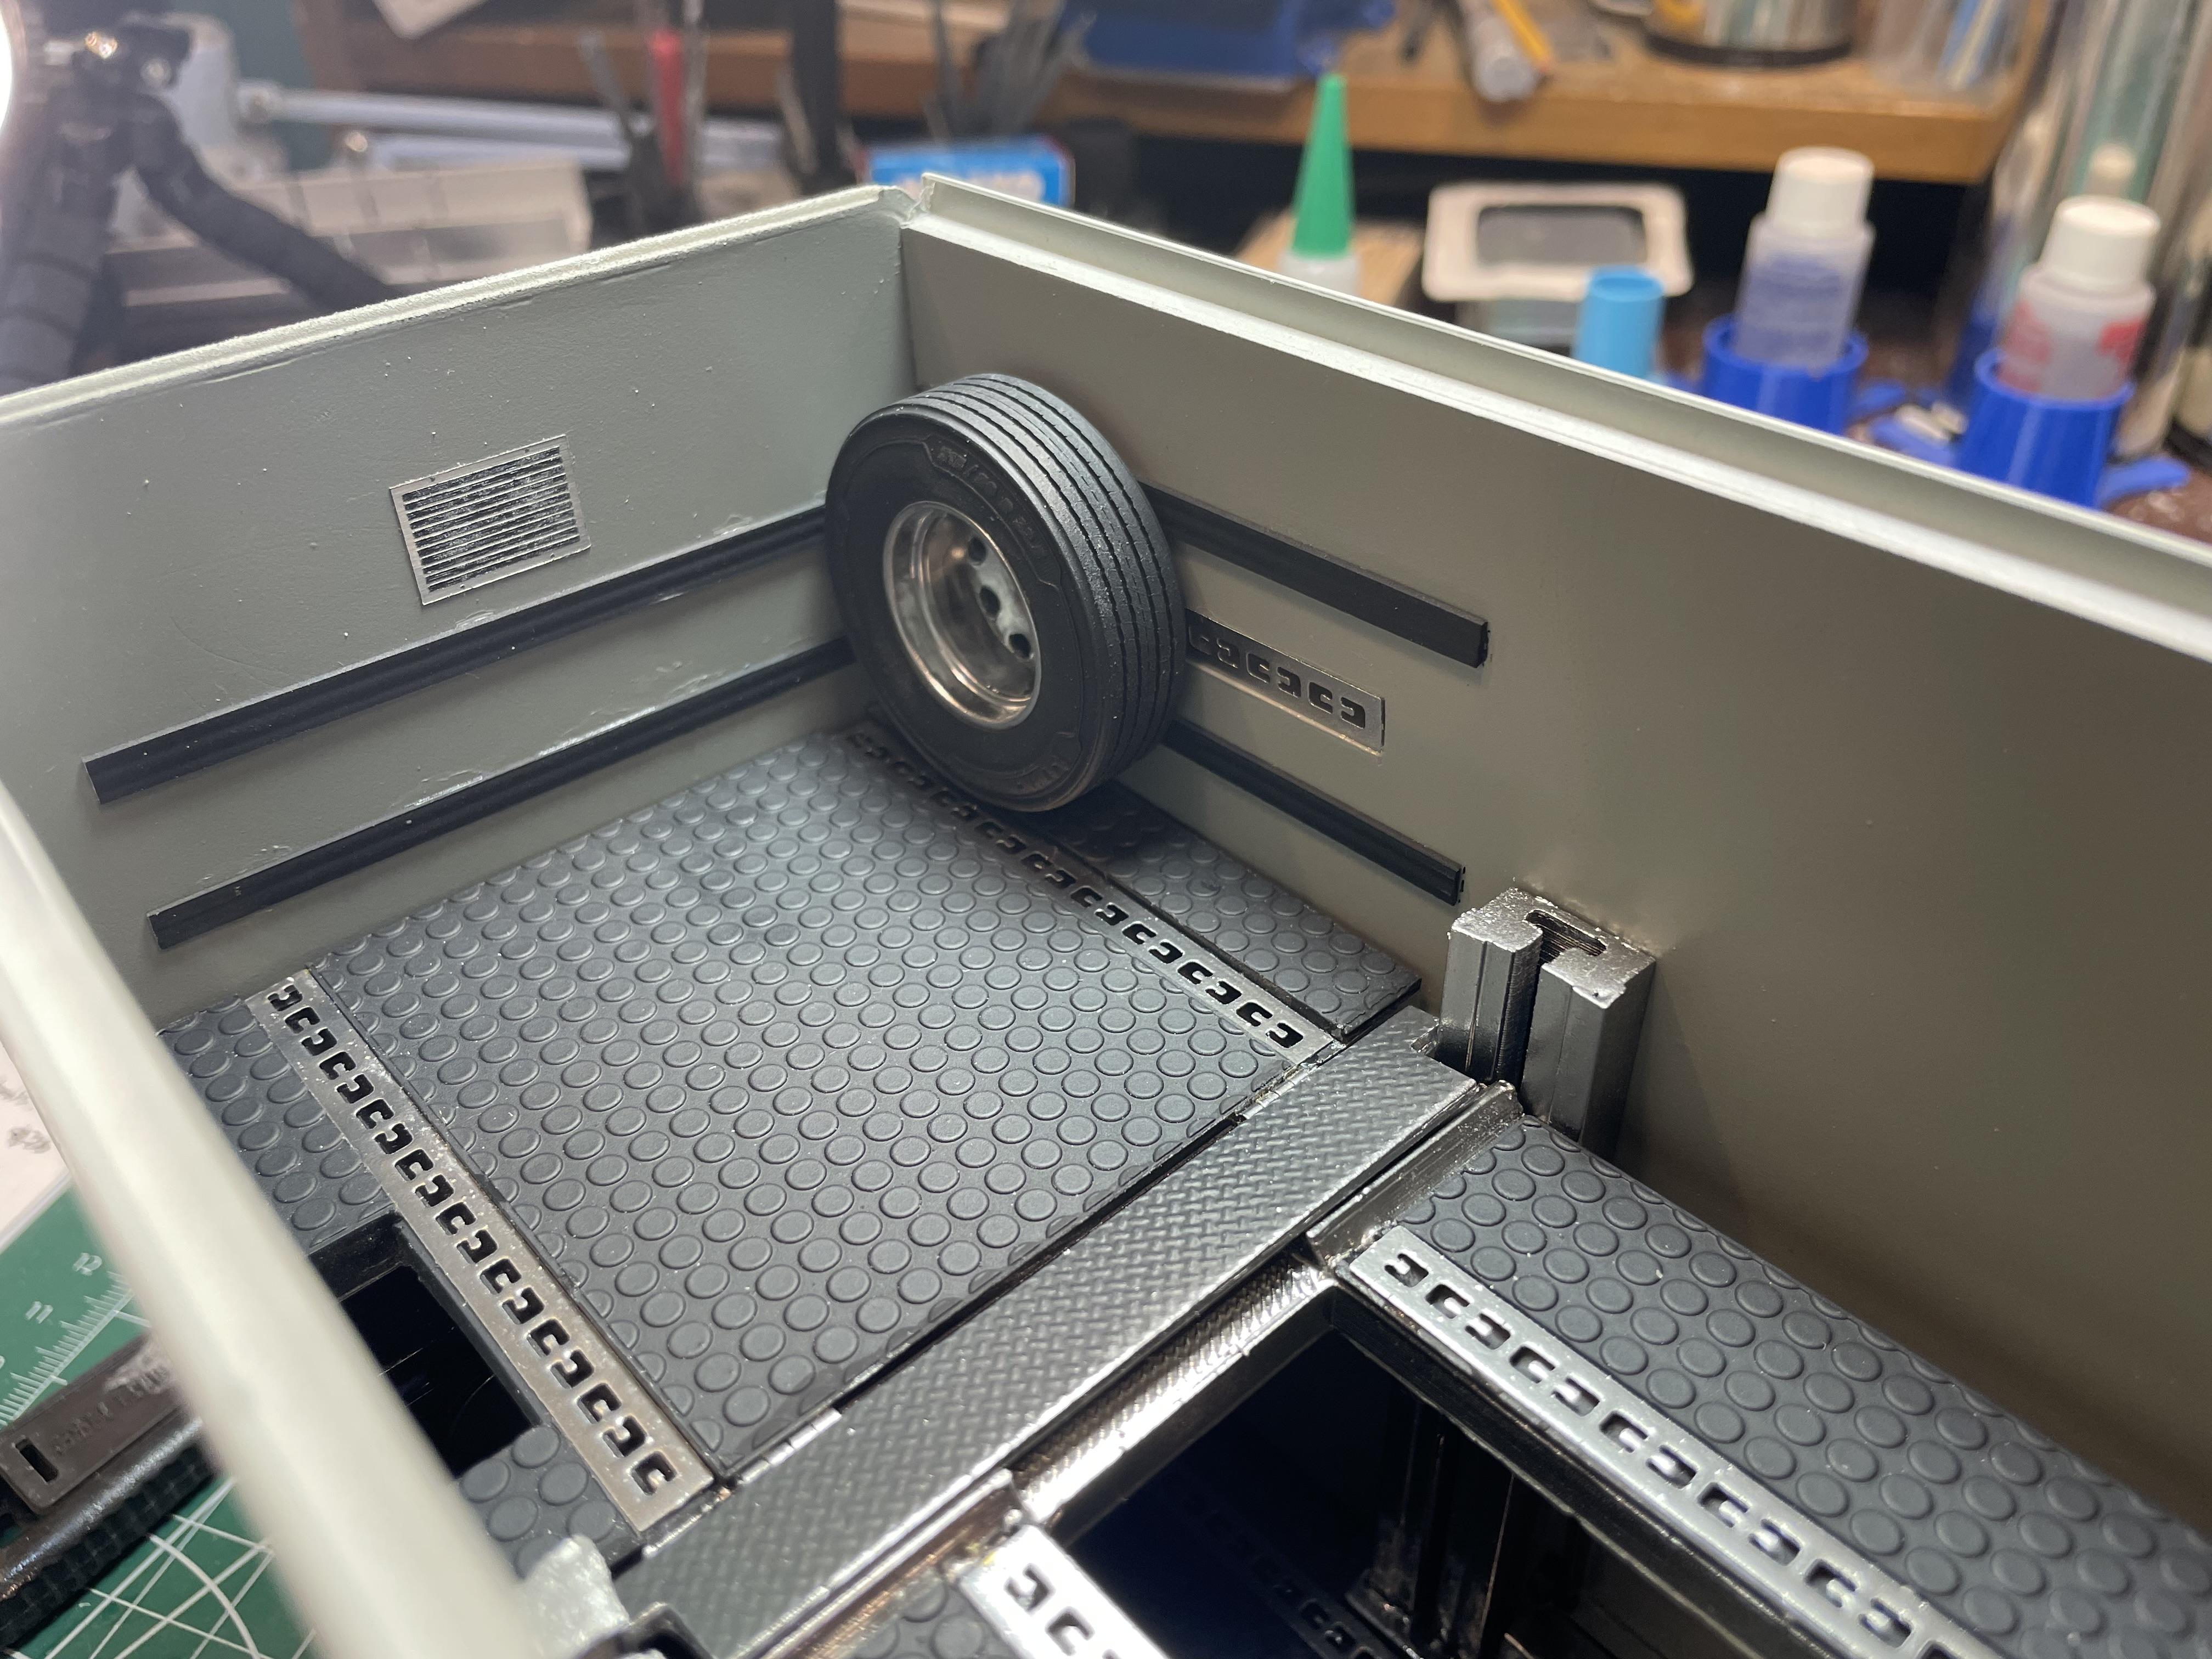
Got some more of the finish work done on the interior of the stacker. I improved the cabinets with trim and BMF (I wasn’t happy with the finish of the Revell Chrome). Made the edges more precise. I added a 120v electrical outlet panel from Iceman - I thinned the depth before mounting it to the cabinet unit. I also added under cabinet lighting and more photo etched switches from CTM’s VN interior set to finish it out. I updated the attic space by adding rubber coin sheets to the walls and moving the e-track. The ladder was installed. Mounted spare tires for the trailer and for the RV were installed using modified In-Bed Tire Mounts from Iceman. The workbench stool is from Black Sheep Customs on eBay. Shortened the height a little. Goes well with the style of the build. Lots more detail work to be done inside, but first I need to turn my attention to the exterior of the trailer.
-
Yep, it’s a Cat C13. If you’re looking for a DD13, nobody has made one yet, but 3d Concepts just released a DD16. It’s closer to a DD15 than a DD13, but probably as close as you can get at this point.
-
BJ & the Bear Super Kenworth
vincen47 replied to Mike77's topic in Model Trucks: Big Rigs and Heavy Equipment
I’ve always enjoyed your big sleeper K100 trucks. The latest is the the best in the series. -
Peterbilt 379 RV
vincen47 replied to vincen47's topic in WIP: Model Trucks: Big Rigs and Heavy Equipment
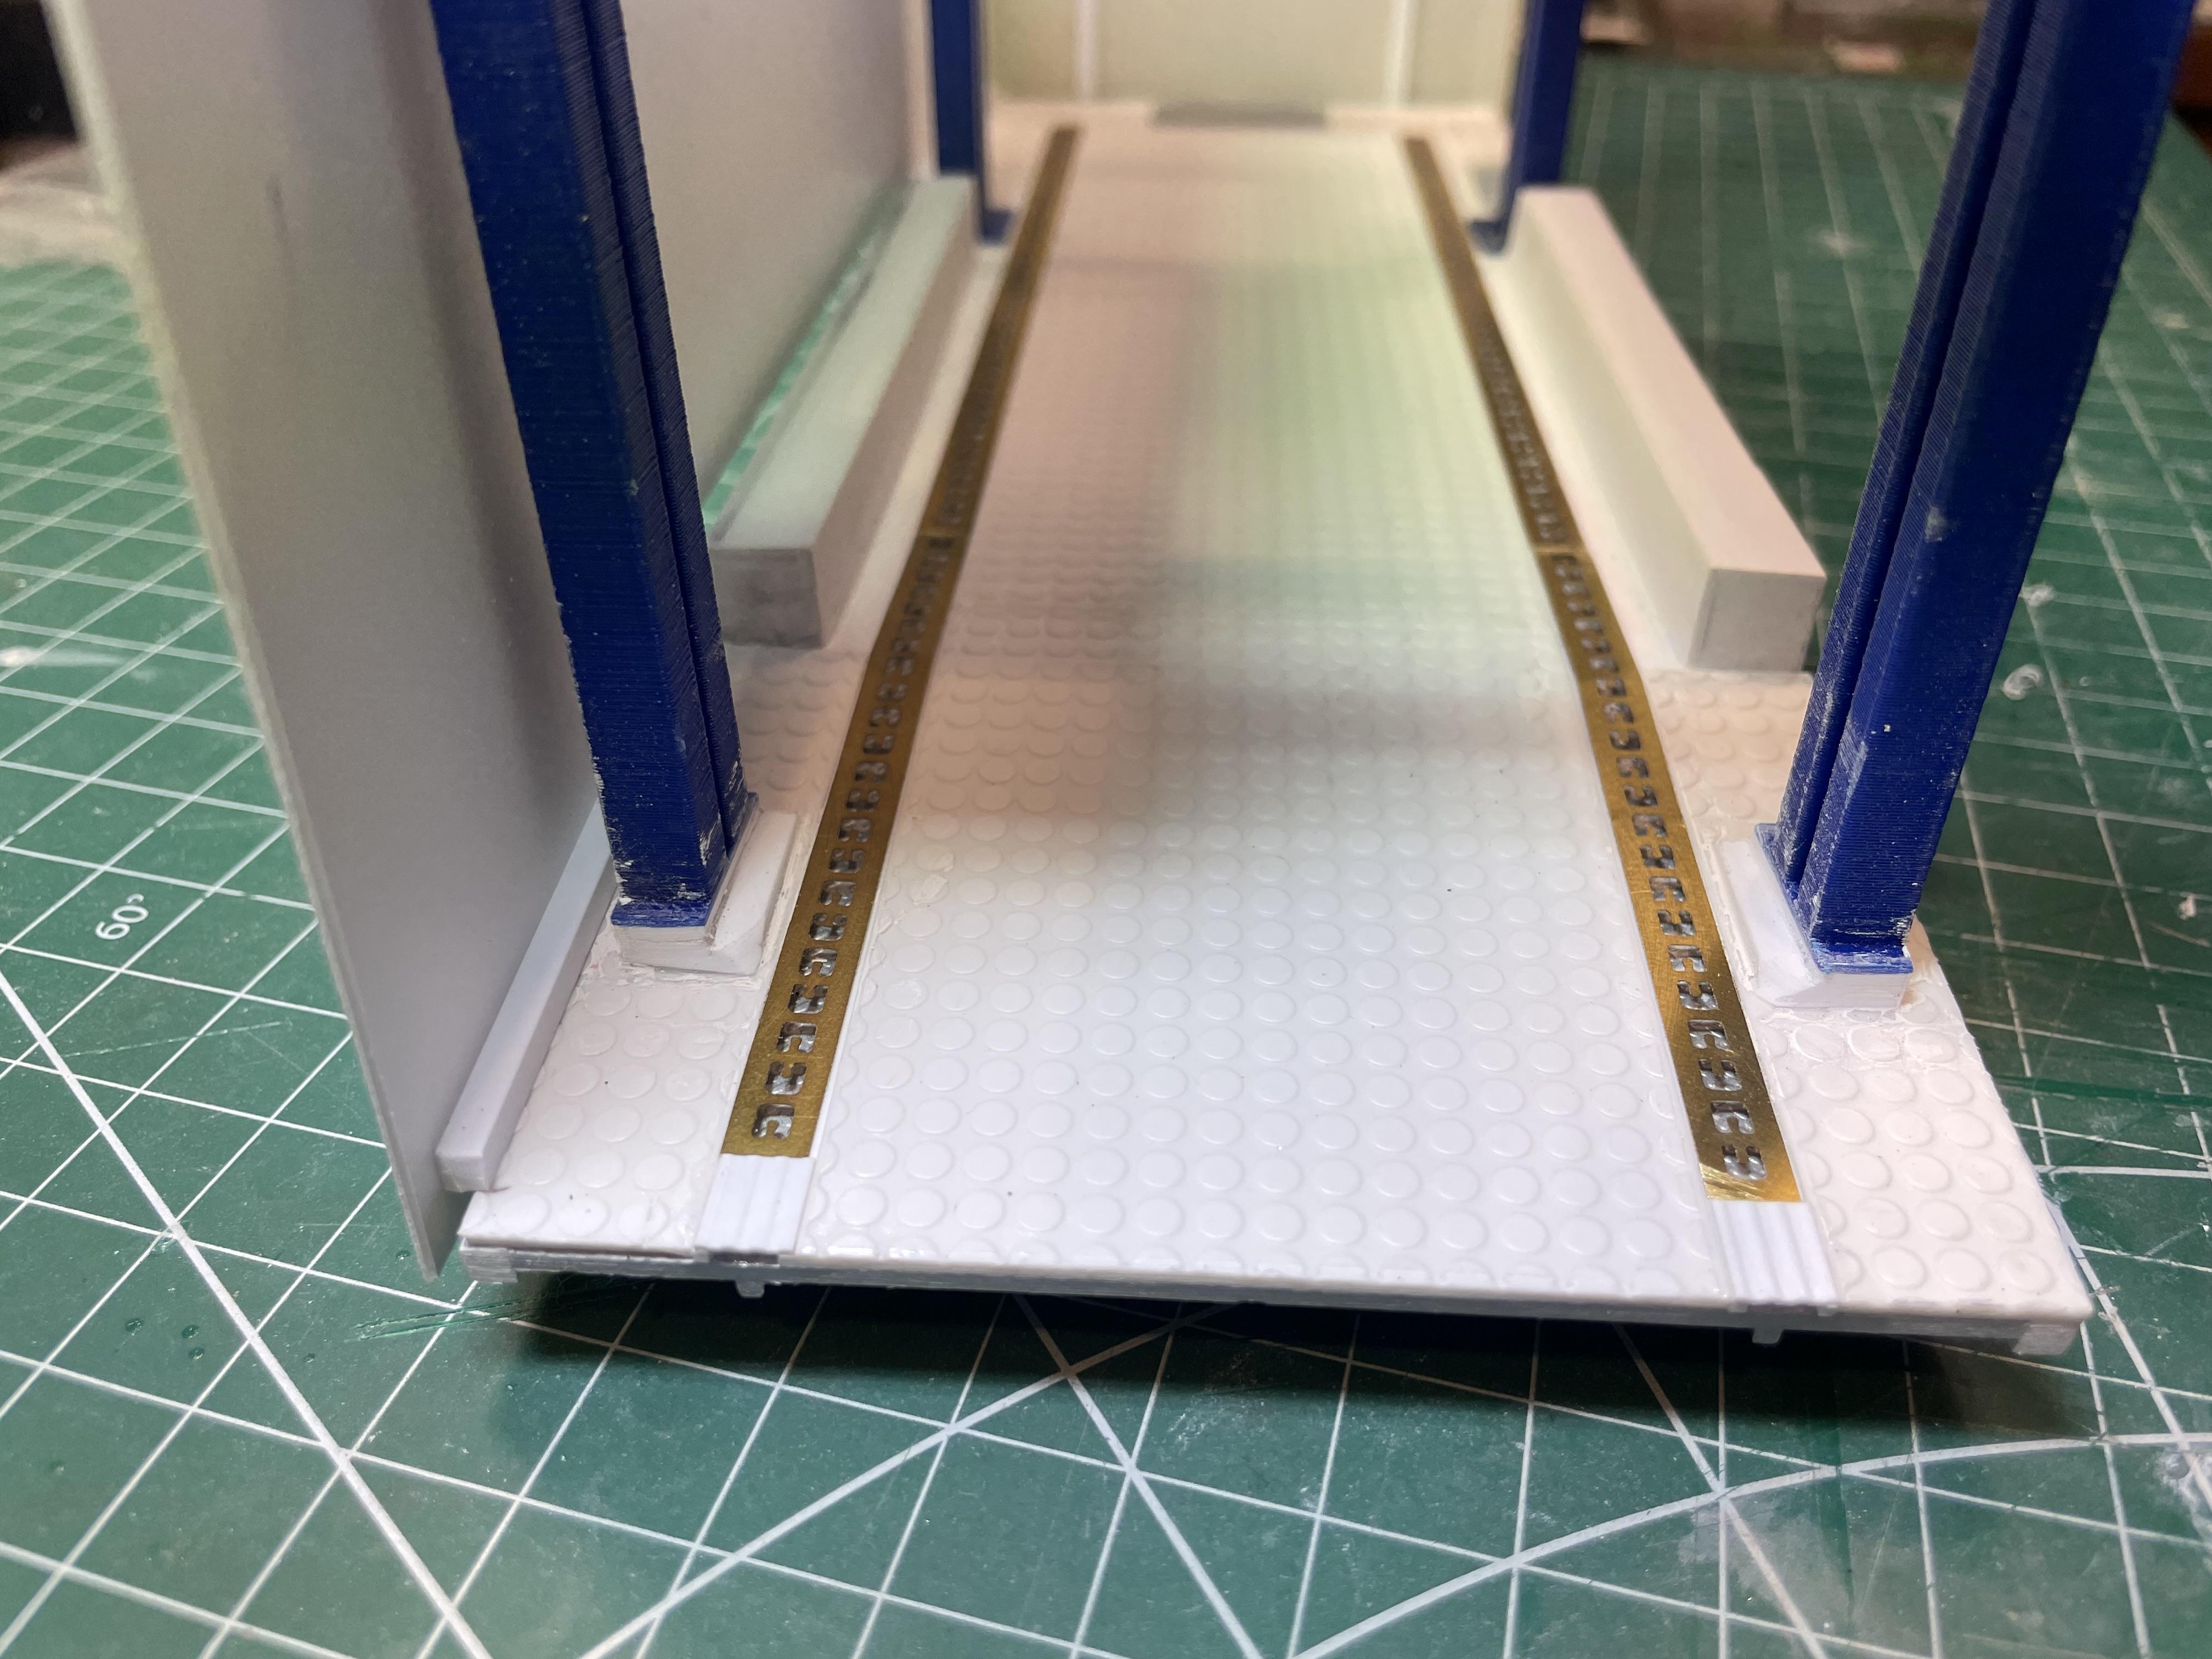
Thanks. It’s 1/24 scale photo etched WWII aircraft carrier tie downs from Tom’s Modelworks, part number 2402. Not an exact match, but pretty close. I searched far and wide for e-track before coming upon the stuff from Tom’s. -
Peterbilt 379 RV
vincen47 replied to vincen47's topic in WIP: Model Trucks: Big Rigs and Heavy Equipment
Thanks! Yes, the roof will be removable and the rear door operational. The lift is removable too, so it could be posed in the down position. -
Peterbilt 379 RV
vincen47 replied to vincen47's topic in WIP: Model Trucks: Big Rigs and Heavy Equipment
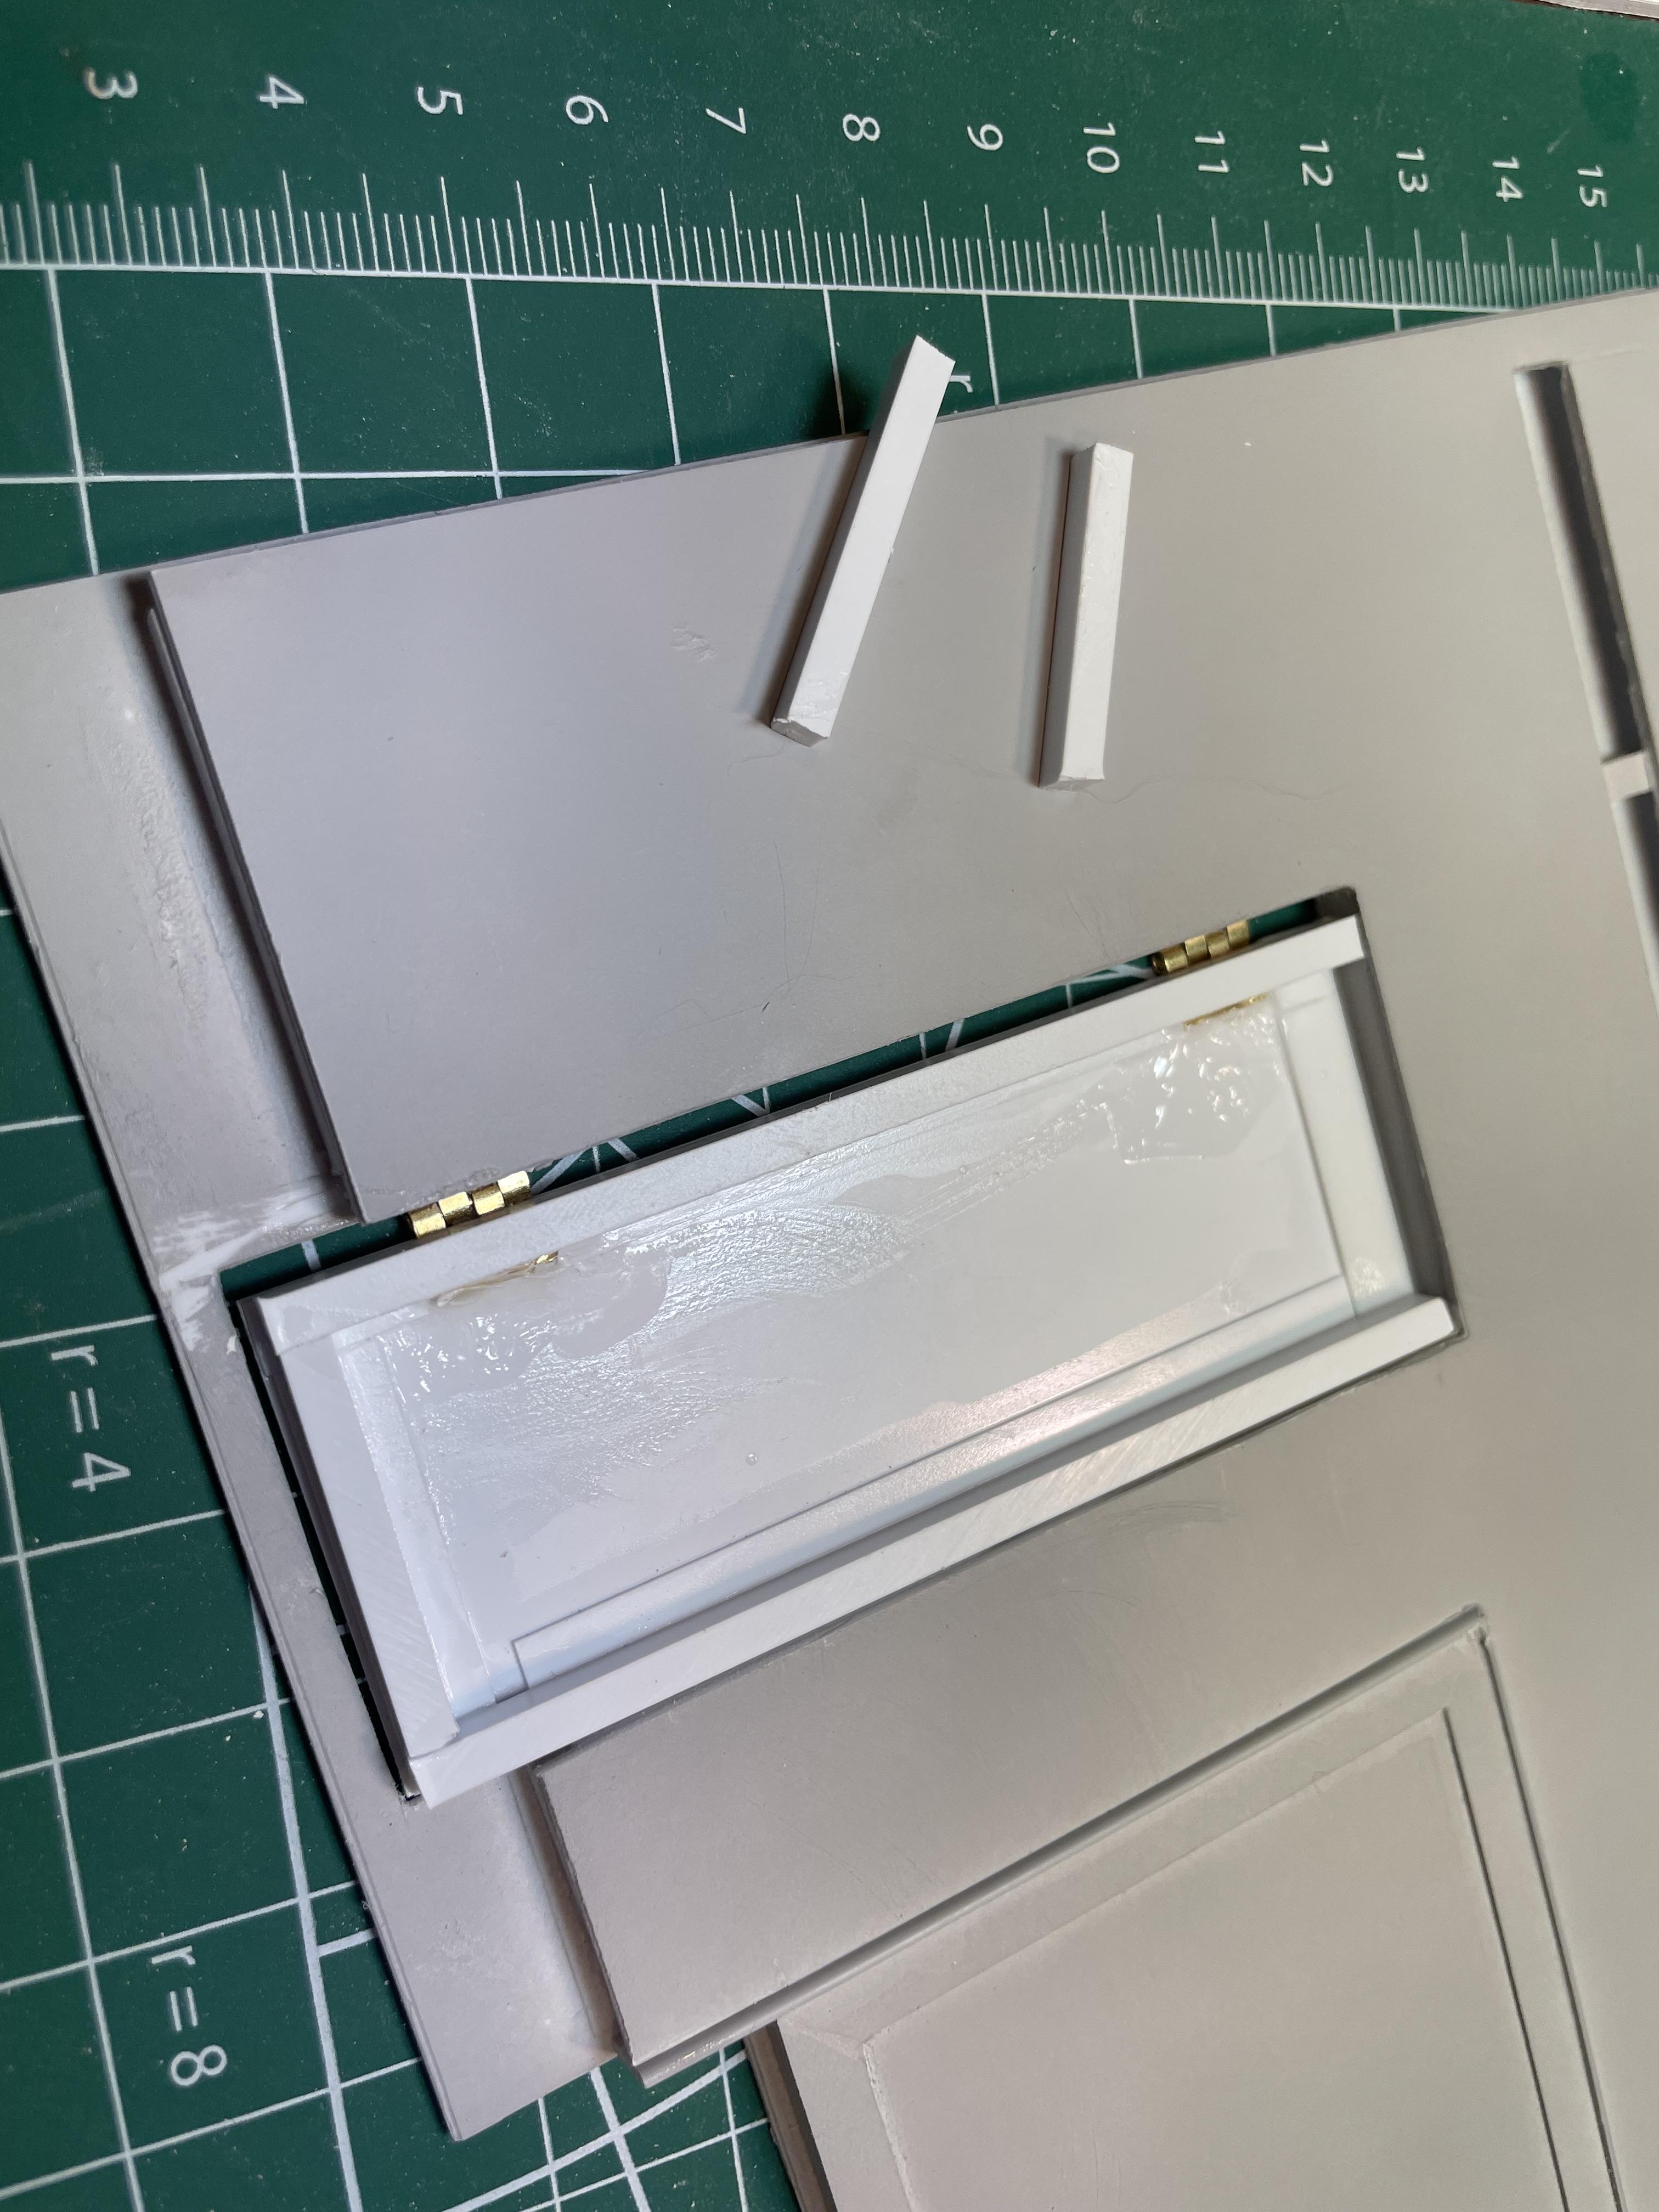
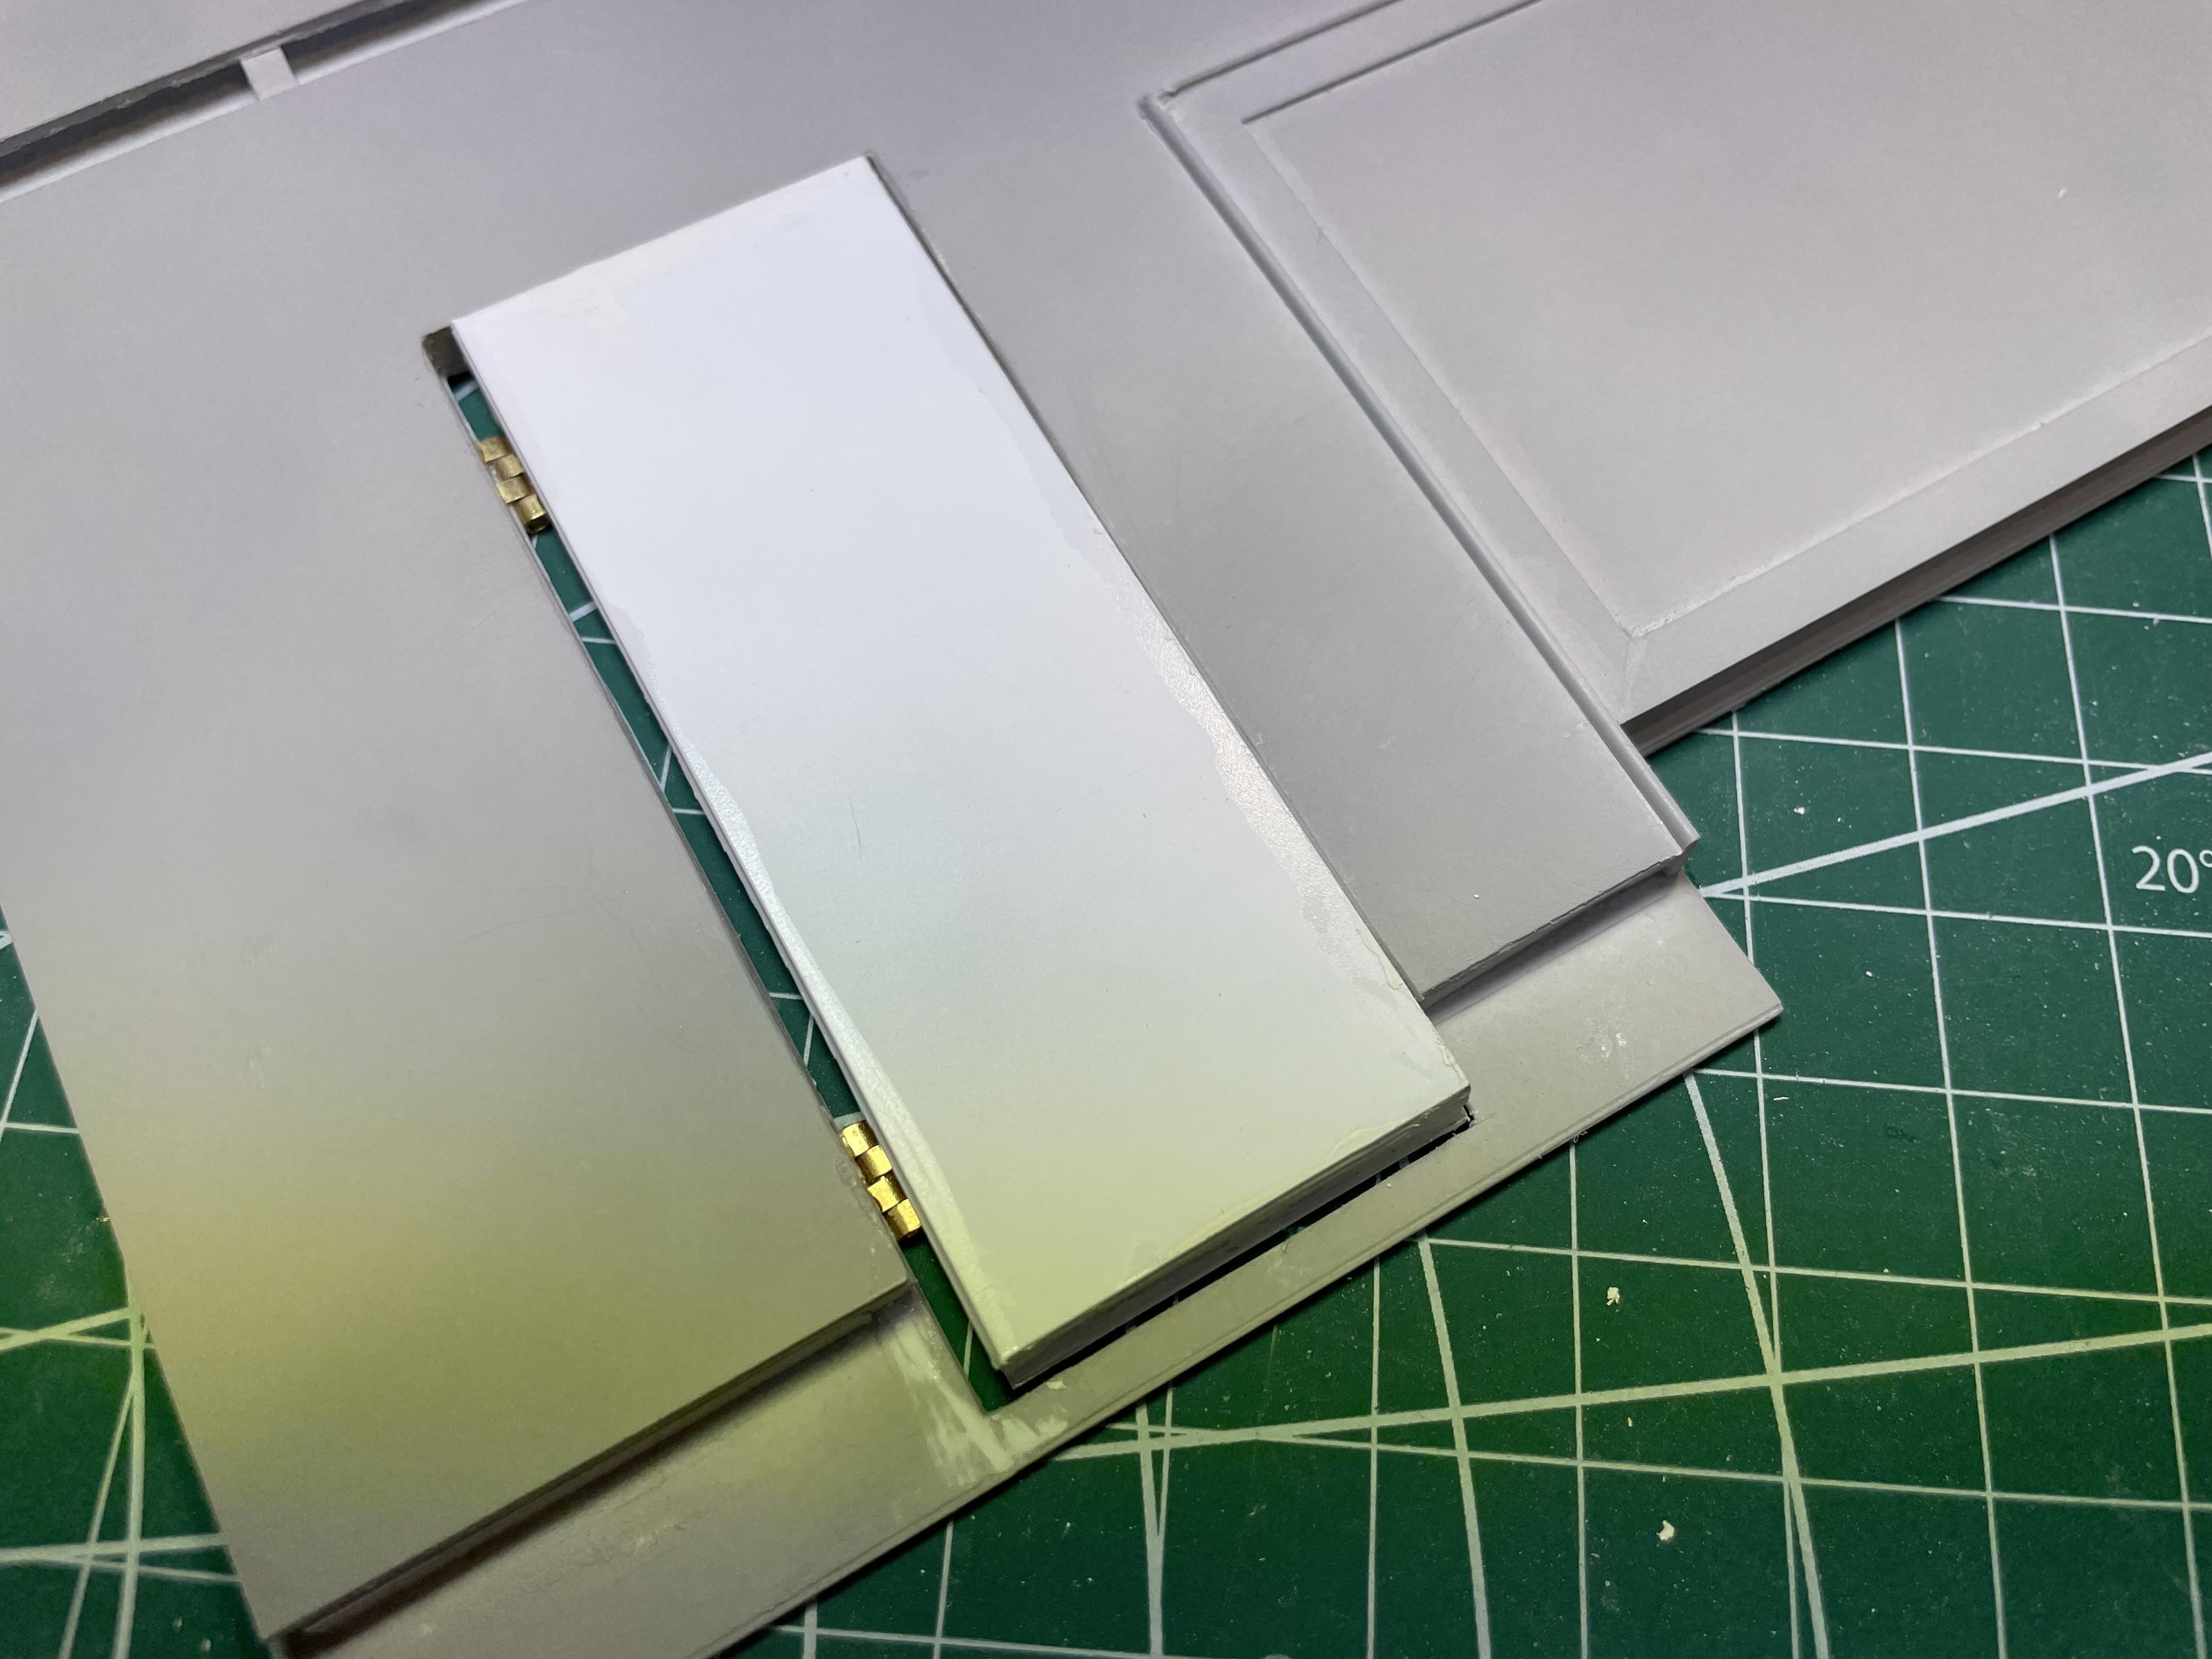
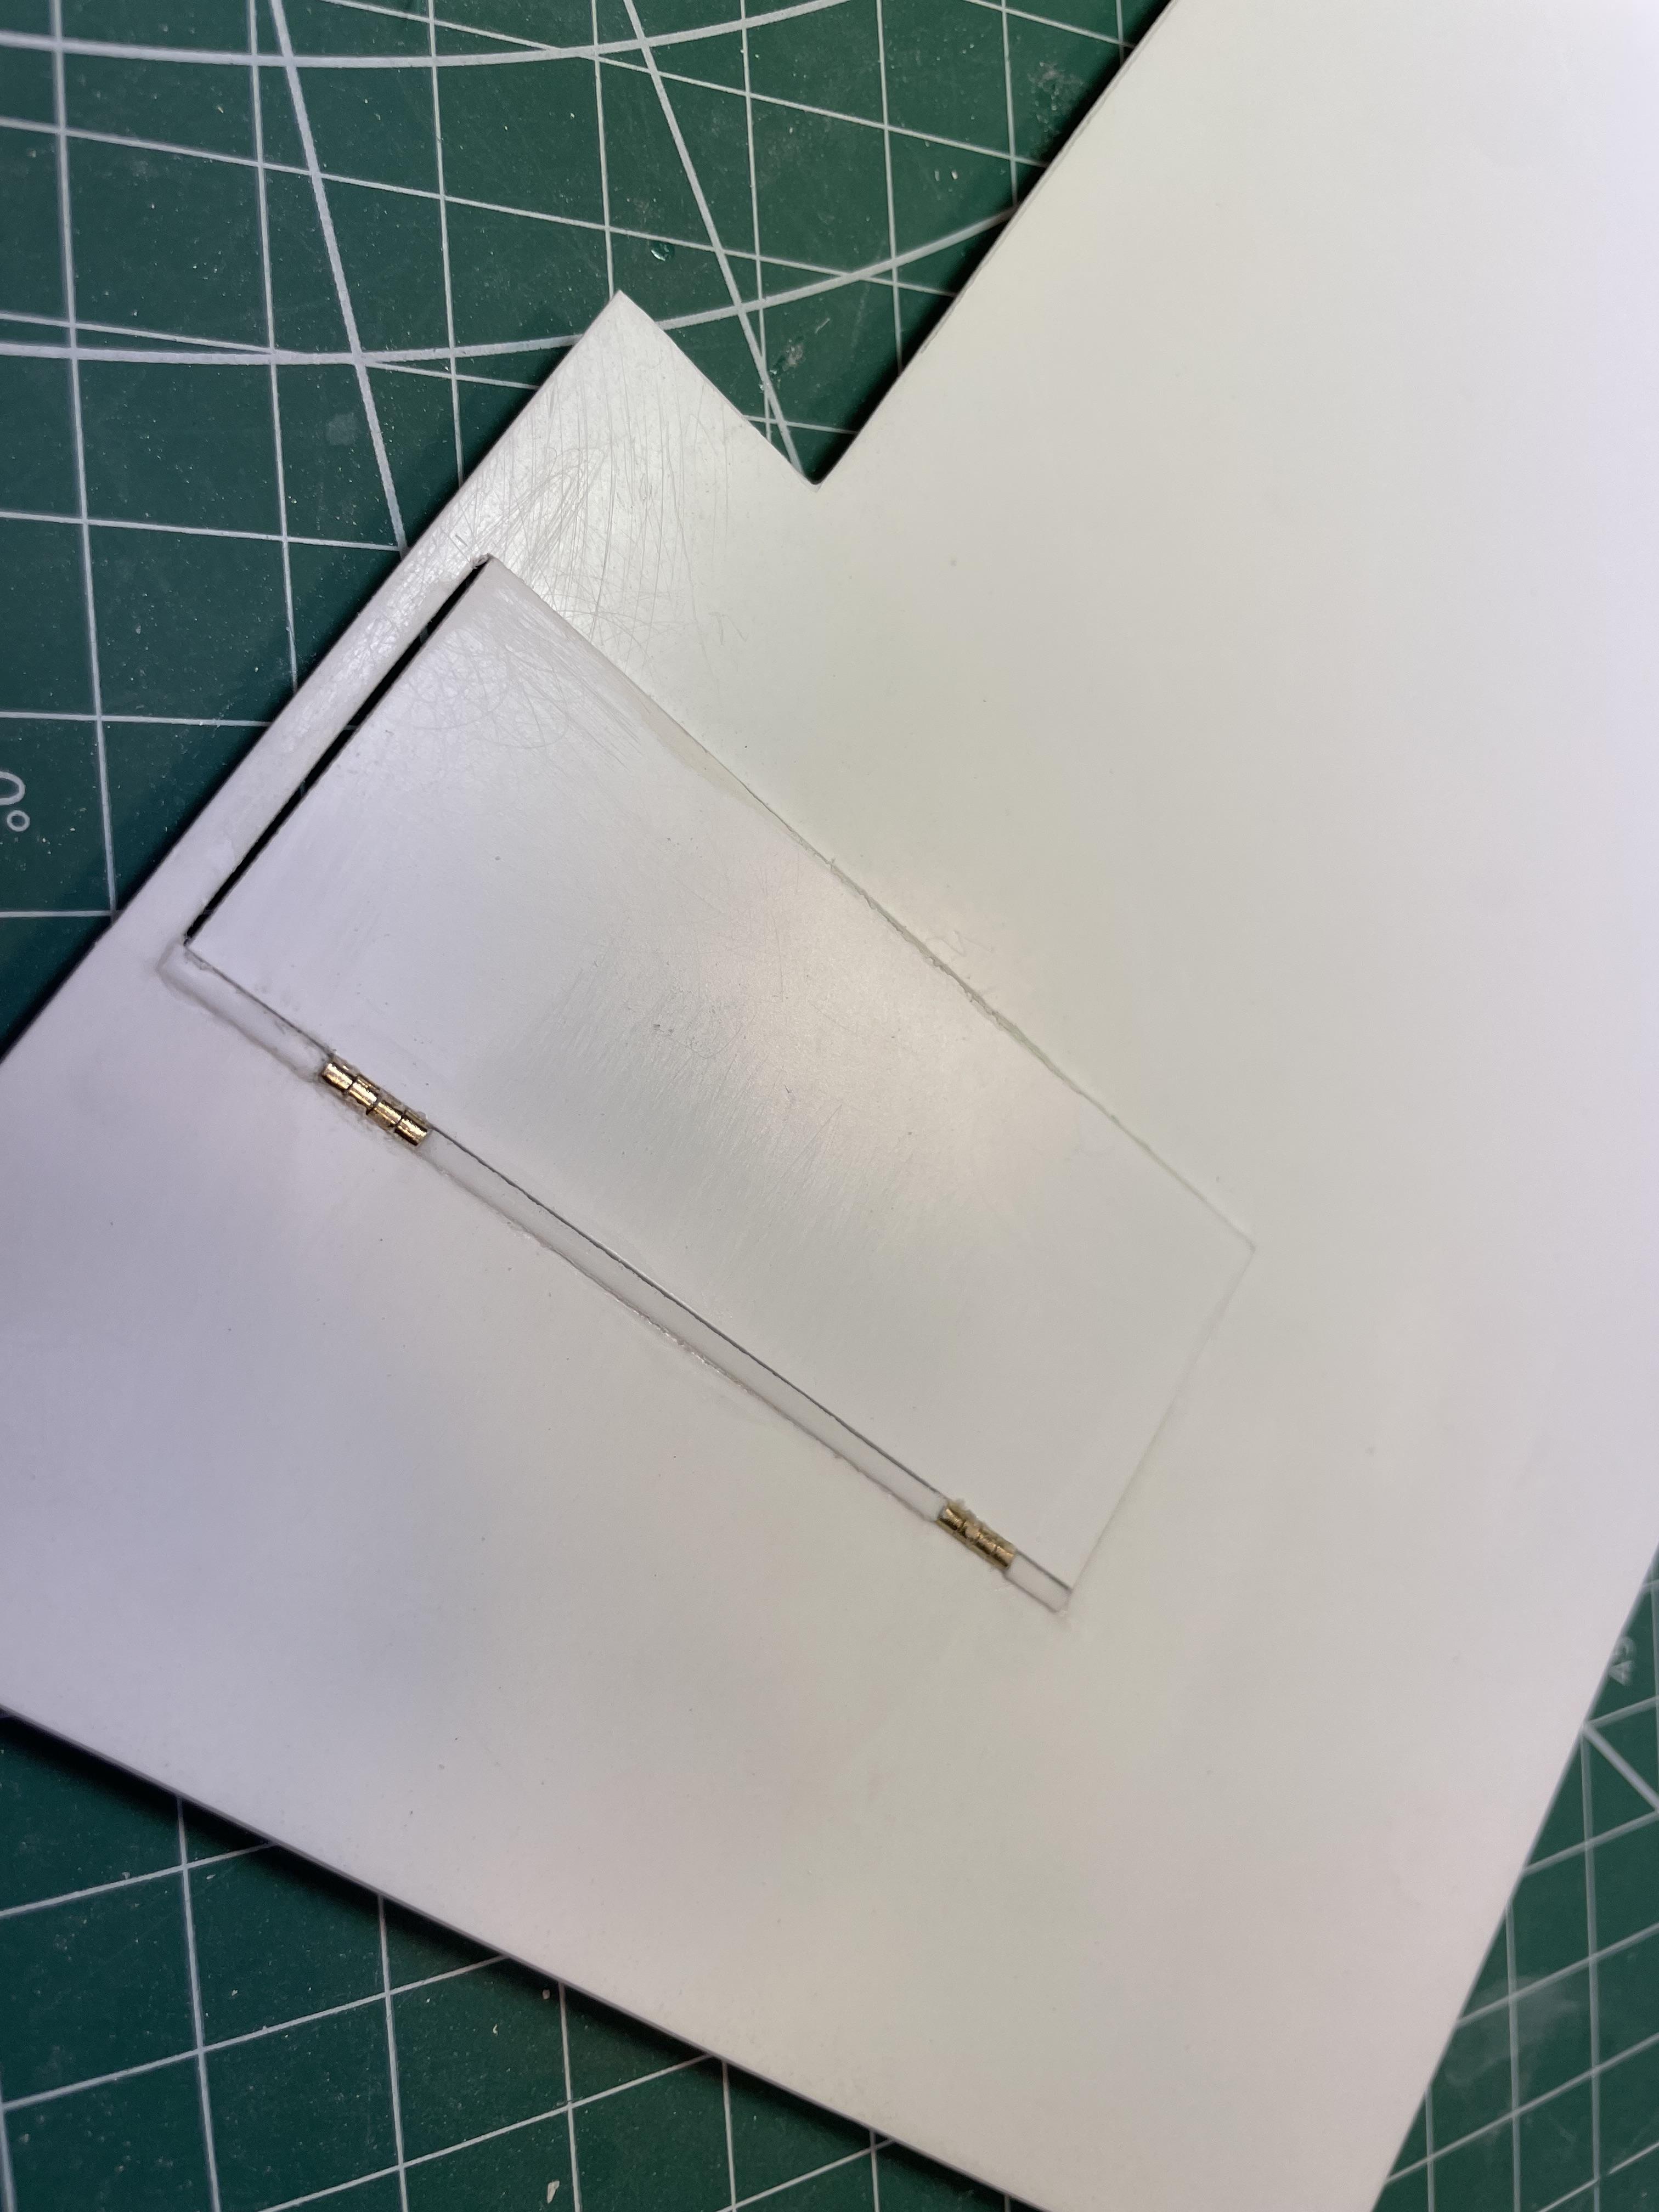
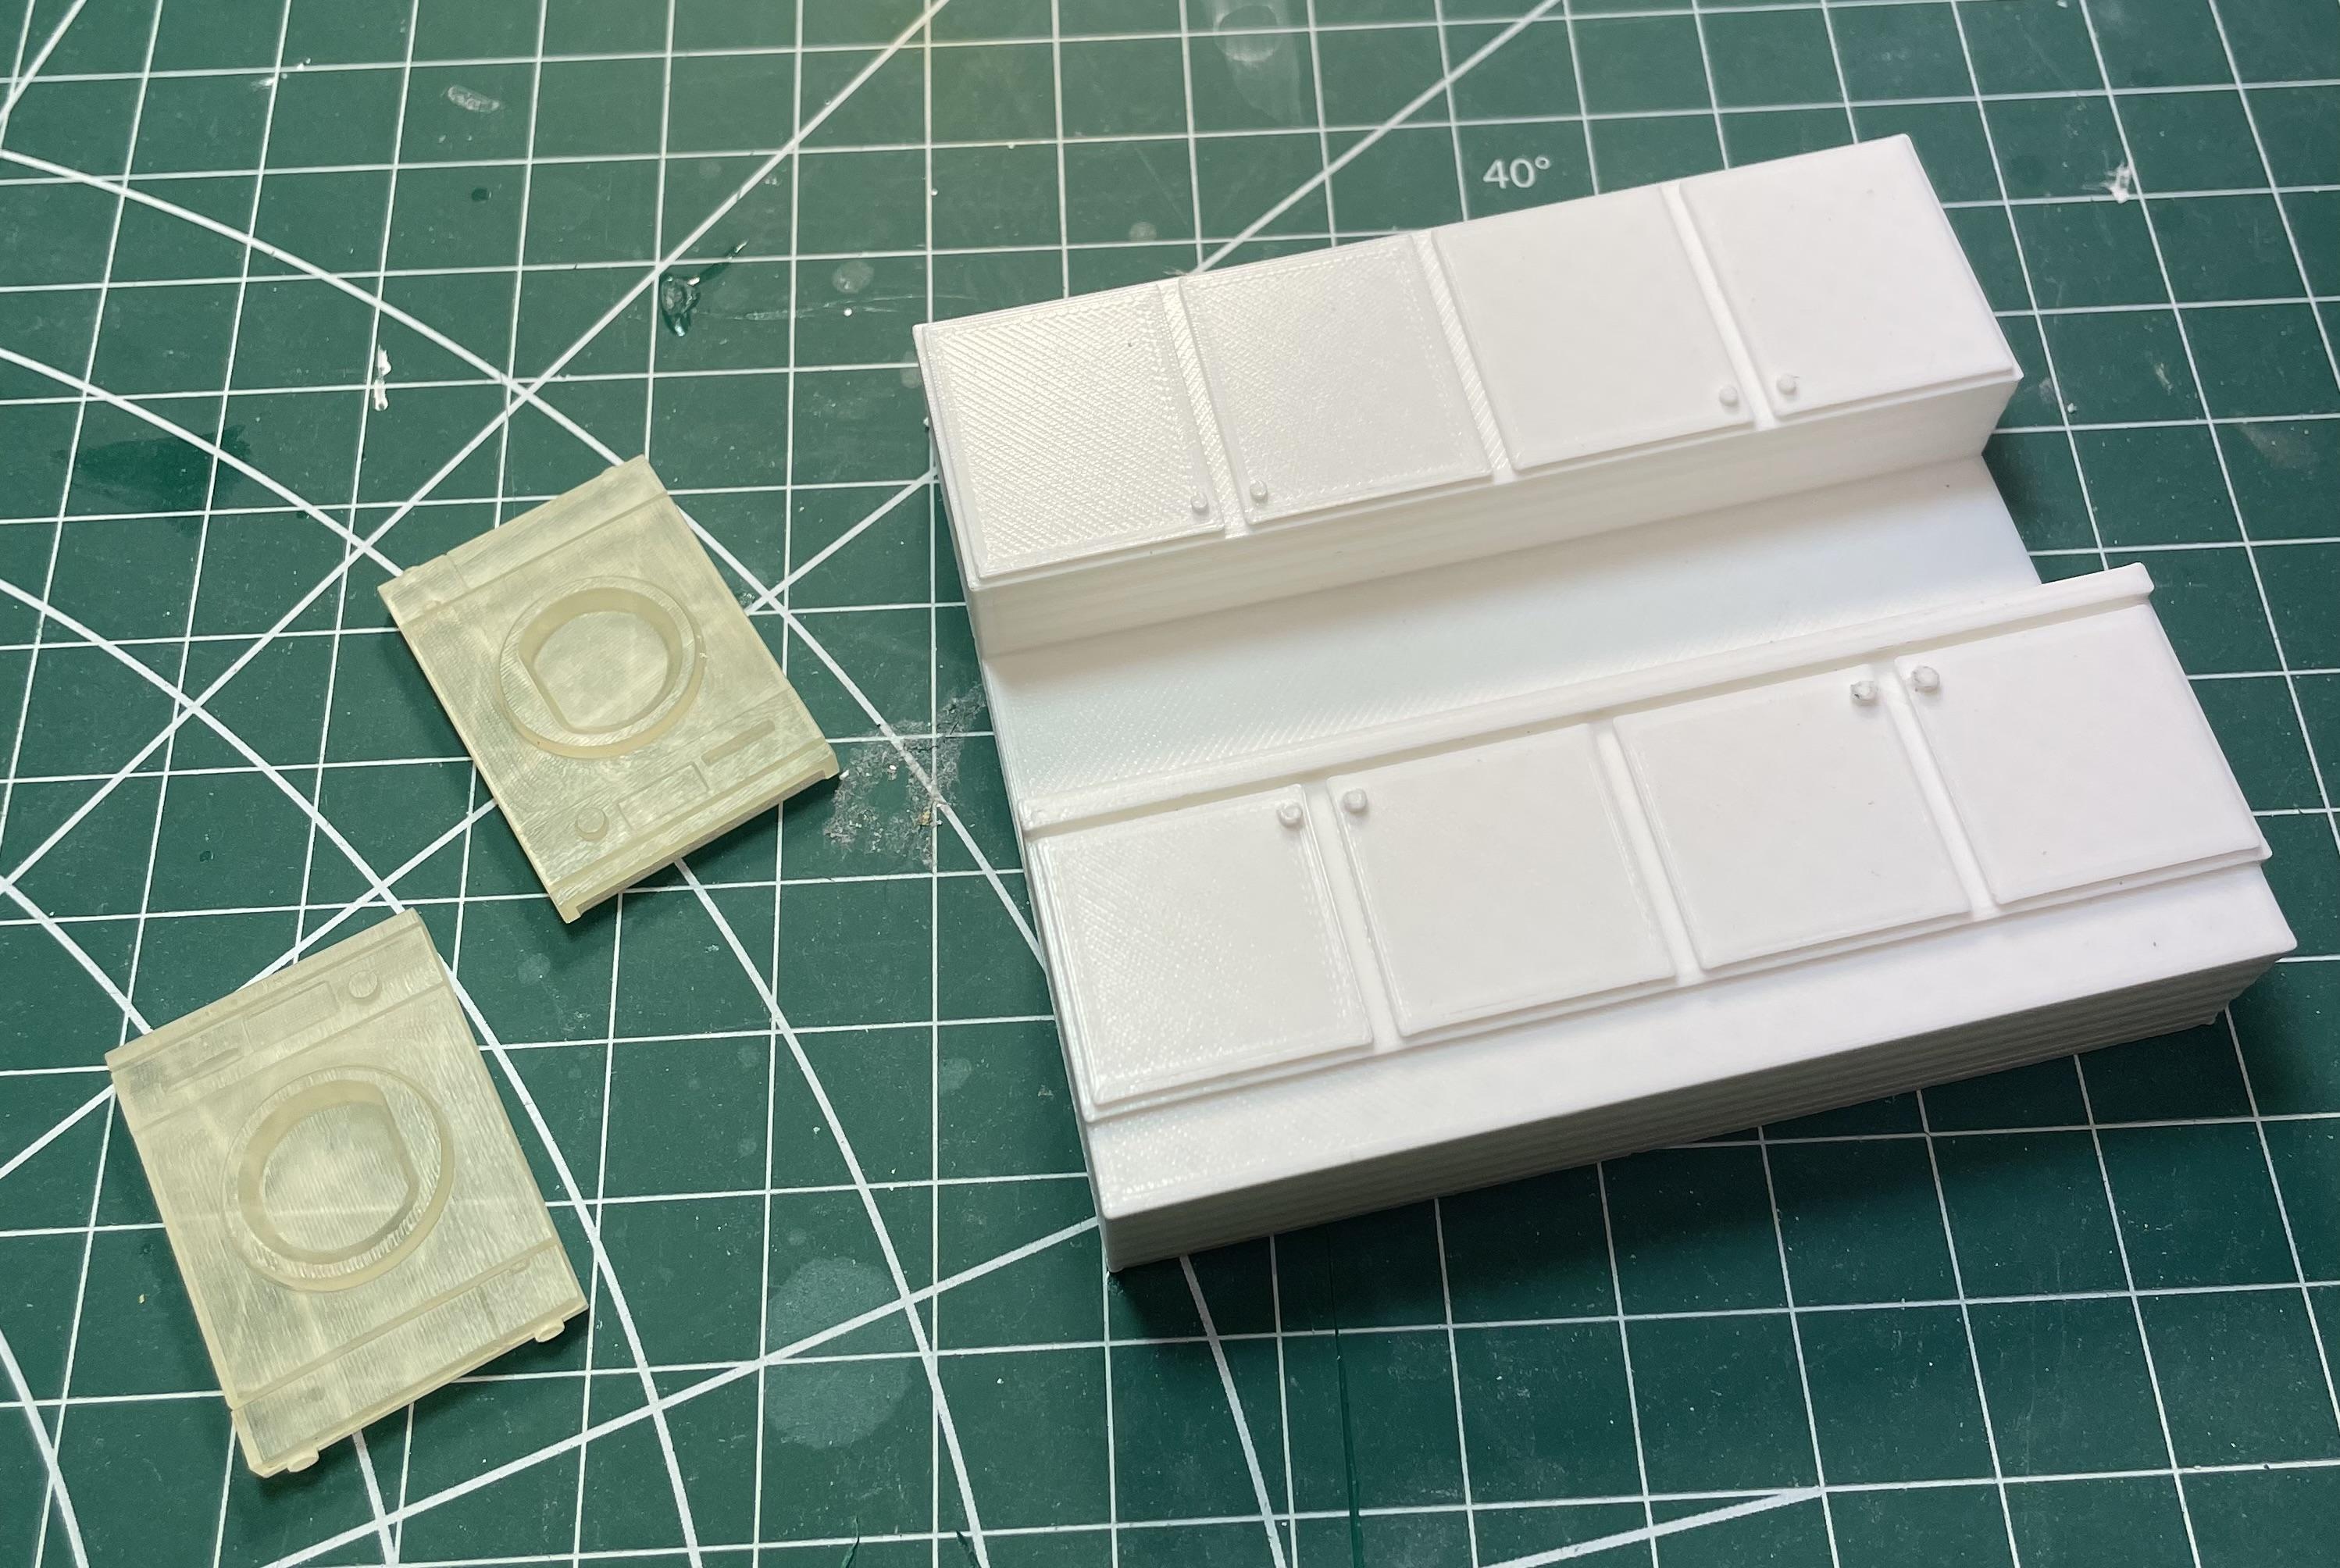
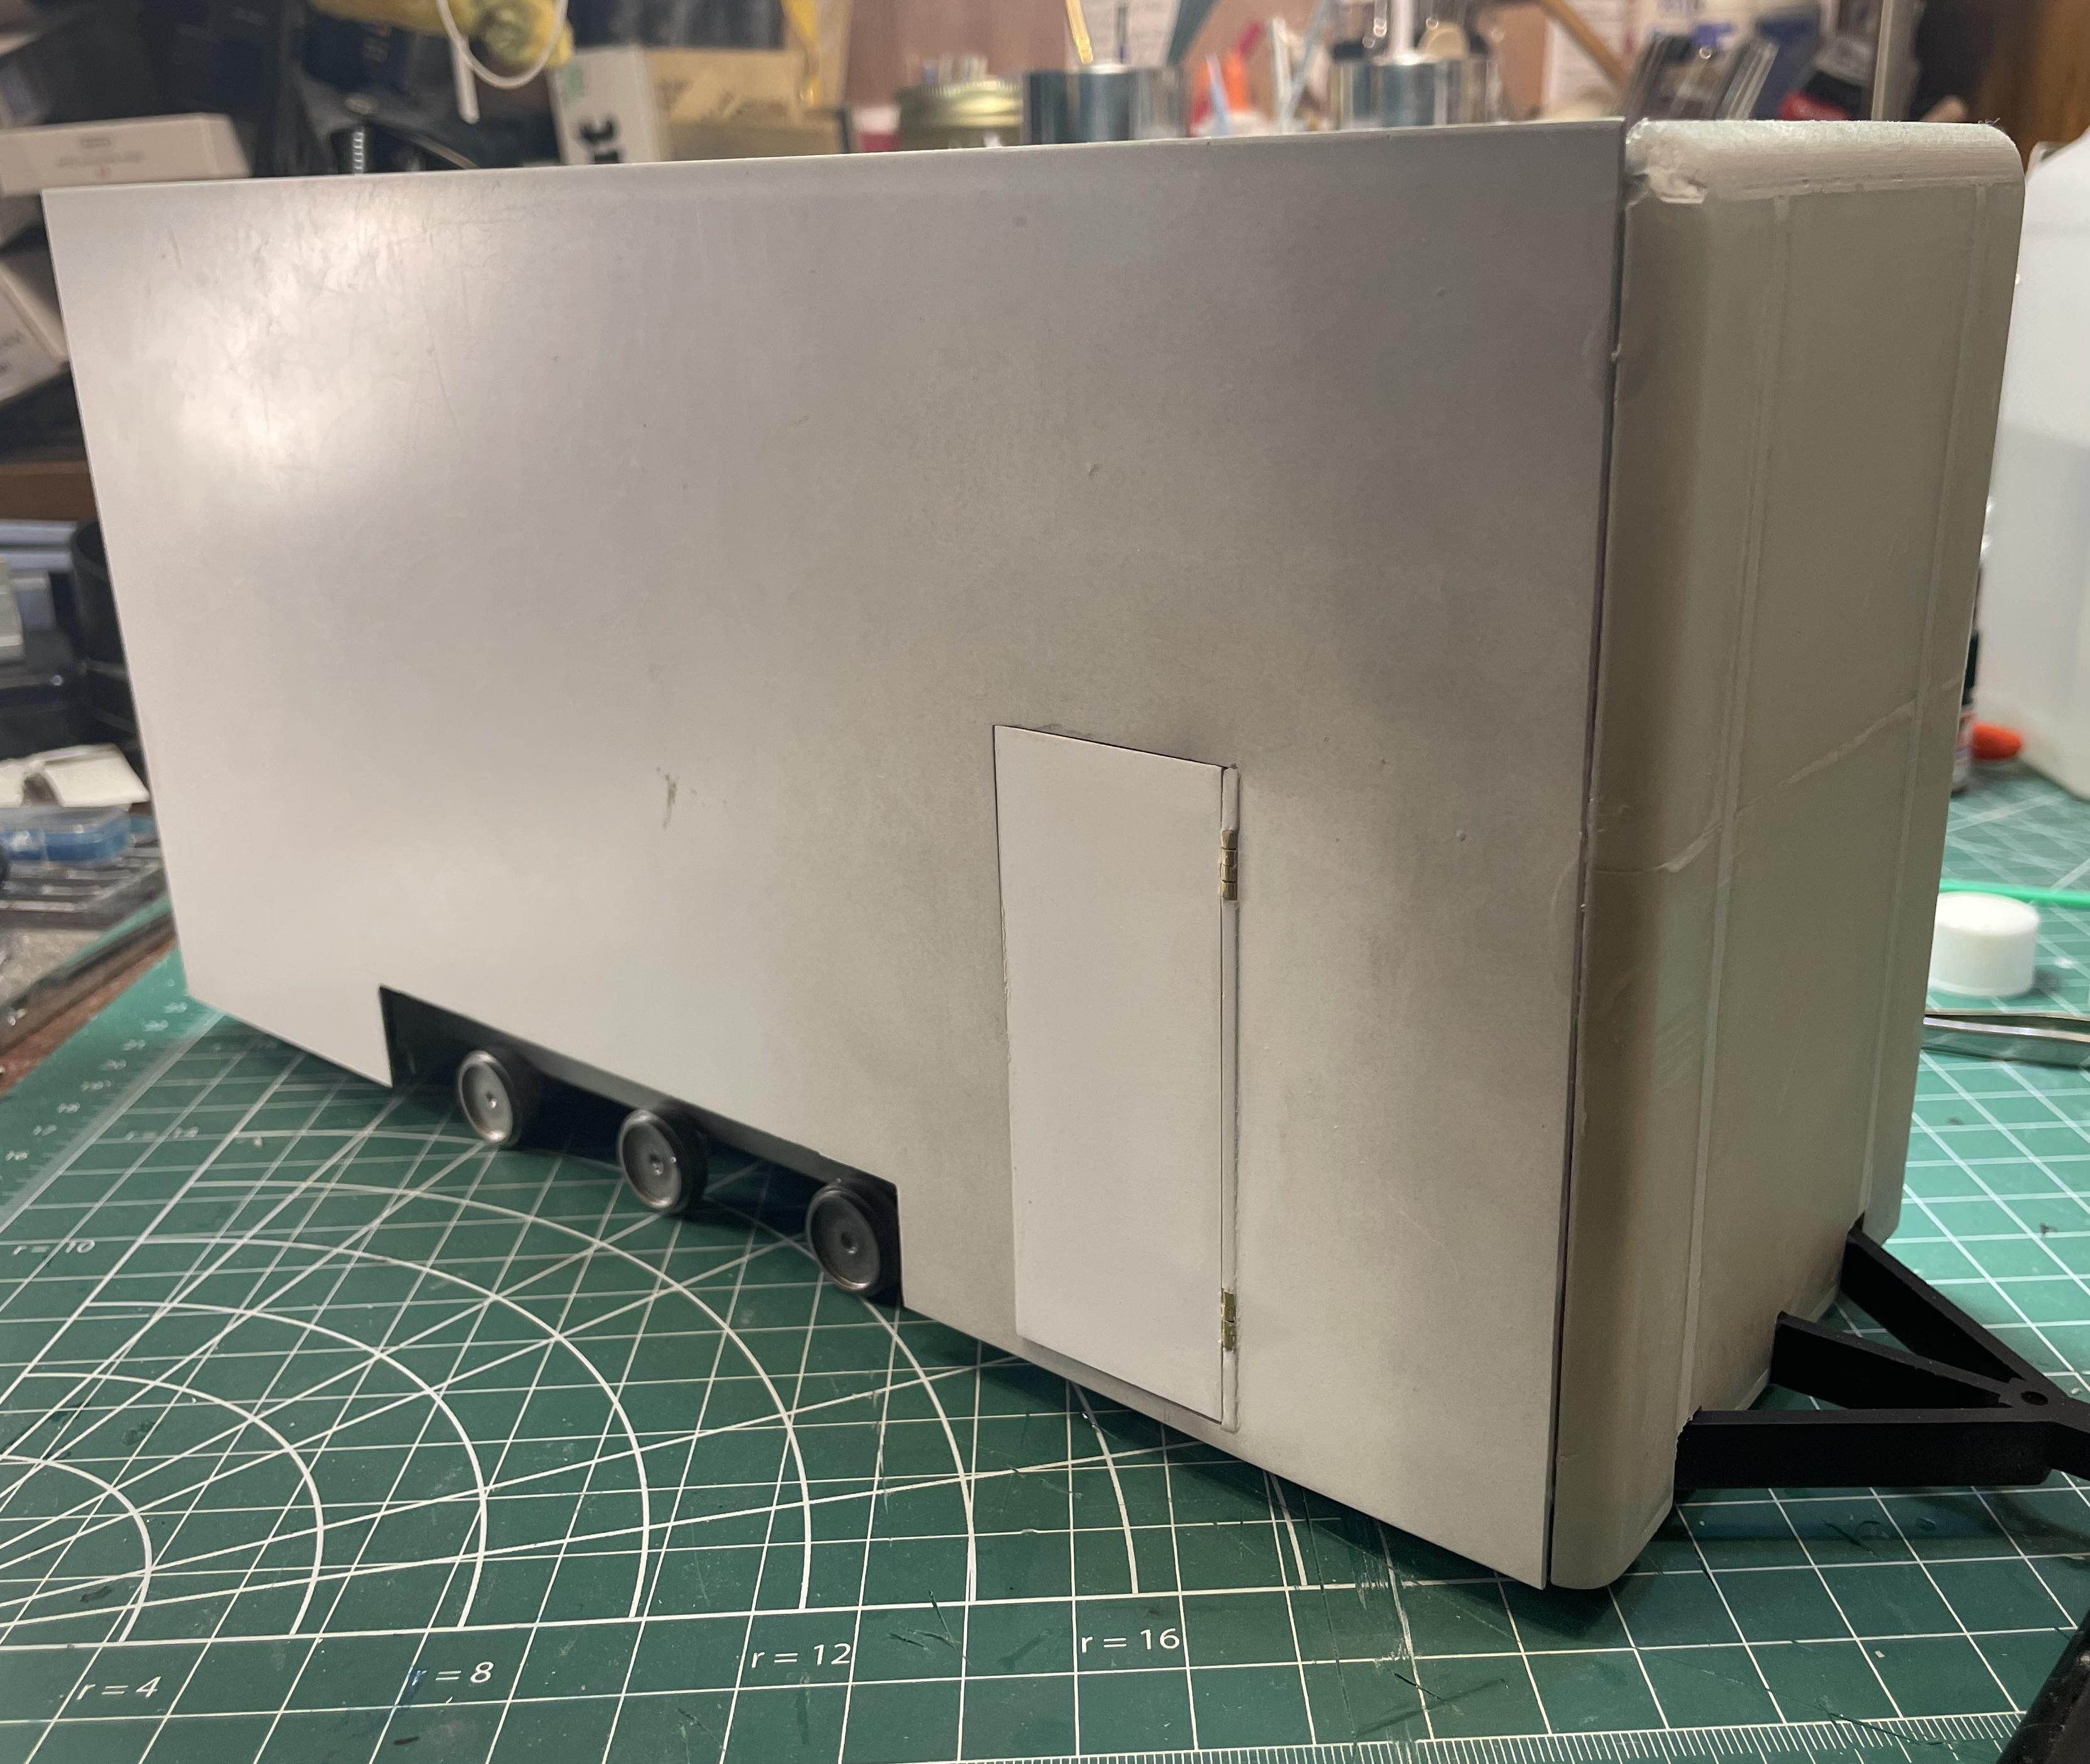
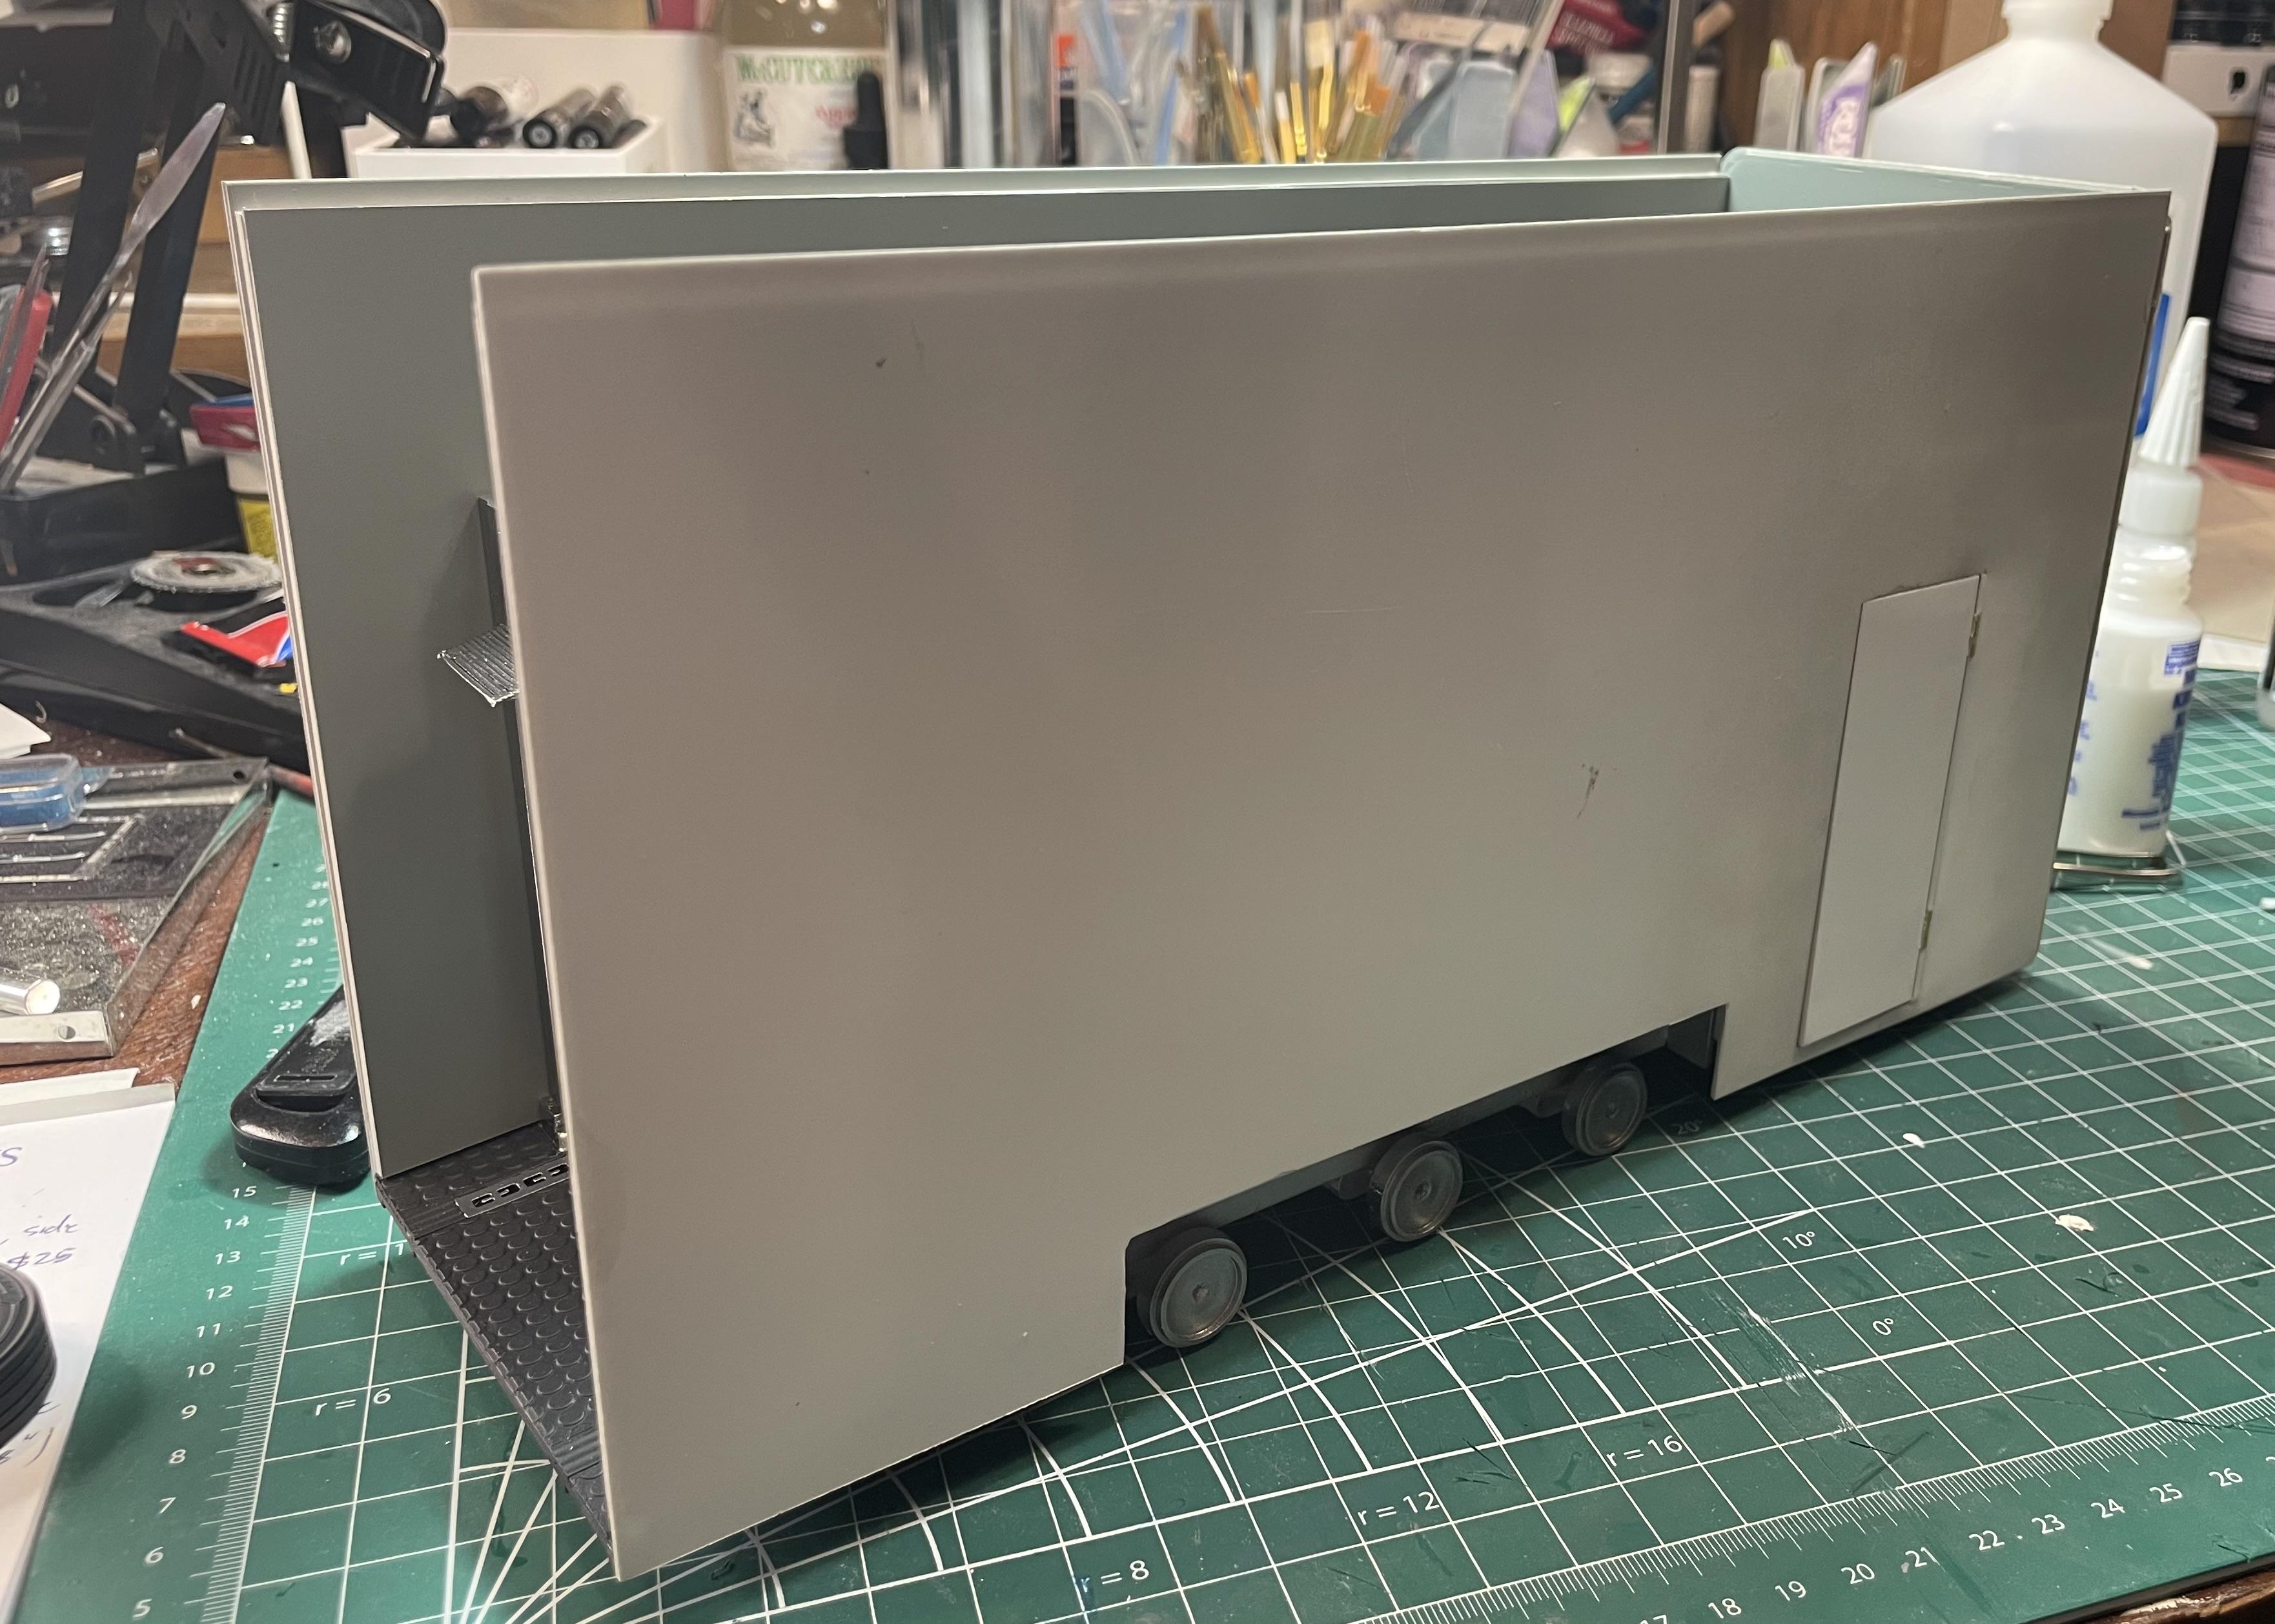
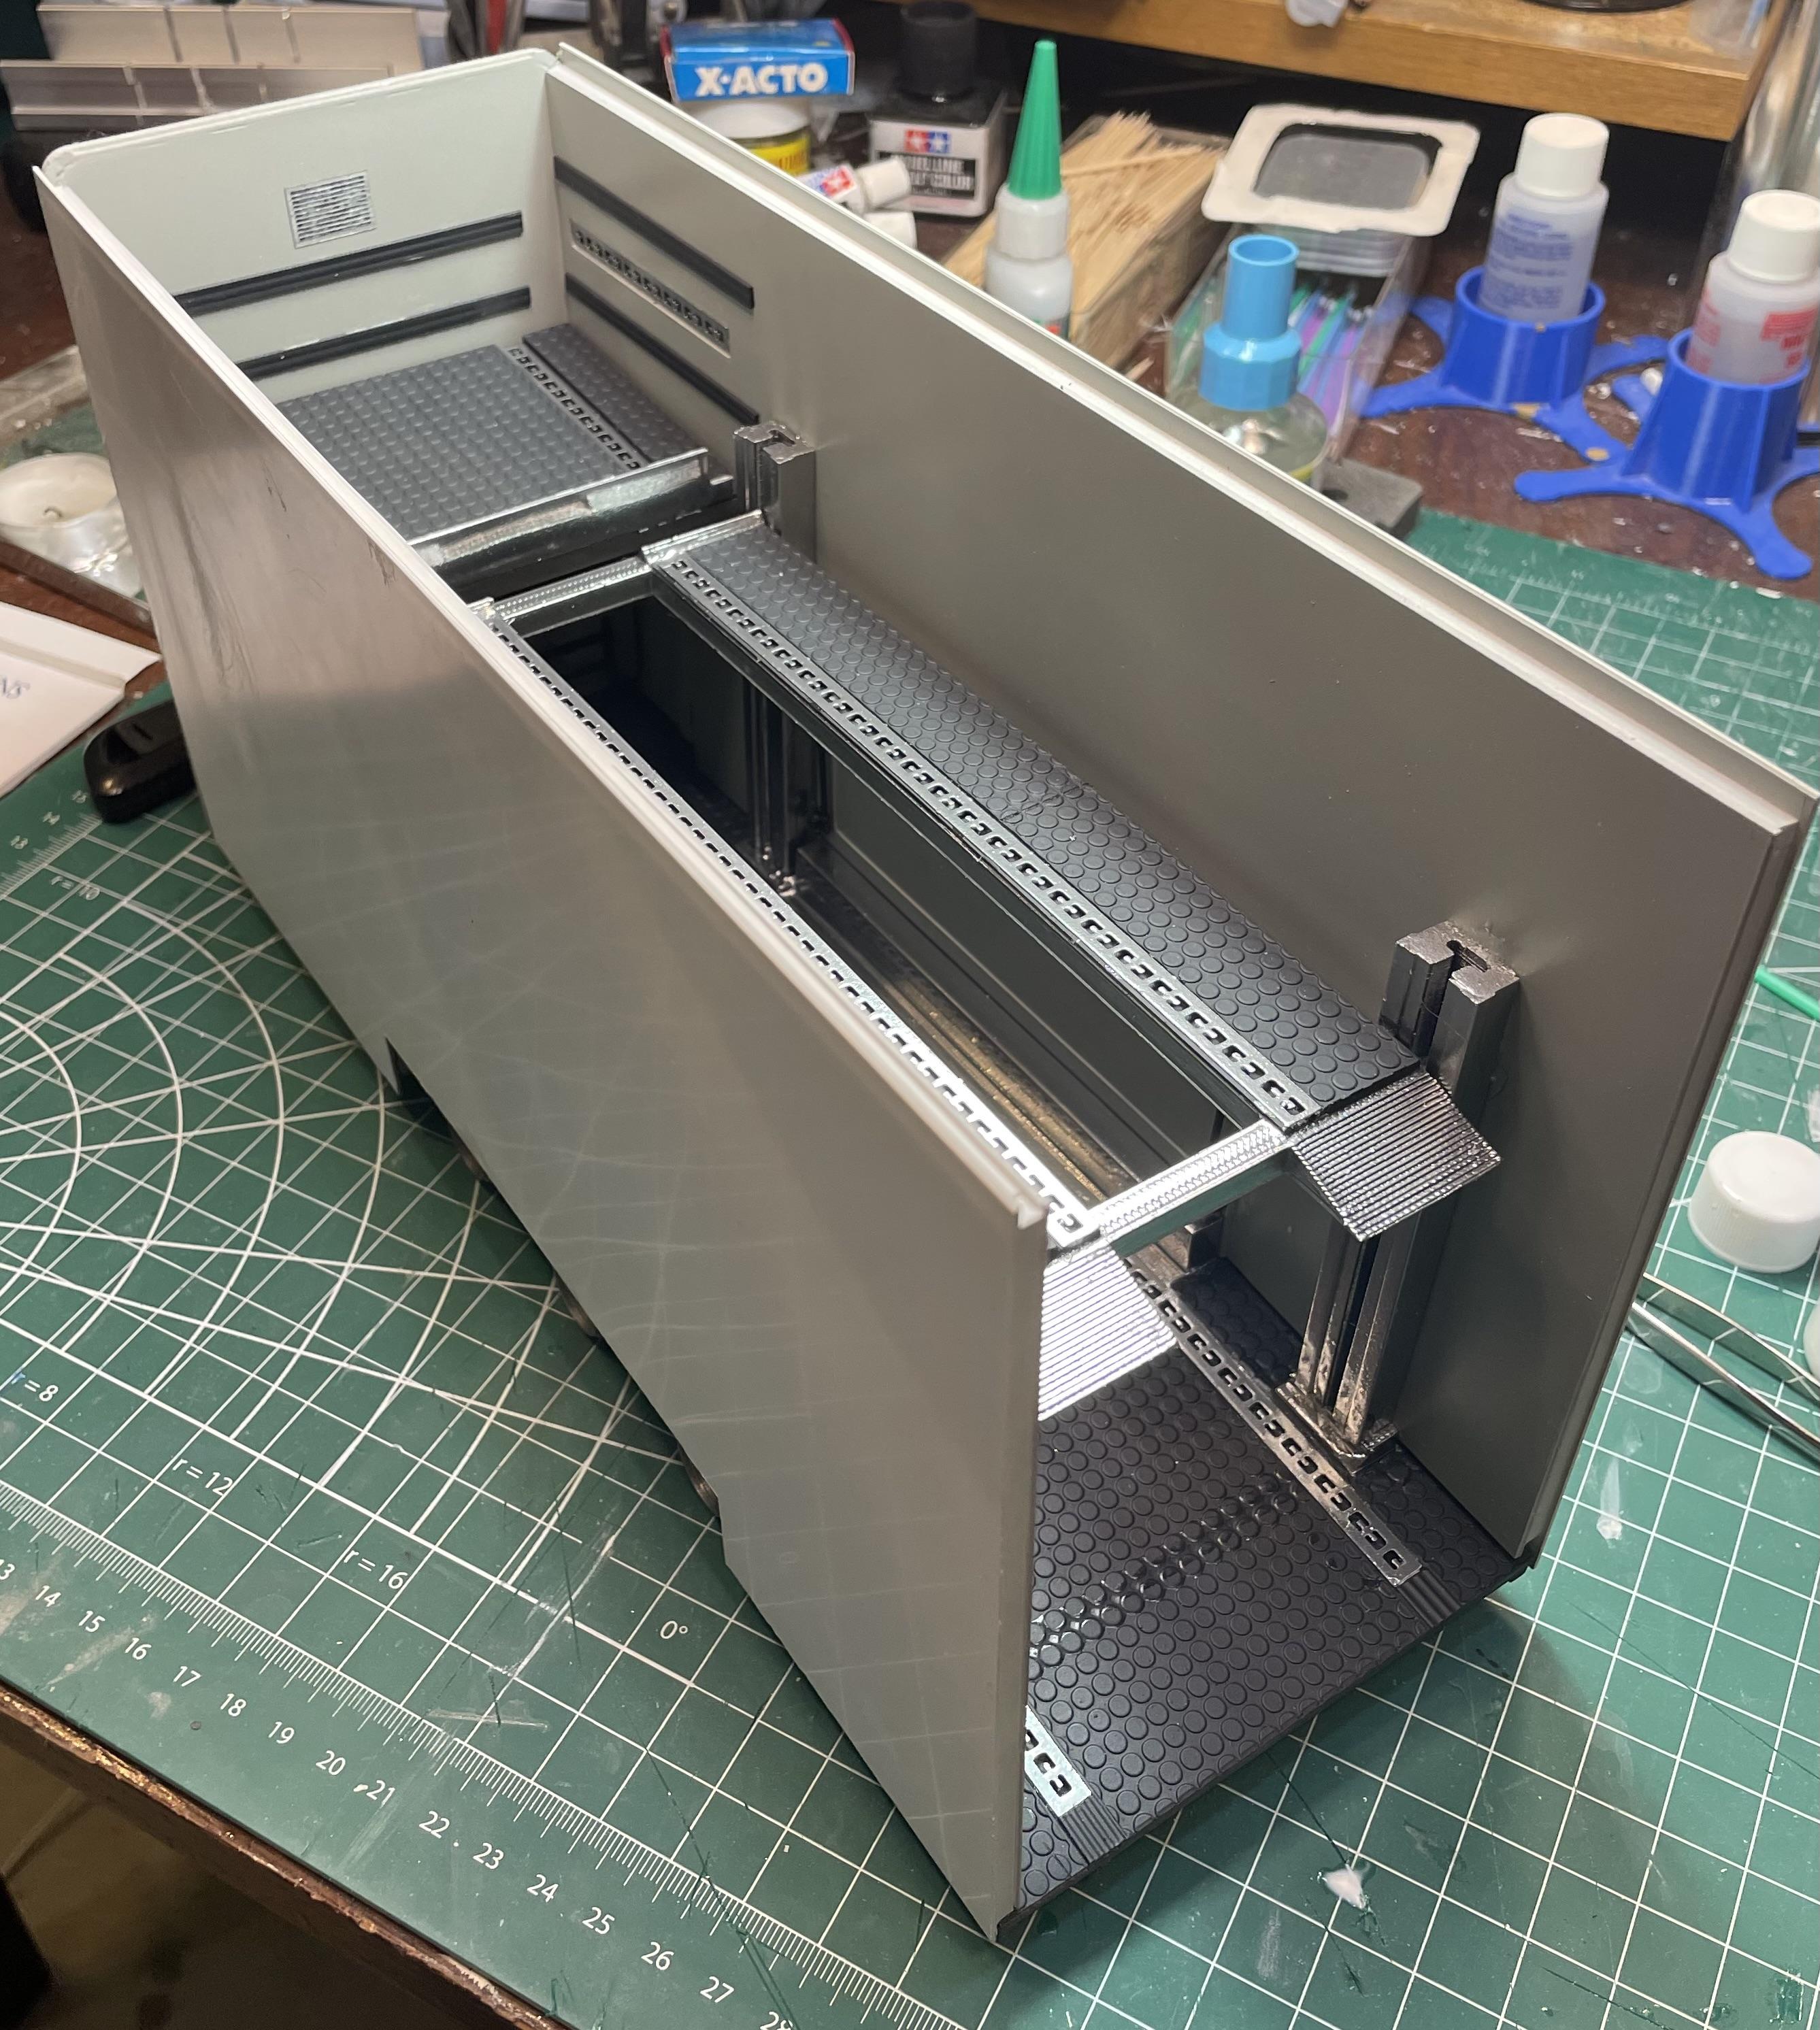
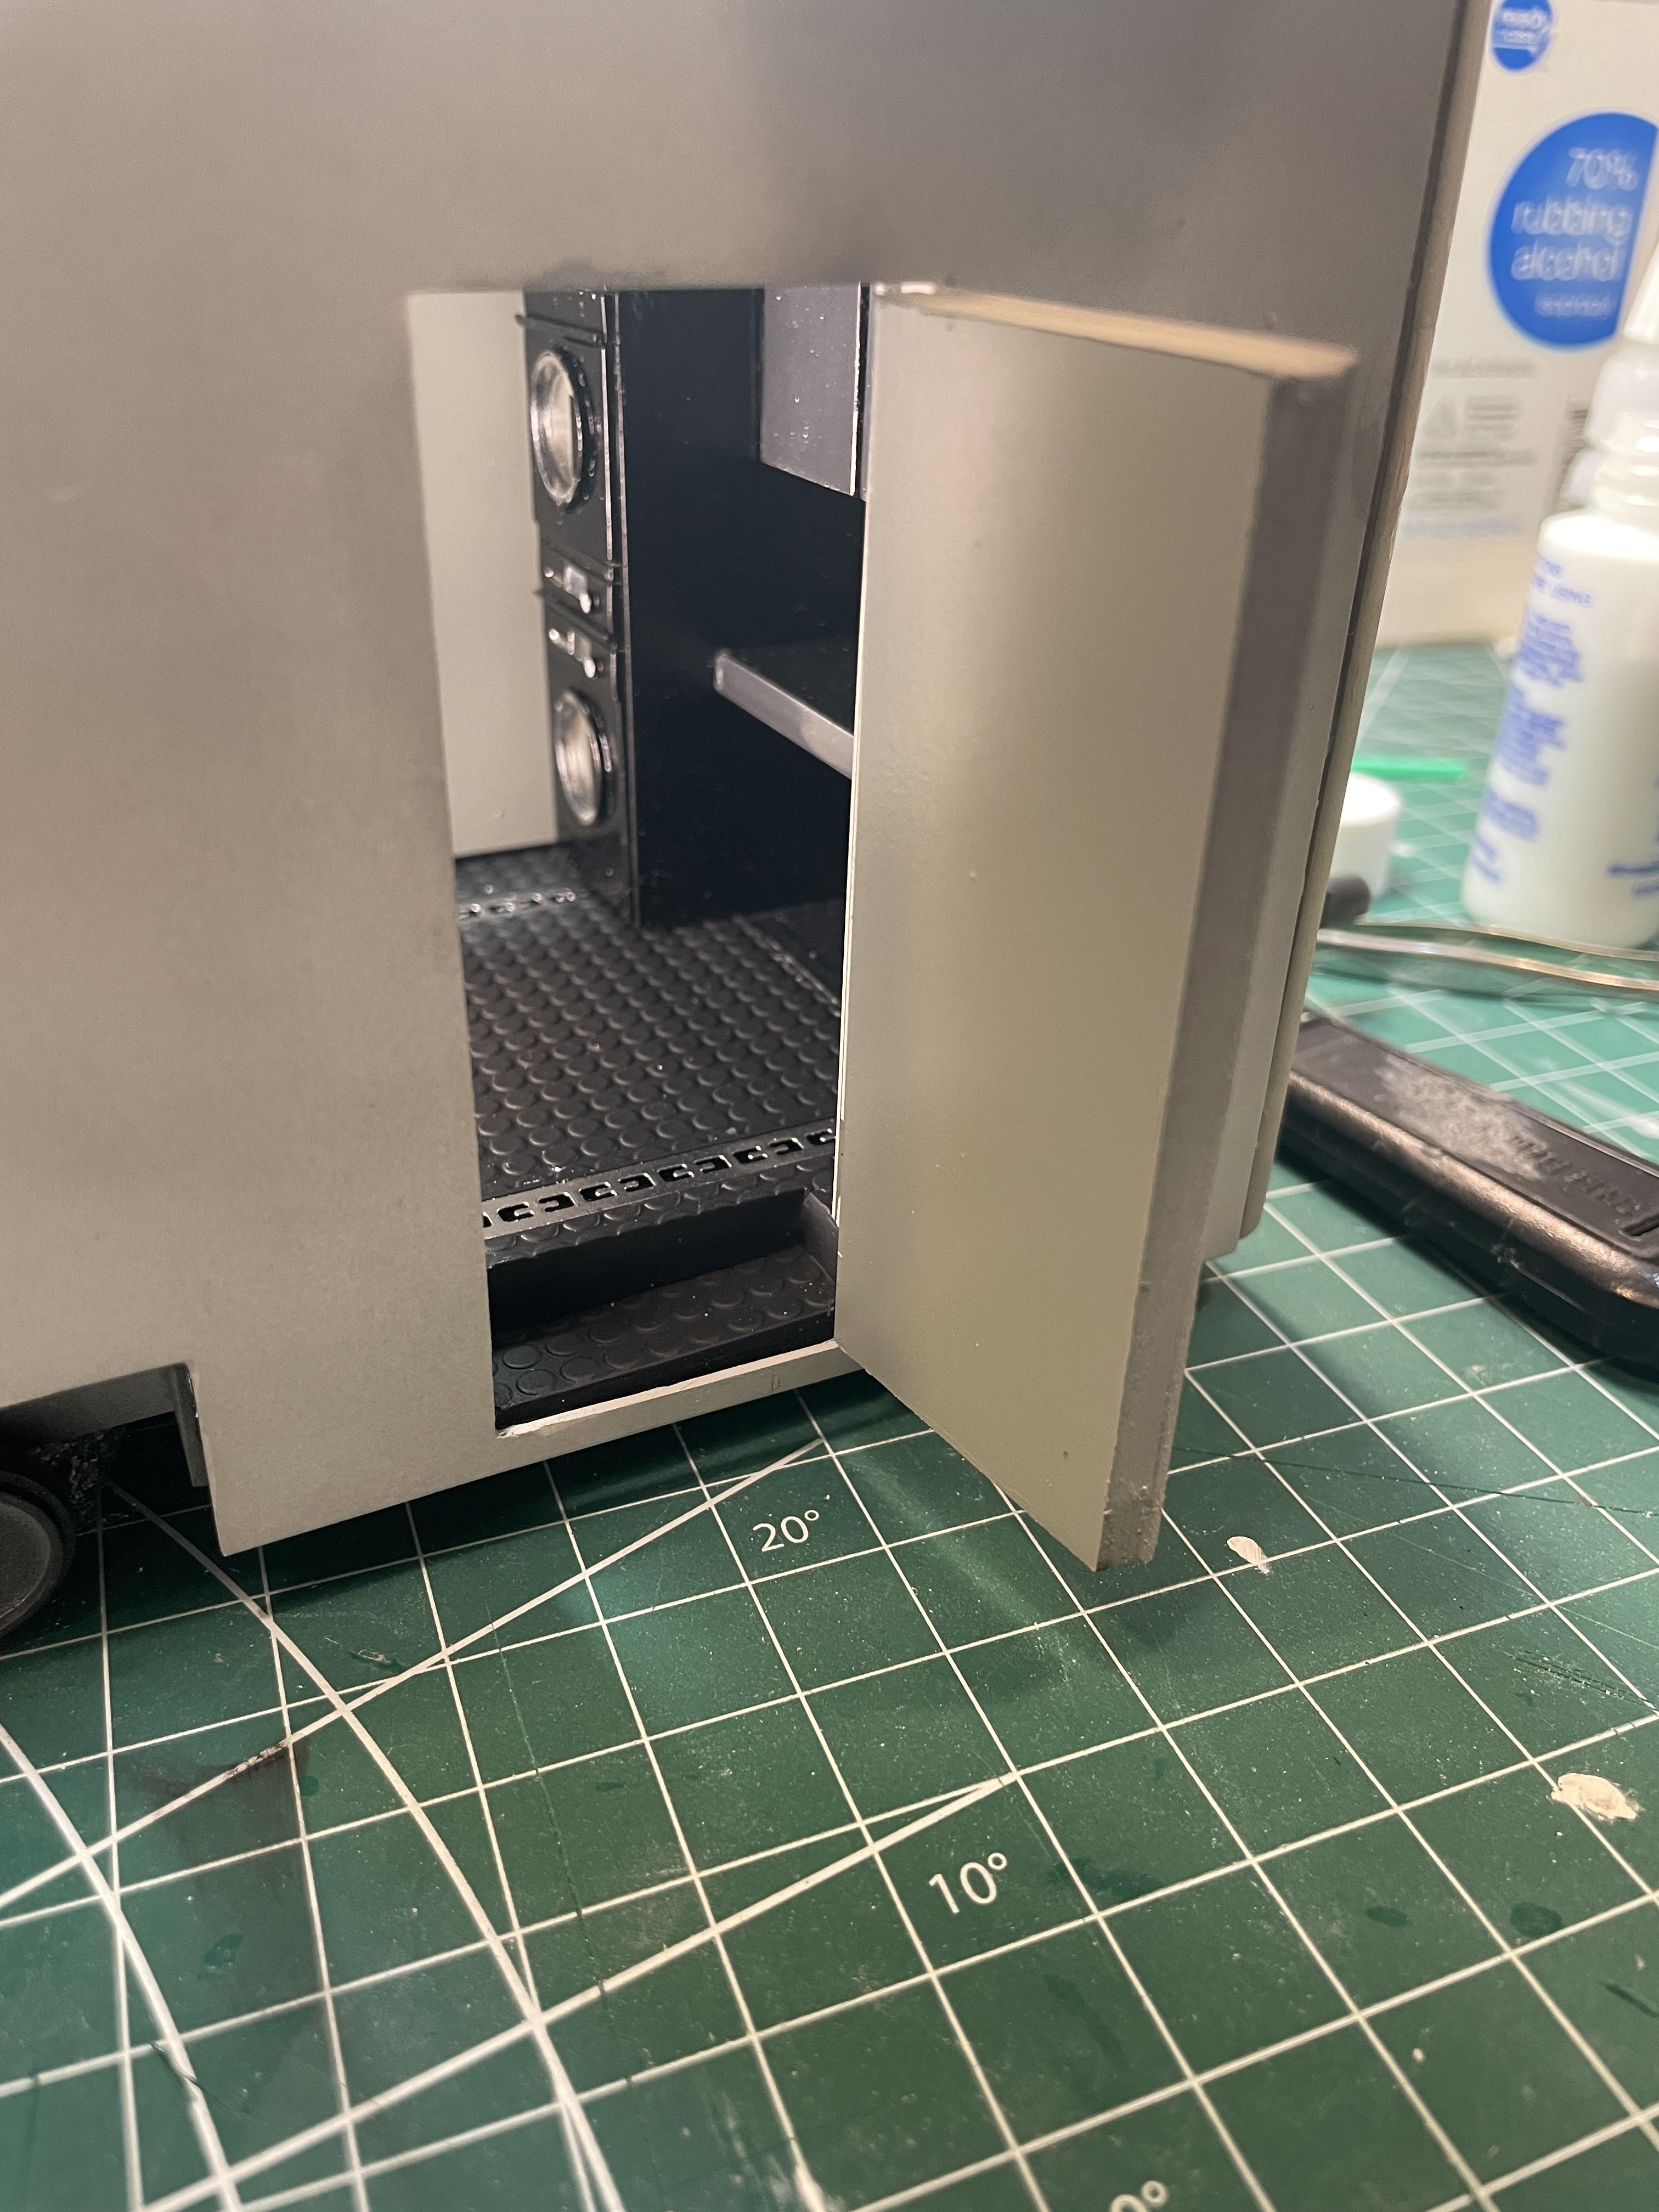
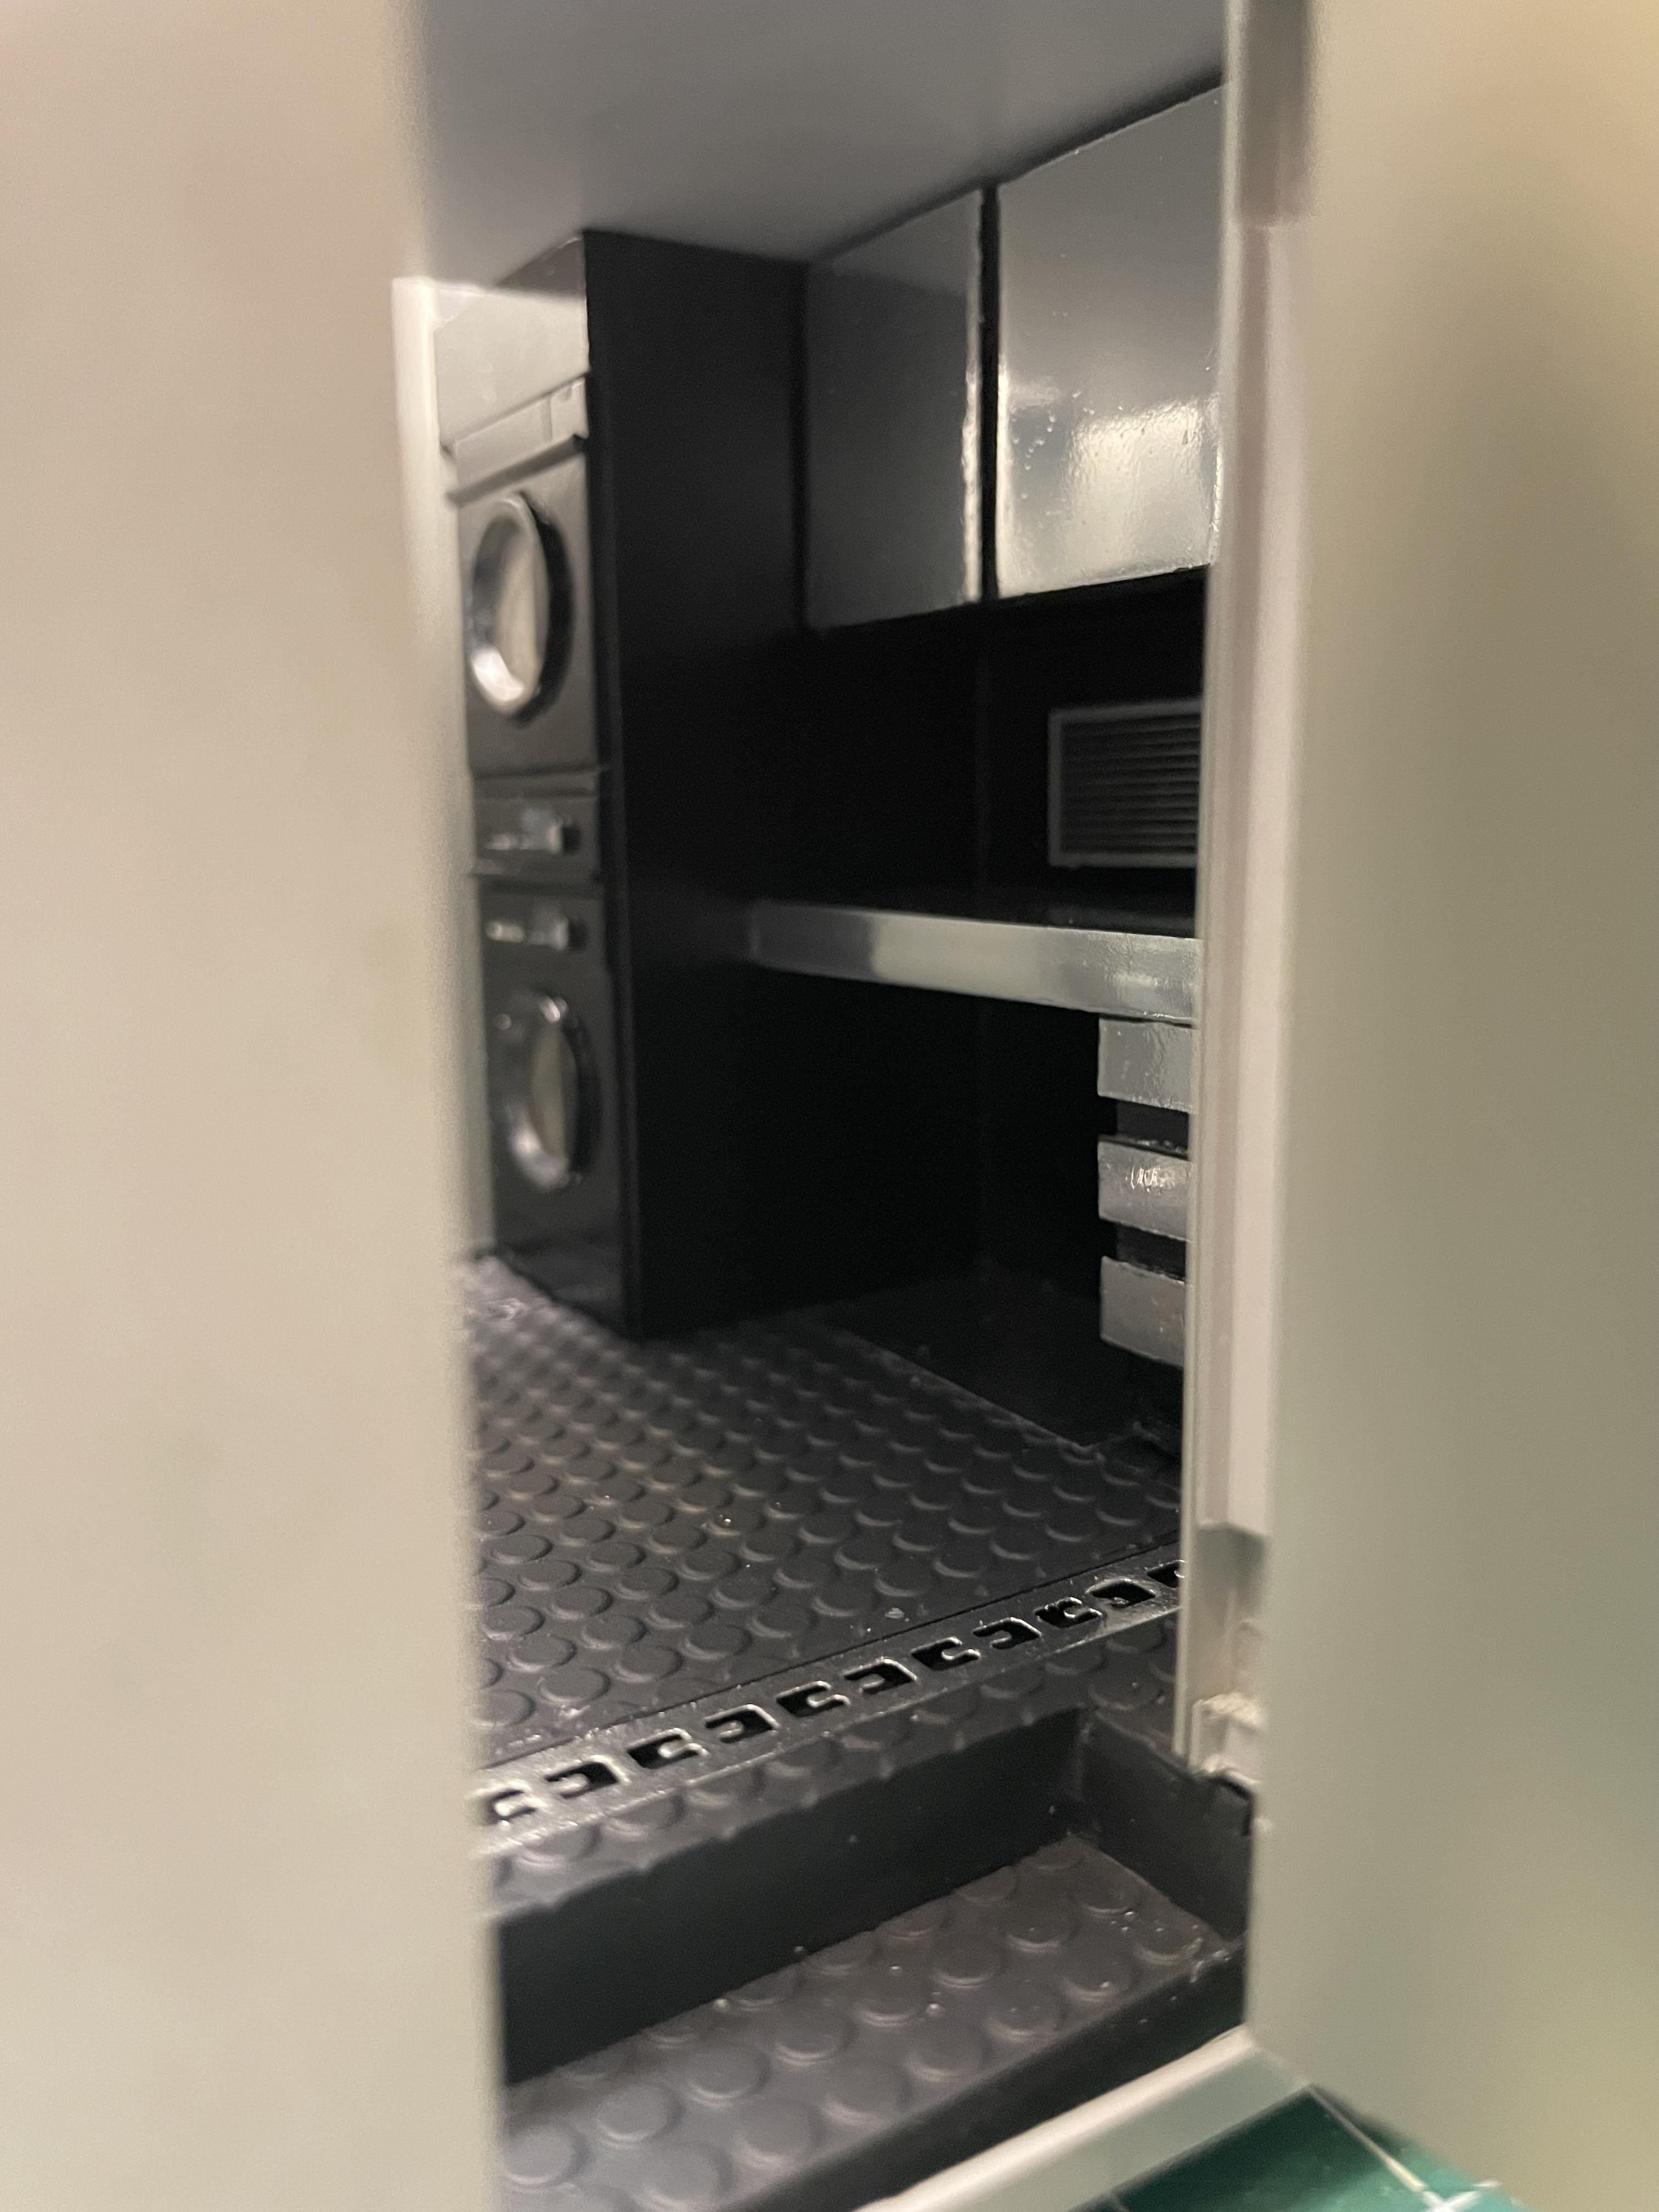
I have the interior of the stacker mostly complete. I decided on grey walls, with stainless and black cabinets. I figured I had to do the interior work, with the exception of final details and trim, ahead of the exterior, for painting purposes. I couldn’t mask and paint the various finishes with the exterior walls in place. I had to get the sidewalls basically finished up first. So, I got to work on the side entry door. I was able to make it operational by sandwiching small brass hinges into the framework. Adding finish styrene trim and the door skin, it fits snug and smooth. I painted the aluminum/stainless surfaces with Revell Chrome and Spaz Stix Clearcoat. The rubber coin flooring got a coat of Tamiya rubber black. The front workshop area started with cabinets from BCS Trading, but I customized them, adding a workbench top, and skinned them in styrene and chrome paint to represent stainless steel. I also modified a washer and dryer I got a while back on shapeways. Some large RVs are equipped with a stackable washer combo inside them, but I always thought it could be put in the stacker instead, freeing up interior space. In a custom stacker, anything goes. The “attic” has rub rails and e-track tie downs, along with an operational drop gate to connect with the lift. Next, I’ll begin work on the rear ramp door, the roof, and trim work. The interior will need a lot of detail parts, too. Then, exterior finishing.
-
Farm Floater Truck 1/24th scale
vincen47 replied to Randy D's topic in WIP: Model Trucks: Big Rigs and Heavy Equipment
That double frame and the detailed crossmembers are exceptional. Wrapping it with styrene was a simple and effective solution for the resize, not to mention, resulting in a realistic double frame. The tank end looks good, too. -
Peterbilt 379 RV
vincen47 replied to vincen47's topic in WIP: Model Trucks: Big Rigs and Heavy Equipment
Thanks! I should have an update on the trailer build this weekend. -
This will be another masterpiece, for sure, and very unique. I haven’t seen a bridge inspection truck built in scale before.
-
1970 Winnebago D27 Chieftain
vincen47 replied to Repstock's topic in WIP: Model Trucks: Pickups, Vans, SUVs, Light Commercial
Simply stunning! Even screen on the window! -
Lonestar - Hot Rod custom
vincen47 replied to LOBBS's topic in WIP: Model Trucks: Big Rigs and Heavy Equipment
Forgot to mention, A&N currently has a wait time of 3 months for shipping. They make absolutely fantastic products, though. The engine is highly detailed. Lots of reference photos are available online of Lonestars with ISX15 engines, as that was the only engine option they offered. -
Lonestar - Hot Rod custom
vincen47 replied to LOBBS's topic in WIP: Model Trucks: Big Rigs and Heavy Equipment
Yes, the A&N “Red American X15” is the accurate engine for the Lonestar. Specifically, it represents a 2014-2018 CM 2350 Cummins, the ISX15. The Auslowe “Signature” is a good representation of a slightly earlier Cummins, the CM 570, the pre-emissions Signature 600. It wouldn’t be accurate for a Lonestar, because Cummins made them from about 1998-2002, the successor to the N14 and the precursor to the EGR-equipped ISX-15, the CM 870. There were two additional ISX-15 engine variations that followed the original ISX-15 before A&N’s version, The CM 871 and CM 2250 (the first with a DPF) but they are close in detail to A&N’s later version. Currently, Cummins is making the next gen, the X15, CM 2450. One way to tell them all apart is the shape of the front timing cover. -
Lonestar - Hot Rod custom
vincen47 replied to LOBBS's topic in WIP: Model Trucks: Big Rigs and Heavy Equipment
With the engine, the Maxxforce 15 was a failure in and of itself, but it also didn’t make it very far into the production Lonestars because of cooling issues with the radiator set up. Moebius used one of the first ones built with the MF as the example along with early specs from Navistar. One of those situations where if they waited, maybe we would have gotten a Cummins ISX15 kitted. Though, we have them available now from A&N Resin. Highly recommended. But, I totally understand if you don’t want to go the engine swap route. When I built my Lonestar RV, I used Cummins red on just the basic engine block and glued the hood shut. It was originally a day cab tractor glue bomb without an engine that I got on eBay and the hood was warped. A red painted MF block and some glue solved both problems. -
Lonestar - Hot Rod custom
vincen47 replied to LOBBS's topic in WIP: Model Trucks: Big Rigs and Heavy Equipment
Yes, the wheelbase is generally whatever the customer wants. 280” is on the longer side of most tractors today, but not unheard of. It’s a generous wheelbase for a Lonestar. It could be shortened a little, if you prefer, but watch out for swing dip clearance for your trailer. Meaning, make sure it doesn’t hit the corner of the sleeper when turning sharply. For Toterhomes, or any RV for that matter, 45’ is the legal limit for a rigid vehicle, just like straight trucks, buses, etc. This would apply regardless if it has a 5th wheel or it’s a bumper pull. RVs can be up to 65’ overall in combination with a trailer, but some states allow 75’. Of course, many privately owned rigs are much longer, and the DOT/police will rarely stop them, much less take out a tape measurer. So legally, 65’ overall for an RV registered rig, but if you’re commercial, then there’s no limit to the overall length, just 53’ for the trailer. That’s how you can get huge race rigs with enormous stackers and toters. Of course many of them are not for hire, too, but they usually don’t get into trouble. If your Lonestar will have a 5th wheel deck for a big 53’ featherlite-style trailer, 280” will still look good. If you’re going with a full coach body (like my 379 RV project) and a bumper-pull style stacker trailer, then 280” will give you up to a 36-40’ rig (about a 26-30’ coach body) and look proportional without too much length behind the rear drives. If you don’t want one that long, then you can shorten the wheelbase. Some don’t have much length at all behind the drives, allowing for even greater trailer tongue weight. My 379 Toterhome will be 45’ with a 350” wheelbase, 24’ bumper pull stacker, and a scale 75’ in total length. I made a smaller toterhome model from a Lonestar a little over a year ago, a scale 32’ in length, single axle, bumper-pull style. I put some flames on the hood. Like you said, the Lonestar lends itself to that “hot rod” look. -
Peterbilt 379 RV
vincen47 replied to vincen47's topic in WIP: Model Trucks: Big Rigs and Heavy Equipment
One thing you may be wondering is why the stacker has an internal lift as opposed to a rear door lift. From what I’ve seen, smaller stackers tend to have a lift on the inside if they are designed for RV travel. They can easily carry two vehicles, or a single vehicle and a small boat on a trailer and/or other toys. Usually, there’s a small workshop in front, on the lower level. The trailers that have a full workshop/garage on the lower level, like many race haulers, require a lift built into the rear door. The vehicle(s) are on the upper level. Of course, the door lift design could also be used on smaller RV stackers too, if desired. But, I think the door lifts are more expensive, and therefore less common on the non-racing stackers. -
Western Star 4900 FA plow truck
vincen47 replied to BK9300's topic in WIP: Model Trucks: Big Rigs and Heavy Equipment
A checklist is a must for a build of this magnitude. I have a Word Doc on my computer for my Pete RV build, as well. It’s a parts roster with sources, divided by major component (engine, chassis, cab, body, etc) and build process checklist. An organizational necessity. Nice to see your detailed list. It reflects your precision and creativity. -
Peterbilt 379 RV
vincen47 replied to vincen47's topic in WIP: Model Trucks: Big Rigs and Heavy Equipment
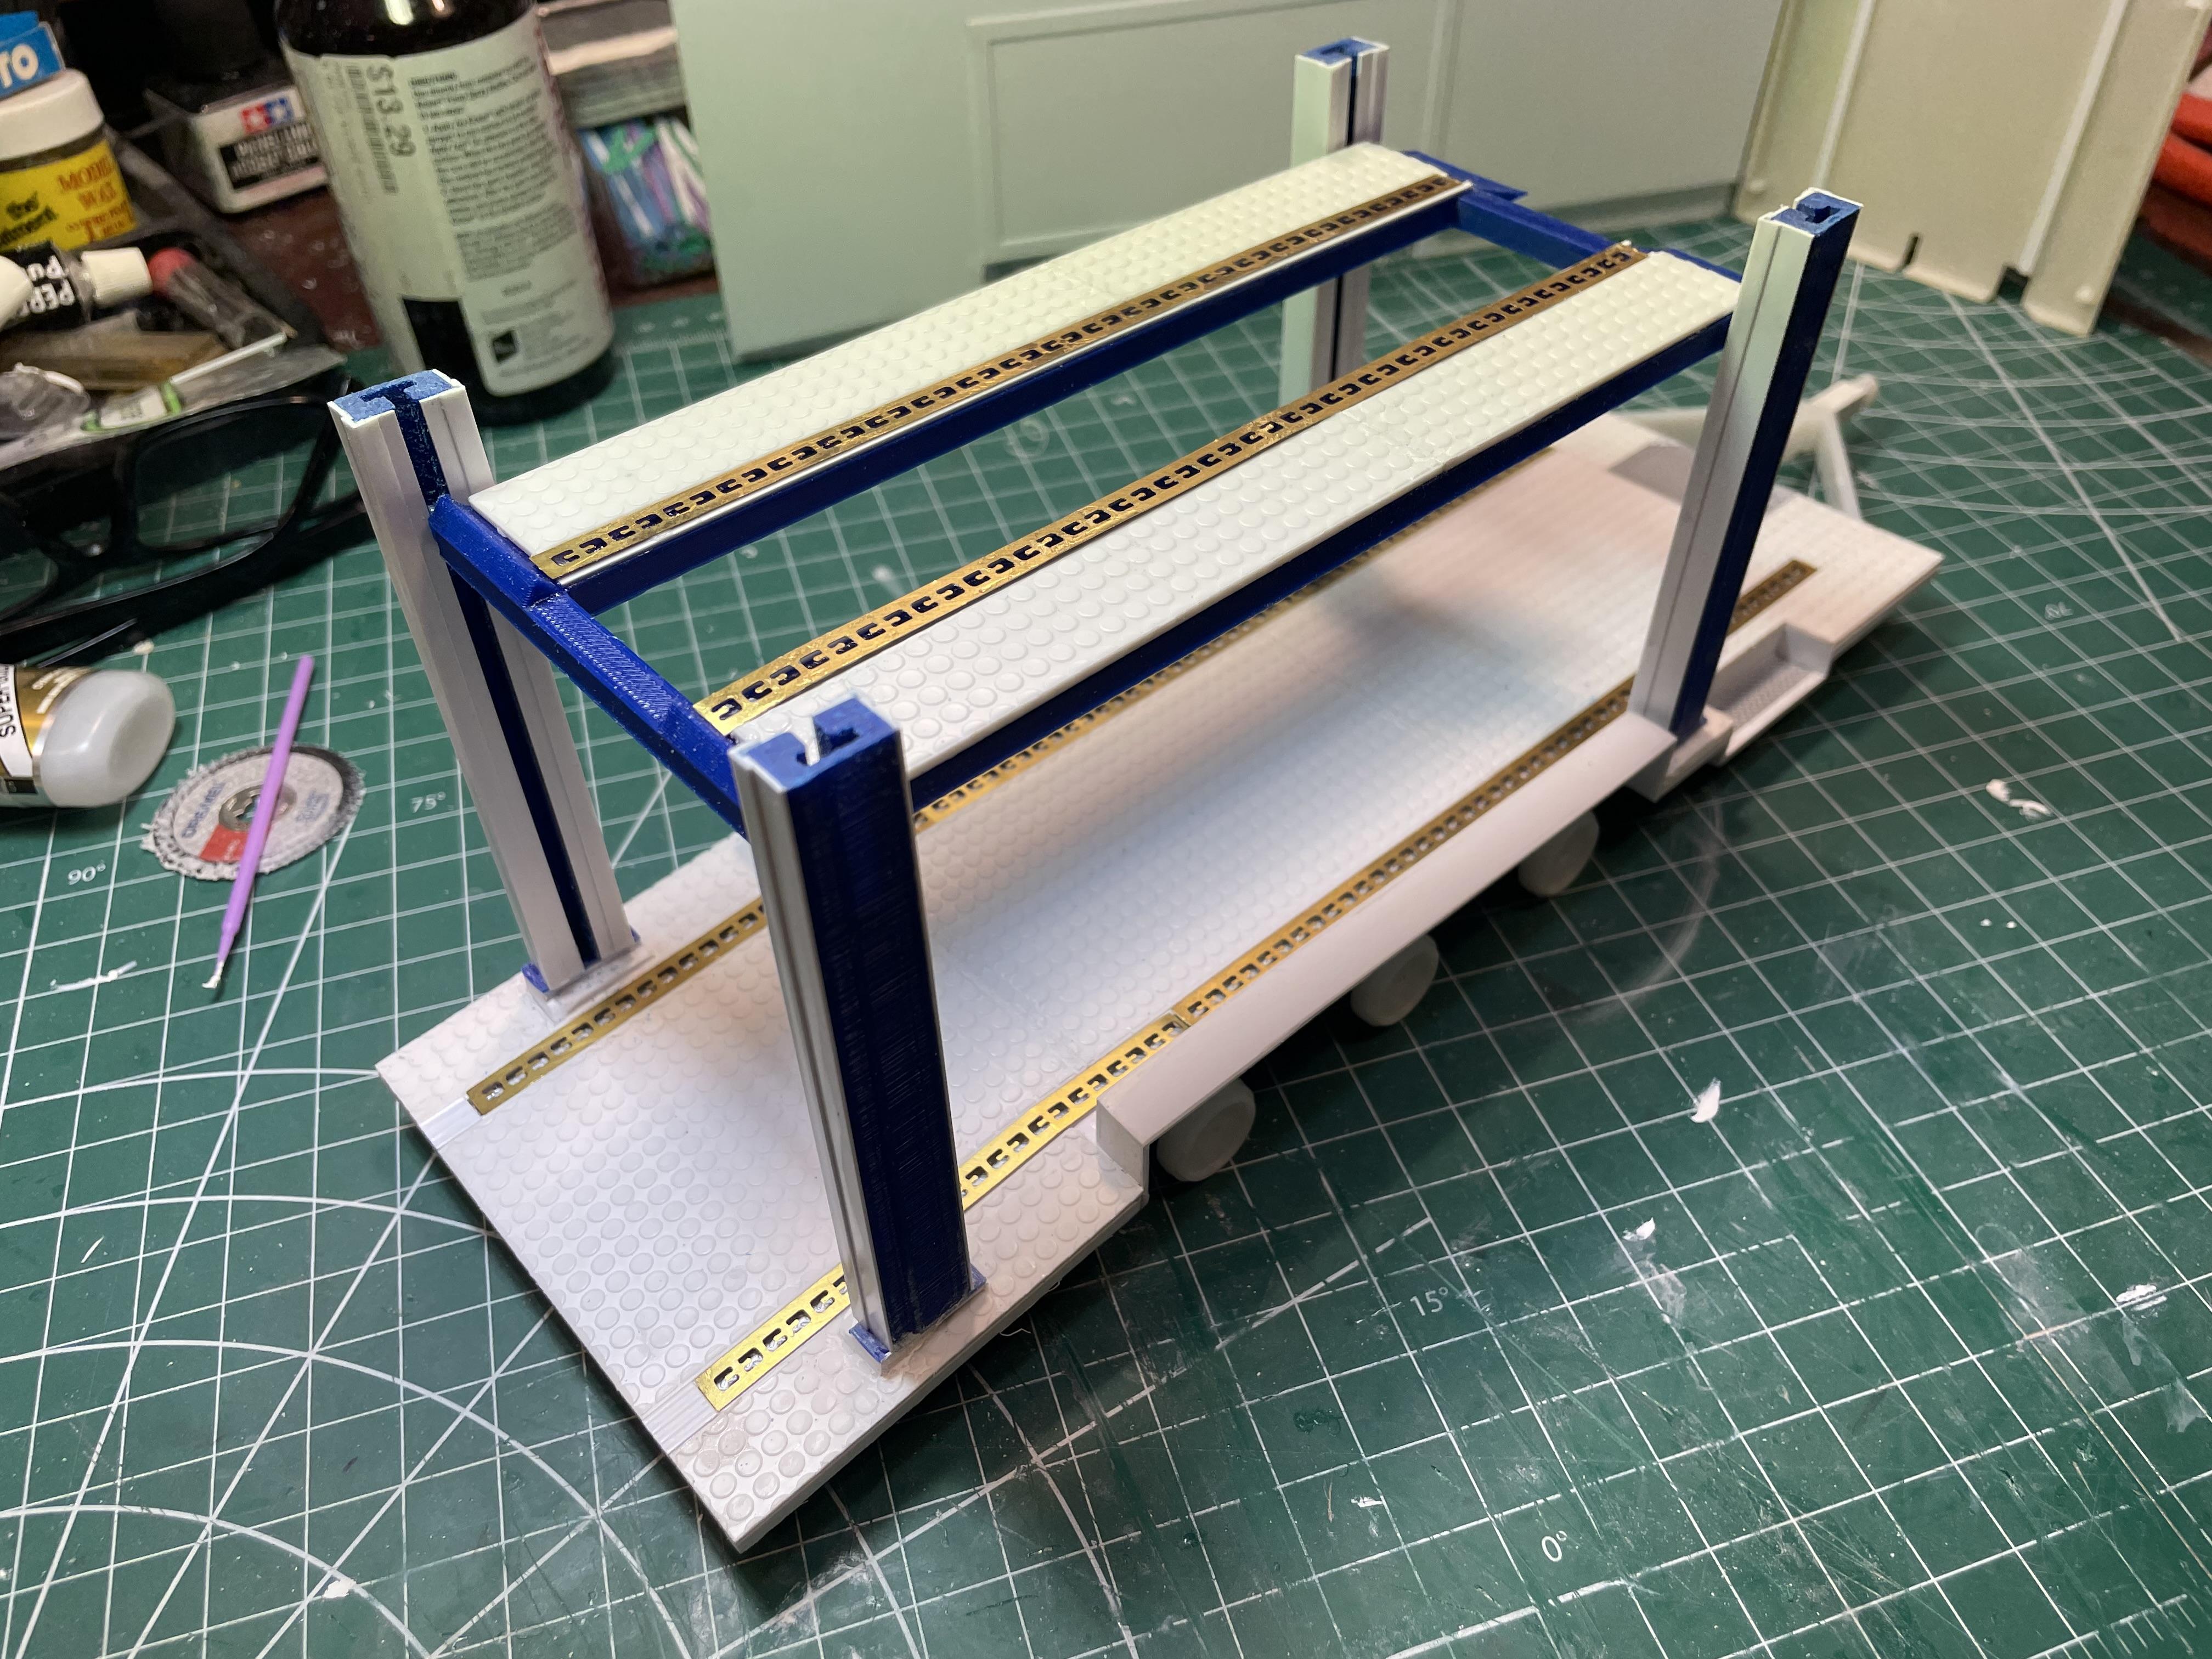
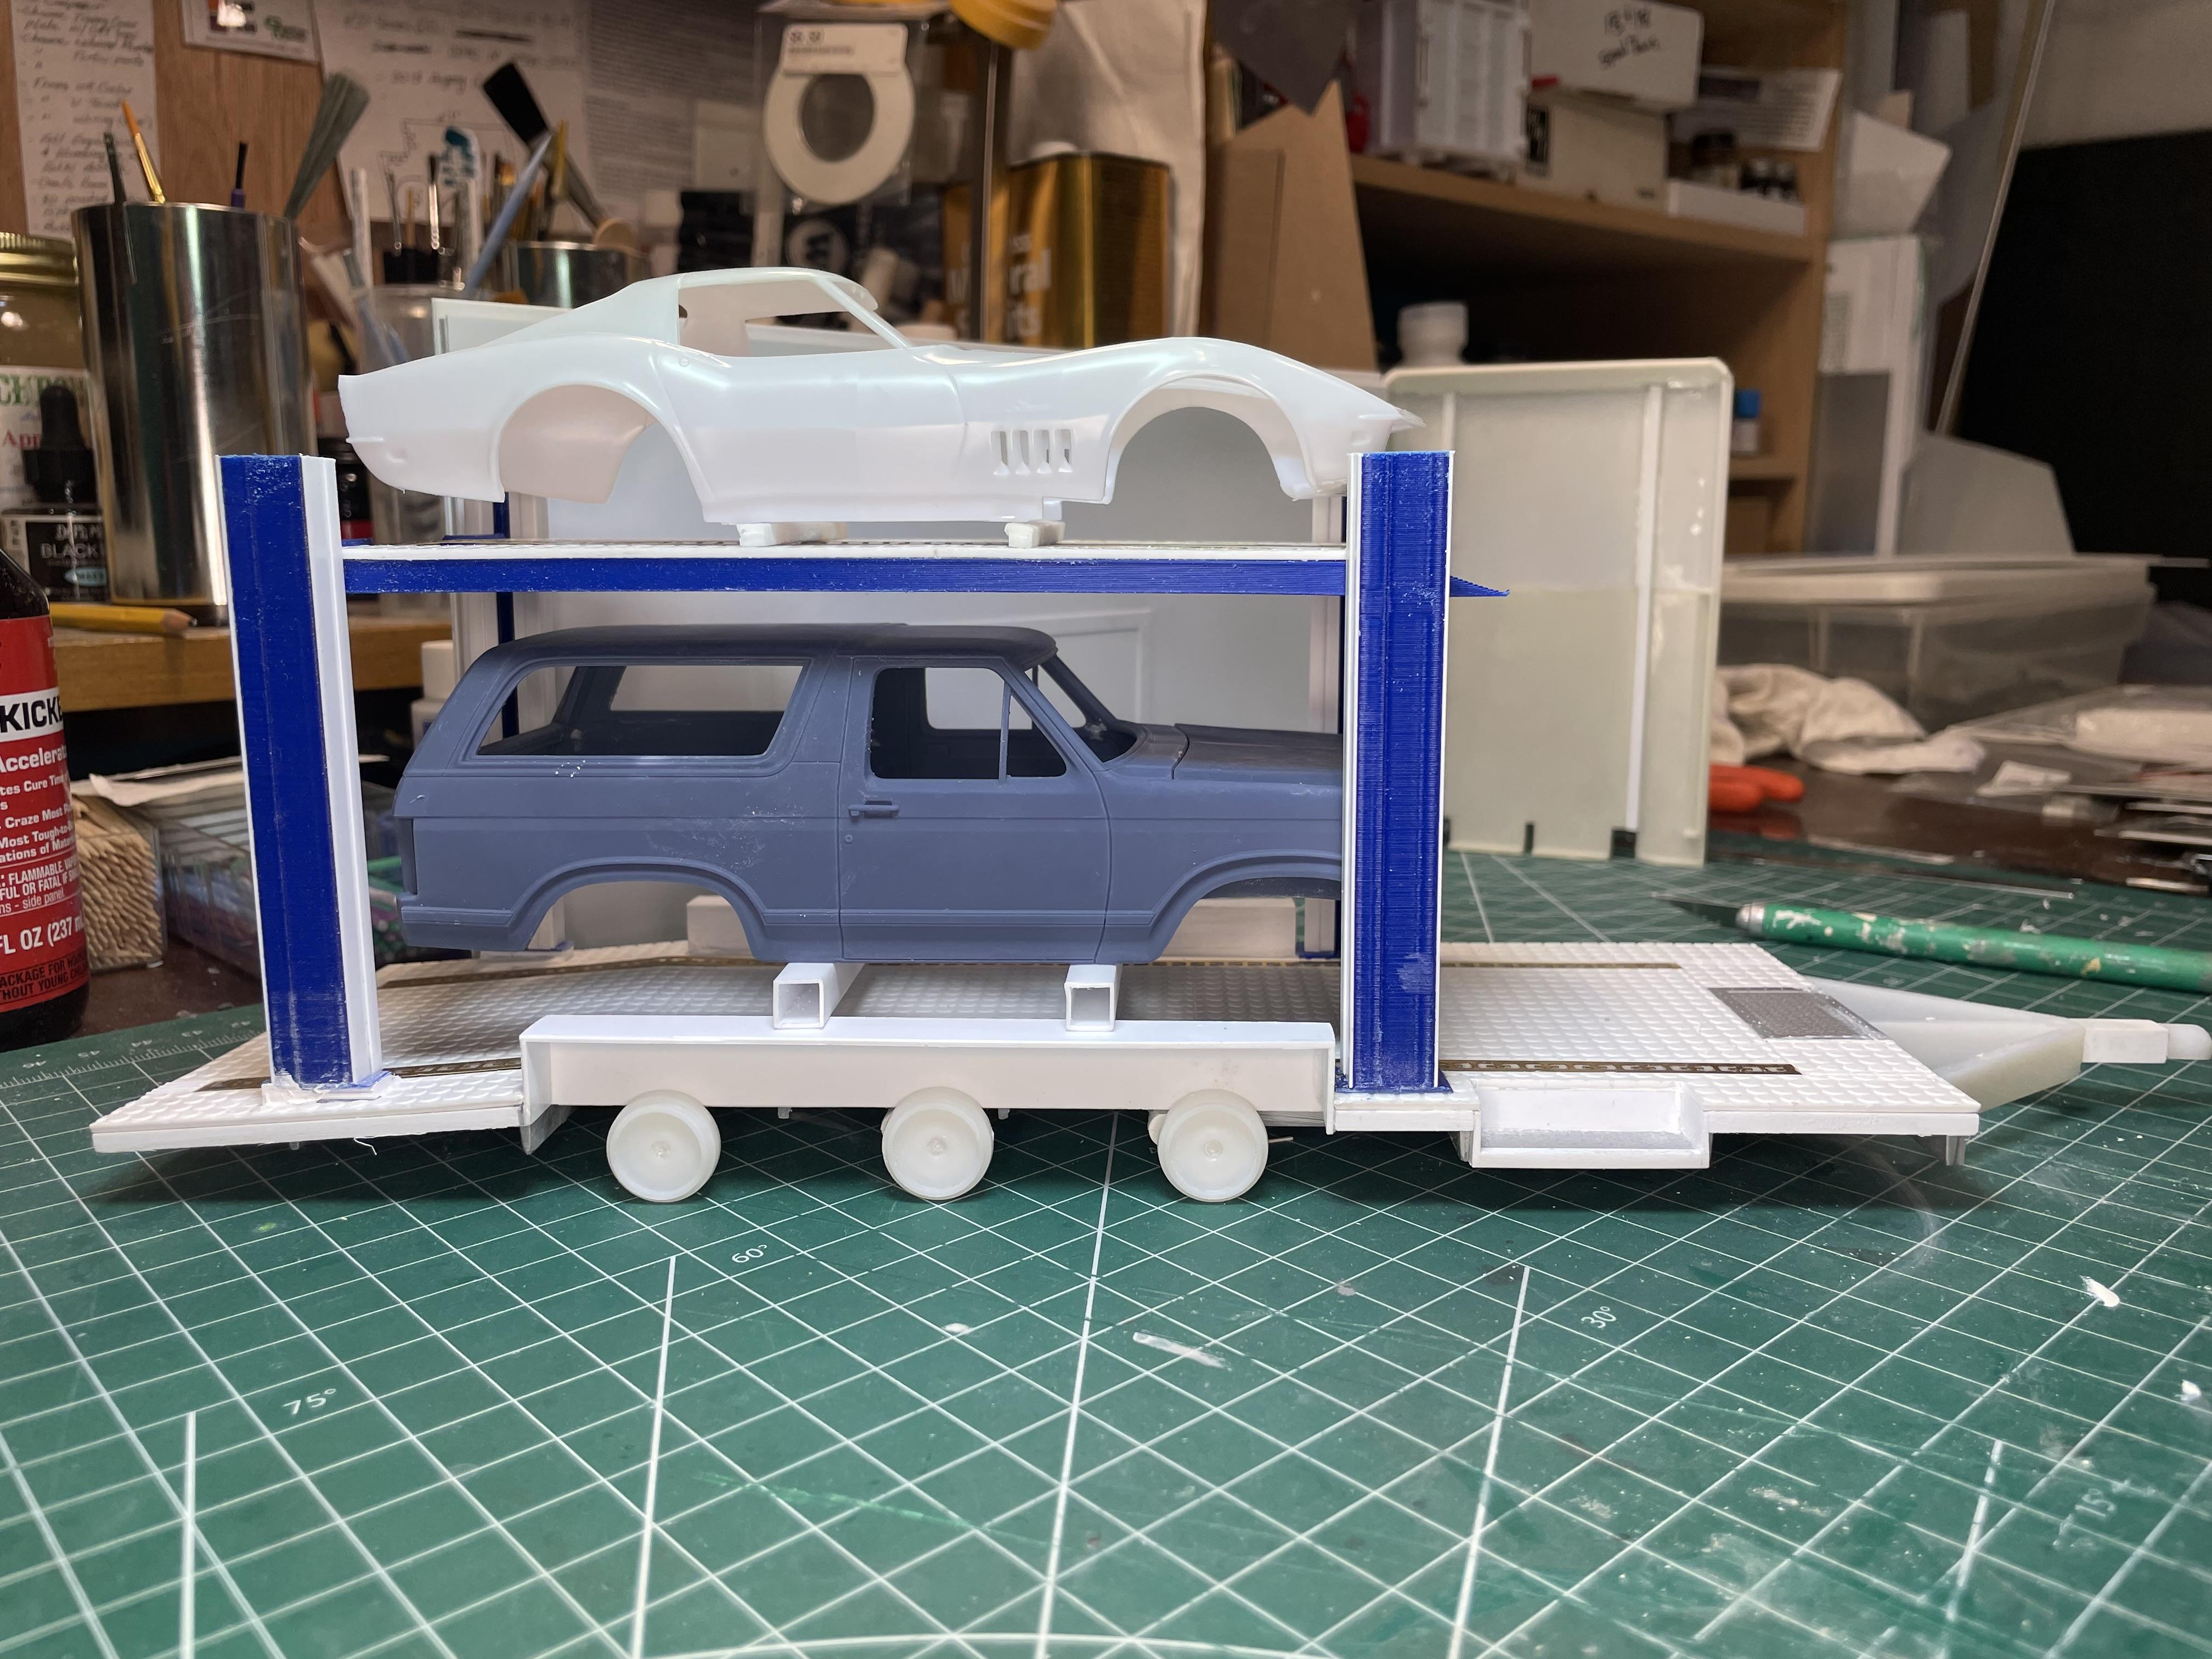
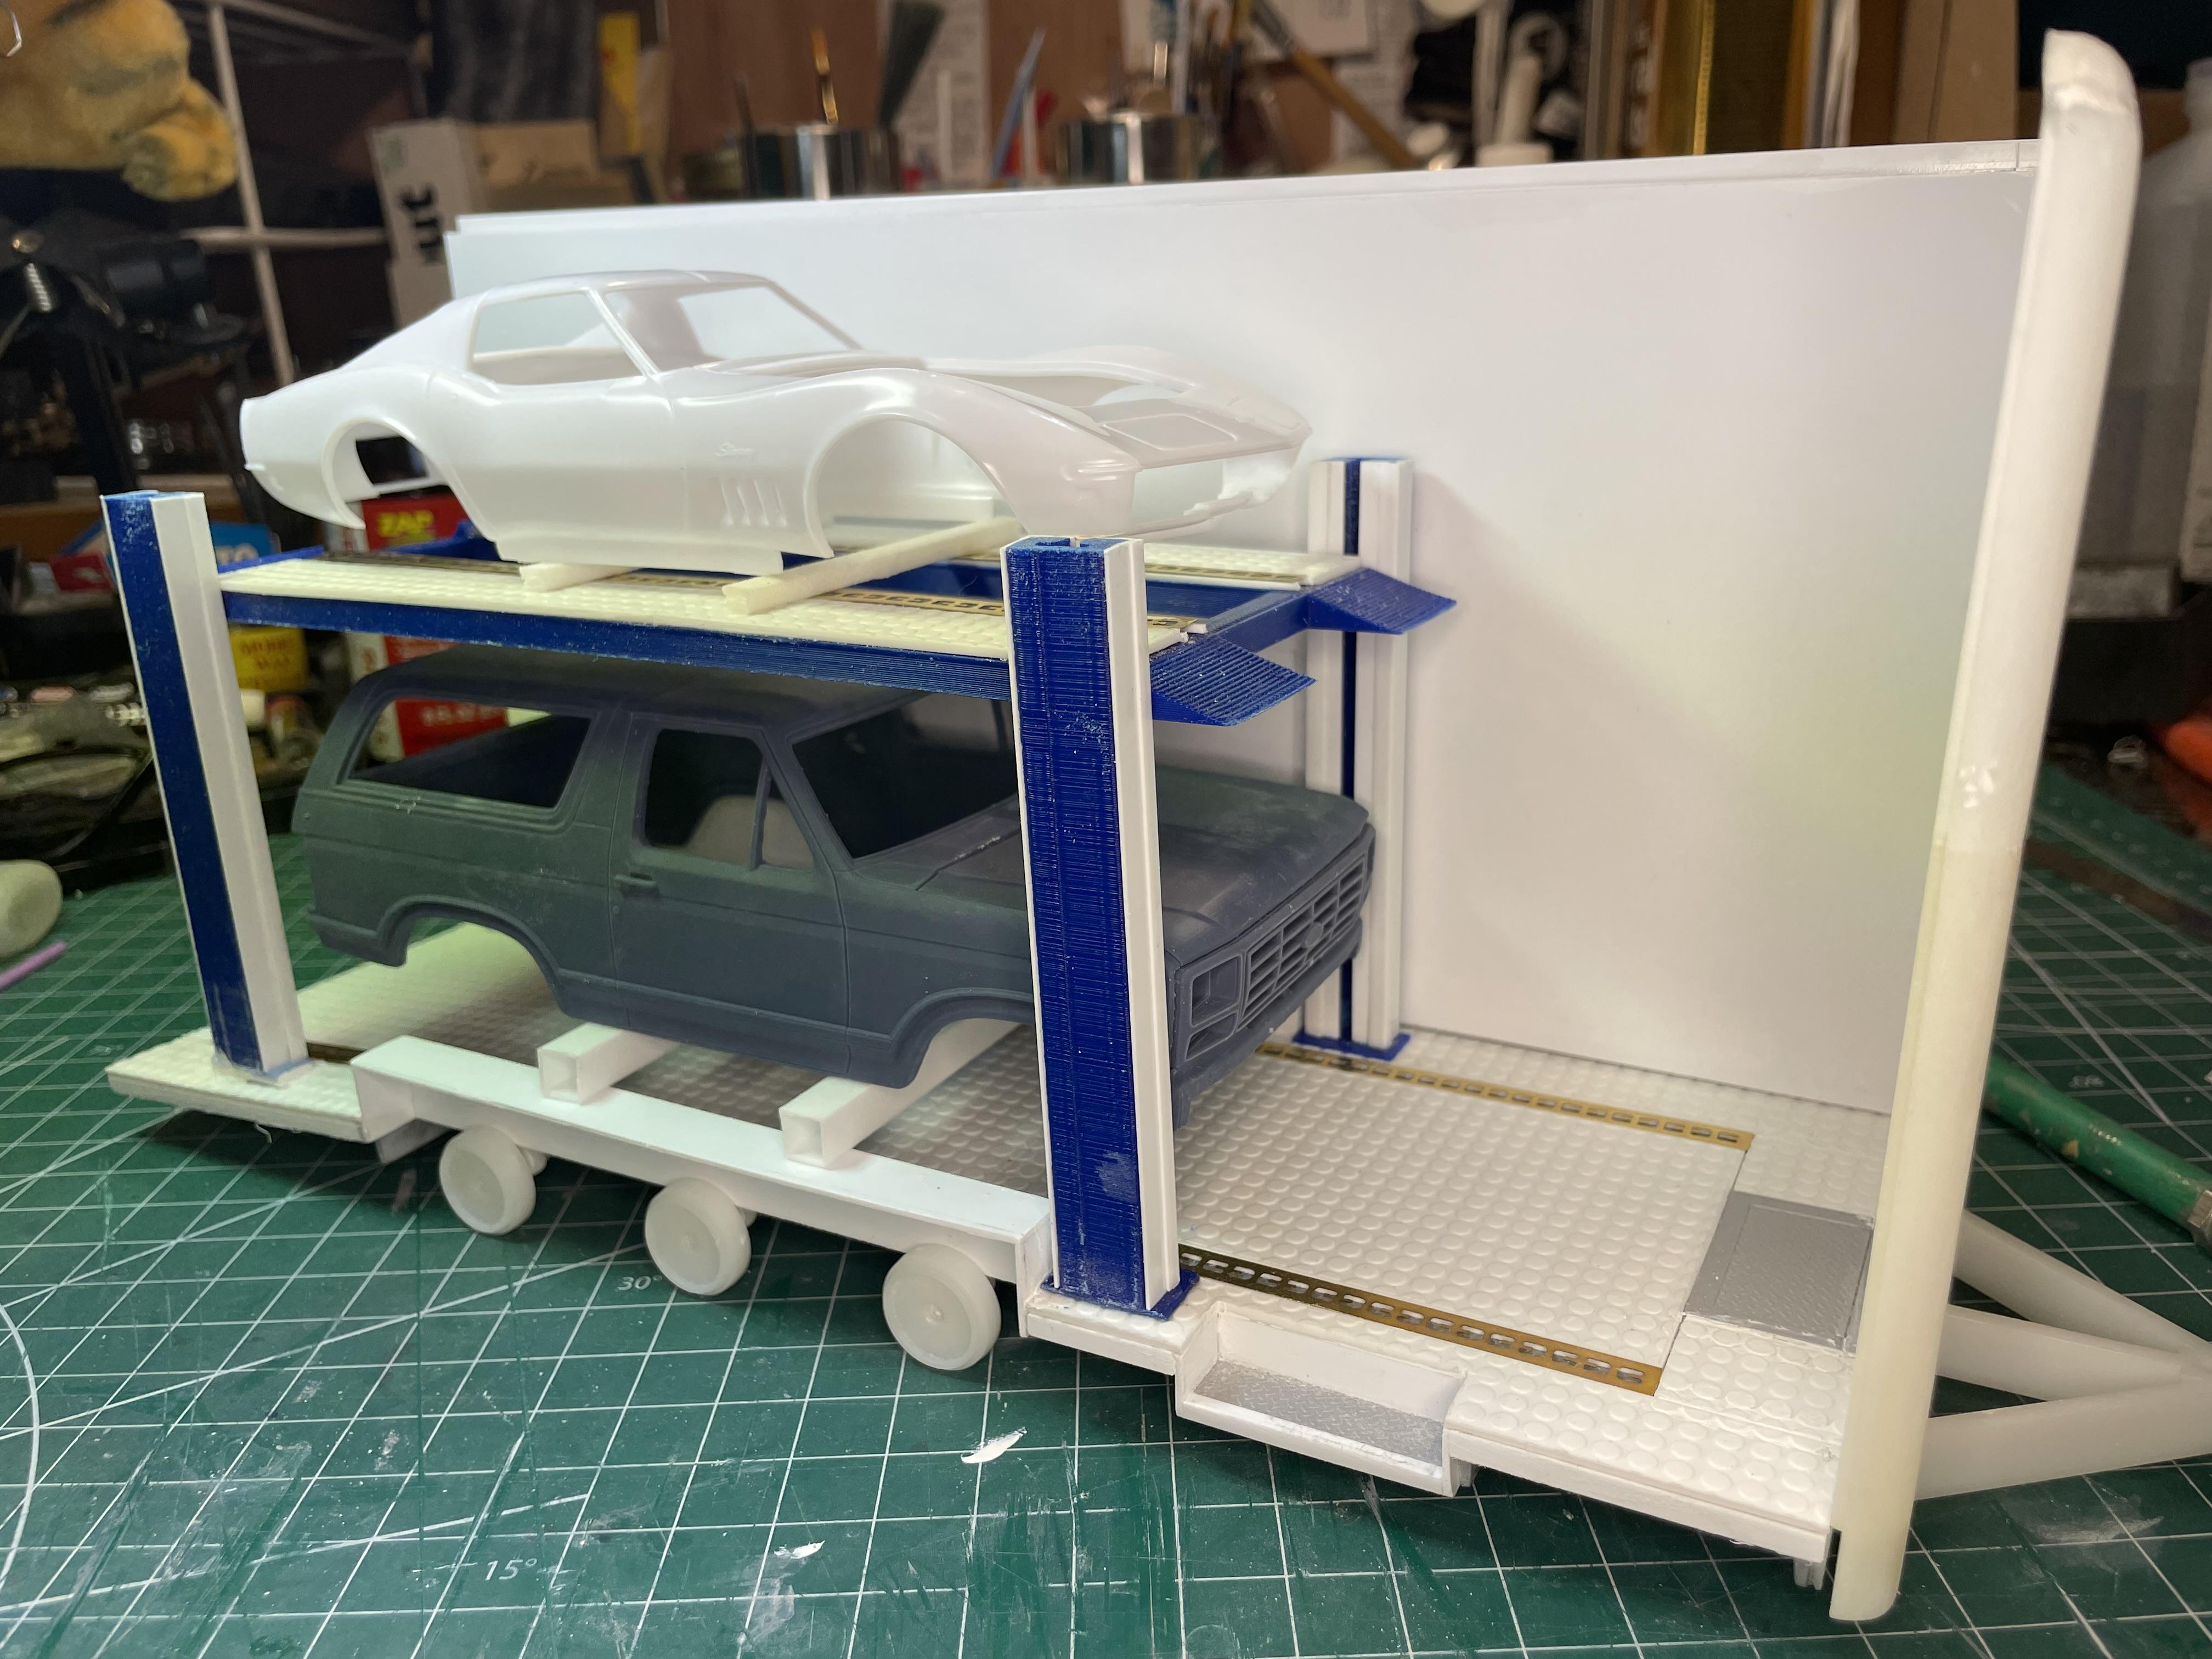
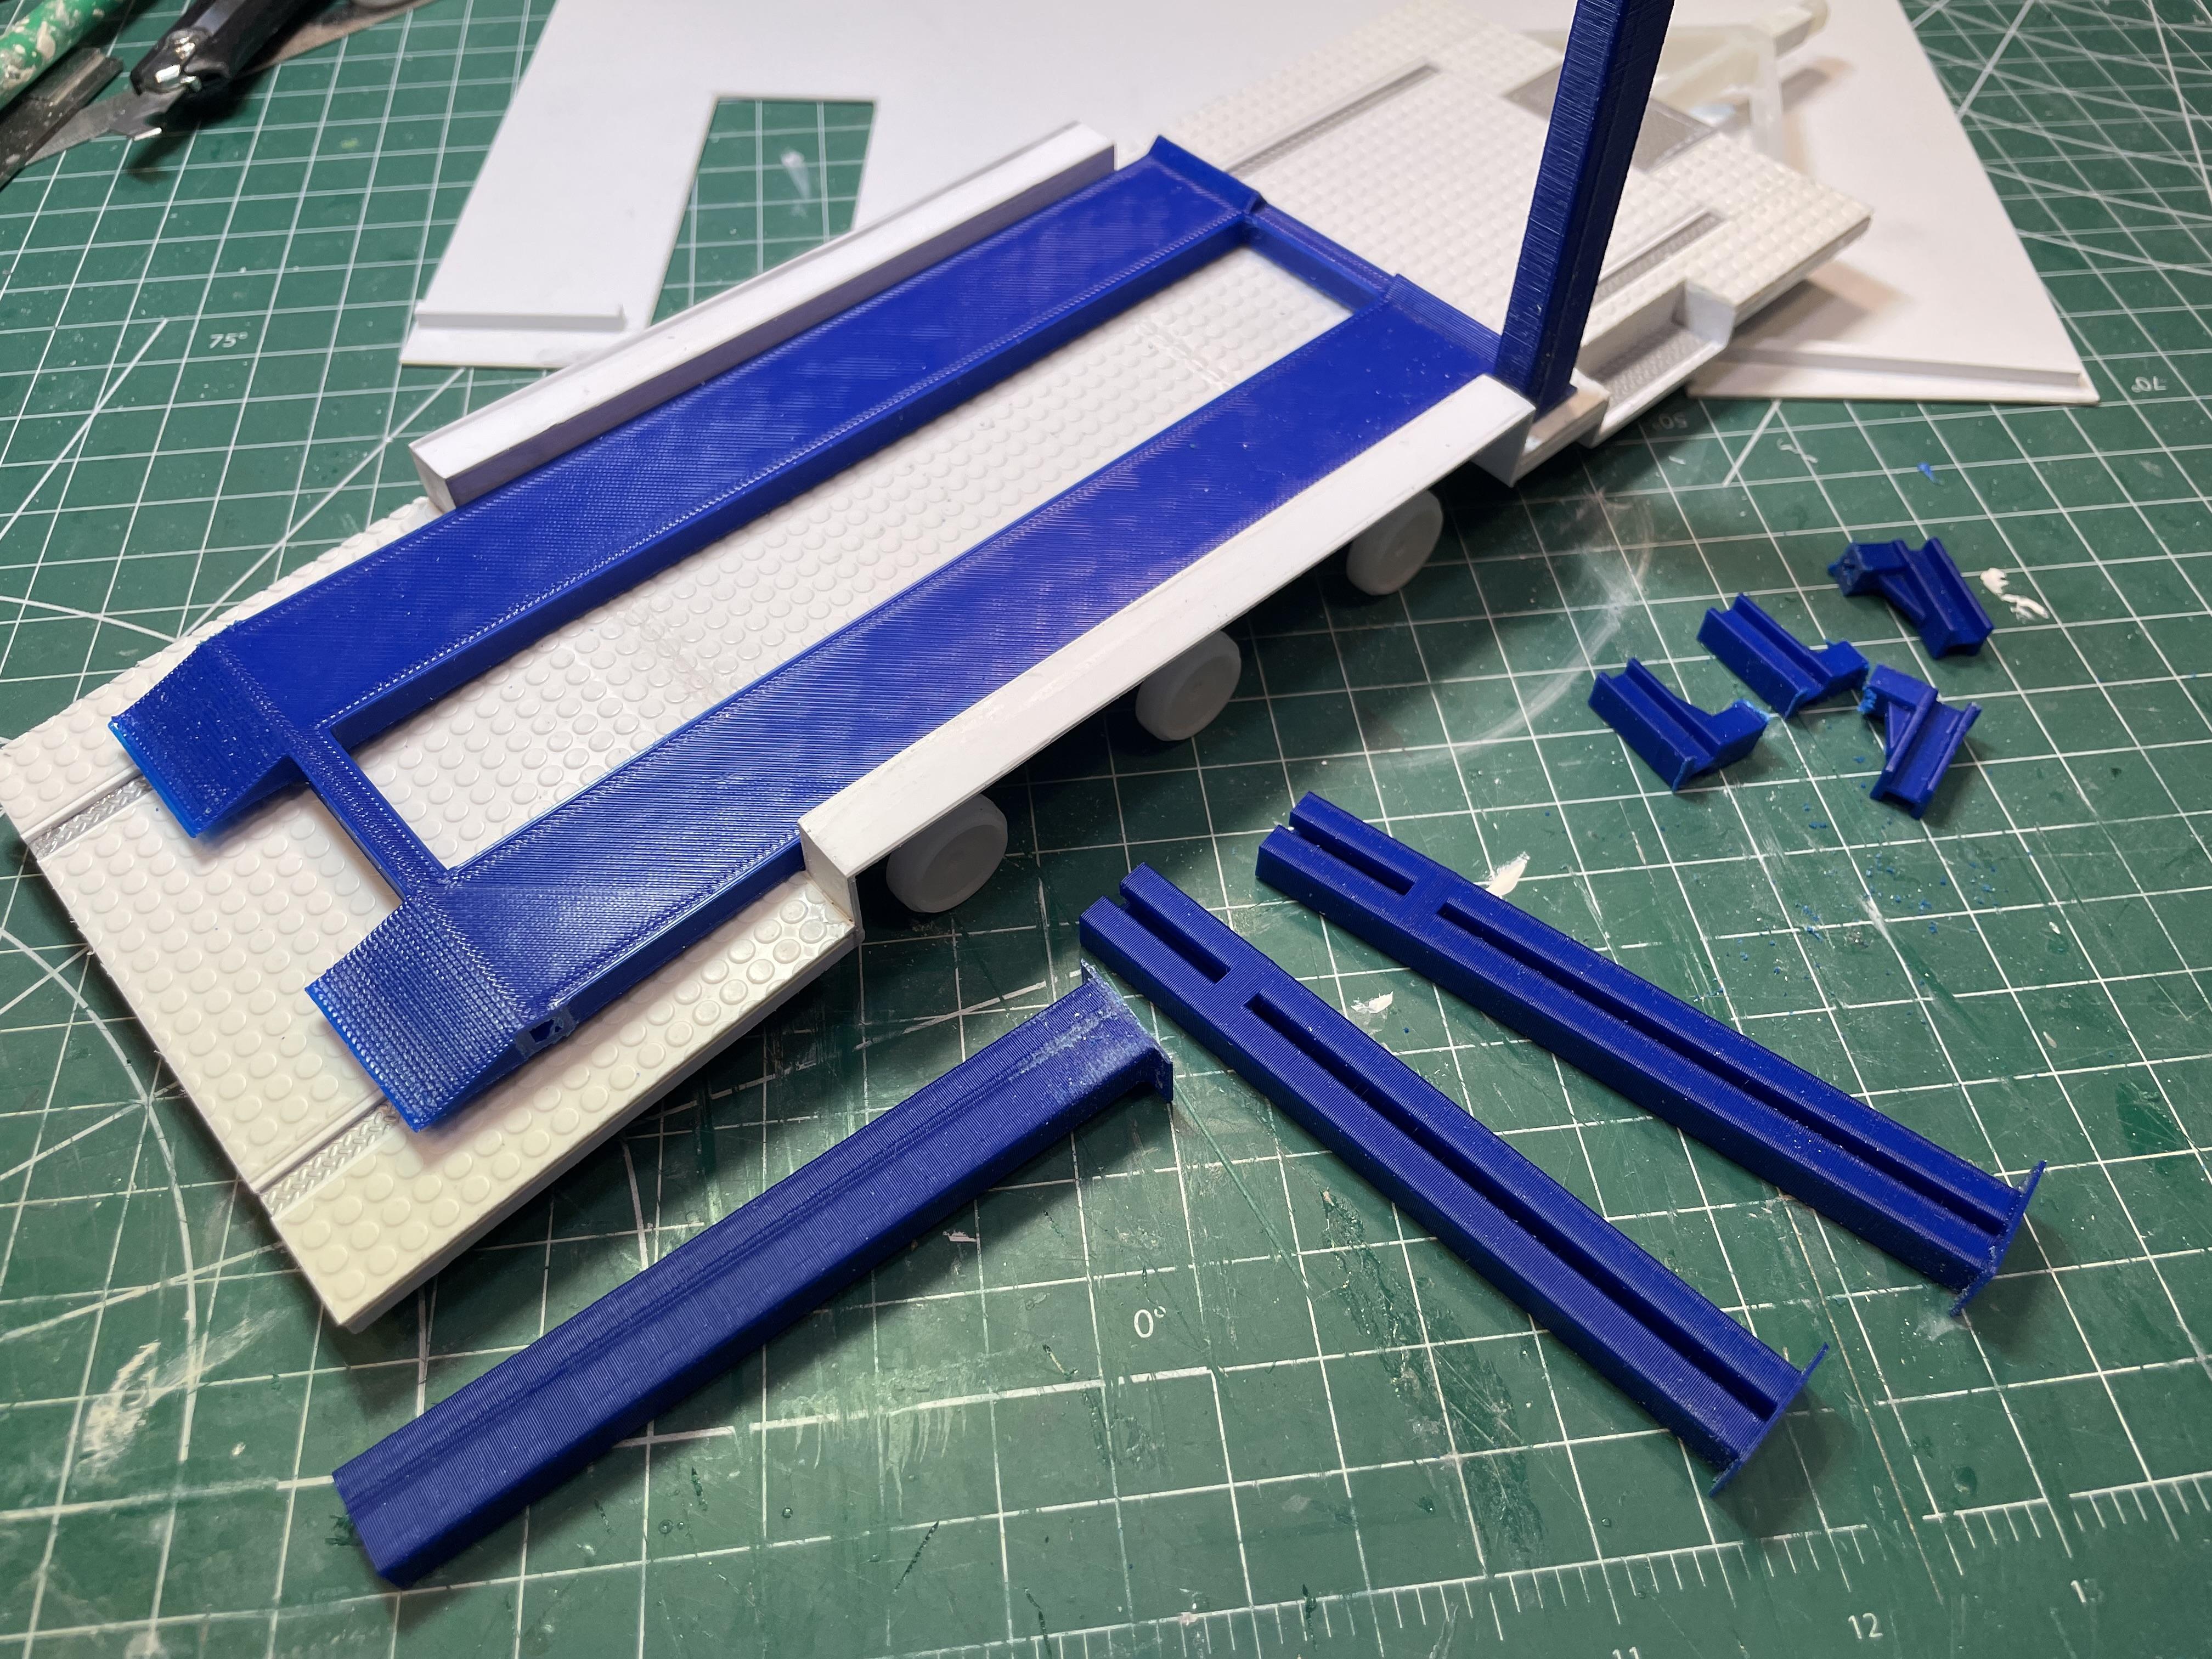
I made some finishing improvements to the lift this morning. Originally, I thought I’d keep the existing texture on the 3d print, as some of it resembled extruded aluminum. But, I ultimately decided to finish the columns with a smooth layer of styrene and the deck with rubber coin flooring to match the lower level. I made sure to elevate the photo etched “e track” as well. Here’s it mocked up with a couple bodies from future builds. This shows how much clearance I’ll have, enough for most vehicles. BTW, the bullnose Bronco is a 3d printed kit I got from Brian Dutz (a member here - Dutzie) on eBay. It is spectacular. The most spot-on accurate Bronco from that era. Highly recommended.
-
Western Star 4900 FA plow truck
vincen47 replied to BK9300's topic in WIP: Model Trucks: Big Rigs and Heavy Equipment
A masterclass in model making. Simply amazing. -
Peterbilt 379 RV
vincen47 replied to vincen47's topic in WIP: Model Trucks: Big Rigs and Heavy Equipment
Thanks, that means a lot. -
Peterbilt 379 RV
vincen47 replied to vincen47's topic in WIP: Model Trucks: Big Rigs and Heavy Equipment
Thanks! I’ve leaned a lot from your builds as well. -
Peterbilt 379 RV
vincen47 replied to vincen47's topic in WIP: Model Trucks: Big Rigs and Heavy Equipment
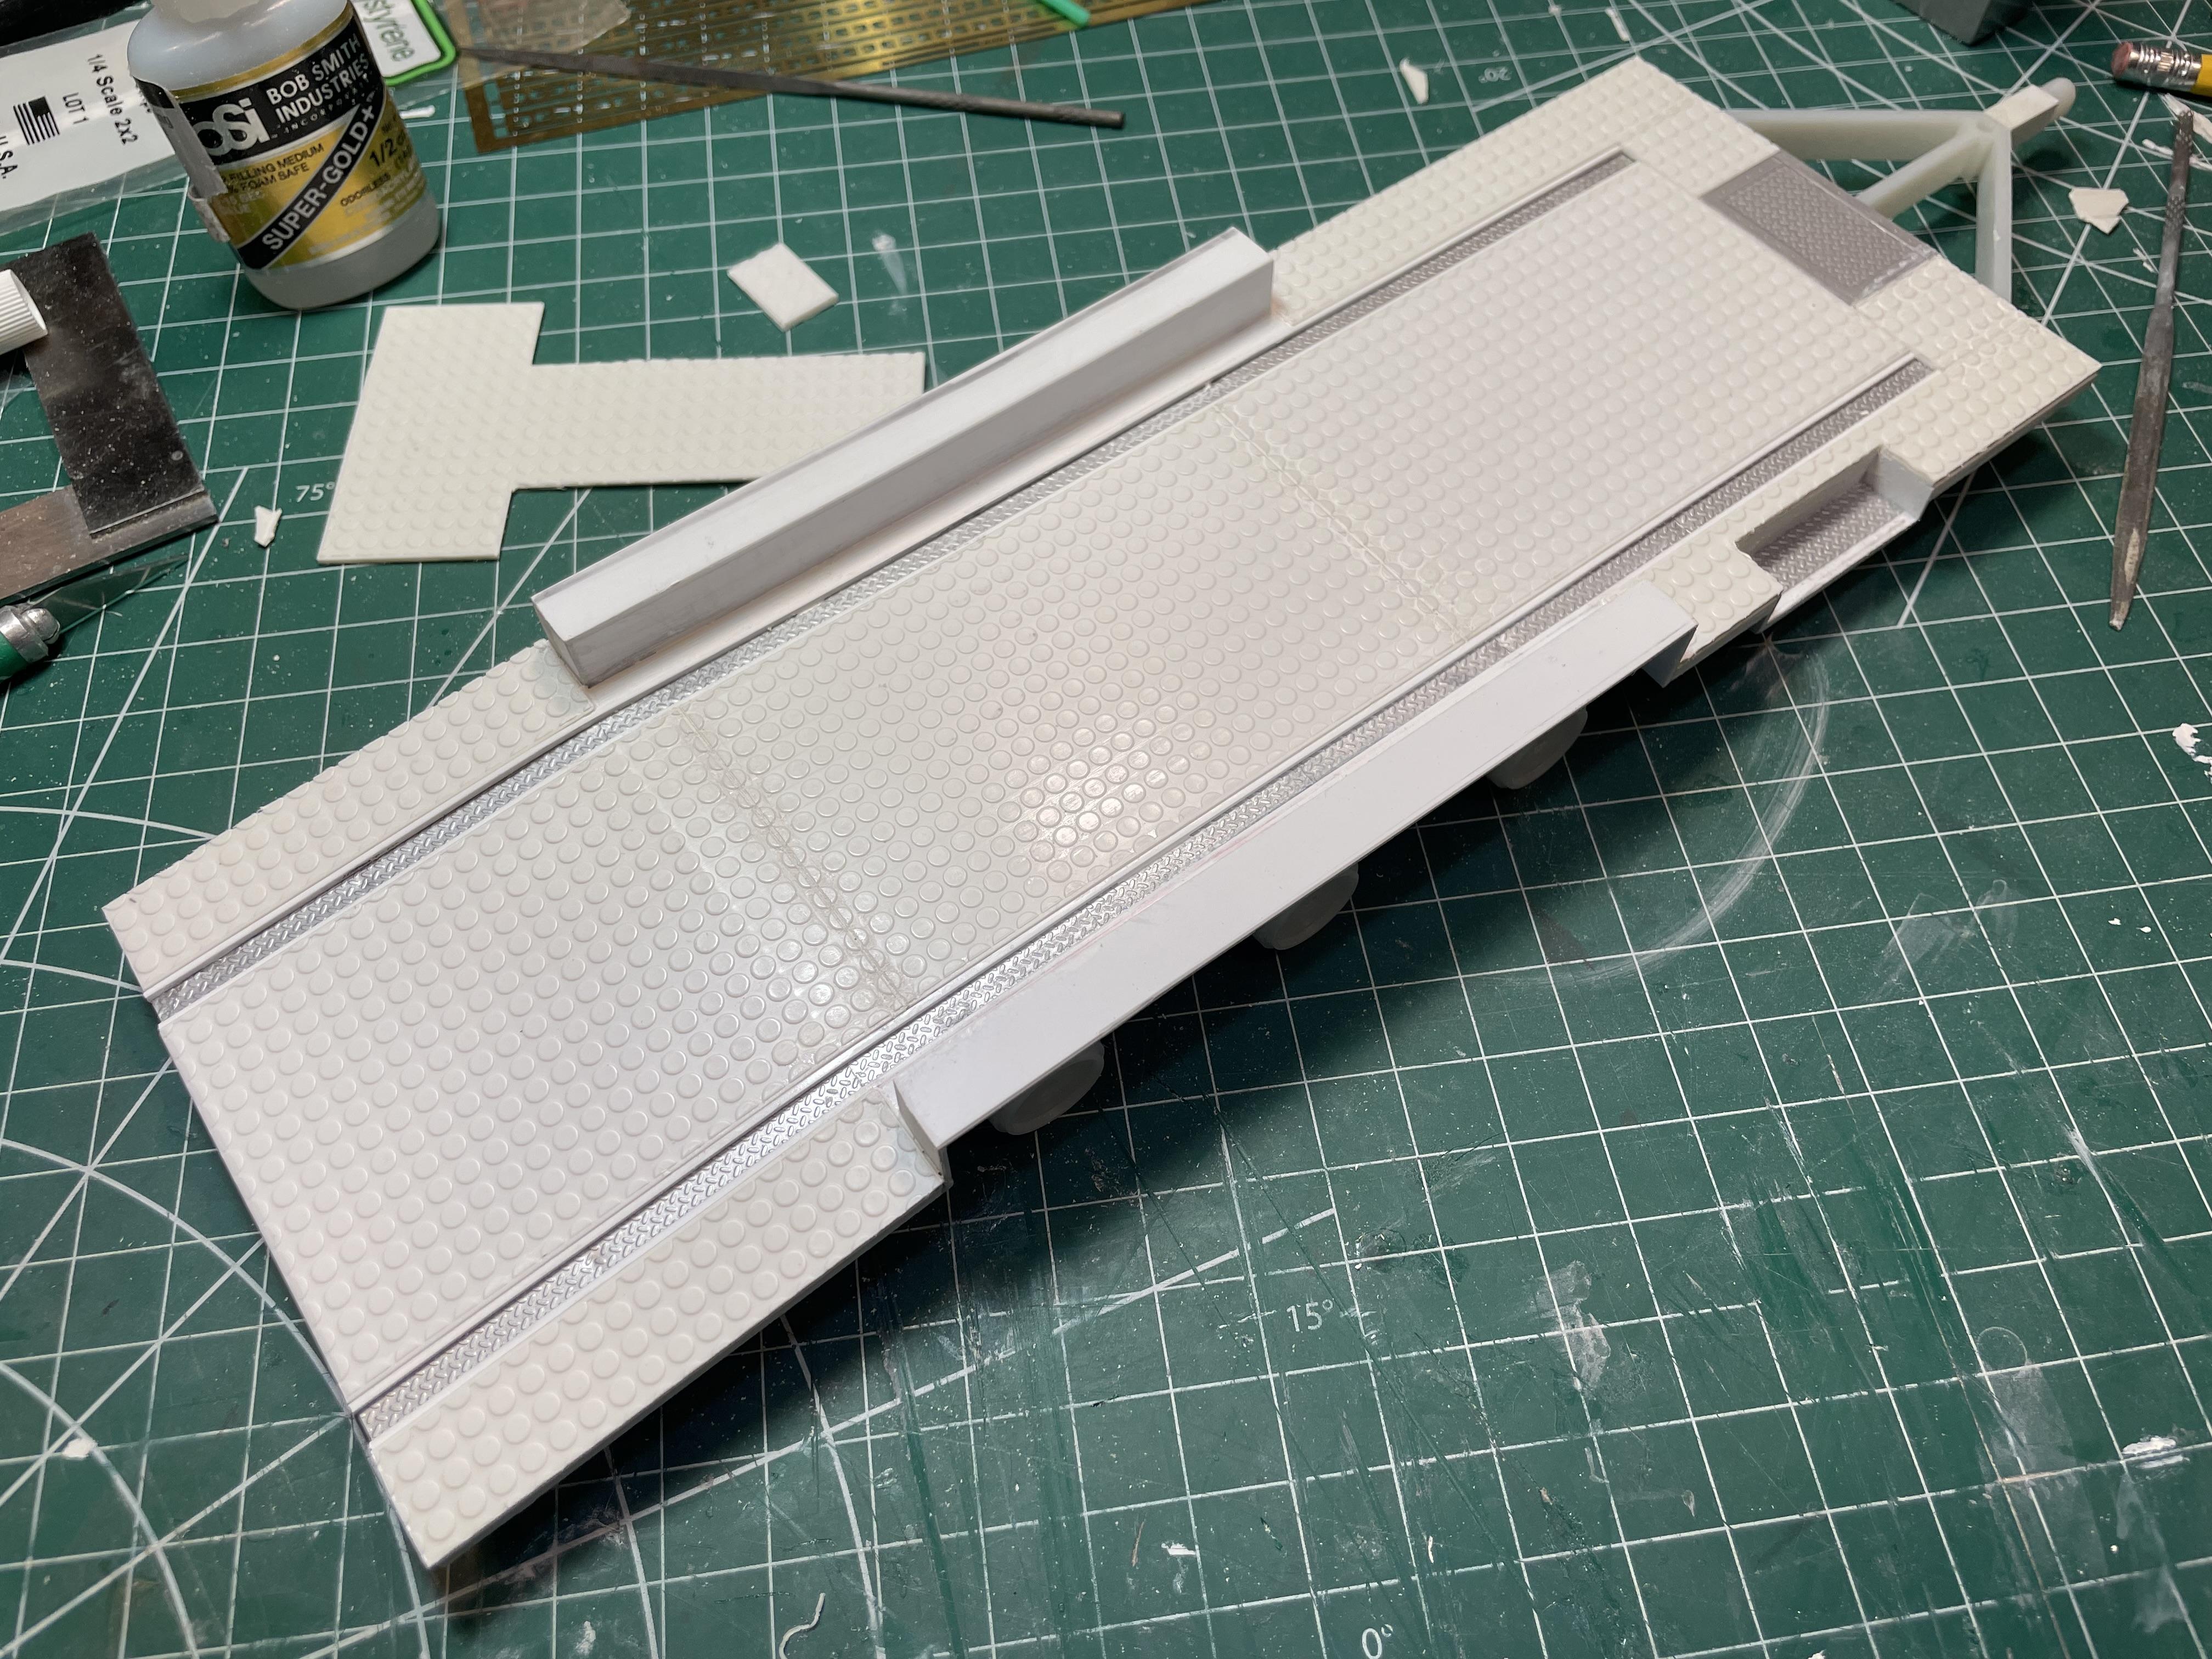
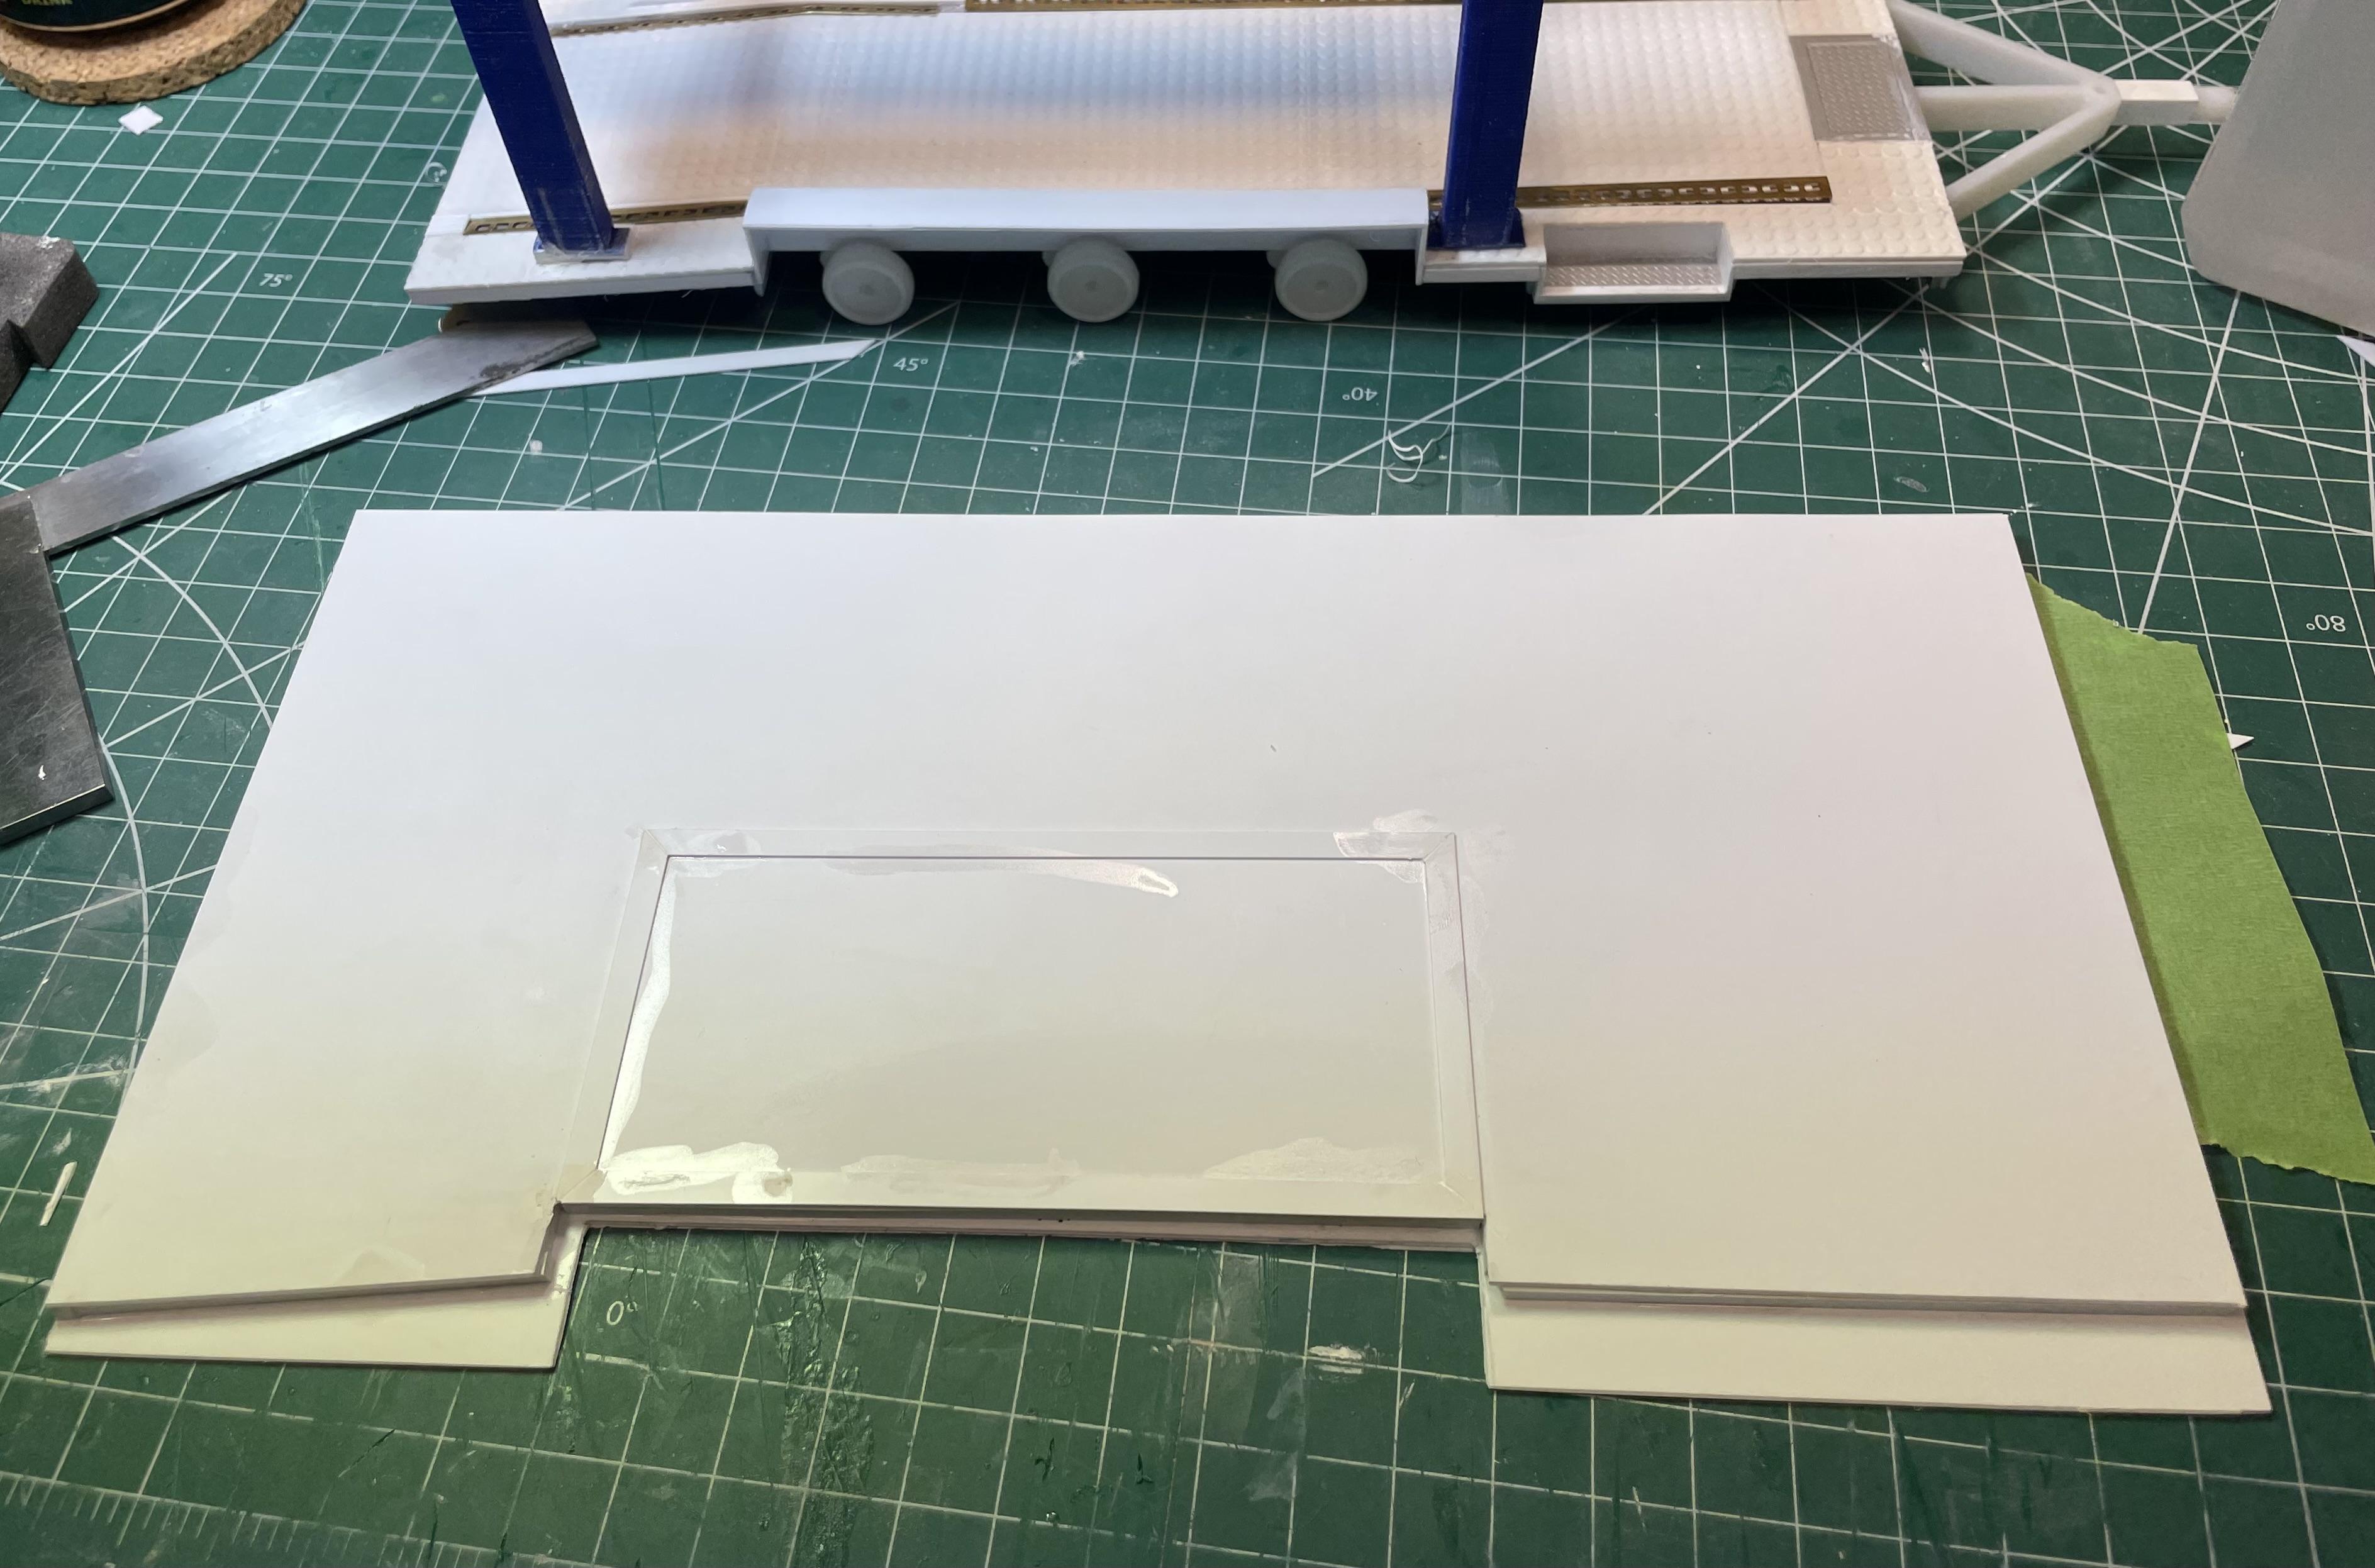
It’s been a few months, but here’s another update…completed the stacker trailer flooring, lift, and one of the interior walls. I used 1/24 rubber coin flooring from Plastruct. I wanted a different look from the typical diamond plate, and it gave me the opportunity to elevate the photo-etched “track-style” tie down system from Tom’s Modelworks. The diamond plate will stay put in the side door step well and the floor winch door. The 3d printed lift is from BCS Trading on eBay. At a scale 14’ long, it was pretty close to what I wanted as is, but I had to narrow it a little by removing the mounts on the lift deck. I added pins, and as a bonus, it’s removable. The deck can be positioned in the up position, or laid on the floor for loading. The lift columns will mount plumb against the interior walls. The left sidewall is now complete. I added “studs” to the .040” exterior sheet, then the inside wall was added, along with the frame for the non-operating escape door above the wheel well. It’s pretty sturdy, as it needs to support the body. I’m planning a removable roof for display purposes. Next up, the other sidewall, front cap and rear door. I’ll also be working on the cabinets. I’ll prime and paint the floor, lift, and interior, too.
-
1980s MAC Corporation Car Crusher
vincen47 replied to StakerAlloys8's topic in Model Trucks: Big Rigs and Heavy Equipment
Very very unique and cool! Great build. -
Peterbilt 377 and Scrap metal trailer
vincen47 replied to StakerAlloys8's topic in Model Trucks: Big Rigs and Heavy Equipment
Absolutely love it. I enjoy builds that tell a story. Even better, when they are unique and high quality. -
Ol'Purple - Ford C900 Garwood LP900
vincen47 replied to carsntrucks4you's topic in Model Trucks: Big Rigs and Heavy Equipment
Absolutely wonderful. -
Revell USA Peterbilt 359
vincen47 replied to StakerAlloys8's topic in Model Trucks: Big Rigs and Heavy Equipment
Great job. I’d love to see more photos of the trailer.