
ewaskew
-
Posts
1,100 -
Joined
-
Last visited
Content Type
Profiles
Forums
Events
Gallery
Everything posted by ewaskew
-
WIP.....69 Daytona Pro Mod..Updated 10/28/10
ewaskew replied to 1320wayne's topic in WIP: Drag Racing Models
Great work Jim,building models like this with all the scratch built parts make them that much better to me. Keep building and showing. -
Thanks for the comment and your welcome
-
yea KeKe your right about needing better quality photos.
-
Thank for the comment. I agree about the black wash,that gives me more problems than anything with my builds.
-
Thank you Mitch for your comment,the sanding everything off was done for the show car look. However the drip rail could have stayed,the window trim stayed on.I just coverd it with black real car pinstriping for something diffrent.
-
Thanks everyone for the comments,yes oldschool I am converting a small block into a big block. The reason I dont just buy a donor kit is because that gets expensive after a while, and a few spare parts and evergreen plastic sheets are a good way to work it out. The eng. will have custom built brackets for the AC.ALT.PS Pump you can't get those in a kit.
-
Thanks for the comments,& Davey your comment is no problem. As you said,your comment helped you learn something,glad your back in the hobby. You are right about how things have changed and this internet gig lets everyone connect, like one big model club.
-
I like this one to. I have the sme kit but decided to ghange it into a GTO El Camino,check it out under on the work bench.
-
nice clean build
-
Davey The reason for the arches appearance is that I built it with a foward upward flow, rather than straight across then a small turn up. A weight loss now is to late LOL. it is what it is and I'm glad you gave your honnest opinion. And I'm glad you will follow it as it gets built it may be a while before I update it due to a 55Chevy that I'm working on. I plan on some fat tires in the back and it will set a little bit higher after it is complete.
-
This is the recent issued kit by MPC. When I got the kit it was not what I expected,so I went with this idea. Let me know what you think. This is the first stage of the painting and the bad areas will be worked out. The color will be Tamiya Orange it looks close to the same as the GTO Judge Orange. Thanks for looking.
-
requested chassis photos
-
Just a few all together.
-
This is AMT'S kit,I wanted the ride stance that I have here. I desided to scratch the frame,my first one. The 230 pieces make up the parts to get it this way,exsample one lower A-Frame has 6 pieces to complete it as a part. 13 kit parts were used,every thing else was built,Pro Tech carb.,hose fittings MCG,& Detail Master after market parts were used. The doors were cut open and they open to the inside of the fender like the real ones do. The trunk was opened and customized. The interior has bucket seats front & back with custom dash and waterfall style console all the way through to the back and wraped around the seats then over to the back deck,complese with speakers and speaker covers. Door panels,custom built with with speakers and covers Front bumper was filed on the ends for a smooth fit.The grill was cut out and replaced with fine brass sreen painted black and cross bar. Headlights are beads from Hobby Lobby. Rear bumper & tail lights were reshaped to fit flush. Front & rear air bags made using tiny o-rings. Sorry about the dust. Sorry about it being in the wrong place it should be in the under glass. If Harry or Gregg can move it to underglass go ahead and do so. Thanks for looking.
-
Thanks for the comments. The Mods were nothing major,I used the Revell 55 chevy Pro Mod kit for a donor. A little reshaping at the top of the tubs with a file,then reshaped the interior door panels to fit. It do's have the wipers,door handels. If it was real life it would be a weekend racer and used for street driving.
-
This is a basic kit,no eng,silver trim is a bit sloppy but I plan on re-doing it. I changed the front bumper and built a roll pan rear bumper,shaved body for smooth look. The color is red & gun metal.
-
I did'nt want to build the same-o same-o so I came up with this little ride. Hope you like it. Thanks for looking
-
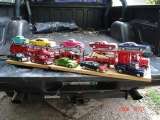
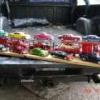
These bikes are missing lights.I just have to add them. The frames have been droped for show bike stance. The seats have been redesigned to match the changes for the custom built frames. Orange tank is all scratch built,the red tank was redesigned using the kit tank. I just started adding cardboard patterns for the look that I wanted,and then added the plastic to the frame and here they are. The Revell kits are nice and many to choose from. However I have several designs that I will try to build later on. The MAJOR PROBLEM that I have is the chrome rubs off very easy and that SUCKS because I have about 20 of these bikes stockpiled and so I'll have to deal with that. Thanks for looking.
-
This is one that I build from the Revell kit. The drive shaft is missing,but I never put them on the shelf upside down anyway LOL.
-
Very cool Brett,I'm going to have to do the cotton ball for the burn out that just sets it off. The car is very nice by itself.
-
I must say that do's look cool,that eng bay is big enough for two engines,LOL If you built a two eng.it could be the start of a new class. SUPER PRO MOD LOL. Very good job.
-
I like it,the flip nose looks cool.
-
I just wanted say the Camaro looks real good
-
Thanks for the photo it is a big help.
-
Stage 3 This is the first step of the engine build. I was going to scratch build one and changed my mind because it is easier to add plastic to the kit eng., by doing that saves time& some details. This is my first time doing this and it's not perfect but it looks good,after is together and painted it will not be seen anyway. I get tired of taking big block engines from other kits,and the 55,56,57 chevy kits all have small engines in a big engine bay. Also the way I did this can be done by anyone that wants a bigger engine. I did have to use the extra intake & valve covers from the 70 Chevelle kit,however I can build valve covers for that kit.