

Straightliner59
-
Posts
4,722 -
Joined
-
Last visited
Content Type
Profiles
Forums
Events
Gallery
Posts posted by Straightliner59
-
-
That's how the louvers come right out of the Revell '36 kit. -RRR
I think I knew that, but had forgotten! I couldn't tell they were open, in the photos with the hood sides taped in place, so I thought you'd cut them open, yourself!
-
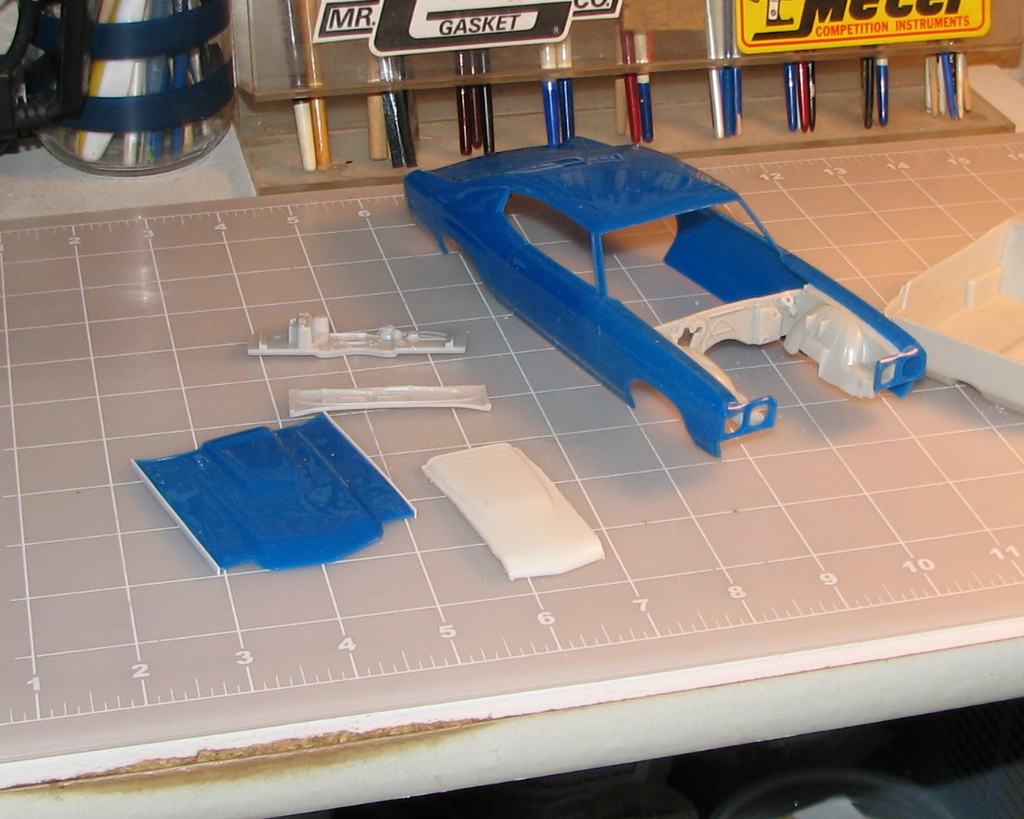
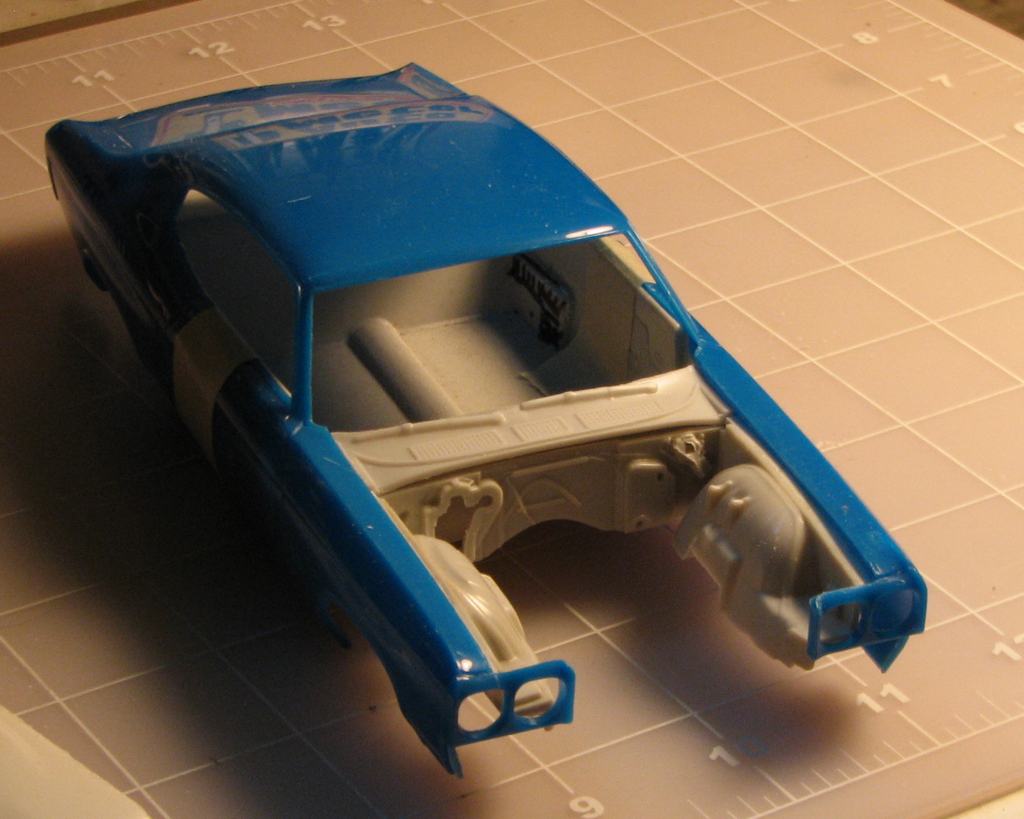
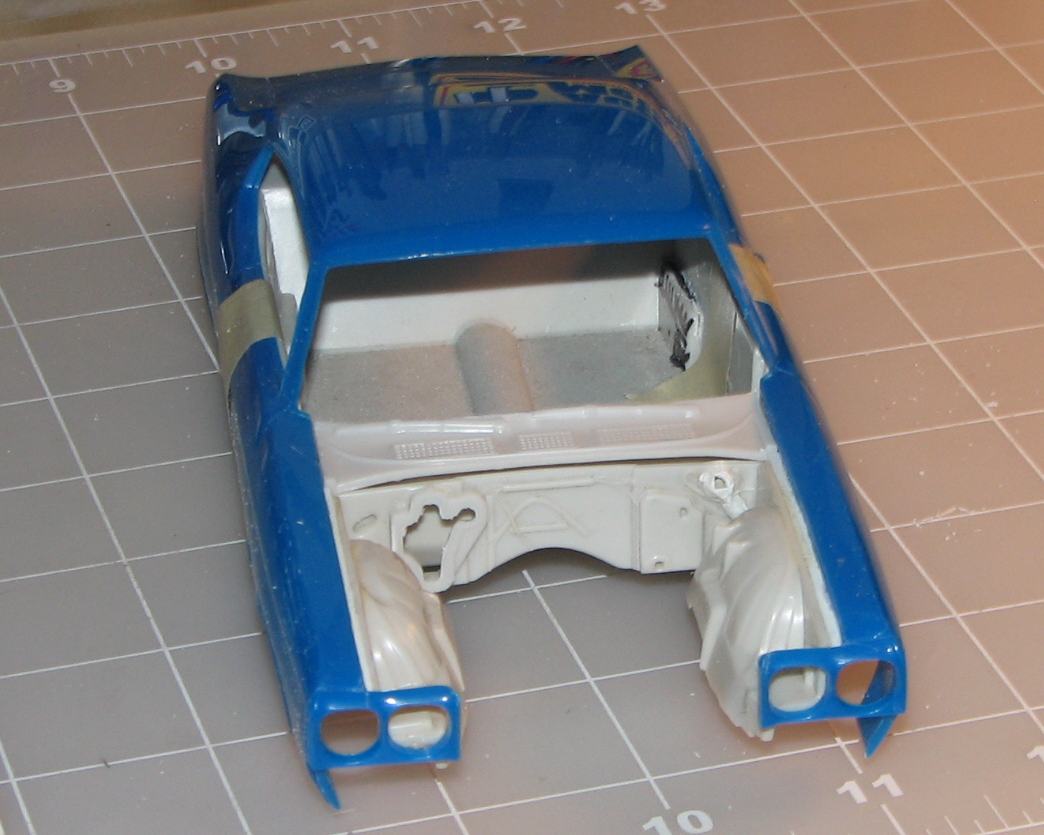
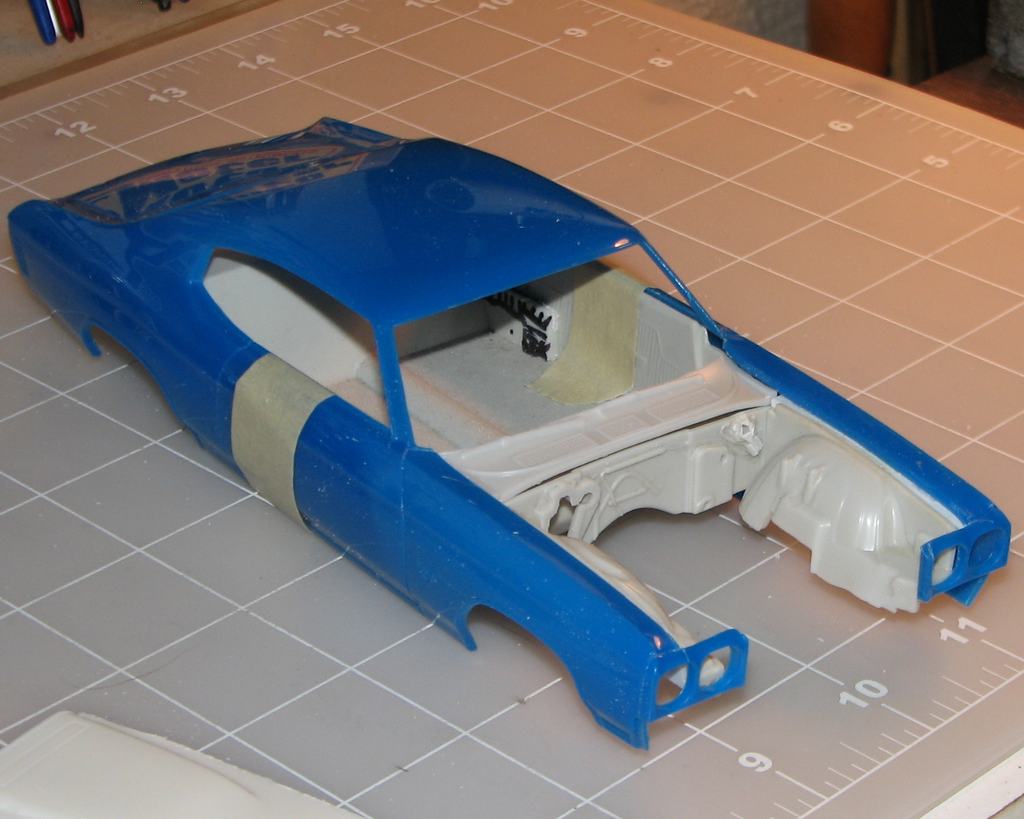
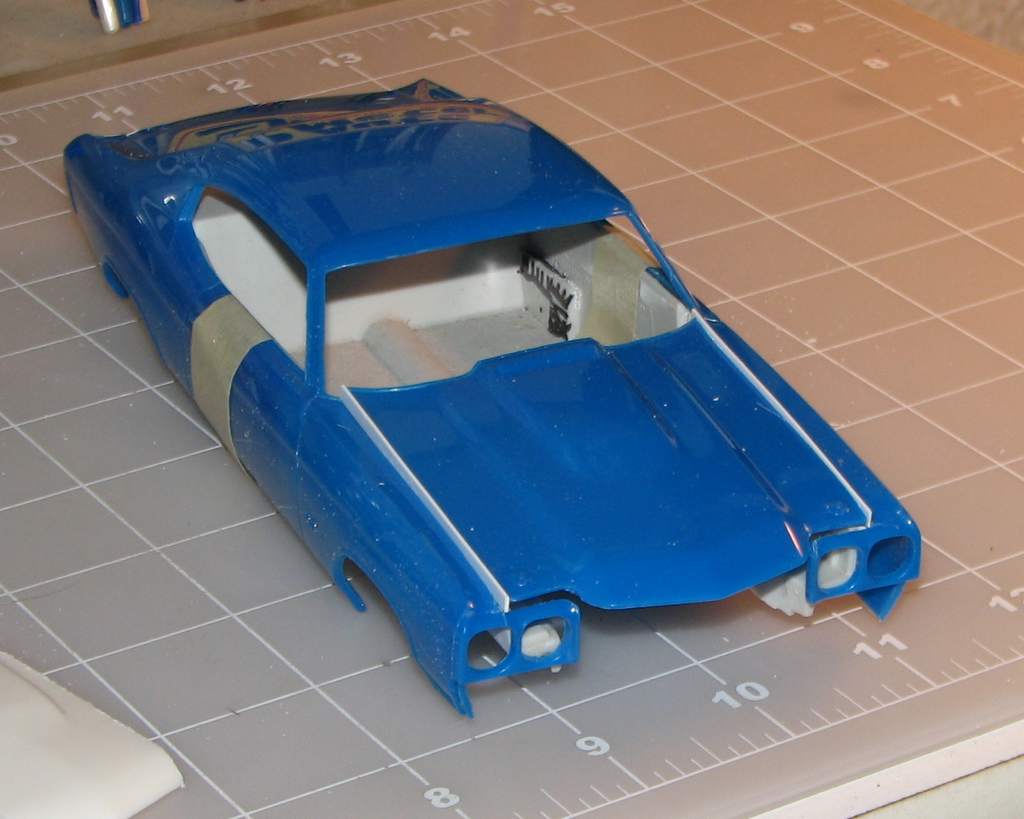
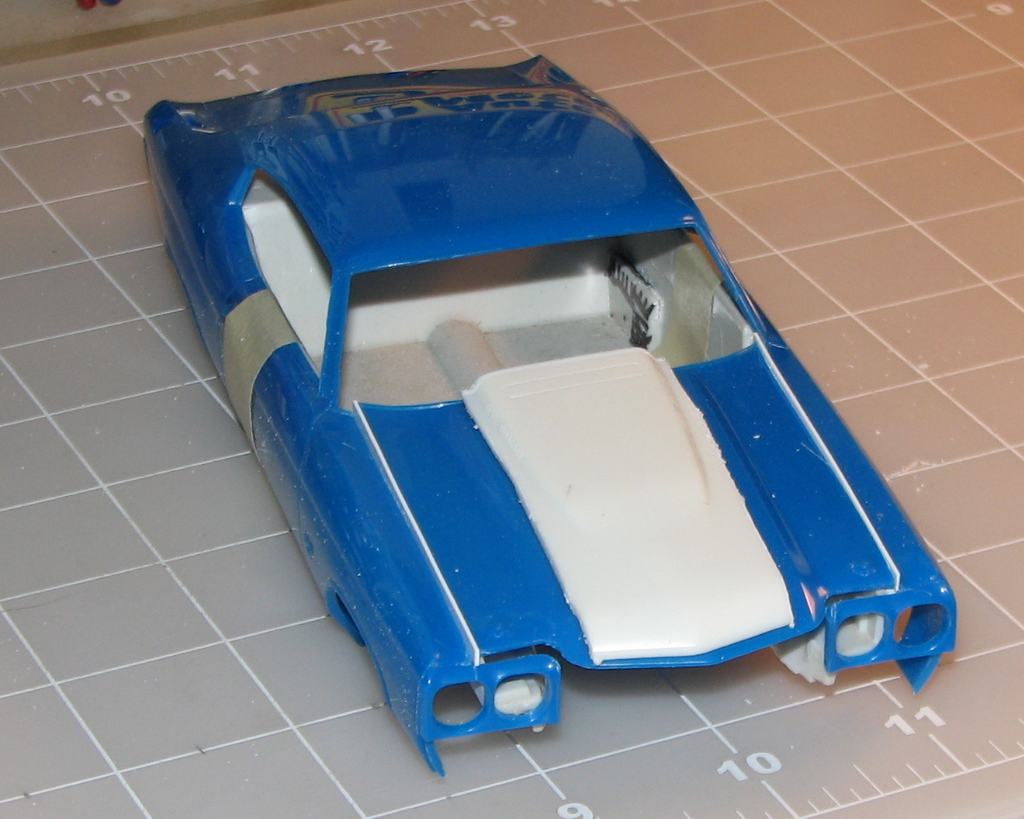
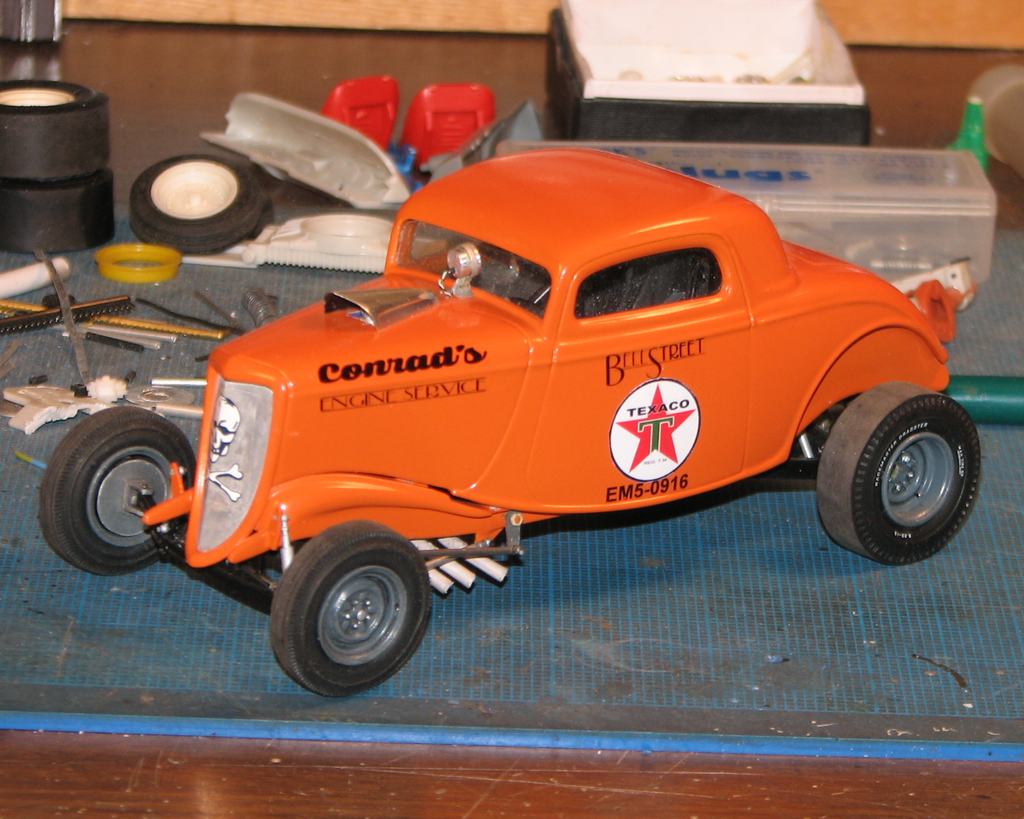
Been a while since I updated this thread. That's mainly because I was struggling with how I was going to do the cowl; In the meantime, I finished up a couple of projects that were close to complete. Those are now posted on the Drag Racing Models thread/board. I digress. A friend suggested the cowl from AMT's '68 El Camino. Bingo! It's now cut to size. I think I am going to clean it all up (no need for wipers on a MP racer!), open the grilles and install some sheet to replicate the duct/plenum, beneath. I've also cemented strip to the edges of the hood, to replace the kerf from removing it from the body. I'll remove the heater and wiper motor from the firewall, as well--again, no need for that stuff on a race car! I'll also install the Cowl Induction scoop from AMT's '70 Chevelle (thanks, Rusty Shackleford! Good call!). Not a ton of physical progress, but, progress nonetheless. The Revell hood will need to be thinned considerably, but, it appears that the hood will nestle beautifully between the fenders, once it's cleaned up.

-
Diggin' this. The louvers look great! Nice job with them!
-
That depends a lot on the builder. For me, it's very important, because I am completely anal-retentive about such things!grin It's so easy to figure it out, too. I just "Google" "Curb weight of (insert make/model here), then divide by the displacement of the engine I'm using. Done deal! The same formula can be used for virtually any "class racer". Just my $.02.
-
"Pretty darned detailed for a humble diorama model." Thanks, Bernard. That's because it's so dadgum difficult for me to just build something! It's always, "Gotta' add this. Oh! This would look cool! Let me try this!" I appreciate your kind words, as always. Originally, I had some apprehension about the towel, as well (it was one of the aspects of the model that played into the dio's theme), but, as the project wore on, across the better part of two decades, I finally looked at it as, "Well, I won't have to mess with throttle linkage, this way!" Overall, I'm pretty happy with it, but, I think I like the '34a little better.
-
Finished 'er up, tonight! Oops! Just noticed I forgot the tank bracket bolts.
-
Hey, Brad! Thank you, kind sir. You had to ask, didn't you?grin
Believe it or not after all those years completing nothing, tonight, I put my second finished model in a week, in the display case! You can check it out, here:
-
Thanks, Snake. That's what really does it for me: researching to ensure that the speed equipment, graphics, etc., reflect the era of the car I'm modeling. Maybe they're "pseudo-replicas" they are replicas of fictitious cars! Hahaha!
-
Thanks, Edgar! It's not quite finished, but, I'm hoping for the end of the day, today! Thank you, Chris, much appreciated! Rick, thanks! As I recall, I used a color from PlastiCote's "Classic Metals" line. There are several of those that were great for modelers! One color was perfect for unpolished magnesium wheels. I found them at either Michael's or Walmart.
-
Thanks, Walt! I appreciate that, coming from you. The kit headers are double butt-ugly!
-
Thanks, everyone, for the nice comments! Well, Snake, gotta have that weight transfer!grin Going to try to get it done today!
-
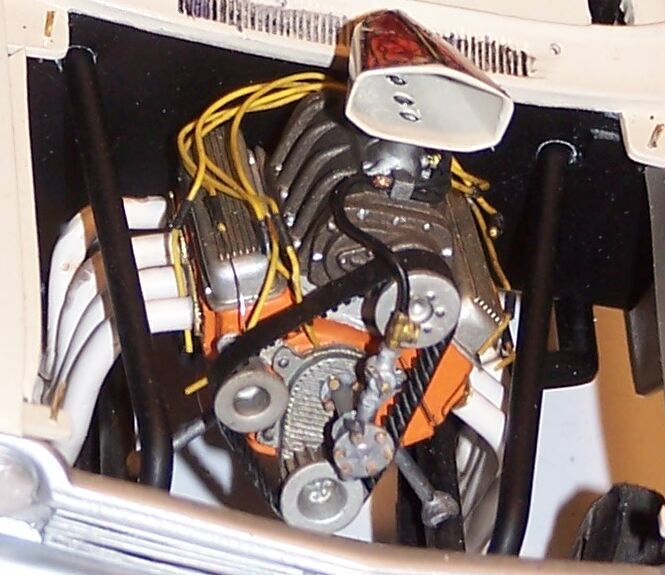
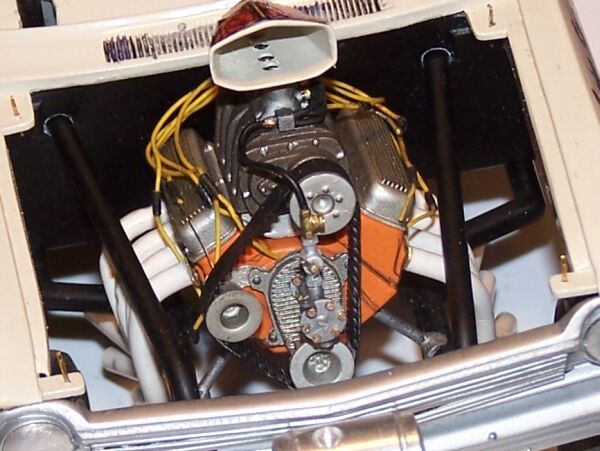
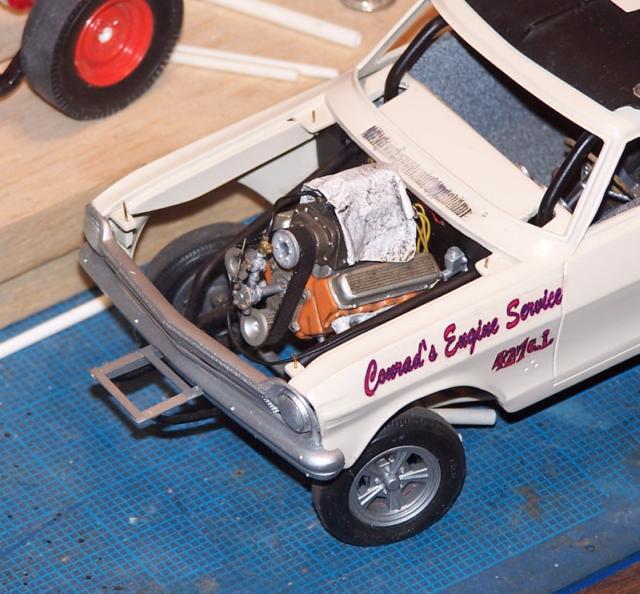
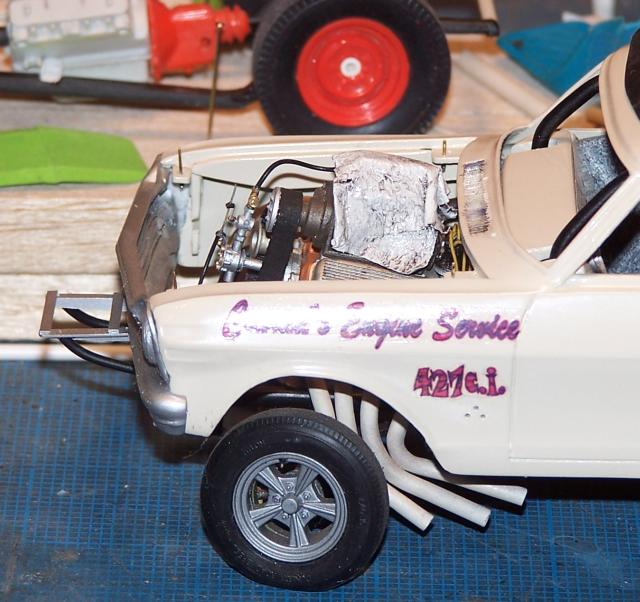
A couple more engine shots. The project evolved, as far as its purpose, which is why some photos have the towel, and some, the scoop.
-
Terrible towel in place.
-
I am about to (FINALLY!) get this project off the bench. I began work on this before I moved to Minnesota. I accomplished a lot of this work while living there. Never took it over the hump. That's about to change! While awaiting a shipment for my '70 Chevelle, I will finish this one. At one time, this was going to be part of a diorama project, thus, it is pretty much a curbside deal. The diorama is also the explanation for the "rag" covering the injector. I think the "terrible towel" looks okay, so I won't be eliminating it (even though everything beneath it is detailed, sans hydraulic throttle linkage).
-
Thank you, Sam! The snappers definitely can make for a cool model.
-
Thank you, everyone, for your kind words! Chris, it feels great, to finally finish a project, again! Bernard, you indeed said those last few items would really make it complete, and you were so right! It was after that, I decided to take a stab at those splash aprons. Really glad I did those! John, I appreciate that, a lot. I strive to achieve something realistic, with my projects. I spend a lot of time and effort researching the elements that go into a build. Thankfully, with the internet, that's much easier! Case in point: B&M's Hydro Stick was introduced in 1960. I was a little reluctant to use it, here, until I red that it was being developed in '59. That prompted me to go with it. Bill, you should dig that project out! It's a great kit for building something that captures a feeling or look, without going totally nuts on it!
-
Hi Dan,
Looks killer !! Captures the era as you always do in your builds ...... Now I am curious about this snap kit, so it is worth buying?
Alan
Hey Alan! Thanks, man! There's no engine, but, I love the kit! I've built two of them, and have another one I started several years ago. Revell's SnapTite '70 Chevelle is worth having, too.
-
Vince, Tom, Roger and Ricky; Thank you all, for the kind words! They are much appreciated!
-
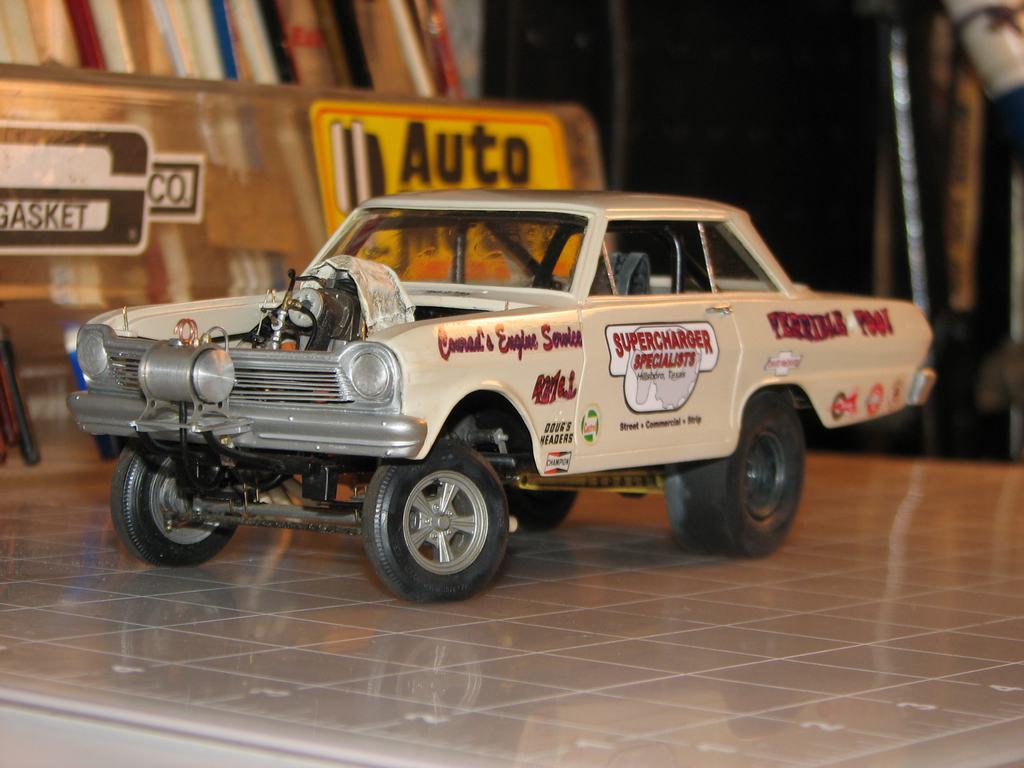
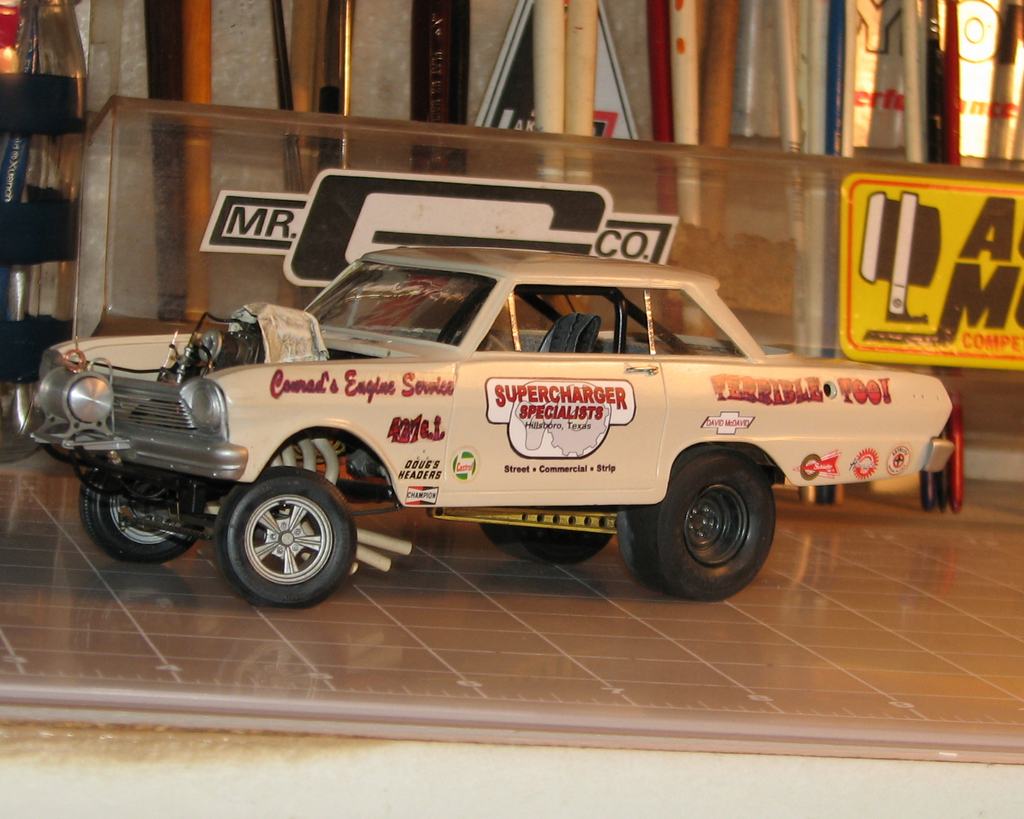
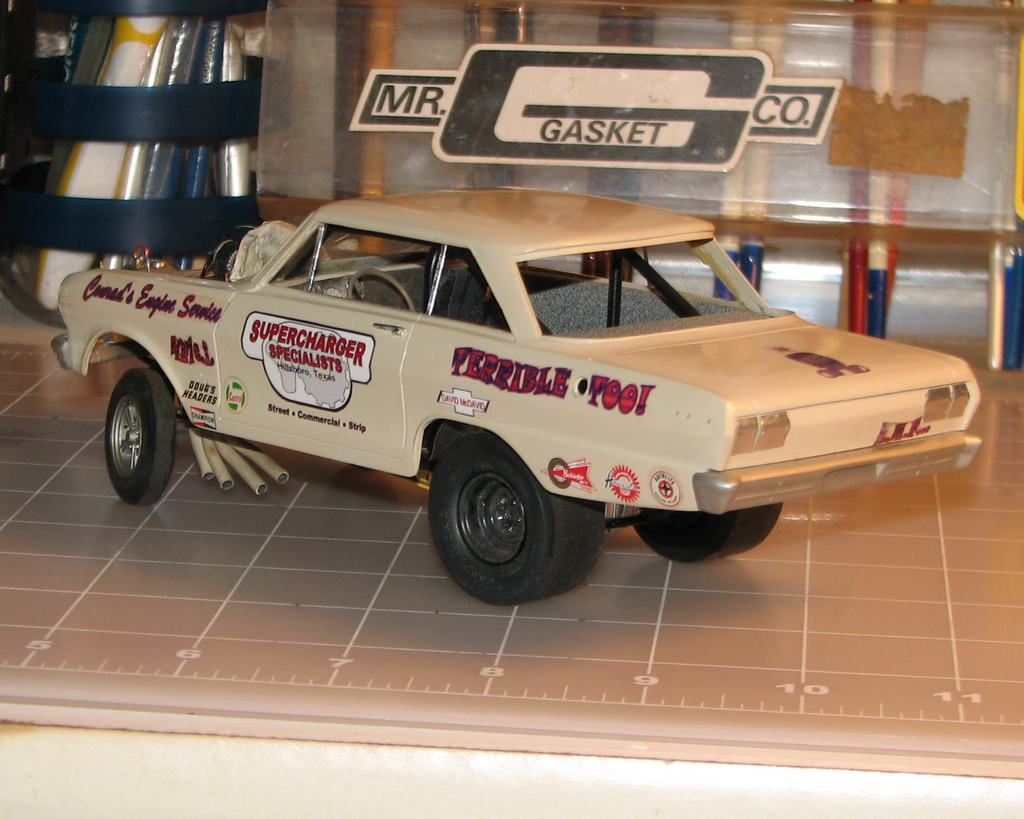
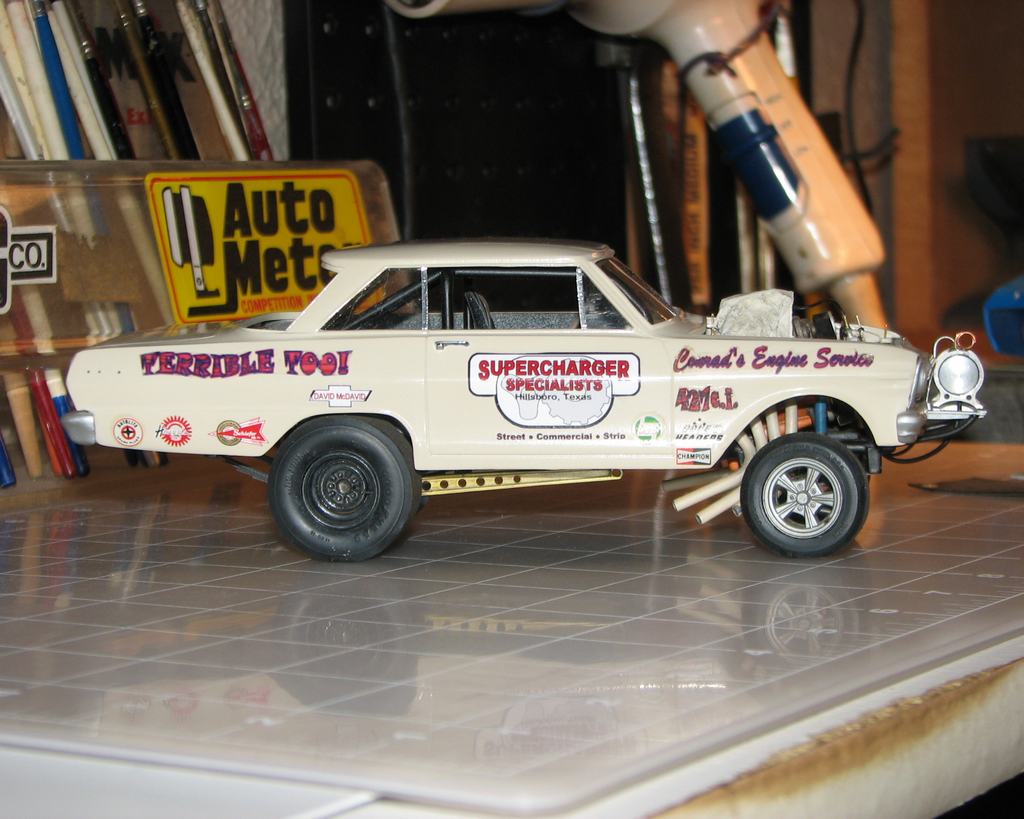
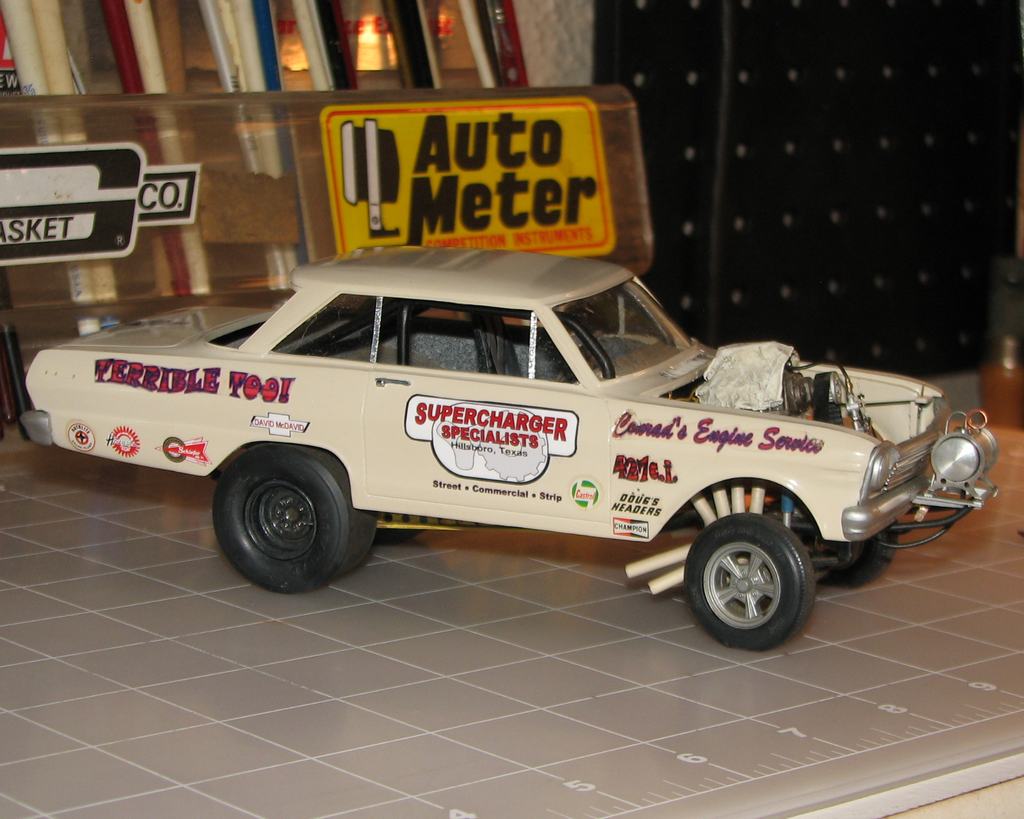
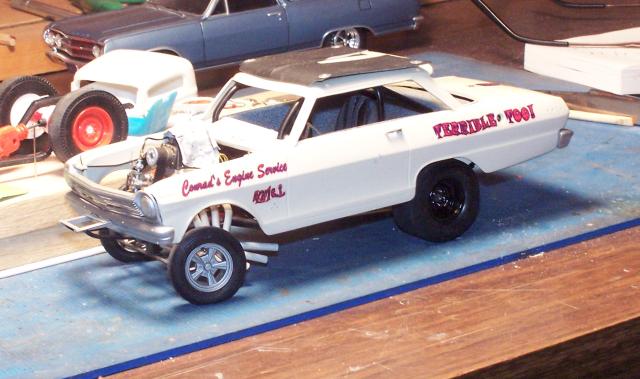
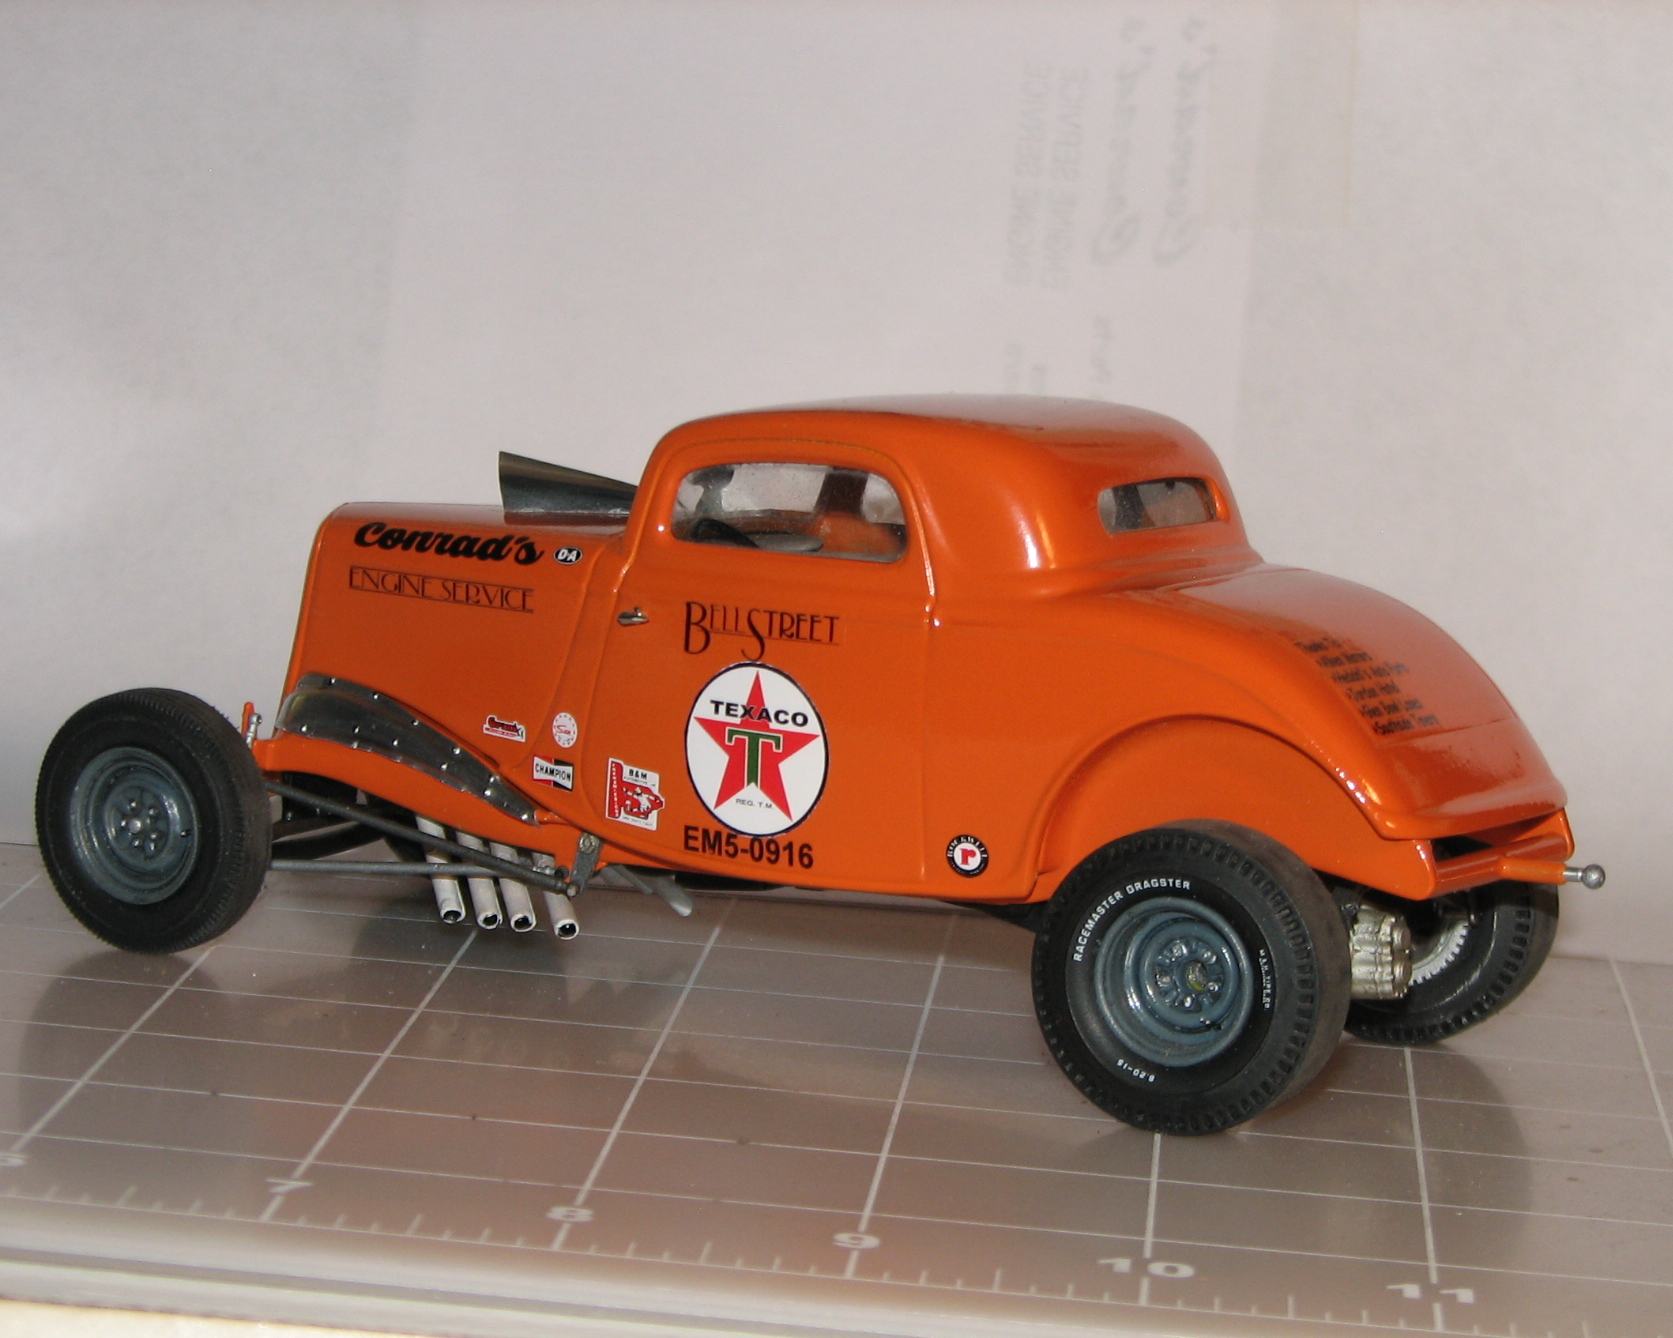
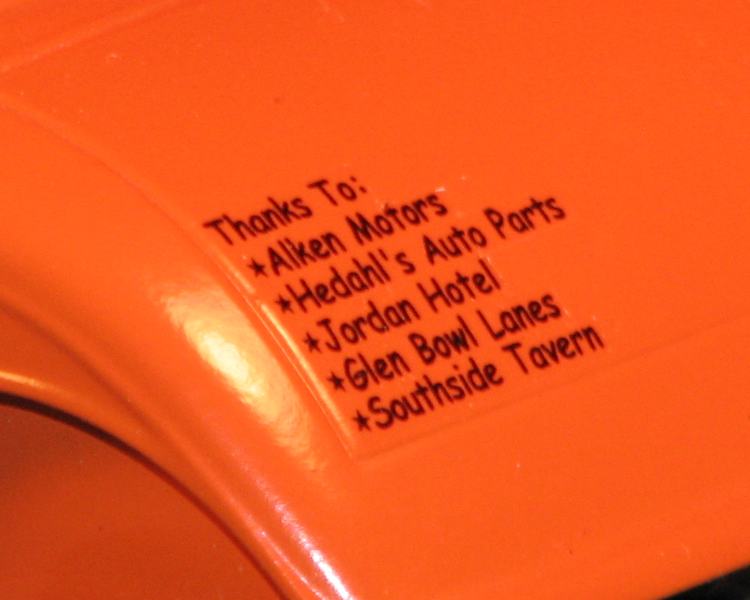
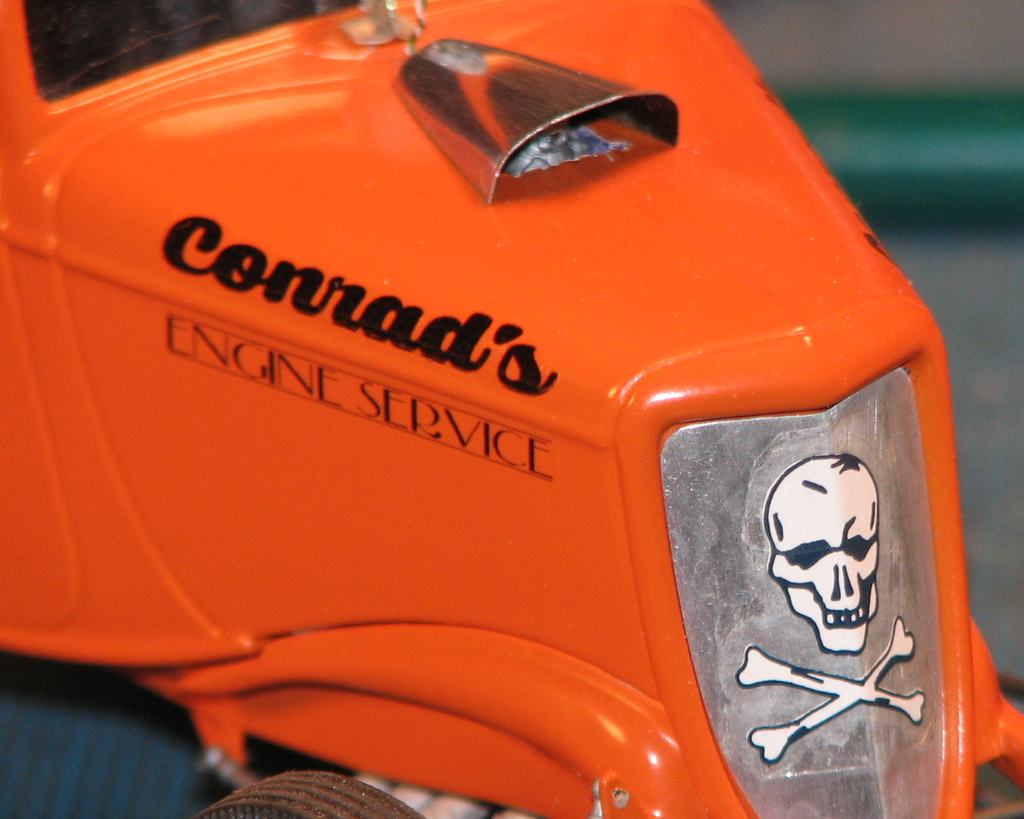
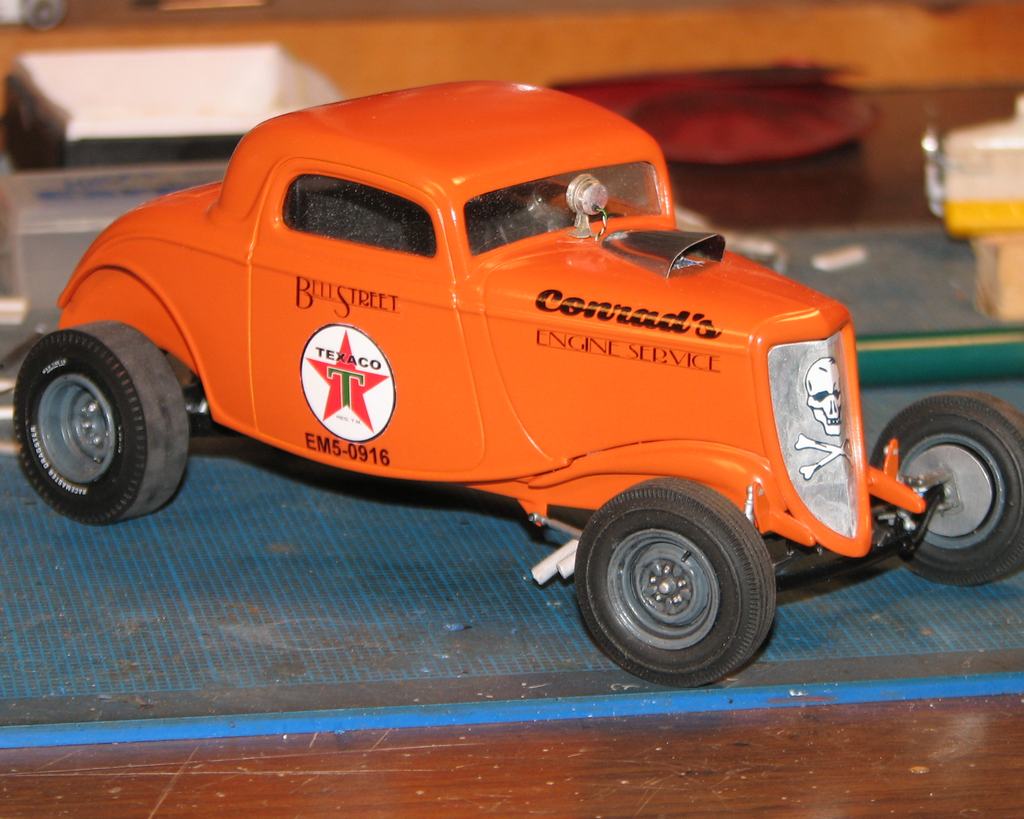
I am happy to announce that, for the first time in 15 or 16 years, I have completed a model! Revell's SnapTite '34 coupe is one of my favorite kits. Inspired by the Mooneyham/Sharp 554 coupe, the 7-11 coupe and the original 15 Oz. coupe, I built this in an attempt to capture the spirit of those cars, in scale. I think I just might have pulled it off! Is the model perfect? Not even close. Even going through these photos, I've noticed a couple of things I need to clean up. It's built to comply with NHRA's 1960 rules for A/A. I drew on my memories of some old businesses from the town where I went to high school, (and attended my first several drag races) for the "Thanks to:" list. Conrad's Engine Service is an ongoing tribute to my Dad. This is the first time I've made a set of decals that actually look decent. I made them all, except for the smaller contingency type decals and the skull.
The interior is paneled in aluminum sheet, the roll bar, seat and dash are all scratchbuilt. There's not just a Hydro-Stick decal on the car--I scratchbuilt a Hydro-Stick shifter for the interior. The scoop is hand formed from .005" aluminum flashing. The tach was turned on the lathe. The front splash aprons were formed from "Tooling Aluminum", available from many craft stores. I burnished the tooling aluminum sheet over the molded in plastic aprons on another kit I have. Once they were formed and trimmed to shape, I used an awl, to create the screw heads that hold the aprons on. After all these years, it's great to finally have something new in my display case! I feel like I accomplished exactly what I set out to: A bitchin' '34 Ford coupe, that's the essence of the three iconic cars named above. Hope you guys like it, too! Comments and criticisms are welcome!
-
So Daniel, are you all moved in now there in
the land of weed happy folks?
David S.
David, I am all settled in, and I'm happy, too!grin My shop is small, but set up nicely, although I had to store some of my parts, and old (OLD) projects in my bedroom closet. Just need to get my paint booth ducted, before winter. Thank you, JC! They really do have a badass look to them!
-
Thank you for the kind words, Terry and David! I am pretty happy with its overall look, as well as the way some of my experiments worked out. Hoping to finish it today, and post a thread for it over on the Drag Race forum!
-
Thanks, Bernard! It was supposed to be finished before I left Minnesota, but...won't be long now. Thank you for the kind words. I appreciate them!
-
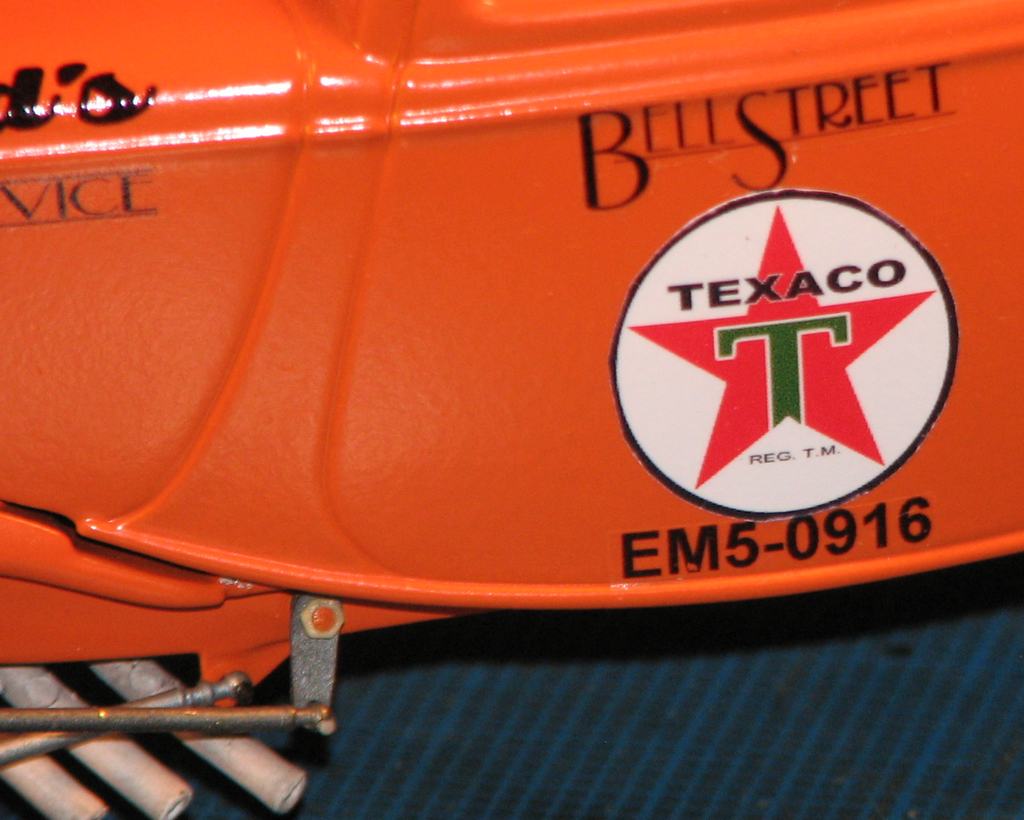
This project is nearing completion, as all I have left to add are a handful of small pieces, a couple of product logo decals (I'd call them contingency stickers, but, what would they have really been worth in 1960?), and some touch-up. She has her warts, but I like the way it sits. I made all these decals, except for the skull, which came from an aircraft sheet. I don't know if anybody else has used the inkjet sheets from Blinggasm, but I am very happy with the results. I got both clear and white, through Amazon. The clear is very thin, and went down without a problem. I "built" the Texaco logo from scratch, using PhotoImpact Pro, and printed it on white. I manipulated various fonts and added the lines with PI Pro, as well. Those were printed on clear.
-
Coming along nicely, JC! I've been hankering to build a road racer, and this is inspiring,


1975 NHRA Modified Production '70 Malibu 10/28 On The Wheels (Again)
in WIP: Drag Racing Models
Posted
Thank you, Brian! That could take a while. It won't be for a lack of trying, though!