
RancheroSteve
-
Posts
1,707 -
Joined
-
Last visited
Content Type
Profiles
Forums
Events
Gallery
Everything posted by RancheroSteve
-

66 Galaxie
RancheroSteve replied to Alan's topic in WIP: Stock Cars (NASCAR, Super Stock, Late Model, etc.)
Cool - I've always wanted to do the Yellow Banana. I have the Galaxie and the decals, at least. Following with interest. -
1965 Mercury Comet Cyclone (update 1/4/19) Finished!
RancheroSteve replied to RancheroSteve's topic in WIP: Model Cars
Now that the Mustang inner fender aprons/shock towers are cut to the right length, I'm removing the molded in upper a-arms. The Moebius Comet has separate upper arms, so I'll be "bolting" those the shock towers in a more prototypical fashion. While work continues on the shock towers, I've decided on a power plant and closed in on the "theme" of this build. I'm going to be using the 5.0 small block with an AOD transmission from the Revell '32 five window kit, with the modern fuel injection and the finned valve covers. The oil pan comes from the Moebius kit, shortened a little to fit the Revell block. Here's a mock-up for fit: The block and trans have been painted bronze/gold; the heads painted silver (to represent aluminum) and holes drilled for plug wires.The headers from the '32 kit don't look like they'll work in the Comet, so I started scrounging through my un-built parts kits and found that the shorty factory headers from the Monogram '94 Mustang looked like they'd work. And who knew? The engine block and heads in the '32 Ford is the same casting as the Monogram '94 Mustang! Figures, I guess. -
1965 Mercury Comet Cyclone (update 1/4/19) Finished!
RancheroSteve replied to RancheroSteve's topic in WIP: Model Cars
I won't do a full detailed review here (that's probably a separate thread), but since you asked, JC: overall not bad, although it certainly doesn't set any new standards (the AMT '67 Mustang engine is still the best early 289 in my book). Dimensionally it looks right, although I haven't measured it out. The valve covers are nice and there are two sets - plain and chromed/finned. The detail on the block, heads and transmission is a little generalized and there are several inaccuracies, especially for anyone that wants to build a replica stock Comet or even a period correct early SBF. I'm not trying to bash or nit-pick the thing here, but I'll list some of my issues: 1. The exhaust manifolds (mentioned in another thread) don't resemble anything I've seen on any SBF, stock or modified. 2. The water pump has the inlet on the wrong (driver's) side for 1965. 3. The air cleaner is too short. 4. The oil filter angle is incorrect. 5. The intake manifold is a later/aftermarket high-rise unit (The AMT has the correct low-rise manifold for a stock 4V or HiPo 289). There are a couple of others, but I don't want to get too "rivet county" here. Some of these things won't matter to most builders and others are easily enough corrected. I'm going to be building my Comet as a "resto-rod" with some updated components anyway - more about that soon. -
Unique TV/Movie vehicle
RancheroSteve replied to BobbyHill16's topic in General Automotive Talk (Trucks and Cars)
I used to see that thing all the time sitting outside Dean Jeffries' shop on Cahuenga Blvd. -
Just an FYI: The Jeff Jones Mysterion seminar scheduled for Thursday night has been cancelled.
-
Cool project!
-
1965 Mercury Comet Cyclone (update 1/4/19) Finished!
RancheroSteve replied to RancheroSteve's topic in WIP: Model Cars
I wanted to keep the original location and dimensions of the Comet firewall, so I glued the side and top sections of the firewall to the chassis, and then fit the Mustang firewall into the center. Plenty of gaps here & there, and the toe boards don't line up exactly, but some scrap plastic will fix all that. After these photos were taken, I applied a generous coat of Tamiya putty. More soon . . . -
1965 Mercury Comet Cyclone (update 1/4/19) Finished!
RancheroSteve replied to RancheroSteve's topic in WIP: Model Cars
OK, so this next series of modifications is a little more drastic and maybe not for everyone. I'm not suggesting in any way that this an essential thing to do - in fact, I'm sure a lot of perfectly nice Comets will be built right out of the box, but I decided I was up for a challenge. Let's begin by comparing the Moebius Comet chassis (in white) to the AMT '67 Mustang chassis (in black): The trans tunnel issues have been discussed in another build thread, but we can also see that the Comet has the lower suspension components molded in, while the Mustang has separate lower suspension, but has the upper a-arms molded to the frame (we'll deal with those later). I began by making a template that I could use later to maintain the correct wheelbase: I then removed the desired section from the Mustang chassis: And then the corresponding section from the Comet chassis: After a lot of test fitting - along with using the template to duplicate the wheelbase - I was able to glue them together: I had to fill a few gaps with small strips of plastic. I'll let the whole thing set up for a while and putty a few seams. Next up will be getting the firewall fitted. -
Improving the Moebius 1965 Mercury Comet
RancheroSteve replied to prrtrainguy's topic in WIP: Model Cars
Yes, that's correct - they cut a hole in the tunnel and added a piece on. Here's a link to the reproduction part: http://www.dearbornclassics.com/transmission-tunnel-hump-4-speed-fiberglass-falcon-ranchero-comet-1962-1965.htm And here's how it looks in place:- 30 replies
-
- 1
-

-
- mobius
- 1965 comet
- (and 1 more)
-
Looking good - a real achievement already!
-
1965 Mercury Cyclone Hardtop- Pics added Jan 5
RancheroSteve replied to Ron Hamilton's topic in WIP: Model Cars
Very effective and subtle improvements, Ron. It's interesting to see where different builders have focused their attentions - I think that shows that this was a desired kit and that while not perfect, it's a good launching point for a variety of builds. -
Improving the Moebius 1965 Mercury Comet
RancheroSteve replied to prrtrainguy's topic in WIP: Model Cars
Good catch!- 30 replies
-
- 1
-
-
- mobius
- 1965 comet
- (and 1 more)
-
Improving the Moebius 1965 Mercury Comet
RancheroSteve replied to prrtrainguy's topic in WIP: Model Cars
Whew, that's a pretty crusty engine bay, but it does show the location of the blower motor. The two holes to the right of the motor are where the heater hoses go through to the heater core. Here's a shot that I think shows things a little more clearly: The shock tower to firewall brace has been removed for restoration, but otherwise this is a basically stock & bare '65 Falcon/Comet engine bay. Major holes (from left to right) are: blower, heater hoses, throttle linkage, and brake master.- 30 replies
-
- 1
-
-
- mobius
- 1965 comet
- (and 1 more)
-
Improving the Moebius 1965 Mercury Comet
RancheroSteve replied to prrtrainguy's topic in WIP: Model Cars
Yes, that's correct - the V8 first appeared in the Falcon/Ranchero as a mid-year option in 1963. Sorry if I came across as a "know it all".- 30 replies
-
- 1
-
-
- mobius
- 1965 comet
- (and 1 more)
-
Kurtis Sports Car (Update 1/27/17)
RancheroSteve replied to RancheroSteve's topic in WIP: Model Cars
The Kurtis used a unibody chassis with '49 Ford suspension parts. Even though it is a body on frame car, the Revell'49 Mercury provided a decent starting point and it has detailed & separate components. After a lot of hacking and scrap plastic, I now have the basic chassis pan and interior platform: I think I've overcome most of the big hurdles in this build - I can actually begin to finish and assemble it now! -
Moebius '65 Mercury Comet Cyclone news
RancheroSteve replied to Dave Metzner's topic in Car Kit News & Reviews
I agree, Dave - that looks like factory ride height, and it's not anything I have any real quibble with regarding the kit. I think to our modern tastes the '65 tends to look a little high in the front - I think that is partially due to the vertical headlights and corresponding fenders. In any case, ride height is something that is fairly easily adjusted to suit one's taste. I'm going to lower mine anyway because I'm not going for a factory stock build. -
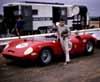
A little more progress: the (Indycals) decals applied. Getting ready to start on the lump and the back end . . .
-
Nascar tires yellow printing
RancheroSteve replied to cobraman's topic in General Automotive Talk (Trucks and Cars)
I know that the Tabasco Pontiac Grand Prix (1997) and Spooky Fruit Loops Monte Carlo (1998) both have them, so maybe some other kits of that vintage as well? For what it's worth, both of those are "limited edition" kits. -
Improving the Moebius 1965 Mercury Comet
RancheroSteve replied to prrtrainguy's topic in WIP: Model Cars
True, but only up until mid-'63. -
Improving the Moebius 1965 Mercury Comet
RancheroSteve replied to prrtrainguy's topic in WIP: Model Cars
Looks like you're off to a good start, but while we're on the interior, if you want to get it more correct, the shape of the transmission tunnel isn't really right for a 4 speed Comet. This is the best photo I've been able to find at the moment, but you'll notice that the shifter is set off to the side, there's a bulge on the driver's side to clear the linkage, and the top of the tunnel is flatter than the kit part. Also, I see you're a new poster here (welcome!), but this thread would probably be better in the "On the Workbench" section. -
Moebius '65 Mercury Comet Cyclone news
RancheroSteve replied to Dave Metzner's topic in Car Kit News & Reviews
I think it's been mentioned in this thread before - and I tend to agree - that it sits just a little high, but it shouldn't be hard to adjust. We also tend to forget that these cars sat a little higher than is now the current fashion when they were brand new, despite how they looked in the sales brochure illustrations. -
Moebius '65 Mercury Comet Cyclone news
RancheroSteve replied to Dave Metzner's topic in Car Kit News & Reviews
Like I said earlier, our very original Caliente hardtop had them. No pictures, but I can remember looking at them and wondering why they were there. -
Moebius '65 Mercury Comet Cyclone news
RancheroSteve replied to Dave Metzner's topic in Car Kit News & Reviews
Ha, right! Now what about the Cometcheros? -
Moebius '65 Mercury Comet Cyclone news
RancheroSteve replied to Dave Metzner's topic in Car Kit News & Reviews
Sounds right to me - so maybe we can say they were on all '65 Comets except the sedans? -
Moebius '65 Mercury Comet Cyclone news
RancheroSteve replied to Dave Metzner's topic in Car Kit News & Reviews
They're not Cyclone specific - I know for sure the Caliente had them as well; so maybe they're hardtop specific? I suspect some of the cars one sees (on Google Images, for example) are "resto-mods" that have had some trim removed (as I'm doing on my build).