
RancheroSteve
-
Posts
1,705 -
Joined
-
Last visited
Content Type
Profiles
Forums
Events
Gallery
Everything posted by RancheroSteve
-
Easy Run Engine Test Stand Something Different
RancheroSteve replied to BobbyG's topic in WIP: Model Cars
Very cool idea and execution. I like your choice of engine, too! -
Same here - I've done it, but never with the intent to grandstand or show off, but to answer a question or illustrate a point if possible - so I hope it comes off that way. I try to do it sparingly and be sensitive about it. I'd listen if someone tells me otherwise.
-
1963 Corvette Grand Sport (update 8/16/16)
RancheroSteve replied to RancheroSteve's topic in WIP: Model Cars
Yes - the Grand Sport has side pipes. -
1963 Corvette Grand Sport (update 8/16/16)
RancheroSteve replied to RancheroSteve's topic in WIP: Model Cars
Some progress: the engine is finished! Mostly out of the bow with a few tweaks. I wired the distributor and added some plug boots. Made a bypass hose for the water pump. There is a fuel block and lines included in the kit but that part isn't mentioned in the instructions. Looked like it would be a tough fit anyway, so I made my own. Headers are also from HRM - supposedly they fit better that the kit items. Right side header is just temporarily pinned on. Next, I'll try to drop this into the chassis and report back soon. Fuel and oil lines will get hooked up later. -
Kenneth Howard A.K.A. Von Dutch
RancheroSteve replied to Greg Myers's topic in General Automotive Talk (Trucks and Cars)
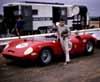
Getting back to Von Dutch's creations - I've mentioned it before, but I'd still like to try building a scale replica of this one day: -
Yes, it's Mr. Surfacer primer with a light coat of wax. I was going for that DP90 look.
-
A relatively quick one for me (only about seven months, but then I've usually got about four or five builds going at once). It's kind of a departure from my usual builds, so at times I felt like I was in unfamiliar territory design-wise, but I'm pretty happy with how it turned out. Thanks for looking - questions, comments, criticisms welcome.
-
1961 Dodge Phoenix (update 5/20/16)
RancheroSteve replied to RancheroSteve's topic in WIP: Model Cars
I made a few details: exhaust tips, license plates, wiper posts - and put it all together. Calling it done. Working up an "Under Glass" post now. -
1961 Dodge Phoenix (update 5/20/16)
RancheroSteve replied to RancheroSteve's topic in WIP: Model Cars
After a few unsuccessful attempts, I think I have a coat of Alclad on the rear bumper that I can live with: Not too far to go now - I should be finishing this one up soon. -
Understood! Keep up the fine work - I'm really enjoying following your projects.
-
I've been using the one from Micro-Mark for a few years with pretty good results. It's a bit of an initial investment, but with some practice you can make stuff you couldn't get otherwise. http://www.micromark.com/micro-mark-pro-etch-photo-etch-system,8346.html I made the grille for this Falcon: As well as various mechanical parts: There are a few threads on this board discussing making "home made" p/e parts. I believe this is the one I'm thinking of: http://www.modelcarsmag.com/forums/topic/51578-micromarks-photo-etch-kit/?page=1
-
Challenging - yes, but I think it could be done with a "home" photo-etch kit.
-
Looking good so far! The thing on the lower right is the pump for the dry sump system. It should have a bunch of braided hoses running in and out of it, to the oil pan, filter, oil cooler, etc. Do a Google Image search for "nascar dry sump system" to get some ideas.
-
As far as I know: Bare steel block; aluminum heads, water pump, and intake manifold.
-
1963 Corvette Grand Sport (update 8/16/16)
RancheroSteve replied to RancheroSteve's topic in WIP: Model Cars
Thanks for asking. I'm always got a few models going at once, so progress may seem slow. I've been working on the engine for the Grand Sport - I should have something to show pretty soon! -
Yep, exactly. Essentially an evolution of what they started with the Boss 302. Those AMT NASCAR kits don't seem to get a lot of love, but most of the parts - including the engines - are pretty well done.
-
Yes, I have every intention of being there - it just gets more & more enjoyable for me.
-
Moebius '65 Mercury Comet Cyclone news
RancheroSteve replied to Dave Metzner's topic in Car Kit News & Reviews
There are a few dead links (the thread is about 7 years old), but If you've got few hours to waste: http://www.jalopyjournal.com/forum/threads/64-65-comets-old-drag-cars-lets-see-pictures.335534/ And a video here: https://www.youtube.com/watch?v=N-dO-UPe7uo -
Moebius '65 Mercury Comet Cyclone news
RancheroSteve replied to Dave Metzner's topic in Car Kit News & Reviews
Oh yeah, for sure! From what I've seen so far the Moebius Comet will be many orders of magnitude better than the disappointment that was the Trumpeter Falcons & Rancheros. If we rivet count, it's only because we care! -
Moebius '65 Mercury Comet Cyclone news
RancheroSteve replied to Dave Metzner's topic in Car Kit News & Reviews
That brace from the Trumpeter Falcon doesn't look bad, but that firewall doesn't resemble any Falcon/Comet part I've ever seen. Don't get me started . . . -
1961 Dodge Phoenix (update 5/20/16)
RancheroSteve replied to RancheroSteve's topic in WIP: Model Cars
OK, I got it foiled! I can see a few small flaws in the photos - funny how it works that way - but it looks pretty decent to the naked eye. -
Well done - clean & simple!
-
1963 Corvette Grand Sport (update 8/16/16)
RancheroSteve replied to RancheroSteve's topic in WIP: Model Cars
I'm not a Grand Sport expert by any means - maybe someone who is can weigh in - but based what I've read, my guesses would be: Zora Arkus-Duntov, who was heavily involved in the Grand Sport program, was not a fan of the split window. Maybe they already knew the split window was going away in '64? Also remember that the Grand Sport bodies were handbuilt, so they could do what they wanted with the body. Finally - and perhaps most likely and importantly, it was probably a little lighter - and they did everything possible to take weight off that car. -
1963 Corvette Grand Sport (update 8/16/16)
RancheroSteve replied to RancheroSteve's topic in WIP: Model Cars
It's a custom blend at this point. The instruction sheet lists Tamiya XF17 as a choice, so I started with that, but it looked a little too dark so I lightened it up a bit. -
Moebius '65 Mercury Comet Cyclone news
RancheroSteve replied to Dave Metzner's topic in Car Kit News & Reviews
Point taken Tim, but I have to think the truth will come out in the end, and a good open discussion is a way of getting at that truth. Most people who consider themselves knowledgeable on a subject are careful to not go out on limb - if a factual error is made there are plenty of opportunities for someone to call them on it. In the case of the '65 Comet, it's not really that a rare car and reliable info is pretty readily available.
