
RancheroSteve
-
Posts
1,705 -
Joined
-
Last visited
Content Type
Profiles
Forums
Events
Gallery
Everything posted by RancheroSteve
-
1963 Corvette Grand Sport (update 8/16/16)
RancheroSteve replied to RancheroSteve's topic in WIP: Model Cars
The interior is done. I added a fire extinguisher and a couple of gauges to the dash. I also made a spacer to move the pedals down and closer to the floor. -
1961 Dodge Phoenix (update 5/20/16)
RancheroSteve replied to RancheroSteve's topic in WIP: Model Cars
It's the "Scale Motorsports" cowhide decal. I bought a sheet a few years back thinking I'd use it someday. After I painted the seats, I was able to use the masking tape as a template. Truth is, it wouldn't be that hard to do with paint if you have slightest artistic sense. Cowhide is a pretty forgiving pattern. -
Moebius '65 Mercury Comet Cyclone news
RancheroSteve replied to Dave Metzner's topic in Car Kit News & Reviews
I don't see the brace or the wiper motor as a huge deal. Some folks (myself included) who are very familiar with these cars were mentioning a few items that they saw as being less than perfect, but no one said these things would stop them from buying the kit - or that anybody else should refrain from buying the kit, which based on what I've seen looks darn good. The more one knows about a specific car, the the greater the likelihood exists that you'll be a "rivet counter" when it comes to that vehicle. In the instance of the brace, it couldn't have been molded in place anyway - it has to be a separate piece, so doing it as an Export Brace makes some sense. If someone wants to do a 100% correct factory stock build, they'll figure out a way to fix it. That's part of what model building is about. To the best of my knowledge the perfectly accurate kit has not been made yet. As I said earlier, I'm not going to try to do an in depth critique of this (or any) kit based on a few photos of what may or may not be the finished tool. But I think if somebody sees something they have the right to point it out. I think most of the members here appreciate what Moebius has given us over the last few years and have the sense to not "throw the baby out with the bath water". I think it's only natural in this day and age to expect products to be intensely scrutinized. Certainly standards for detail and accuracy are way higher than they were when I was first building models, and information is way more available. I think the dialog is healthy - it's a big part of the reason we come here. -
1961 Dodge Phoenix (update 5/20/16)
RancheroSteve replied to RancheroSteve's topic in WIP: Model Cars
The interior is done. Starting with the very basic and shallow three piece interior (tub, dash and steering wheel), I decided to go for something splashy. Red to match the roof with cowhide inserts. I added arm rests, seat belts, window cranks, turn signal stalk, rear view mirror, a little BMF, and Fuzzy Fur for the carpets and the package shelf. -
Moebius '65 Mercury Comet Cyclone news
RancheroSteve replied to Dave Metzner's topic in Car Kit News & Reviews
It would make sense that the Mustang wiper motor would be in the same location as the Falcon's - as I'm fond of saying, a Mustang is just a re-bodied Falcon. The wiper motor (original as far as I know) still works on my '63 Ranchero, so I'd say it's a pretty reliable part. -
Moebius '65 Mercury Comet Cyclone news
RancheroSteve replied to Dave Metzner's topic in Car Kit News & Reviews
Yes, I noticed that too. The air cleaner also looks a little too flat to me and there are a couple of other mechanical details that seem a bit off, but I'm trying to withhold my judgements until the kit is in my hands. Enough about it looks right that I'll be buying at least one for sure. -
Try to arrange a tour of the International Model Car Builders Museum: http://www.themodelcarmuseum.org/Tours/tours.html Nothing to buy there, but lots to see.
-
Nice work - always good to see the Futura!
-
It's been a while since I built this so I can't remember all the details, but I was able to get it to fit acceptably - maybe not quite perfectly - without too much hassle.
-
Its not too difficult to carefully separate the center section of the canopy, then only attach the front and rear sections. The thickness of the "glass" makes it pretty difficult to hinge prototypically, but you can leave it loose for removal.
-
1961 Dodge Phoenix (update 5/20/16)
RancheroSteve replied to RancheroSteve's topic in WIP: Model Cars
Ha, OK - if you say so! The fin trim is looking a little scary to me. -
1961 Dodge Phoenix (update 5/20/16)
RancheroSteve replied to RancheroSteve's topic in WIP: Model Cars
Thanks for all the good suggestions on colors, guys. It's just out of the paint booth. After some deliberation I decided to go with: Testors shiny "Revving Red" with a little Tamiya Pearl Clear on the roof and the little spear on the side; Mr. Hobby 1500 Black primer on the body. I'll wax the primer a little just to even it out. I think the black will set off the chrome trim nicely, the red will go with the wheels and will be carried over into the interior (coming soon). I've got some BMF-ing to do! -
After all the amazing work you've done on this, I think you can handle plug wires.
-
Kurtis Sports Car (Update 1/27/17)
RancheroSteve replied to RancheroSteve's topic in WIP: Model Cars
Slowly but surely, a little more progress - it's taken me a while to figure out how to approach making the windshield frame. With nothing commercially available that was suitable, I decided it would have to be scratchbuilt. I drew a frame on paper and fit it to the body, then scanned that template and refined it in Photoshop. After some more trail and error, I got this: I think I have it about where it needs to be. Next step is to photo-etch this in brass and add some channel for the glass. Thanks for looking. -
I saw it at my LHS today. I've got the previous issue so I'm not sure I need another, but it looks like a really good package!
-
Are you ready for the (Gold) Rush???
RancheroSteve replied to Faust's topic in Car Kit News & Reviews
I still see some pretty wild vans around on the street: -
Are you ready for the (Gold) Rush???
RancheroSteve replied to Faust's topic in Car Kit News & Reviews
Not my thing at all, but I totally appreciate your enthusiasm, your sense of humor, and your writing skills! -
1963 Corvette Grand Sport (update 8/16/16)
RancheroSteve replied to RancheroSteve's topic in WIP: Model Cars
Looks like it's out of print and going for more dollars than I have laying around. Wish I had a copy, but I can't complain - I've got a pretty good auto reference library. Can't have it all! -
1963 Corvette Grand Sport (update 8/16/16)
RancheroSteve replied to RancheroSteve's topic in WIP: Model Cars
Here you go - hope these are legible enough. -
1963 Corvette Grand Sport (update 8/16/16)
RancheroSteve replied to RancheroSteve's topic in WIP: Model Cars
Thanks guys. The upper arms fit just fine and are much more delicate than the kit items. I don't have any good reference photos, so I'm only assuming they're more prototypically accurate. Mine also came with a good set of instructions on how to install them and also how to lower the front ride height. I haven't gotten to the headers yet, but they are supposedly a much better fit than the kit parts. -
Nothing too fancy here - just doing a (mostly) out of the box build of the Accurate Miniatures kit. I will be using the HRM upper control arms and headers. Yes - I filled the slots on the bottom of the frame: An enjoyable build so far - more soon.
-
What did you see on the road today?
RancheroSteve replied to Harry P.'s topic in General Automotive Talk (Trucks and Cars)
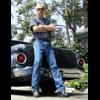
Not exactly "on the road" I guess, but just up the alley from me is a garage that's always closed. I poked my camera over the gap at the top of the door and took this: A vintage Dodge with a coat of dust, last registered in 2003. -
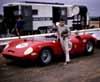
I built a few of these "Great Moments in Sports" kits when I was a kid. They're quite well done.
-
In case you missed it down there under "All the Rest" - I just built a little one as well:
-
I was just thinking today that I should measure it and scale it out! I'm 6'5" so I ride the tallest frame I can find (25 1/2" or 65cm) and still have a lot of seat post showing. Thanks for the kind words, guys.