
gonzo64nova
-
Posts
186 -
Joined
-
Last visited
Content Type
Profiles
Forums
Events
Gallery
Everything posted by gonzo64nova
-

41 2 ton chevy rusted
gonzo64nova replied to bpletcher55's topic in Model Trucks: Pickups, Vans, SUVs, Light Commercial
I think the woodwork in the bed looks excellent -
The VW looks like its coming along great, the zombie looks like he had a couple of people for dinner and couldnt eat another foot. LOL Great job!
-
anther 57 ,
gonzo64nova replied to bpletcher55's topic in Model Trucks: Pickups, Vans, SUVs, Light Commercial
X2 You really crank out some killer looking trucks -
64 chevy
gonzo64nova replied to bpletcher55's topic in Model Trucks: Pickups, Vans, SUVs, Light Commercial
Wow, looks like you really spent alot of time on your step-side,the suspension work looks excellent. -
40 ford pick up,
gonzo64nova replied to bpletcher55's topic in Model Trucks: Pickups, Vans, SUVs, Light Commercial
Great job on the Forty,it has just the right stance and the wheels and tires look great also. BILL -
You cant go wrong with a C10 ,they look good in just about any style. I think one of those 802 cu. in. Sonnys pump gas(1350 HP on 91 octane!) motors would be just right for this. Those trucks tend to be a little heavy LOL. Good job! BILL
-
Anyone have any photos of the kit's components?
-
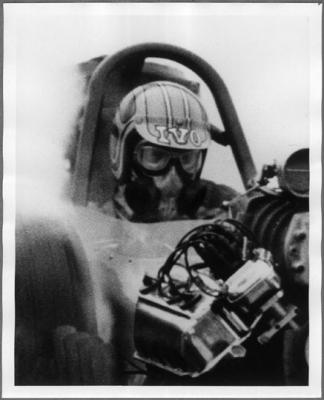
I use plain old masking tape painted flat black,it looks pretty realistic. For the fire-proof bags I use the foil inside cigarette boxes, that too looks pretty good as well. I also use masking tape (unpainted) as the covering for the chute lines in the first photo.
-
I love this, just paint the scoop and radiator shell with red oxide primer,paint the roll bar white and put some numbers and a class on the doors with some thinned out white paint and it would look awesome. Then it would look perfect for that era of race car.
-
This is a great build,it has so many cool features. I even like it in primer with the steelies and the WWs.
-
Your scratch building is amazing, the tiny details are so cool. I like to scratch build things in plastic, but after seeing your work I think I will just say I screw up things in plastic now.
-
Outlaw 10.5 / pro mod Corvette ZR1
gonzo64nova replied to nhra1625's topic in WIP: Drag Racing Models
Ted, I had heard the same things you did about damaging the Dremel with a light dimmer, so to put all my fears to rest I hooked mine up and have been running it that way for two years with no problems what so ever. It doesnt get hot and you can start the Dremel at what ever speed you set the dimmer switch to. I can turn mine slow enough to count the revolutions if I want to. I think this modification extends the life of the Dremel. Hope this helps- Bill P.S. Most of the Dremels produced now have a built-in speed controller. -
Willys Jeep Panel
gonzo64nova replied to Psychographic's topic in WIP: Model Trucks: Pickups, Vans, SUVs, Light Commercial
Thats some crazy fabrication work you've got going on . It looks very impressive. -
Wow the 1/25th scale body shop has alot of work ahead of themselves LOL . Your camaro looks great , I especially like the replacement quarter panel , the busted up windshield and the Hot Rod magazine on the seat.
-
Outlaw 10.5 / pro mod Corvette ZR1
gonzo64nova replied to nhra1625's topic in WIP: Drag Racing Models
I just used a dimmer switch from Home Depot, works like a charm. I brace my hand holding the Dremel against the edge of the table top and rest my other hand ,forearm and the piece Im grinding on the table top. Hope this helps -
This might make it easier to understand....
-
Outlaw 10.5 / pro mod Corvette ZR1
gonzo64nova replied to nhra1625's topic in WIP: Drag Racing Models
nhra1625 if you want to invest in some tools I would suggest a Dremel tool first, it can be used with numerous bits to do pretty much anything you need. I buy extra bits at Home Depot and I couldnt do without mine it saves me hours of sanding sometimes. Another tip is to hook the Dremel in series with a dimmer switch,that allows you to turn it really slowly so you dont melt the plastic and gives you greater control of how much material you remove. Hope this helps! -
Lowering the front shouldnt be too hard, just cut that round area completely off then get some small rectangular rod and fit it between the upper and lower "a" arms with the wider side facing the outside of the vehicle. Then drill a hole where you want the centerline of the tire to be and glue in some round rod to slide the back-side of the wheel onto. If you have trouble with this description I could draw a diagram for you. Keep in mind when you change one thing it can effect ten, mock up your intended ride height ,then check clearance on things like the oil pan, trans pan and exhaust.
-
Outlaw 10.5 / pro mod Corvette ZR1
gonzo64nova replied to nhra1625's topic in WIP: Drag Racing Models
nhra1625 you look like your off to a great start, I second what Brett said about the tubing sizes, they are usually .060 or .080 and smaller for gussets in 1/25th scale. I always fish-mouth my tubing with a small round file for a better fit. Your wing looks great ! There are plenty of Outlaw 10.5 and Pro /Mod style builds on this forum that you could use for reference. Just keep the wheels and tires handy for mocking up your ride height so it doesnt get too low or too high. I usually make some sort of blocks (pop-sickle sticks or styrene) to sit the chassis on to keep checking the ride height and header clearance if your not going to make them go thru the front fenders. Hope some of this helps, just ask if you need more help, the builders on this forum are some of the best. -
41 chevy "olive"
gonzo64nova replied to ryanm's topic in WIP: Model Trucks: Pickups, Vans, SUVs, Light Commercial
Dont take this the wrong way but I really liked the first version , your weathering was impressive. I agree with you on the lowering ,lower is always better ! -
65 Chevy Step Side
gonzo64nova replied to RocknRolla's topic in WIP: Model Trucks: Pickups, Vans, SUVs, Light Commercial
Cool build RocknRolla, I really like the low stance and weathered look. -
55 cameo surfs up
gonzo64nova replied to Models by Bear's topic in Model Trucks: Pickups, Vans, SUVs, Light Commercial
Nice job Chris, I've always liked semi-gloss black on the older trucks. Nice details also. Bill -
Thanks for the chassis shots Chris, I am just completing a 70 Chevy step-side done in a similar way. I like your approach because it eliminates having to do any bed modifications. Looking forward to more wip photos. Bill
-
This thing is old scool cool Ira !
-
Thanks for the help guys, I have never seen the Leal car, The photos are a big help. I am keeping the Shelby ground effects so I might just make up my own sponsors / team. Im working on the frame and mounting the hemi, then headers ( the job I dread ) Im going to try a set from one of the Pro/Sportsman kits first. Rodger - nice job on the S &M car, Ilook forward to all your new builds Wayne - Thanks for the pics, I love it when I can add to my reference collection.