taaron76
-
Posts
806 -
Joined
-
Last visited
Content Type
Profiles
Forums
Events
Gallery
Everything posted by taaron76
-

'65 Chevelle SS 396 Z-16 (Under Glass 7-July-15)
taaron76 replied to taaron76's topic in WIP: Model Cars
The doors and trunk and cut out and hinged. Now I gotta work on how I'm going to mount the door panels. Trying to figure out if I should mount them and fill the voids with styrene and then paint, or paint everything and then join them after paint. I worked a little on the mockup stance with the wheels I'm going to use. The front is as low as I can get it before I started digging into the fender wells in the engine bay. The wheels in the back are a little bigger, but I think this stance will work. Here is the stance with the doors and trunk open. I'm excited to plugging away on this one. I'm hoping to get some paint on it by this weekend. -
A pair of 66 Novas- small update for now on the wagon
taaron76 replied to microwheel's topic in WIP: Model Cars
My notepad is out, Jim. Tim -
'65 Chevelle SS 396 Z-16 (Under Glass 7-July-15)
taaron76 replied to taaron76's topic in WIP: Model Cars
Jim - I hadn't really thought about it, but maybe I'll see how this one comes out and go from there. Kinda crawling before I start walking. Lol. That is a good idea, though, and worth pondering. I was able to get the drivers side cut and hinged tonight, but no time for pics. I'll post some tomorrow for sure. I had a late night MRI scheduled at Walter Reed Military Hospital and just got back. Blasted migraines and headaches! I tell the Doc that the cure is more car modeling... He doesn't seem to think so. It was worth a shot... Tim -
Awesome! You'll love acrylics when you are done. Tim
-
Looking good, Joe! Nice progress and update pics. What color is this going to be? Tim
-
Amazing! Tim
-
Nice work, Paul. Well done!!! Tim
-
'65 Chevelle SS 396 Z-16 (Under Glass 7-July-15)
taaron76 replied to taaron76's topic in WIP: Model Cars
Well, I wish hinging the doors was a lot easier than it looks. Cutting the door out was cake, just time consuming. Making the hinge the correct size so it didn't interfere with the rest of the interior and making sure door opened and was level, was another story. Practice makes perfect, hopefully! lol I ordered some hobby magnets to mount and conceal them in the doors and trunk to keep them closed. I'm using 18 gauge aluminum wire, which makes it strong enough to withhold normal opening and closing, but easy enough to bend and adjust, if needed. Tim Here is the passenger side door panels and doors carved out and hinged. Once everything dries good, I will make the door jambs. Just another shot to show a functioning, level door. There is piece of tape to keep the door closed. I'll crimp the tubing a little more to give it a little bit of friction and make it a little less easy to open. Typical hinges... -
'65 Chevelle SS 396 Z-16 (Under Glass 7-July-15)
taaron76 replied to taaron76's topic in WIP: Model Cars
Thanks guys! Joe, Jim - I look forward to your update every day. You guys do amazing work!!! Jim - working on the passenger side door as we speak. This one is getting the full detail. Lol Tim -
'65 Chevelle SS 396 Z-16 (Under Glass 7-July-15)
taaron76 replied to taaron76's topic in WIP: Model Cars
Thanks guys! Yep, same level of detail like I did on the '67... just a little more in depth. Should be fun! Tim -
Since the '67 Chevelle is now Under Glass and ready for the car show this weekend, I figured I'd get started on the '65 tonight. This will be my first attempt at cutting the doors and trunk out, so I figure its gonna take me a little longer than usual. I'll also be using flocking material for the first time as well. I spent about 30 minutes tonight cutting on the trunk and then another 30 making the hinges and mounting them up. I have to order some magnets to mount and see the trunk/doors. This one will be fun! Exterior: Metallic Black Interior: Dark Gray/Light Gray Combo Wheels: Custom Here is what I got done tonight. Thanks for looking! Tim
-
Thanks guys! I appreciate all of the great comments. Tim
-
I'll probably see what the chrome rocker molding looks like. Thanks! Where at in Europe are you? Tim
-
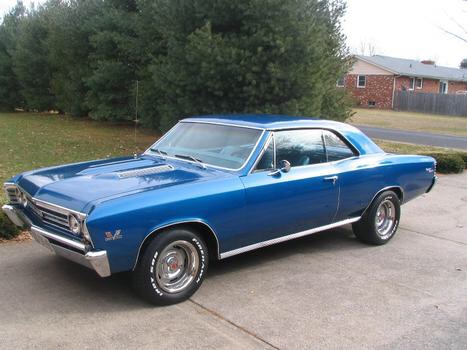
Here is a blue '67 with the chrome rockers and without fender trim. Another one with both.

-
Michael, There is a chrome molding piece that covers the rockers, but I believe they also had chrome molding around the fender edges as well. I could still add them and BMF the fenders, but don't want it to be too cluttered. Decisions... Tim
-
A couple of daylight/sunshine pics to bring the metallic out a little. Tim I still haven't decided if I should put the chrome pieces on the rockers below the doors. Thoughts? Tim
-
Those wheels and tires came out great, Joe! Tim
-
Thanks everyone! As far as the firewall/engine bay and radiator support... I typically paint them the same color as the body, vice semi-gloss black. It's just a personal preference of mine that I think makes it look a little better. Thanks again for all your comments and compliments! Tim
-
Thanks guys! A few wires makes a huge difference. This one was a fun build. Tim
-
'67 Chevelle SS 396 (Under Glass ***3-May-2015***)
taaron76 replied to taaron76's topic in WIP: Model Cars
Posted the finish product in "Under Glass". Thanks for looking! Tim -
The top of the radiator is hitting the hood, so I'll pull it out tomorrow and fix it so it sits flat... didn't notice until I put the hood on. Tim
-
'67 Chevelle SS 396 (Under Glass ***3-May-2015***)
taaron76 replied to taaron76's topic in WIP: Model Cars
Thanks everyone! I got the radiator installed and put the overflow waterline in as well as the windshield wiper reservoir line. The engine bay area is complete. I've got the bumpers detailed and ready to get installed... after that, just the rearview mirror and this one will be a wrap. This one was my longest and most detailed build to date. Not bad after getting back into 6 months ago after a 20 year absence. lol I'll post some pics up tonight, I hope. Tim -
What kind of base coat did you use? I've sprayed acrylic over just about everything. Tim
-
'67 Chevelle SS 396 (Under Glass ***3-May-2015***)
taaron76 replied to taaron76's topic in WIP: Model Cars
Thanks a lot, guys! I test fit the rear bumper last night and its not marrying up like it should. I'll have to take a pic to show you guys... Frustrating when you get down to the last stretch and something doesn't fit the way it should. Hopefully I can fix it. Tim -
'67 Chevelle SS 396 (Under Glass ***3-May-2015***)
taaron76 replied to taaron76's topic in WIP: Model Cars
I was able to get the interior and body mounted on the chassis. I still have to detail a few parts and the bumpers, etc... This build has been a great stepping stone for me with a bunch of great tips from everyone. Thanks! I was too lazy tonight to use the DSLR, so these are from my iPhone 6 Plus, which takes really good pics without any editing the brightness or contrast. Tim