ferrari87
-
Posts
235 -
Joined
-
Last visited
Content Type
Profiles
Forums
Events
Gallery
Everything posted by ferrari87
-
Thanks! I don't remember the RX-7 from GT, I was obsessed with the 3000GT and Skyline in that game.
-
John, here are a few videos to help out: prep, paint, wetsanding Just as a helpful tip, two coats should not have the coverage that you have right now. After two coats, you should still see some primer. As for your issue on the roof, look into buying Novus 1 and 2. Among many other products, that system will help you buff out scratches from sanding. I don't know how your model looks now but i'm sure it something you can live with. You have to start somewhere
-
Prep your model first. When you pull it out of the box inspect it for nicks, scratches, and flash. Then wash the car in a large tupperware container with Dawn dish soap. This will rid the car of 1. the oils used to release the body from the mold. 2. the oils from our own hands. Then rinse the car off and using a light grit sandpaper, wet-sand the body until the "shine" on the plastic is gone. That will give the primer a "tooth" to adhere to. A toothbrush helps get into the panel lines. Use an old spray can, they are usually a good diameter to fit inside the car body. Use doubled over tape on the lid to hold the car onto the spray can lid. Personally, I spray the underside of the car first (the part of the car that would sit on a flat surface, the underside of the bumper, the underside of the rocker panels). I don't think there's anything you can do for orange peel in a metallic paint. Someone way more experienced than I will have to walk you through that process.
-
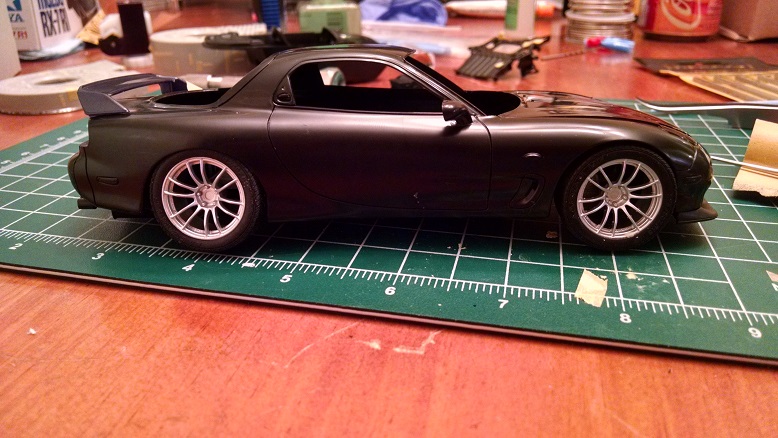
ok guys, big update! I painted the body, wing, wheels, and underbody and applied the carbon decals! The rims didn't turn out on camera well, but they are as planned, painted gunmetal by model master
-
I've primed the body, wing, hood, and rims. Tomorrow is finally a day off for me so I'll be painting the body and wing TS-51 (Racing Blue), the hood and part of the wing flat black (in anticipation for carbon fiber decals), and the rims modelmaster metalizer gunmetal. While those bits dry, the interior and engine bits will get their coating of primer.
-
if it goes fast enough, i think it'll take off! That looks so cool!!
-
Thanks! I appreciate the support! I've been working hard on this to create a nice RX-7.
-
Thanks Jonathan! It's been a lot of fun building this one. It helps recover from the meltdown (literally) of my DBS kit.
-
Thank you! I will eventually be doing an inside, I'm slowly building up idea's for that. Thank you Rich and Eric! I'm hoping to finish her up at the beginning of next week.
-

garage diorama fully detailed and fully scratch build ...
ferrari87 replied to crazyrichard's topic in WIP: Dioramas
This looks phenomenal Richard! I'm in awe! -
Well, I'll go through photobucket since the file size limit for some reason is 45kb (cue Ben Stiller: "Is this a post for ants!?) For those of us who don't want to look at a tiny dot of a picture, here's my way of saying bigger is better: And a few of the "normal" sized pictures...
-
Hey guys! Over the past month I've made substantial progress. It took a very long time to make the brick walls and then paint them! Many nights were spent watching TV and painting bricks. Then there was the decorative concrete base at the walls, the door, and waiting for the signs to come in. I was disappointed one day to find that the base and the long wall had -for some reason- warped. So I had to spend some time working the base back straight. So, here is she about 90% complete. I still have to finish the concrete base, add a wash to the door,add grass to the border of the long wall, and generally touch the whole project up. Apparently the file size is 45kb now, so standby for photobucket pics..
-
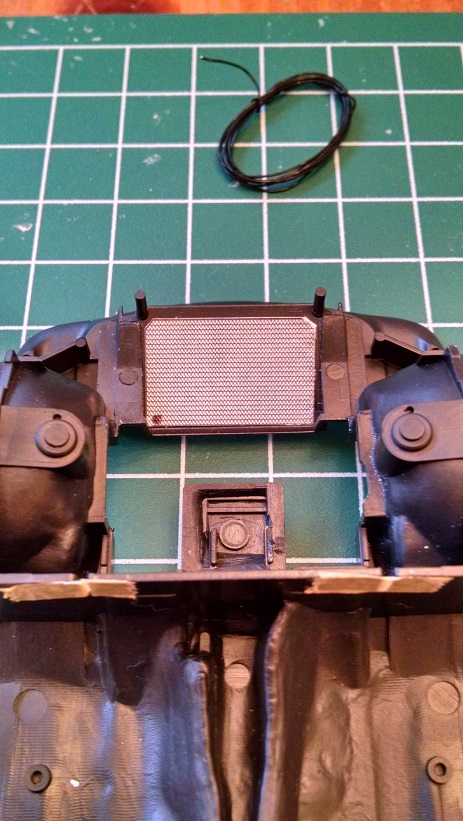
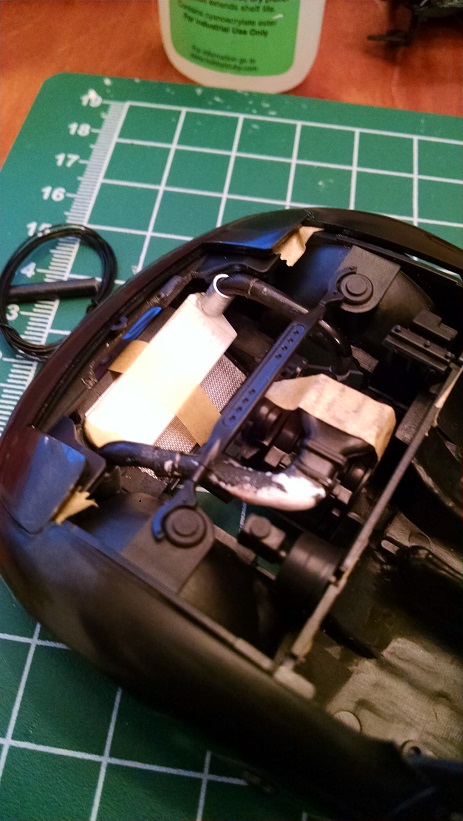
Hey gents. Pretty big update here as it's been awhile since I've posted anything. I've been working a lot lately as well as splitting my build time between this and a diorama. I've managed to complete the rear shocks and springs using black wire. I've also completed the engine. I could keep tinkering around but in my experience, the more I tinker the more I screw things up. So, i've leaving well enough alone. I also drilled holes in the ABS unit and brake booster for lines later in the build. I also used my Dremel to grind down the offending parts of the Fujimi Gram Light rims. Next up is a dunk in bleach to get rid of the chrome and then I need to build the "male" connector for them. Other than B-pillars for seat belts, the build is done. I can start priming and then painting in TS-51 "Racing Blue" Adding a PE radiator under the intercooler... engine:

-
Thank you good sir. Now I can start looking into how the lines are run
-
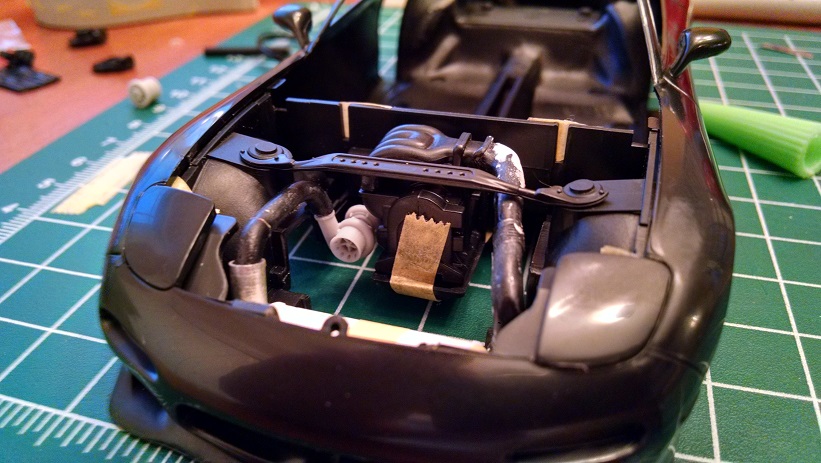
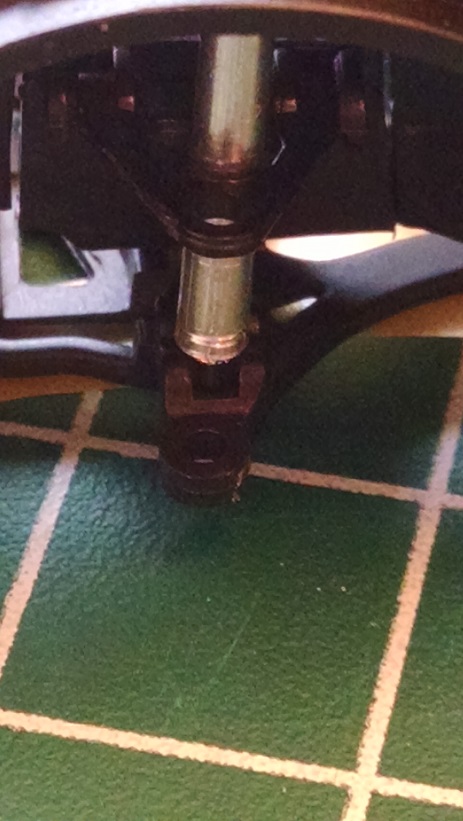
Thanks guys! Initially, I pulled this off the shelf looking to build it straight out of the box. No frills, just primer, paint, then assemble. However, just paging through the directions and browsing through photos online, I just couldn't help but take the opportunity to give this RX-7 an overhaul after several ideas started floating around in my head. As I build, I get further away from the memory of the Great DBS Letdown and more excited to see this through. I'll be honest, after the DBS basically melted in my hands I didn't even want to take the parts off their painting sticks. So some idea's for the build: The shocks will be painted green to model TEIN products. Sway bars will be painted blue to model CUSCO products. The interior needs some serious help. The doors are completely void of any detail what-so-ever, so I'll have to do some work there. Seatbelts will need to be made and flocking applied to the floor. Lines will be run from the master cylinder and brake booster to each caliper. Speaking of which, I need help guys. Can you please help identify #2 in this picture. I know #1 is the brake booster and master cylinder but I do not know what #2 is.
-
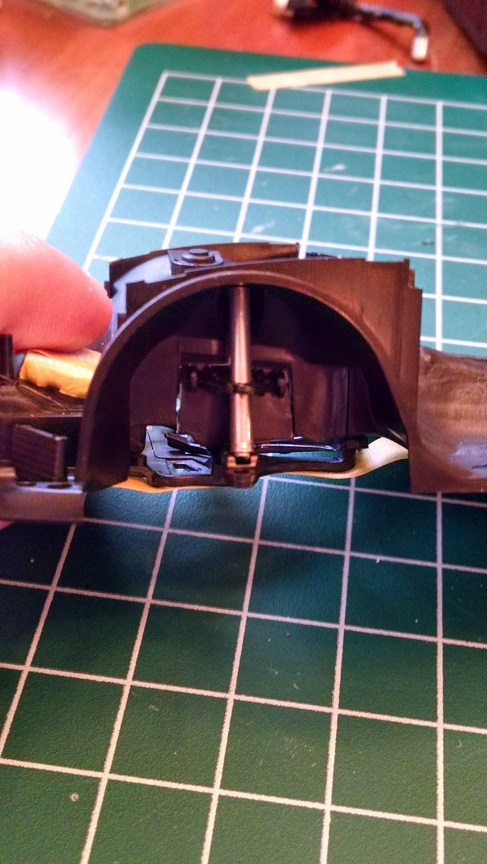
Thanks Fabrizio! Small update for today. I only tested out some potential shocks. Using aluminum tubing, I just made a rough estimate of the length needed. I haven't added the springs yet. This was just a "can I do this" idea. Seems legit to me.
-
Well you are just hammering out vettes arent you?
-
Thanks guys. The amount of modifying makes me feel like I'm working on a tank again. They were never right. I almost forgot what tamiya white and basic putty smelled like and how to debond my fingers from each other. I am going to incorporate many themes seen over the years in the import scene. With the exception of the wild body kit and BLAH_BLAH_BLAH_BLAH. I love the slightly modified stock look. I wont be lowering the car *I dont think* because of the RX-7's design. Relocating the front A-arms would be quite difficult. It may be possible to modify the steering knuckles but I havent got that far.
-
Evening gents. I'm coming back after my big DBS let down with a build heavy WIP, Tamiya's RX-7 R1. I've ditched the BLAH_BLAH_BLAH_BLAH stock turbos that where molded onto the oil pan, cut out the stock air box, battery, and intercooler for a custom setup. For one, I'm using a Hobby Design turbo to run a single turbo setup rather than the stock sequential setup. I pilfered an intercooler from my R-34 kit and a rear spoiler from my R-32 kit for a few more custom touches, as well as Aoshima 18 inch Gram Lights 57 Xtreme's instead of the stock wheels. Gram Lights: A few engine shots: a little work on the exaust. The down pipe is custom made from sprue I heated up and bent to shape. It will mate up almost exactly with the turbo in the engine bay. I also used an exhaust from an aftermarket kit. It will have a slanted appearance that seems to be common now-a-days on STI's. It still needs work obviously... and the rear wing: All parts still need some serious cleaning up. Seam lines need to be gotten rid of and many of the custom parts need to be fully sanded and formed. I'm still in the mock up phase but for the actual engine, I'm getting ready to transition into the next step which will be running plug wires, oil lines, brake lines from the master cylinder and smaller details like a blow off valve and oil filter. The body will be painted telefonica blue (TS-51). The hood will be carbon fiber along with the front and rear spoiler. The rims will be model master metalizer gunmetal.
-
Thanks guys! On Monday or after the new year I'm going to contact Tamiya USA and see if I can get a replacement body and the other pieces. If not, I will camp on Ebay for a cheap kit. I'm going to restart this thread when I get a new body in. Until then, I've decided to start my RX-7 R1 build, so I'm going from a kit made in this decade, to one made when I was 6.
-
I'm going to contact Tamiya USA and see about getting a new body, hood, and front bumper as well as the piece that goes into the rear end to finish the duck tail spoiler. All else fails, one day I'll buy a new DBS kit but for now, this bleeping kit is going into baggies and stuck on a friggin shelf. In retrospect, I probably could have sanded the area and repainted. The ENTIRE paint job was not screwed but i did not want flawed paint in any way. I also should have just stuck with DOT 3 or 4. I have a bunch of other kits in waiting, first up is an R-34 VSPEC II that I plan on putting an engine into from a donor R-32 kit.
-
That is awesome. Thank you very much for the info!
-
Well, that's all she wrote folks. I stripped the body clean and at first, it was going very very well. However, something happened to the stripper. It started to gum up. I tried washing it off, no luck. I tried using mineral spirits, that seemed to make it worse. It went down from there. The passenger side A pillar snapped and finally, the whole model became soft and springy. DO NOT USE CITRISTRIP! DO NOT USE CITRISTRIP! It doesn't play well with plastic. I have to find a new body, front bumper, and hood. I don't know if I feel like buying a whole new kit, as that's A. a waste of several parts and B. dang near a waste of money. I don't know what I want to do and this model has done nothing but fight me the entire flipping time. For now, I'm taking a break. Thanks to you that followed along and to those fellow DBS enthusiasts, I apologize for screwing up such a gorgeous car.
-
I stuck it back into the iso alcohol bath with the body to soak for another 9 hours while I am at work. When I get home I will get at the last little bit of primer and see what i can get off the body. I did discover this morning that glue holding the front bumper on had failed and the bumper is now off. I am also going to take an old sprue and let it soak in the Citristrip for an hour to see what happens tonight. Hopefully, it isnt a melted goop of plastic and stripper.
-
Tamiya LaFerrari, Revell 599 GTO, AMT '67 GT350.