ferrari87
-
Posts
235 -
Joined
-
Last visited
Content Type
Profiles
Forums
Events
Gallery
Everything posted by ferrari87
-
No damage to the plastic. No bubbling, pitting, or warping. The hood does feel a little more flexible maybe? I don't know the science behind plastic and such but I didn't really handle the hood a ton before and I also didn't test the flexibility of the hood, so I can't say with any certainty that its a little more flexible. I have heard that Dot 3 and 4 can cause the plastic to be a little more flexible so perhaps it's unavoidable. Oh, I spelled it wrong, it's Citristrip.
-
MERRY CHRISTMAS! ok guys, here's the hood. It's not done quite yet. I have some more stripping and sanding to do. The little bit of white towards the windshield side of the hood is primer. So far this Citrustrip has done a great job. the body is still soaking in a solution of water and 91% iso alcohol. I'll let it soak until Thursday and see what happens then. See you guys soon and enjoy Christmas! Look forward to seeing what kits ya'll get!

-
Ok guys, first bit of good news. I have stripped the hood of almost all paint and primer. I still have some work to do on it but I went to Lowes and got "Citrustrip." It read the same as Ready Strip and is probably the exact same thing except it smells like orange-glo. That is, it has a nasty orange smell to it. The bottle says "pleasant", I say noxious. Anyway, I let the paste sit for no more than 5 mins as I wanted to ensure the stripper did not have much time to get at the plastic. Almost on contact, the stripper turned red from the paint so my initial feeling was this stuff was "hot". I will post a few pics up tonight, after I finish the hood. Im planning on sanding it out a bit more from 800 on up to 3200, wet and dry. So far, this stuff works and works well!
-
Well about 24 hours in 91% iso alcohol has taken the paint off of the hood rather well. There's still some primer on the hood so it went back in to soak. The body, oh lord. I put it in last night after buying more alcohol to actually cover the model (I also used one of the wife's casserole dishes, ha!) and even then, needed to add a little water. The paint has bubbled in places and it comes off with a plastic scraper, but its not "easy." I've seen various techniques, various products from Brake Fluid, 91% iso alcohol, Simple Green, Castrol Super Clean, and there's one that I like. It's called Ready Strip and worked in minutes. here's a video For now the car will continue to soak in 91% until I can get my hands on some of the Ready Strip, maybe the alcohol can loosen up the easy stuff and then the Ready Strip can rid the car of the stubborn paint. Fingers crossed.
-
No no not at all. I was the one being sarcastic. I had no idea about the static electricity and i was half serious about grounding myself, I've been shocking myself on light switches and all sorts of things around the house.
-
10-4 sir. I will hook myself up to a grounding cable. She's really been giving me a hard time. I think it would be very easy to pack it up but I really love the DBS and I've wanted to complete one for a long time. I wasn't sure about it being my second car. I really want to do this car well so I won't accept a even slightly flawed paint job.
-
Well, I have had a lot of static electricty around the house the past couple days. I don't touch the model, only the stand its on. I think a lot of my issues came from my final wet coat. I know there were no issues in the paint prior to my final coat and I just went heavy on it. I have the hood soaking in iso alcohol now and when I get home from work tonight I will check it out. I figured I'd respray both the hood and the body. I think the color is phenomenal. I was expecting it to be a little flatter, but man it glossed up well! My phone does not capture its true beauty.
-
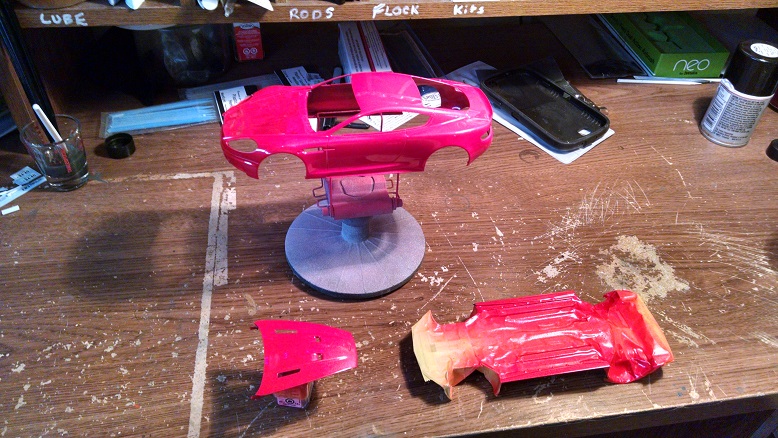
I tried wet sanding the issues out and it isn't working out. First, the bubbles had no paint behind them, so they have basically cratered. So in the center of the crater I have the white primer. I know sanding these out won't work on the back end when i paint as I will still have issues with the crater not having the same depth as the paint around it. So, I'm going to strip the body tonight with 91% iso alcohol and try this all again. This time, I'm decanting the paint and using my airbrush. That way, I have the best control of the paint.
-
I have one now. I debated on decanting the paint but figured I'd give a rattle can a shot this time. First impression, i'm not a fan.
-

half a dozen 69 camaro's *new pic's 3-8* all 6 complete!
ferrari87 replied to tbill's topic in WIP: Model Cars
Ain't that the truth! -
I'm just going to sand it out. Overall, the paint (to me) looks spectacular. I'm used to painting tanks, so I'm not used to achieving a factory finish. "perfect" in armor was banged up. Now I just have to learn how to wet sand. As I've seen Donn Yost mention before, painting is a technique that must be practiced until it is second nature. I washed the body days before primer and even then, I painted today about a week after laying the primer. The only thing I could think of is somehow water got on the car, most likely from the can as I may have placed it into warm water between coats. I will have to remember to keep contaminants out of the work area in the future. I think so too, the PE grille will look better. It's slightly misaligned on the passenger side, about halfway down. It was a devil to keep aligned during the build but went together surprisingly easy. I'm starting to really love the PE add ons. I remember some of the items for my tanks just driving me absolutely bonkers.
-
I did mine today as well! Looking forward to your R8! I also used to live in PA, I was born in Wilkes-Barre. Gotta say, I prefer Tennessee. It was 50 today
-
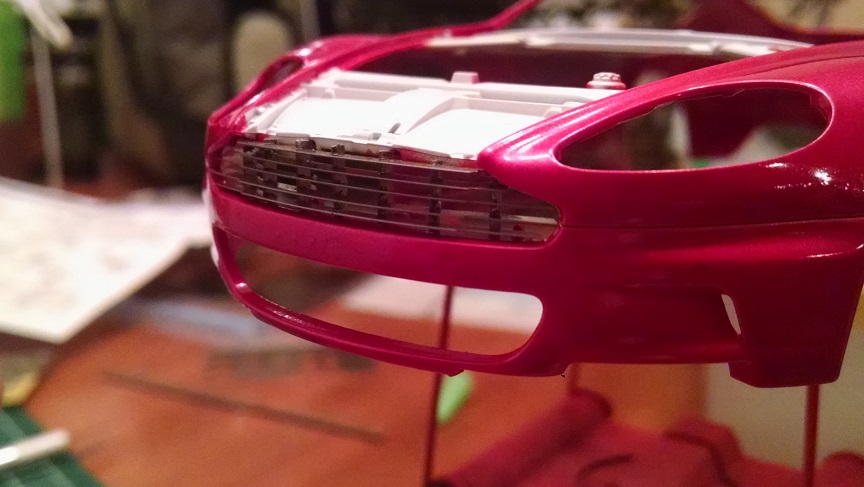
I also built the front grille. I do not know if I like it as the stock one once dechromed I think fits better, but is obviously too thick to be in proper scale. here are the grilles inserted into the car for comparison: and finally, gloss black rims: I would like to know which grille you guys think is best. I'd like to use the P.E. grille but I don't know how good it really looks. It will be painted flat black. Look forward to hearing any support, constructive (or non-constructive) criticisms welcome. Advice and tips are much appreciated!
-
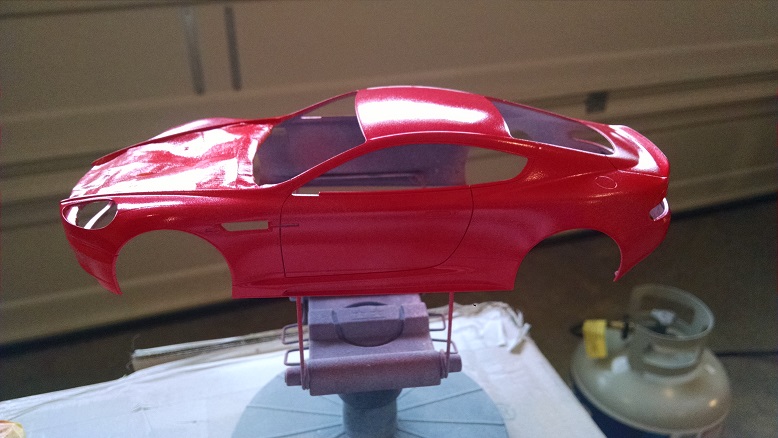
Ok folks, big updates here for you guys: Here are a few ok pics of the paint. I love the paint color, and I love how shiny it is right out of the can. However, I don't like spraying from a can. I can't control the pressure and I feel like a spray can is like a fire hose, it just blasts paint out in a deluge. I wasn't careful enough and there are many areas that need wet sanding tomorrow morning. They are below. From now on, I will be decanting the cans and using the airbrush. here you can see where the paint built up under the door/above the rocker panel, enough to completely cover up the bottom panel line. Here you can see a bubble. I don't know how these happen, so any advice would be much appreciated. and more bubbles... and the one bright spot, the hood. Boy this looks good. You can actually see me taking the picture in the hood. I was suprised how shiny the paint was without any work. I can't wait to see how it turns out.
-
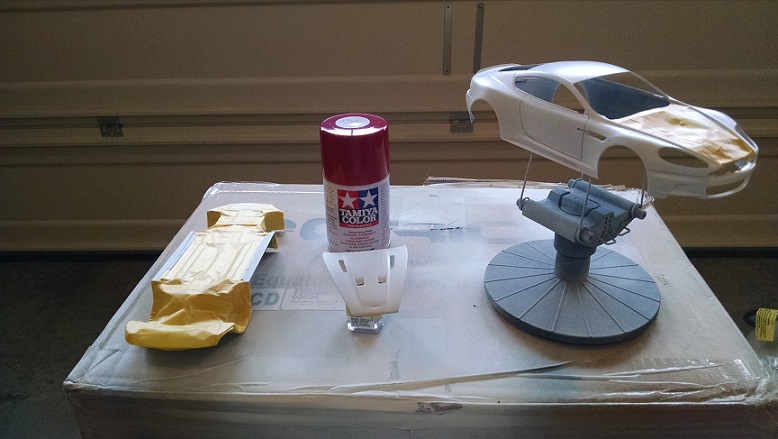
happy Monday gents. First of a big update today! I painted the body, hood, and underbody Mica Red. It's still curing, but final pics will come. These are a few I snapped during painting. Unfortunately, I laid the paint on rather thick. There are several spots that gathered paint, particularly at the bottom of the doors. So much so that the panel line between the rocker panel and the door has almost disappeared. All of those areas that need attention will be wet sanded of course. All in the name of learning I suppose. I'm off to paint the rims gloss black. Stay tuned!
-
Happy weekend gents! An update and a choice for today. First, I've decided on Mica Red for the basecoat and gloss black for the rims. That leads to the update! After utilizing google to .00000000003% of its potential, i found out that bleach and coke can be used as well so I tried coke and i'm sure it works after a few days, but no thanks. So, into the bleach it went. This was just Clorox Household Cleaner bleach. After about 5 minutes, here are the results: I should have some paint laid down tomorrow and some other updates.
-
Way cool!!!! This is awesome!
-
I will do that mustang! I'm going to hit up the store on Monday and start the process of chrome killing while I get the body painted and the first round of chassis colors done. I plan on doing a lot of painting Monday and some last detail bits built this weekend, like brake lines and the two hoses that connect to the throttle bodies.
-
MORE RED!!!! YES!! (no sarcasm..i love red cars.)
-
Well then, I need to make a trip for some oven cleaner!
-
Matt, that orange is gorgeous, it's going to take some time to decide between that and the red! I'm definitely into the idea of stripping the rims of the chrome, I'll have to see how well Coke and oven cleaner work on some of the spare sprue... Chris, Thanks man, I don't mind at all! You guys have helped with the flat spot I found myself in. I'm really looking forward to working on it some more. I'm still really digging the PE rotors, they look phenomenal. All in all, I appreciate the help guys! I'm all for keeping the stress out of the hobby and step aside when things get a little rough. Sometimes it's best to stand back and take a wider look at what it is you are trying to do, rather than focus and stress over a very small piece of the project. Stay tuned folks!
-
THIS!!!!
-
Killer red!
-
Thanks mustang! That's my feeling because the frustration level reached today made me want to put the parts in sandwich baggies and shelve the DBS. However, I can't and won't quit. I feel like the optional rims were what made the Carbon Black stand out from a base DBS and without them, recreating the car to spec wouldn't be right, it would be a Carbon Black with the wrong rims. Instead, this will be my DBS. A blend of both base and Carbon Black and I think I can still do the DBS justice.
-
IMHO, i never bought into this technique in tanks and i dont for cars. Like Steve said, shadows should be created by light, not paint. By painting a shadow, or post shading, you fix the shadow so if the angle at which you are looking at the model changes, so too should the shadows created by a model. In essence, i always felt as if this technique captured a tank in a photograph, you are not modeling a vehicle, rather you are modeling what you 'percieve' and therefore, limit your audience to what you see. The model looks great, I love the dash, but I never thought this worked on tanks and it sure doesnt work on cars. Now preshading, yes there was and is a definite need for that, perhaps even in cars, i have not experimented with it on cars. For tanks and aircraft, absolutely necessary.