

Helper Monkey
-
Posts
109 -
Joined
-
Last visited
Content Type
Profiles
Forums
Events
Gallery
Everything posted by Helper Monkey
-

Cameras
Helper Monkey replied to KeepingTheHobbyAlive1998's topic in Model Building Questions and Answers
Every photographer I knew in school always said that photography is all about lighting. Learn how to light things and you can have awesome pictures. I suggest using a lot of light, the brighter the better. Diffusing the light through something translucent such as frosted mylar or thin cloth will help to cut down on glare and reflective sports. Light the model from the front and from the sides. Never from behind. Its sorta like those old west movies where the hero rides off into the sunset and all you see is silhouette. Same thing will happen with your model. Using a tripod will help with shakiness or blurriness in most cases. High end cameras often have a remote that then you press it it takes the picture. Timers are a great way to get around using a remote if your camera can not use one. Both ideas work on the same principal in that you don't need to push the shutter, where you could shake the camera and cause blurriness from your touch. Keeps the camera rock steady. You can get great photos with your iphone if you use lots of lighting. I have seen tripods or mounts you can use for phones. A neat little trick a lot of people do not know about the iphone. You can take photos with the volume increase or decrease buttons on the side of the phone. What makes this cool is that the head phones that come with the iphone have a volume increase and decrease button built into them. You can set your phone on a tripod or mount and hit the buttons on your headphone and take photos. No shake or accidental nudging while taking the photo. -
Has anyone used gesso as a primer?
Helper Monkey replied to Helper Monkey's topic in Model Building Questions and Answers
I ended up mixing 4 parts white gesso (from Daniel Smith), 1 part Carbon Black Golden High Flow acrylic, 1 part Golden GAC-200 and 2 parts Tamiya X-20A Thinner. I did a test spray on a hood that I washed and sanded with 1600 grit sand paper before hand. The modified Gesso went on really well. I only sprayed a thin layer in order to test it. It sanded well with the 1600 girt paper, but it went down to the plastic really fast. Most likely due to the fact I sprayed such a thin coat. I did not get any flaking, chipping or anything like that however. It did bring out the light scratches on the underside of the hood. I am debating if I am going to resand the entire underside or if I am going to brush on some gesso there and see how it fills scratches.. I waited about a day before I sanded. Since it is acrylic it does have a tendency to shrink and I wanted it to cure before I attempted to sand it. Over all I am impressed. It worked much better than the AK Interactive stuff I tried. I am going to experiment and see how it goes. -
I have a bunch of gesso in my art supplies. I was thinking I could thin it down with Tamiya Thinner, add GAC-200 to promote adhesion to plastic and maybe add a little black to turn it grey. Has anyone ever done this? I have used the AK interactive but I didn't really care for it much. I know gesso is sand-able because I sand between coats when I prime my canvas.
-
I suggest the Eclipse HP-CS. Its the best selling airbrush where I work and the one I typically tell people to buy. If you want to know I work for an art store. Some people do not like the HP-CS because it has a .35mm needle and jet. Which means you have a smaller coverage area. You can however upgrade the Needle, the jet and the housing to a .5mm for a larger area. I tend to stay away from the revolution and neo lines. They are not that great. Along with any trigger as opposed to typical airbrush design. I had a HP-CS and I loved it over my current Badger. My HP-CS got stolen sadly. I also had the Smart Jet compressor. A nice compressor and it turns itself off when you are not using it. However If I were to redo it I would buy the Power Jet Pro.
-
Need some helping using airbrush
Helper Monkey replied to Nowak1981's topic in Model Building Questions and Answers
You will need the I 602-1 for the cap and I 604-1 for the jet. Get them at Chicago Air Brush http://www.chicagoairbrushsupply.com/eclipseparts.html -
Need some helping using airbrush
Helper Monkey replied to Nowak1981's topic in Model Building Questions and Answers
Sounds like the Paint is too heavy for the brush and that its drying before it hits the body. You need to thin out the paint to make it flow with the HP-CS. You may also go and buy a larger needle for the Iwata. I know for a fact that they make a .5mm for it. You will need the needle, the jet and the housing. It should set you back around $40.00 to $50.00. I would also dial up the the PSI on the compressor I run mine between 25 and 30 psi. -
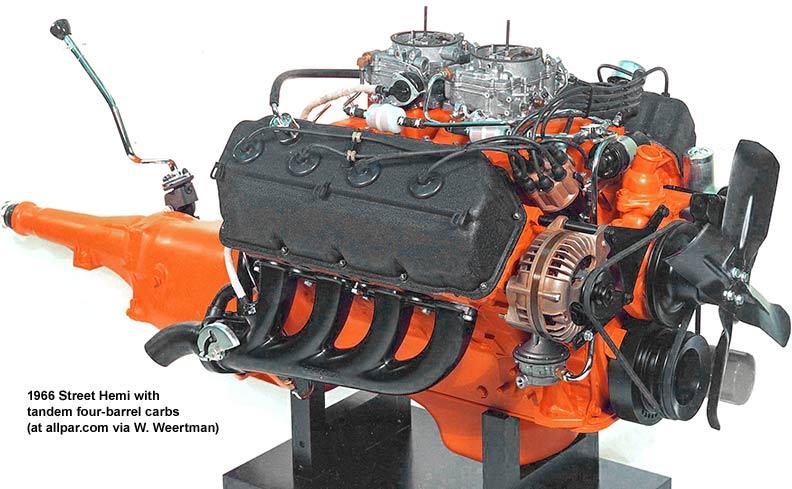
I am just surprised that there is no oil filter and pump on the model. Its kinda disappointing. Now I assume the fuel pump has a line that run from the gas tank and then one to the carbs correct? I look at the photo I posted and I see the fuel pump with a line that goes up the motor and splits to the carbs. but then no other line leaving it. I am assuming that is because the pic is of a free standing motor and not in a car. Again, assuming that hole I can see would be where the lines goes from the pump to the tank.

-
Paasche Talon TG-3F or Iwata HP-CS
Helper Monkey replied to Detailed's topic in Model Building Questions and Answers
I used to have the HP-CS. Key word being had cause it got stolen from my car a few weeks ago. However, I love it. I had bought a new jet, needle and jet housing to upgrade it to a .5mm if need be. I also added on the External MAC Valve and the Pre-Set Adjustable Handle. I always have an extra needle on hand just in case. It is easy to damage them. Any airbrush you get I always recommend that you get a Duel Action and Gravity Feed. Siphon feeds or even side mount feeds have more of a chance to sputter and cause problems. It is also easier to control a Duel action than a single action. -
Airbrush Needels What`s the Best Size
Helper Monkey replied to 69NovaYenko's topic in Model Building Questions and Answers
Most air brushes have an option to switch out the needles and jet/nozzle. I had an Iwata HP-CS which comes with a .35mm needle and jet/nozzle. I also had a .5mm needle and jet/nozzle for it. I use the word Had because someone stole it from my car a few weeks ago. I mostly use the Tamiya acrylics. I find their metallics work better with the .5mm than the .35 cause they clog. I also use Golden's High Flow Acrylics. I find that the pearl colors work pretty well with the .5mm. Everything else for Tamiya and Golden, I run the .35mm because I find that I get too much running, pooling and other problems. This has to do with the size of the pigment. Larger pigments need a larger opening. Finer pigments do well with smaller openings. -
Every car I have owned as been from the 90's. A 93 plymouth sundance, a 95 dodge neon, a 98 dodge neon R/T, a 91 Grand Marquis, and finally a 91 Subaru Legacy. I do not think I worked on anything older than a 87' Trans Am GTA.
-
No I see the oil filter in the picture on the real motor. Its grey. Its not hard to miss. I would have assumed a fuel pump would only be in the fuel tank. Shows what I know. Basically the model kit does not have a oil filter or mounting for it. I do not even see a reference to them on the instructions.
-
Scratch what I said. As I looked more in-depth at the motors. The part I am referring to is not the oil filter. Not entirely sure what it is. I think its some kinds of emissions part, ERG valve or something? It is the part that is located under the alternator. I hate to admit it, I do not know much about these older cars. My expertise was always on things post 1990. Most of the cars I had were after that time. Either way it appears there is no oil filter on this model kit. Has anyone on here ever scratched built the oil filter and mounting? If so, do you have pics I can look at? Other wise I will just have to figure it out and do it myself. I know I saw that all aluminium HEMI being built on here. that is well outside of my skill set.
-
That is what I thought. Does anyone know if there is an updated engine front piece or should I remove where the filter attaches, and attach it to the other side?
-
I have learned a long time ago to do research on which ever kit I am building. Every photo I found online of the hemi had the oil filter on the left/drivers side of the motor. On the kit it appears to be on the right/passenger side. Am I correct in assuming that the model is wrong?
-
Thanks a lot guys. I vaguely remember doing that on my freind's Trans Am GTA like 15 years ago. Just takes a little something to jog that memory lose.
-
It has been so long since I worked on a car with a distributor and a coil that I forgot where the coil sits at. I have a 41 Plymouth and I am going to use the Revell 354 c.i. motor pack in the car. I have a prewired parts by park distributor with coil. I have no idea where to place said coil. Not sure if it mounts to the fender, firewall or the motor. Please help a forgetful person remember. I looked at a bunch of 331 caddy motors pics but I can not make out where the coil rests.
-
Revell '29 kitbash - an RPU - final update 10/30
Helper Monkey replied to Jantrix's topic in WIP: Model Cars
Thanks for letting me know the color. I need to go and get me a can of that. -
The machining skills needed to do this are amazing. by far the most detailed and impressive model I have seen to date.
-
which is a good pearl acrylic?
Helper Monkey replied to Helper Monkey's topic in Model Building Questions and Answers
thanks a lot. I will try the aztek ones. First off I need to get a new airbrush and compressor. I had mine in my car and it got stolen 2 nights ago. -
I was trying to paint the body of my model with Golden's Hi Flow Acrylics. Long story short no matter what I did they just would not turn out. I kept getting fish eyes, running problems or orange peel. Sad thing is that the high flow pearlescent is a great color its just a pain in the butt to use. I was hoping that someone else made a great white pearl color. I have used Tamiya paints and they are great. they airbrush on great. however the only pearl I see is the Titanium Silver (i do own it) and it is too silver for my needs. I need a pearl that is close to white, does not have to be white just close.
-
Sedan Delivery Decals
Helper Monkey replied to Toner283's topic in Model Building Questions and Answers
you may try brandsoftheworld.com. They have a lot of Vector logos. I hear https://inkscape.org/ is a good free vector program. I have not used it. I use Adobe Illustrator. You could use google images too. If you tell me the dimensions I may be able to recreate it for you. I am pretty quick with illustrator. Post an image of what you want or e-mail me at mattpernack@yahoo.com with the image and I will see if i can create a vector of it. that way you can re-size it to any size without any loss of image quality. I am working on a 37 ford panel also. Mine is gonna be a Vernor's delivery truck. -
My question is this. How long / how many coats of paint does it take you guys to paint a body when you air brush. I can not help but think I need to do many very light coats or maybe even passes. How many of you do one color over another and do you have any tips for this. Such as a pearl coat and a transparent color over top? I am using about 35psi and an Iwata Eclipse HP-CS converted to a .5mm from the standard .35mm. I ask because I have to strip down the paint on my 49 merc again. This is the 4th time stripping it. First time I painted the body using only Daler Rowney FW Pearlescent Glatic Blue Liquid Acrylic Ink. A mistake, the paint did not adhere very well and I learned the hard way I need to prep the body first using soap and alcohol. I also learned I needed to prime the body first. My second attempt. I wanted to use acrylics so I got AK Interactive white primer. I mixed it with air brush thinner and some Golden GAC-200 which promotes adhesion to non-porous surfaces. I attempted to paint the Golden's HFA Pearl over it. I got a lot of pooling, rippling and unevenness in the pearl. The primer did not do much better. It got lumps and all sorts of high spots. I learned here, use a good primer, thin down the HFA with extender, add some GAC-200 and add a little flow-releaser. My Third attempt. I used the Tamiya Fine White Primer. This stuff works so much better than the AK ever did. I sprayed the pearl over multiple coats. I got some unevenness so I sanded those areas and resprayed the body. I packed it up and set it in a box and waited a week before I then decided to spray the Golden HFA Transparent Phthalo Blue over top of the pearl. (I am limited to being able to paint only on certain days. I bring all my airbrush equipment to work and set up in the studio where I am allowed to paint and paint there. I am not allowed to paint at home as the other people in my household are afraid of being poisoned.) At this time I noticed I started to get some fish eyeing on the body. I am not sure if it is because of not washing the body between colors, or cause I use 50% alcohol instead of something stronger or if I am trying to spray too much at once.
-
Blah. My plan of painting blue on top of the pearl just failed. I got so many fish eyes on the body. I assume its cause I didn't properly prep it. I think I need to make sure I wash it properly next time. but once again I need to strip it and start over. The only part that came out good were the rear wheel skirts. the color looks amazing. Instead of trying to spray the pearl and then the blue on top I am going to just mix them together and do it that way. It should work just fine. I sprayed a spoon with it. It looked good. I am learning, no more multi layer paint jobs. At least until I learn how to use them properly paint models. Using an air brush for fine art is a whole lot different than painting model bodies. I am in the process of stripping the paint here. Most of the blue is gone. the pearl is being a little stubborn. Good thing my acrylic paint cleaner attacks only the acrylic and not the tamiya fine spray primer underneath. If i had to take it all back to bare plastic I think I would lose my mind. As you can see here the blue is very beatiful. I love the color pity its so hard to paint. Its golden's Iridescent Pearl (fine) with transparent Phthalo Blue (green shade).
-
Does anyone know if there are photo etched versions of the Ford V8 Emblem below?
-
That paint looks amazing. I never thought of mixing dry pigment into paint to get that kind of effect.

.jpg.d620665bc20b53c2e0ad84c7693dbbe6.jpg)
.jpg.2c11307399b46c5a0dc20e1b4c81d79b.jpg)
.JPG.c182e0eac9f9ce2d2695e557ee7ddd49.JPG)
.JPG.226d60a004d66ada75a9e7157a9a92d7.JPG)
