Helper Monkey
-
Posts
109 -
Joined
-
Last visited
Content Type
Profiles
Forums
Events
Gallery
Everything posted by Helper Monkey
-
I just saw this, I was wondering if anyone has tried to use regular artist metal leafing?
-
I would have thought the pigment size would have been too large to go through an airbrush without clogging, even when thinned down. What size airbrush are you using.
-
That interior looks amazing.
-
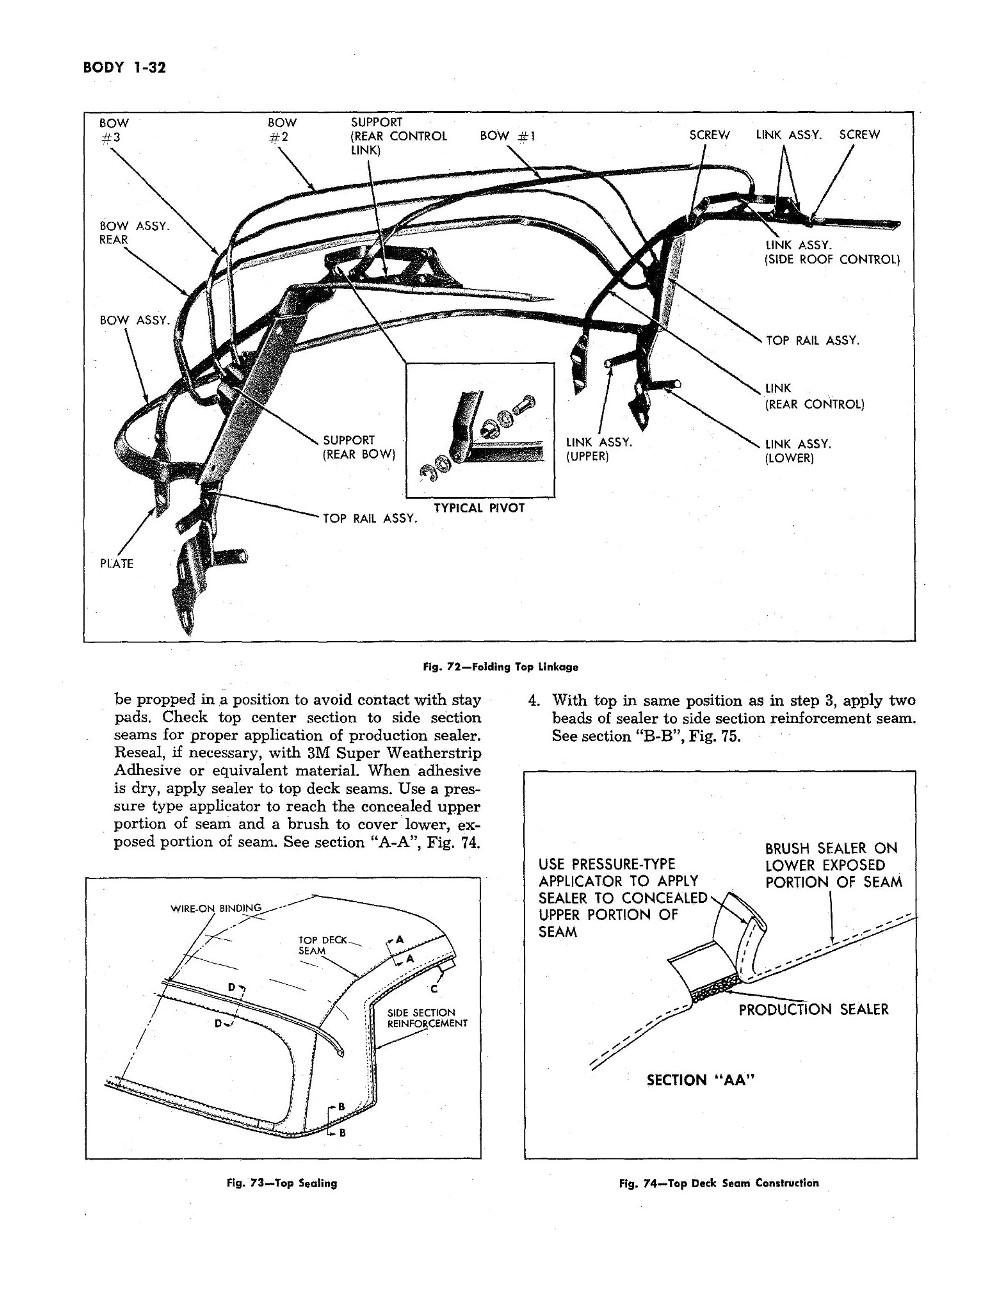
Has anyone built a working convertible top for their project on here in 1/24 or 1/25 scale. I am working on 53 vette and I think it would be awesome it I could build a working top. I found a page from the repair manual that shows the framework and the hinges for it. I could probably fabricate something based on the image below but if someone else already did the work I was hoping they would be nice enough to share it with me.

-
I love Rally. I hope to see more.
-

2013 60th Anniversary Corvette 427 Convertible
Helper Monkey replied to ismaelg's topic in WIP: Model Cars
This looks amazing so far. I can not wait to see more. -
Fine point paint marker?
Helper Monkey replied to Ben's topic in Model Building Questions and Answers
I have been playing around with the idea of empty paint markers. Since I work at an art store I have access to these http://www.molotow.com/products/marker-ink/empty-pump-marker-system/. The smallest offered is 2mm. They have a hard felt tip on them. the kicker is the nibs are removable/replaceable and they have smaller nibs that are available in 1.5mm and 1mm, they can be swapped out. I have used them with both FW Liquid Acrylic Inks and Golden's High flow acrylics with no problems. I am going to fill one up with some Tamiya acrylics and use the 1mm technical nib to see how they work. I assume they would work with enamels too, however I think they would dry up a lot quicker. The pens run about $4 for the empties, while 2 pack of the nibs was about $3. I had to buy the nibs from someplace else. I got them from http://artprimo.com/catalog/markers-empty-markers-c-28_76.html. -
Problems with Tamiya primer and color.
Helper Monkey replied to Zoom's topic in Model Building Questions and Answers
Looks to me that you need to a bunch of light coats. I have learned and I am sure it is the same for everyone else one here that you can not expect to do light colors in one coat only, especially over a darker color. When you try to do too much at once you get pooling and uneven paint. Of course there is always the issue of which pigment is being used in the paint. Sadly most model paints never tell you the pigment they use. PW6 is the pigment code for Titanium white. The most opaque white on the market that is not PW1 which is lead / flake / cremitz white. There are very few reputable companies that use lead white as it is considered poisonous. I tend to see it used in artist brand oil paints as lead speeds up drying time. However if they are using PW4 which is Zinc/Chinese white. Zinc white is known to be transparent, so it will take a lot of coats. -
I just love that color of paint. So vivid. I like the idea of using another green for the interior with the brown highlights. It just screams 70's with that avocado and brown color. Great choices.
-
good thing I did not attempt it yet. Hot water, Check! Sad thing is however I discovered that I will need to cut the sway bar in the middle, take out 1-2mm to shorten it as it is too long. Of course, the ends are the problem area I was worried about breaking accidentally while trying to bend them.
-
Ok. Thanks a lot guys. I really appreciate it. I just need to find an easy way to heat it up. Maybe a few quick passes with a cigarette lighter while not getting too close.
-
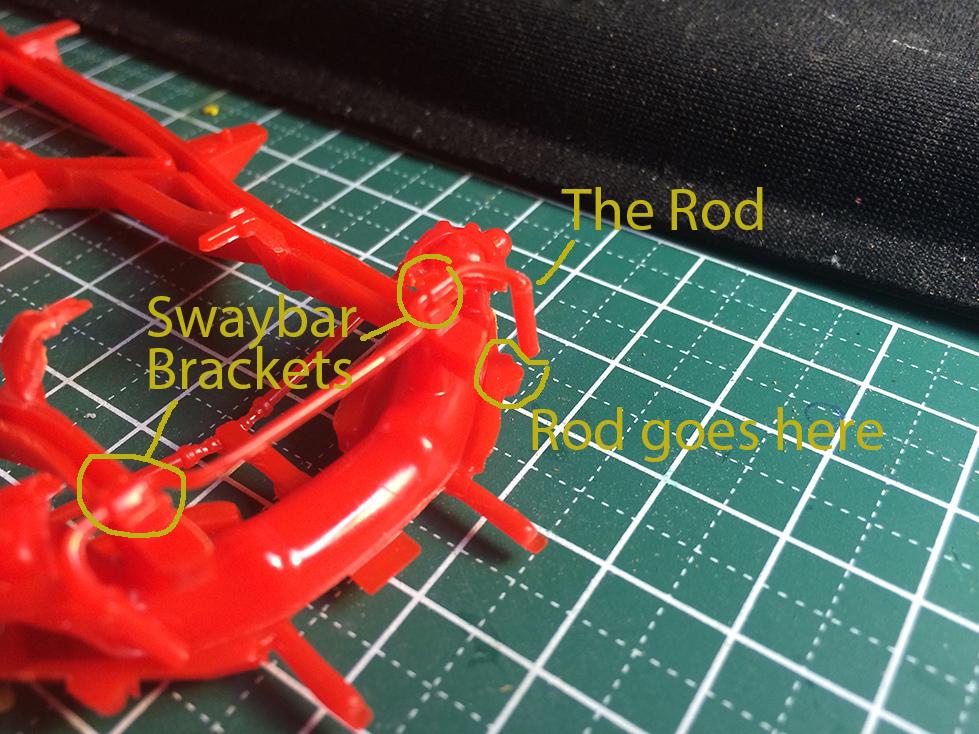
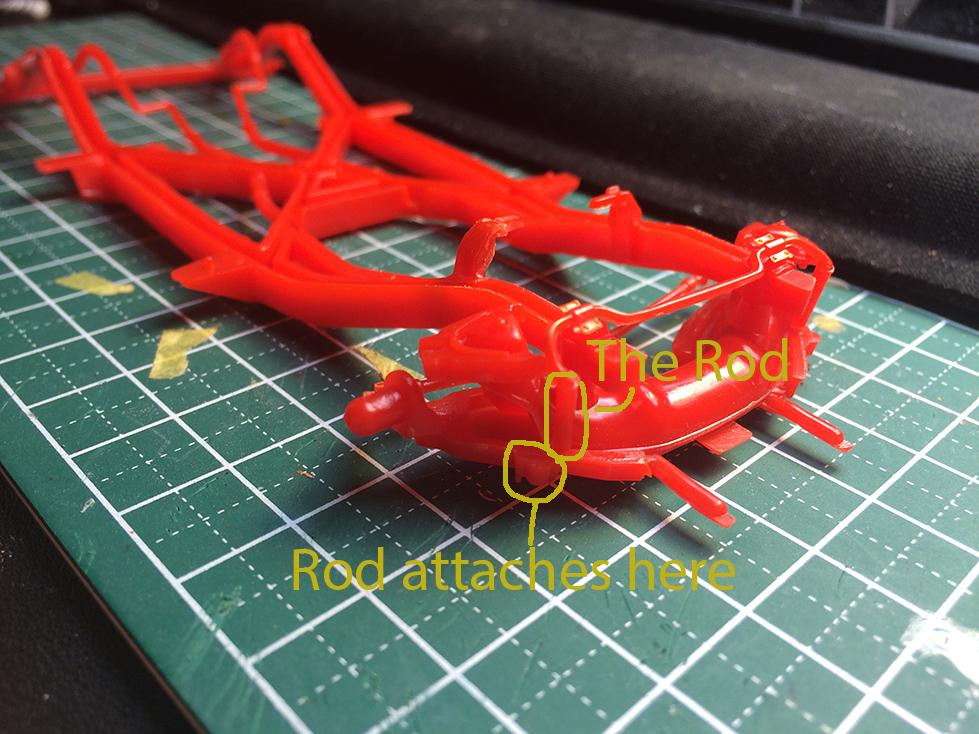
I am working in an older kit a 1/24th scale 53 corvette. the box says its from 1991. Not that this may matter. I am putting together the front suspension and the Front sway bay they supplied me with is horribly warped. I would like to know the best way to bend the bar into shape. My plan was to glue the sway bar down at the brackets, let it dry and then glue the 2 bars down to the cross member or whatever it is called. The pic does not illustrate how bad the warping is but you get an idea. The next two Illustrate how it should attach. The rod attaching points are flat with no holes in them. I can see now it would be a pain to do this even if the part was not warped. They provided no holes or anything for the sway bar ends to mount into. I have not yet glued this down I am worried I might break the part. If you guys need more info let me know.
-
Very nice. I have always like Mine's, they make such nice tuners. Not over the top and everything is functional. You an excellent job on this one.
-
I like that you did an olds. I do not see many of those around.
-
I love that paint. I bet that old bottle of paint is awesome.
-
This is cool. I love the wood grain. You did a great job on that.
-
They always say "You are your own worse critic"
-
I did not think anyone would like them that much. thanks for the feedback.
-
First off I want to state this is the first model I have done since I was a Kid. Back then I basically painted and stuck them together. This time I wanted to put a little more detail into one. I have been working on this one for close to 3 weeks if not a month. Mostly just experimenting with my airbrush and paints. I am currently using mostly tamiya paints. However since I work at an art store and get an awesome discount I am also going to try the New Golden High Flow acrylics (mostly on the body). This is the kit i am working on. I have a lot of it put together already. I sadly did not do a whole lot of detailing on the motor. I am already learning a whole lot on what to do for my next model. I decided to try lots of techniques to see which ones suit me. Here I was trying flocking. I discovered that I liked it a lot. Next time I will make sure that when I add flocking, it will be the same color or near the same color as the paint underneath. I used white flocking on blue paint and it made the mats seems kinda dull. I may try to get some blue flocking in the future and redo the mats. As you can see below I have started to paint the body but I had a few flaws in the paint so I had to sand down those areas so I can reblast them with my airbrush. I am using The High Flow Iridescent (fine) thinned with a little High Flow airbrush extender. Once I finish the touch ups here I am gonna blast the whole thing with High Flow Transparent Phthalo Blue (green shade). I am hoping the pearl will show thru and give a nice rich deep color. We will see when I finish it. Things I have learned this build but many of you more than likely know. 1) Make sure to sand everything to get rid of injection points. (there are a few places I did not do this at. Especially on the floor boards as they showed through even through the flocking. 2) Flocking is Awesome! Just make sure to use one that is close to the color of the paint under it. 3) Sand the primer too. I had too many uneven spots that showed up when I painted the pearl on. 4) Clean the parts with a good soap and kitchen scrubbie. and then clean them again with rubbing alcohol and do not touch them afterwards. (I found this out the hard way when my masking tape peeled off some of my paint. 5) Mix Golden's GAC-200 into my acrylics and my primer to promote adhesion. 6) Next time, spray the base boards and such the same color as the body. It will make it easier for the under carriage, firewall and the engine bay to stand out from the engine. Despite all the little problems I had a lot of fun building this. I went slow and took my time despite my wanting to finish it as fast as possible.
-
I also agree with this. Its my go to black. I find the Tamiya colors spray on nice and smooth. I am however about to start a new kit here soon and I am going paint it all with Golden's new High Flow colors. (With the exception of using AK Interactive's White Primer) Golden's Carbon black is pretty shiny. I will have to see what I can do to it to matte it down. Maybe some of the Airbrush Medium. The bottle says its more matte than shiny as opposed to the airbrush thinner.
-
How do you touch up chrome parts?
Helper Monkey replied to Helper Monkey's topic in Model Building Questions and Answers
That van looks good. I like all the little details on it like the Hawaiian Seat cover and the emissions stickers. I have not considered this. I assumed there was not enough surface area for it. -
I was curious how people touch up the chrome parts on their kits. I have been using Rust-oleum Chrome metallic finish, It is not that metallic. I have heard of getting parts re-chromed, but from what I understand you need to ship them out and have a place do it. Time consuming and plus it sounds expensive. I have also heard of the Alclad method where you paint everything glossy black and then use their chrome over it to make it look like chrome. The guy at the local model shop here suggested the AK Interactive Xtreme Metal Chrome Metallic Paint. From what I have read its just like the alclad. Even if I were to do something like the alcald, would I have to remove the old chrome first? If so how would I do that? Mostly I just want to touch up the areas from where I have to cut them off from the tree.
-
The white was cured, I sprayed it about 2 or 3 days before the blue and the primer was about 1 week before that. Like I said it blamed it on poor prep work. I will probably also sand it with a fine grit like a 800, to rough it up a bit. I was thinking of using some Golden GAC-200 which is suppose to increase film harness and promote adhesion to non-porous surfaces. ********************************************************************************************************************* I ended up testing the acrylic cleaner full strength on part of a parts tree to see if it would melt the plastic. 6 hours later the plastic was fine and it did not feel as if the cleaner softened the plastic at all. I then added a bunch to the bottom of a container and diluted it with some water. I stuck the parts in and let them sit for a few hours. When I removed the parts, I discovered that the blue was peeling away. You can see it in the photo below. I then took a very stiff hogs hair stencil brush and scrubbed the parts under warm water. The primer and the Tamiya both came right off with minimal effort. Now the plastic did stain a little blue in a few places but that is because the blue paint was a phthalo blue and all phthalo pigments have a high staining rating. One reason they are such great pigments. They have a high tinting strength. I am now going to sand them a little bit with a fine sand paper, re-prime them using my AK Interactive primer and add a little GAC-200 to it. then Blast it again with the Tamiya flat white. I think I may mix a few drops of the GAC-200 into the tamiya too. Once it finally cures I will tape it again and paint the blue. I will post the results When I Finish the paint.
-
Elmer's clear school glue question
Helper Monkey replied to VW93's topic in Model Building Questions and Answers
I personally use PVA from Lineco. It dries clear and very flexible. The reason I use it is because i have a giant 32oz bottle of the stuff that I use for book binding and I paint using acrylics instead of enamels so it sticks to acrylics pretty good. -
I have an interior door panel that I have painted. I used my airbrush to prime with AK Interactive white acrylic primer thinned down with a little Golden Air Brush Medium. I then coated it with Tamiya flat white acrylic and finished off with Golden Phthao blue Green Shade. When I went to remove the Tamiya masking tape it removed a layer of the white paint. I am going to attribute the problem to the fact that I probably did not wash the model properly beforehand. I believed I may have used a 50% rubbing alcohol but from what I have read on the boards I should have used Dawn or something stronger to prep it and then used the alcohol. Basically, how should I proceed from here? Sand down the part completely, rewash, wipe with alcohol, prime, and paint again or something else? I am at a loss as to my next step. Is there some kind of stripper I can use to remove the acrylic? I assume most strippers will ruin the plastic too. Has anyone used an acrylic Brush Cleaner such as this one? http://www.jerrysartarama.com/discount-art-supplies/brush-washers-and-cleaning-supplies/brush-and-hand-cleaners/ez-air-acrylic-brush-cleaner.htm?utm_source=googlebase&utm_medium=cpc&utm_campaign=shopping&gclid=Cj0KEQjw35-vBRD3qKz8hPezlIIBEiQAOeKNrk_4GJQS8OLPW0nB6jqkMO1pBOe12cUcEewJwQYM3g4aAgfs8P8HAQ. I have used that on synthetic taklon brushes at full strength, let it soak for a few hours and it softens up the acrylic paint to allow it to be washed out of the brush with soap. Here is a image of what happened. I have to say that the Phthalo Blue Green Shade turned out wonderful.