Ferbz
-
Posts
508 -
Joined
-
Last visited
Content Type
Profiles
Forums
Events
Gallery
Everything posted by Ferbz
-
Thanks! It'll be a curbside so I'll be able get the stance this low or close to it fairly easily. I did have to raise the rear inner fender wells a bit though.
-
Ha! I was thinking exactly what you've shown here(as they say, great minds think alike!). And yes, I imagine the skin of the upper halves of the tail light housings would swing up along with the flat rear 'door' area as well as the window and frame. Dare I attempt to actually cut it out and hinge it? I intentionally glued the doors and hood shut on this model as I wanted to build it as a curbside. Besides, opening that rear door would be alot of work and I'm lazy
-
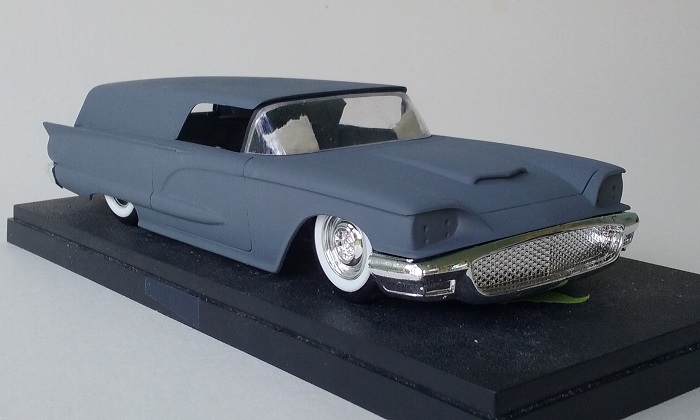
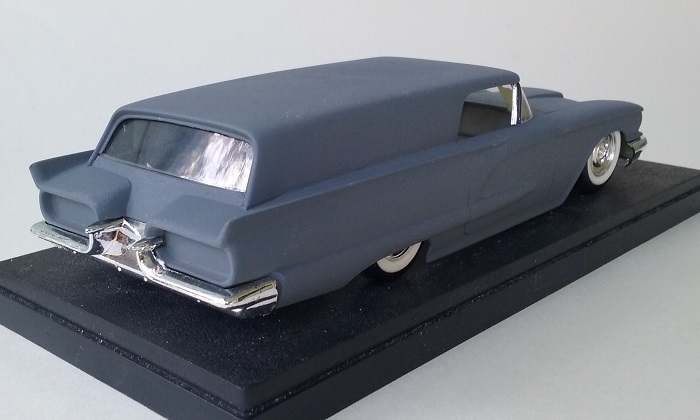
A little of progress on this: I shot a couple coats of primer just to see how the body work was looking(spot putty/block sanding I ended up deciding on keeping the rear window/tailgate/tail light area pretty much how I originally envisioned it. I really wanted to keep the big capsule shaped tail light openings as well as not make the top any longer rearward as I thought it might make that rear area feel too heavy. The rear window/tailgate surfaces closely match and line up with the angle of the rear bumper's licence plate area. I wont actually cut open a tailgate and make it functional, but will scribe in the tailgate lines into the 'deck' surface above the tail lights. In my mind the 'deck'/top surface of the tail lights and rear window would rotate upwards as a single unit. I think it looks cool/odd, sort of like a concept car from the era if you get my meaning I'll keep going on it and see where it ends up...

-
Looks good! And hats off to you giving an older build a new life. I've yet to section a shoebox ford myself. How much did you section it?
-
Thanks for the suggestions! I have indeed been looking at Ford wagons and trying to figure out how i can get a similar factory look while keeping as much of the T bird style intact. Stay tuned...!
-
Thanks Steve! Not a problem with your suggestions...I'm into old school traditional customs. The whitewalls and wheels you see in the pics are what I'll be using, and as far paint jobs go, I try to stick to what is usual for the style/era my builds represent. I also try to stay away from whatever colors are trending.
-
Haha! Maybe build it up as Evira's Hearse!
-
All great ideas, thanks! I was considering slanting that rear window forward a bit, good call. I also like your split window/tailgate idea. I think that's how the real wagons work, yes? I was also considering chopping the top a bit more. I have about a 3" scale inch chop on it now. I'm just hesitant to cut that front windshield any more as I would begin to have some fitment issues with less glass to mount to the cowl. I did think of shortening the rear of the body like you mentioned, but I like the long length of the car. Whatever i end up deciding to do with that rear area it'll be(I hope)something that's believable and something that looks as 'factory' as possible.
-
Nice idea! I was also looking at how some of the ford wagons' tailgates/tail lights look and work. Modifying the T bird to have a single tail light pod on each side makes sense and still keeps it looking like a Ford design. However, I have some ideas I want to try for custom tail lights that require the big oval spaces the T bird already has. I'll do some more head scratching......thanks for your insight! I think your idea could work nicely. Please post your progress once you start cutting into that plastic Yes, it's the old Monogram stand by kit. I was hoping they would have addressed some of the problems this kit has always had when they issued the custom version. Sadly, the poor fitment/alignment of the doors are still there, as are the sink marks in the sides of the front quarters. I spent some time attempting to improve these areas and hope the end result will be passable.
-
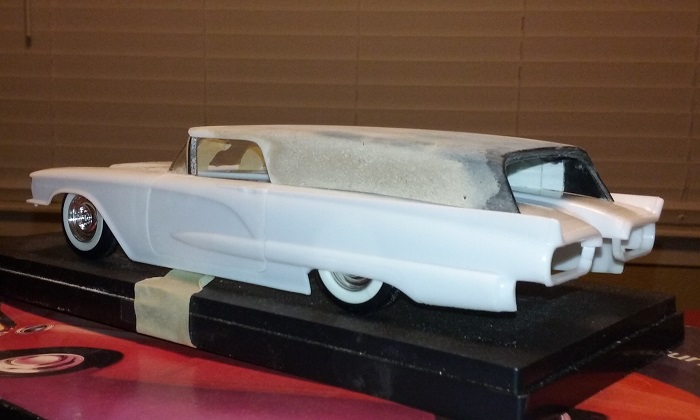
Thought I'd share one of my current projects. I'd been wanting to try this for years am finally giving it a go. I used two hardtops, some sheet styrene and putty to get it to this stage. One of the hardtops had a bow in the top surface for some reason and I did what I could to get it to work(including using more Plastic Wood putty than I normally like to use!) I think it'll work but progress will tell. Lots of work needed to get this to appear like a real wagon/delivery(interior cargo area work and some sort of functional looking tailgate). Plans call for a classic Larry Watson panel paint job in single stage colors(still debating which colors at the moment). I'll be sure to post more pics as I go.
-
Very cool!
-
What a cool, fun thing to do! I've occasionally seen coupes/sedans of various makes/years converted into sedan deliveries and wagons, but never a Super Bee, and never from scratch! I also like how you're keeping the style of it within the Dodge family/era by referencing that Coronet wagon. I'm currently working on converting a Monogram 58 T Bird into a chopped sedan delivery. I have plans to make it look like a custom from the late 50's by painting it similar to Larry Watson's iconic 58 T Bird. I'll post pics in 'On The Workbench' soon. Looking forward to seeing more of your progress!
-
WTB: 54 Olds caps & 50 Merc dash
Ferbz replied to Ferbz's topic in Car Aftermarket / Resin / 3D Printed
Thanks for the tip! I'm actually planning on scratch building those. They have to get molded onto the front of the fenders and I have an idea of how to make it all work. Fingers crossed that my plan works out. I'll post pics of the process I have in mind if it works -
WTB: 54 Olds caps & 50 Merc dash
Ferbz replied to Ferbz's topic in Car Aftermarket / Resin / 3D Printed
Thanks everyone! I'm in the process of ordering the 50/51 dash from Norm. He doesn't have the 54 Olds caps though which I'm still on the hunt for. -
WTB: 54 Olds caps & 50 Merc dash
Ferbz replied to Ferbz's topic in Car Aftermarket / Resin / 3D Printed
Actually, if anyone can identify the hubcaps in this pic, and inform me if they're available in resin(or plastic) this could be an 'plan B' instead of the 54 Olds caps. I'm guessing at some point these different caps were used on Curly's car for a short time(or maybe just for this photo shoot?)as I only recall seeing the car in pics and in person with the 54 Olds caps. -
WTB: 54 Olds caps & 50 Merc dash
Ferbz replied to Ferbz's topic in Car Aftermarket / Resin / 3D Printed
Thanks! Those are pretty close, but I'm shooting for getting as accurate as I can with this build. I know I've seen 54 Olds resin caps before, I just cant remember who made them... -
Whoops, I goofed and accidently posted the magazine cover pic twice.....
-
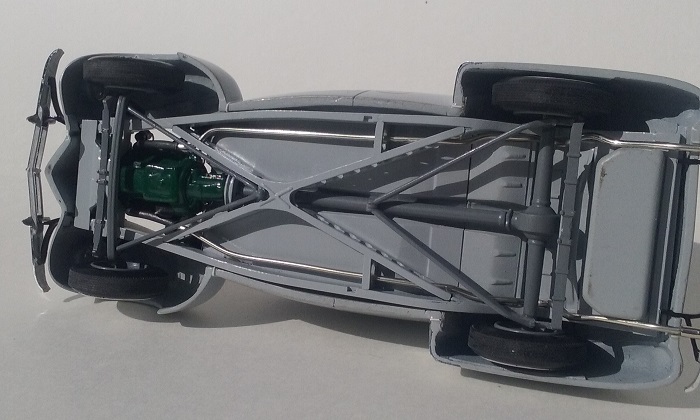
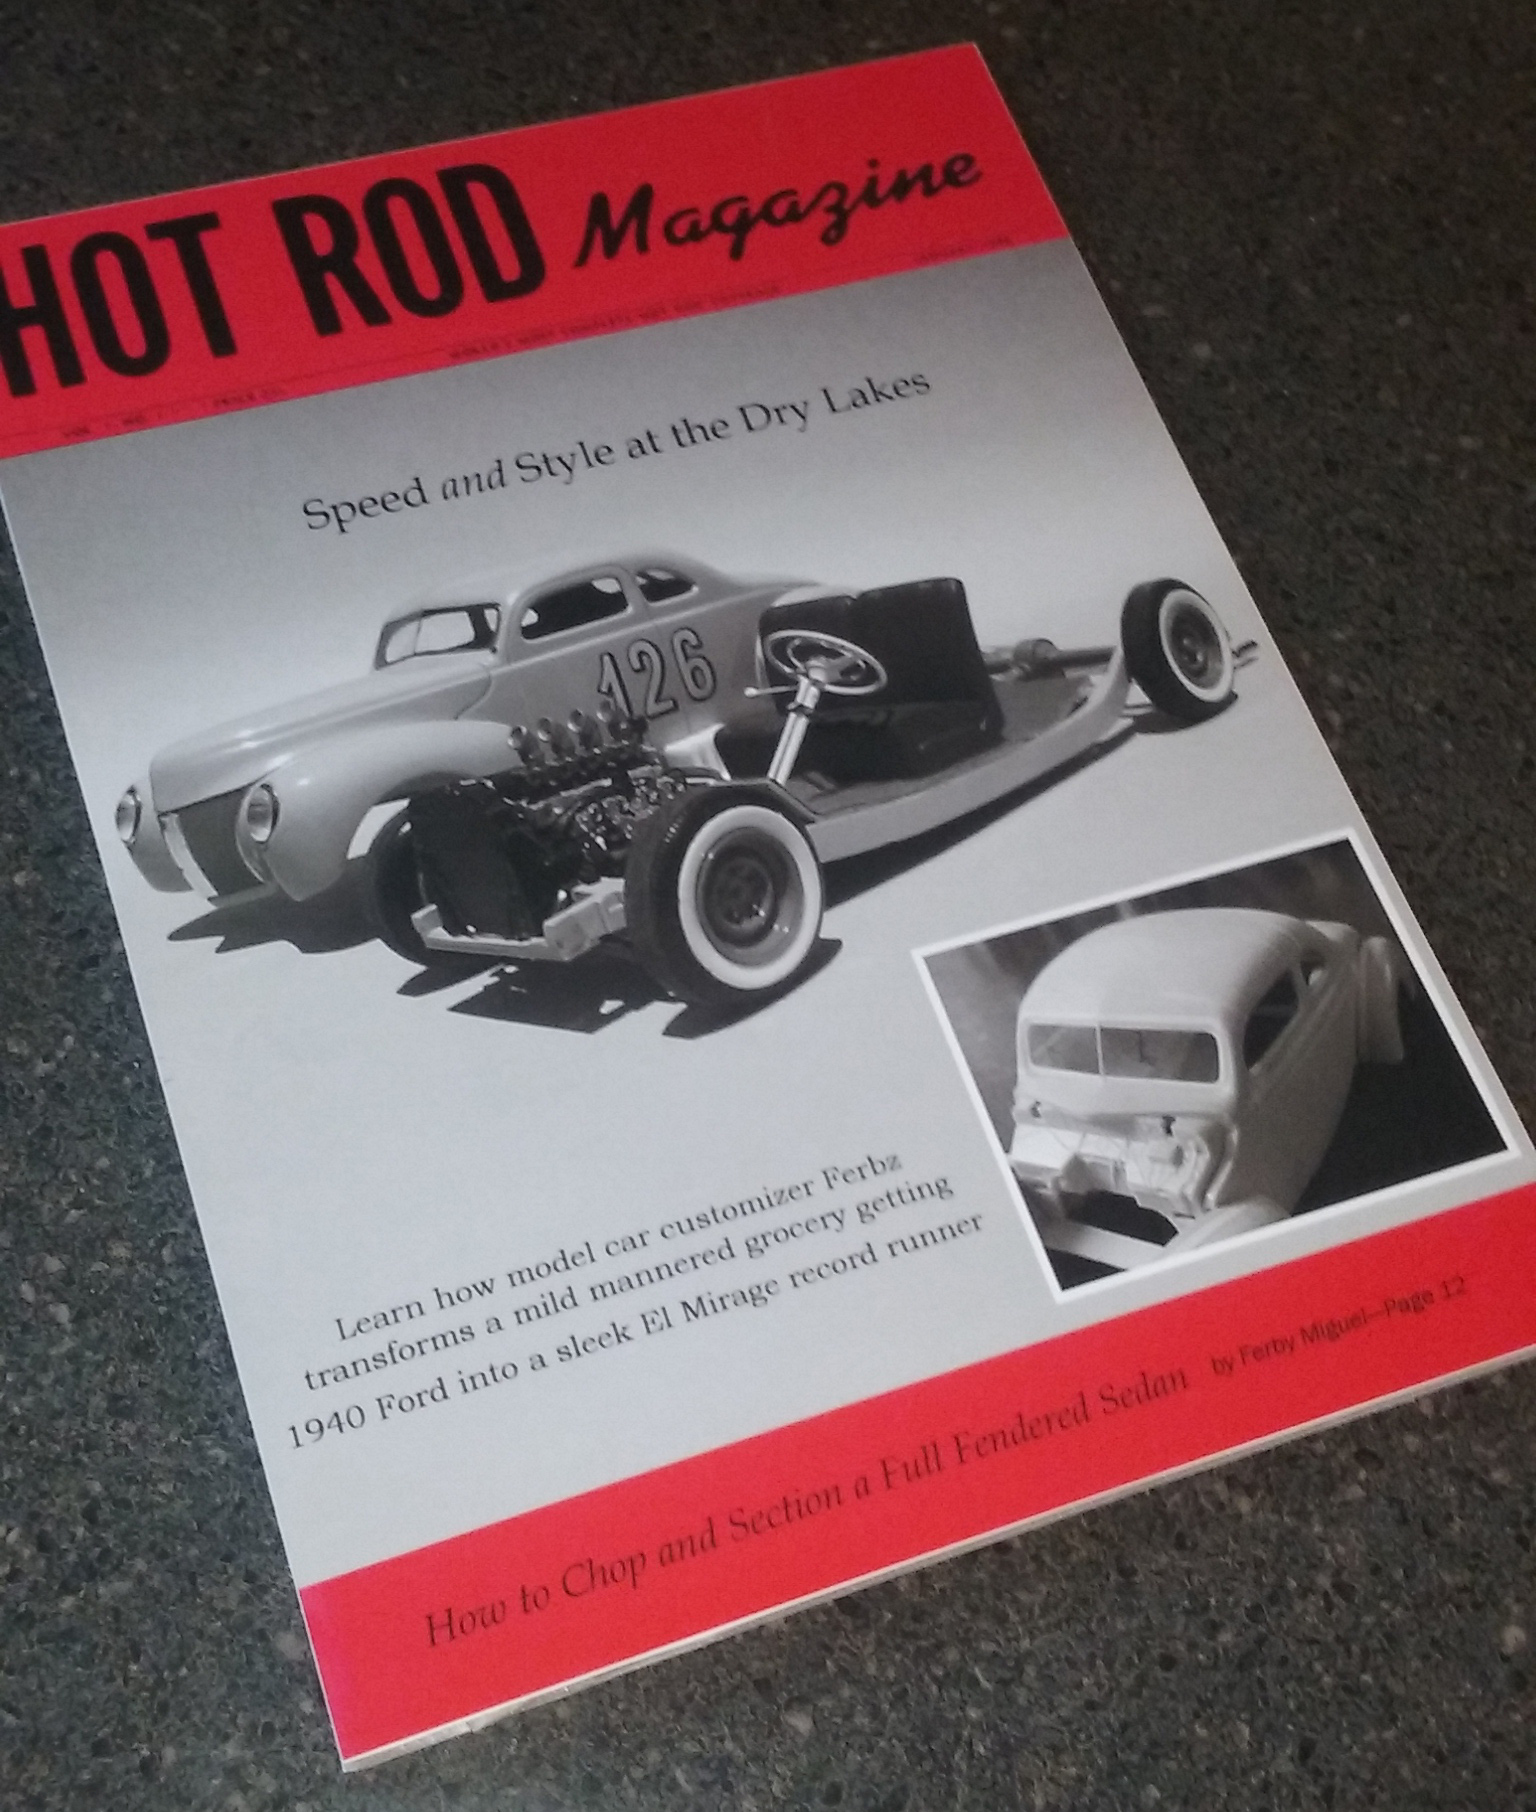
Thanks for the compliments everyone! Here are a few more pics. The undercarriage shot shows how nicely the Revell 48 ford actually chassis fit under the AMT 40 Ford body. I had to shorten the wheel base a tad(upon researching I discovered the 1:1 48 Ford wheel base is 2in. shorter than the 40) I had to cut the interior tub apart separating the rear panel and door panels from one another and each of these from the floor in order to integrate the notched Revell 40 Ford trunk floor(and also to install the interior into the body. Once I glued the fenders to the body during the customizing phase, there was no other way for me to install the interior). Another side note: I also used the 48 Ford chassis for it's wider track width as a functional reason for widening the fenders. As it turns out, the track width was still too wide and I had to mess with the offset of the wheels to get the tires to fill the fenders properly. At some point I'll get around to adding the missing chassis detail I mentioned previously. I don't plan on entering any contests so who knows, I may just be lazy and leave it as is Just for fun, I've included a fictitious photoshop mockup of my build as it might have appeared on the cover of Hot Rod magazine in the late 40's if it was a real car. *I really like the idea of some of the early postwar customs serving double duty as cruisers AND record chasers back in the late 40's. To me, they epitomize the combination of speed and style.
-
Thanks! I'm always happy to share something new I've discovered that works for me. I'd also like to see more people try the fender welting(beading) detail on fendered cars too. Also try using pie pan tin if you haven't yet for misc. aluminum or thin gauge metal detail.
-
I'm attempting to build a 1/25th scale copy of Curly Tremayne's 50 Merc custom and am in need of a set of 1954 Olds hubcaps and a 50 Merc dash. I recall seeing these available at one time but don't remember from whom or where. Can anyone help out? Thanks in advance!
-
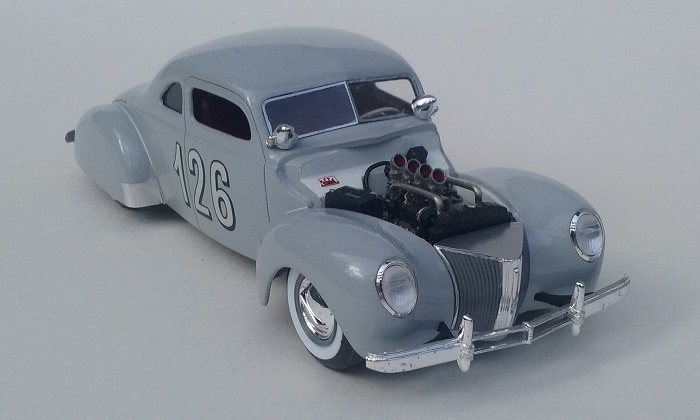
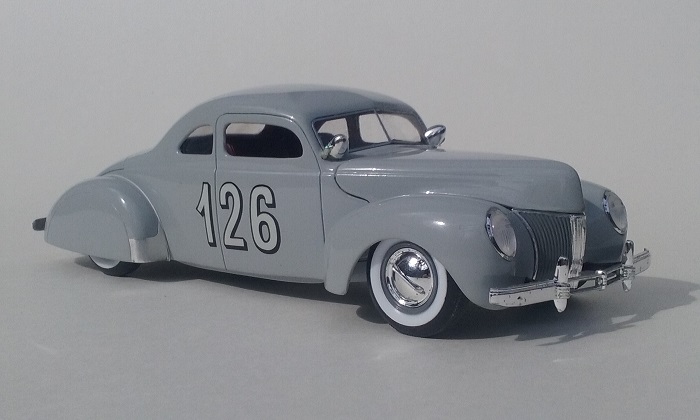
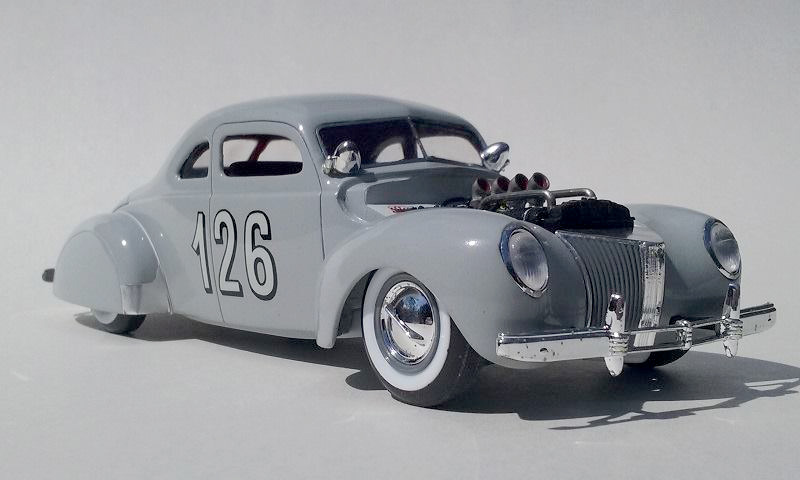
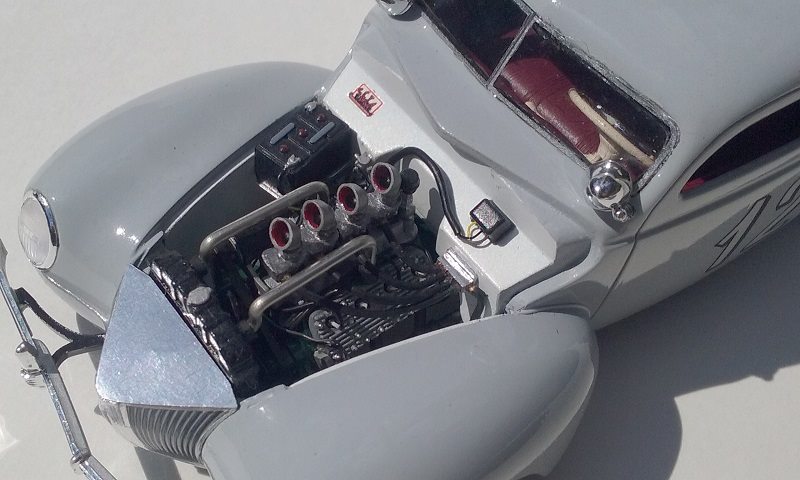
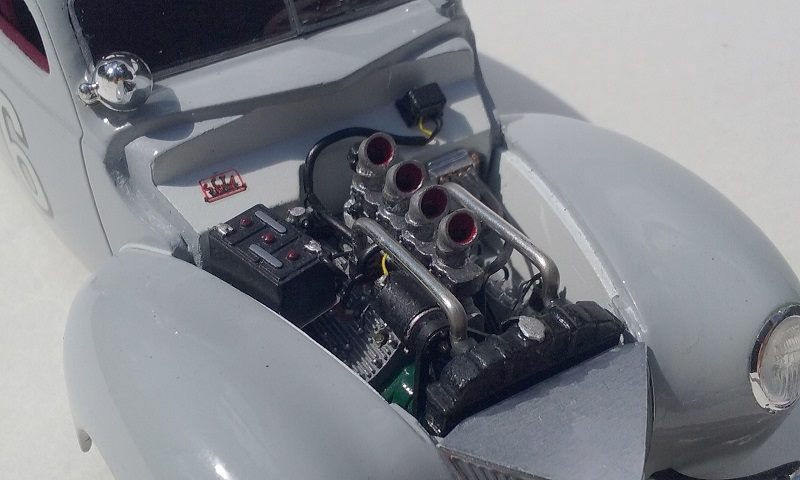
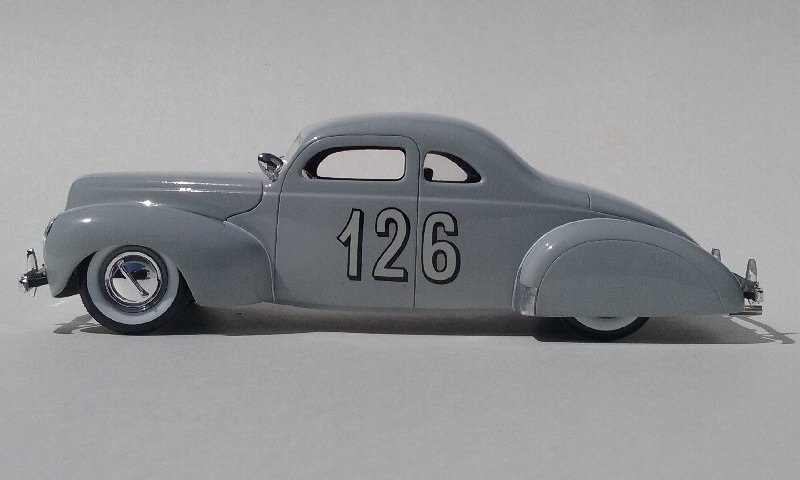
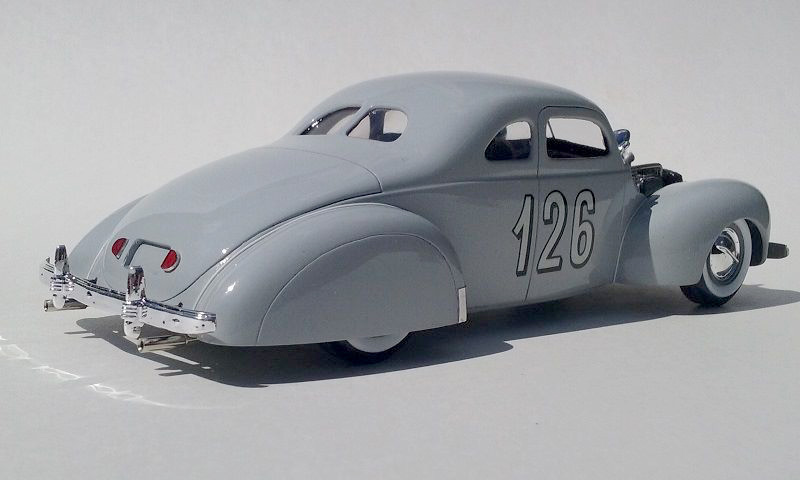
Even though there's a few things I still need to add like a license plate, rear shocks, steering linkage, I'm calling this one finally done! It's an AMT 40 Ford body that's been chopped, sectioned, fenders widened, running boards removed, rear fender openings filled and flush skirts scribed in. Old bumper bracket holes in fenders filled and relocated to accomodate the 41 Lincoln bumper brackets, hood and grill area replace the original AMT hood/grill. Firewall is smoothed and windshield height reduced further by getting filled in slightly. I used the Revell 48 Ford chassis/motor for the wider track width and nicer detail. Solder was used for exhaust tubing and suspension was modified to lower the stance. The wheelbase also had to be shortened slightly but it fits surprisingly well(I wonder if anyone ever did this mod back in the day). I added the Revell 40 Ford trunk floor/gas tank underneath and notched it to accomodate the lowered rear suspension. I'll add undercarriage shots soon. Some new detail techniques were tried out on this build: white plug wire for fender beading(welting)and pie pan tin to make rear fender guards and the grill shroud/cover. Adding some wiring harness detail in the engine compartment is also something I've never done before, as well as modifying a 2x2 intake to make a 4x2. Hopefully this all visually makes up for the lack of any carb linkage which I just didn't wanna do this time around Doug Rice's 1:1 39 Ford was my main inspiration for this build. I wanted to try to faithfully build an early postwar custom that could have also run at the dry lakes. Period modifications, parts, colors all hopefully represent this purpose. Enjoy the pics! I may try to take more with better lighting and post those as well.
-
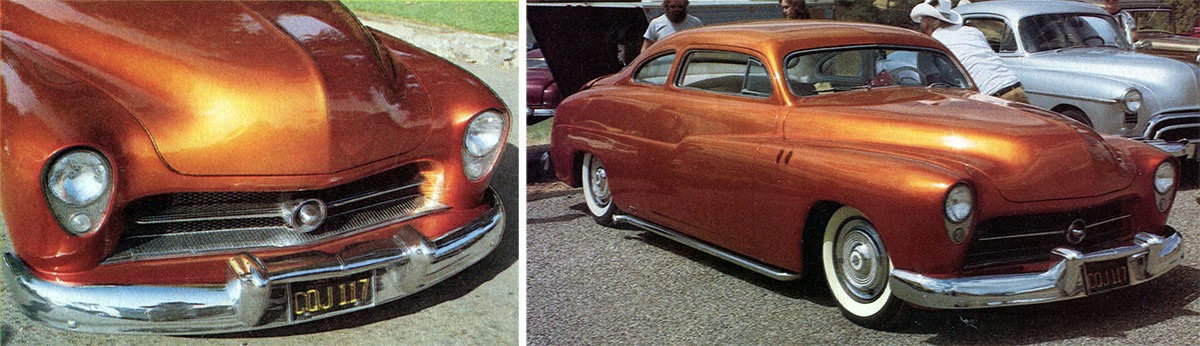
Thanks! I got the idea from Jack Calori's 1:1 36 Ford. That car had these flat tail lights that were on either side of the sunken license plate(see attached pic) His particular lights fit the space really nicely. I think they were from a late 30's Hudson but I'm not certain. I wanted to do something different, yet appropriate and era correct looking and just couldn't find the right solution. While digging through my stash of odds and ends, I came across these two pieces and thought they might work in similar fashion like Calori's 36. They stick up from the deck a little high and seem a bit blocky to me from the side, but overall they do the trick for me.
-
Well, here are a couple more pics of it pretty close to it's finished state. I still need to add rear shocks, steering linkage, license plate and I may try to make a Russetta timing tag for the firewall. Once all these little details are added, I'm gonna call it done and post better pics in 'Under Glass'.
-
Thanks! There aren't many shows nearby, at least not nearly as many as there are in Nor. cal where I used to live, but I do plan to take it to a local IPMS show here in town this month.
-
Thanks! I wanted to build something really different and true to the era. I learned about Doug Rice's 1:1 39 Ford and loved the way it had so much radical body mods done but was also built for speed runs at Bonneville. Single stage gray color, racing numbers and hopped up flathead all make a unique statement to me.