Ferbz
-
Posts
508 -
Joined
-
Last visited
Content Type
Profiles
Forums
Events
Gallery
Everything posted by Ferbz
-
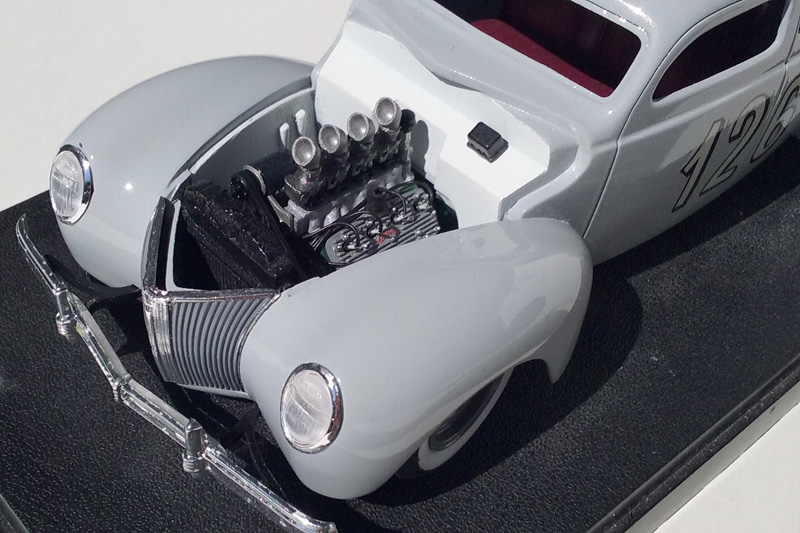
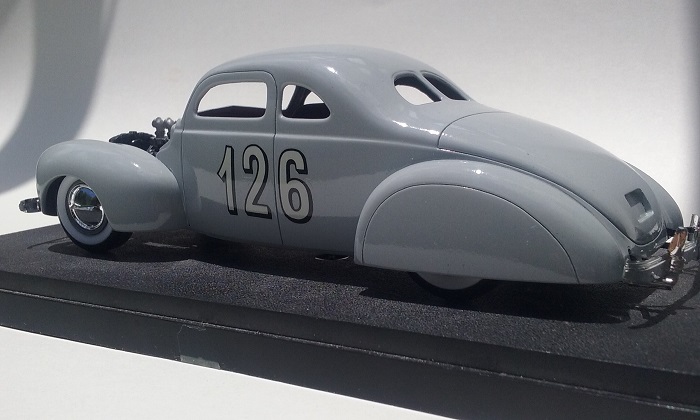
Thanks! It's actually a build inspired by Doug Rice's 1:1 39 Ford Bonneville car as well some other early postwar custom cars that were built in the late 40's meant for speed AND style. Like his car, my Ford is chopped, sectioned, fenders widened, etc. There were a few custom cars that ran at the dry lakes in southern California in the late 40's and my build is meant to pay homage to cars like those. Hence the racing numbers, the hopped up 4 carb flathead, etc.
-
Thanks! I've had a pretty good vision for it rolling around in my head for some time. It's nice to finally have the finish line for this build in sight.
-
My pleasure, I'm always willing to share, especially if it's something I discovered myself! Hex rod is a great idea! I may try that next time instead of insulation. I'm guessing there was no way to touch up the white on your plugs once you glued them? Admittedly, I don't do that much detailing. I just got it my mind to detail out this flathead motor for this car. It doesn't have much else going on with it other than the bodymods; no open doors/trunk, no extra interior detailing, etc. Thanks man! Most welcome. I'm sure someone somewhere has done this, I just happen to come up with it on my own and I like it enough to share Interesting. Thanks for the tip. I've never come across the problem in the past, although I was using a different brand(Plastikote, when they had a line of spray can Nitrocellulose Lacquer) I also feel like Nitro lacquer dries harder than Acrylic lacquer. Could be just me though...
-
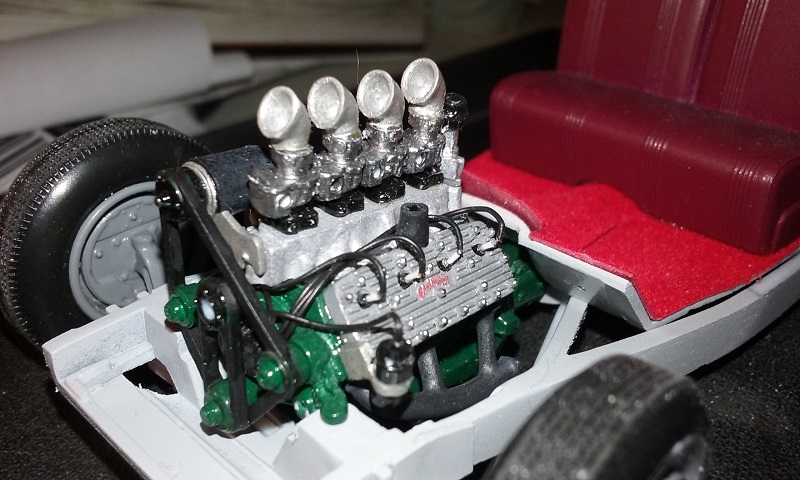
Ha! Thanks! I actually have plans to try to make B&W versions of these pics. Those plugs are actually my first attempt at making them. I basically took white spark plug wire and trimmed the insulation off of one end just long enough to slide the wire into the hollow insulation of the black spark plug wire end. I made sure to leave a small gap of exposed wire in between them to represent the metal tip of the plug. The other end of the white wire is glued into a larger diameter hollow black insulation to represent the hex head part of the spark plug. The inner dimension of this larger black wire insulation is the same as the outer dimension of the white wire so it fits. I drilled out the holes in the cylinder heads to match the dimension of this larger black wire insulation and glued them in(hope this all makes sense) It was extra work but I like the results since you see quite a bit of the spark plugs on flatheads. Here's an earlier shot of the motor that shows the plugs. Give it a try on your next build!

-
Thanks man! I've done my share of fancy paint jobs so I wanted to build a model with a simple paint scheme. Single stage Light gray seemed to suit the style and era of the car pretty well. During the build I watched alot of WWII documentaries and I've always liked classic B&W movies especially old sci-fi films. I think this influenced the color choice quite a bit. Green for the engine block and red for the interior seemed like natural choices too.
-
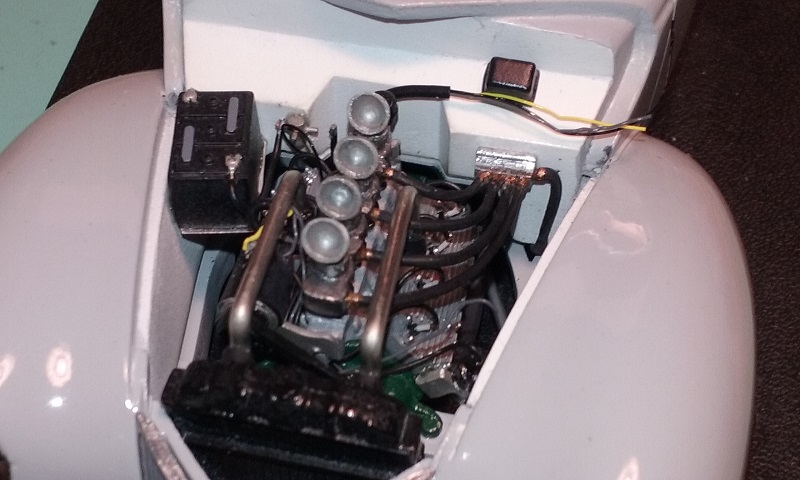
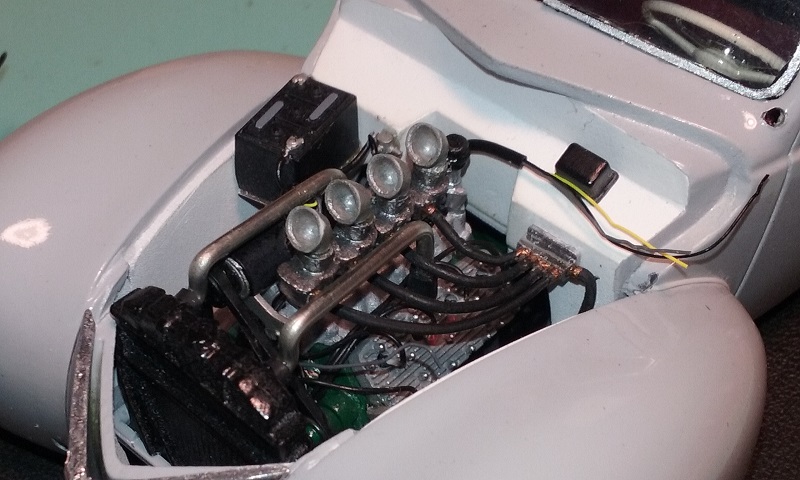
I thought I'd post some more progress pics as I inch closer to completion on it. I've been fighting with the paint(cant really see it in these pics)specifically the clear coat which is Duplicolor automotive Acrylic spray can clear. It's been on the model for months and it's still tacky! I found another thread of other people having the same problem with the same product. Maybe Duplicolor made a bad batch? I sprayed it over the summer and as part of my regular regiment I let the paint gas out and cure for at least a month before I started the wet sand/polish process. At the time it seemed hard enough as it took to the wetsanding/polishing just fine. Over time though I noticed finger prints and a tacky-ness to the clear as I handled it during the build. I have recently begun to dry sand it with super fine grit and clean/wax it as a last ditch effort. The finish is no where near where I wanted it to end up, but luckily the light gray color doesn't show too much of it's flaws. I don't plan to enter it into any contests, it's just a personal build. I'll have to figure out a way to minimize handling it as I get closer to final assembly....wish me luck with that.... Enjoy the 'posed' pics. I'm also adding some engine pics to share how the wiring/plumbing detail is coming along. I'm leaving out some detail like carb linkage, etc because I just didn't want to go that crazy with it
-
I'm about to buy and try out my first set of Micro mesh Polishing Pads. I've had some experience and success wet sanding/polishing paint jobs before using traditional means of 1500-3000 grit paper and polishing compounds, but thought I should finally try out these pads for myself. This might seem like a dumb question, but I'm curious if using them dry is an option? The reason why I'm asking the dry vs. wet question is because since these pads are removing even finer grains/amounts of paint from the surface, maybe using water as a lubricant/cleaner during the process isn't necessary? Thanks in advance!
-
Thanks David! Body mods are my favorite thing to do and I try my best to get it as straight as I can before paint. I guess I'll wait a bit more and see how the clear gasses out then wet sand/polish a small area as a test. Yeah man, flatheads are cool! I knew I wanted a 4x2 carb set up on it so I modified a 2x2 intake to do it. It's not great, but not bad either I think. I'll try to post more updates as I go.
-
Here are a couple more mock up pics. These include the grill with added chrome detail and headlights temporarily in place. Question for the group: It's been almost 4 weeks since I've sprayed the clearcoat and it's still not hard/dry enough to wet sand/polish! Anybody else have any curing problems with Duplicolor spray can clear acrylic lacquer? I did see an older thread on this subject but didn't see any solutions. My guess is they now have a weird formula for their clear that requires a looonngg drying time?
-
Thanks! I got the inspiration to widen the fenders from Doug Rice's 39 Ford 1:1 car(actually, his car was the main inspiration in general for this build). I couldn't find any documentation on why he widened them as it was not that common of a modification. My guess is he may have wanted a wider track width for stability since he built the car not only for style but for runs at Bonneville as well.
-
Thanks! I used the engine from the Revell 48 Ford kit but the cylinder heads are from the Revell 40 Ford Street Rod kit.
-
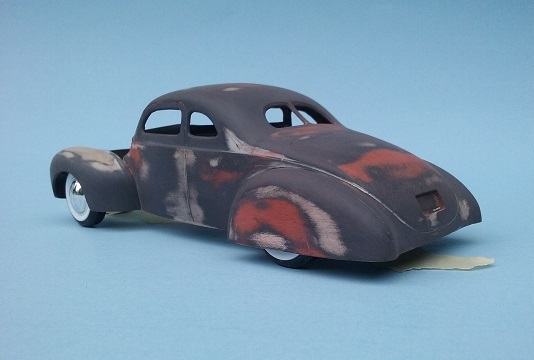
Thanks! The 39-40 Ford in factory form is a beautiful car, but as 1:1 customizers discovered back then, chopping and sectioning it makes it a much sleeker car. Remove the right amounts during the process, and you get a really elegant effect. The paint has yet to be wet sanded and polished, but thanks for the compliment! It's quite a bit of work to get the body smooth again after modifications are made. I've found no easy way around the process of primer, putty, block sand, then repeat as many times necessary to remove scratches/imperfections and level out high and low spots until the body is ready for paint......it is my LEAST favorite part of a build! Here are some earlier progress pics :
-
Thanks Jason! My main inspiration for this build was Doug Rice's 1:1 39 Ford as well as other 1:1 early postwar 39-40 Fords that were chopped/sectioned during that time of the late 1940's. All amazing cars but I wanted to try and use a little more restraint on my proportions. Rather than 'looking' like an obvious radical custom, I was attempting to make the car appear more like a factory design. The overall effect makes it easier to notice it's relation to the 39-40 Ford's more elegant cousin, the Lincoln Zephyr. In hindsight, I would have chopped the top a teeny bit more though, particularly in the rear to make it a bit more sleek...but there's no going back now! Not sure if you've seen my earlier posts of this build, but like Doug Rice's 1:1 car, I also widened the fenders, which I think plays well with the proportions of the chop and section. I'll post more pics!
-
I thought it was high time I post my progress on this build. First off, I've been calling it a 39 Ford which isn't exactly accurate. Since I grafted the grill from the Revell 40 Ford Standard kit to the front, it's really a 40 Standard with 39 headlights. Splitting hairs I know, but I just wanted to mention it Since my last post on this build, the body has been painted(finally!) and cleared and I'm waiting for full cure before I wet sand/polish it. The motor is built and installed in the frame and am slowly adding wiring/plumbing detail to it. I still have to make the upper radiator tubes and fuel lines/fuel block. I'll be attempting to make a firewall mounted starter relay and will try to snake around some wiring harness detail in the engine compartment for added detail(something new I've never done before!) I recently made dual exhaust using solder and it's glued into the frame(I'll show the undercarriage in a following post). The interior pieces have been painted and I've added 'carpet' to the floor. The front/rear suspension still needs paint and installation but here are a couple shots mocked up with the body on the frame sitting at ride height. The bumpers, hubcap, grill are temporarily in place. It's still got a ways to go but the finish line is in sight!
-
Pegasus builder R. Mike Johnson gone?
Ferbz replied to Ferbz's topic in General Automotive Talk (Trucks and Cars)
I actually mention it in the body of my text in the second line: 'To my surprise and sadness I heard that model master Mike Johnson passed away last month.' In hindsight, I probably should not have titled my thread with a question mark. I also see how that could cause some confusion. I did double check and found an obituary online confirming what I heard(I probably should have mentioned that as well)and am wondering if anyone has any more information... -
Model Show In San Antonioor Dallas, Anyone?
Ferbz replied to oldcarfan's topic in General Automotive Talk (Trucks and Cars)
Hey Gary, I've been aware of both shows and while I am curious about them I'm just not had the time/funds to travel(I'm in Austin like you!)to check them out. Even though San Antonio is much closer than Dallas, it is an IPMS show which means they are focused on more than just car models. Nothing wrong with that, their interest is on modeling of all types from military to vehicles to sci-fi. Both San Antonio and the Farmers Branch shows sound like fun especially if you haven't attended a show in quite a while. Did you know Austin has an annual show in town? It's usually in September: http://www.austinsms.org/contest.php I've been to it twice and even though it again is an IPMS sanctioned show, I do enjoy the vendors and the wide category of models that show up as well as the model cars that do attend. Since we are in the same town, let's keep in touch! I've been meaning to reach out and see how many other model car 'nerds' there are in Austin. I've met a small number at the local show, but I know there's more of us out there! Ferbz -
I did a quick search on this subject and didn't find anything on this subject here so I thought I'd post this. I hope it's ok to do so: To my surprise and sadness I heard that model master Mike Johnson passed away last month. For those not familiar, Mike Johnson was the top winner of the first Revell-Pactra contest in the early 60's with the model car he called 'Pegasus'. In honor of his win, a bronze copy of his car was made to subsequently top the contest trophys for that prestigious contest. I was fortunate enough to have known Mike personally in the 90's when we lived in Las Vegas, NV. I moved from Las Vegas in 2001, lost touch over the years and am now stunned over the news of his passing. If anyone has any info regarding this news please share. If you're not comfortable doing so publicly please message me. Mike was a not only an amazing model car builder, but also a good friend and great mentor. It would also be great to hear any stories and see any memorabilia about Mike that might be floating around out there.
-
Great build and great video! I grew up listening to that song too! One of my favorites from Zapp and Roger.
-
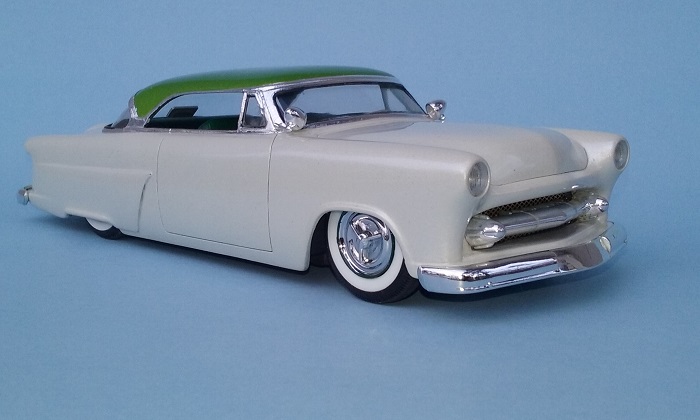
Very cool! Just the kind of subject matter I've been building lately, clean customs.....and a curbside as well! Most of my builds are curbsides because I take so long on my projects that full builds me take forever to finish! With curbsides, I get a sense of accomplishment Nicely done!
-
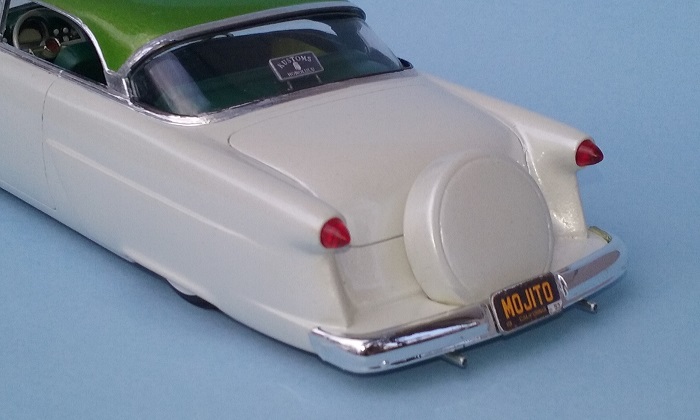
Thanks so much! You have a good eye for noticing. I purposely wanted to try my hand at putting some serious thought into 'redesigning' this body style but keep it in the tradition of the car's era. My basic thought was to 'fix' the things I didn't like about the original design, keep it cohesive, and add a continental kit in a way that doesn't appear as an afterthought. Get this: I was going to do a tri-tone panel paint job on it, but as fate would have it, that idea blew up on me and I had to come up with another solution. It turns out I like the simpler white/green paint job as it sells my design ideas better by not highlighting them but letting the viewer discover them on their own, basically what you said And while I do like the 'change for the sake of change' type of customizing, I've been thinking a lot more lately about the purposeful 'restyling' idea of customizing in my builds. In fact, this idea is currently driving my chopped/sectioned 39 Ford project.
-
Thanks! Funny thing: the idea for the name struck me after I finished it. I stared at it for some time then realized the color scheme reminded me of one my favorite drinks Maybe it was subliminal while I was putting together a game plan for the color scheme. Goes to show sometimes you never know where inspiration can come from.....intentional or accidental!
-
Thanks! Very true. This build has alot of customizing but nothing too radical(other than the chop). Most of it was restyling ques that combined all add up to the visual impression it makes. I enjoy seeing people posting pics of their custom builds sitting next to a factory stocker. That really shows the difference! If I had a spare 53 I would have done the same Well I do have my build thread in On The Workbench if you're interested in seeing how it was all accomplished.
-
Yes, nicely done! And please tell us how you did such a clean flocking job. I've done a handful of my models with it and I don't really like using it. I learned that by using spray adhesive then rubbing the flocking into the area with my fingers I get a better, even result but it still doesn't look as nice as you've done on this Caddy....
-
Thanks! I just wondered why Revell made them that way. I tried mounting them on different models and they looked awkward on all of them due to their weird angle as well as the arms being a little long.
-
Anybody else think that the spotlights I used from the Revell 48 Ford are made at weird angle? They were difficult to pose in the right position as a result. I do like how the arms add that little extra bit of detail, but don't they also seem a tad long? Just wondering what you all think....