Ferbz
-
Posts
508 -
Joined
-
Last visited
Content Type
Profiles
Forums
Events
Gallery
Everything posted by Ferbz
-
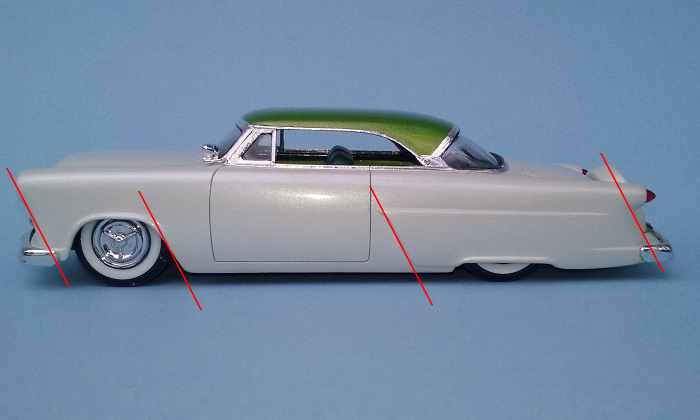
Thanks! To be honest, there was a little bit of trickery involved with the rear fenders: I separated the rear vertical portion under the taillights and pushed them in at the top, making the taillight housings appear lengthened. This area was then peaked using plastic rod and filler. This gave me the angle that matches the continental kit/trunk. This also might add to the illusion that the fenders are extended rearward, but they're not.
-
Thanks! The color scheme was actually my second attempt! I had planned to try a tri-tone panel paint job similar to the Keith Ashley clone of the 1:1 Barris built Larry Ernst car(so many names to describe one car!)but the paint job got botched and I had to strip it and repaint. I decided on the green/white combo with the green theme continuing into the interior. Thanks! I see way too many continental kits on 1:1 customs that don't flow well with the car. I know that some of this is due to functional restraints, but I had to try and see if I could at least solve it design-wise in scale
-
Thanks for noticing! I also purposely designed that angle into a few other areas of the car as a subtle visual theme. It exists at the leading edge of the front fenders, the rear edge of the front wheel well openings, the scooped openings of the rear fender bulges, and like you mentioned, at the rear fenders/trunk and continental kit. The rear license plate is also mounted at that angle and the rear bumper coincidentally also has a hint of it. There was some deceptive work that went into getting that angle at the rear of the car. Since I knew I wanted to lean the continental kit forward I also wanted it to be as close to the trunk as possible. In order to do that I had to cut the top surface of the trunk/fenders loose(excluding the position of the taillights) and slide it forward until I got the desired angle at the rear. This is also partially why the rear fenders may look extended when they're not, really. As a side note, the bottom perimeter of the rear window also moved forward along with the deck helping the chopped top to flow smoothly into the large rear window. While I was at it, I also wanted the continental kit to sit low enough that from the side it didn't become a visual 'hiccup'. This meant I had to sink it into the rear gravel pan as much as possible without it dipping too far below the rear bumper. You noticing that angle is much appreciated!

-
I've posted my progress on this build in On The Workbench, and it was pretty much close to complete. Since I've finally gotten around to adding the last pieces of detail(spotlights, exhaust tips, license plate)I'm officially calling it finished! These shots were taken outside, but it was cloudy and overcast and I had to use the flashlight on my phone to get these pics. As a result, the effect of the white pearl and metallic green isn't very obvious. At least the pics are clear and in focus
-
Yeah Bernard, me neither! I really like those sets of pie crust slicks. Now, if someone would re-issue those old Revell Parts Packs Bubbletops.....:)
-
Wow, I can't believe it's been almost a year since I started this thread. Thanks to everyone for your insightful replies. I have since been able to pick up a previously issued 49 Ford kit at a decent price as well as one original issue in a partial trade for some artwork. The biggest news is that I recently learned that Round2 is re-releasing AMT's 49 Ford kit! Finally the wait is over. I'm looking forward to picking up this updated version and am happy to see the beloved shoebox is finally back in production.
-
Really nice fogging!
-
Love this post! So many nicely done paint jobs here. From patina to candy to single stage to flake, very inspiring. I'm particularly proud of this paint job on my 57 Chrysler. It was all done using Plastikote automotive spray can lacquer with the exception of the dark fogging which was done using reduced black nail polish and some gold pearl mixed in clear. I sprayed the gold metallic base first, then masked off the panels. I airbrushed the panel edges with the black, then sprayed the panels with candy red. I then peeled off the masking, added some gold pearl powder into some clear and layed a couple coats over the whole thing before burying it all in clear. I used my own polishing system of wetsanding with 1500 and 2000 grit, then toothpaste as a rubbing compound, then Mirror Glaze for final finish.
-
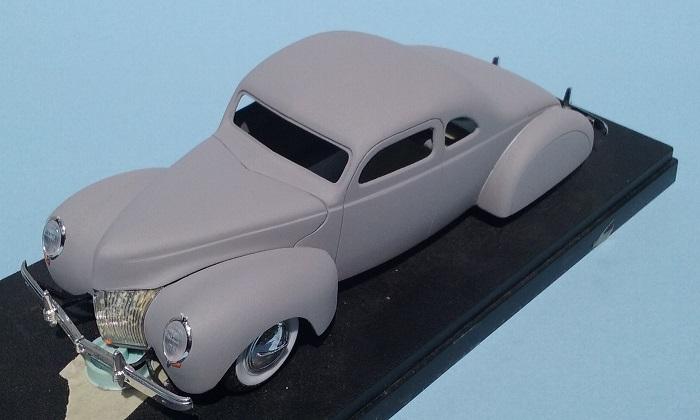
Chopped/sectioned 39 Ford(update:primer mock up!))
Ferbz replied to Ferbz's topic in WIP: Model Cars
Thanks everyone! I appreciate all your pointers and suggestions. I especially like the pie plate idea for gravel guards. It should be thin enough to cut and bend pretty easily and would the right thickness. I'll post pics as I do my experimenting.... -
Chopped/sectioned 39 Ford(update:primer mock up!))
Ferbz replied to Ferbz's topic in WIP: Model Cars
Thanks! I noticed on quite a few custom built "concours" cars of the time that their skirts were quite large and I wanted to hint at that aesthetic. Seems the more elegant the car, the larger/fuller the skirts were. In actuality, these skirts also appear large due to the fact that the fenders/body are smaller than stock due to the sectioning(I also removed some height from the bottom of the body/fenders when I removed the running boards). Your tail light suggestions are great, but I want to use some pre-49 ones that are a little more obscure and not so easily recognizable. As an example, 39 Ford teardrops would work really well, but they're too typical for me. On a side note, I want to also replicate the stainless steel gravel guard in the front bottom portion of the rear fenders(google Doug Rice's 39 Ford or Jimmy Summers 40 Merc). Any suggestions would be appreciated. I want to try to avoid gluing a thin styrene sheet piece there and foiling it and want to try doing something more realistic somehow. -
Chopped/sectioned 39 Ford(update:primer mock up!))
Ferbz replied to Ferbz's topic in WIP: Model Cars
Thanks! I see your point but no drip rails on this one. Many of the chopped 39/40 coupes of the era have them removed so this build will mimic that look. -
Chopped/sectioned 39 Ford(update:primer mock up!))
Ferbz replied to Ferbz's topic in WIP: Model Cars
I've not decided on a color yet, but it'll likely be a single stage color to keep with the post war theme. Not something too dark like black, nor something too light like cream. -
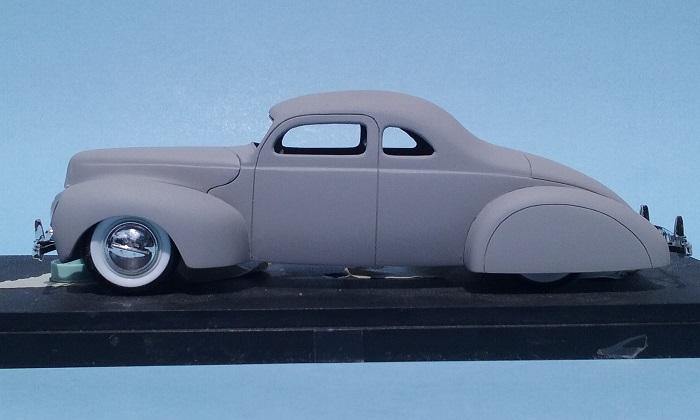
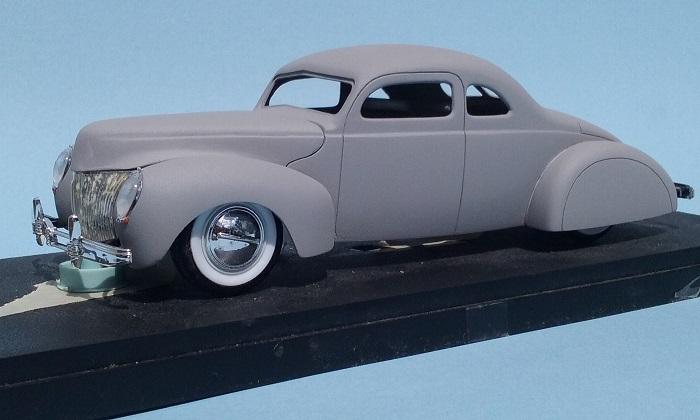
Here's a few mock up shots with bumpers, grill and headlights and a fresh coat of primer. Putty work is just about done and block sanding begins. Since my last post, I've glued together and fitted the hood. I had to raise the character lines on the sides to better match the body's lines and added a peak(sorry, its difficult to see in the current pics). I modified the Revell 40 Ford bumper brackets to work with the Monogram 41 Lincoln bumpers and cut the mounting holes in the front/rear fenders. Early on I eyeballed and guessed that the Lincoln bumpers would work being that they are 1/24th scale, but I think they work fairly well with the widened fenders. Lastly, I scribed in the rear fender skirt seams and fender-to-body seams. By the way, I want to do something a little different(but not out of theme) with the tail lights and not use 39 teardrops even though they would work fine. I also want to mount them on the trunk lid to the left and right of the license box and not on the fenders or the bumper brackets. Slow and steady wins the race, right?
-
You're welcome. It's one of the progress shots of how I added the inner lip for the windshield glass to mount to(an idea I got from Steve Boutte). There are better pics of the chop in my previous post of this project. It's not too different from how others have done it successfully out there. One difference I think is the windshield being laid back and glass opening reduced. BTW, in hindsight I would have chopped it just a tad more to give a better 1:2 height proportion of the top to body. No turning back now!
-
Thanks! This one will be old school all the way It'll be a period piece: late 40's post war custom with hopped up flathead and factory chassis, single stage color for the body, etc.
-
Thanks! It is tough to get this top to look right. I think mostly because the top is so small and so round. In my eyes, I still don't have it quite right but it's close enough! I tried my best with this project to have a keen eye about proportion and fixing some of the odd things(in my opinion)about this body style. Included in the top chop is the slight leaning back of the A pillars(the factory angle of the windshield looks too vertical to me). I also reduced the height of the windshield opening by filling it at the top(the factory windshield also looks too tall to me. Chopping the top alone doesn't fix this). Check out the attached image:
-
Thanks Chris! I'm attempting a period piece with this one. There were a bunch of chopped/sectioned 39/40 Ford customs built in the early post war period of the late 40's/early 50's and many of them had hopped up flatheads just like the hot rods of the day. So in keeping with the theme I have going, I'll build a flathead with all the traditional hop up parts available at that time: finned heads, multi-carb intake, etc. I'll try to detail with wiring/plumbing, etc.
-
Since my last post, I sprayed an initial primer coat and started the spot putty process. I'm making it look ugly so it can look pretty! I dislike this part of the bodywork process but I'll get through it ....! I still have to glue and fine tune the already sectioned hood making sure it lines up with the body/fenders. Stay tuned...
-
Do you have pics posted of your progress? I'd love to see it. Chopping AND channeling/sectioning is no small task no matter what the body style is.
-
I actually chopped the roof twice! When I first did it, I wasn't happy with the profile as it didn't flow from front to back the way I wanted so I made some additional cuts and moved things around a little more. Chopping these coupes are difficult to get right in scale as well as 1:1 in my opinion. My model still has too much crown in it to me, but I'm not messing with that top anymore
-
Thanks everyone! I'll keep posting updates as I go.
-
Thanks! While I've been learning alot about the many chopped/sectioned 39/40 1:1 custom Fords built in the early post war period, not many widened the fenders. Doug Rice's 1:1 39 Ford had the widened fenders and was a huge inspiration for this project. Although I wonder about the practical need for why he did it, I really like the look of the wide fenders. It fixes the quirky narrowness of this body style to me.
-
Thanks! No primer yet....I'll post pics when I spray the first coat. I wanted to publish pics of the bodywork before it gets covered up. The first coat to me is the initial test of how the bodywork looks.
-
Since my last post on this project progress has been slow and steady. I've since glued the top/body/fenders together, filled the rear wheel openings(I'll later scribe a fender skirt line for the flush skirt illusion), filled the bumper bracket holes(I'll cut small, more accurate ones later), cut open a recessed license area in the trunk, added a filler strip along the bottom of the front fenders/doors, filled/smoothed the firewall, replaced the 40 grill area with a 39 from the Revell kit, filled the windshield opening at the top(even when chopped the opening is too tall for me)and added an inner lip for the "glass" to mount to. I took some step-by-step pics of how I did this and may create a separate post with them. I got the idea from Steve Boutte and I think it's going to work pretty well(thanks Steve!) It's almost ready for first primer coat. Paint color is undecided except it will be some single stage color appropriate for the era. As I think I mentioned, I'm attempting to build this car as an early post war style custom. Plans call for a hopped up flathead with a 4 carb setup. I may try to scratch build a weird one that has the carbs side by side rather than all of them inline, just to be unusual. After some researching it seems there were a few people experimenting with really odd but cool multi carb setups back then! Those manifolds are super rare today. Enough yapping, have a look at the pics One last note: notice that piece of tubing in the interior? I was gluing some sheet strips on the inside of the top to strengthen my cuts as is my usual practice, but because the top was not yet glued to the sectioned body, the B pillars buckled inwards towards each other! I tacked in that tubing to push them back out, then glued the top/body/fenders together. I hope that when I remove it things will stay where they are...
-
Nice work, James!