Jiml0001
-
Posts
120 -
Joined
-
Last visited
Content Type
Profiles
Forums
Events
Gallery
Everything posted by Jiml0001
-
Make your own braided lines for pennies
Jiml0001 replied to Jiml0001's topic in Tips, Tricks, and Tutorials
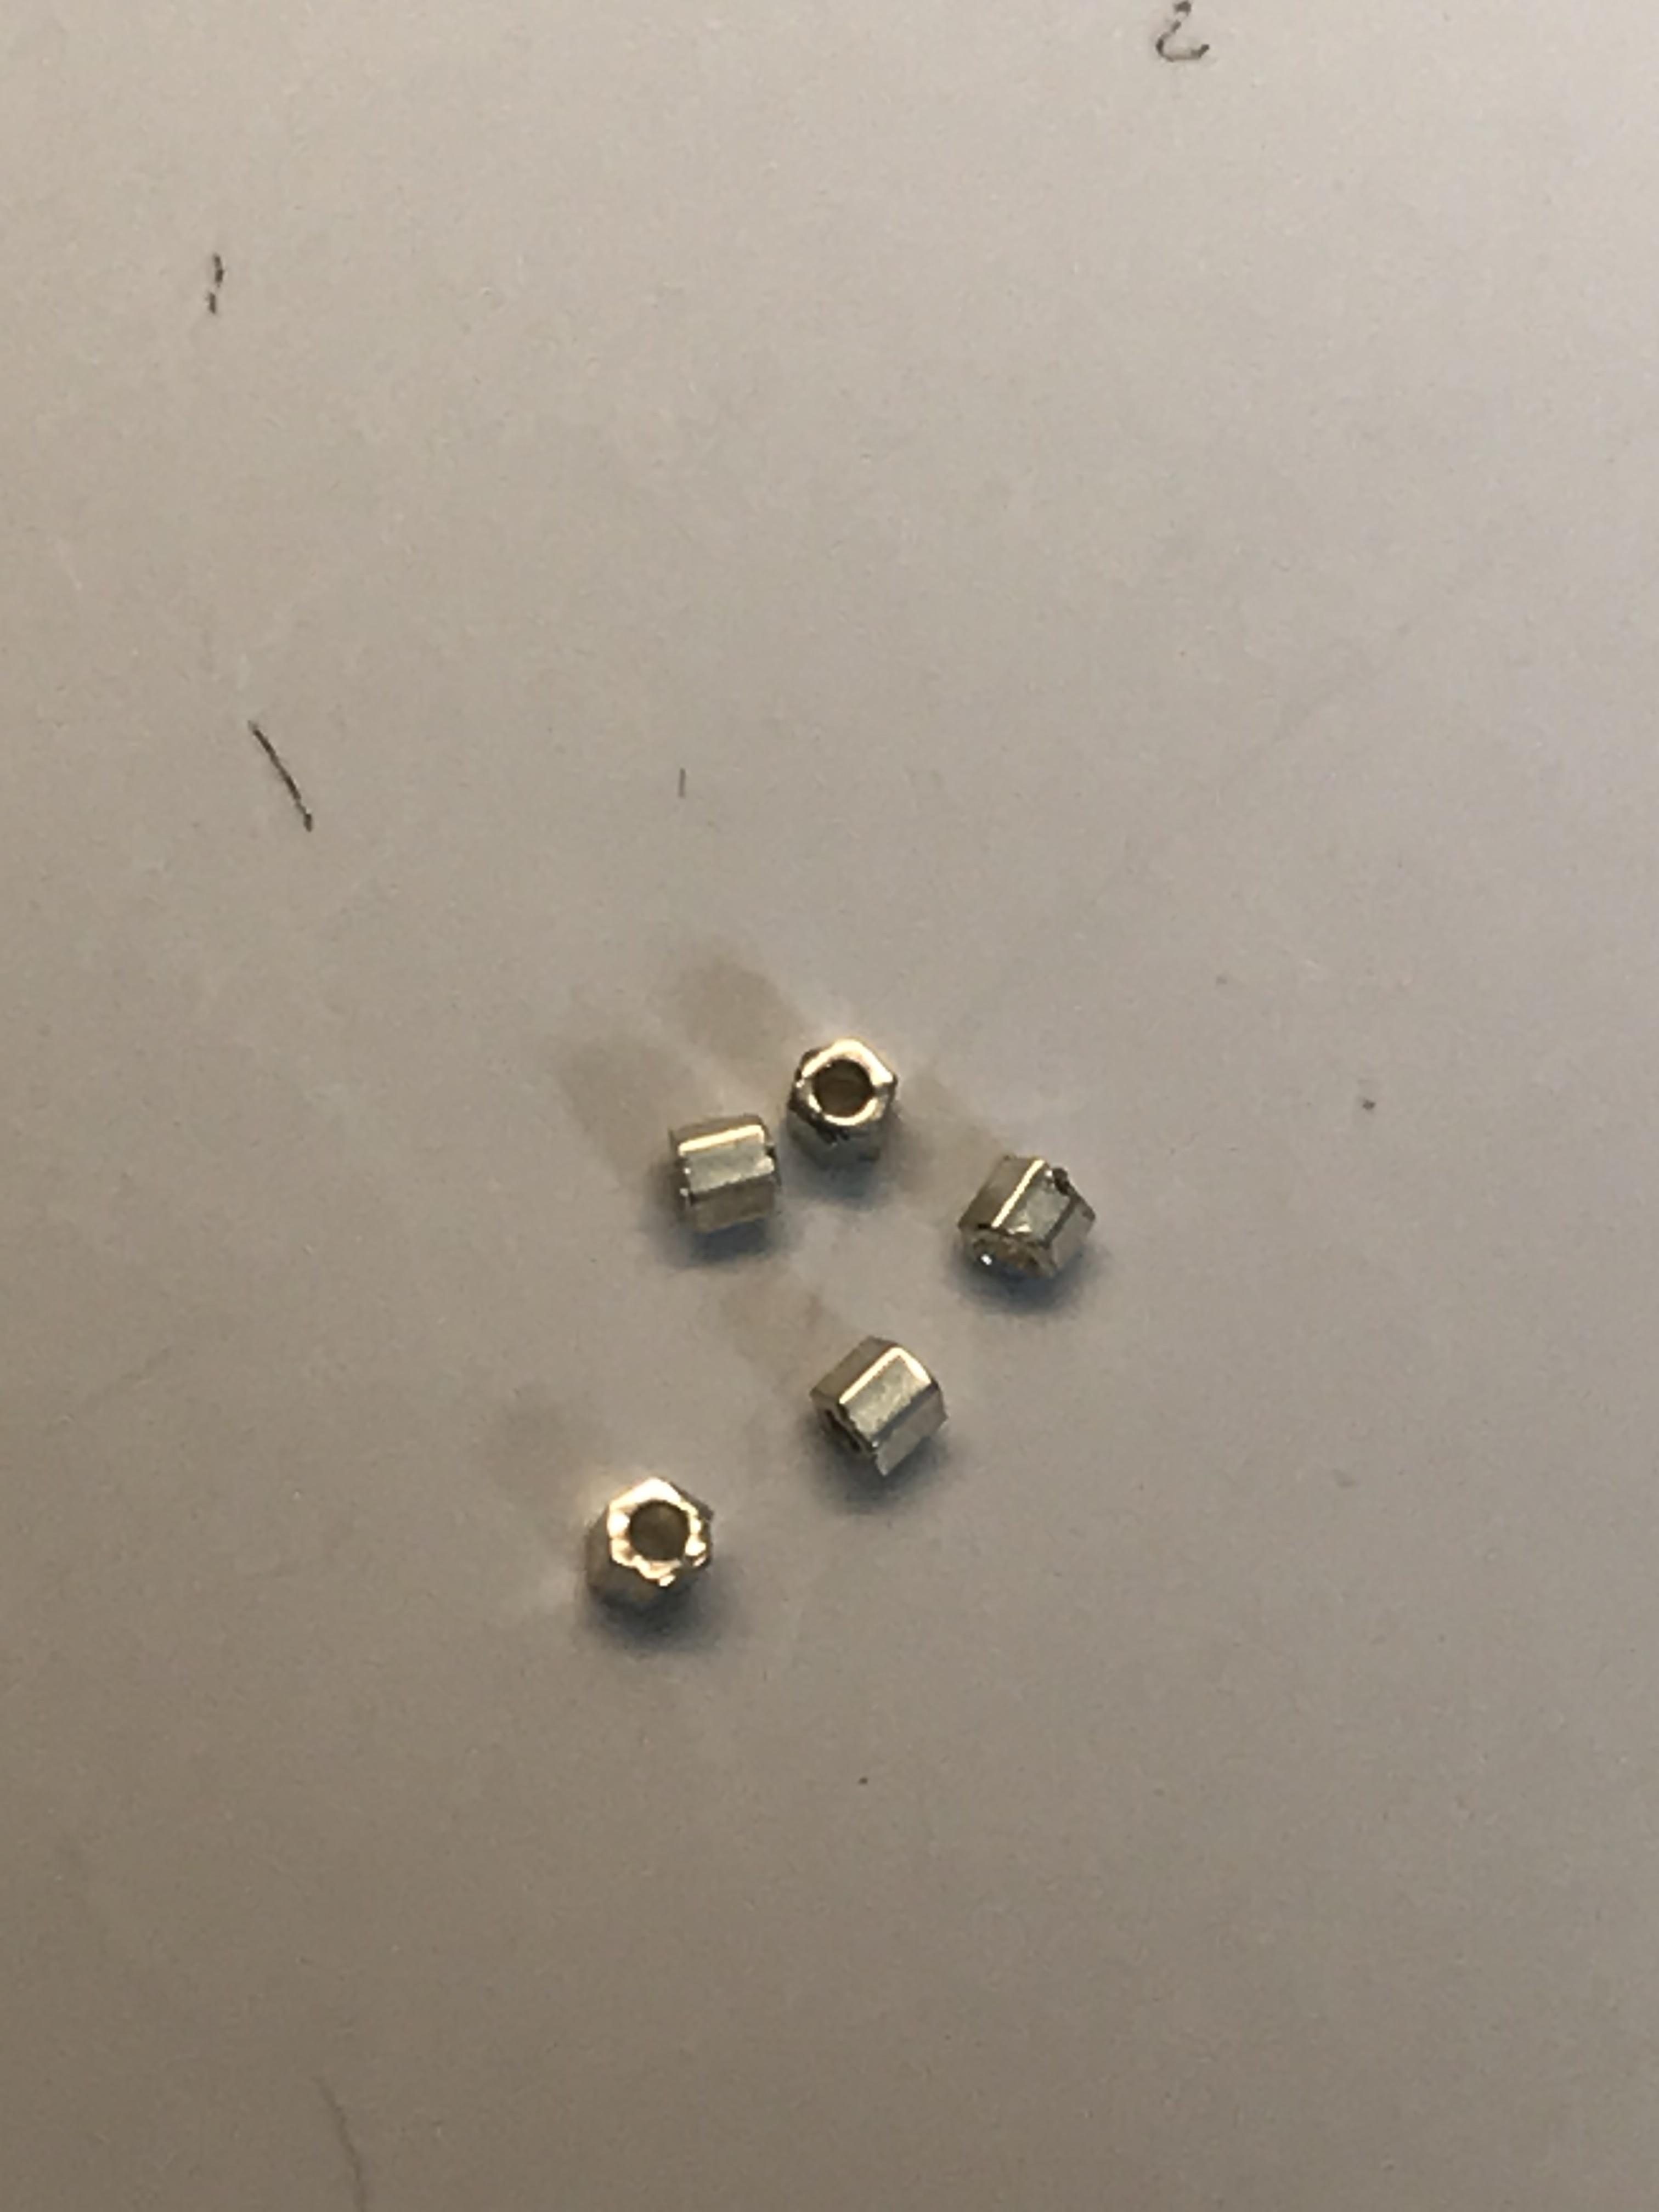
https://www.firemountaingems.com/itemdetails/H20A8888SB?gclid=EAIaIQobChMI_ZqZy5PX-gIVgBXUAR35BQLAEAQYAiABEgLQffD_BwE number 15 silver hex beads. -
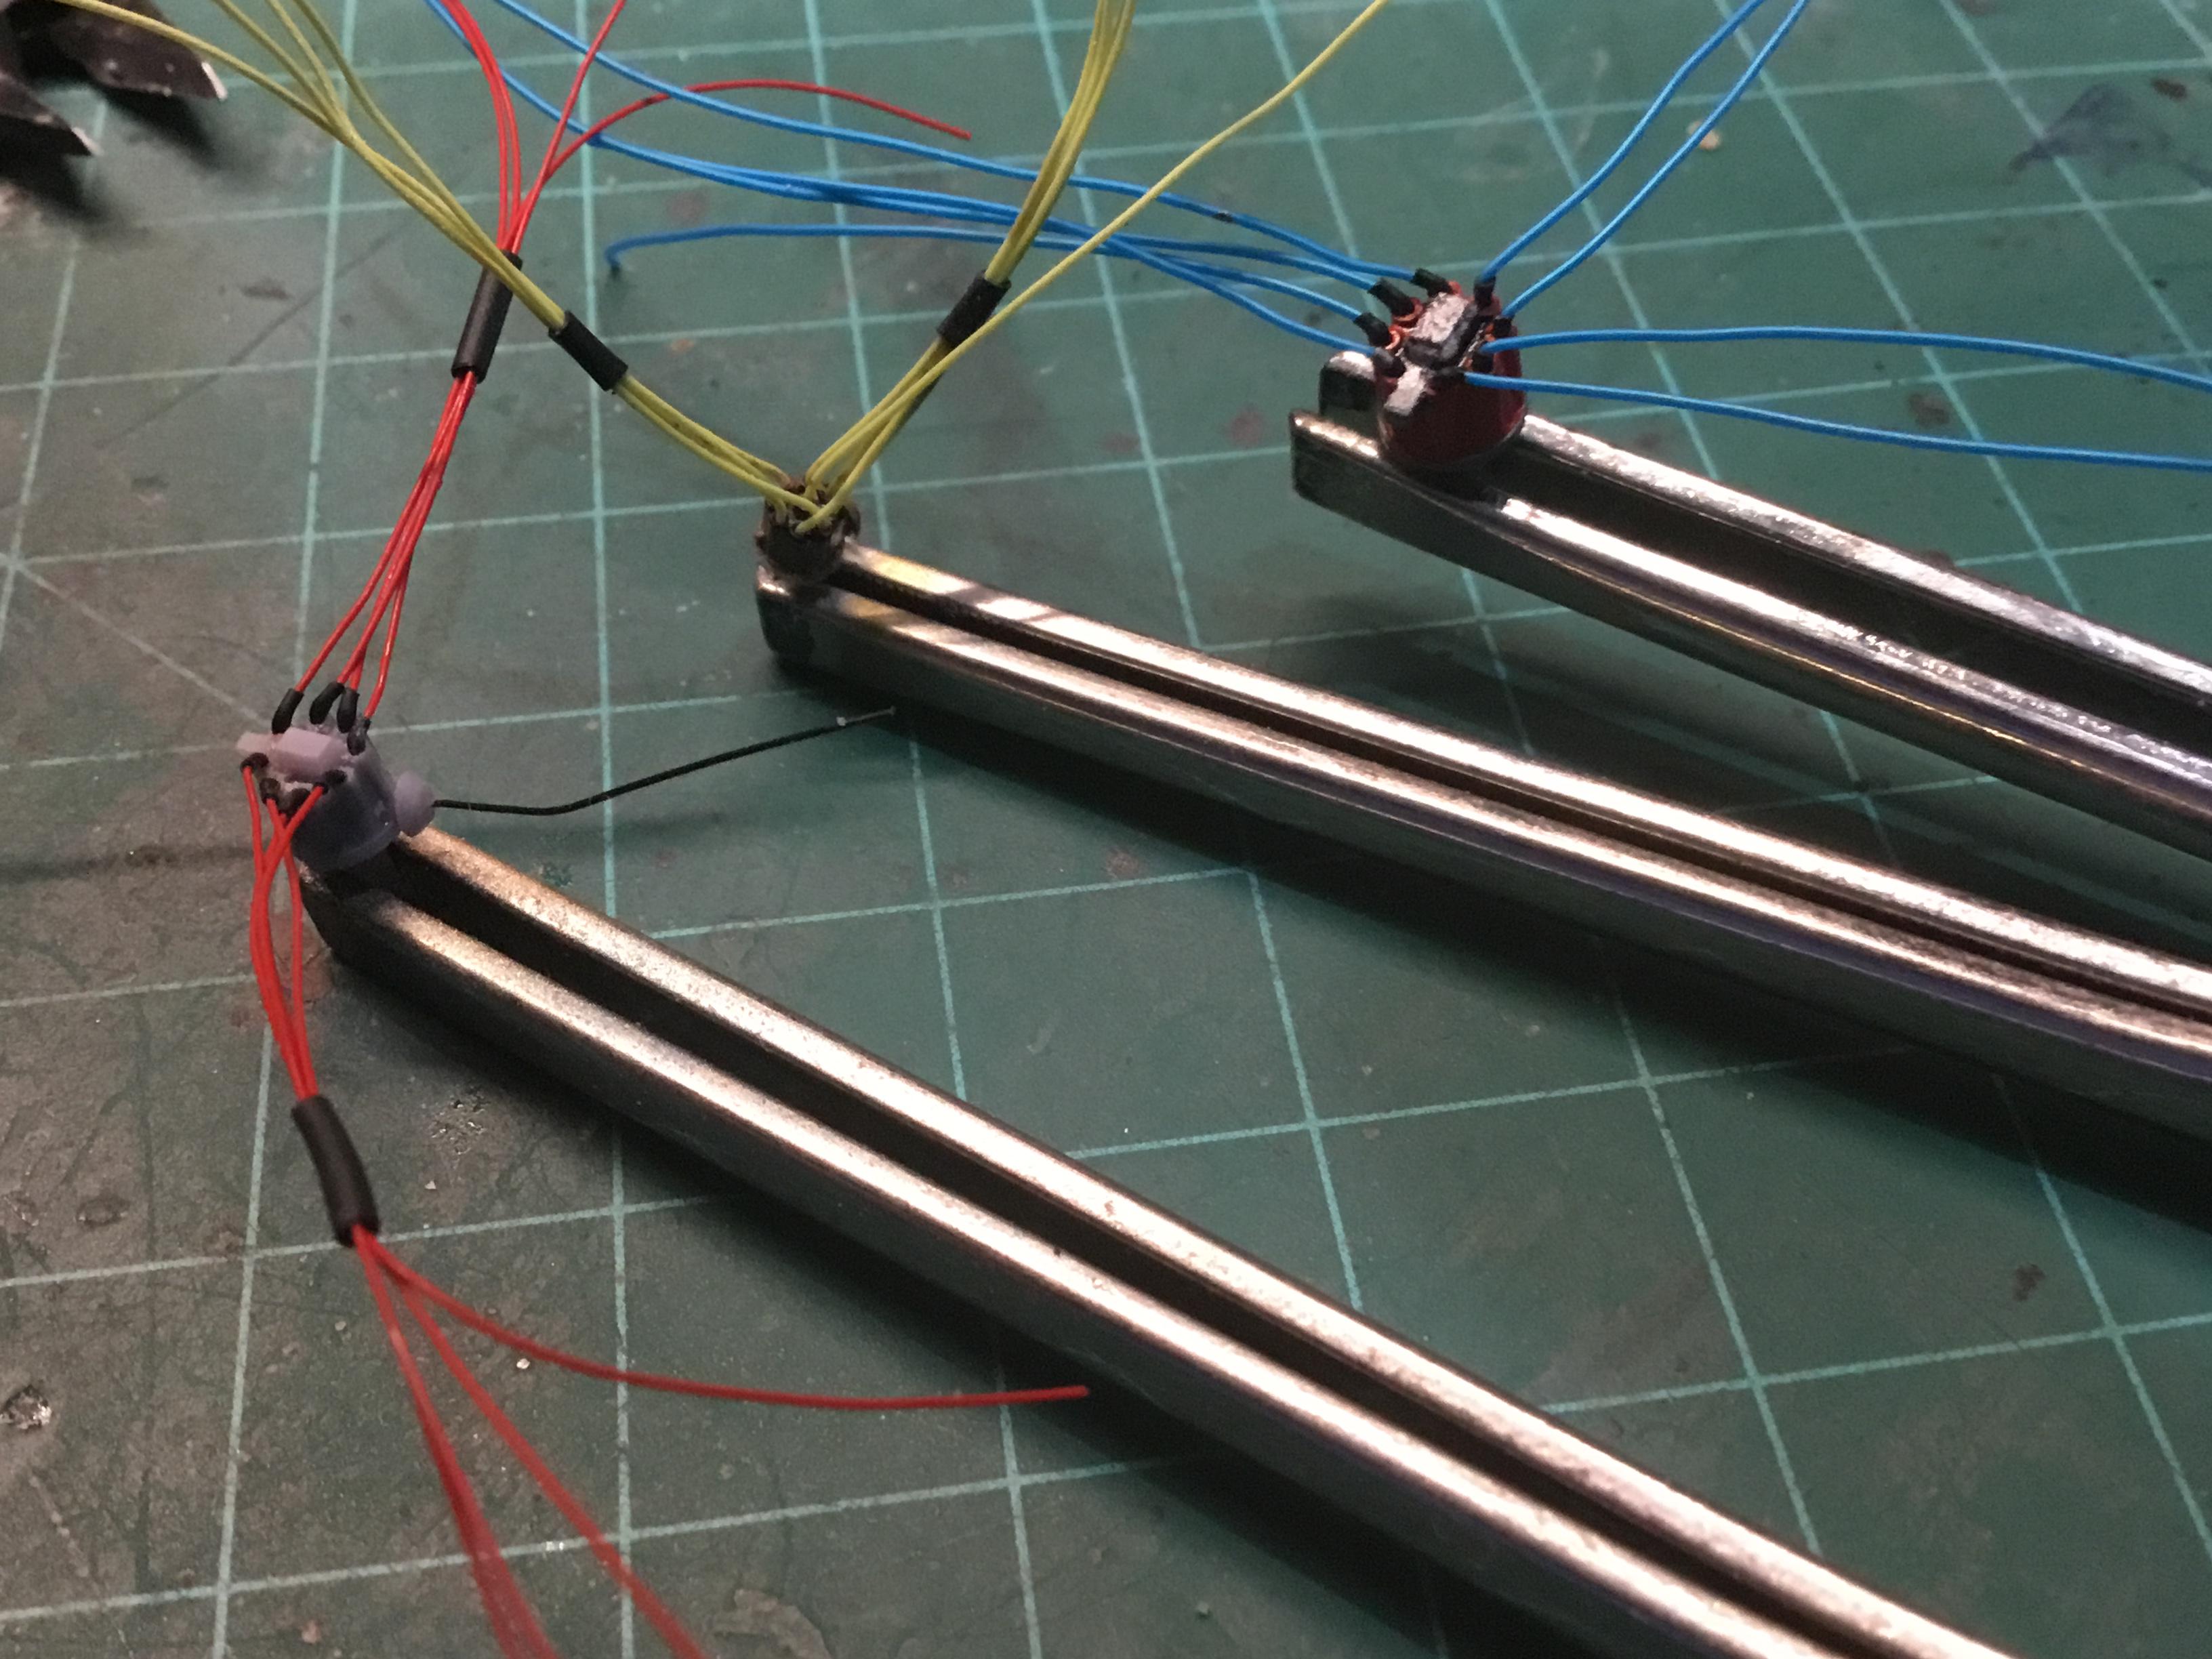
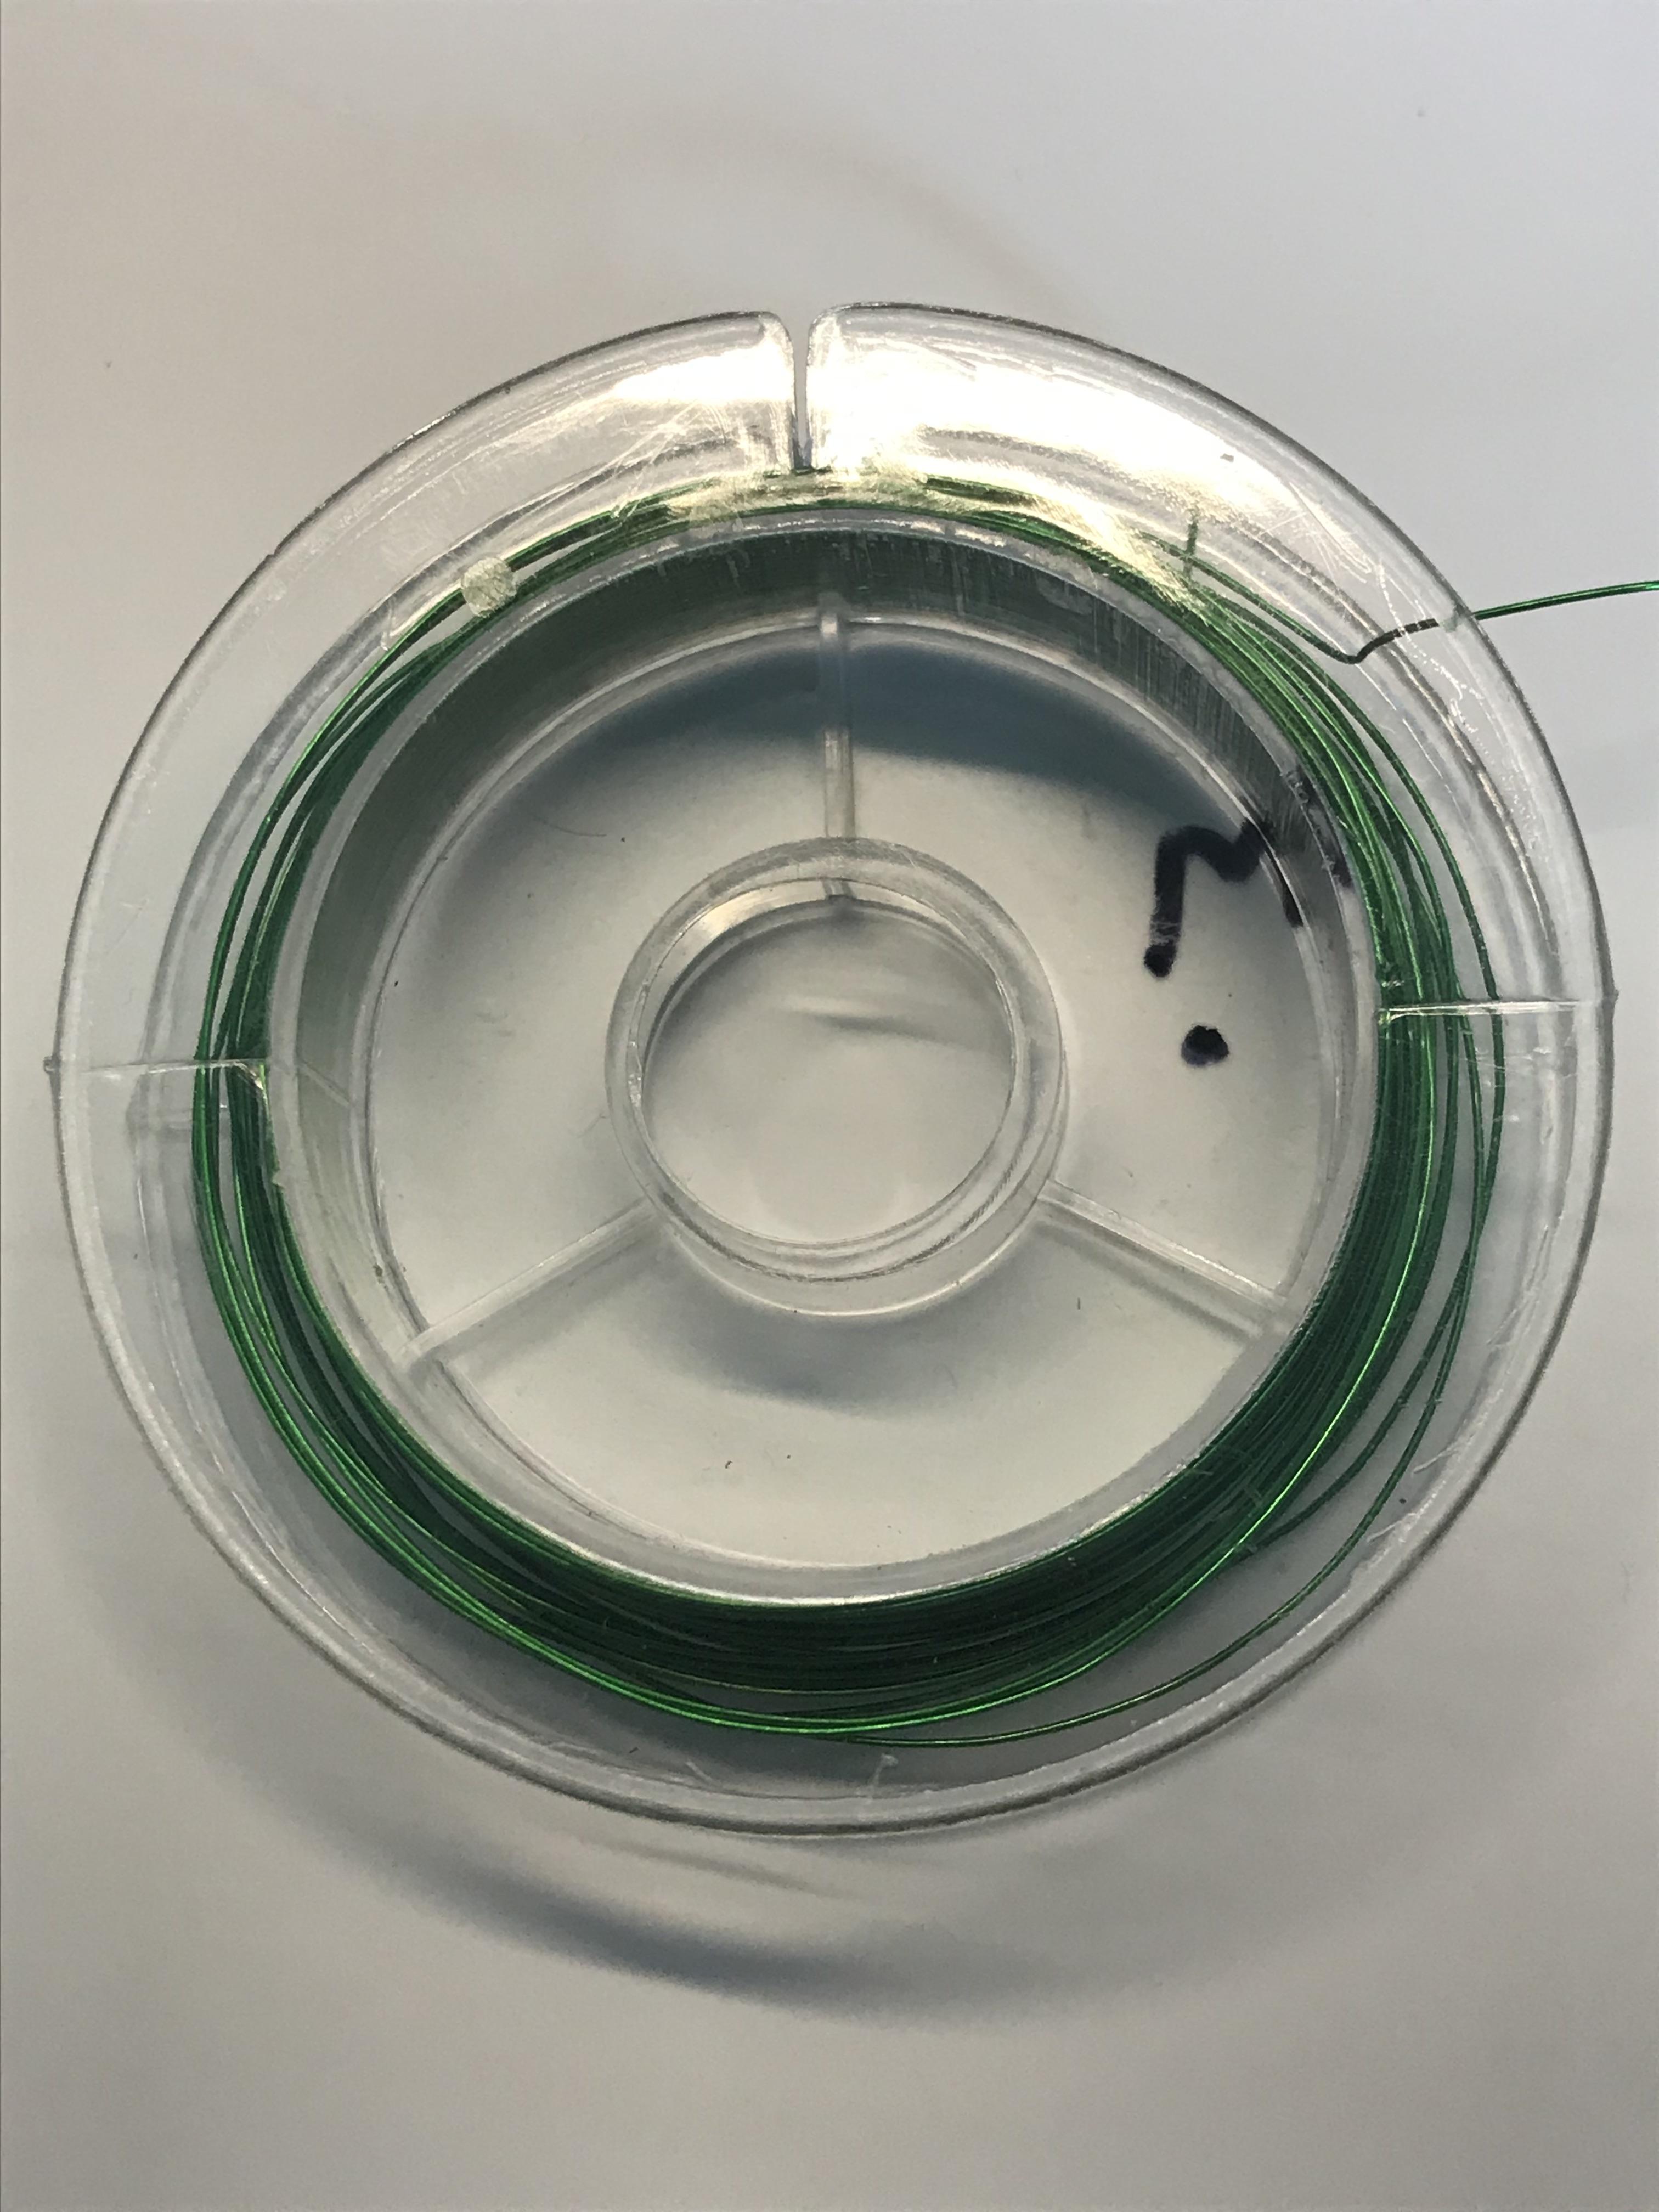
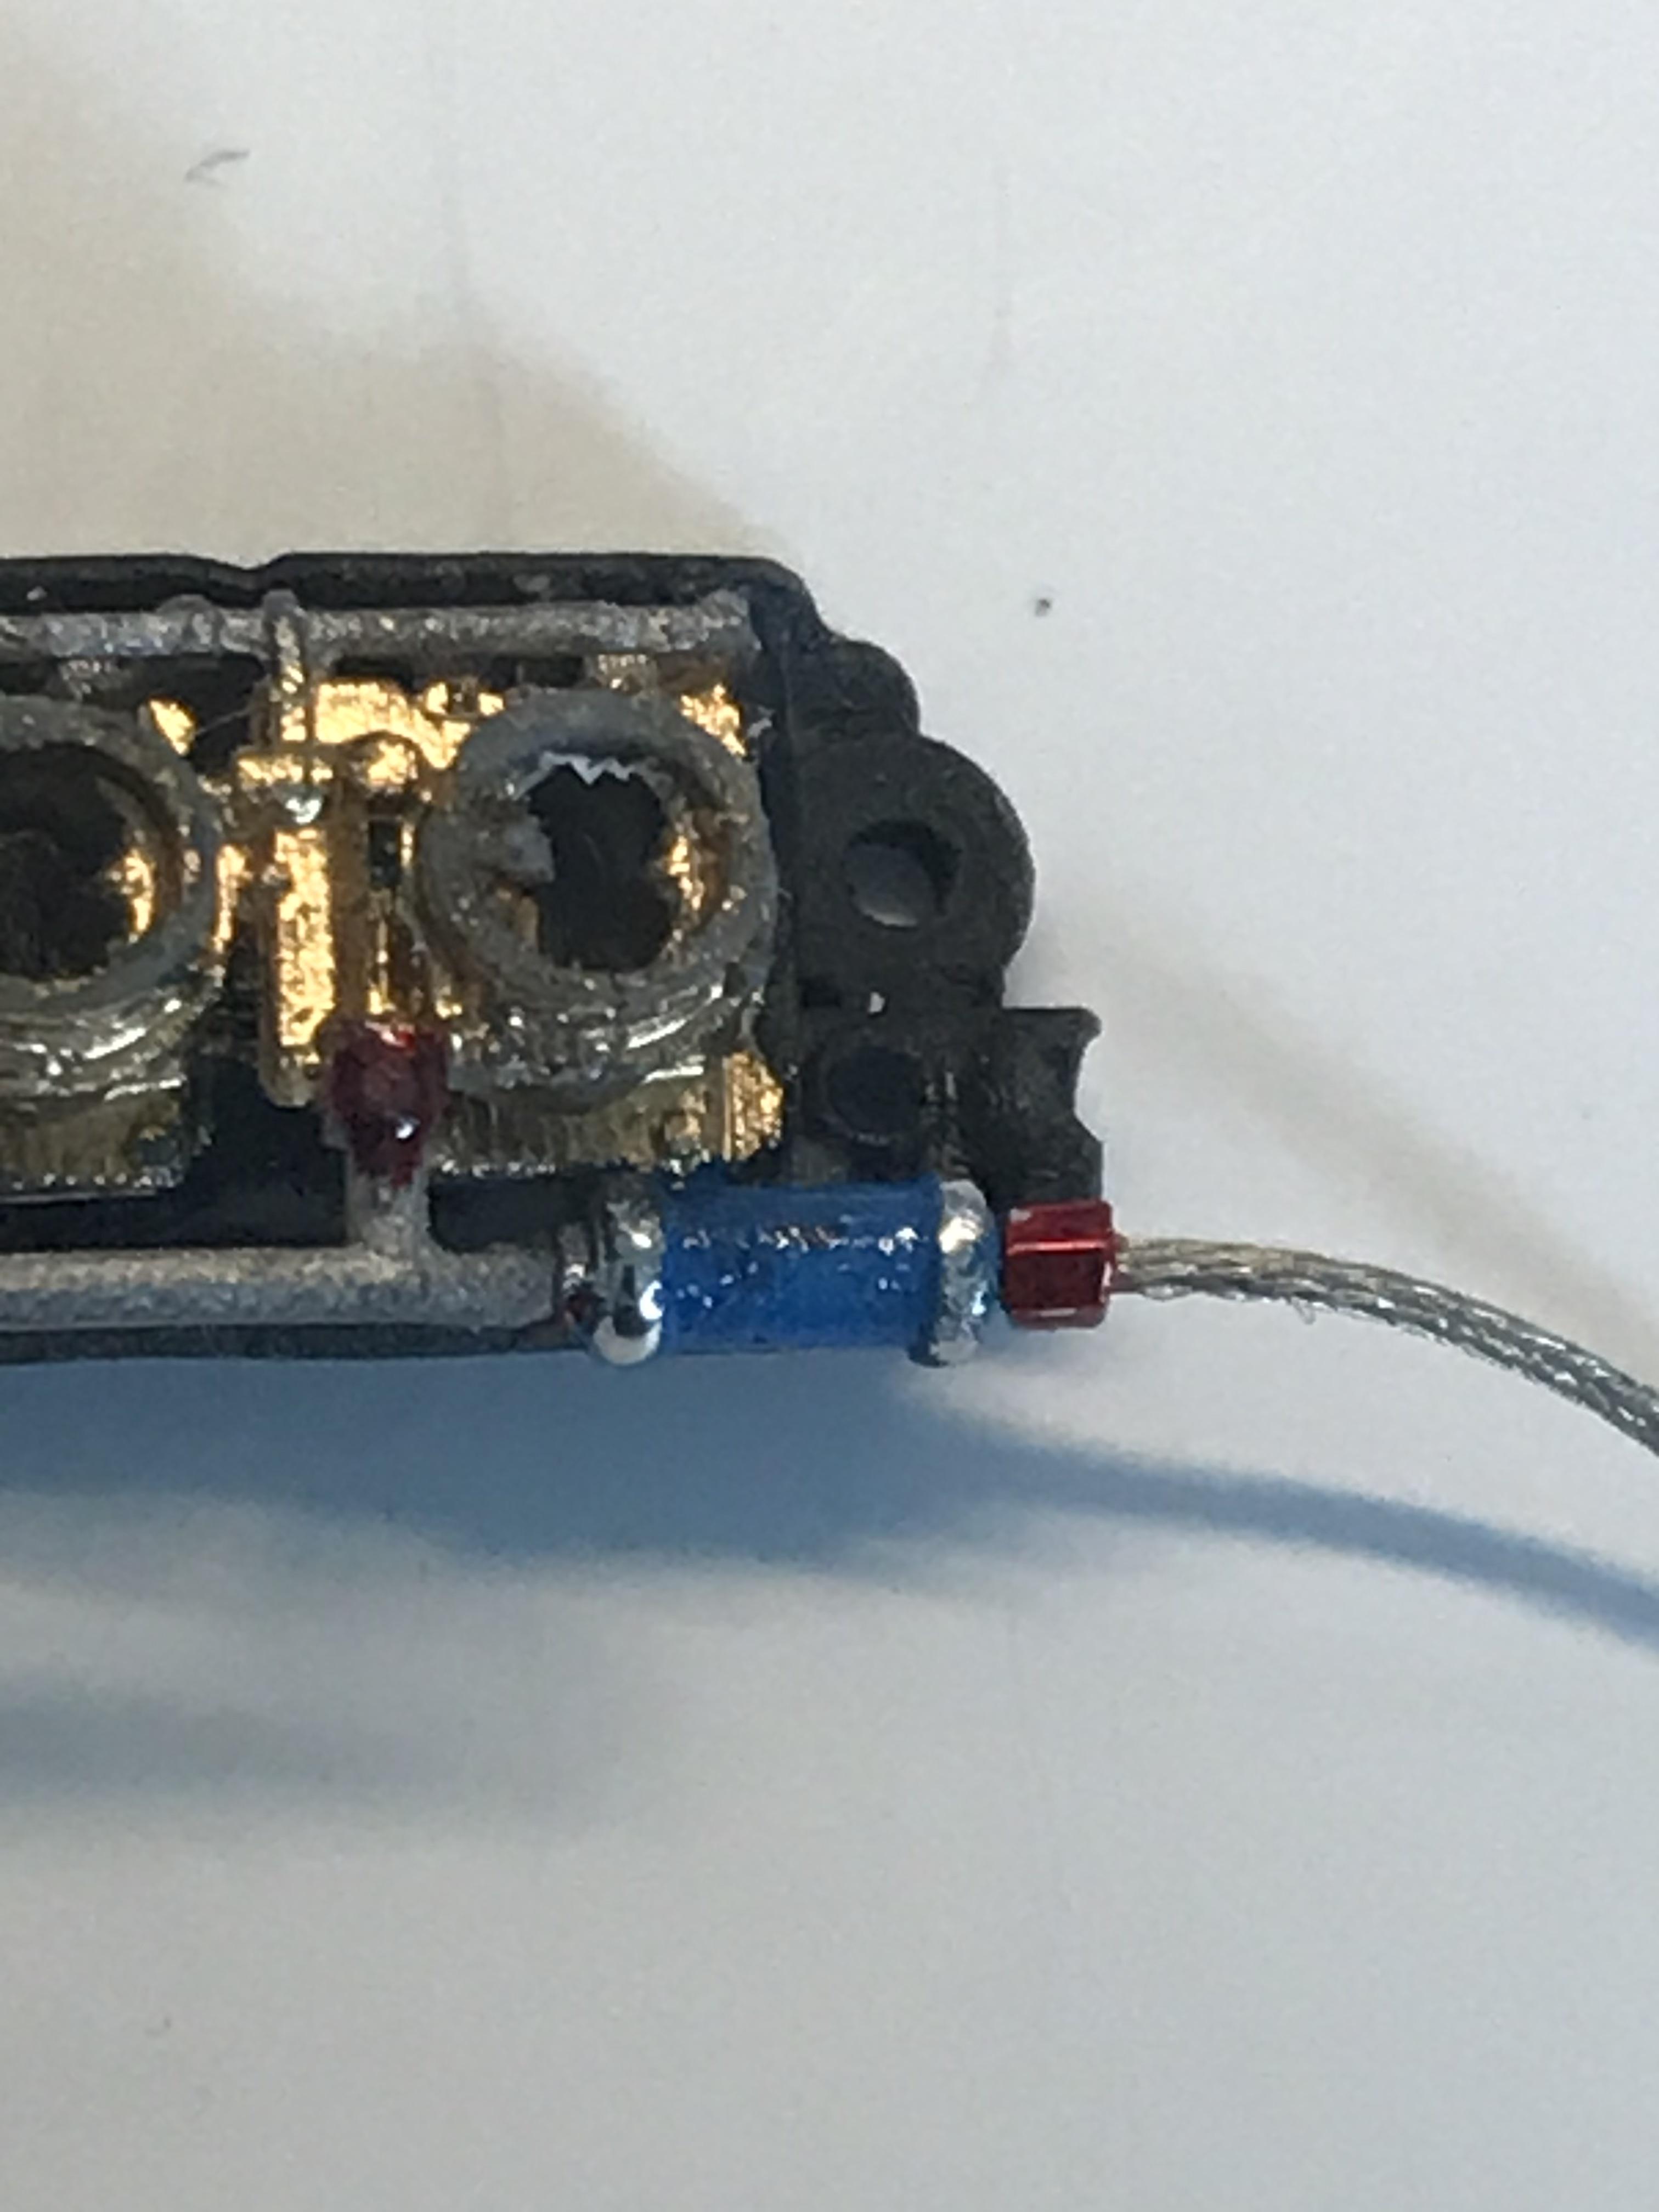
Here are some different sizes. The red wire on the hei distributor is .4 mm and scales to 3/8 inch in 1/24 scale. The yellow is .25 mm. And represents 1/4 inch plug wire The blue wire is a half mm and scales out to a half inch in 1/24 scale This is the size most detail vendors sell for plug wire I think it is just too big

-
Another thing I found is that wire using Teflon insulation is not opaque. It is translucent and I couldn’t find any paint that would stick to it
-
For .25 mm wire search for 10 meters 7/0.05 ultra slim Dia. 0.28mm 0.011" super thin cable Wires Red again many colors and also $5.00 plus shipping for 10 meters of wire. In 1/24 scale this is 1/4 inch in scale. I use this for standard ignition wires
-
Search for UL10064 Ultra-Fine Electronic Wire 0.38MM High Temp Hook Up Wire
-
I got some .38 mm outside diameter wire on eBay. Many colors to pick from. $5.00 plus shipping for 10 meters (over30 feet) of wire. In 1/24 scale that is almost exactly 3/8 of an inch in scale. I use this size for HEI ignition wires
-
Be careful. The AWG rating refers to the size of the conductor not the outside diameter. I have found the same AWG rated wire in three different outside diameters. If you are looking for true scale then you want .25 mm outside diameter for 1/4 inch plug wires and .40 mm for 3/8 high tension wire but again look at the outside diameter not the AWG number
-
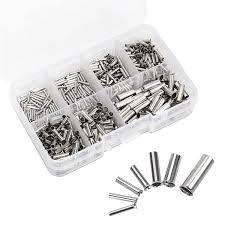
I got these on ebay. 600 total in 7 different sizes for $5.95 plus shipping
-
Bootlace ferrules are wire ferrules. Just another term for the same thing.
-
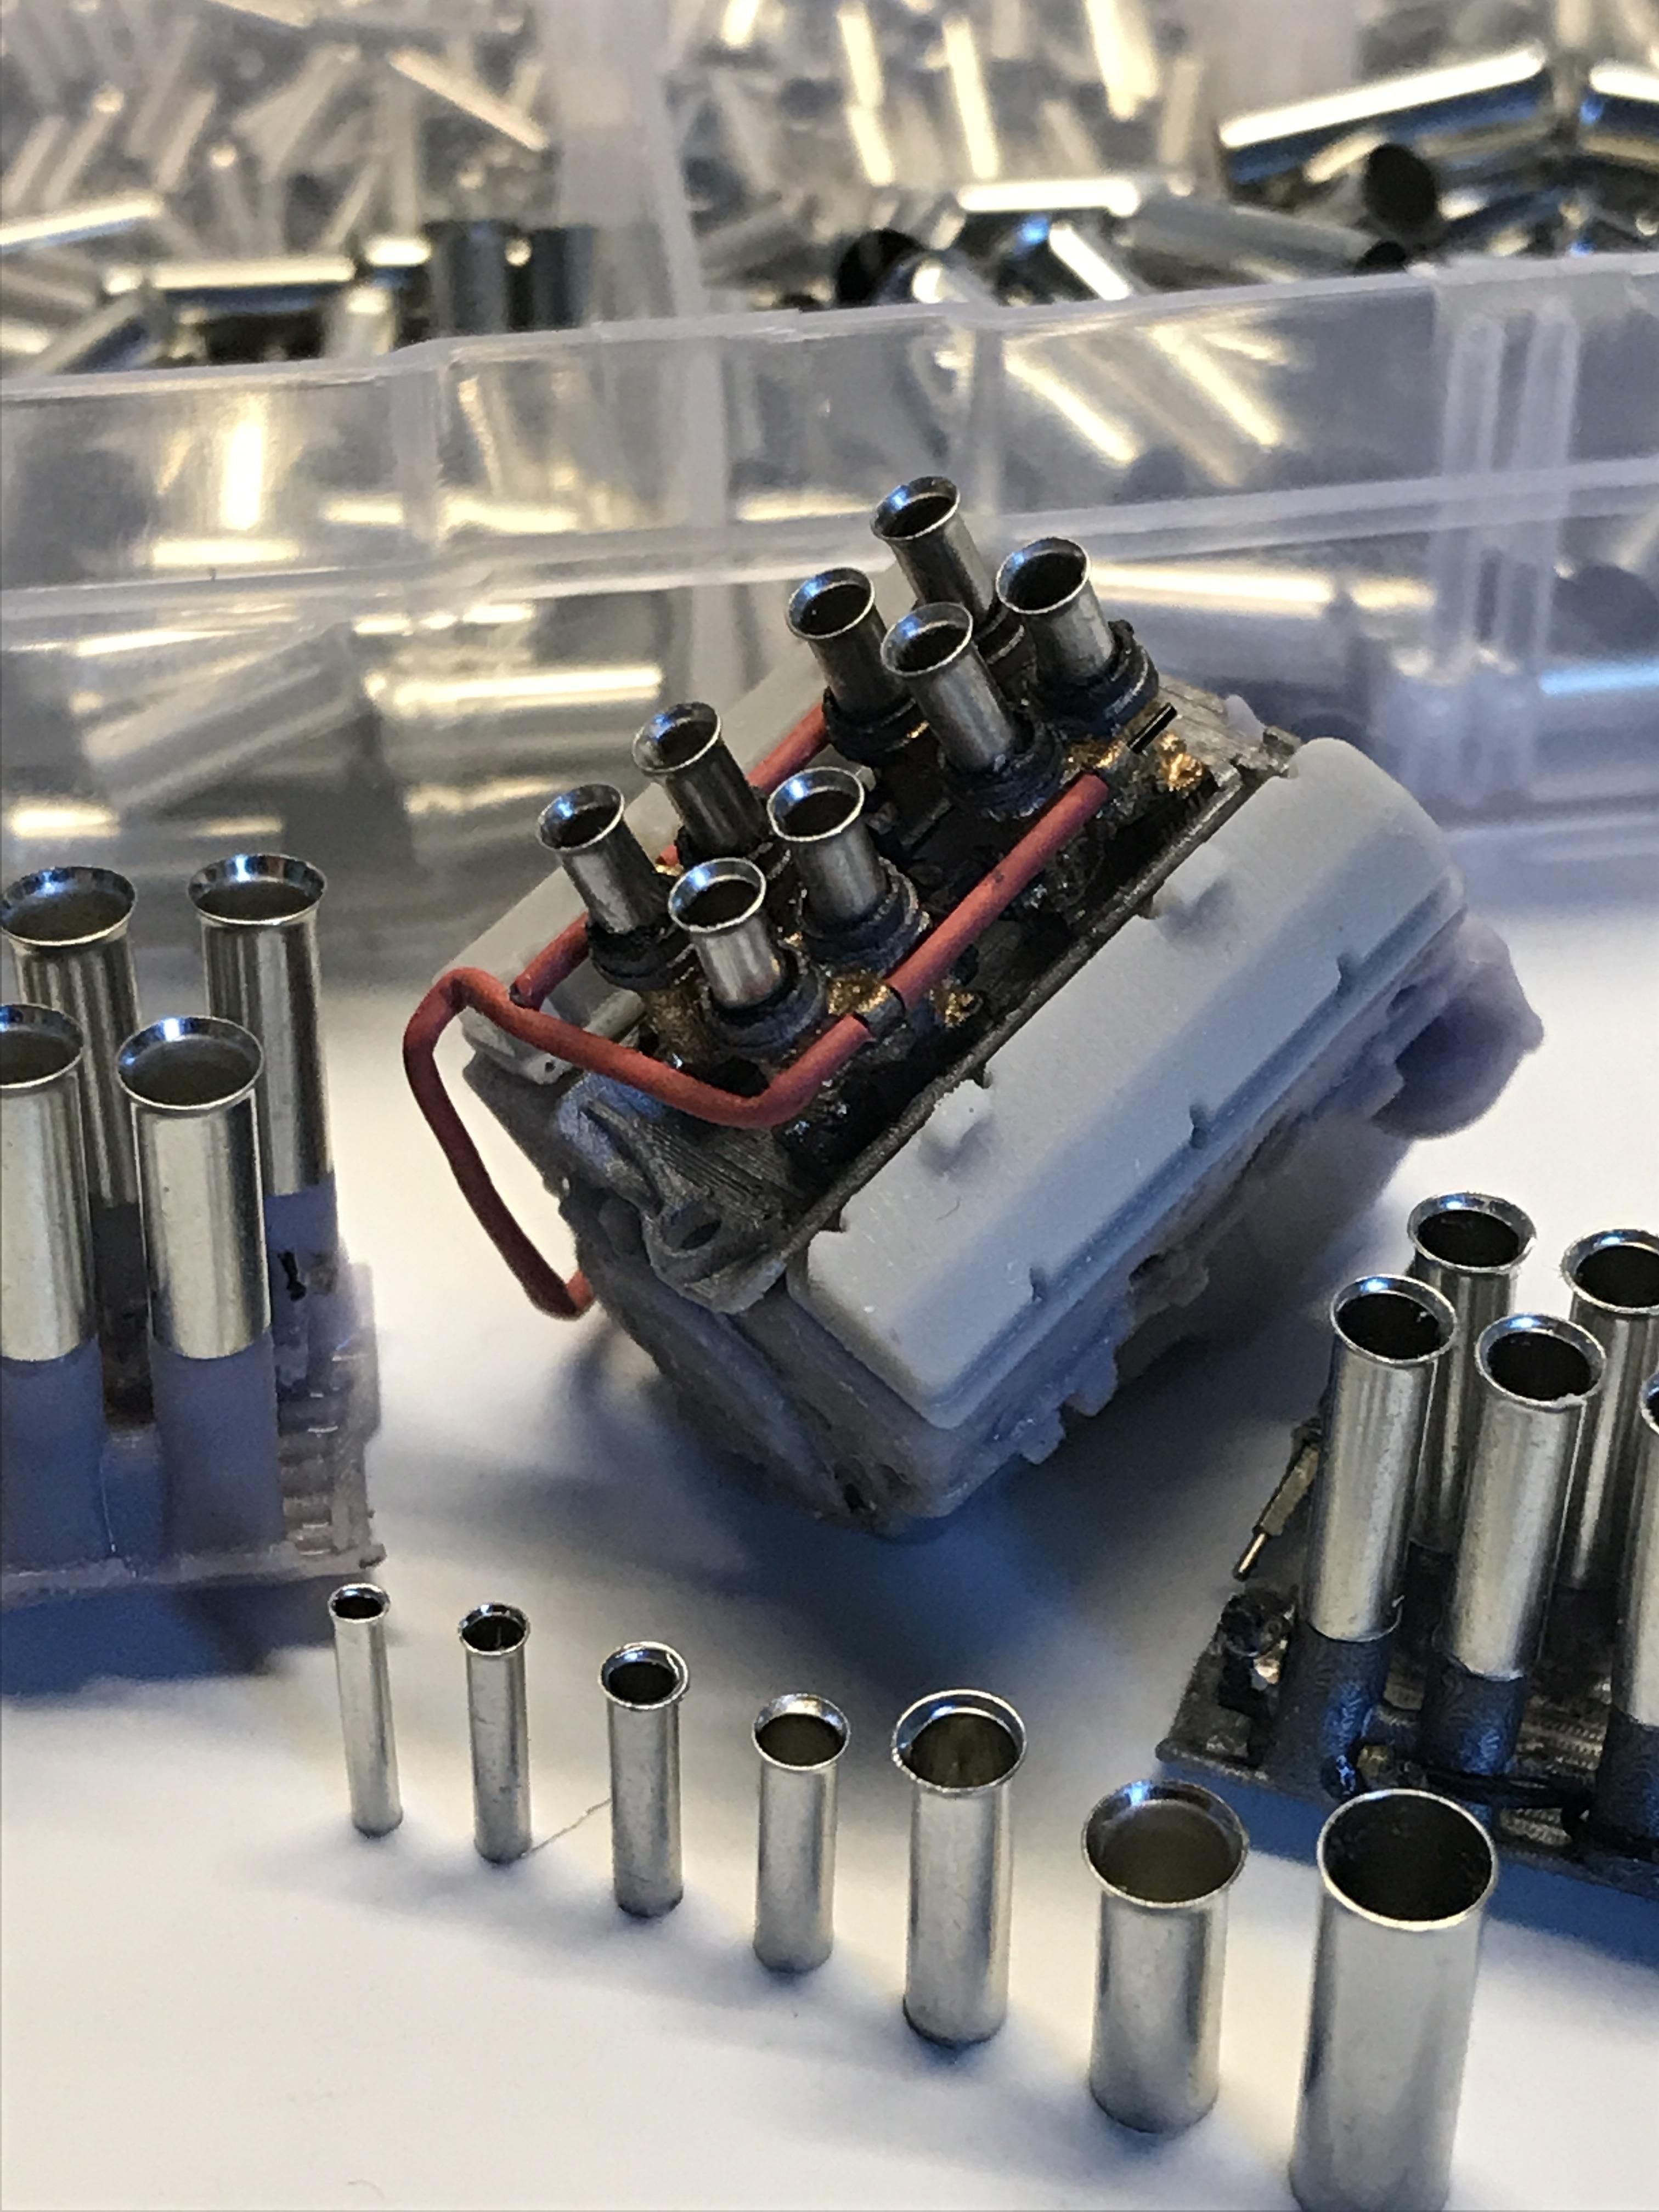
Found a great replacement for velocity stacks. Google “bootlace ferrules” and you can get a box with an assortment of sizes. I paid $11 for this assortment with 200 pieces in it. They are thin walled and beautifully chrome plated brass tubes. They really look fantastic and I think they look better than most of the aftermarket turned stacks or exhaust tips for a tiny fraction of the price
-
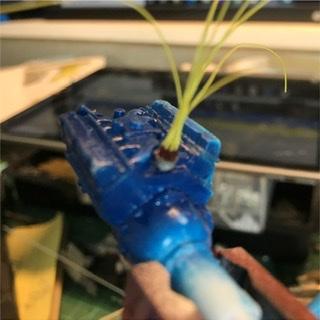
"These need to be about 2 millimeters to be correct scale. I use something called “bead bumpers”. They are tiny discs that go between necklace beads if you want to space them out. You can get both 1.5 and 2 millimeters and a lifetime supply is less than $5 dollars these are really tiny. Drill a hole in your distributor and glue in some 28 gauge wire. Slide on a bead bumper and then attach your hose from there to somewhere on the intake manifold. I also have 3d printed distributors both with and without advances
-
Make your own braided lines for pennies
Jiml0001 replied to Jiml0001's topic in Tips, Tricks, and Tutorials
There are a couple of reasons. If you don’t remove it you can’t stretch out the braid and make it small enough to fit in the hex bead. By putting the small solid wire in after the beads are threaded on you can bend the hose and it will retain its shape and having the wire inside keeps the braid from flattening out and distorting when it gets bent, especially a sharp bend -
Trying some different intake setups
-
Playing around with printing different types of intakes
-
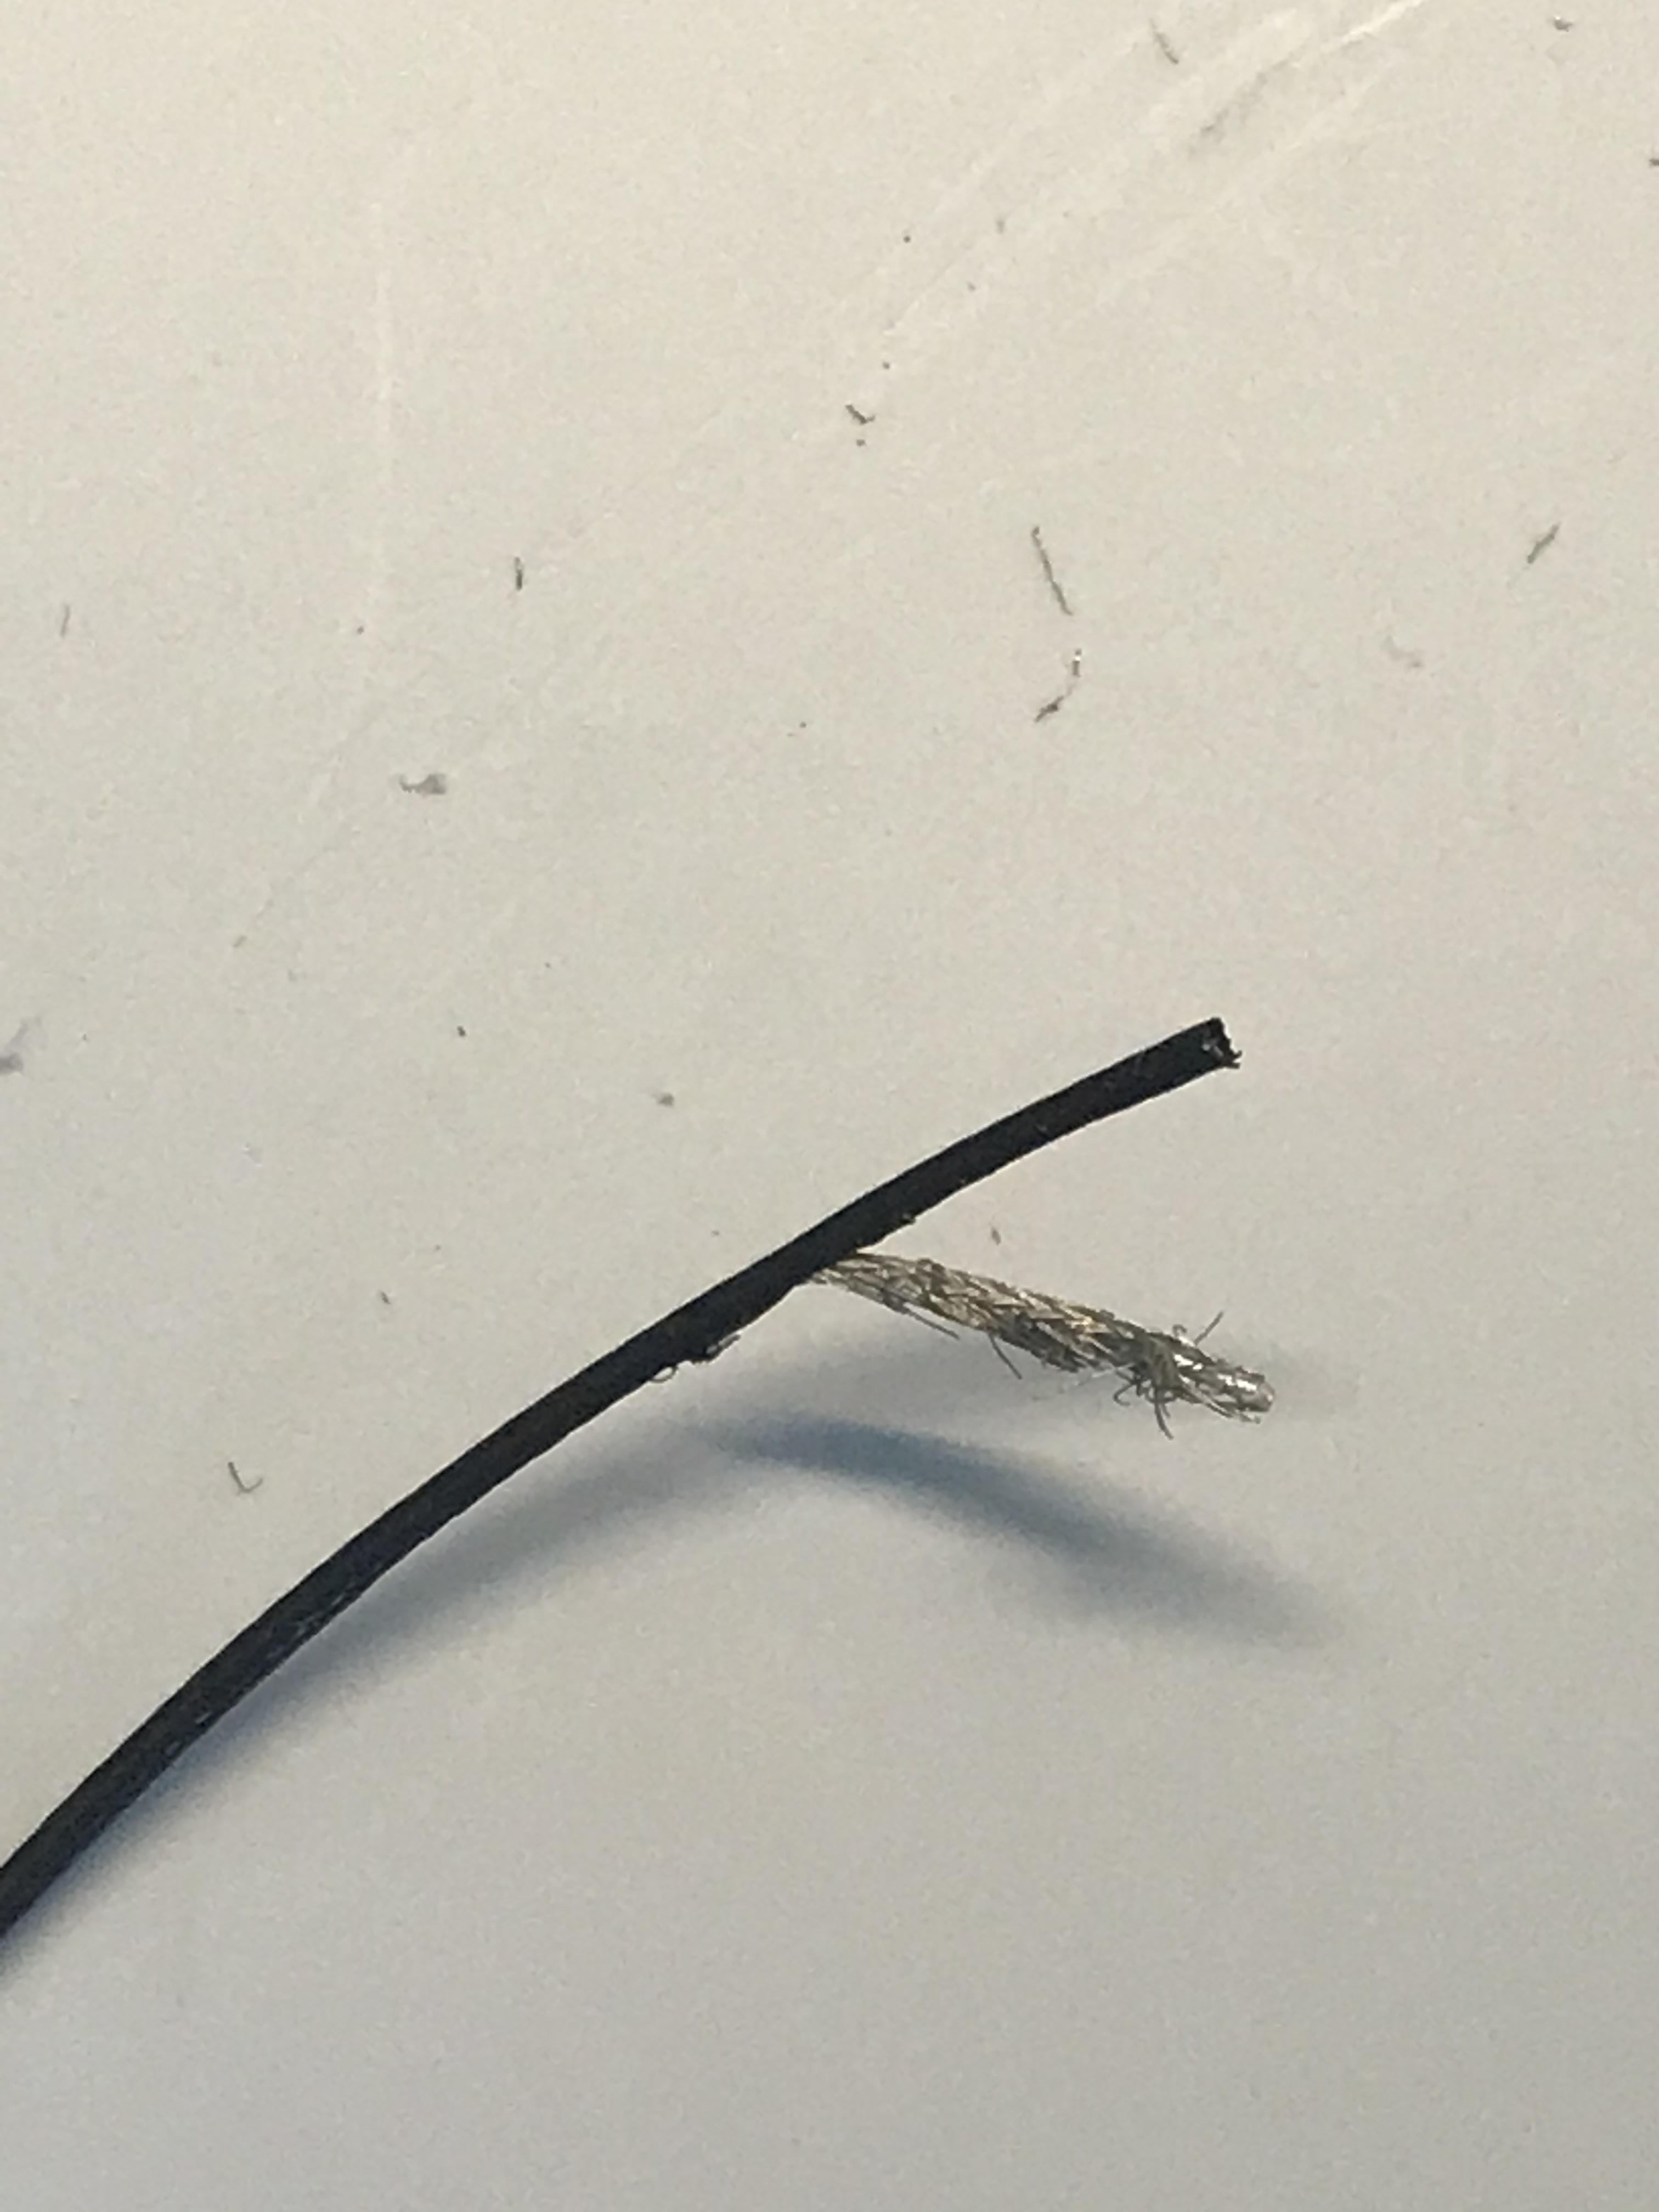
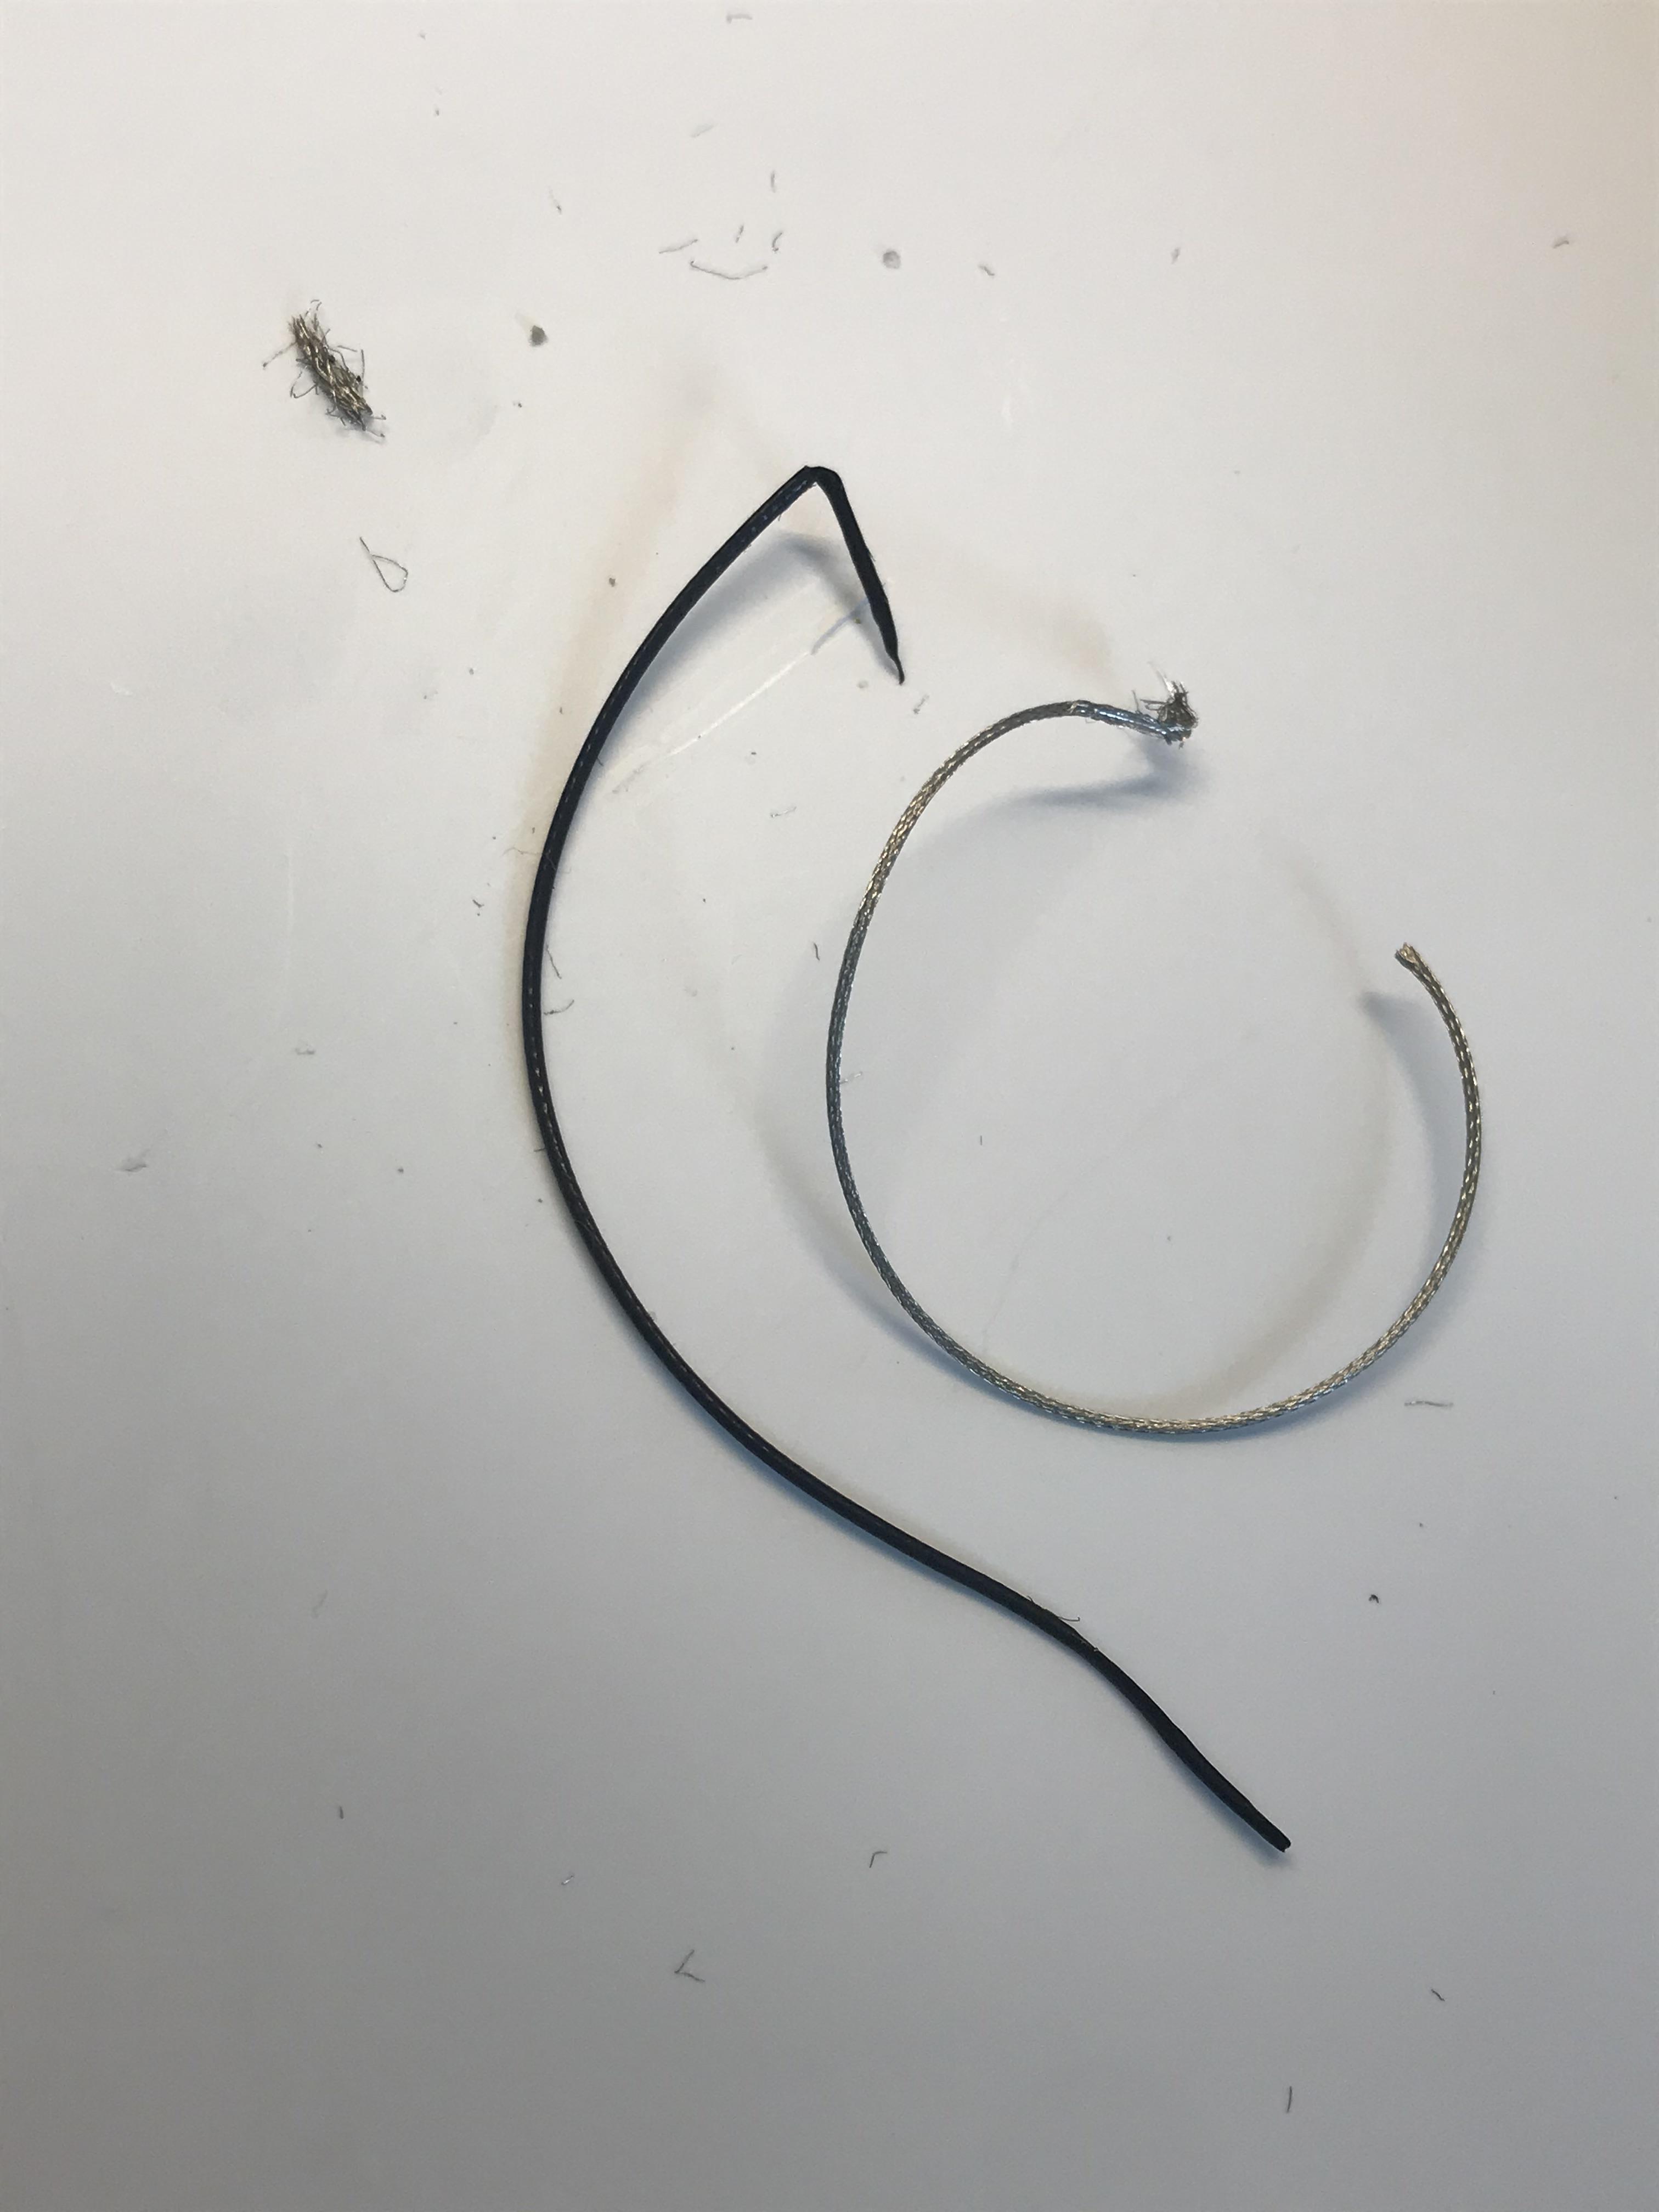
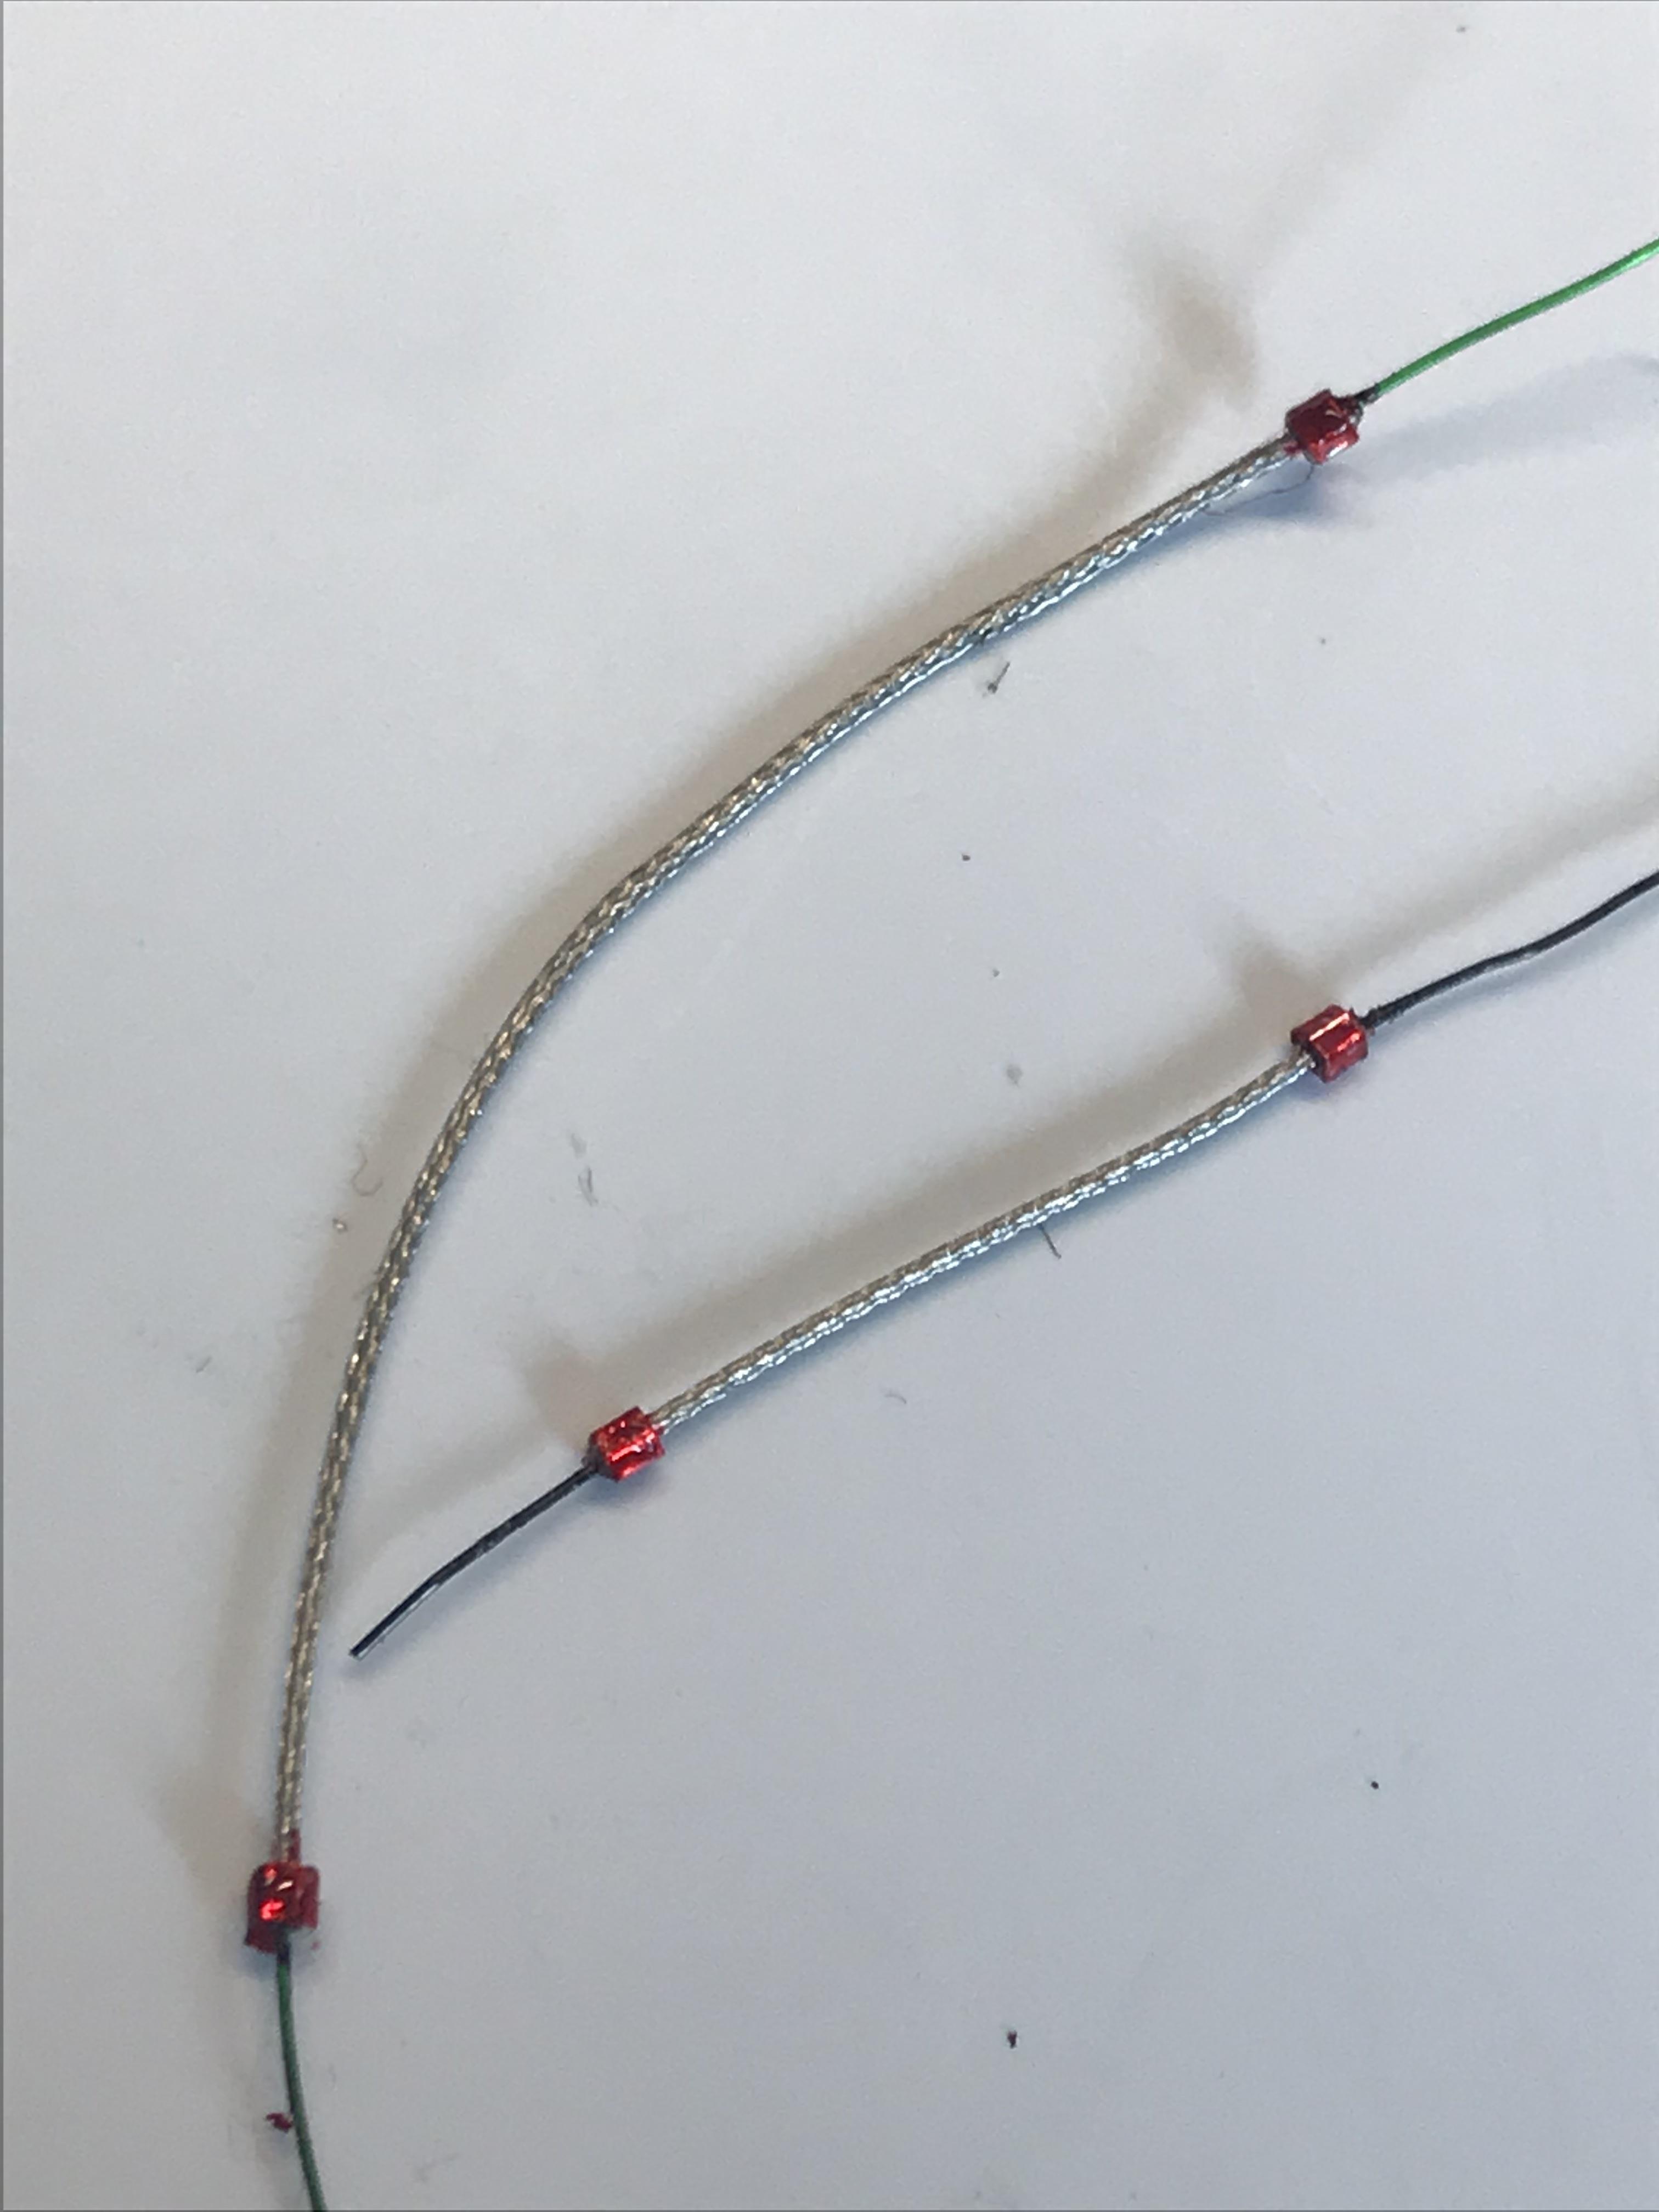
A big part of this hobby for me is coming up with ways to make things myself. Now there are lots of braided lines and ends available out there, and they are beautiful, but they are a little pricey. I wanted to make my own for both fun and to save money. I have put together a method that looks great and will only cost you pennies. First are the three materials you will need. The most important is to find the smallest coaxial cable you can find. I use coaxial cable that is 0.81 mm (.030 inches) in diameter and the last time I saw it was on AliExpress. It was going for $6.96 for 10 meters and with shipping was just about $10.00. That is two and a half cents per inch. If you buy a 20 meter piece it is even cheaper. There is also coaxial cable that is .64 mm. I did get some of that but the inside shield was not braided, it was just a wrapping so it won't work for braided cables. The second material are the ends. I got hex "seed beads" in metallic silver. There are hex beads in different colors and sizes. In this tutorial I am trying to make the smallest cable possible so I use a size 15 hex bead. That gauge is about 1 mm wide (1 inch in 1/24/ scale). The hole in the center is 1/2 mm in diameter. The third item is 28 gauge jewelry wire. I use this down the center of my cables so I can bend them to any shape I want and also the braid won't flatten out when you bend it sharply. The wire center also gives you a way to attach your braided cables. I got my 28 gauge jewelry wire at Hobby Lobby for around $10.00. For that price I got ten rolls of different colors. I don't remember the length but it is easily a lifetime supply. The first thing to do is to remove the outer insulation on the coaxial cable to get to the braided covering. Cut a piece of cable to work with Removing the outer covering works best with pieces about 8 to 10 inches long. Any longer and the outer covering wont slide off. If you want to get longer pieces, try heating the outer covering when it comes time to remove it. Use a knife to strip away about a half inch of covering so you can get to the braid. Grab the braid with tweezers or pliers and start working the covering off. I rub it down the whole length using a fingernail over and over. It doesn't take long for the covering to loosen up and slide off. Now you have the braid. (The outer covering could be used for other things of course). Use tweezers to spread apart the braid at one end and find the center core wire. This will pull right out . (Again, the center wire is useful somewhere. I have used it for fuel lines.) Stretch the braid out to make it as small as it can go. To add the hex nuts I cut the end of the braid at a sharp angle so it comes to a point. Use this pointed end to slide into the hex nuts. I always put the bead on its side and push the braid through it. Put a second bead on the braid for the opposite end of your cable . Here I cut the braid to length I want and be sure to make a straight cut. If you look at the end of the braid you can see where the center wire used to be. I take a piece of 28 gauge that is longer than the braid and slide it inside the braid. This should go well as long as your wire is straight. If the wire wants to poke out of the side of the braid as you push it through, straighten the braid out. Now slide the hex beads to each end of the braid and secure with a drop of glue. Push the bead out to be even with the end of the braid. Be careful, if you push too hard the bead will slip off the braid and you will have to start all over. A little clear red or blue paint finishes your homemade braided cable. The materials cost about two or three cents for an average braided cable and the supplies you buy will make hundreds and hundreds of braided cables for your project. I did this tutorial using the smallest stuff i could find. The cable as shown above is a one half inch braided hose in 1/24 scale. If you want larger, there are all kinds of sizes of both the coaxial cable and the hex beads. Use the metallic silver color (which is chrome) and the clear red and blue paint on the ends really pops. Good luck and have fun.
-
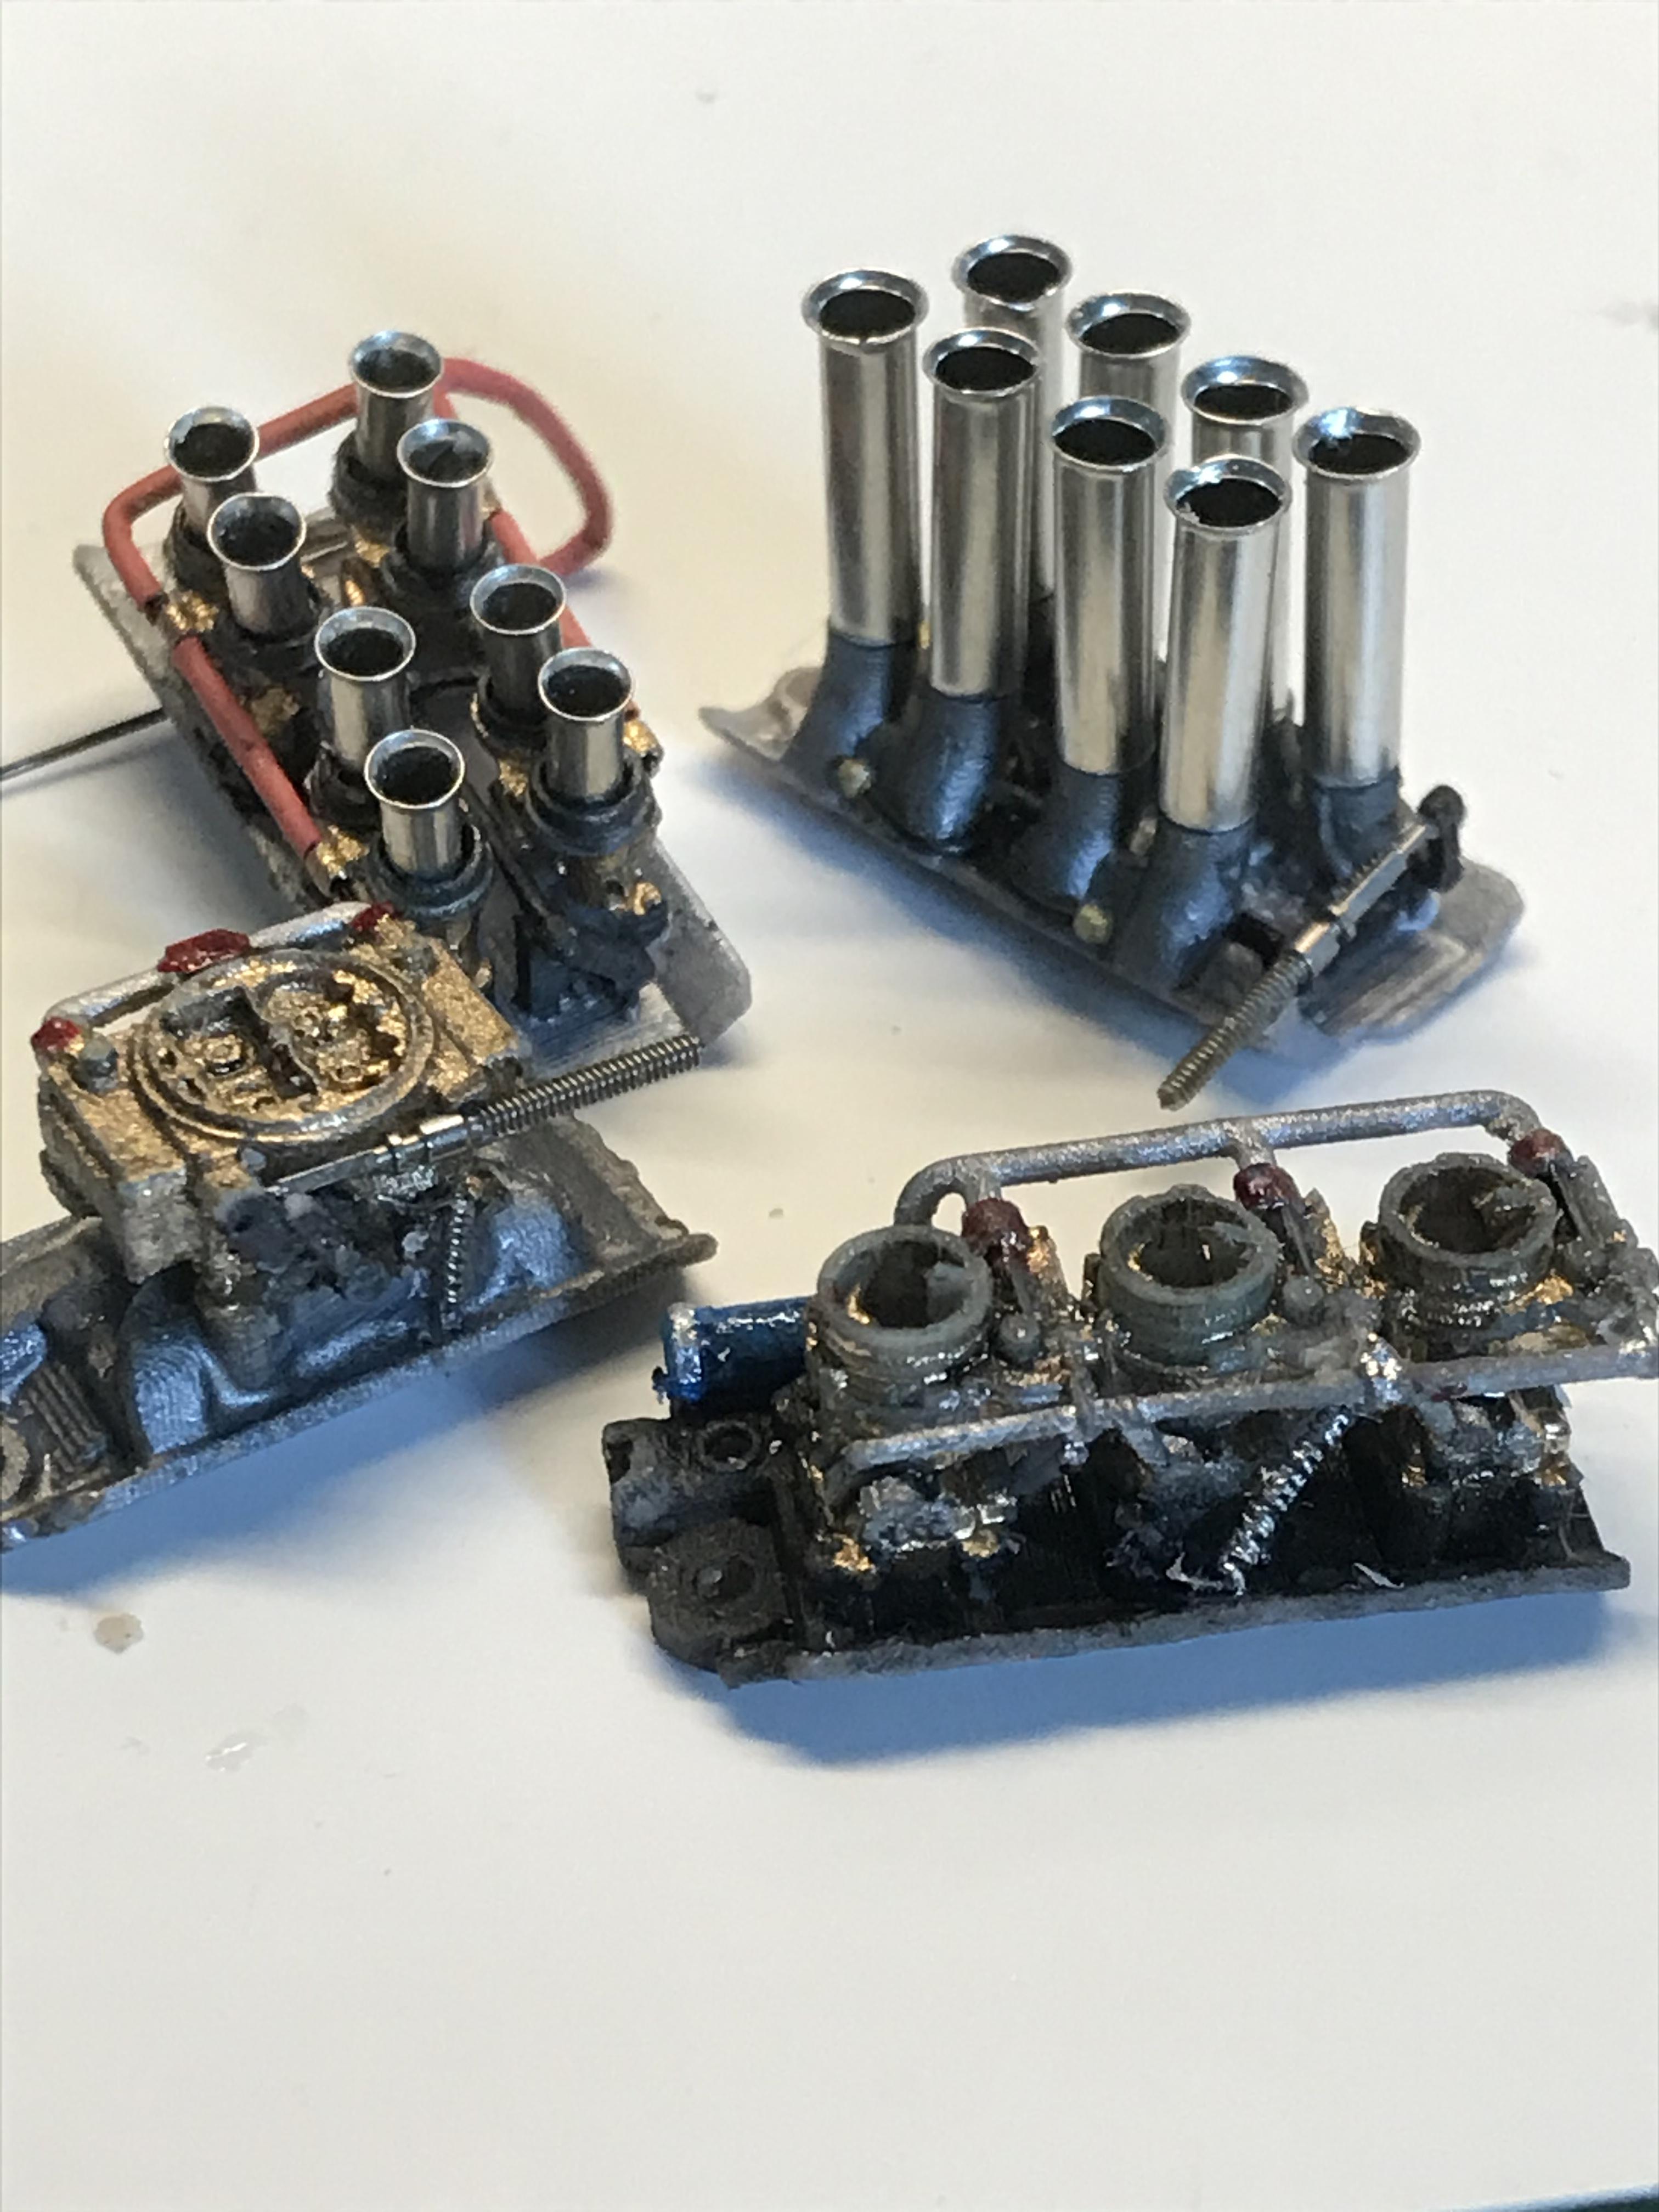
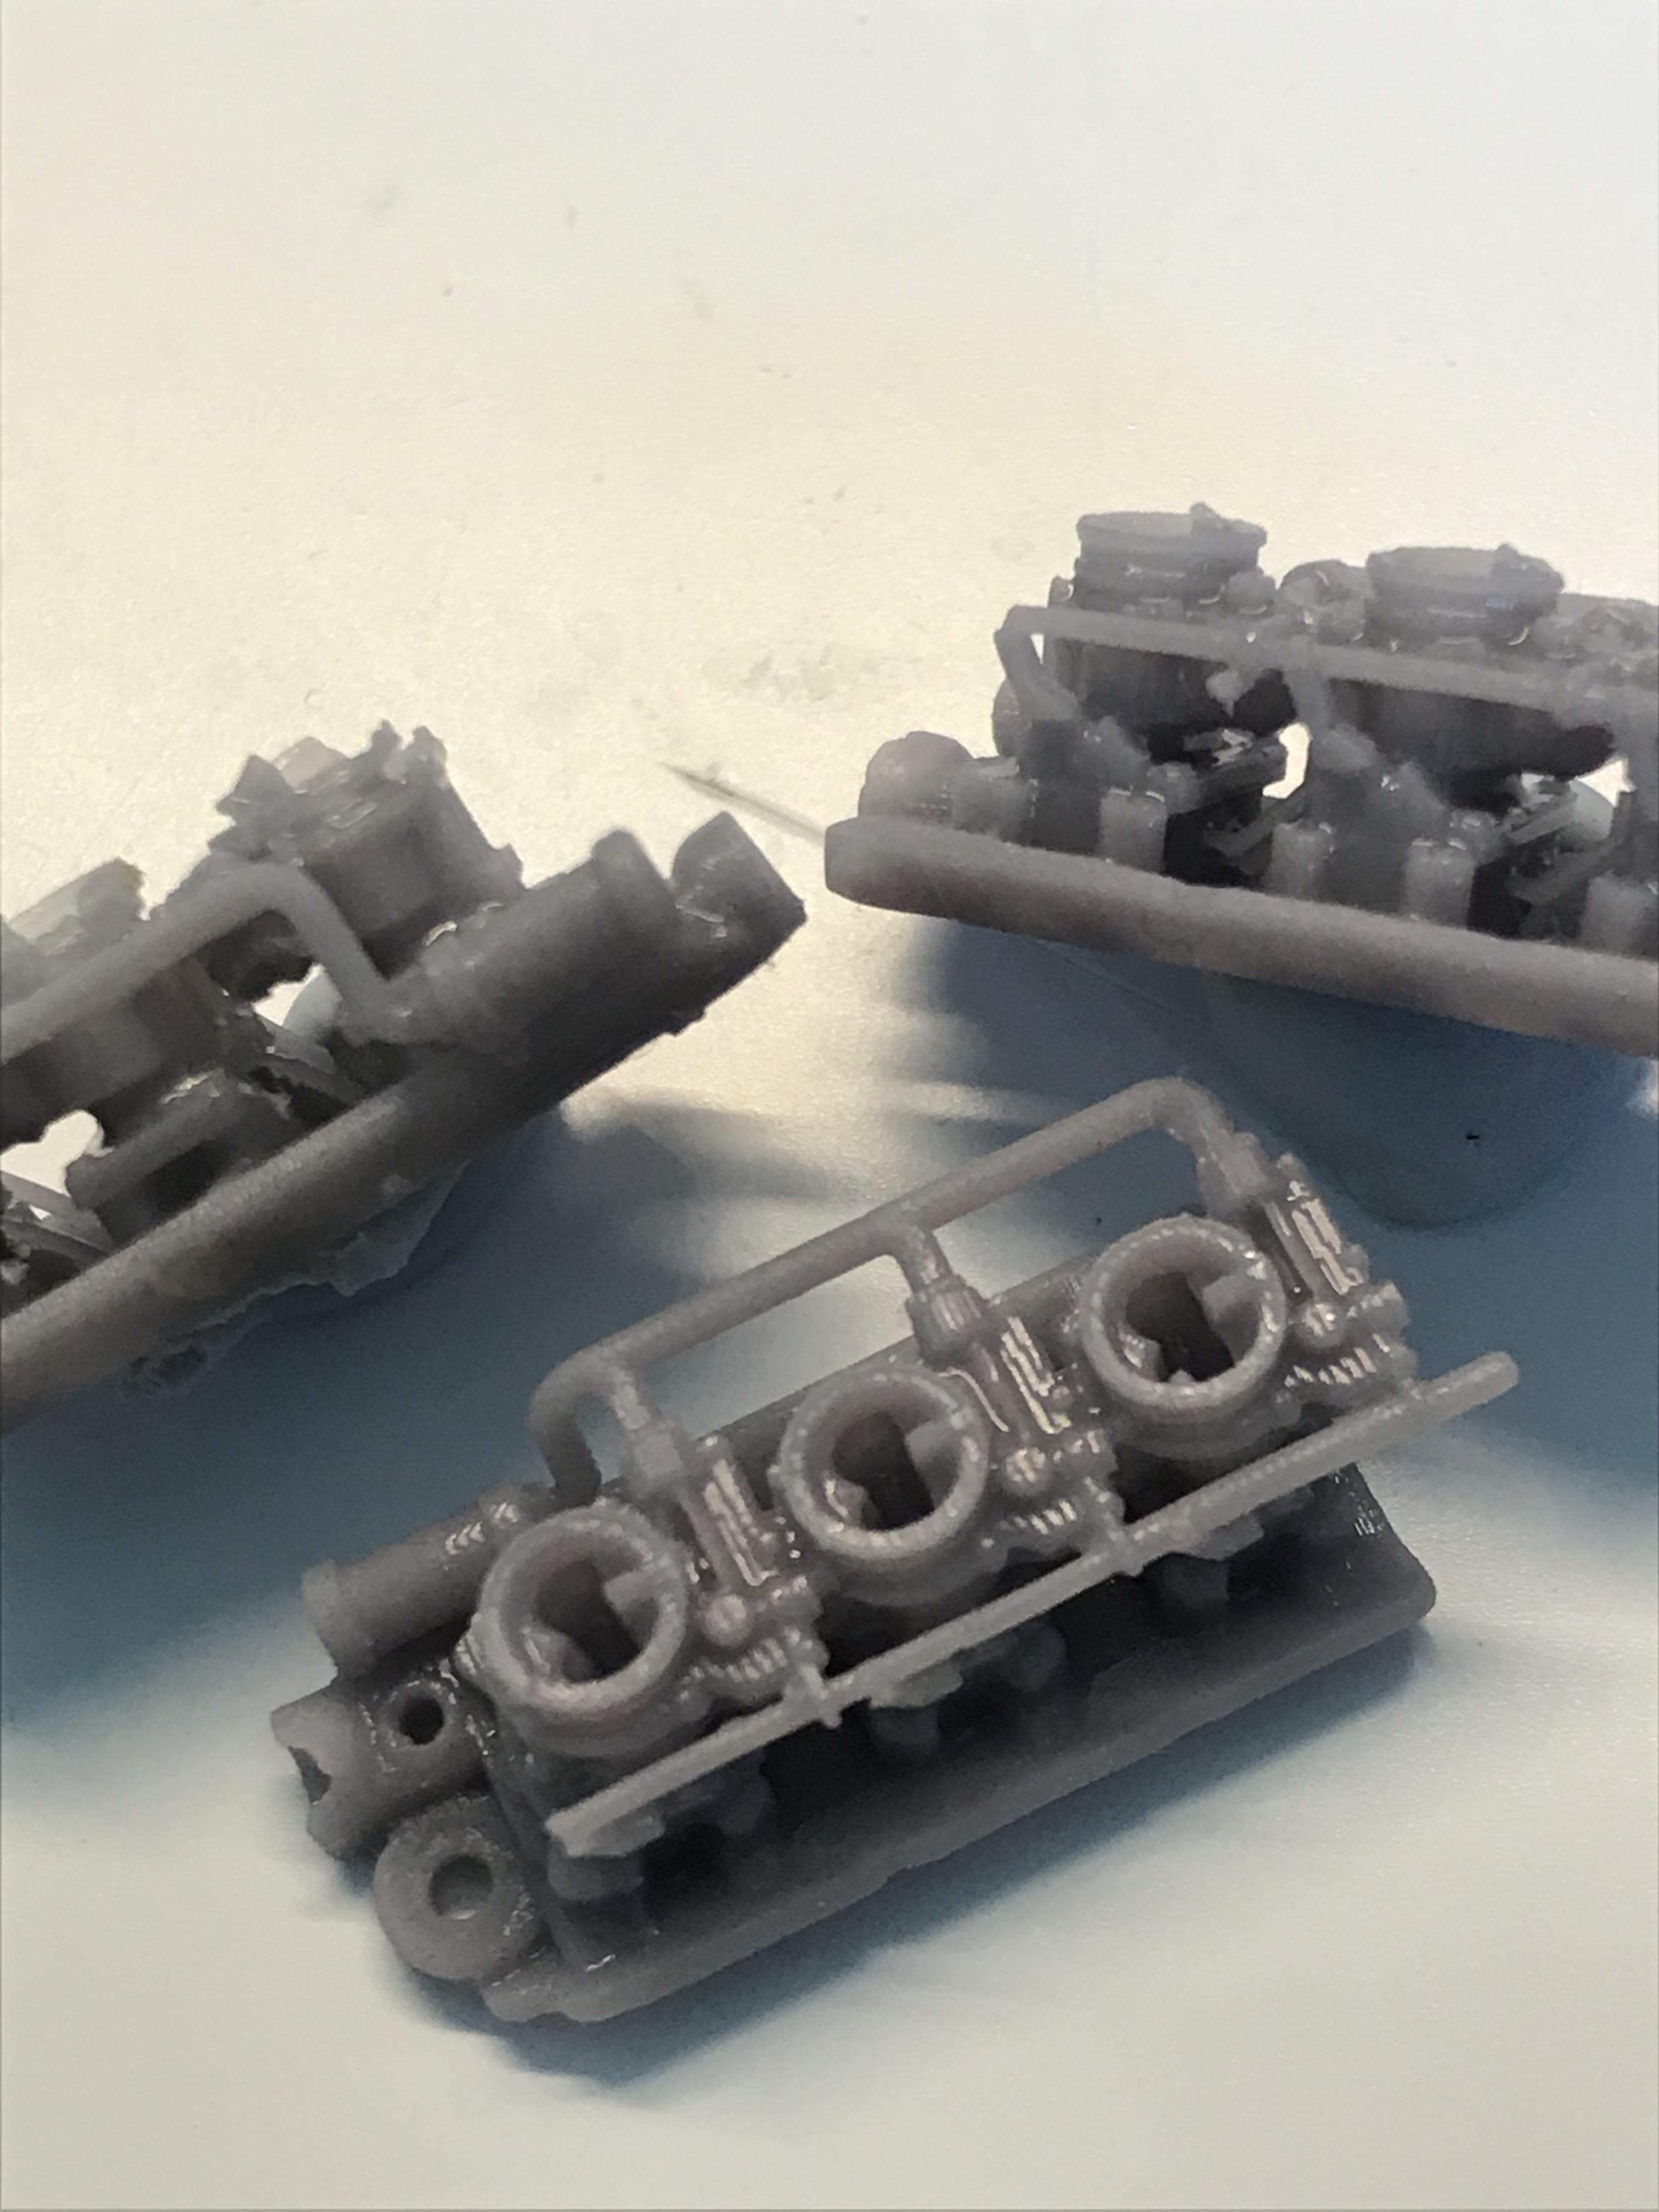
Today I am trying my hand at putting together some 3D Carburetors. These are three Rochester 4GCs on a small block manifold.
- 1 reply
-
- 5
-

-
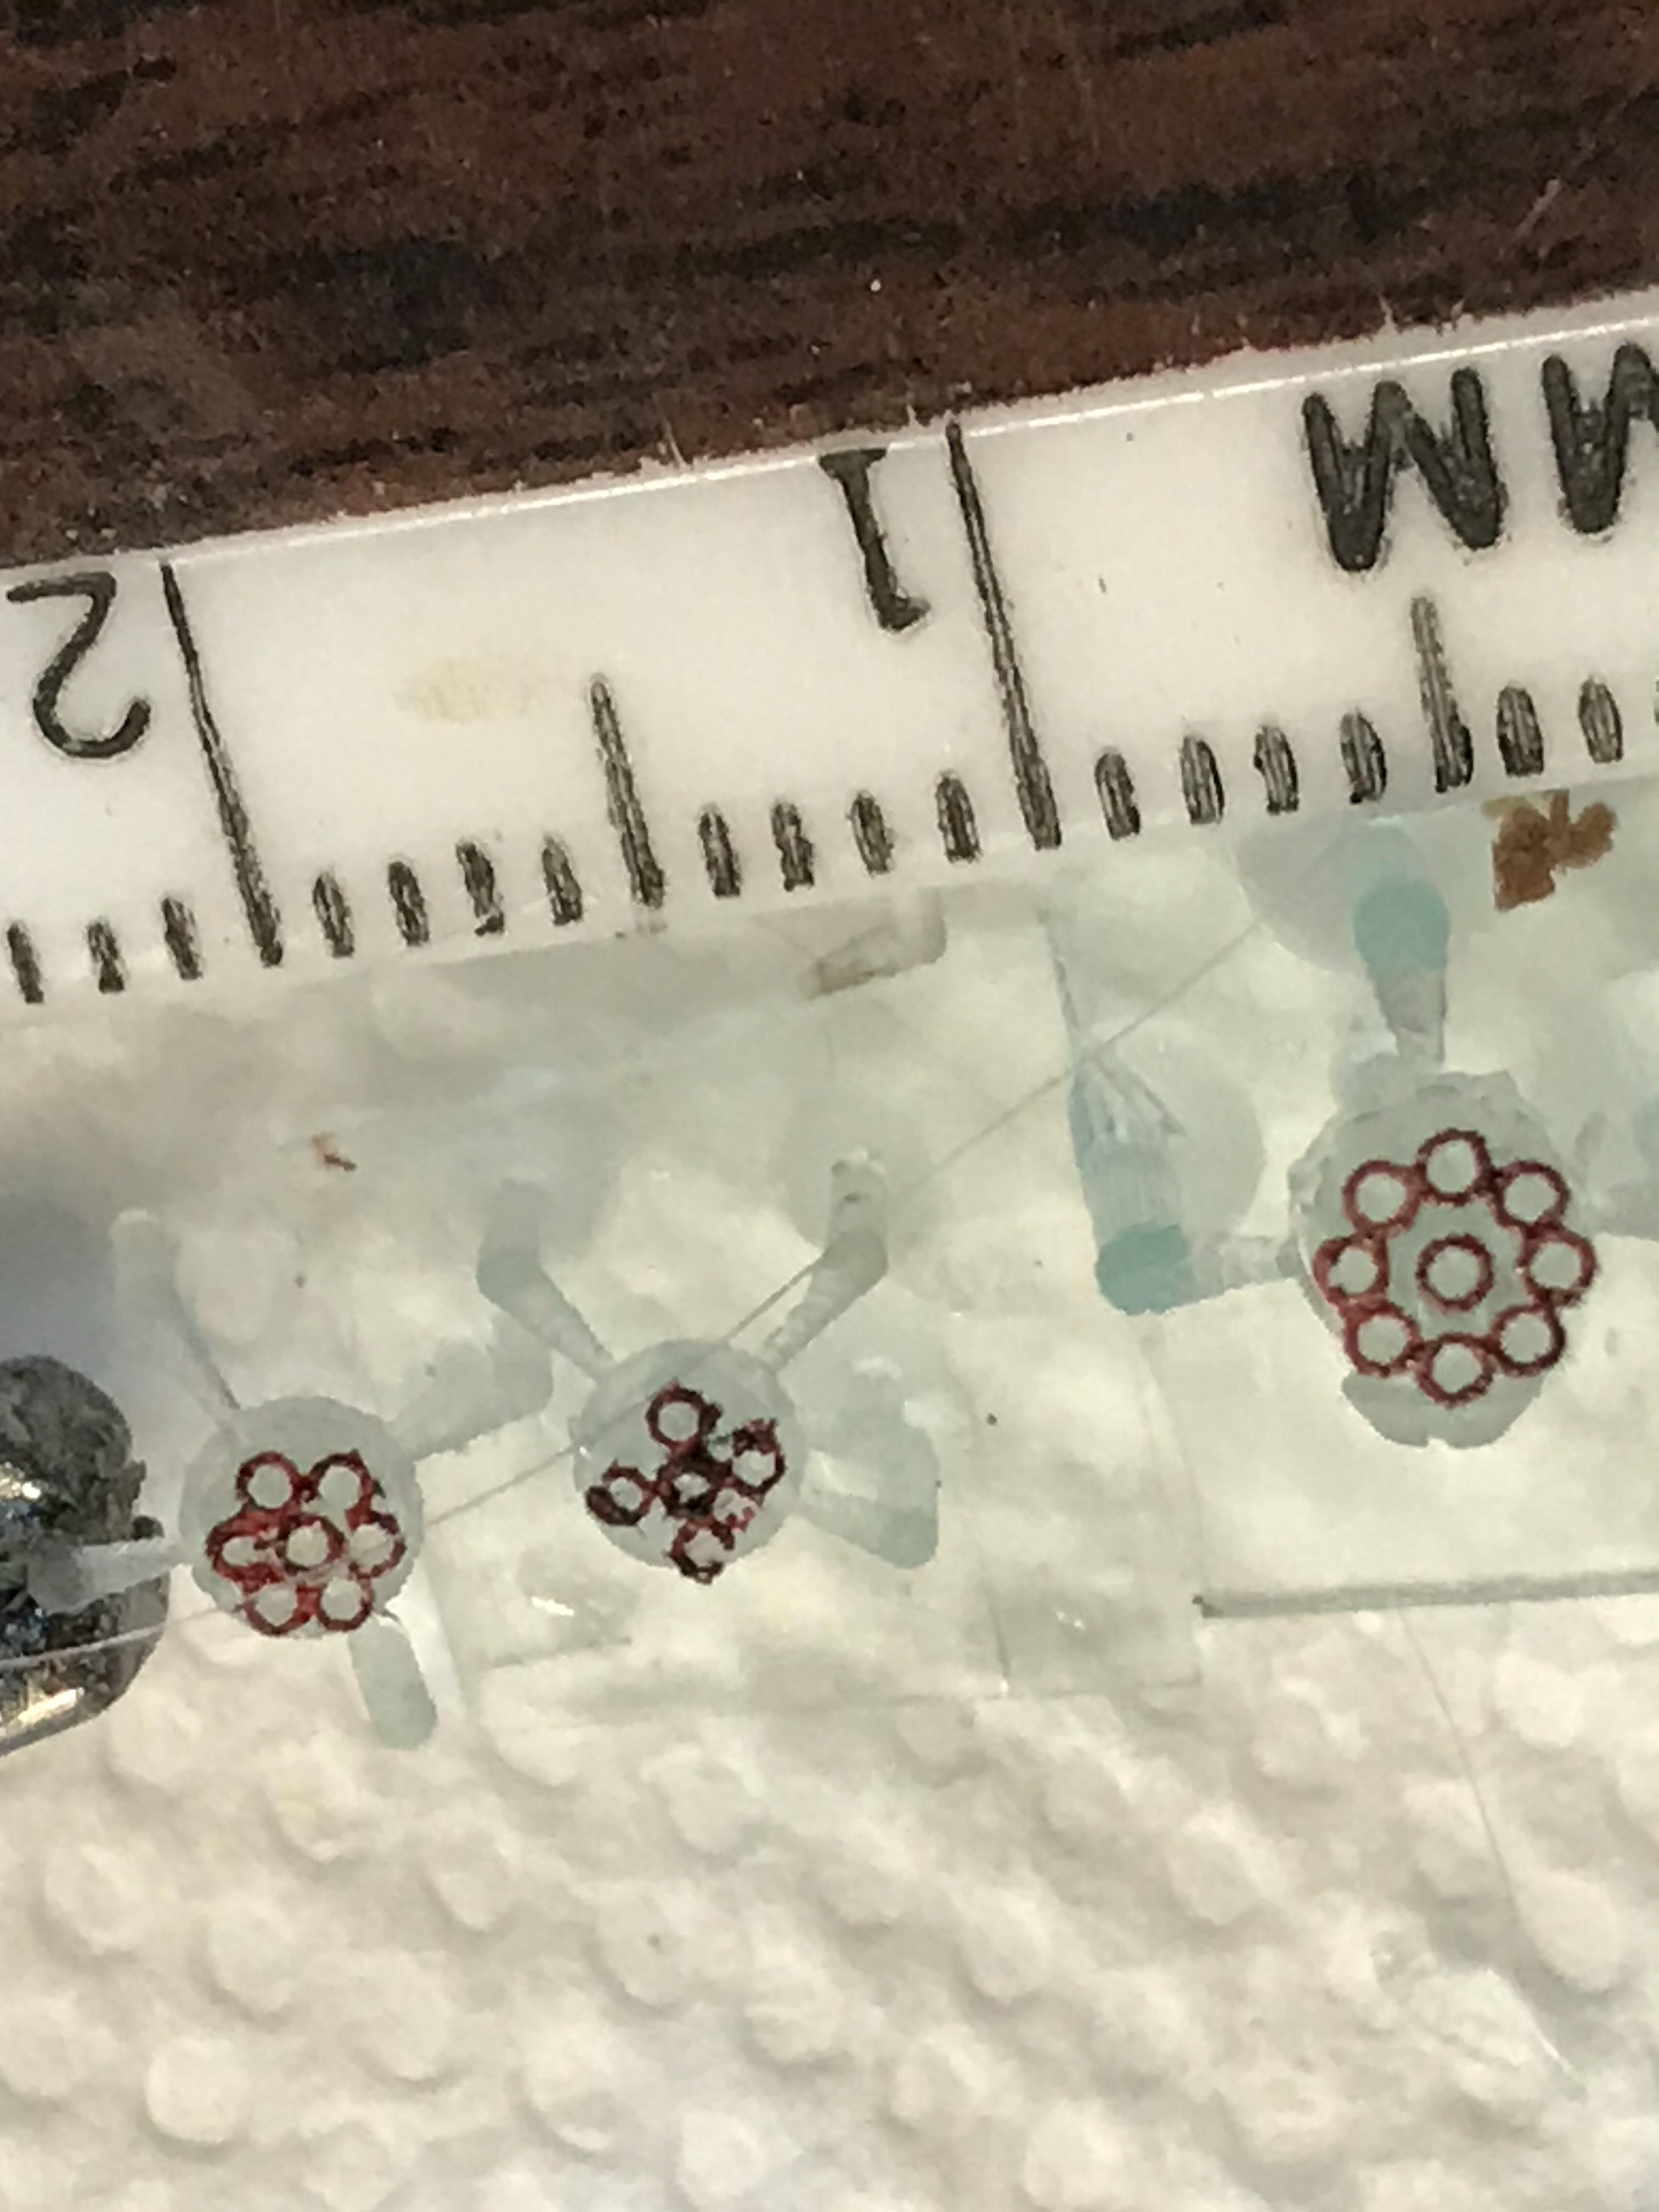
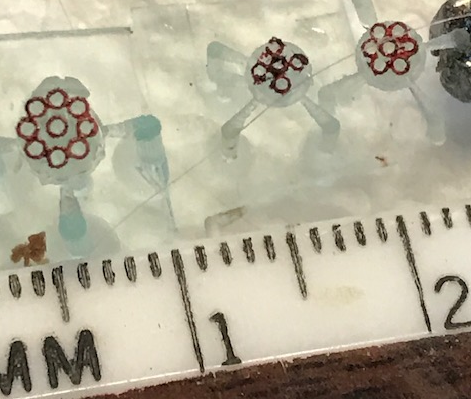
Sorry my work isn't doesn't hold up. I think that the holes and spacing look pretty perfect to me. If the holes look off, like the 4 cylinder in the pic, it is because I couldn't hold the brush steady enough. All the holes are perfectly round and run through top to bottom. Also realize that these measure from three to five millimeters across and the holes are a little over a third of a millimeter. These holes are too small for what most detailers use for plug wire. The wire I use is 0.3 millimeters in diameter. In 1/24 terms, the four cylinder distributor scales out to 3 inches. The six cylinder scales out to 4 inches and the 8 cylinder scales to 5 inches. The wire I use scales out to 3/8 of an inch in diameter. I haven't seen anything any smaller. These also have sides with relief for the plug wires, not just a round cylinder. The drawing shows what it looks like in detail. Also, I have no interest in selling anything. I was going to share what I have for free with anyone until I run out.
-
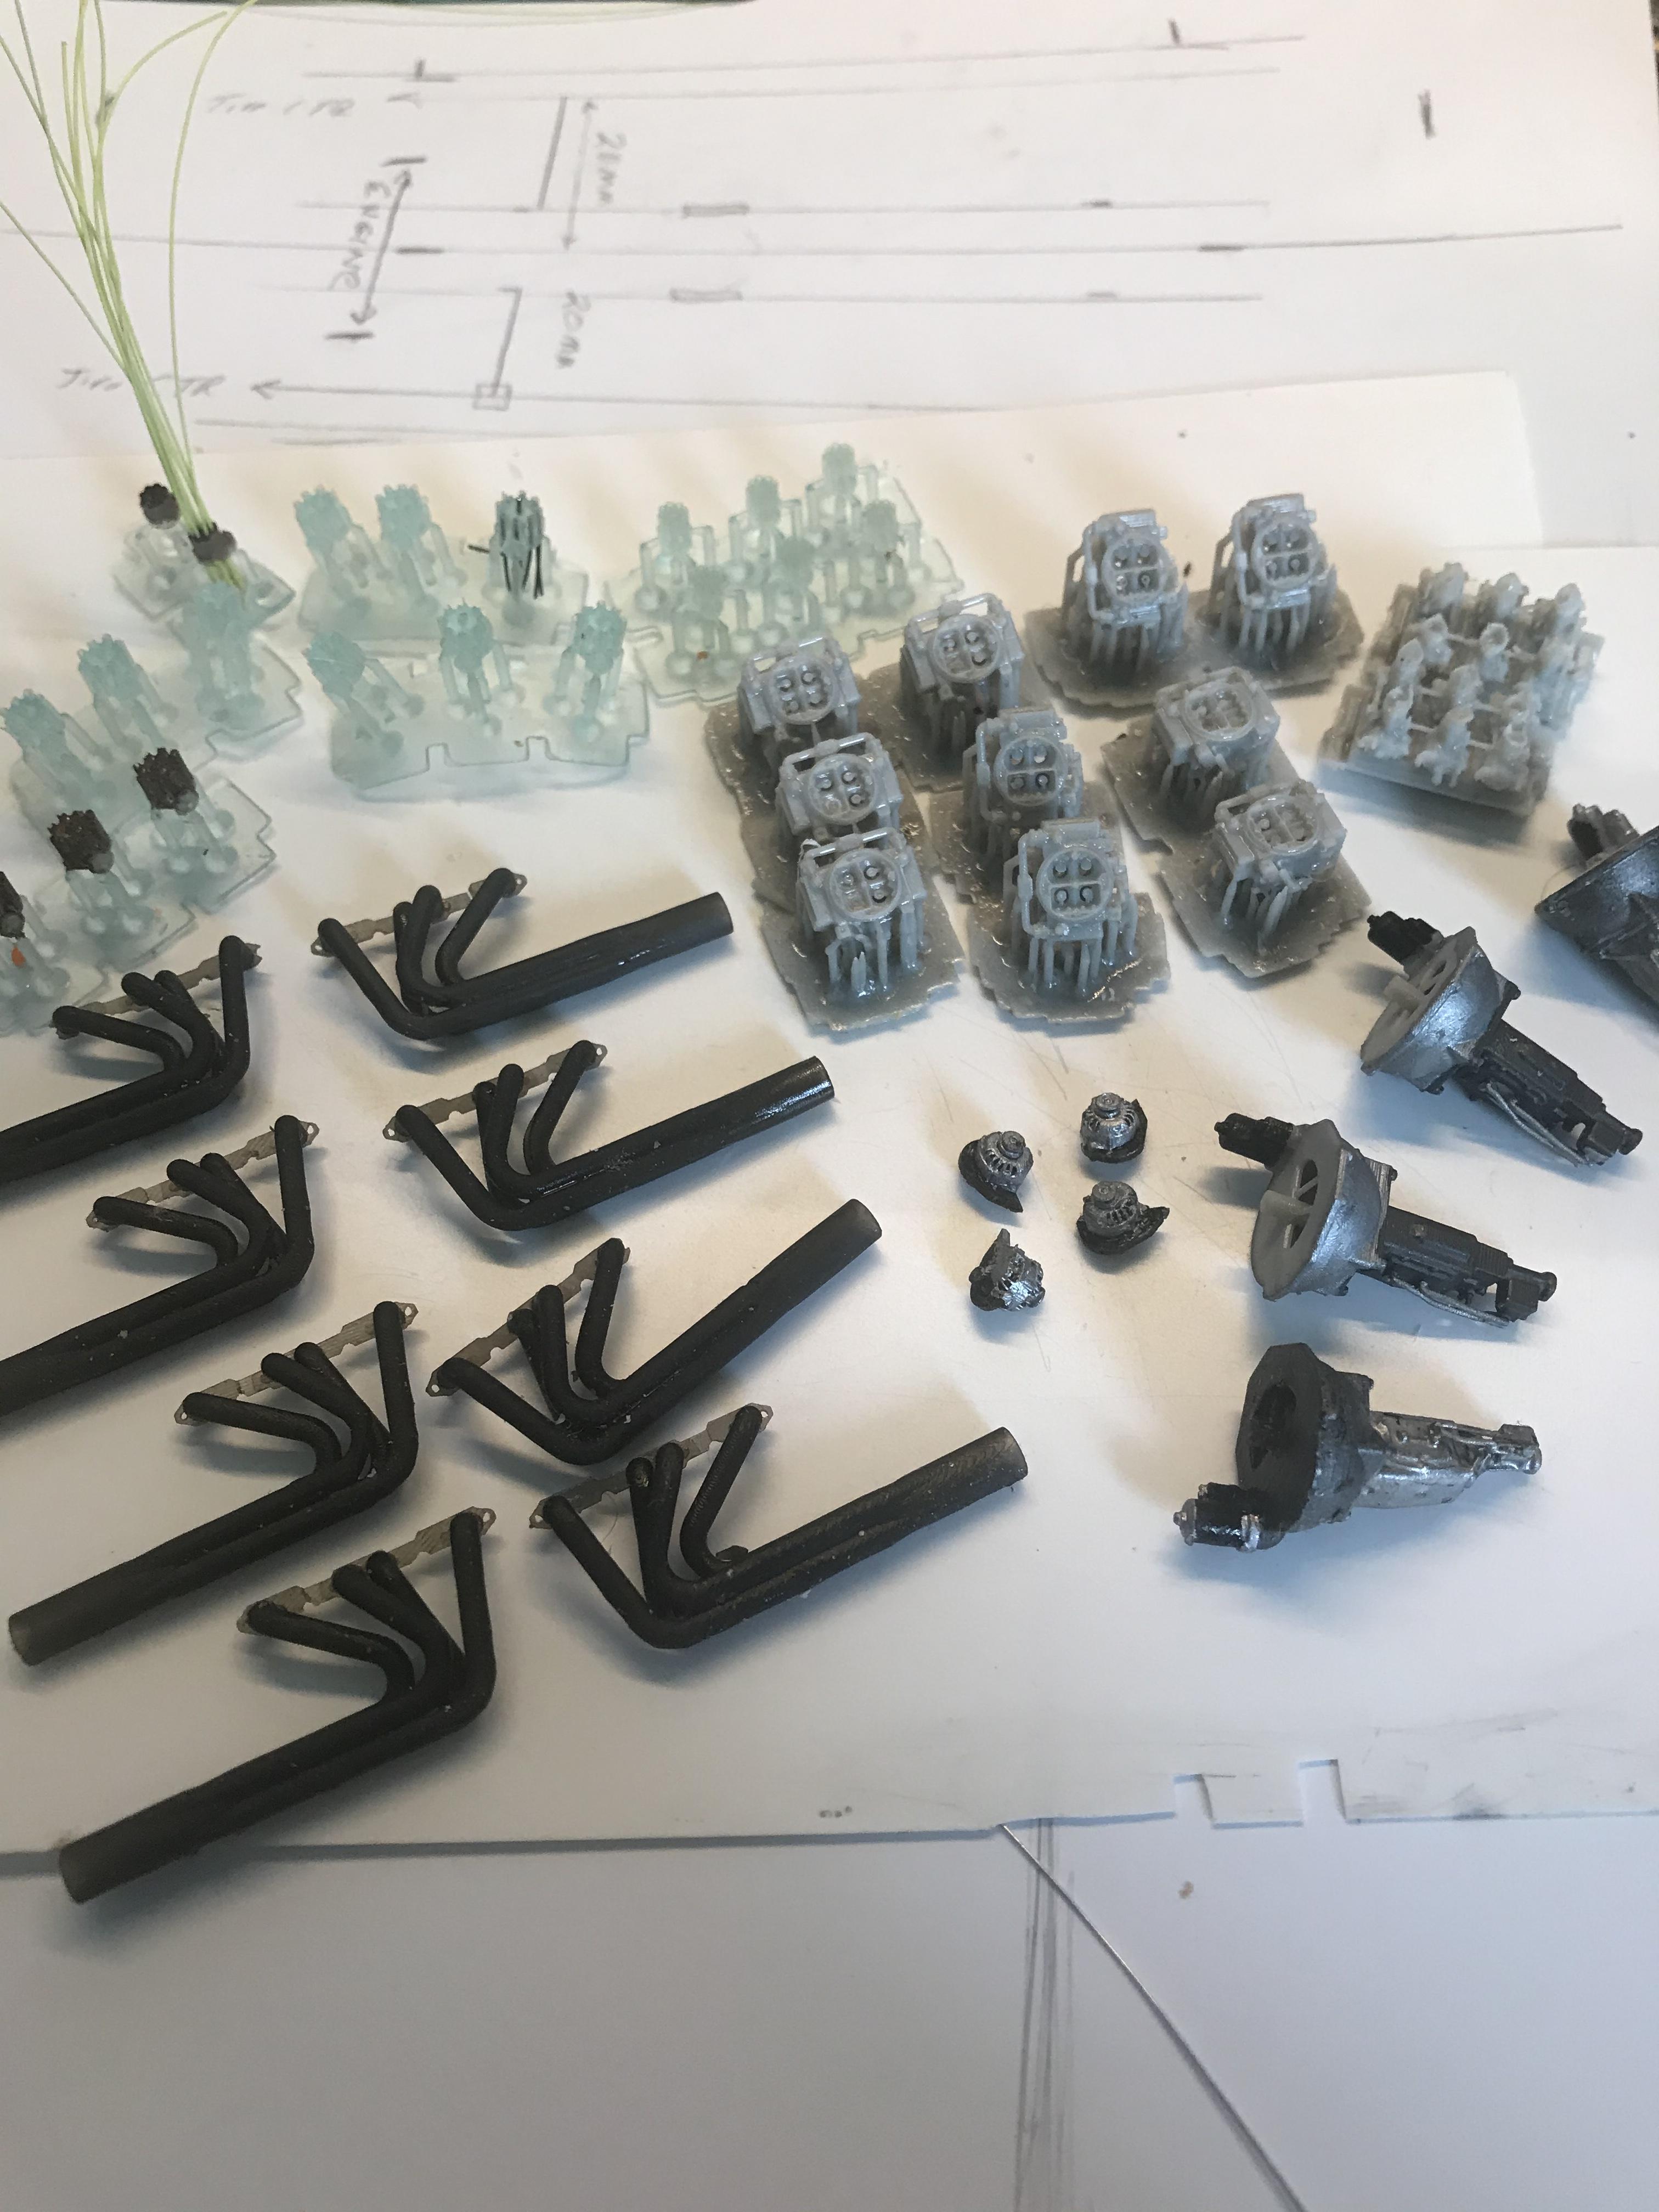
I’ve been having fun printing this stuff. I don’t have anyone around to share with. If anyone can use any of this stuff I’d be glad to share. I’ve got lots of exhausts, carbs, distributors, alternators, blocks and transmissions. Let me know if any of it interests you.
-
Every time I print a block I see something I want to change. Pretty soon..........
-
Those carbs started out as Holley 450s
-
Already did the alternators
-
Now on to carburetors
-
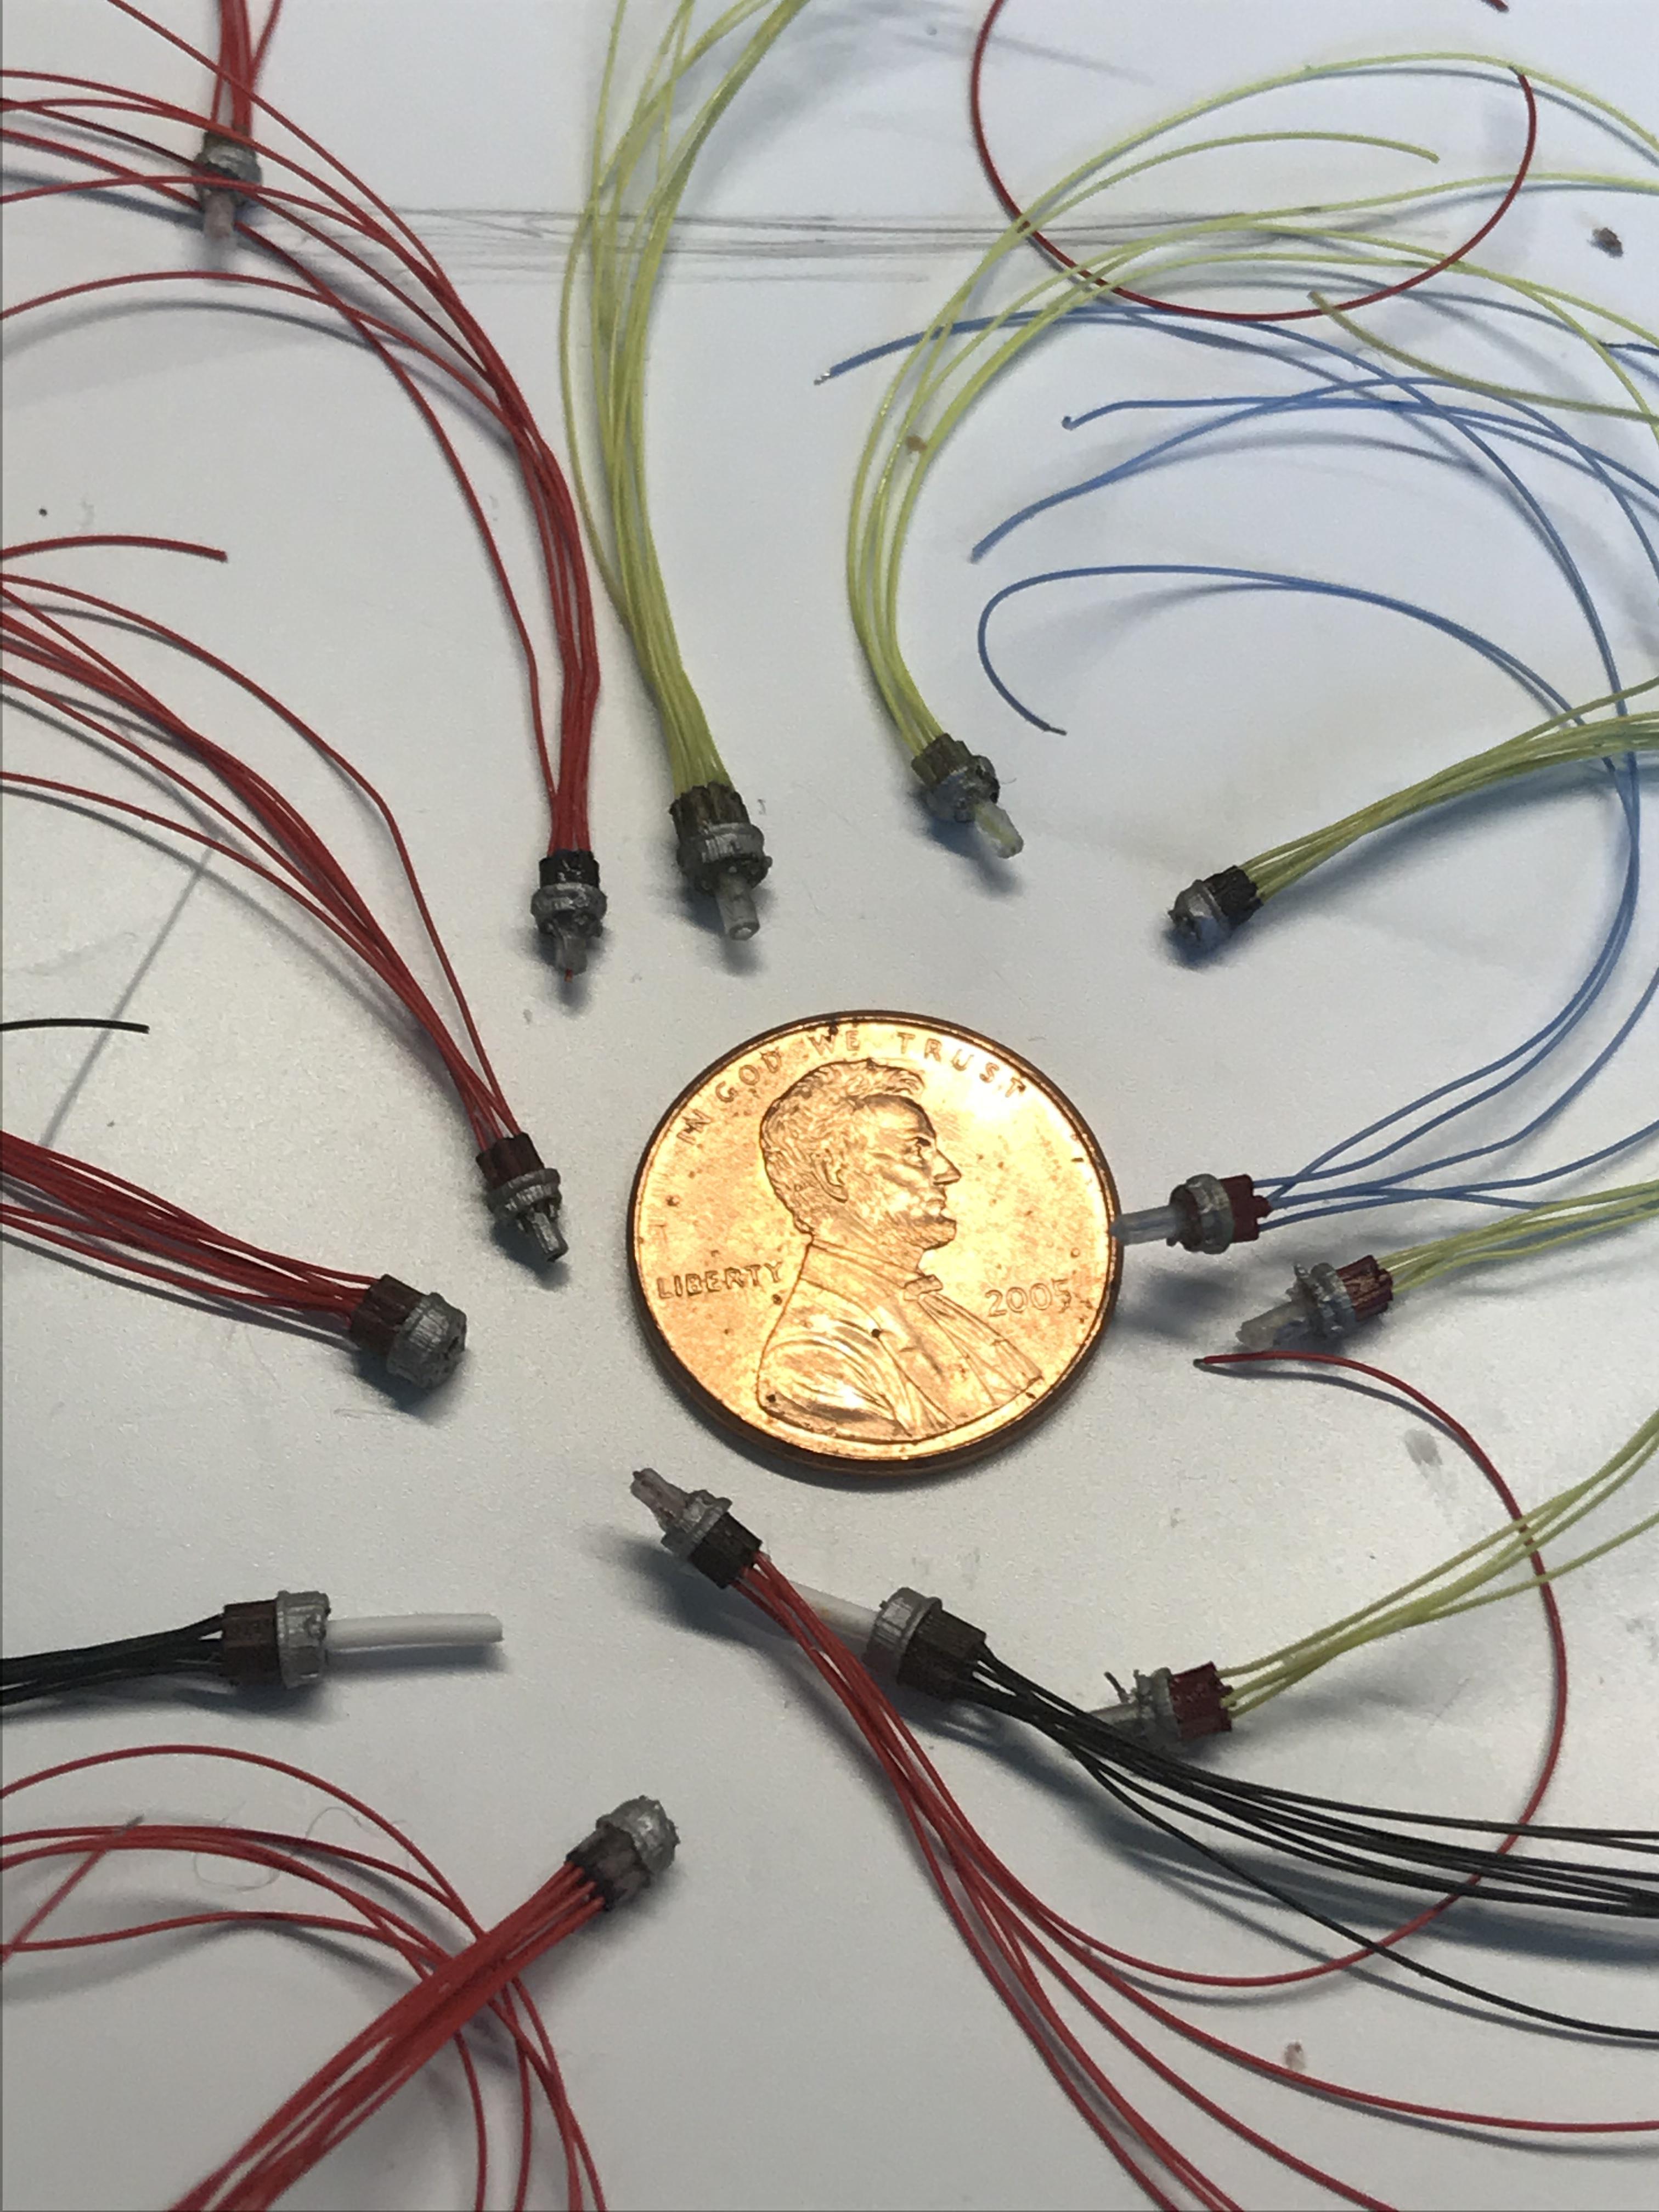
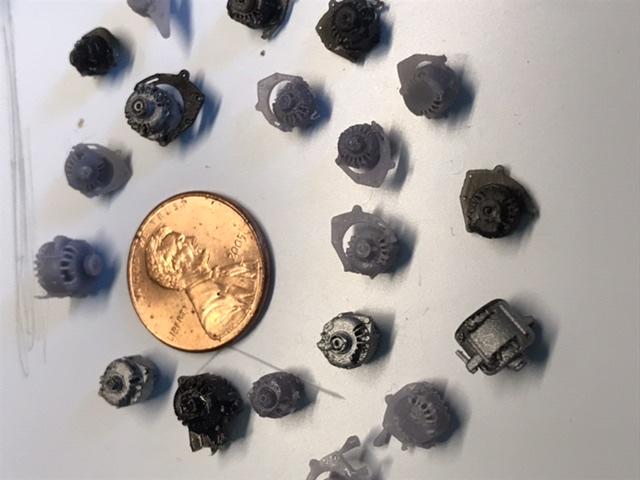
Went a little crazy making tiny distributors. The question is will I live long enough to use them all? Picture only shows some of them
-
Been using CML Supply on line. I use #77 and #78 for spark plugs and these seem to hold up better than others I have tried
-
I bought a Phrozon Mini about a year and a half ago and have never had so much fun. Every thing said above is true,,the different brands aren't that much different. The big thing I would mention is resin. I use water washable resin and love it. No smell to worry about and you wash up with water. My hobby area is in my bedroom so the lack of odor is important. Also, the Phrozon is very quiet. I can start a job and go to bed without noise being an issue. I'm sure the other brands are also quiet but ask around. Some of these print jobs take hours so the less noise the better. I can't believe the accuracy you can print with. I have distributors with all 9 holes in them that are less than 4 millimeters in diameter. I have some 4bbl carbs that are unbelievably accurate and I have some wire wheels where the spokes are almost hair like. A lot of fun. I am not a CAD drawer so I search the web for drawings I can use or modify. I use MeshMixer to edit drawings and can make simple things from scratch. I also use ChituBox slicer and it works great. If anyone wants to try any of my drawings just let me know, I'm glad to share with other modelers. Have Fun!