Nataan92
-
Posts
62 -
Joined
-
Last visited
Content Type
Profiles
Forums
Events
Gallery
Everything posted by Nataan92
-
haha yes, that was the plan
-
Thanks everyone. Thanks, I just used what the kit specified which was Tamiya TS17, which i decanted, to use in my airbrush.
-
oh right, No that is just the same silver paint as the body
-
Thank you
-
Thanks for the feedback. The silver outline around the lights is just the rear canopy part, so it is all silver paint, the clear red part just sits behind this part.
-
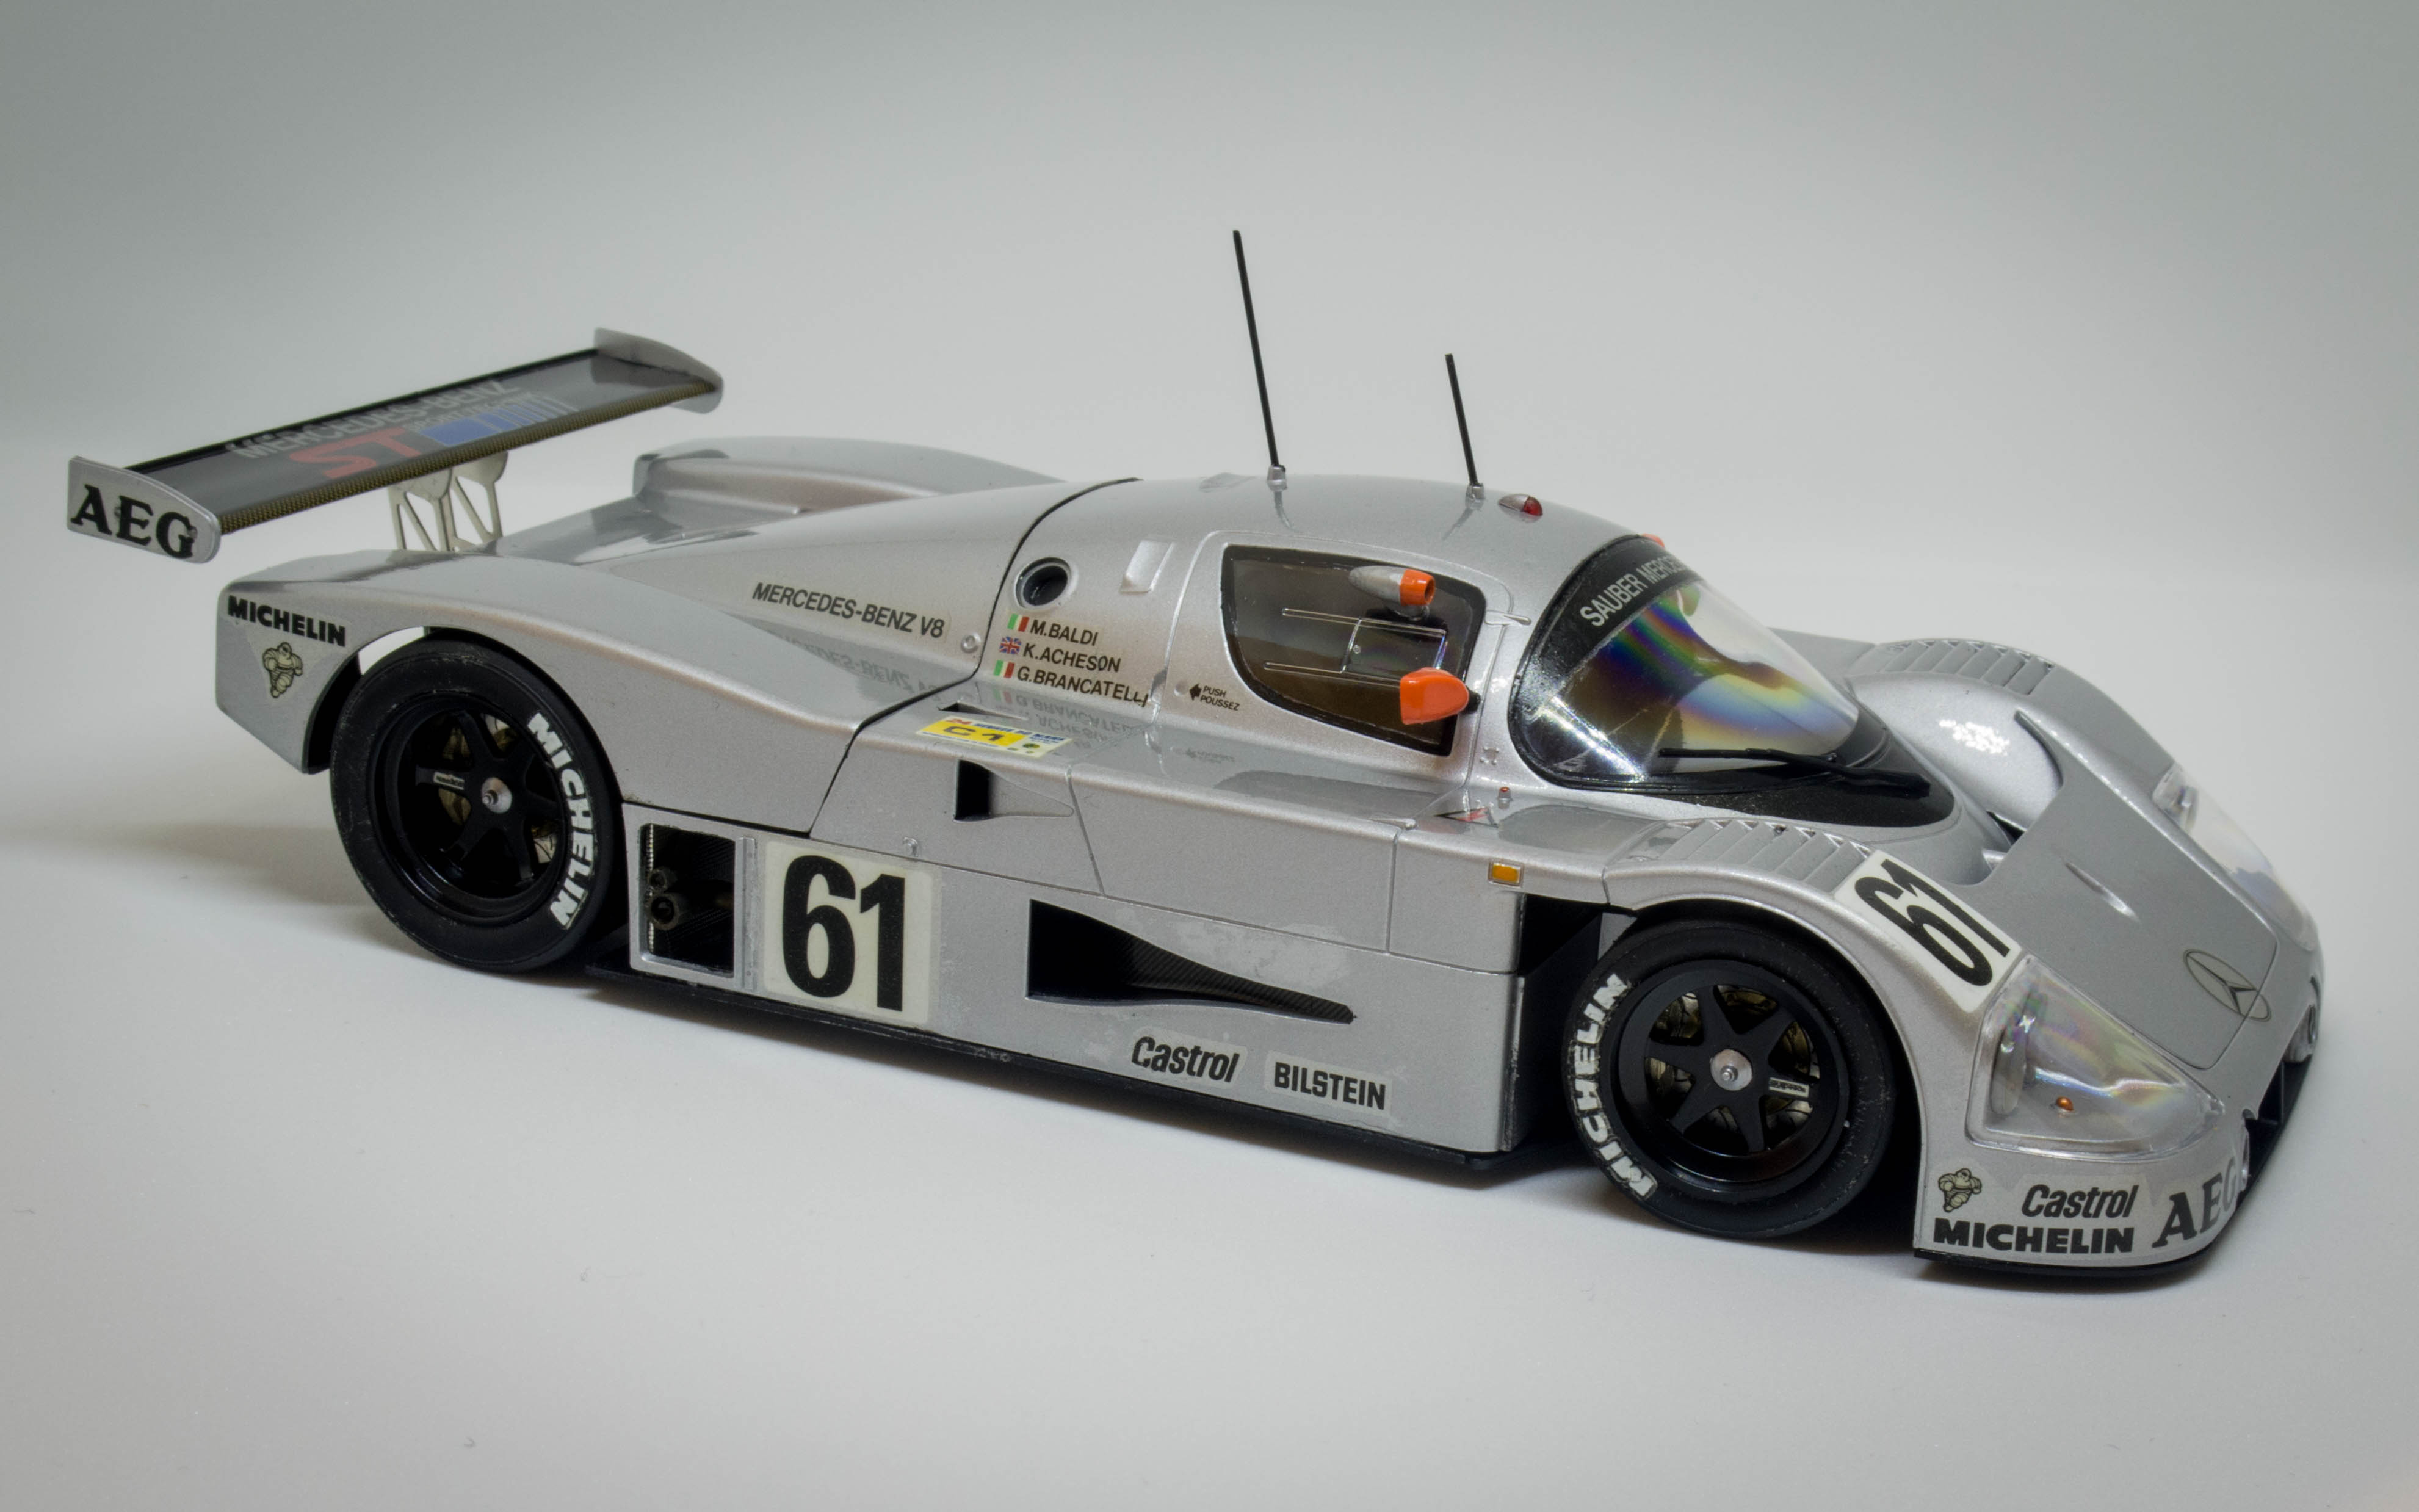
Hi All, Today i finally finished the Sauber C9. I started this kit about 10 months ago, but took a long break, due to life getting very busy. Anyway, i have linked my WIP thread, if anyone wants to see some of my progress though this build. Going into this build, i wanted it to be the most detailed kit i had ever done, and i think i have completed what i set out to do. I am very pleased with the final outcome of the build. Thanks for looking Nathan

-
Hi All, A few days ago i applied the clear coat to the body and decals. It was my first time using the Scale Model Supplies 2K Clear coat (pretty much the Australian version of zero paints) and was very pleased with the shine that this clear coat provided, as well as applying very smooth with very little orange peel. I also finished the seat, and racing harness. that marked the completion of the interior. The only things left to do on the exterior was to paint the black outline of the windows/windscreen, Head/tail lights and the side mirrors and antennas. I didnt take an photos of the final stages as i was on a roll, and forgot to take some... Anyway, the car is now complete, and i am super pleased with how it came out. I will be posting some proper photos under glass soon. Thanks for following this build, I really enjoyed building it. Nathan
-
Hi All, Another small update. Today i started applying decals to the front half of the body, and the rear wing. The condition of the Old decals turned out to be ok. there is a little bit of silvering in the clear transfer film, which i was able to reduce with some micro sol. Its not perfect from certain angles of light, but should hopefully be less visible with the clear over the top. if anyone has suggestions on better ways of removing silvering, let me know. Its my first model of of this vintage, so haven't had this issue before. Thanks Nathan
-
Thanks for the comments, no i used some Model factory hiro heatshield foil. It has a light adhesive, so it applies very easily, just like regular bare metal foil.
-
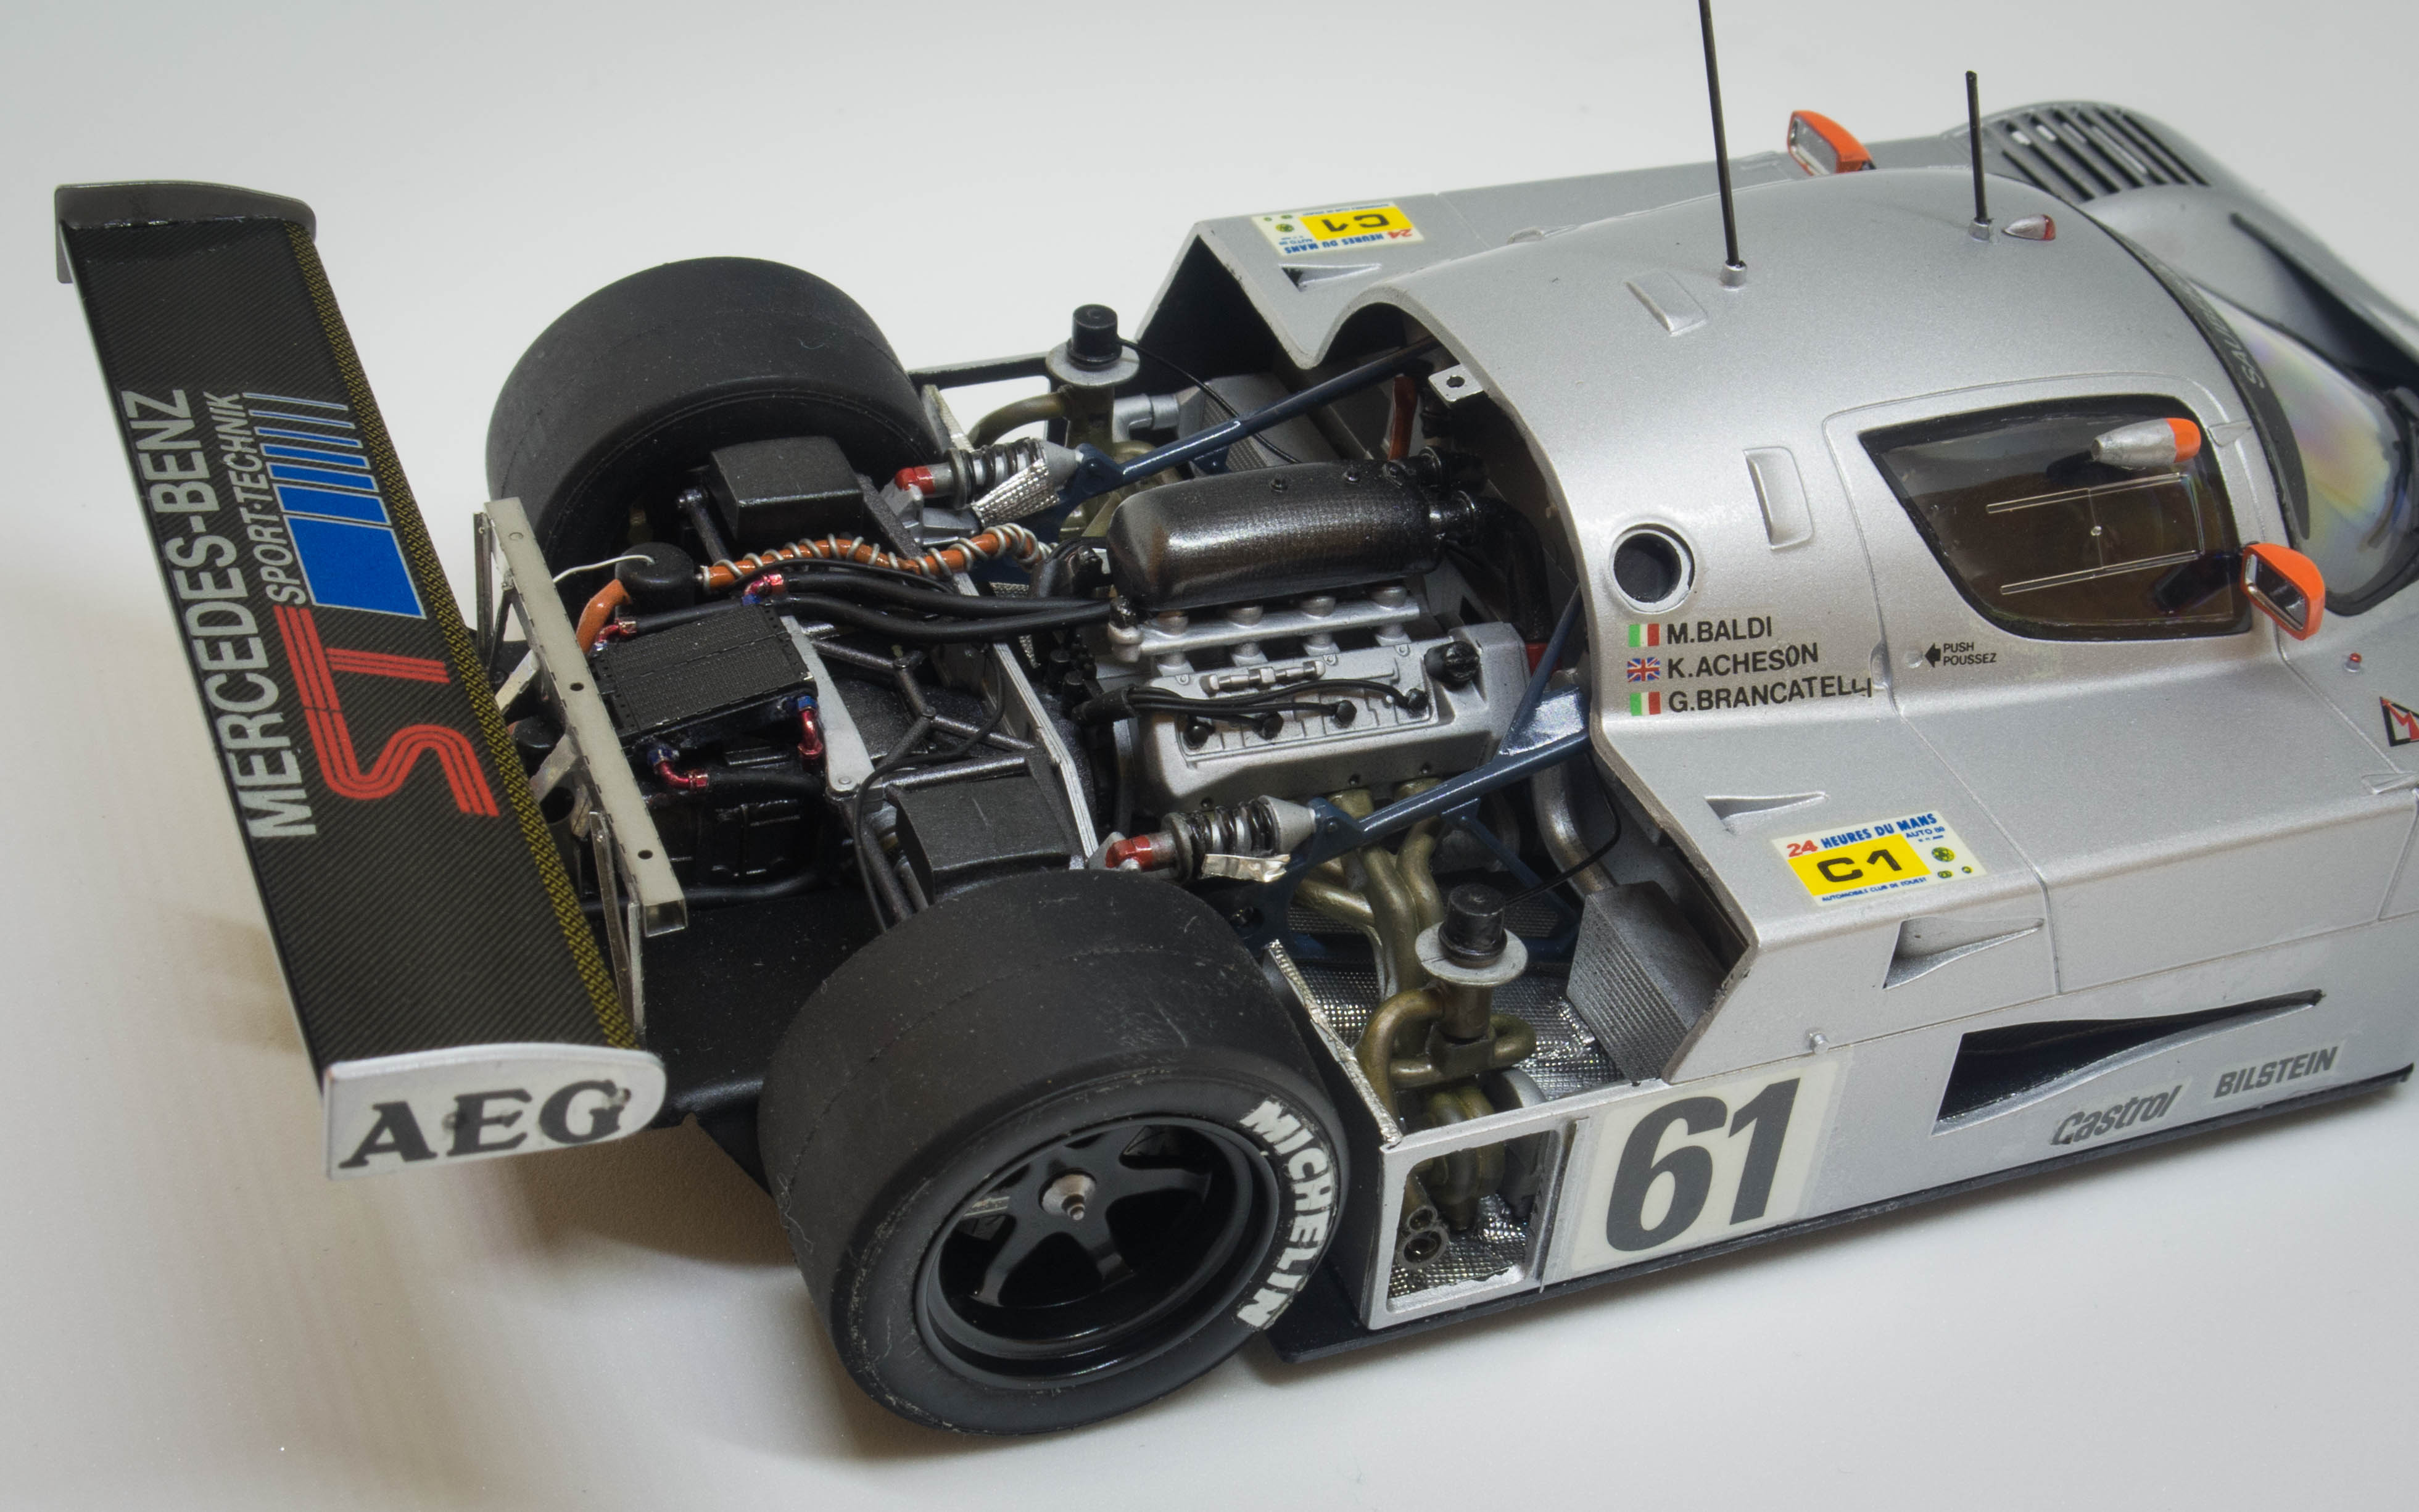
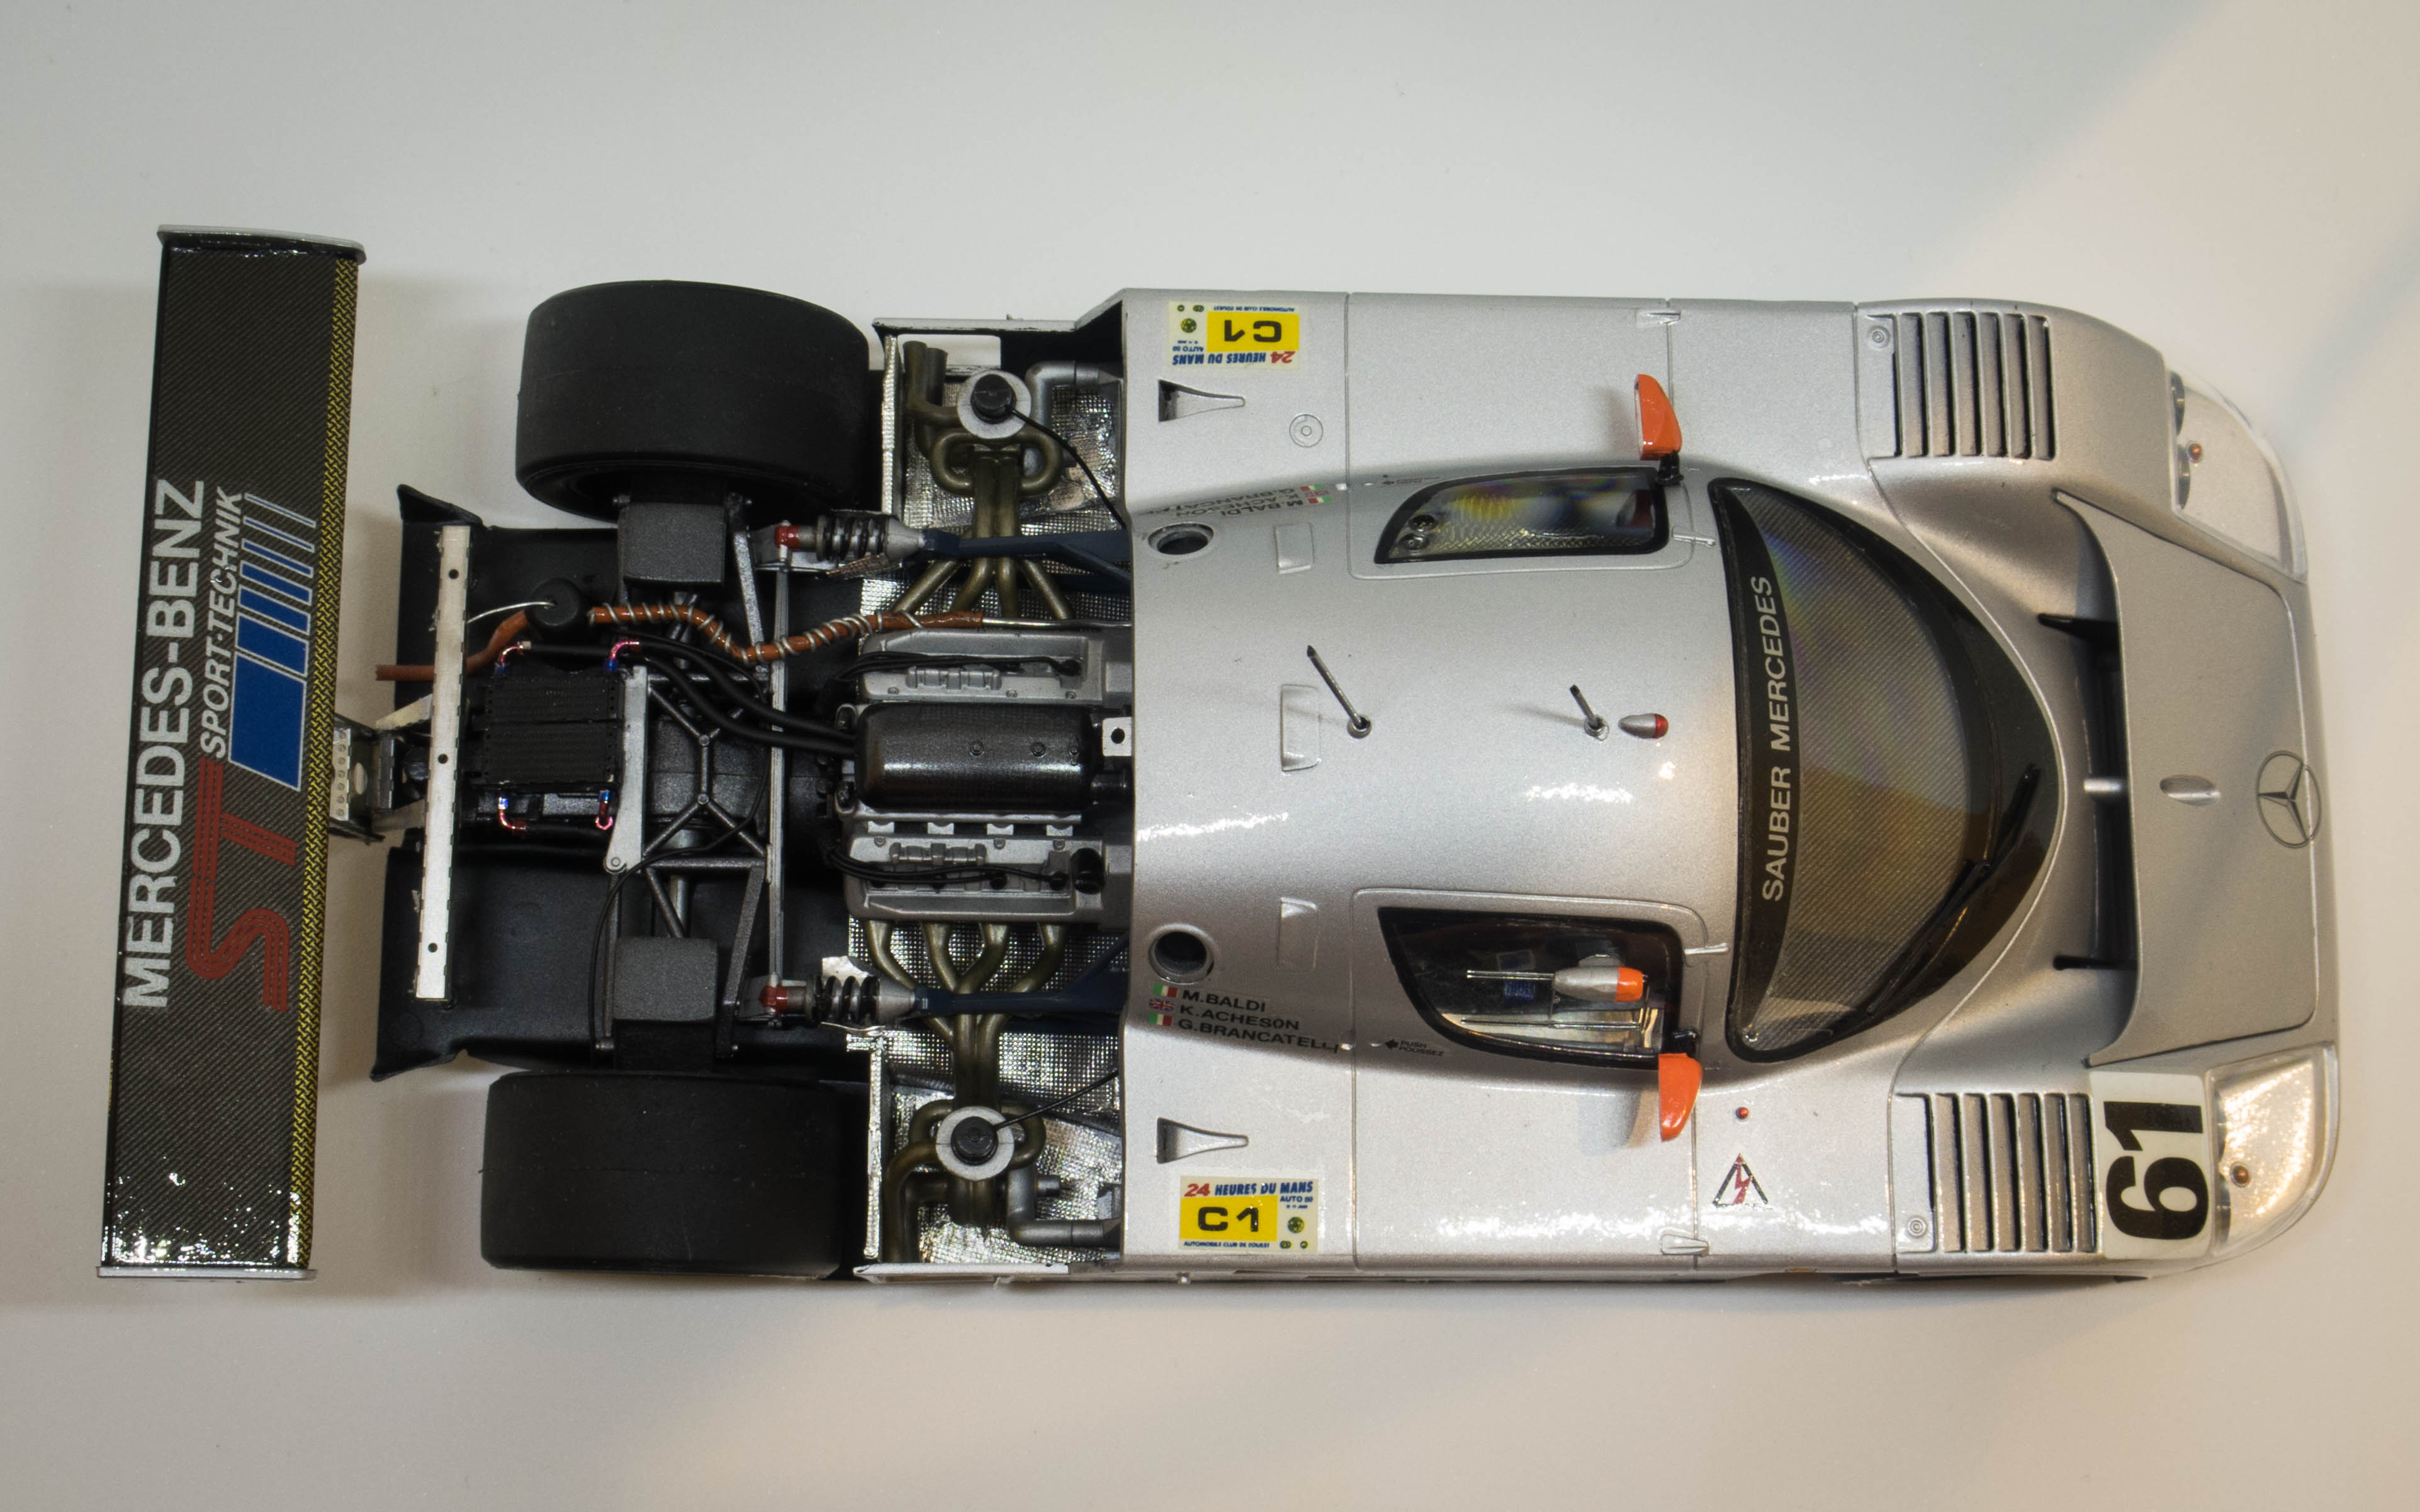
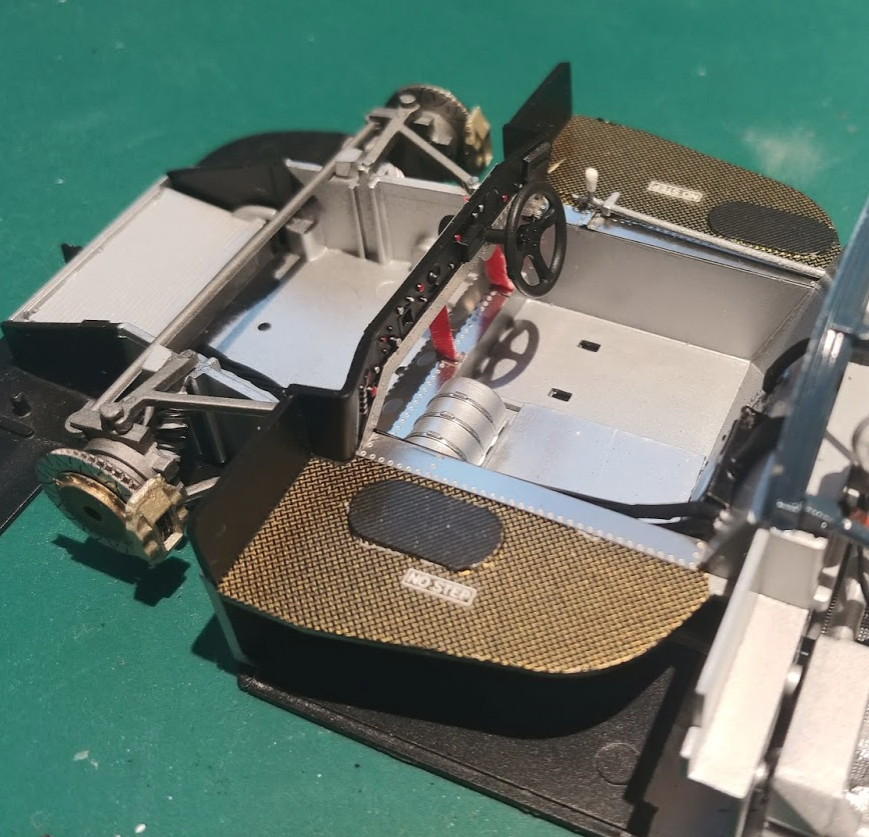
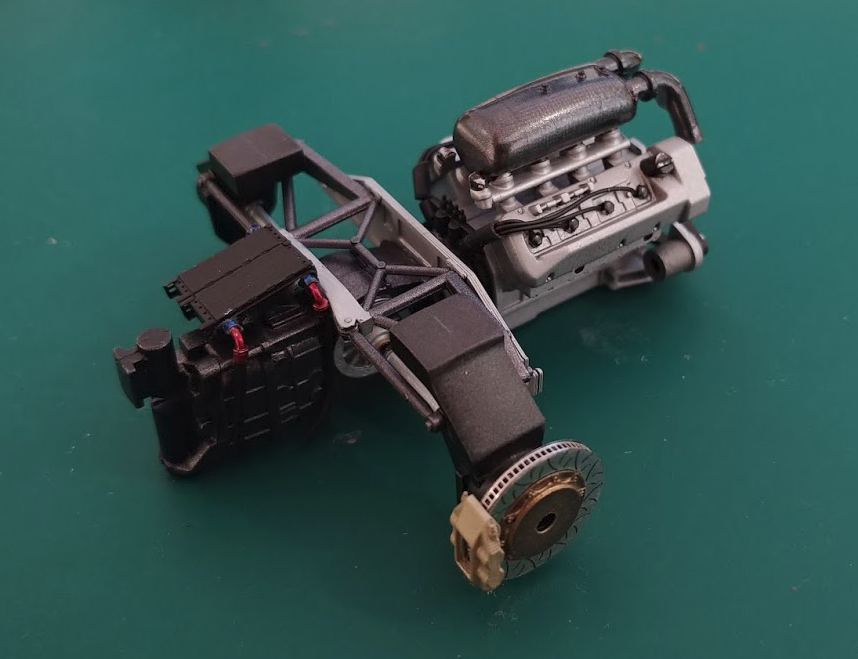
Hi All, Another day closer to finishing this kit. Today i finally finished the engine bay, this included the exhaust, Turbo's and some more wiring for the brakes and wastegates. I am very happy with the detail and finish of the engine bay. It will look very nice when the whole car is complete. Today, i also completed most of the interior. All that is left is to make the harnesses for the drivers seat. Its a shame that most of the details of the interior will be hidden when the body goes on. Tomorrow i will be starting to apply the decals to the body. Thanks for looking Nathan
-
Hi All, Another small update on this build. I have almost completed the engine bay, just exhaust and turbo's to go. The firewall and structural frame/roll cage were completed, and i added some heat shield foil to add some more detail. i am very pleased with how it is coming together now. i may even get it finished by my June deadline. I will probably do the body next. Thanks for looking Nathan
-
Hey all, Finally back at it with this model. it as been a very busy start to the year, so have had no time to continue modelling. There is a local contest coming up in June that i want to submit this into, so i better get a move on. I have now finished pretty much all the wiring and hoses for the engine bay. I have also completed the PE rear wing supports and transmission mounts, Which were a major pain in the butt, so i'm glad that they are done now I have also completed the painting of the Chassis which needed a few areas masked. I have also started painting the body, and i have the decals sitting in the window frame, and am pleased to report that it seems to be doing the trick. Hopefully my next update will be much sooner. Thanks for looking Nathan
-
they look to be wheels from a Group C race car. Perhaps they are from the Tamiya toyota 88CV Taka Q kit, given the yellow plastic underneath. I havent built this kit though, so someone else might be able to confirm.
-
Oh really? that would be a really cool build. If you do happen to go that route, i would be interested in the decals, assuming I cant fix the ones i have.
-
Thanks Dann. I'm really excited to keep building this!
-
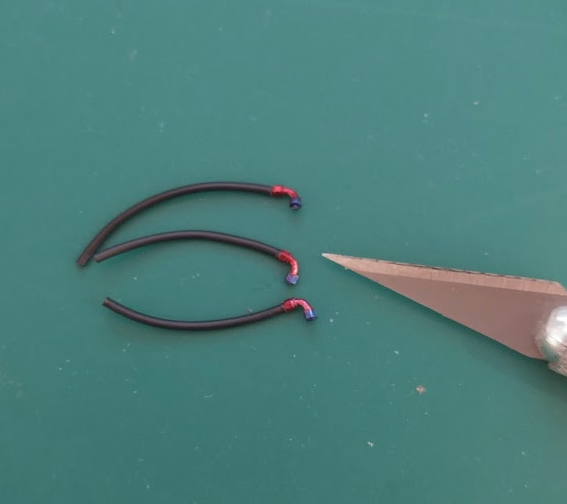
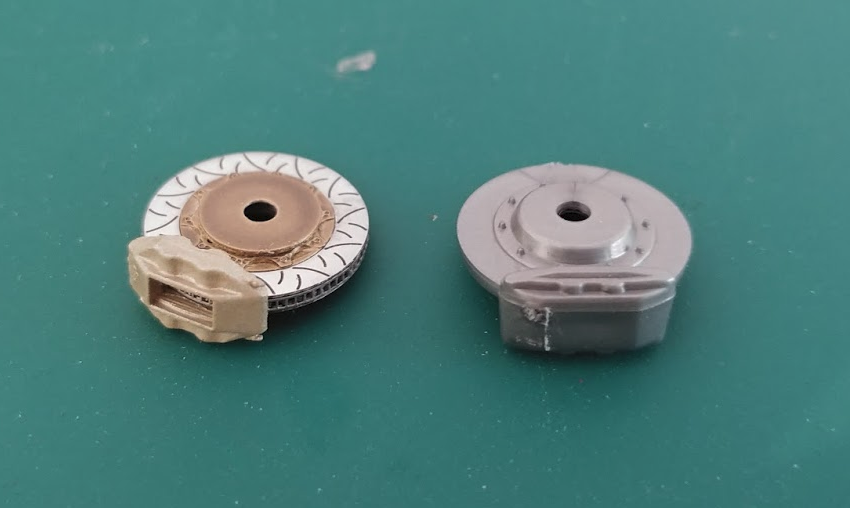
Hi All, Im back at it with this kit. I took a break from it shortly after starting, to do some less intimidating kits. Today, I did a lot of the engine bay parts. I am really glad i bought the detail up set, as the added details are amazing, and very satisfying to build. I started with the transmission/oil coolers, suspension brace and brakes, which are built up as layers of PE pieces. I have done brakes like this in the past, but this one was by far the easiest. Unfortunately, while i was trying to colour/paint the oil cooler's AN fittings, i lost one, so will have to wait for some more to be delivered later in the week. The engine is slowly coming together, and am very happy with how it looks. Thanks for looking Nathan
-
I feel your pain. Literally the same thing happened to me with the exact same kit. I wonder perhaps (could be a coincidence) but it could be an actual bad batch of PS plastic from Tamiya that reacts badly to hotter automotive paints. I was using Automotive primer and topcoat colour and had the exact same thing happen. the paint forms a ring-like pattern from one point and spreads. It was really annoying, cause even after clear coat and wet sanding and polishing it didn't come out, even though the clear coat was perfectly level. here are a couple pics of mine.
-
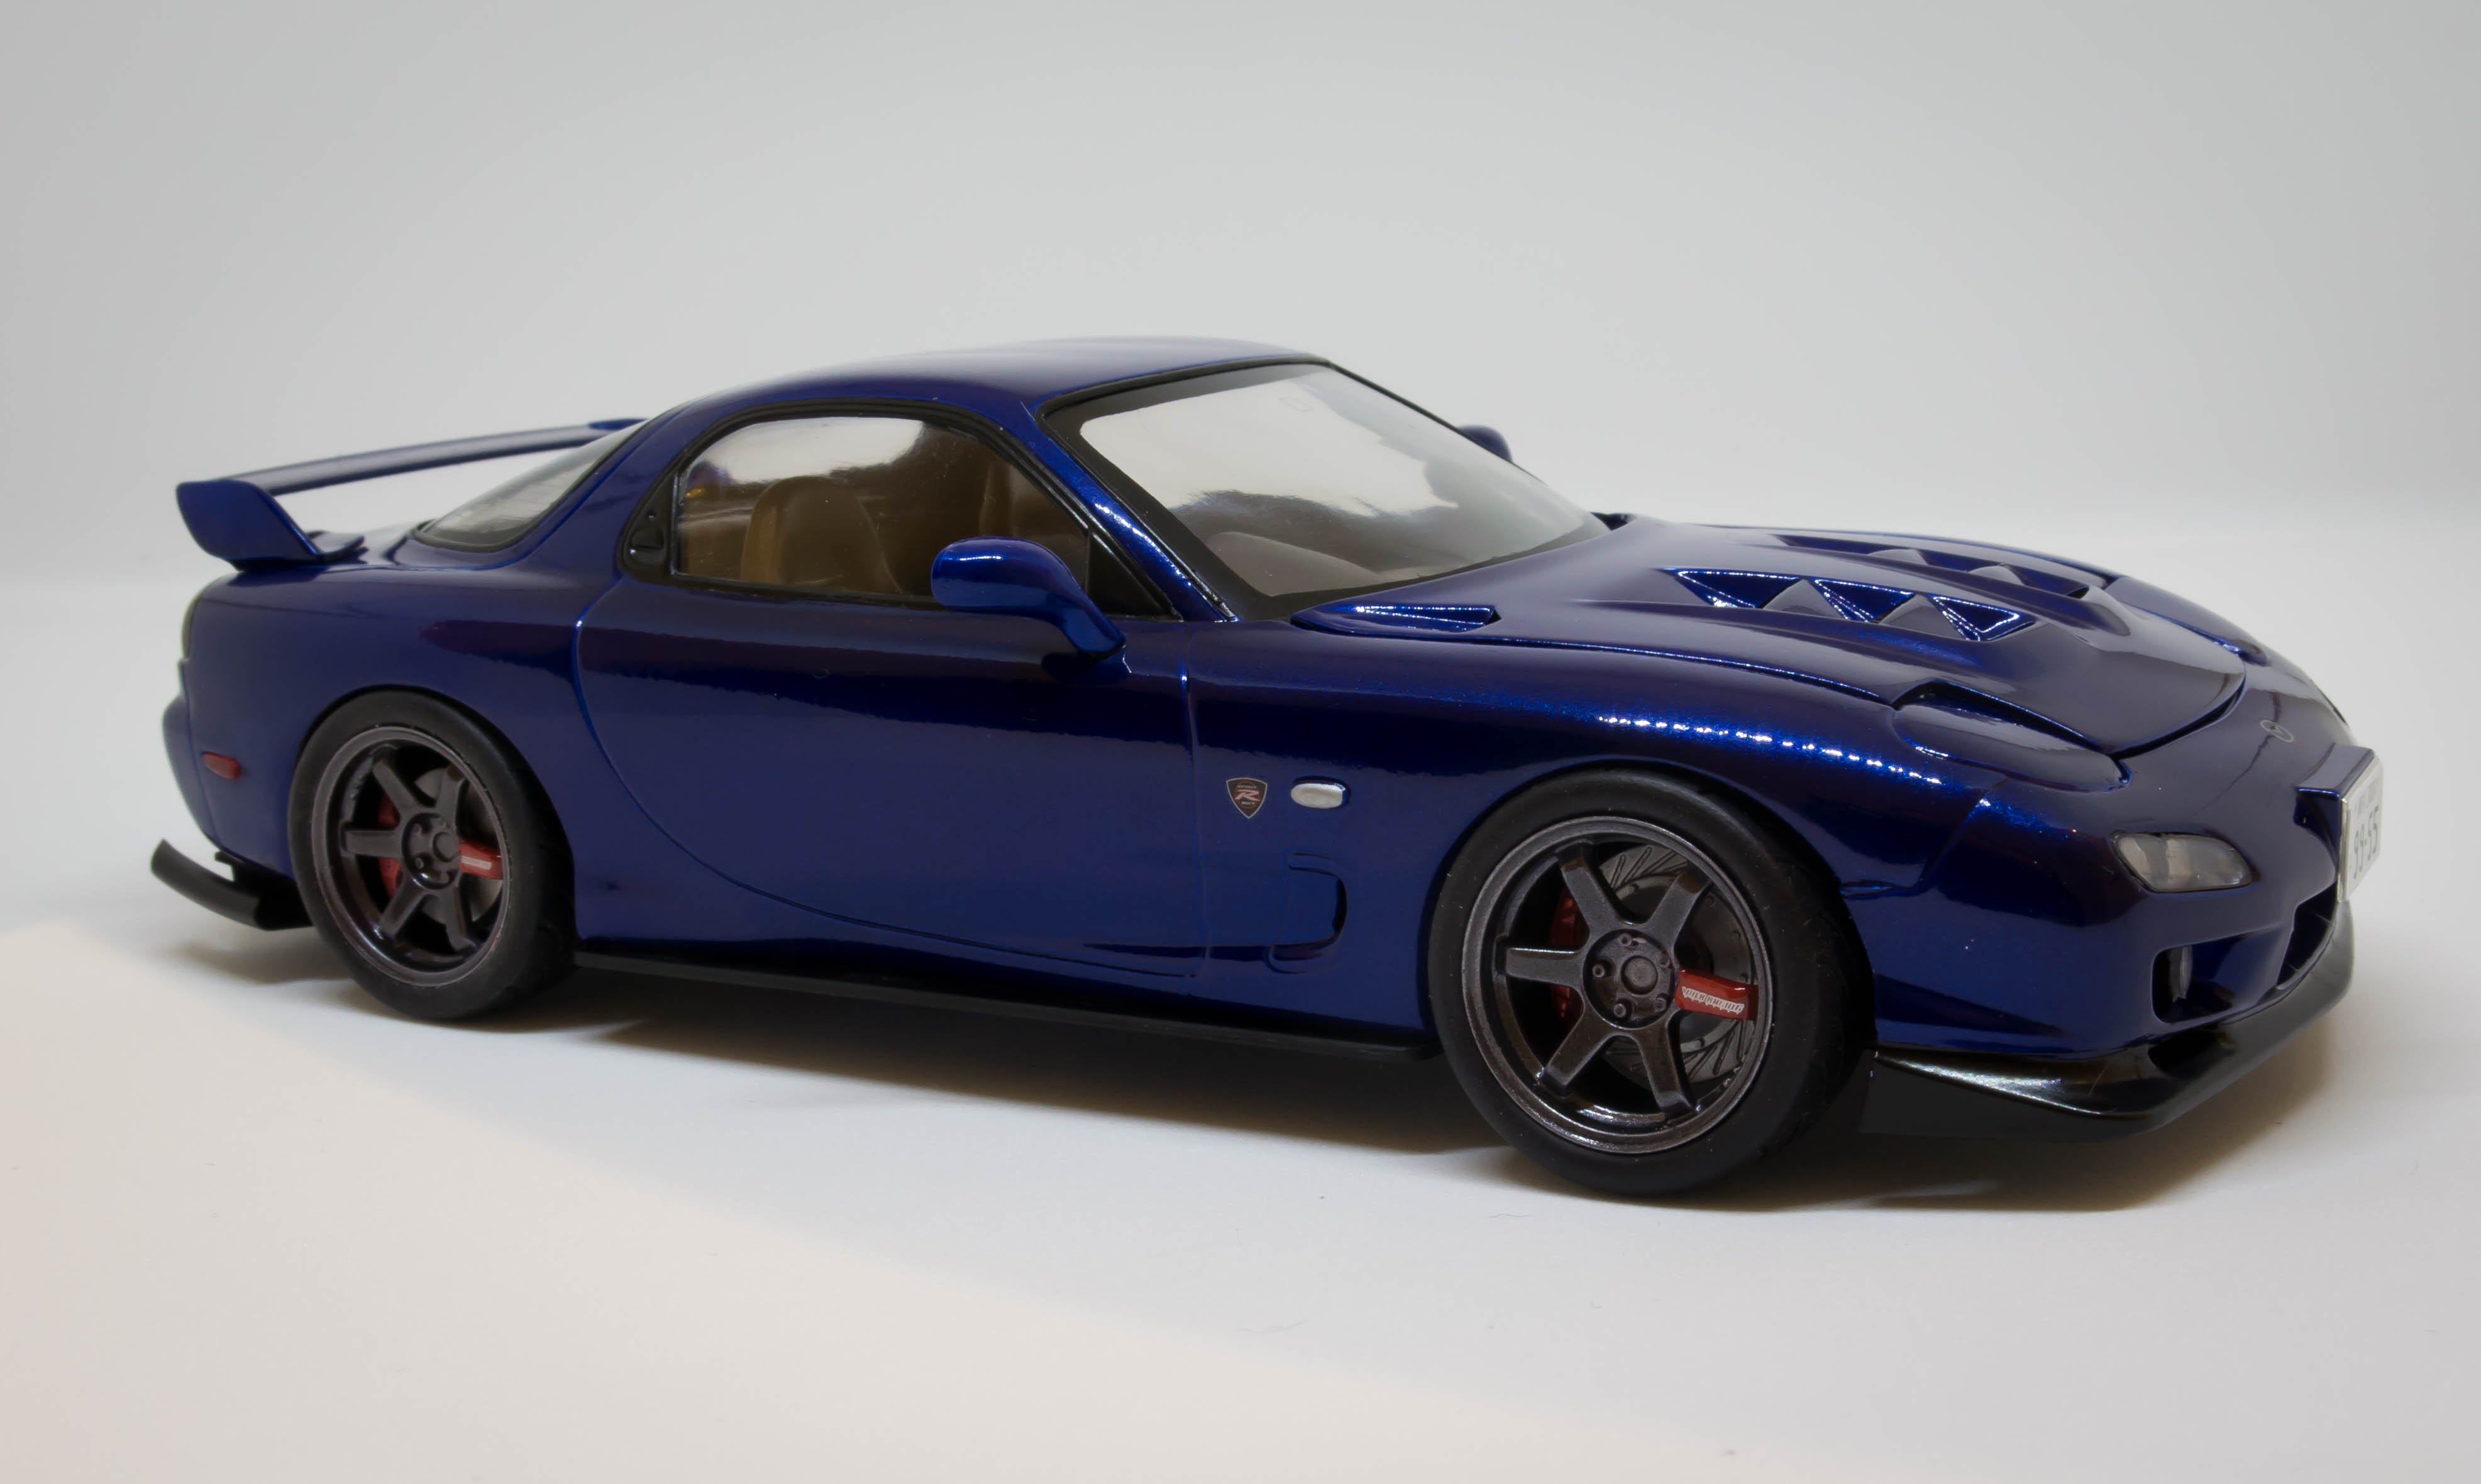
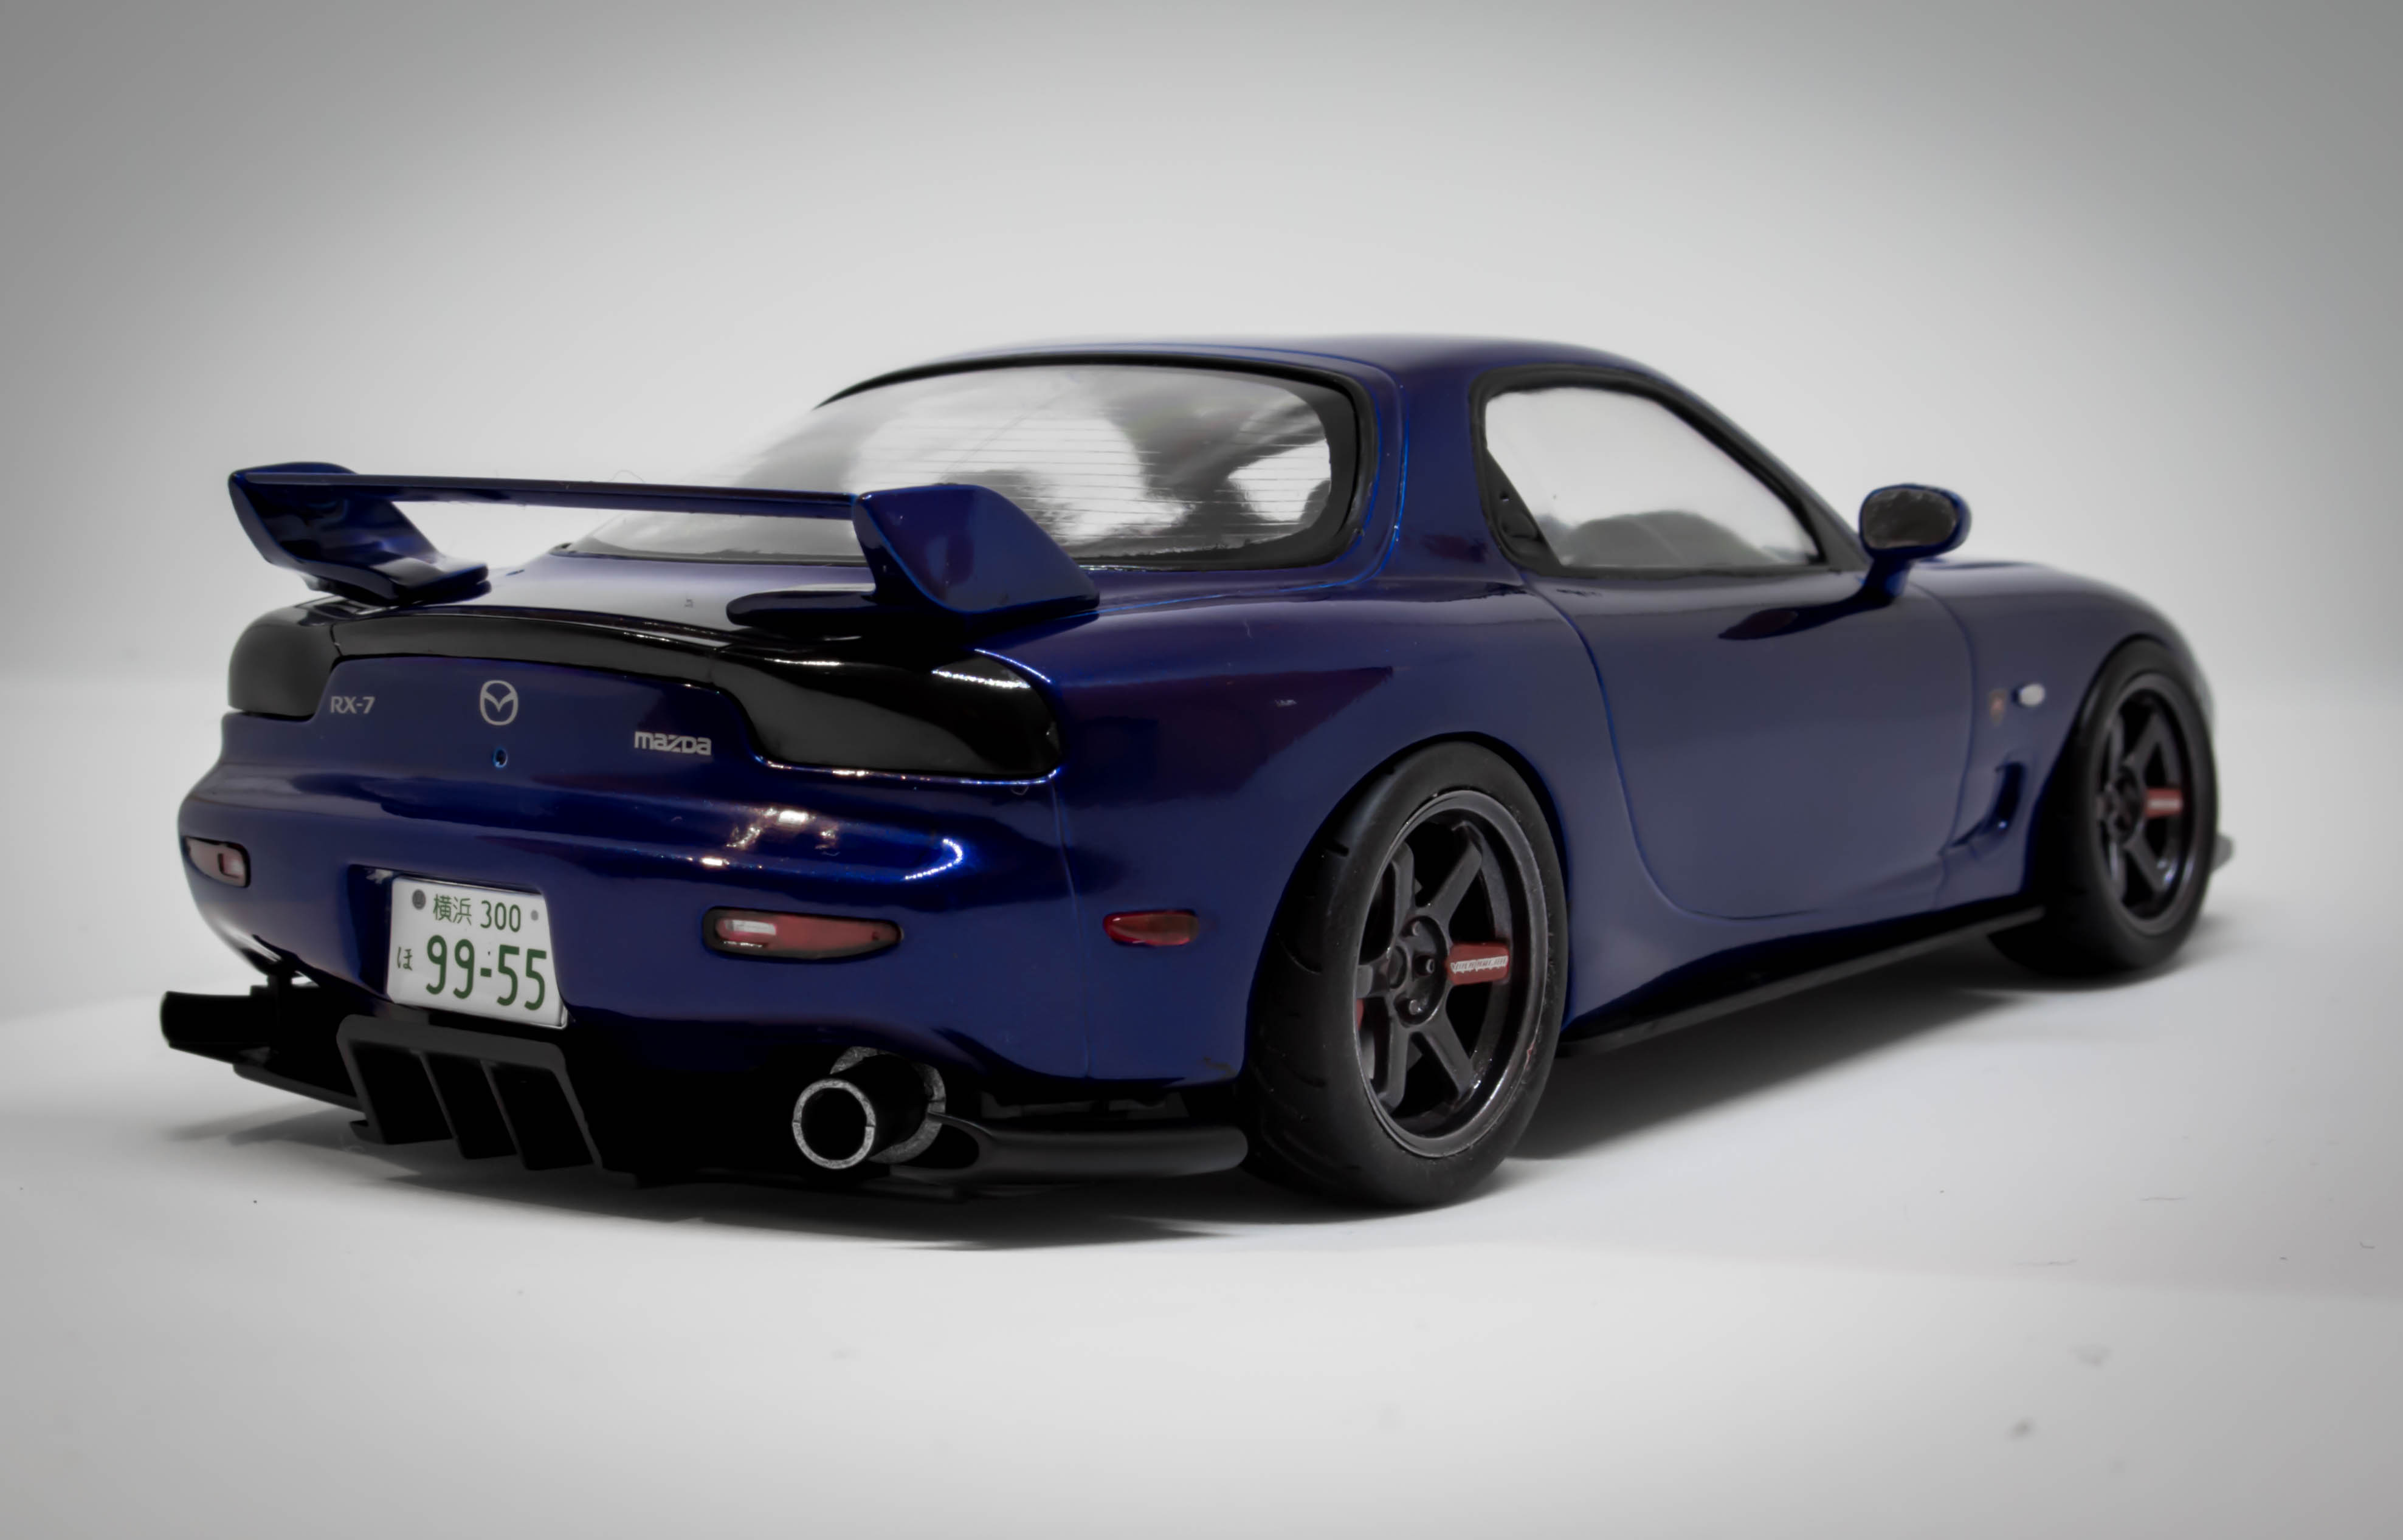
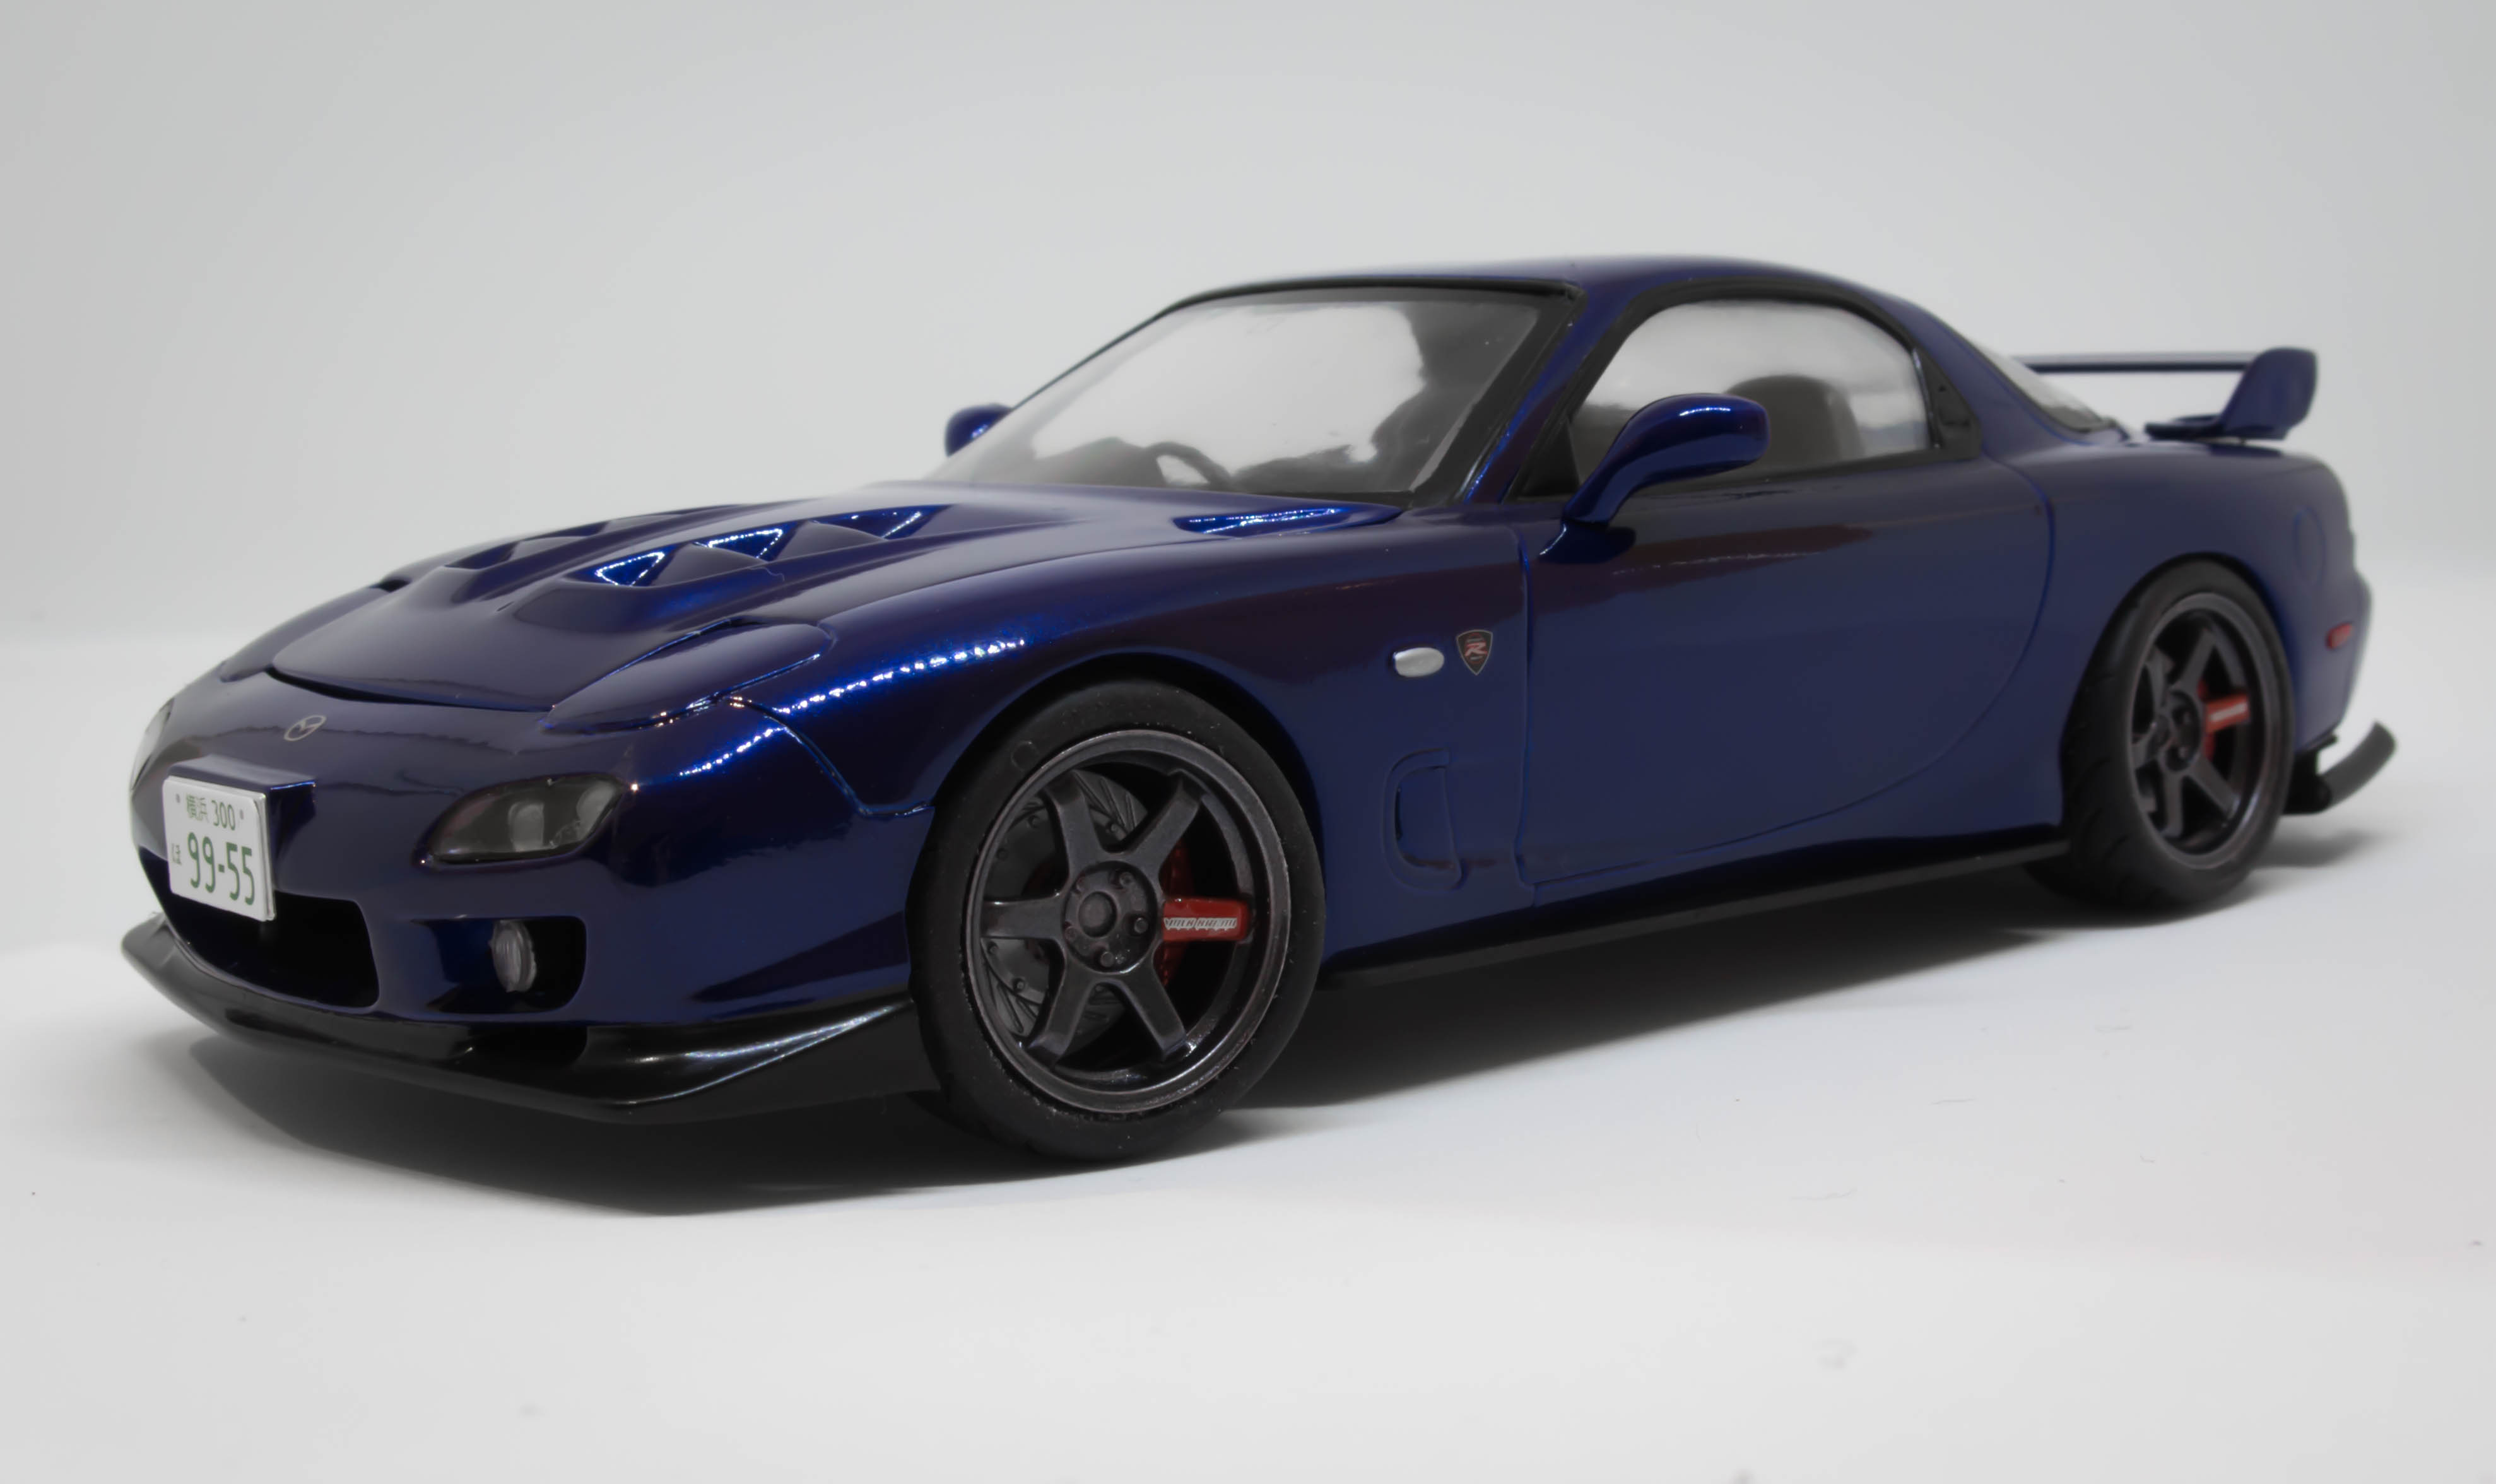
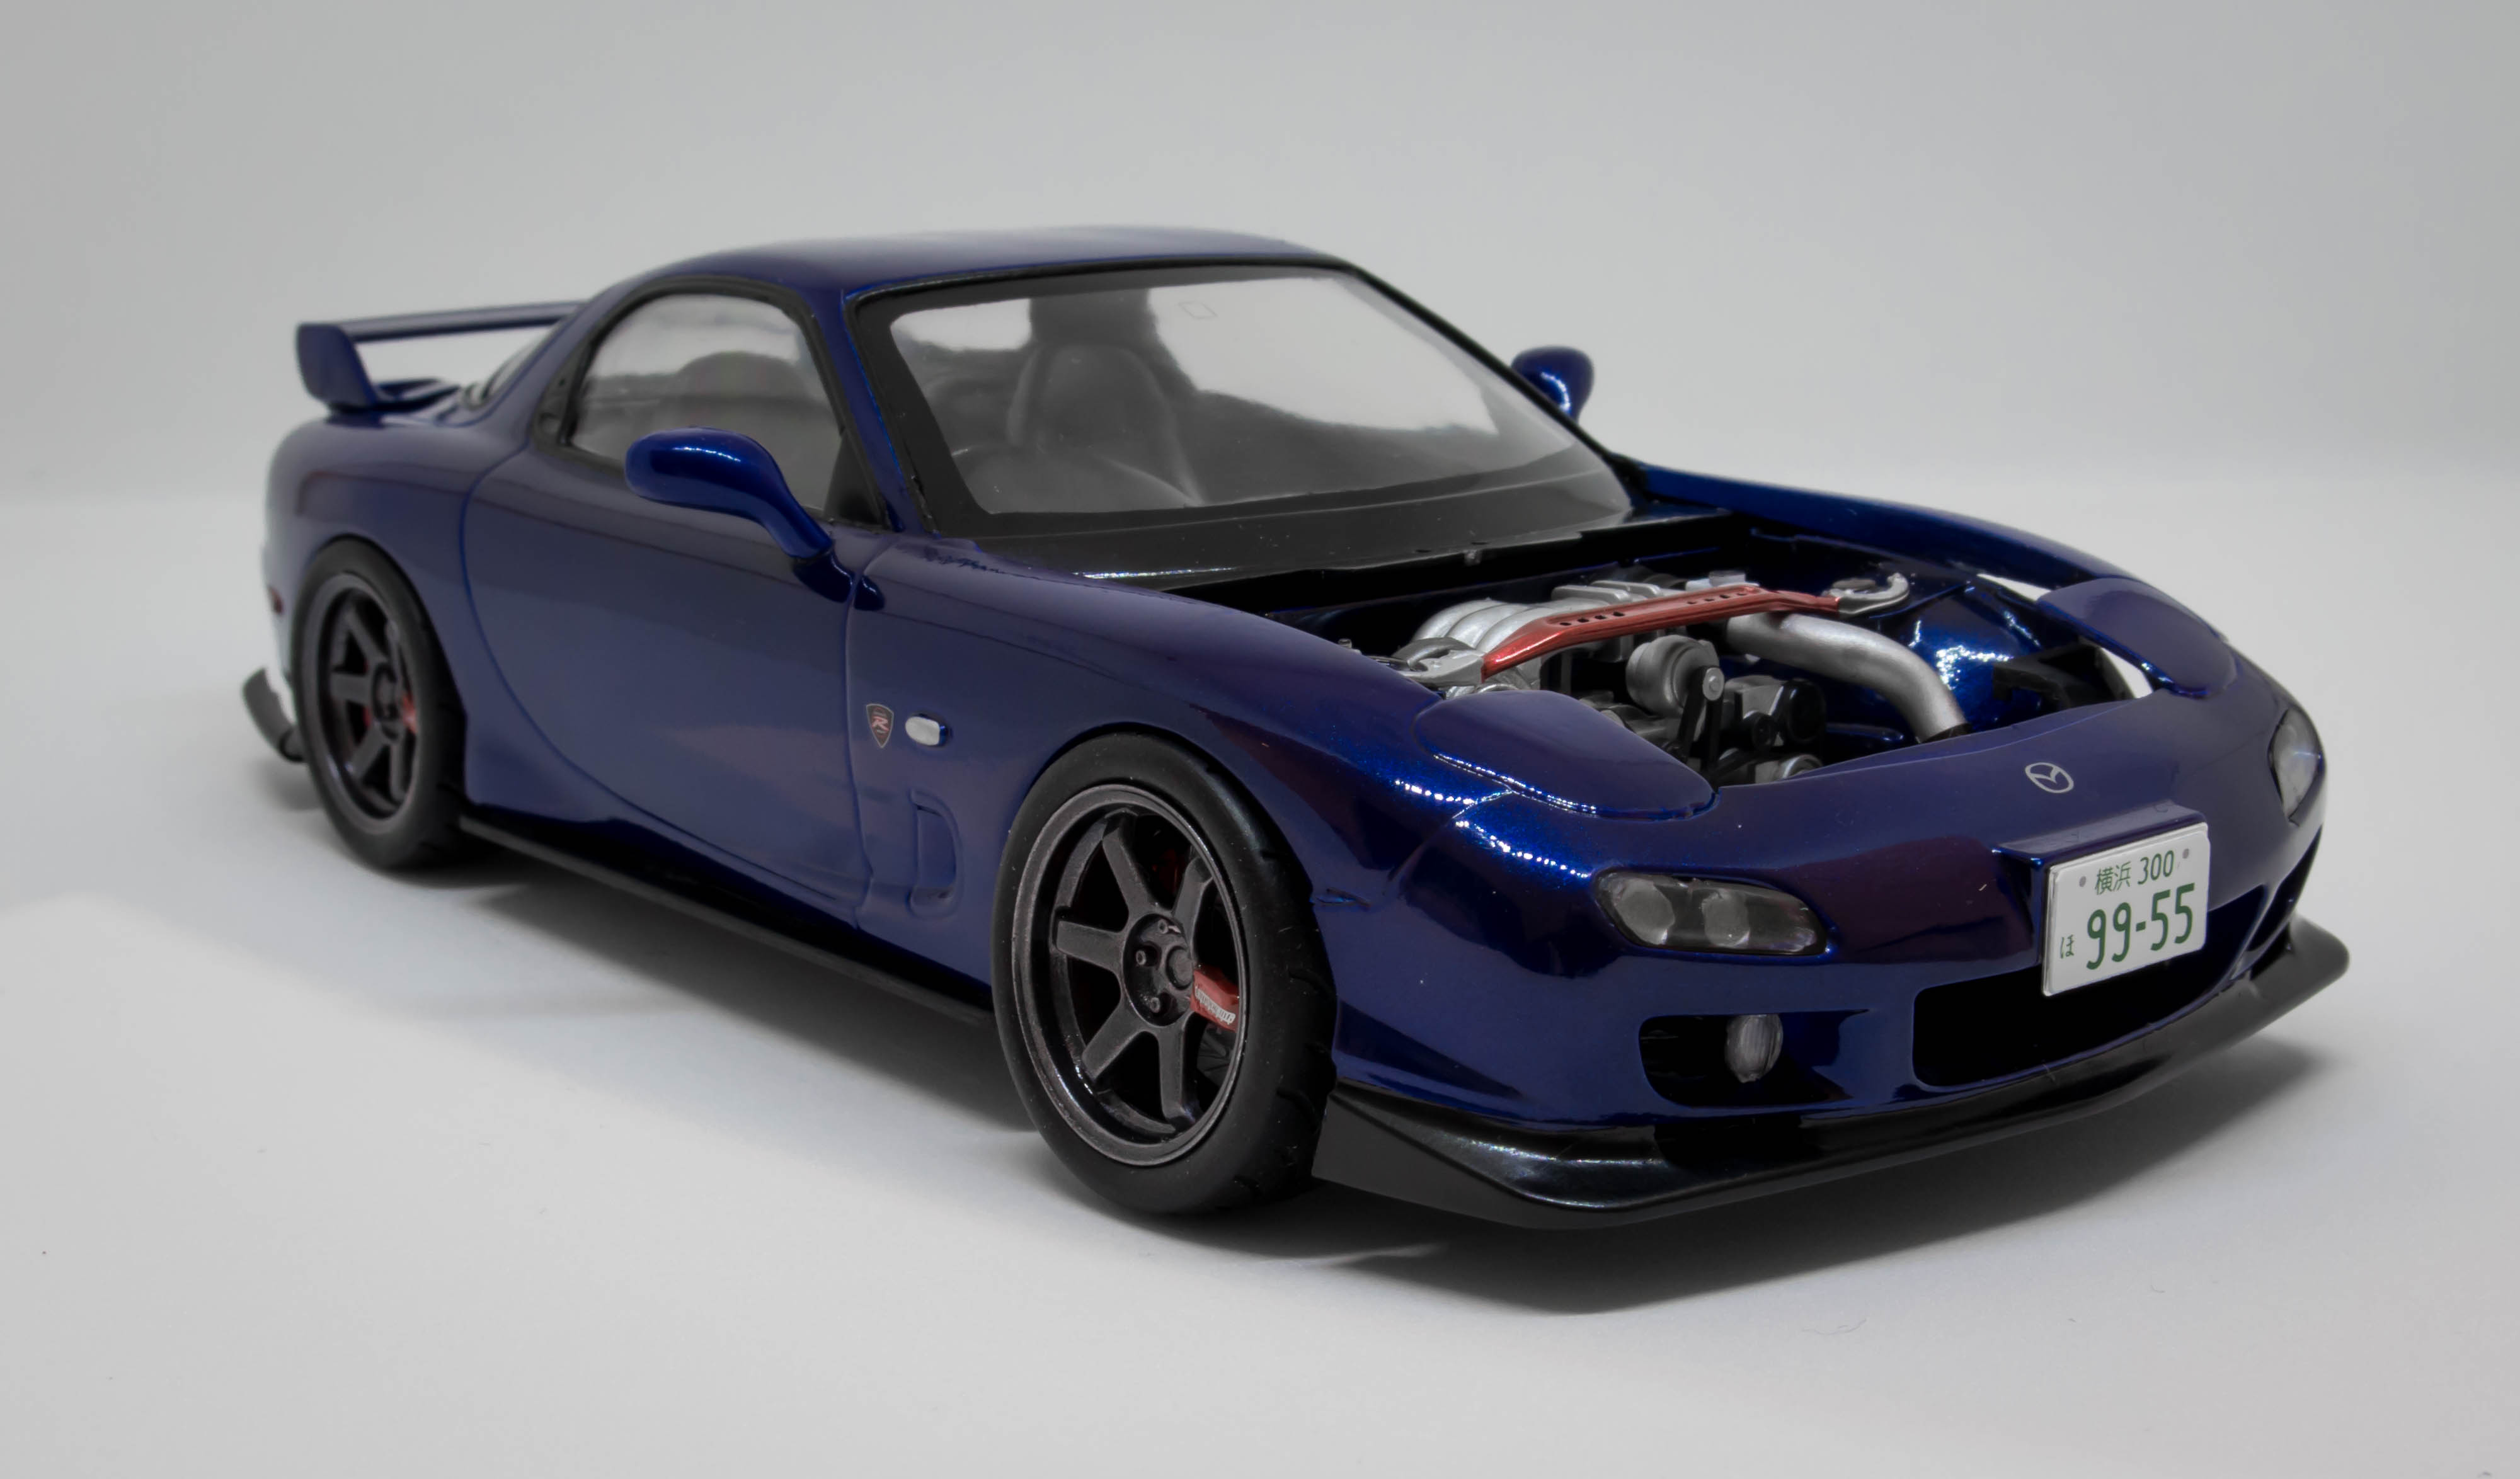
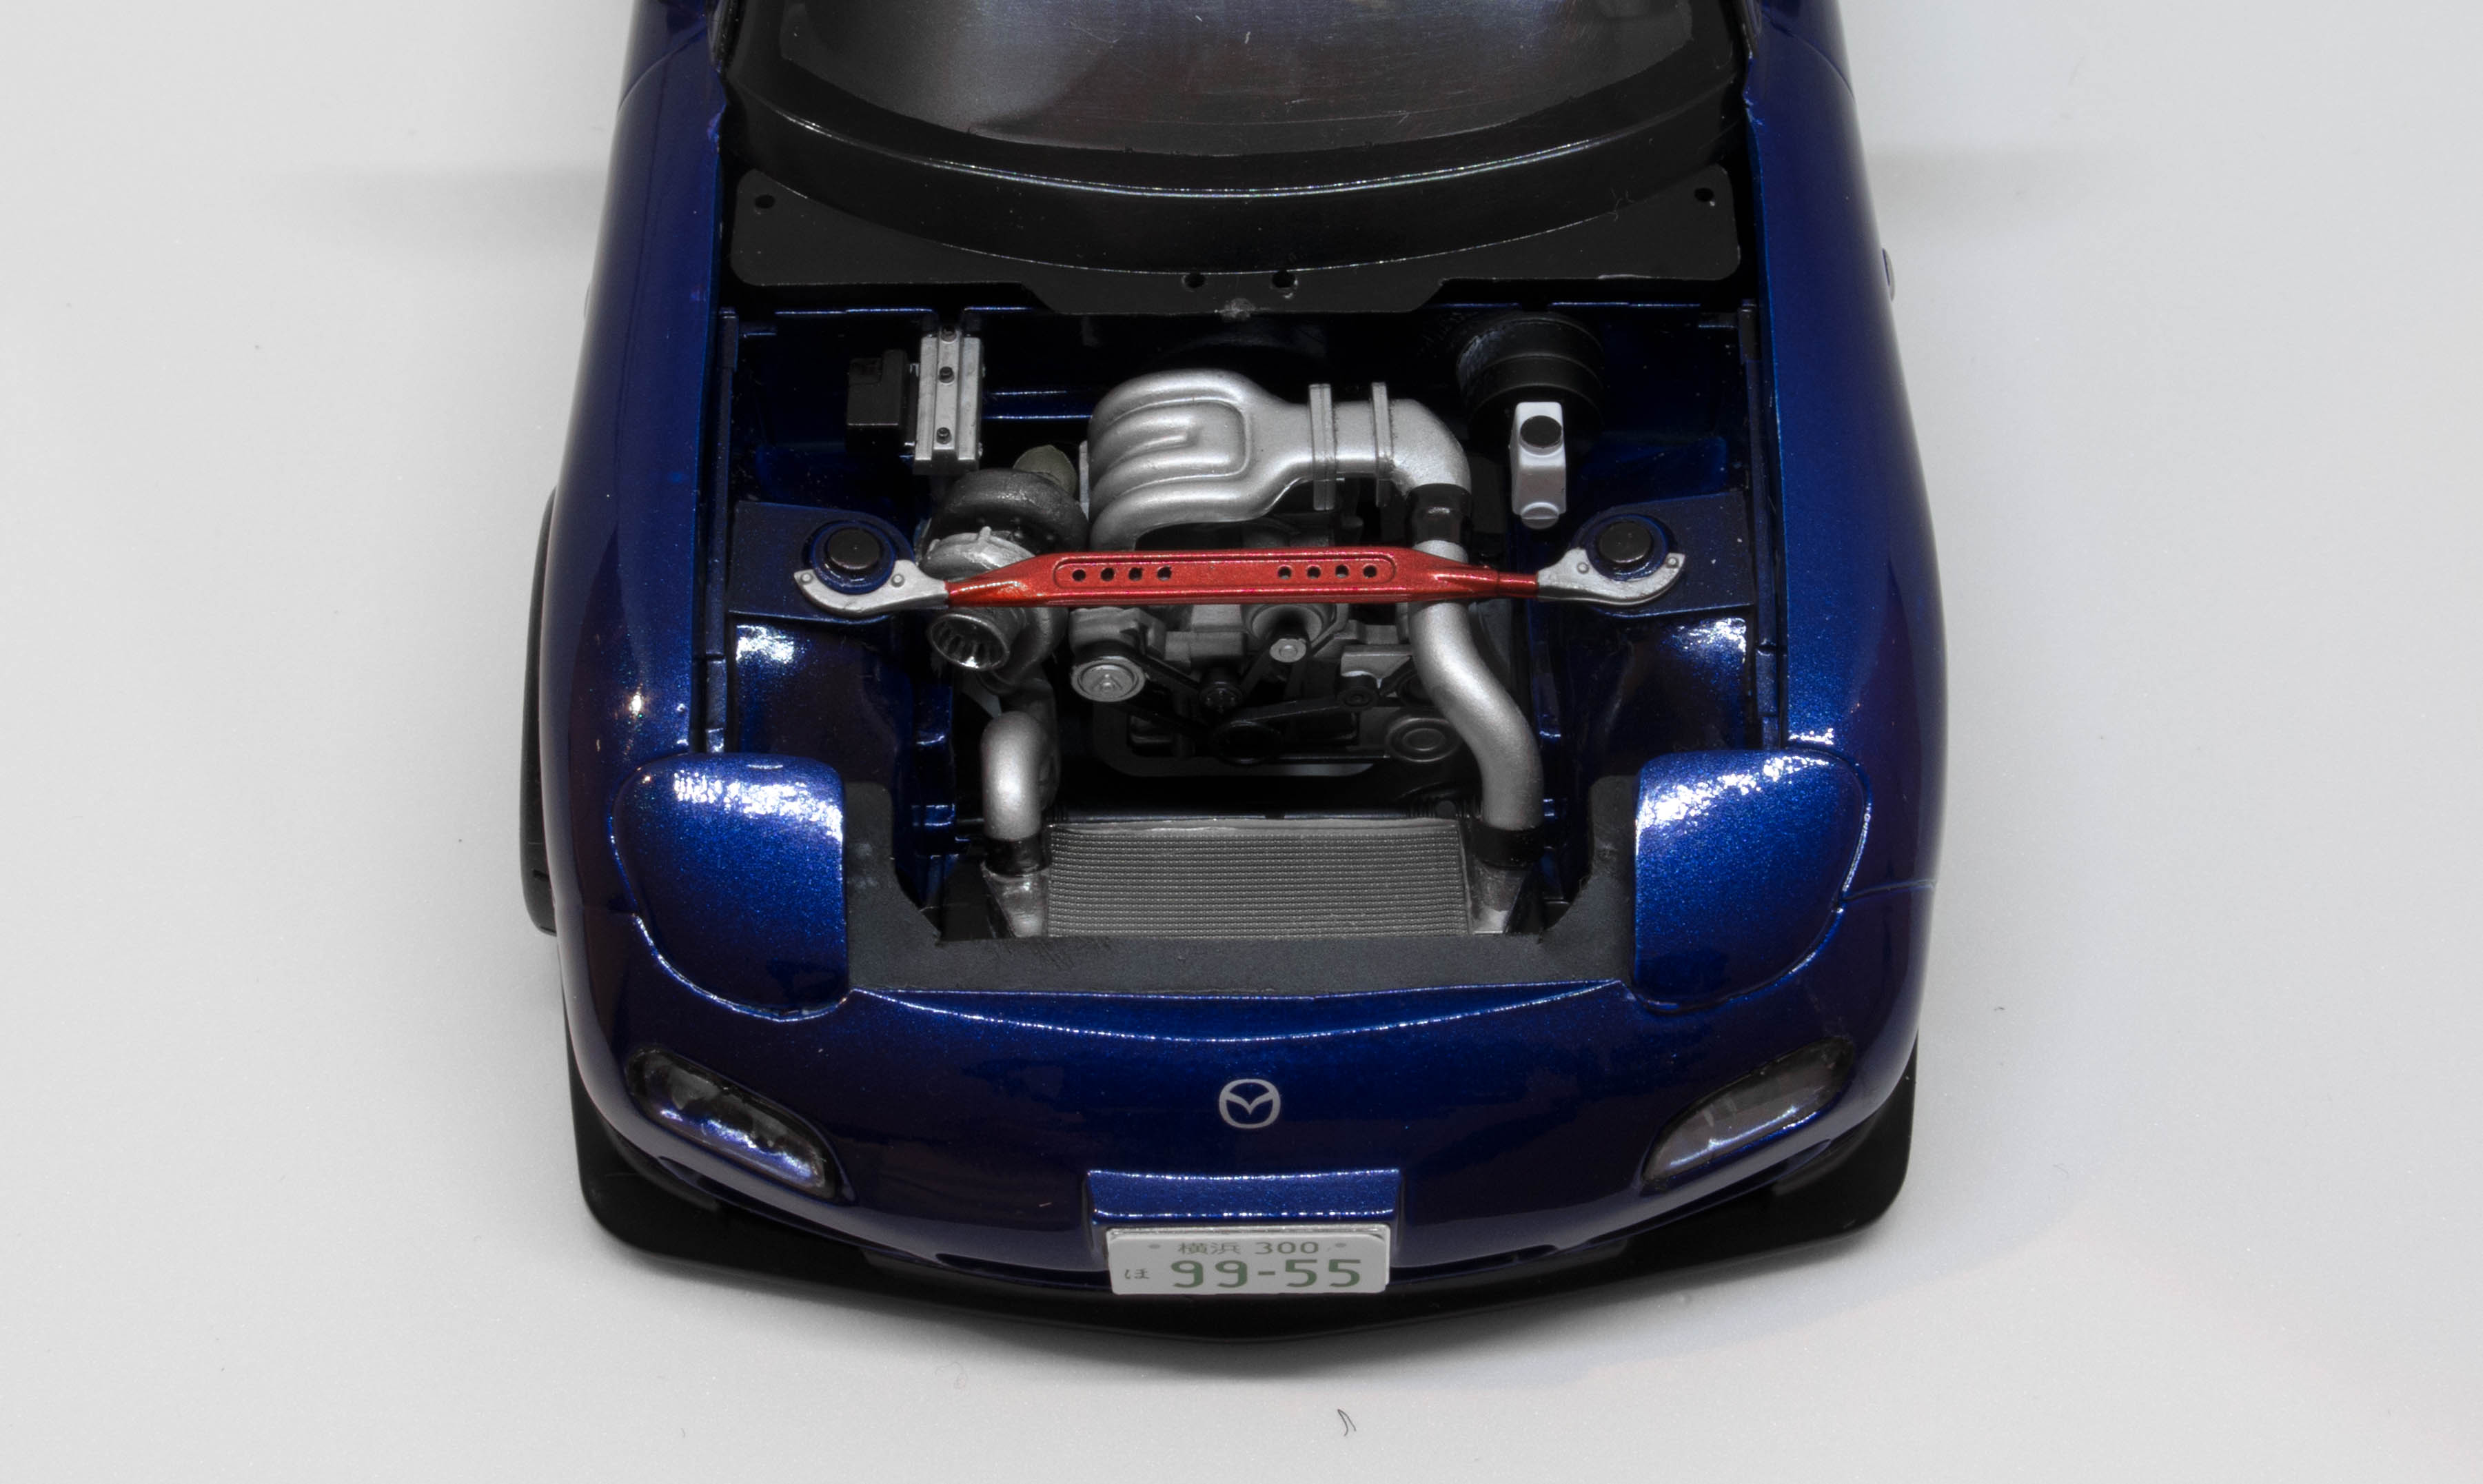
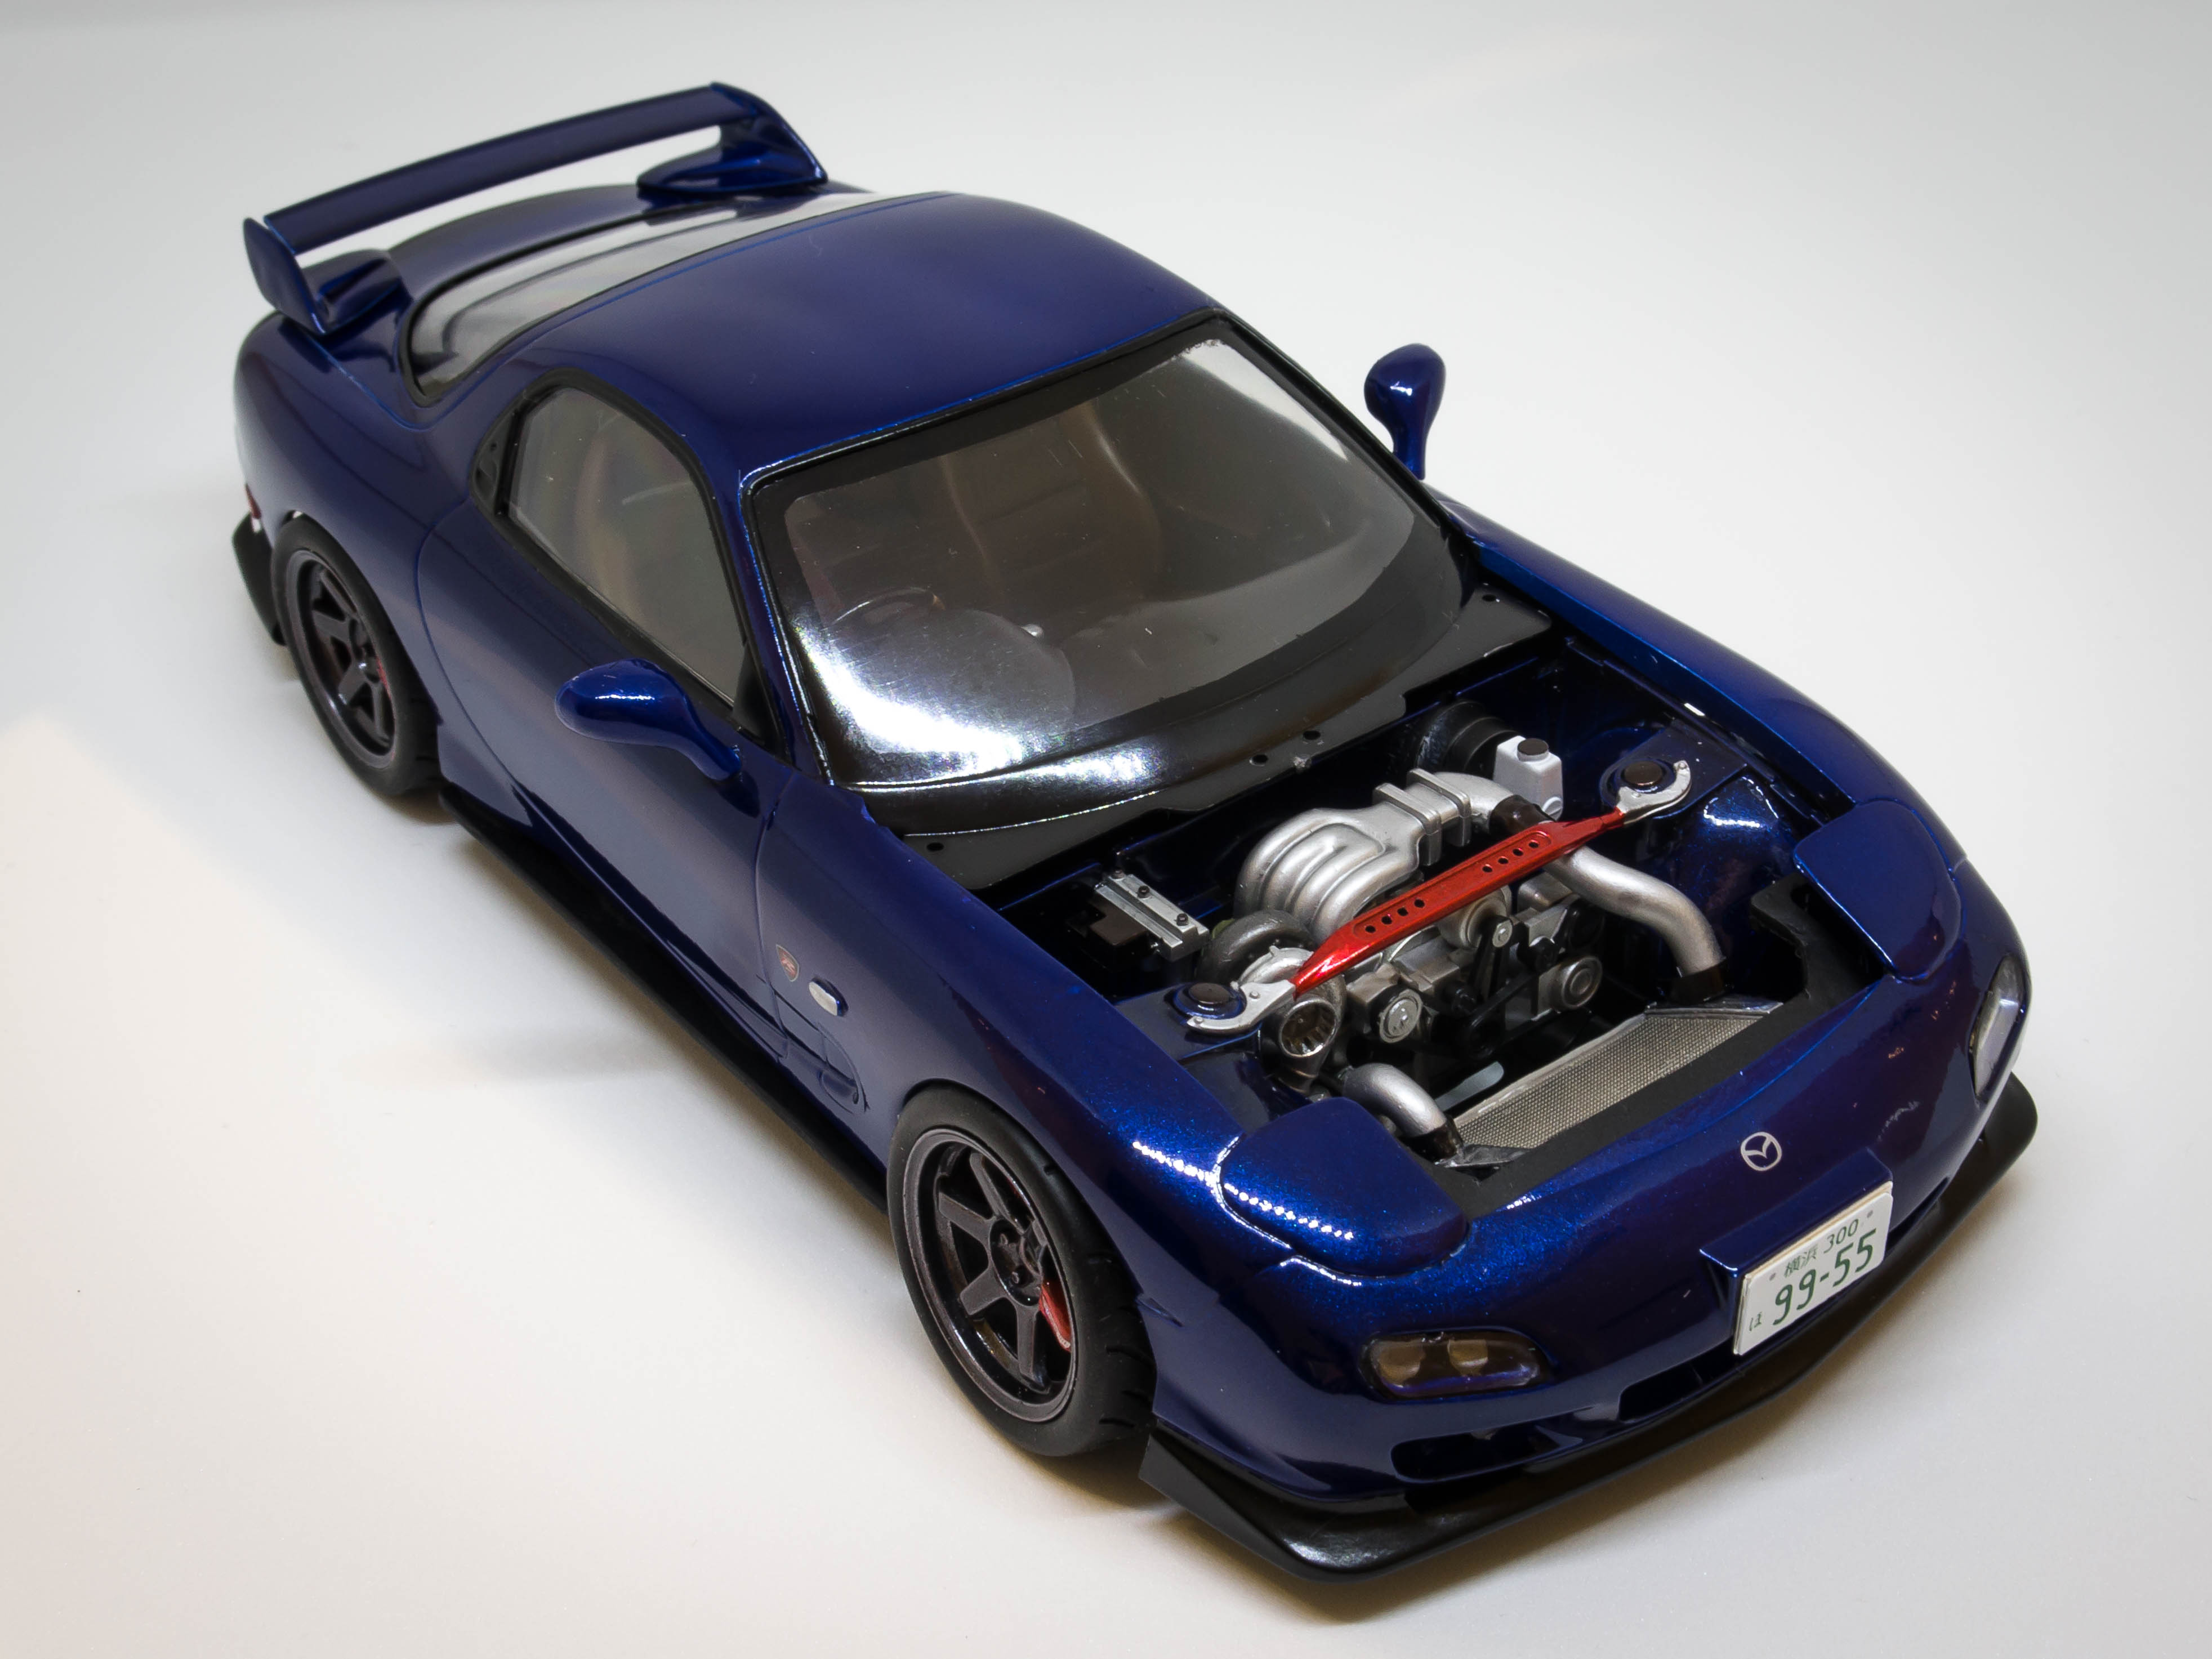
Hi All, I finished this kit over the weekend, after several weeks, of slow progress. I am really pleased with how it came out. The body is from the Aoshima RX7 Spirit R kit, engine and chassis are from the tamiya kit, and the aero bits are from a fujimi kit. I discovered along the way that even though they are all the same car, and scale, each brand has modeled the car slightly differently, and so not all the parts played together all that nicely. A lot of filling and sanding had to happen to the bonnet, and chassis to make it work with the aoshima body. I didnt get around to doing a WIP on this build, Thanks for looking Nathan
-
yes, certainly the engine bay and interior are very detailed.
-
Hi All, 2 weeks ago, I was at a local Hobby swap meet. I came across this little beauty and swooped on it. The kit was 30AUD which is about the asking price for a basic Brand new tamiya kit. I was stoked to get such a rare, complete kit for such a price. This, and the Mazda 787B, are my all time favorite race cars. There is something about the boxy late 80's - 90's styling that i really love. When i got home i went online and bought the Hobby Design PE kit too. The kit is complete, with all parts still inside their plastic bags. Looking at the instructions, you can tell the age of this kit, as the white paper has gone yellow, as have the decals unfortunately. I am hoping that they can still be used. The carrier film has a slight yellow tone to it too. I havent had much luck in finding this livery online, the only one i have found is 50USD. I have some Microscale Liquid decal film, which is meant to restore old decals, so ill give that a shot first, before i go and buy some new decals. I am planning on detailing this kit as much as possible, and will be building it to the #61 car which finished 2nd in the 1989 race (I prefer the bright orange accents, over the yellow which was on the winning #63 car). Thanks for looking, I'll hopefully have some build updates soon Nathan
-
Im not aware of them being available in 5 lug. I have found 15" superlites (look pretty much the same as watanbes) by scale productions with 5 lugs https://www.scaleproduction.de/product_info.php?info=p1951_15--minilite--p-------.html
-
Thanks all for the comments. Yeah its one of my favourites. I also love the Milenium jade that the standard R34 GTR comes in. Minght have to do that at some point too...
-
Nice build so far. I like the colour What wheels are you planing on using? I did a similar build last year and used these wheels https://www.scaleproduction.de/product_info.php?info=p2201_16--fifteen52-outlaw001.html
-
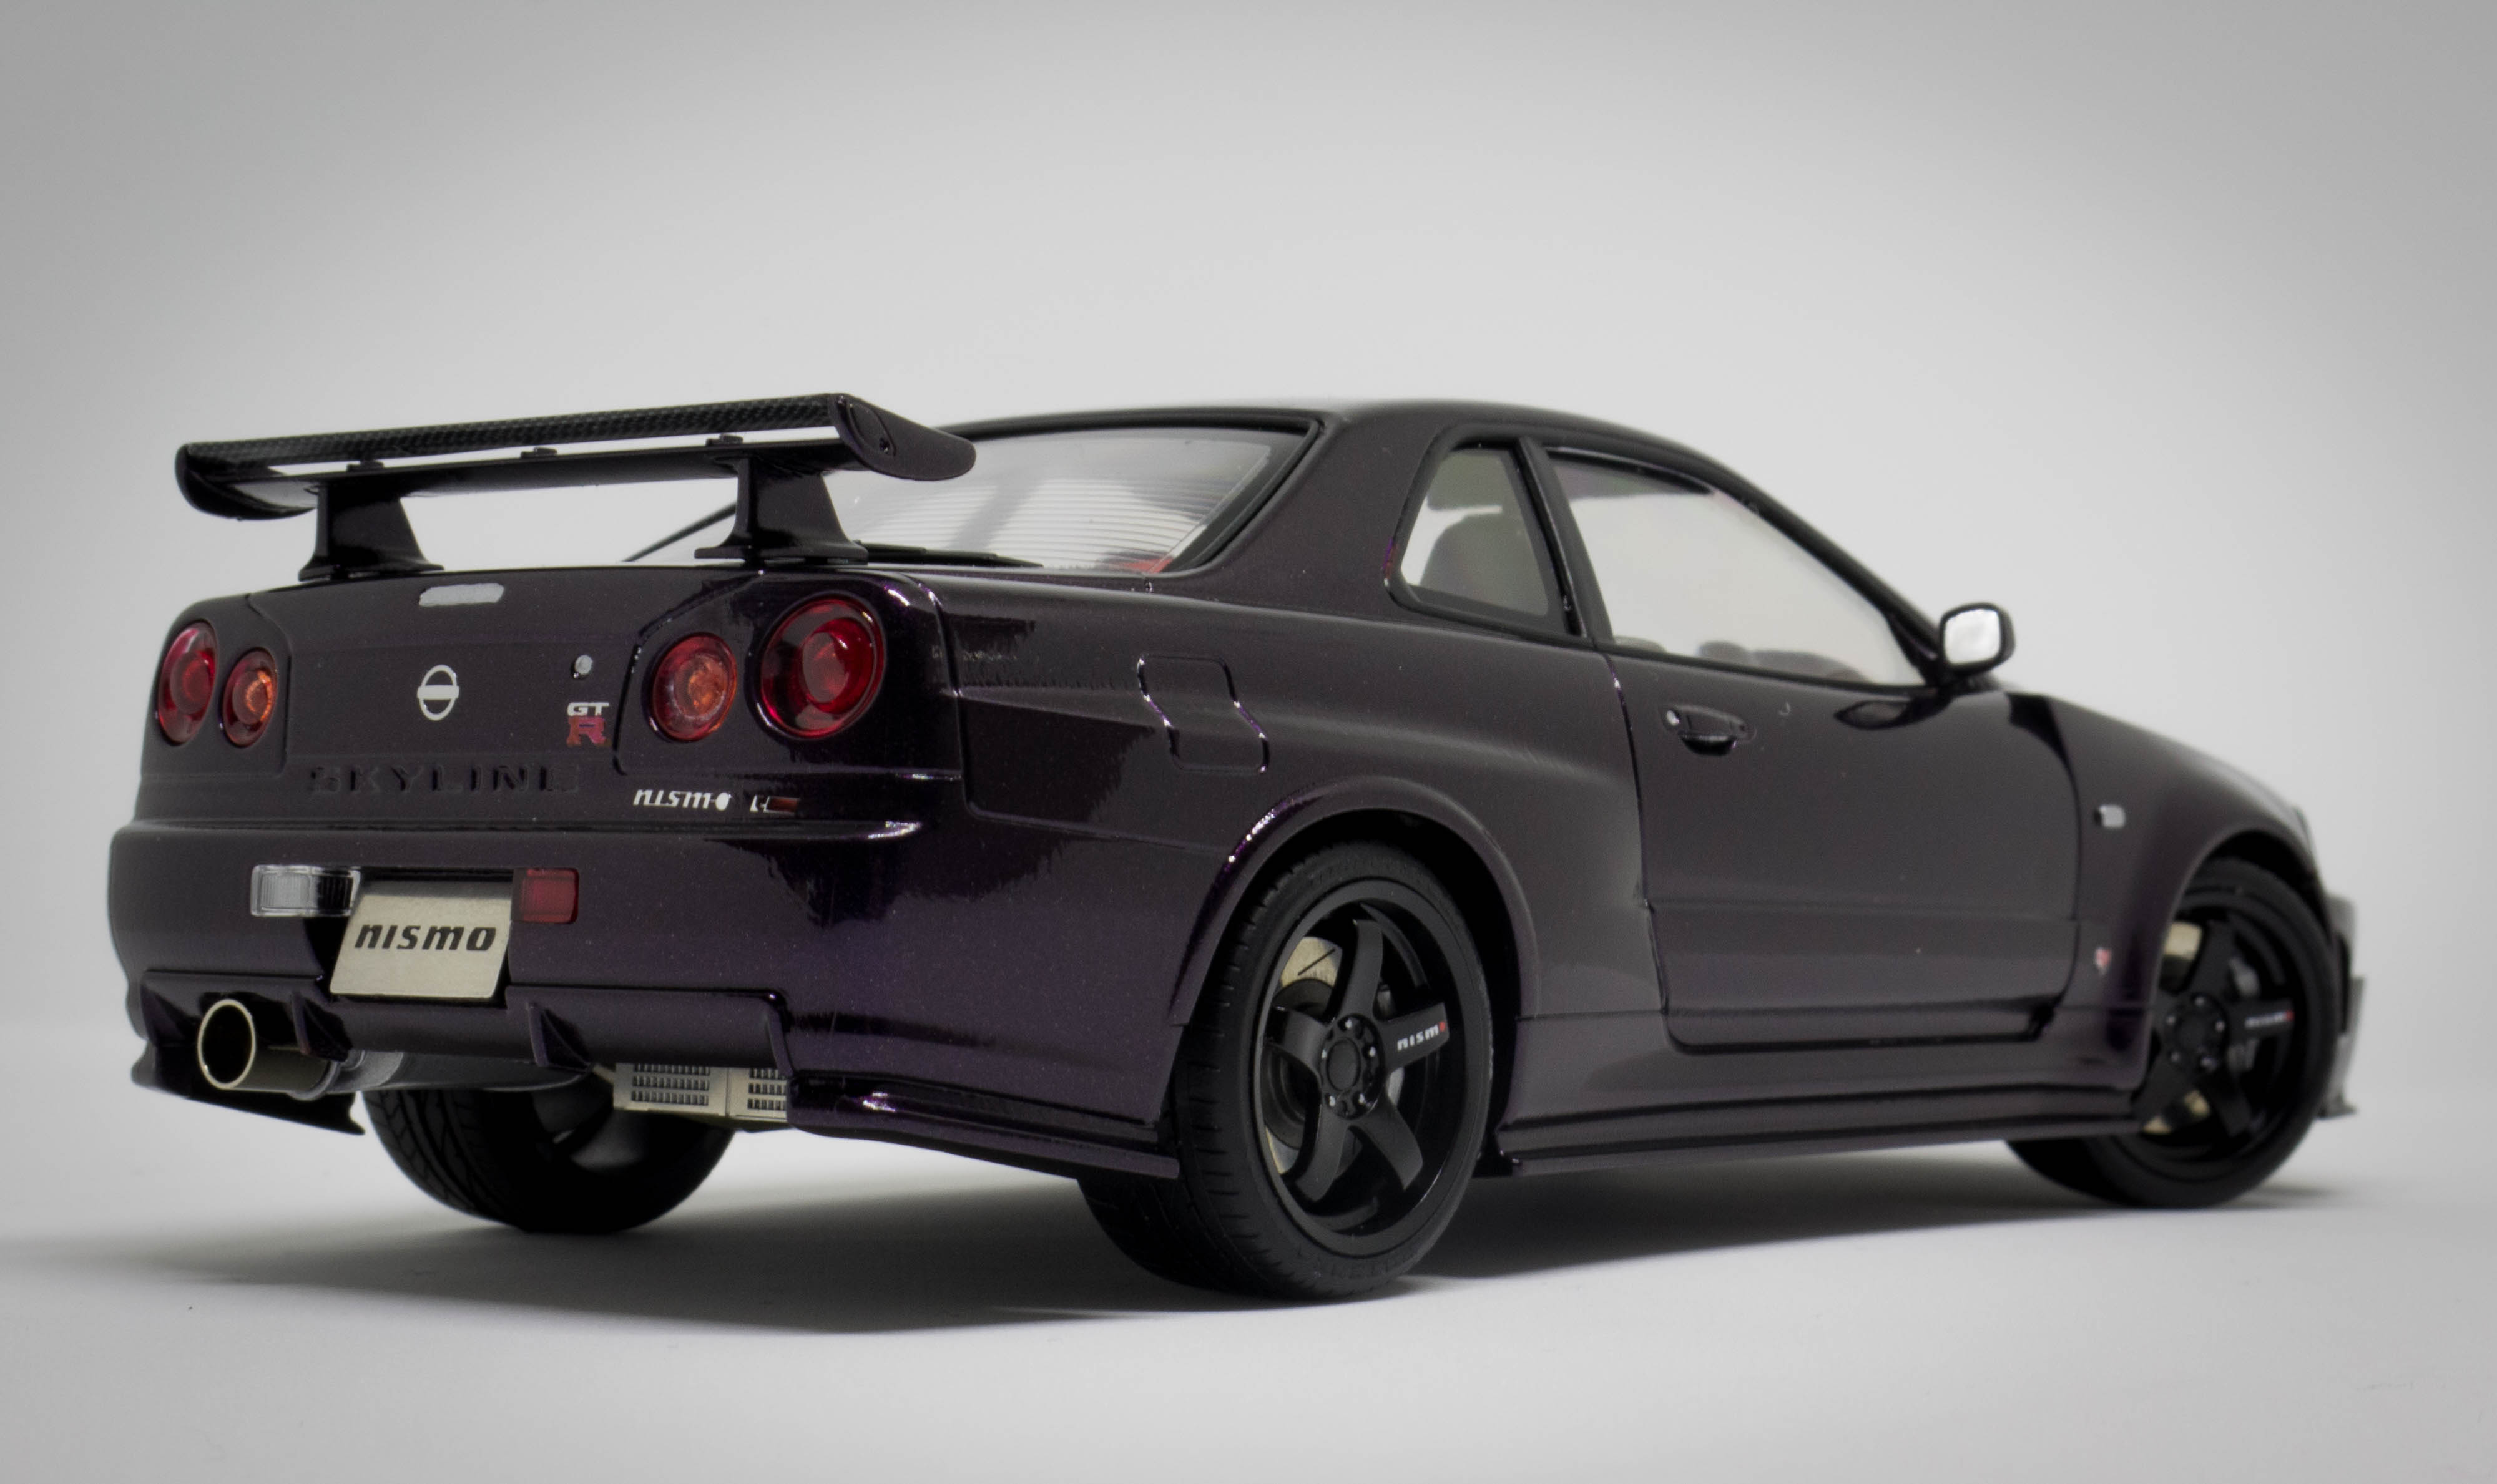
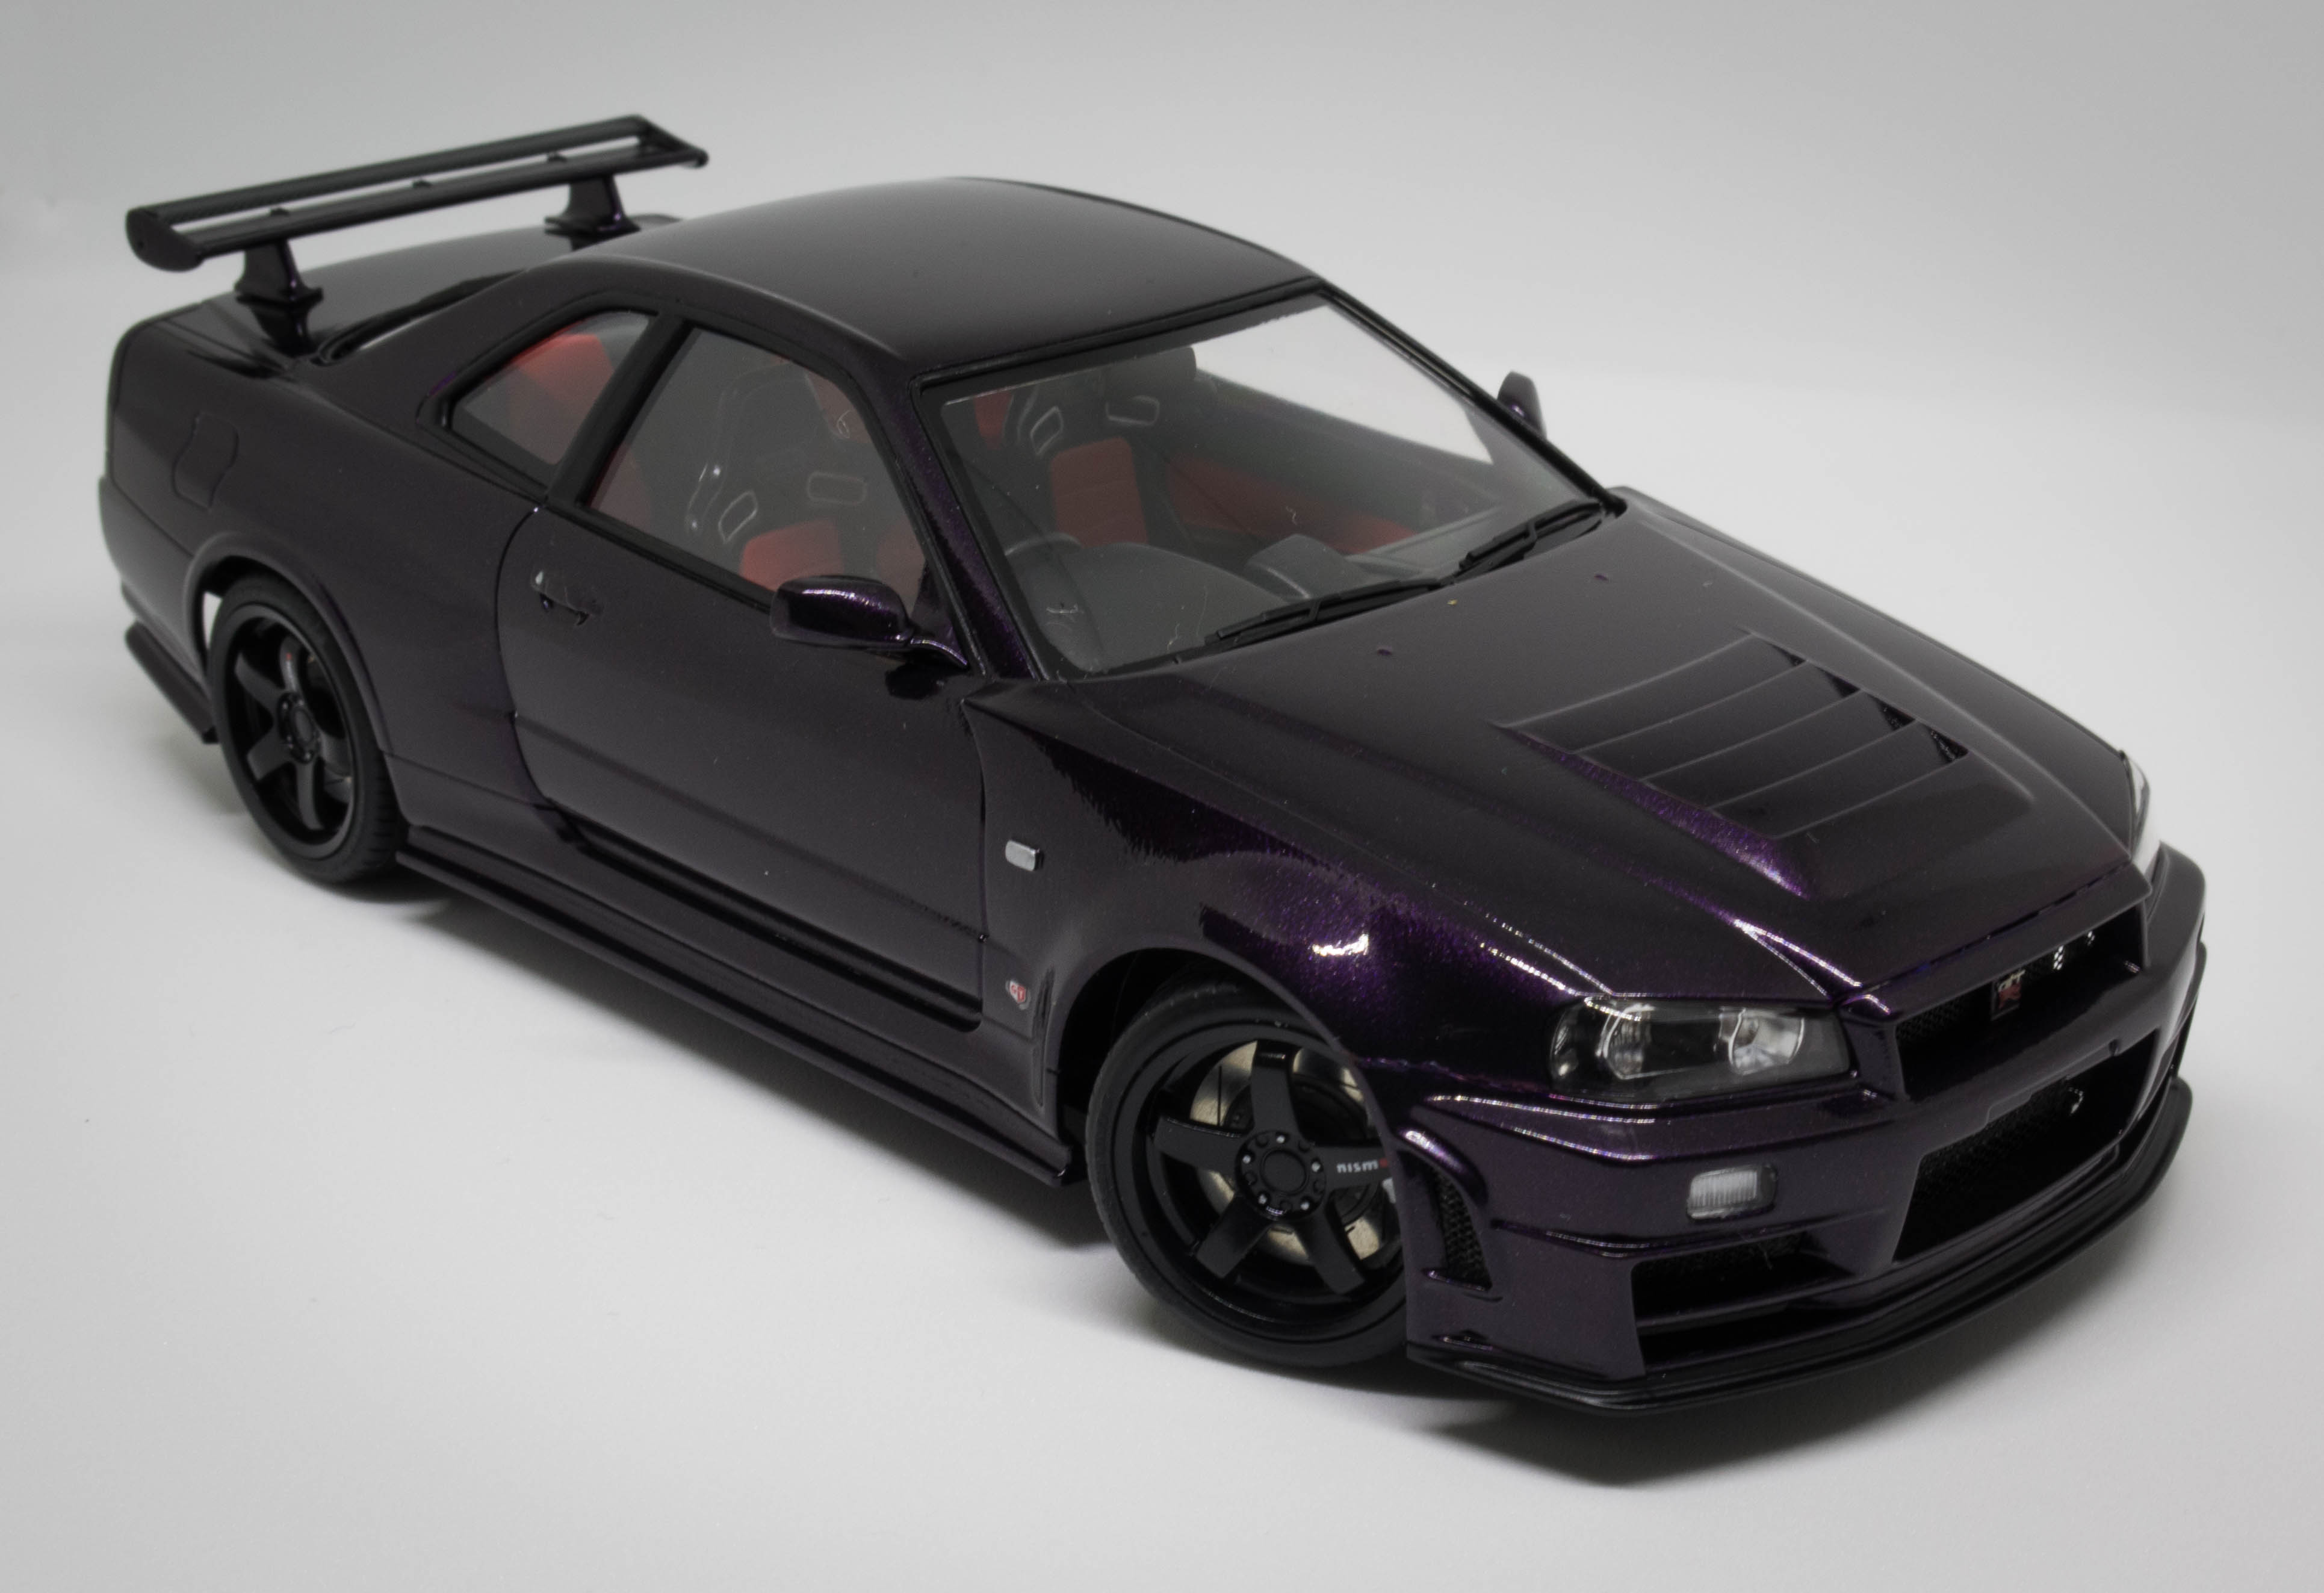
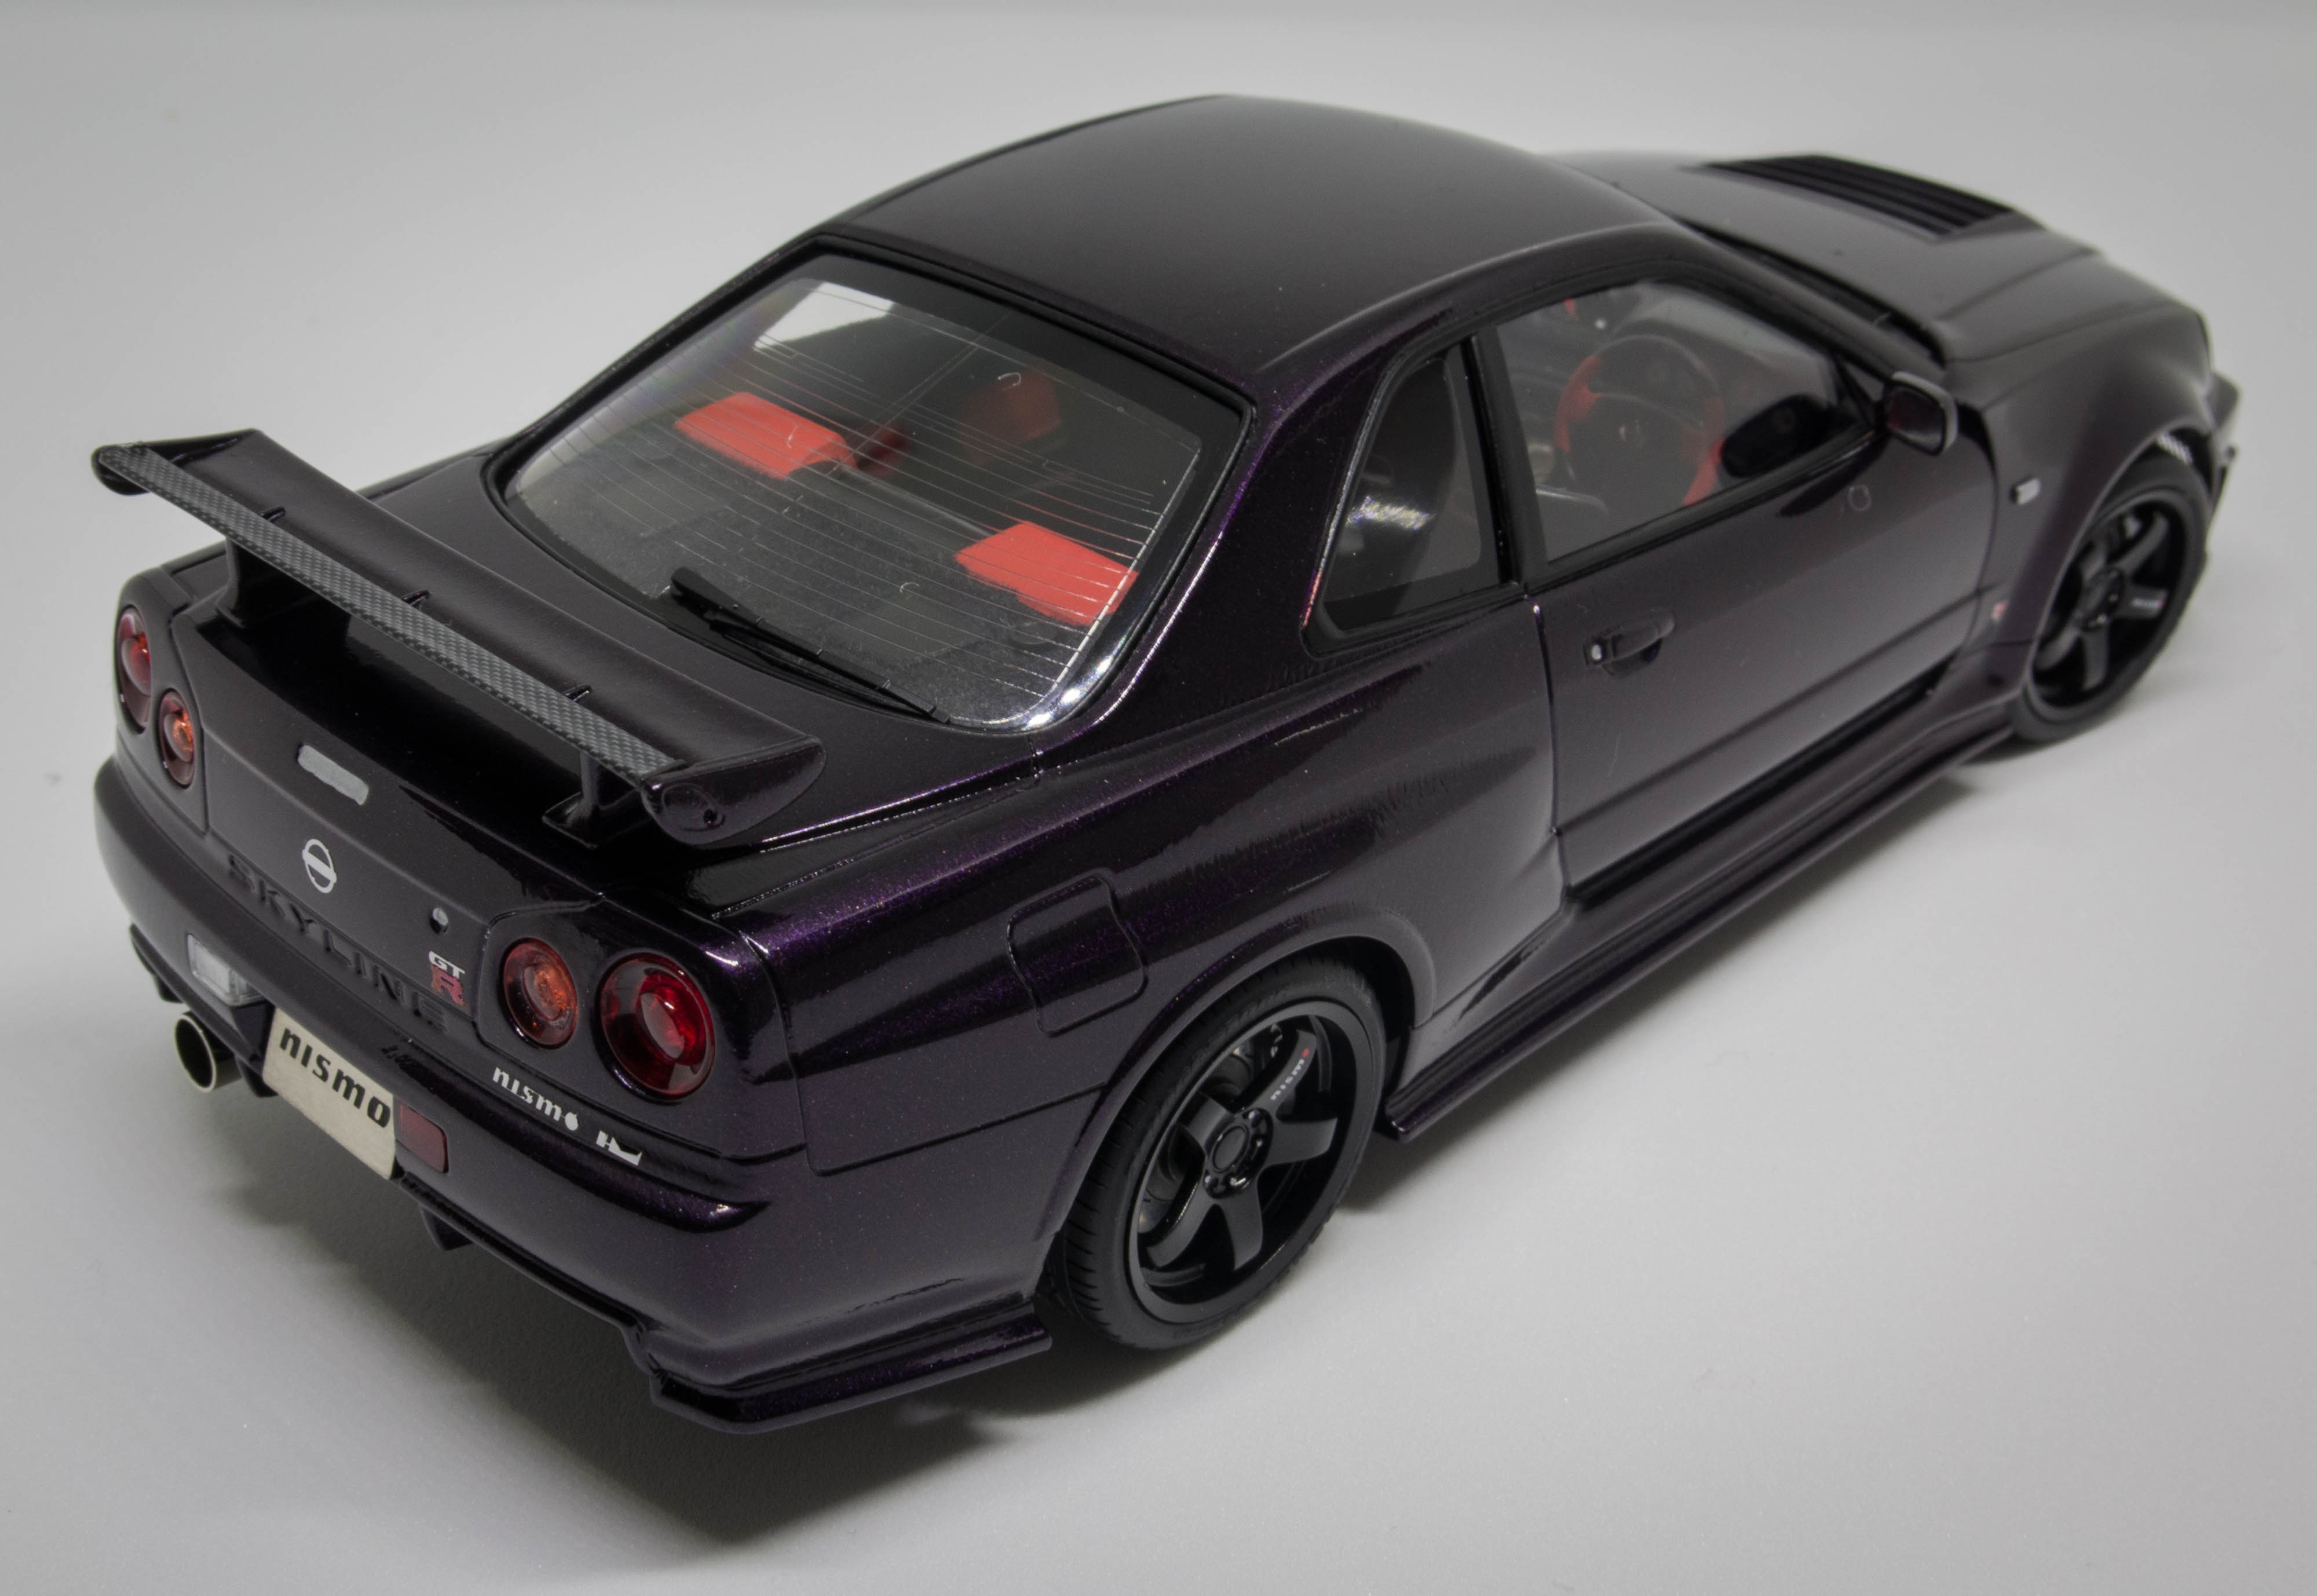
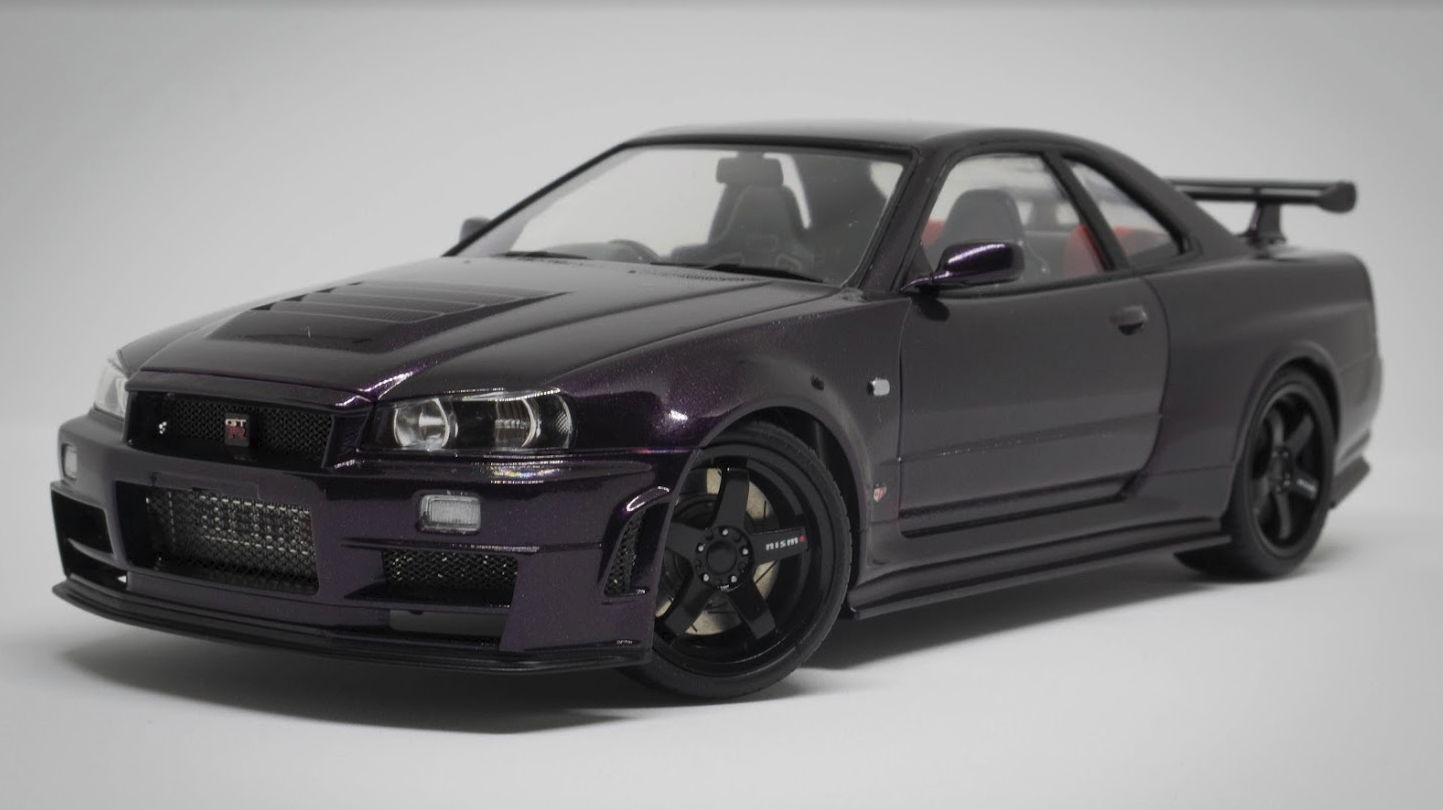
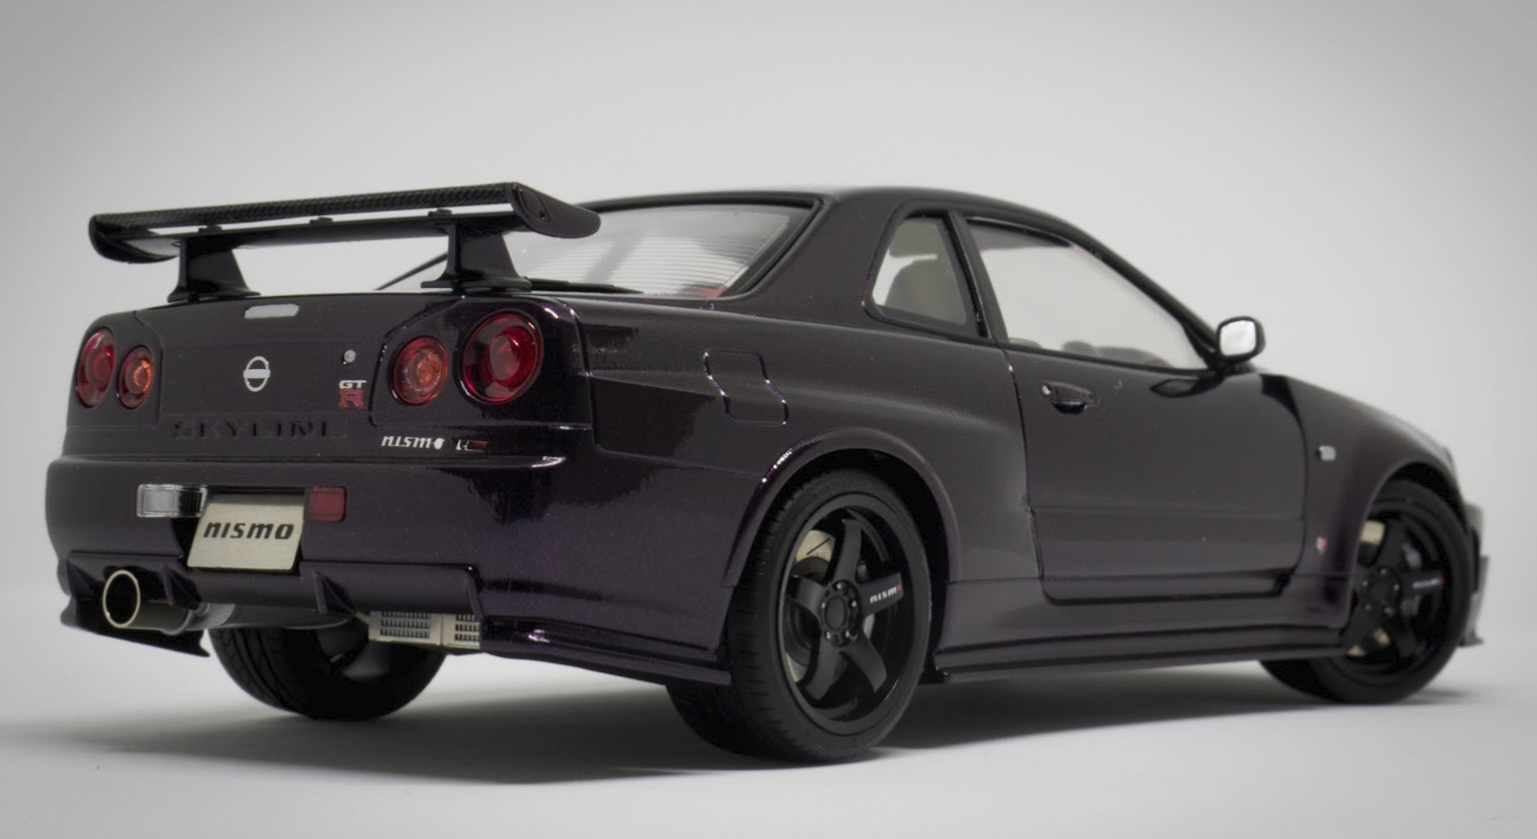
Hi All, I just completed my latest build, of the Nissan skyline GTR R34 Z-Tune by Tamiya. I first attempted this kit about 8 years ago and stiffed it up completely, so i really wanted to do it again properly. you can check out my WIP here: Now for the pretty pictures Thanks for looking Nathan
-
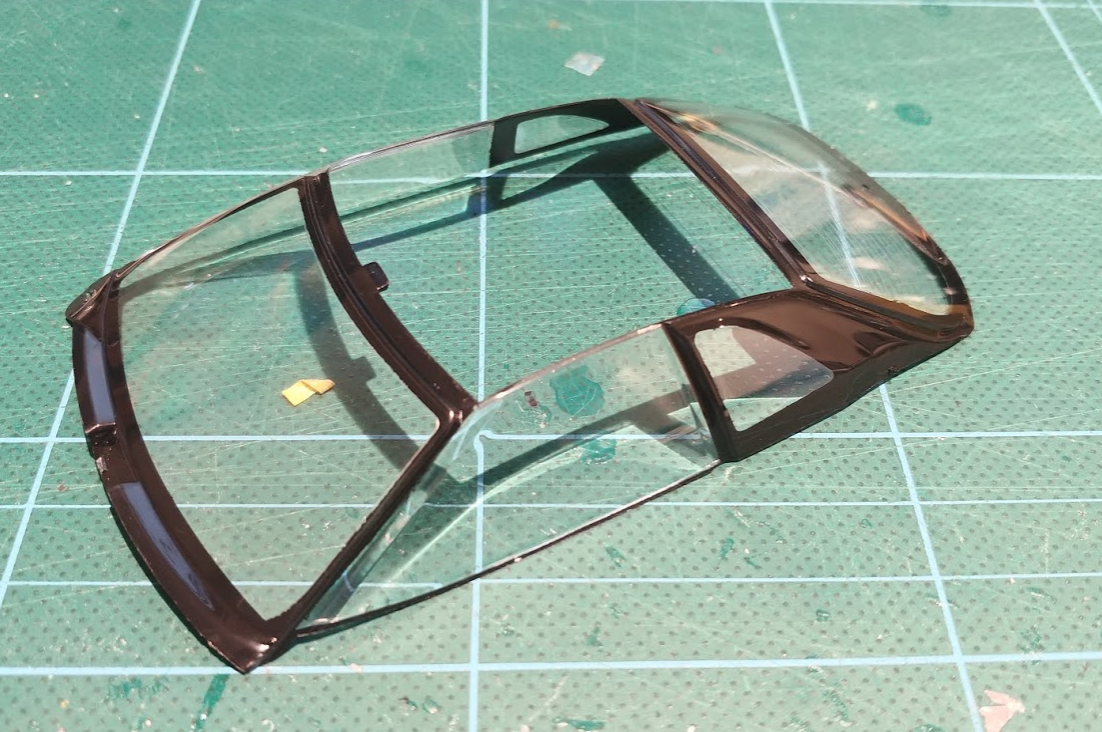
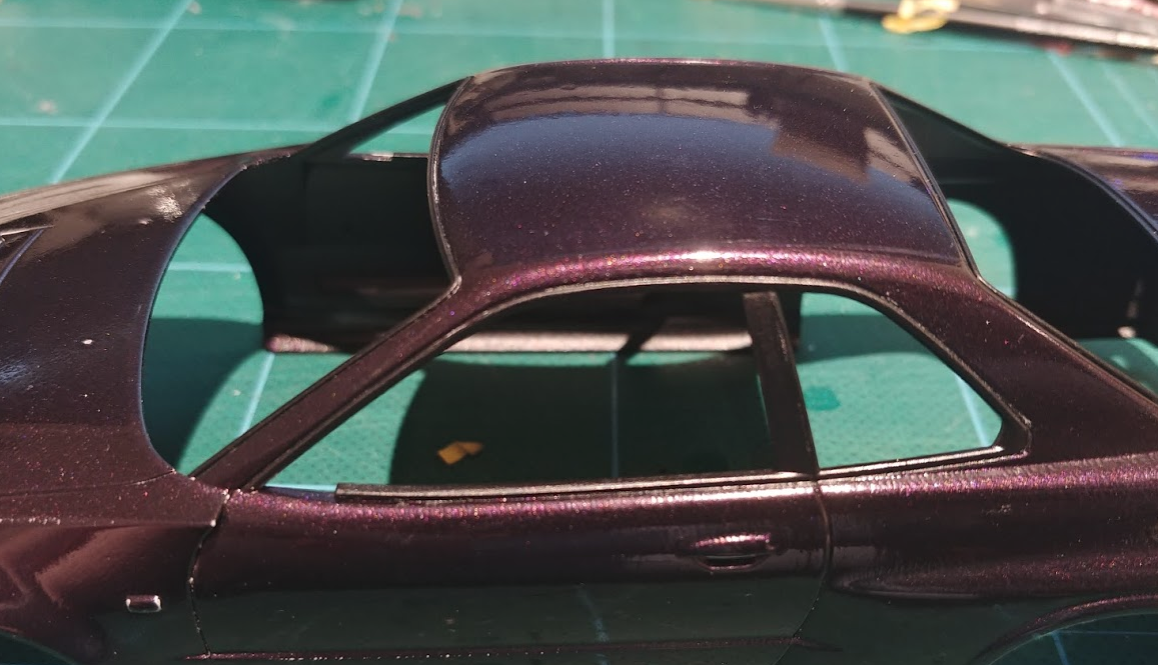
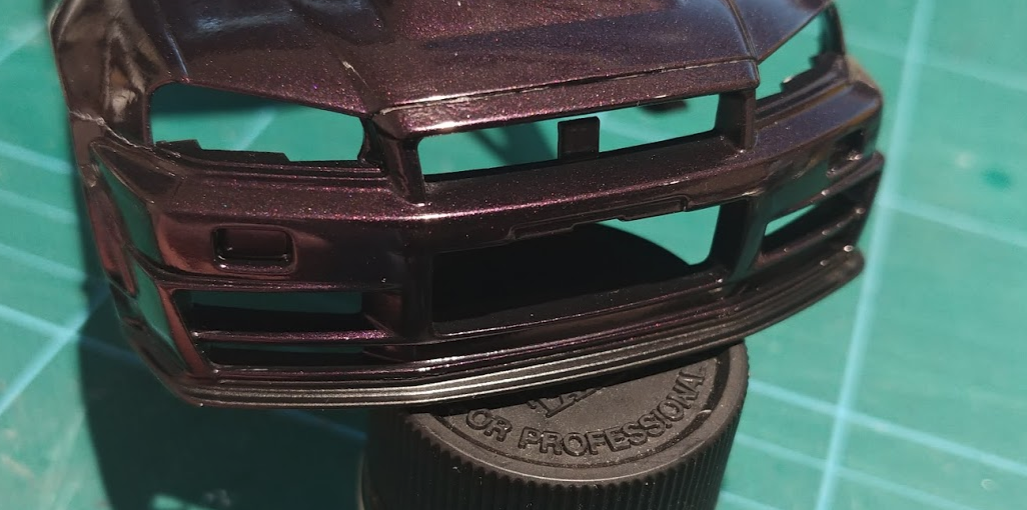
Hi All, This is my final update on this kit. I kinda got in the swing of things, and just smashed out the rest of the kit and didnt really take any photos. (not that there was a great deal of the kit left to do) The clear windows we masked up using the supplied window masking stickers Then I Masked off and painted the window frames of the body, as well as the front lip spoiler/splitter. the only other bits to go were the lights, and other small pieces on the body. Behold, the completed model. Thanks for looking Nathan