RCprofile.JPG.6b95b19b856bf00a3becd6aeaaa48f3b.JPG)
Ian McLaren
-
Posts
1,360 -
Joined
-
Last visited
Content Type
Profiles
Forums
Events
Gallery
Everything posted by Ian McLaren
-
RCprofile.thumb.JPG.1691ea753d0f0897fdc1b2510cf06775.JPG)
1/16th 55 Thunderbird BB/FC Funnycar "GIRL TROUBLE"
Ian McLaren replied to Ian McLaren's topic in WIP: Drag Racing Models
Nick thank you so much for the kind words, another update will be out soon. -
1/16th 55 Thunderbird BB/FC Funnycar "GIRL TROUBLE"
Ian McLaren replied to Ian McLaren's topic in WIP: Drag Racing Models
Thank you so much Daniel, coming from you it really means a lot. Am I not looking in the right place but I don't see a thread from you at the moment. -
1/16th 55 Thunderbird BB/FC Funnycar "GIRL TROUBLE"
Ian McLaren replied to Ian McLaren's topic in WIP: Drag Racing Models
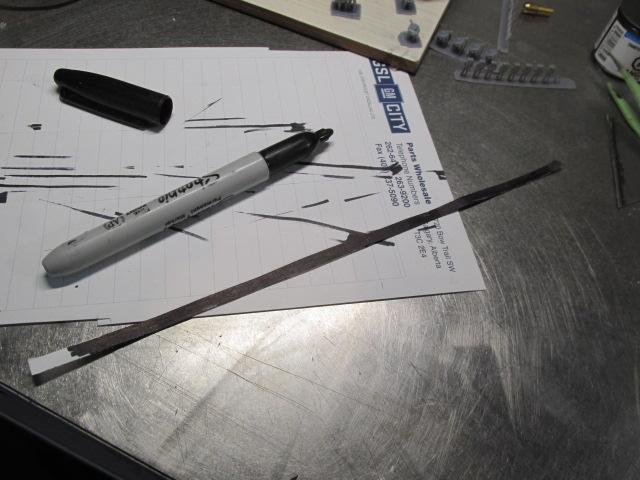
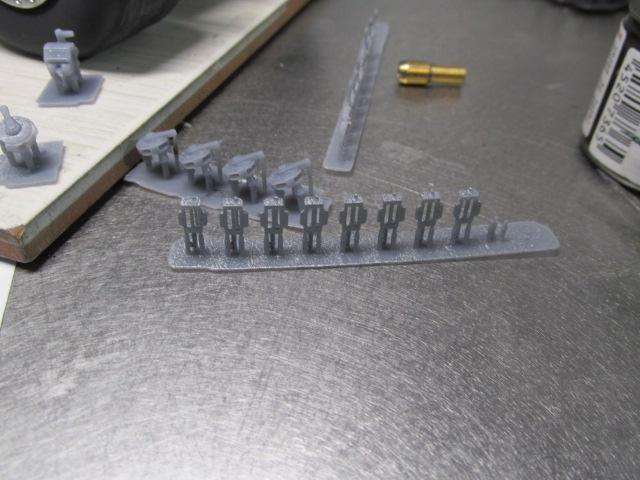
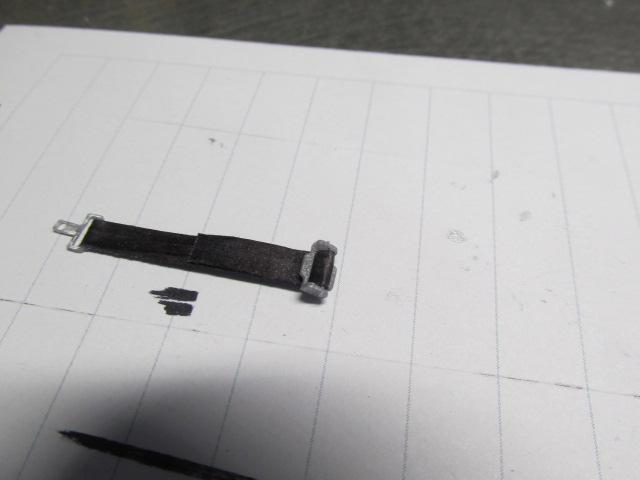
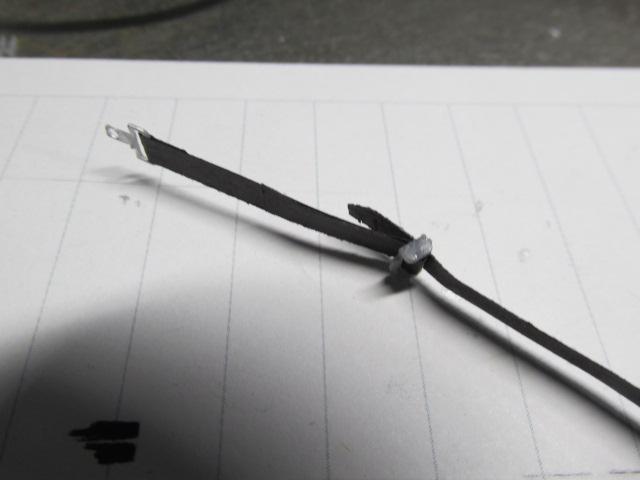
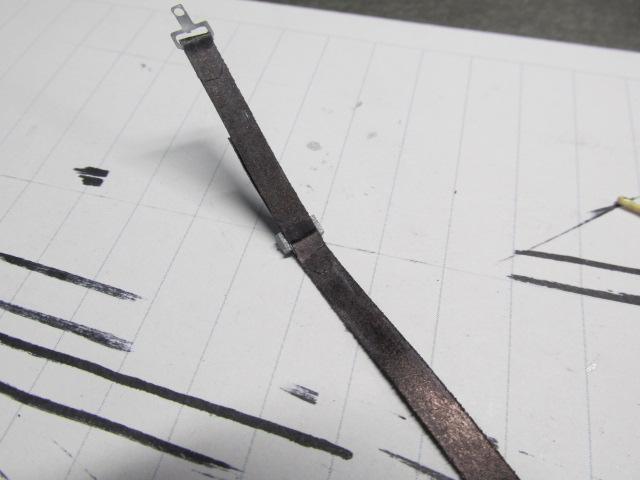
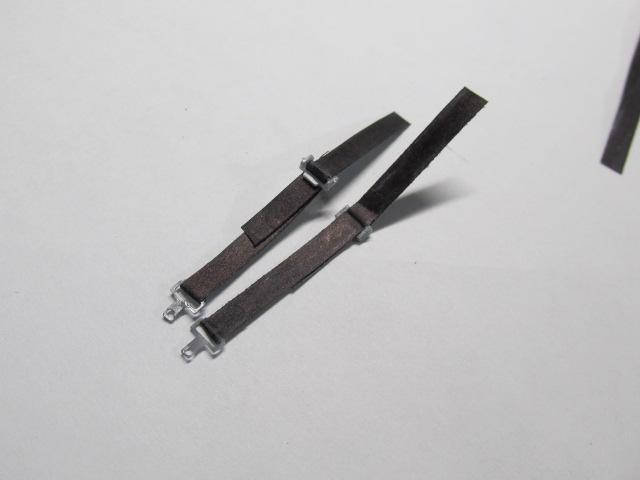
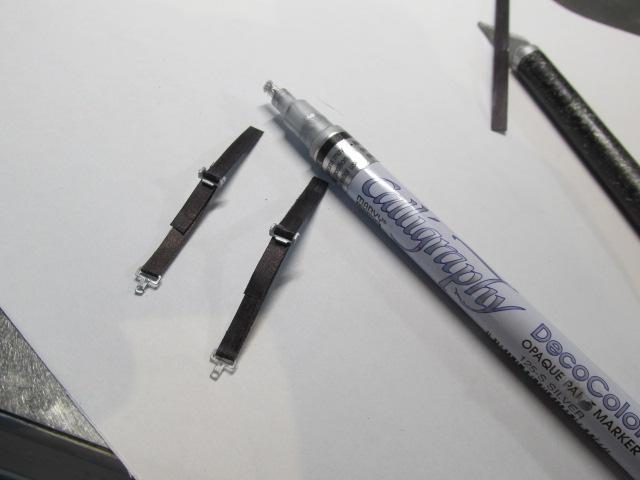
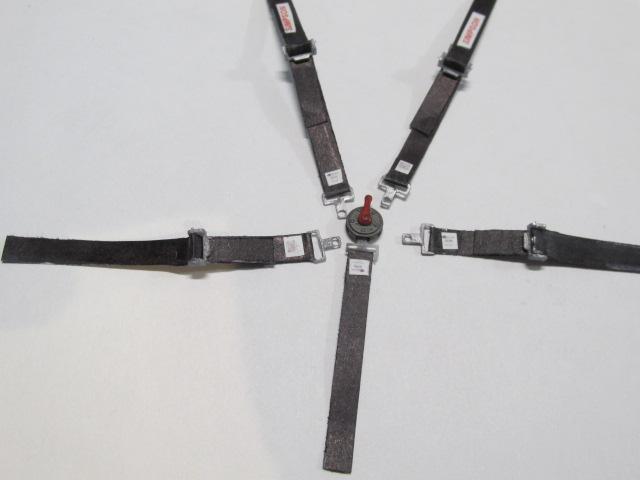
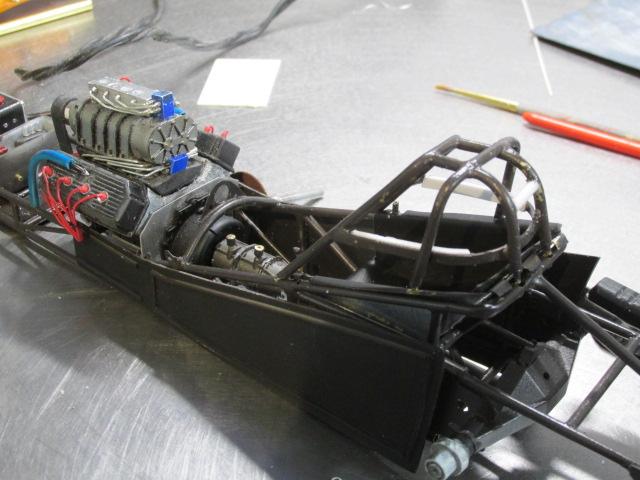
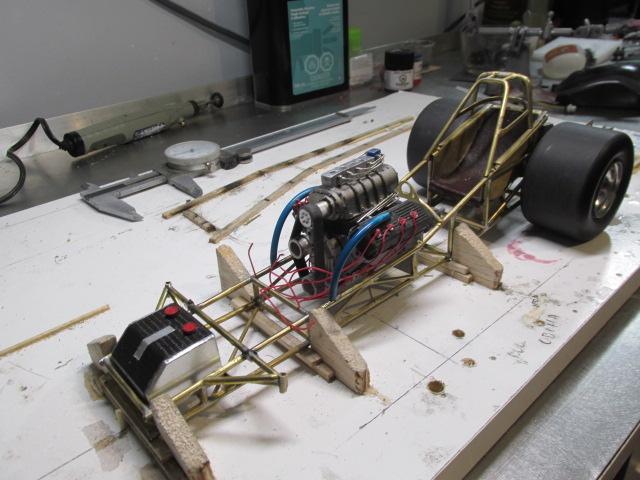
Working on the back section of the chassis. As well as the progression of the scratch built harness ( self printed hardware, plain bond paper cut to size and colored with a felt marker, chrome calligaphy pen for the buckles) resized photos of the Simpson patches and SFI date tags printed on plain bond paper all assembled with CA adhesive, instrument cluster also scratchbuilt
- 63 replies
-
- 2
-

-
- 3d printed
- scratch built
- (and 2 more)
-
1/16th 55 Thunderbird BB/FC Funnycar "GIRL TROUBLE"
Ian McLaren replied to Ian McLaren's topic in WIP: Drag Racing Models
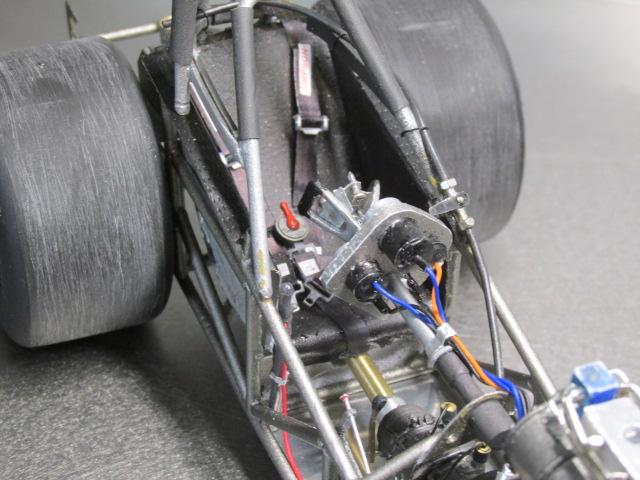
Interiour just about done and the chassis getting very close to completed
- 63 replies
-
- 3
-
-
- 3d printed
- scratch built
- (and 2 more)
-
1/16th 55 Thunderbird BB/FC Funnycar "GIRL TROUBLE"
Ian McLaren replied to Ian McLaren's topic in WIP: Drag Racing Models
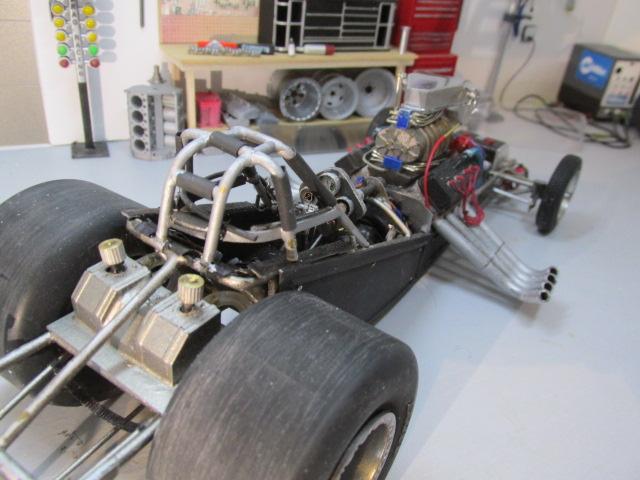
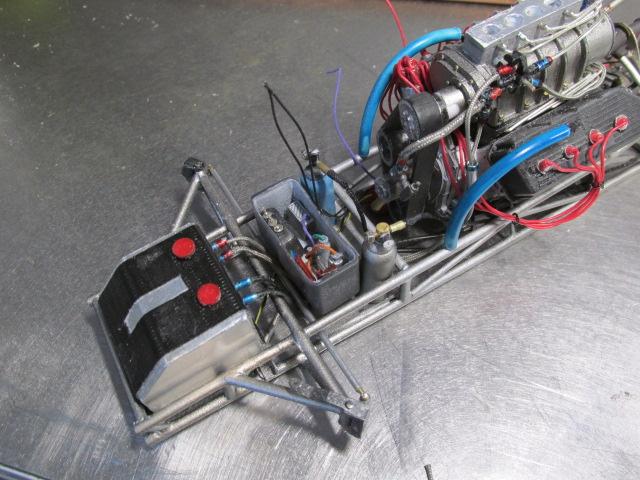
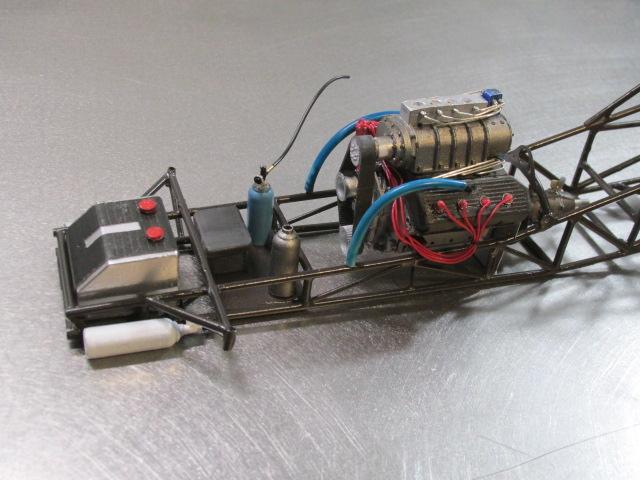
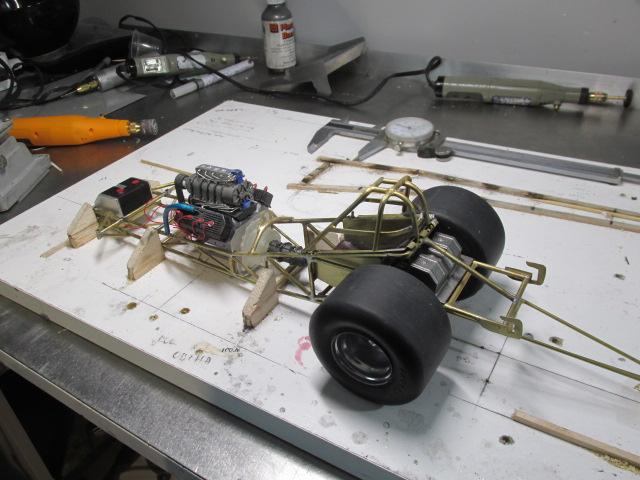
Starting assembly, mostly front end plumbing, engine systems and headers
- 63 replies
-
- 2
-
-
- 3d printed
- scratch built
- (and 2 more)
-
1/16th 55 Thunderbird BB/FC Funnycar "GIRL TROUBLE"
Ian McLaren replied to Ian McLaren's topic in WIP: Drag Racing Models
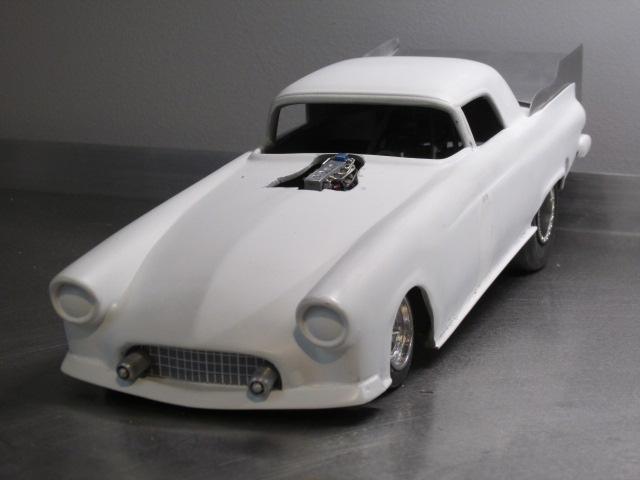
Taking a bit of a break from the small pieces and details on the chassis to spend some time on the body. Primarily the grill decal (draft printing on paper) and the bumper bullets, actual metal throught out. Also once again making sure there are no interference points between the chassi detail and the inner body supports
- 63 replies
-
- 2
-
-
- 3d printed
- scratch built
- (and 2 more)
-
1/16th 55 Thunderbird BB/FC Funnycar "GIRL TROUBLE"
Ian McLaren replied to Ian McLaren's topic in WIP: Drag Racing Models
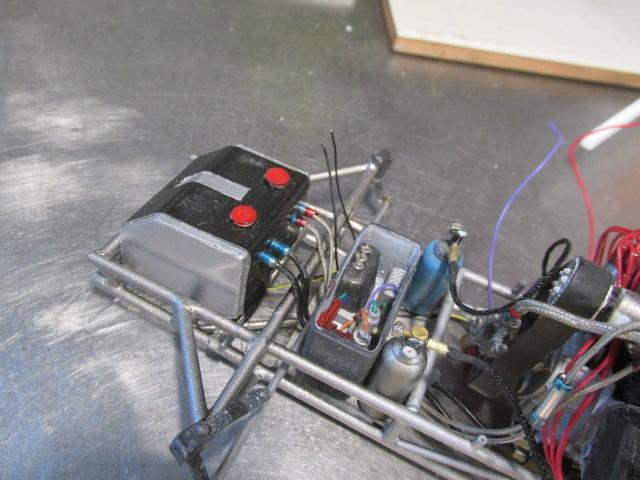
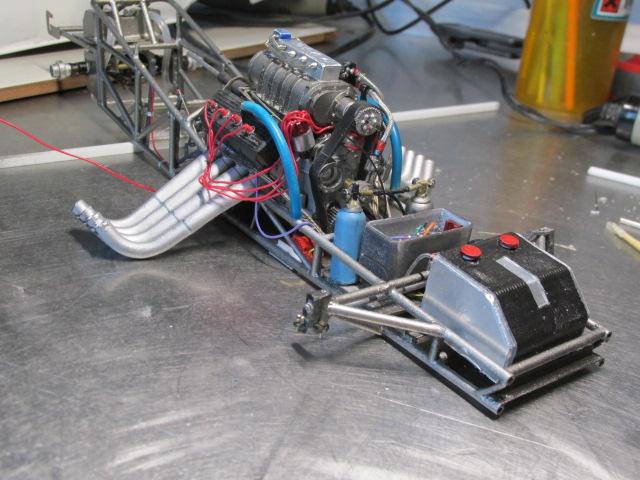
🔧 July 26 – GIRL TROUBLE update Things are starting to look like a car! All those hand-built bits—plug wires, electronics, air/CO₂ tanks, magneto pieces—are finding their places on the chassis. The chassis color was tweaked to better reflect the original, and final placement is mostly dialed in. All that’s left now is plumbing. Seems deceptively simple, but you and I both know how that goes.
- 63 replies
-
- 3
-
-
- 3d printed
- scratch built
- (and 2 more)
-
1/16th 55 Thunderbird BB/FC Funnycar "GIRL TROUBLE"
Ian McLaren replied to Ian McLaren's topic in WIP: Drag Racing Models
Now to group them into a usable whole.- 63 replies
-
- 1
-
-
- 3d printed
- scratch built
- (and 2 more)
-
1/16th 55 Thunderbird BB/FC Funnycar "GIRL TROUBLE"
Ian McLaren replied to Ian McLaren's topic in WIP: Drag Racing Models
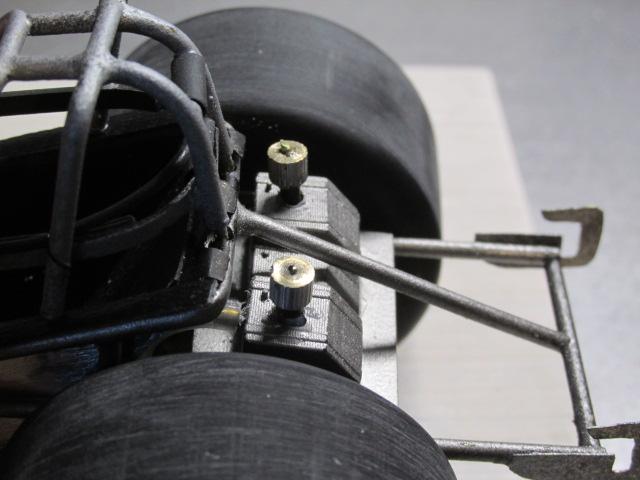
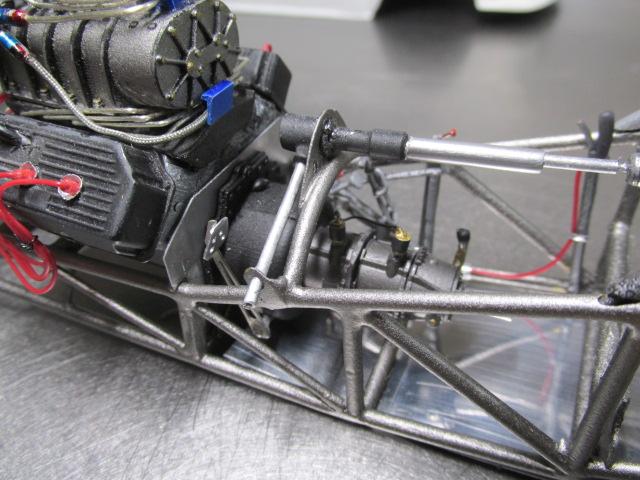
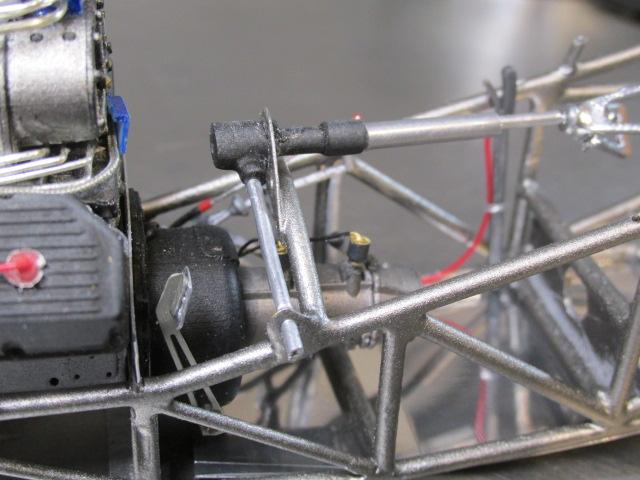
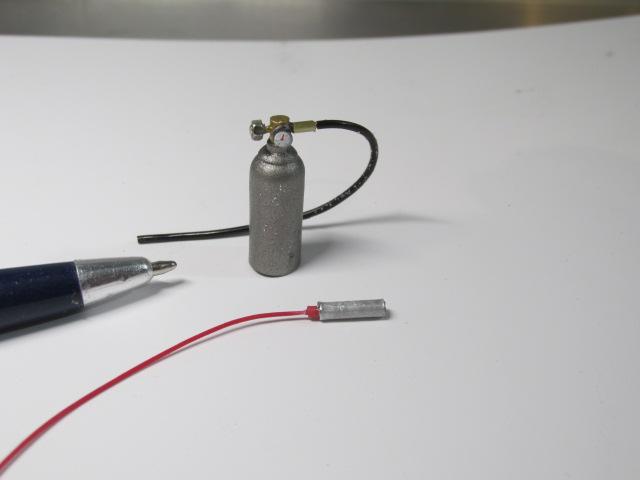
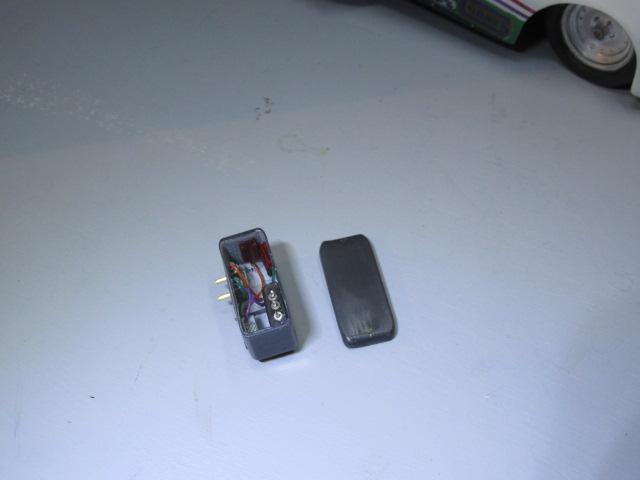
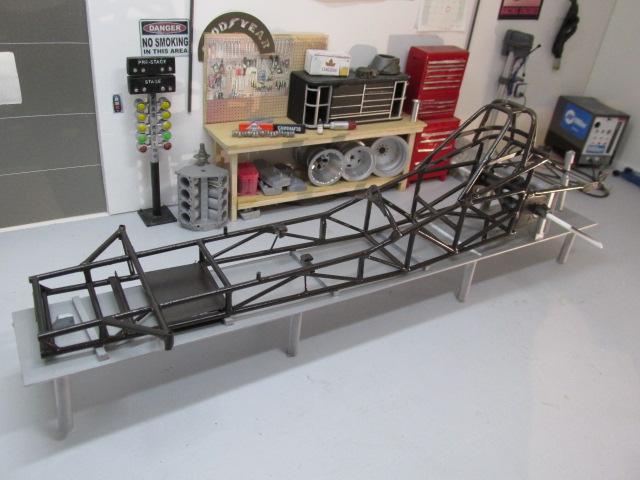
Progress continues but the sheer number of scratch build pieces slows things down, for example there are 7 pieces in each air/CO2 tank plus two mounting brackets each, three pieces in each plug wire and seventeen pieces in the magneto and offset drive assembly. the electronics box is also parts and labor intensive. All of that aside assembly of the chassis has begun. Final paint and details are now being donewith wire and cable runs to be added next
- 63 replies
-
- 4
-
-
- 3d printed
- scratch built
- (and 2 more)
-
1/16th 55 Thunderbird BB/FC Funnycar "GIRL TROUBLE"
Ian McLaren replied to Ian McLaren's topic in WIP: Drag Racing Models
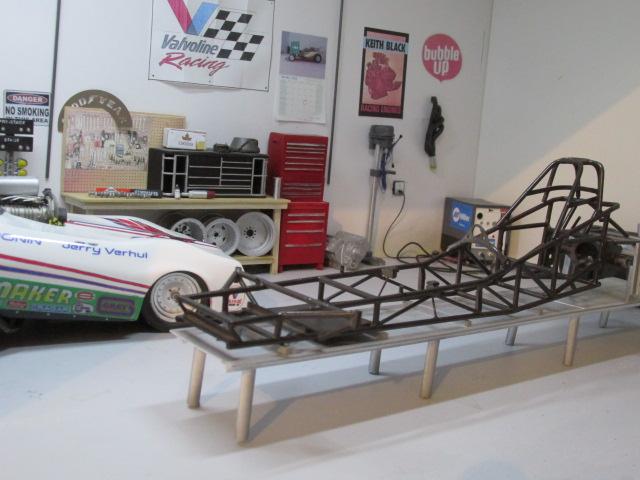
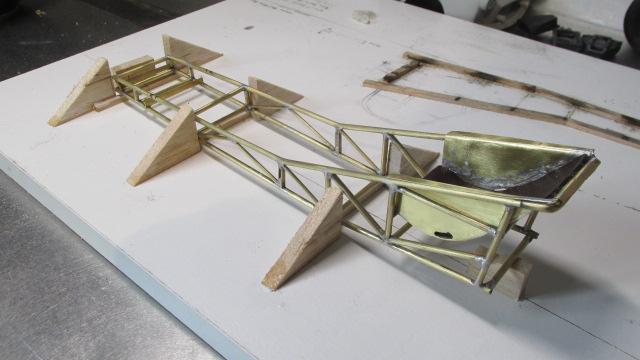
The chassis is now Tamiya Dark Metal with two clear coats and is now ready to start assembly. A long time coming.
- 63 replies
-
- 4
-
-
- 3d printed
- scratch built
- (and 2 more)
-
1/16th 55 Thunderbird BB/FC Funnycar "GIRL TROUBLE"
Ian McLaren replied to Ian McLaren's topic in WIP: Drag Racing Models
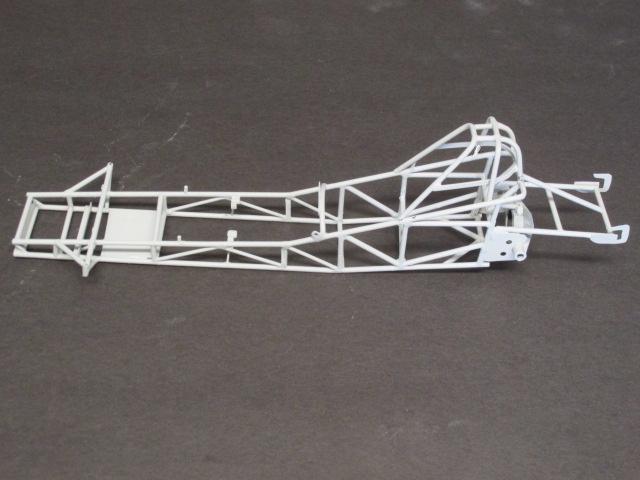
Worked on the chassis for a couple of days on clean up and adjustments, finally I can see the light at the end of the tunnel, primer is on
- 63 replies
-
- 4
-
-
- 3d printed
- scratch built
- (and 2 more)
-
1/16th 55 Thunderbird BB/FC Funnycar "GIRL TROUBLE"
Ian McLaren replied to Ian McLaren's topic in WIP: Drag Racing Models
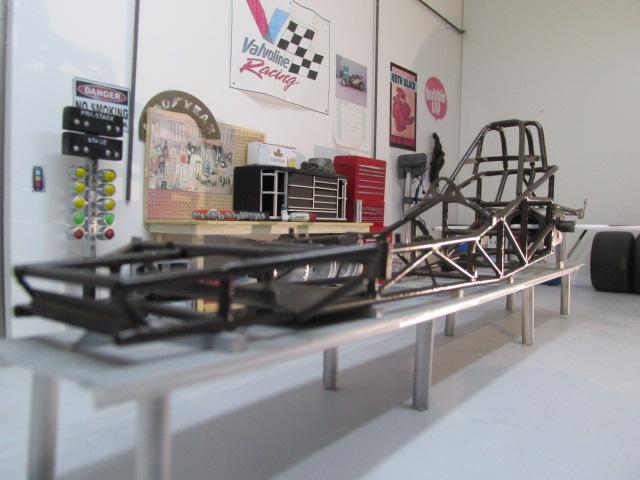
The chassis is progressing as are the related details, puke tank and lines, steering gear and instrument panel
- 63 replies
-
- 3
-
-
- 3d printed
- scratch built
- (and 2 more)
-
1/16th 55 Thunderbird BB/FC Funnycar "GIRL TROUBLE"
Ian McLaren replied to Ian McLaren's topic in WIP: Drag Racing Models
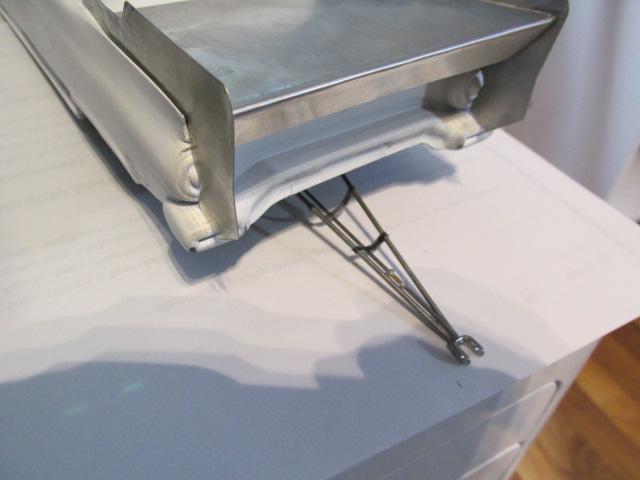
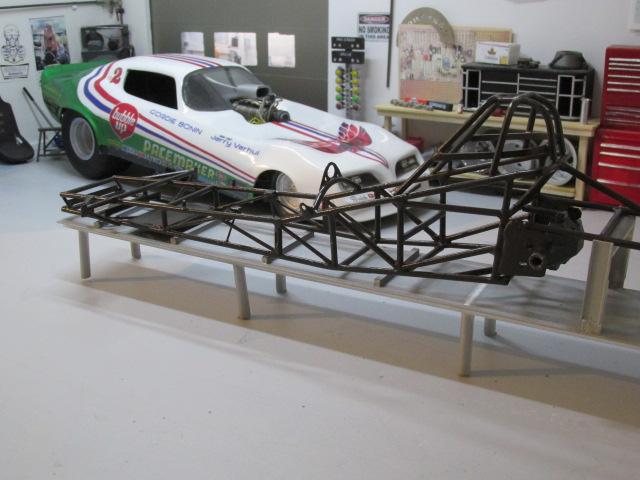
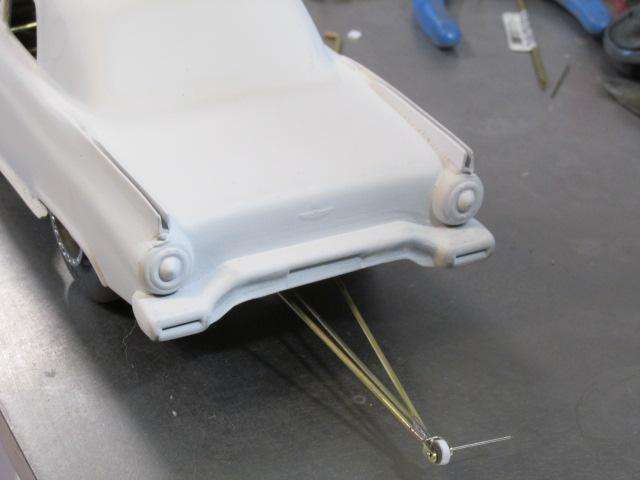
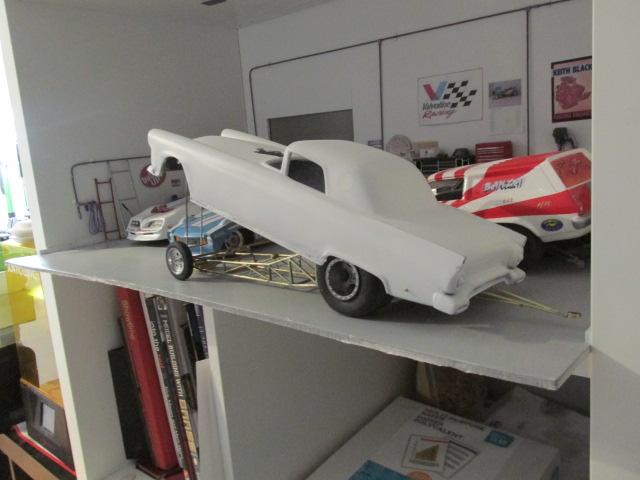
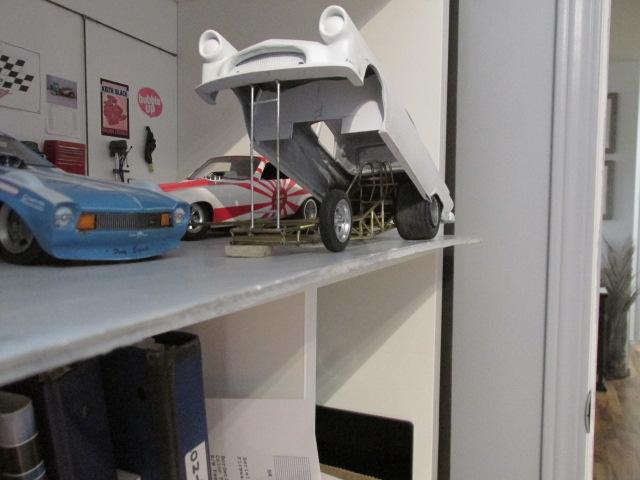
First time the body and chassis are connected by the correct mounts, and the wheelie bar has been fabricated
- 63 replies
-
- 4
-
-
- 3d printed
- scratch built
- (and 2 more)
-
1/16th 55 Thunderbird BB/FC Funnycar "GIRL TROUBLE"
Ian McLaren replied to Ian McLaren's topic in WIP: Drag Racing Models
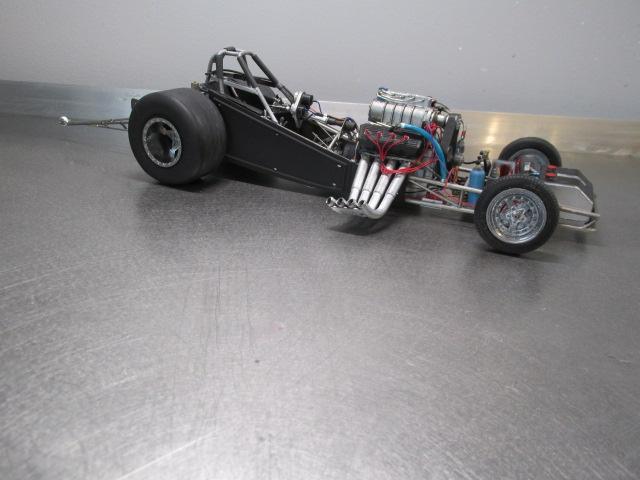
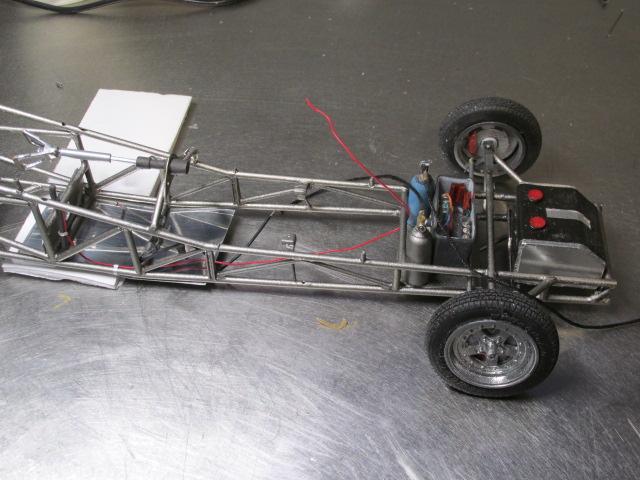
Finally on it's wheels ,
- 63 replies
-
- 3
-
-
- 3d printed
- scratch built
- (and 2 more)
-
’72 Dodge Demon Drag Racer 1/25 scale
Ian McLaren replied to AmericanMuscleFan's topic in WIP: Drag Racing Models
When the B1 heads came out they caused great concern to those of us running Chevrolet power. It turned out the concern was justified and these became very competitive. Your machining skills have certainly done these heads justice and really add to the pedigree of the engine. I agree with Tim, bring on the valve covers! -
As per usual everything looks great, I am really enjoying watching this progress.
-
1/16th 55 Thunderbird BB/FC Funnycar "GIRL TROUBLE"
Ian McLaren replied to Ian McLaren's topic in WIP: Drag Racing Models
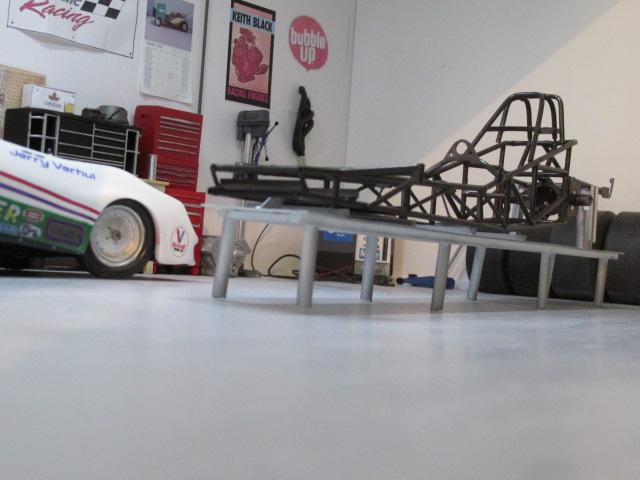
Back from a short holiday, did make some progress yesterday, on to the chassis and front and rear suspensions.
- 63 replies
-
- 3
-
-
- 3d printed
- scratch built
- (and 2 more)
-
1/16th 55 Thunderbird BB/FC Funnycar "GIRL TROUBLE"
Ian McLaren replied to Ian McLaren's topic in WIP: Drag Racing Models
LOL Sorry Tim, not really showing off, once the jig was made getting the second chassis to this point only took about 1 3/4 hours. There is still a lot to do on both! -
1/16th 55 Thunderbird BB/FC Funnycar "GIRL TROUBLE"
Ian McLaren replied to Ian McLaren's topic in WIP: Drag Racing Models
Thank you Dave! -
1/16th 55 Thunderbird BB/FC Funnycar "GIRL TROUBLE"
Ian McLaren replied to Ian McLaren's topic in WIP: Drag Racing Models
Thank you Francis, I, like you try to use the correct material where ever possible as nothing looks like metal except metal when it's not painted -
1/16th 55 Thunderbird BB/FC Funnycar "GIRL TROUBLE"
Ian McLaren replied to Ian McLaren's topic in WIP: Drag Racing Models
The side skirts in aluminum really start to bring out the personality of this body style
- 63 replies
-
- 3
-
-
- 3d printed
- scratch built
- (and 2 more)
-
1/16th 55 Thunderbird BB/FC Funnycar "GIRL TROUBLE"
Ian McLaren replied to Ian McLaren's topic in WIP: Drag Racing Models
Side skirt template makes all the difference to the overall look, re-reprofiled the front fender area again and the injector just needs a small spacer between it and the 14-71, just like the real car. Next, to clean up the front end and lower front edge of the fender and I'll be close to the final primer coat and blocking the body for paint. Also shown basic chassis partially assembly in the jig to set chassis and body ride height and drive train alignment. I was having trouble with my iron when doing the seat, it has since been cleaned up as have all of the tube joints.
- 63 replies
-
- 1
-
-
- 3d printed
- scratch built
- (and 2 more)
-
1/16th Vega Funnycar With a difference
Ian McLaren replied to Ian McLaren's topic in WIP: Drag Racing Models
And did I mention cheap, it also works well if you are building mutiple structures that have to match regardless of the material. I have used it for one off structures but usually just use the magnetic assemble set as repeatability is not as much of a factor. -
1/16th 55 Thunderbird BB/FC Funnycar "GIRL TROUBLE"
Ian McLaren replied to Ian McLaren's topic in WIP: Drag Racing Models
Yes it has, I dom't think I could have gotten to this point with the Plastic model that's out there. -
1/16th 55 Thunderbird BB/FC Funnycar "GIRL TROUBLE"
Ian McLaren replied to Ian McLaren's topic in WIP: Drag Racing Models
Thank you Steve, I'm building two versions of the same chassis , I just started on the one for the Thunderbird today, the one shown is for the Vega . BTW your Promod chassis looks to be coming along nicely.