RCprofile.JPG.6b95b19b856bf00a3becd6aeaaa48f3b.JPG)
Ian McLaren
-
Posts
1,360 -
Joined
-
Last visited
Content Type
Profiles
Forums
Events
Gallery
Everything posted by Ian McLaren
-
RCprofile.thumb.JPG.1691ea753d0f0897fdc1b2510cf06775.JPG)
Pony Express 70s BB/FC ex M/T Pinto
Ian McLaren replied to Ian McLaren's topic in WIP: Drag Racing Models
Thank you Daniel, I was blown away when they arrived, but Jeff has always exceeded my expectations on all of my silly projects- 63 replies
-
- 1
-

-
- brass chassis
- not a kit
- (and 2 more)
-
Pony Express 70s BB/FC ex M/T Pinto
Ian McLaren replied to Ian McLaren's topic in WIP: Drag Racing Models
Thank you Francis, They were done for me by Jeff Faris out of Washington. When you can't afford the machines it's nice to know an aerospace machinist. Jeff has supplied me with numerous parts, wheels for three other models, Injector stacks for the Banzai Vega Panel and most notibly the exact Donovan 417 valve covers of my Royal Canadian FED ( the covers alone used up six hours of my time measuring, and remeasuring the real covers). Also the better part of two weeks in machining to get the angles correct and the heights and angles for the four breathers perfect ( they were much taller on this car than what we thought was the norm. -
Pony Express 70s BB/FC ex M/T Pinto
Ian McLaren replied to Ian McLaren's topic in WIP: Drag Racing Models
Wheels arrived and chassis is progressing, not too far from paint
- 63 replies
-
- 2
-
-
- brass chassis
- not a kit
- (and 2 more)
-
Pony Express 70s BB/FC ex M/T Pinto
Ian McLaren replied to Ian McLaren's topic in WIP: Drag Racing Models
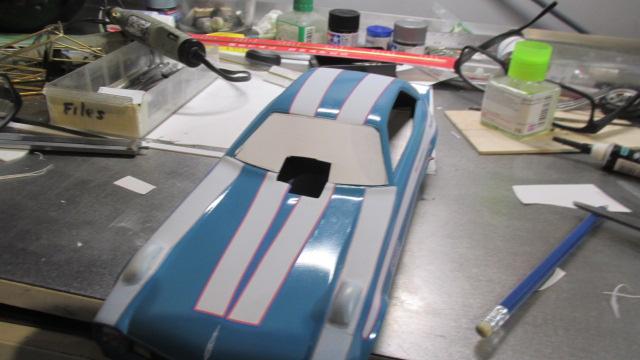
Rough wind shield template completed, now to cut and file fit the permanent windshield engine starting to come together, no clear on the body yet as decaling still in progress
- 63 replies
-
- 3
-
-
- brass chassis
- not a kit
- (and 2 more)
-
’72 Dodge Demon Drag Racer 1/25 scale
Ian McLaren replied to AmericanMuscleFan's topic in WIP: Drag Racing Models
Just WOW!!! -
Pony Express 70s BB/FC ex M/T Pinto
Ian McLaren replied to Ian McLaren's topic in WIP: Drag Racing Models
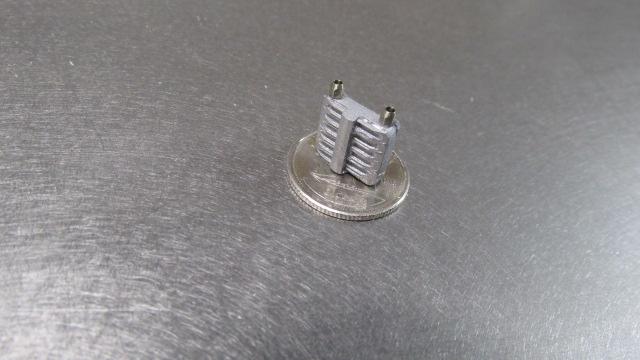
Latest update working on the chassis and building some more details. Body support structure in progress. I also scratch built a 1/16th scale Oberg oil filter for the car, it is comprised of 18 individuals pieces including the two fittings. MVI_0405.MOV
- 63 replies
-
- 2
-
-
- brass chassis
- not a kit
- (and 2 more)
-
Loving the seat frames, as you said they will add a lot of interest to the interiour. Also I'm very glad to see you back on line.
-
I am in disbelief at how much detail and effort you have put into just the intake/injector and the mag is simply on another level. You just keep on setting the bar higher and I'm, never, going to believe you again when you say this is going to be a more simplified model to recover from my previous model. But dam it's been fun to watch and learn from this model and I can't wait to see the finished product, even if it takes another 20 pages to get there. LOL
-
Pony Express 70s BB/FC ex M/T Pinto
Ian McLaren replied to Ian McLaren's topic in WIP: Drag Racing Models
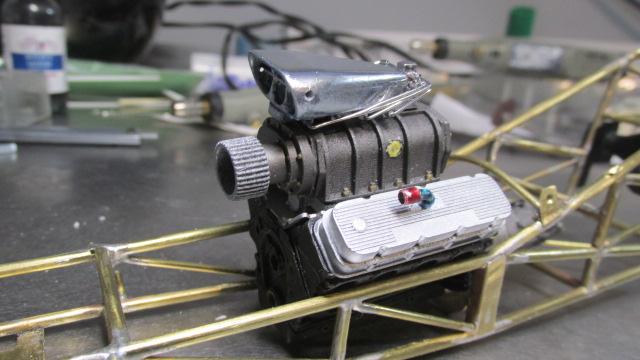
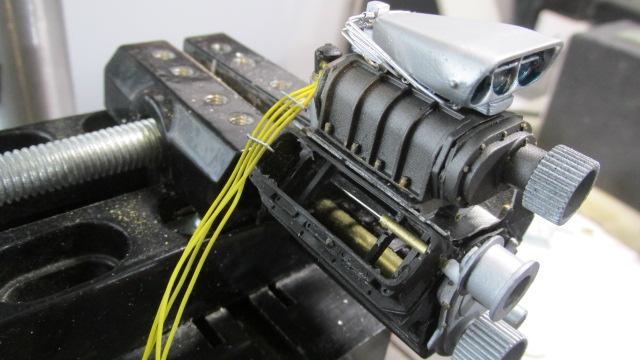
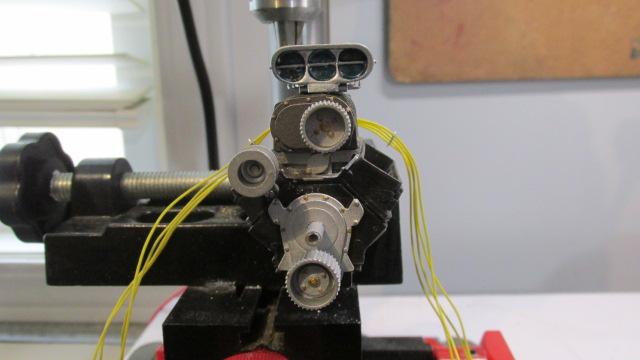
Today is engine day, plug wires injector lines, blower belt idler and some detail painting, this afternoon is fuel pump, barrel valve at start on the throttle linkage. Not much overdrive here (soft tune up) I'll probably change the upper pulley
- 63 replies
-
- 3
-
-
- brass chassis
- not a kit
- (and 2 more)
-
Pony Express 70s BB/FC ex M/T Pinto
Ian McLaren replied to Ian McLaren's topic in WIP: Drag Racing Models
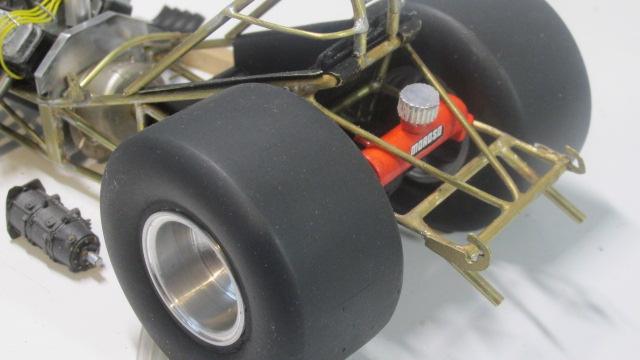
Chassis, driver controls to install, steering gear, Oberg oil filter mount, Dzus plates and weight bar. Then the color can be applied
- 63 replies
-
- 2
-
-
- brass chassis
- not a kit
- (and 2 more)
-
Pony Express 70s BB/FC ex M/T Pinto
Ian McLaren replied to Ian McLaren's topic in WIP: Drag Racing Models
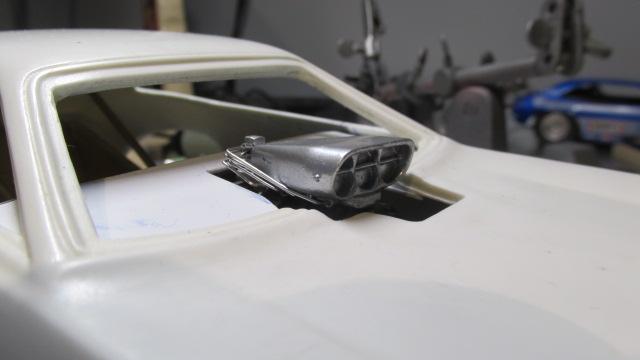
Progressing, body tin is roughed out. Not really thinking it would work I tried the tin out of the Green Elephant to save time due to the restraints of the build off. Turns out it was pretty close, can't be used as is but made a useful base and time saver over scratchbuilding the complete assembly.. If there is time left over I can try some detailing that I was going to ignore on this piece of the model.
- 63 replies
-
- 2
-
-
- brass chassis
- not a kit
- (and 2 more)
-
Pony Express 70s BB/FC ex M/T Pinto
Ian McLaren replied to Ian McLaren's topic in WIP: Drag Racing Models
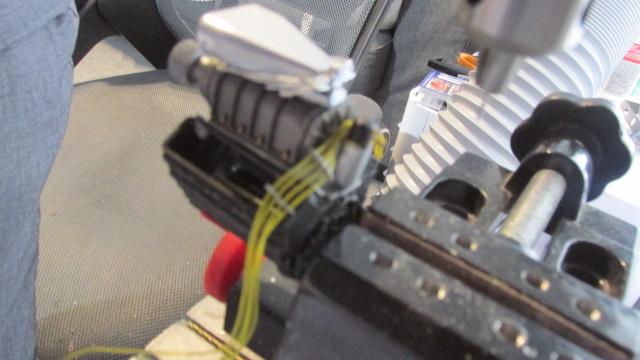
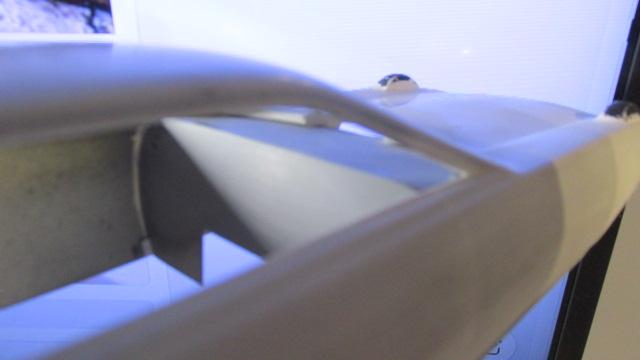
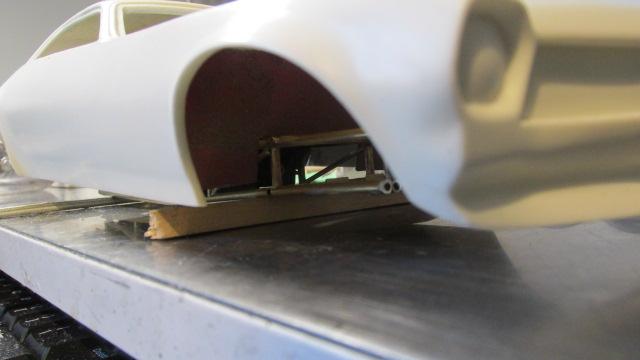
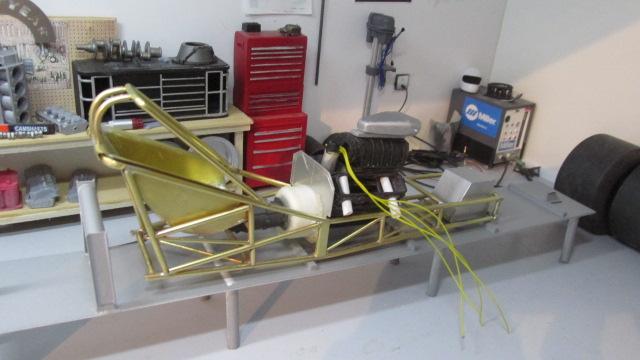
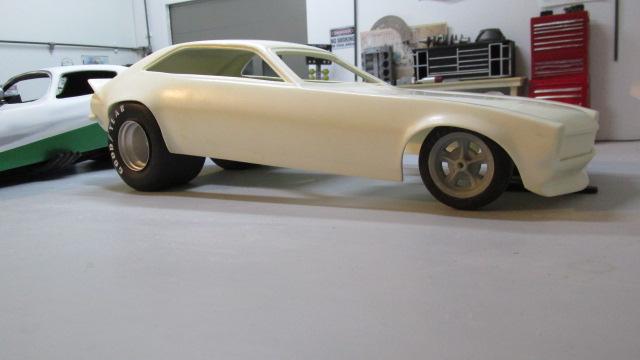
Final positioning of the chassis to body, several adjustments had to be made to allow proper clearances to be maintained all at once, chassis ride height, body ride height, tire clearance and engine positioning. The engine needed to be lowered in the chassis to allow the body to be low enough for proper ground clearance while maintaing the hat to body relationship as per the real car (very low). This also required some additional grinding for roll bar and tire clearance. Adding to the complexity was the fact that the engine could only be lowered so much before an issue with header to upper frame rail came to light. These are things that don't normally happen when building a kit based model but become facts of life when scratch building a recreation and were also present when building the real cars. Having been there and done that on this particular car, I feel these issues enhance rather than detract from the modeling experience. In this particular case it also brings back memories of the things, places, events and people (many of whom are no longer with us) associated with this car. To set their final positions the firewall, dash area top, and front bulkhead had to be templated and revised several times before everything fell into place. From here forward the heavy lifting is complete, and now the focus is on adding details, wiring, refining surfaces, refinishing and final assembly. Still a long way to go but I think there is a faint light at the end of this tunnel.
- 63 replies
-
- 2
-
-
- brass chassis
- not a kit
- (and 2 more)
-
Pony Express 70s BB/FC ex M/T Pinto
Ian McLaren replied to Ian McLaren's topic in WIP: Drag Racing Models
Thank you Francis, Except for the body (Competition Resins), the fuel tank, engine (pan to injector) ,bellhousing,Lenco and shifters, wheels, tires and differential are self printed the Mallory / Joe Hunt magneto is scratch built from aluminum. To clairify all of the STL files are purchased, mostly from Ron Olson @3D Model Specialties although most of the files have been modified for this specific model.- 63 replies
-
- 1
-
-
- brass chassis
- not a kit
- (and 2 more)
-
full detail 1/16th Gordie Bonin BubbleUp Trans Am Funnycar
Ian McLaren replied to Ian McLaren's topic in WIP: Drag Racing Models
Thanks Tim, I have a friend in the Canadian Postal Service and we were talking yesterday ( he's far enough up the chain to have a viable opinion) he guesses that I can start expecting the decals arrival in the second week of January given they were coming in from the states. Fingers crossed and mean while I keep working on the Pinto. -
Pony Express 70s BB/FC ex M/T Pinto
Ian McLaren replied to Ian McLaren's topic in WIP: Drag Racing Models
Thanks Daniel! So far I'm satisfied with how they are turning out. I have been watching how you did the decals for the Badman and would like to give it a go, but I think I come up a little short on the talent deal for that. -
Pony Express 70s BB/FC ex M/T Pinto
Ian McLaren replied to Ian McLaren's topic in WIP: Drag Racing Models
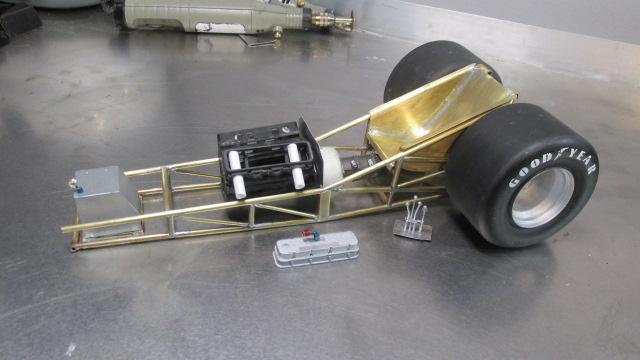
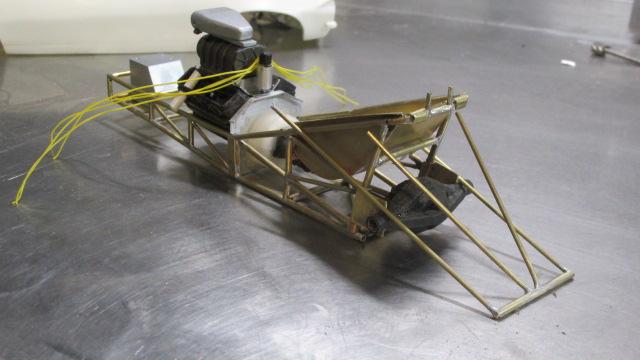
Progress on the chassis and drivetrain. Engine, firewall, bellhousing and Lenco all aligned on internal tube that lines up with the pinion. Mallory magneto built (aluminum) rear body support assy in progress. Roll bar/cage fabricated but not completed with head restraint bars (can't be installed until chassis, seat and seat belts finally installed. Correct early M/T short valve covers and Jomar stud girdle printed and painted, with blow by fittings installed. Lenco shifter printed and detailed.
- 63 replies
-
- 3
-
-
- brass chassis
- not a kit
- (and 2 more)
-
Pony Express 70s BB/FC ex M/T Pinto
Ian McLaren replied to Ian McLaren's topic in WIP: Drag Racing Models
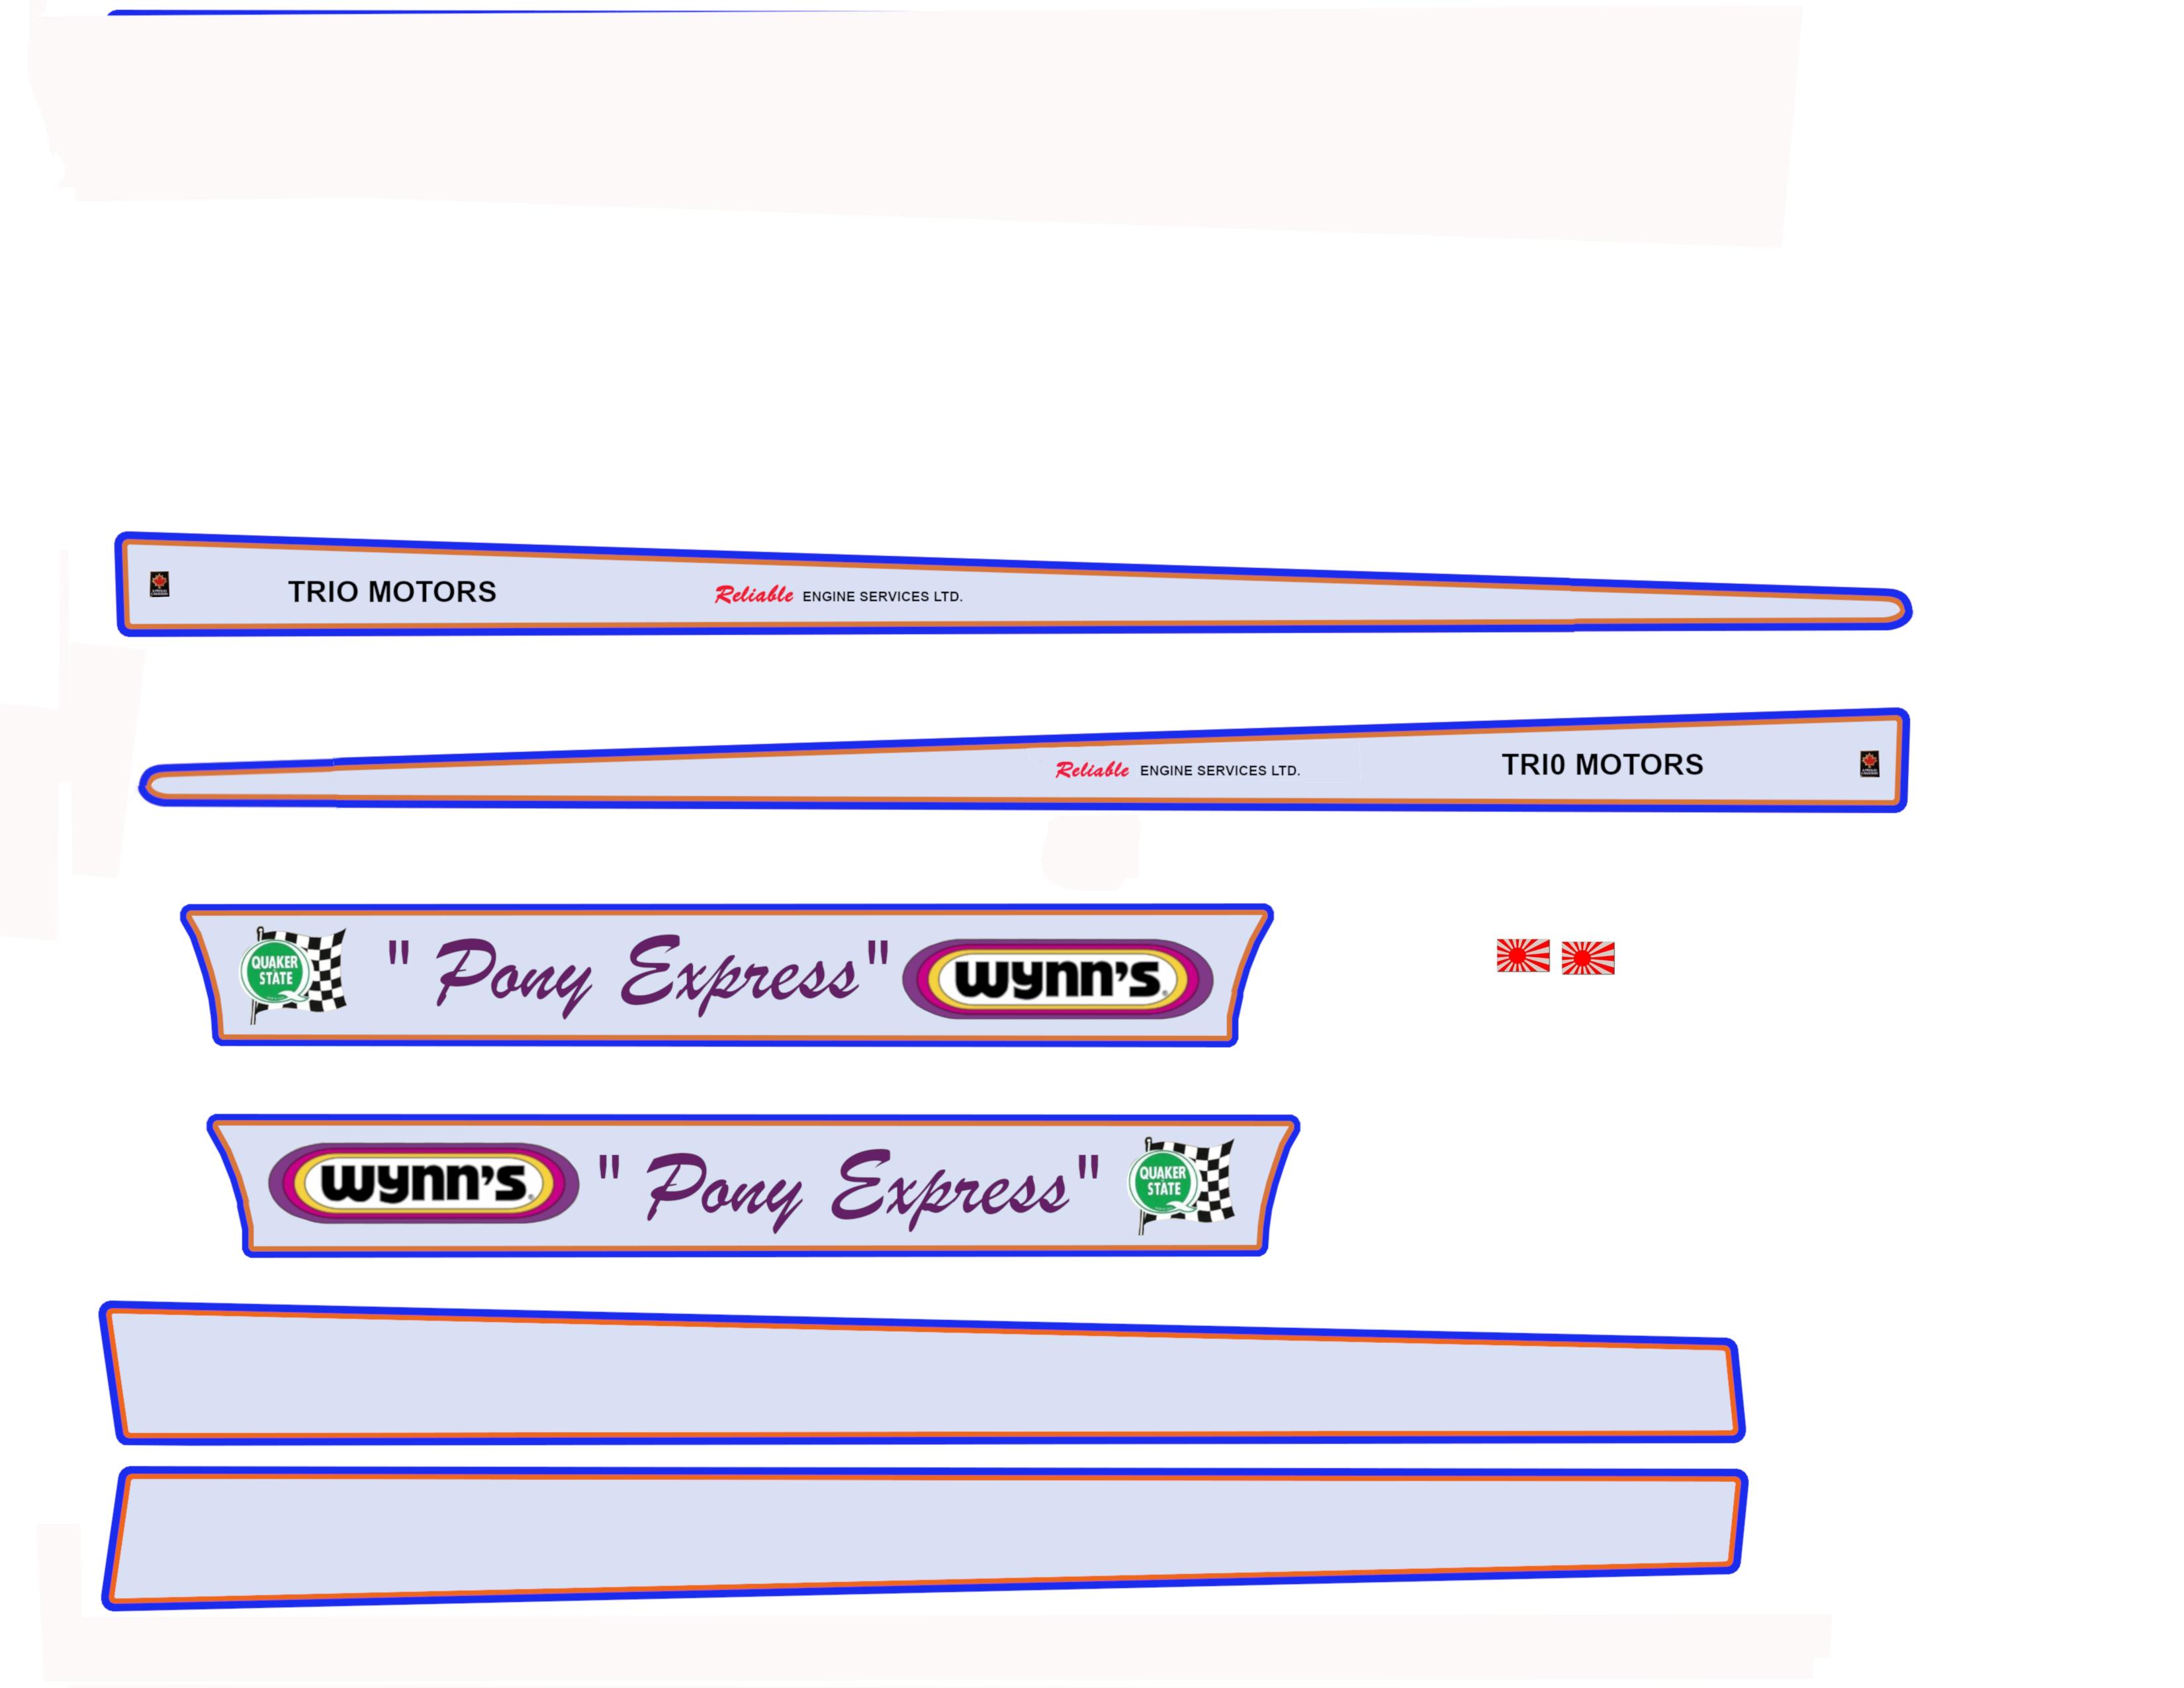
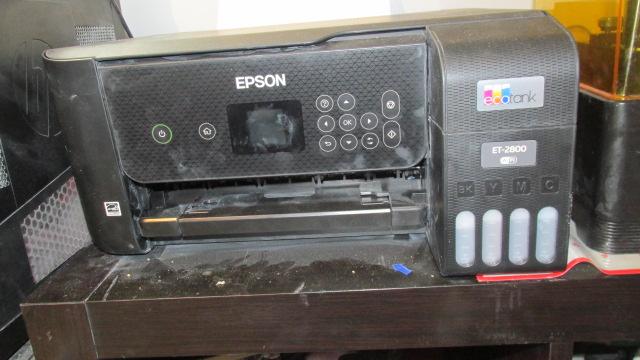
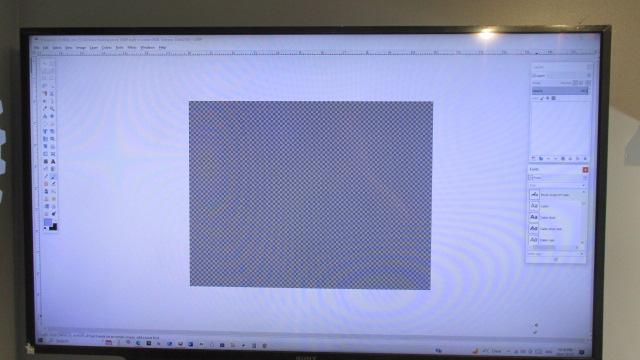
As promised here is a bit on how the decals are being done First photo is the basic graphics and the included details, The second photo is the printer I'm using ( a standard inkjet printer like most people will own) Photo three a photo of the graphics program I use ( I'm not endorsing this product, just showing what I use) The basic work screen ( this is from the GIMP program but most graphic programs will look similar). Lets talk about the printers first. Both laser and inkjet printers can be used to create decals instead of the comercial products and techniques commercial decal manufactures use but there are limitations and drawbacks to both home units. The main one being they don't print white as a color so any white in the decal has to come from either a white body on the model or from white decal paper. Secondly both machines print in translucent ink so the back ground color of the body shows through when using transparant decal paper (the back ground will change the look of the ink and color changes with show through the decal) black lettering is mostly immune to this but even it has some transparancy. If you use white decal paper the colors look correct but the body color behind and around the decal is white ( requires very carefull trimming of the edges and there wil almost always be a very narrow whte edge where is trimmed). Also hole in letters for example an O will have a white center and so would have to be cut out (no fun!)The main difference between laser and inkjet prints is that the laser ink is mostly water proof while the inkjet ink desolves when wetted. Laser decals can be used as printed if not gotten too wet for extended times, while inkjet decals have to be clear coated to protect the ink. There is a company producing a non recoat inkjet paper that is supposed to solve that issue, which I used on the Eddie Hill Top Fuel Car with fair success. But it has a dull surface and needs to be cleared either before of after installation to look correct. I used to do all my decals with a laser printer but switched back to inkjet for one simple reason. Resolution, is much better with inkjet when dealing with low to mid priced printers, and so small product sponsor decals are much sharper with an ink jet as opposed to a laser of similar quality. I'll touch on graphics programs briefly, almost anything on the market will do what is needed for basic decal production and the prices vary hugely and the differences are usually in capabilities that are of no rewal value to design and printing of most basic decals All of these programs have a learning curves of varing difficulties for even simple opperations but some are more intuitive than others. Options for these range from FREE open source programs to multi thousands of dollar for full function commercial offerings, but they all will do basicly what we need. There are work arounds for most of the short comings I have listed but they add to the difficulty of creating a creditable decal set. Receintly I had a project that I was trying to do the decals for and had spent many hours on, finally I contacted one of the best professional decal manufactures, sent him all of my research, discussed options and different appraoches, and had him do these decals. They are far superiour to what I could product because of the complexity and subject matter of the project. Some times you just need more talent and better equipment, but most of the time you can produce just what you need if your willing to put in a little effort.
- 63 replies
-
- 1
-
-
- brass chassis
- not a kit
- (and 2 more)
-
Pony Express 70s BB/FC ex M/T Pinto
Ian McLaren replied to Ian McLaren's topic in WIP: Drag Racing Models
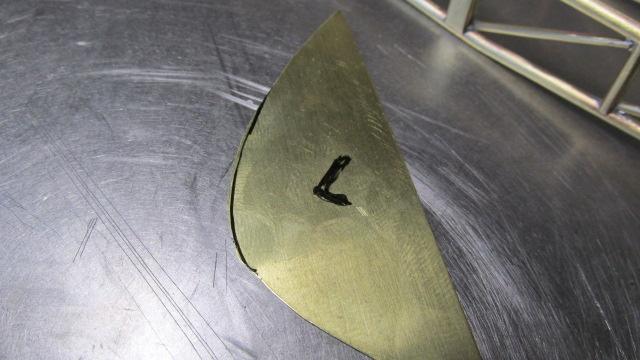
Seat construction, (1) (Photos in order) seat back and cushion panel cut to width and formed around upper and forward bars ( held in place with twisted iron wire to act as a clamp during fabrication and soldering) (2) marking side template (3) Rough cut side panels (4) Fitting and marking edge with a sharpy marker) (5) Remove area in black to refine shape (6)side panels soldered in place (7) Edges folded over upper side rails to form the seal to the body tin. I didn't cover the basic soldering techniques but I will post a tutorial if requested. For a change of pace and to get away from the soldering fumes for a while, next up will be the steps in the design of the decals for this build.
- 63 replies
-
- 5
-
-
- brass chassis
- not a kit
- (and 2 more)
-
Pony Express 70s BB/FC ex M/T Pinto
Ian McLaren replied to Ian McLaren's topic in WIP: Drag Racing Models
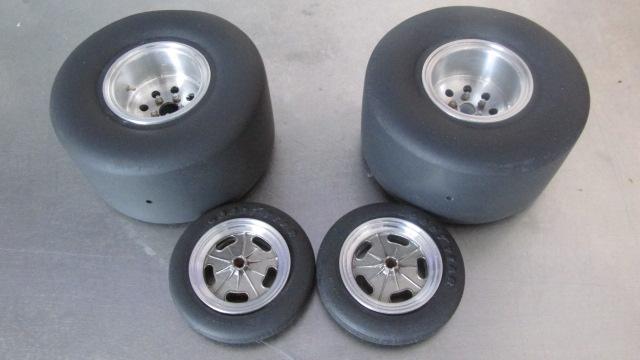
The chassis is progressing, I will some of the process further into the project regarding the fabrication, I have also fount wheels and tires in the spares box for this project
- 63 replies
-
- 2
-
-
- brass chassis
- not a kit
- (and 2 more)
-
Pony Express 70s BB/FC ex M/T Pinto
Ian McLaren replied to Ian McLaren's topic in WIP: Drag Racing Models
Thank you Brian, I'll be showing some of the process regarding the brass fabrication in future up dates as well as other construction methods I use. -
Pony Express 70s BB/FC ex M/T Pinto
Ian McLaren replied to Ian McLaren's topic in WIP: Drag Racing Models
Thank you John So am I, I've been looking forward to building this model in 1/16th for decades -
Very cool project, I'll be following. I loved your Dynacorn comment, they were at best just a starting point and there were times a piece of flat sheet would have been less work. The products currently on the market, though not perfect, have made restorations at least a little less challanging.
-
Daniel you just keep forging ahead, with inovative solutions to modeling issues. There is hardly an update that goes by when I don't pick up another valuable tip. You just keep making all of us better modelers.
-
Pony Express 70s BB/FC ex M/T Pinto
Ian McLaren replied to Ian McLaren's topic in WIP: Drag Racing Models
Part of it is still in Calgary, it resurfaced about a year and a half ago. I'm going in early January to photograph and measure it. I've been thinking of doing a proper version of the car when it still had the Boss 429 in it ( Chuck has Decals). I know the front half was cut off and I assume lost, years ago. But with measurements from the cage section and the photos out there that show the front half, I think I can come pretty close. I'll post some photos here of the original.- 63 replies
-
- 2
-
-
- brass chassis
- not a kit
- (and 2 more)
-
’72 Dodge Demon Drag Racer 1/25 scale
Ian McLaren replied to AmericanMuscleFan's topic in WIP: Drag Racing Models
I'm with Daniel on the plating, and the control arms are great as usual. Don't fear the joints, if they were well cleaned,properly dry fitted and the correct flux was used along with sufficient heat the joints are close to indistructable