RCprofile.JPG.6b95b19b856bf00a3becd6aeaaa48f3b.JPG)
Ian McLaren
-
Posts
1,360 -
Joined
-
Last visited
Content Type
Profiles
Forums
Events
Gallery
Everything posted by Ian McLaren
-
RCprofile.thumb.JPG.1691ea753d0f0897fdc1b2510cf06775.JPG)
full detail 1/16th Gordie Bonin BubbleUp Trans Am Funnycar
Ian McLaren replied to Ian McLaren's topic in WIP: Drag Racing Models
So this project is on hold for a while. I had a routine checkup with my cardiogist last week and during on of the test they found an 11 second gap in my heart beat. I got a phone call and 4 hours later I was in the cardiac wards advanced monitoring room. After a wait of 3 days I got a pacemaker Sunday morning and was home late Sunday afternoon. Everything went exactly according to plan during the surgery and I have been home for two days now.. I am limited in what I can do for the next 10 days of so the incision heals and secures the pacemaker and its leads to the heart. As all of the restrictions are shoulder height and up most modeling is on hold. I can walk, climb stairs, go outside and even have a mild set of exercises to do, however I cannot drive for two weeks after the surgery. All in all I'm in pretty good shape and feeling good, except for the left shoulder and incision site which will pass fairly quickly I am told. -
full detail 1/16th Gordie Bonin BubbleUp Trans Am Funnycar
Ian McLaren replied to Ian McLaren's topic in WIP: Drag Racing Models
Still futzing with the body, chassis, engine alignment. Not haveing measurements of how far out the engine was has made this endevour exponentialy more difficult. first I had to get the chassis ride height correct. Then space the body up the correct amount above the chassis to get both the ground to body height correct and well as how far through the body the blower sits and how far forward in relation to the windshield. Almost all of this stems from the rear motor plate ( the main numbers I don't have). Add to this a generic body whose measurements may or may not be the same as the BubbleUp car (not the manufacturers fault just a fact). All of this added up to serveral motor plates, body mounts (front and rear), 2 different blower manifolds, two sets of front motor mounts and a third set (more scale appearing) in the works, but I now have measurements. Two different blowers and several adjustments to the front blower extension. Also needed were two different approaches to the actual firewall tin and mounting proceedure. Another reprofiling the rear edge of the hood and lower windshield frame was needed to eliminate the kick up that was cast in as part of the body. The following photos show the end results of all this nonsence and I now have the look I was aiming for. Now back to just straight adding details and building
- 190 replies
-
- 4
-

-
- scratch built
- brass chassis
- (and 1 more)
-
full detail 1/16th Gordie Bonin BubbleUp Trans Am Funnycar
Ian McLaren replied to Ian McLaren's topic in WIP: Drag Racing Models
It's great to have you foiiowing along, lots more to come. In regards to fast company, I was at Sheppard Raceway and Edmonton International Raceways driving the RaceCar Distributors A/ED the days they were filming for the movie. I think Norm may still have the fake Montana plates they stuck over the Alberta plates while filming.I also have a copy of the movie. I have a lot of photos from that era so documentation is not really too bad and I can find most of what I need. The Swindahl car was quite different from most so it has been a bit of a challange to document.- 190 replies
-
- 1
-
-
- scratch built
- brass chassis
- (and 1 more)
-
full detail 1/16th Gordie Bonin BubbleUp Trans Am Funnycar
Ian McLaren replied to Ian McLaren's topic in WIP: Drag Racing Models
Thanks Daniel, not on this one. I did try on the 1/12 Camaro Top Sportsman's rack, using the parts from a Tamiya 1/12 F1 kit. The problem was the shaft angles from the steering wheel to the rack. I have no idea how that would been done in this scale, but there would be some awesome machining involved. -
full detail 1/16th Gordie Bonin BubbleUp Trans Am Funnycar
Ian McLaren replied to Ian McLaren's topic in WIP: Drag Racing Models
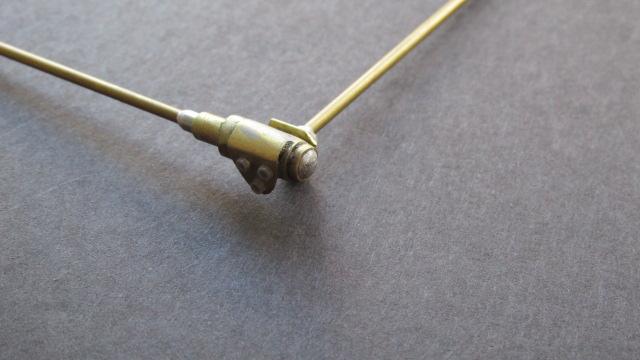
This is my most ambitious scratch built part so far. The steering box for the Bonin car is mostly brass except where aluminum looks more correct. If anyone is interested I do have the in progress photo showing the process I used to assemble this part
- 190 replies
-
- 4
-
-
- scratch built
- brass chassis
- (and 1 more)
-
full detail 1/16th Gordie Bonin BubbleUp Trans Am Funnycar
Ian McLaren replied to Ian McLaren's topic in WIP: Drag Racing Models
I have been considering getting a resistance soldering system for a while now and it very well may be the next major addition to the shop. I am assuming it is used primarily for small details as opposed to primary fabrication or am I wrong in that assumption -
full detail 1/16th Gordie Bonin BubbleUp Trans Am Funnycar
Ian McLaren replied to Ian McLaren's topic in WIP: Drag Racing Models
Thank you Francis, yes the front suspension was one of the things that made me want to model this car. No plans or drawings and the original car is long gone, but there was enough information to piece it together. I knew the front track width and the wheelbase which set where the front tires needed to be. Some great photos of one of the sister chassis were on an old Bring a Trailer add from a few years back. They really showed good details of the front suspension and chassis. From knowing the chassis tube dimensions ( the rules govern that) I could calculate the rest of the tube sizes that I needed. Kind of the long way round but it got the job done. -
full detail 1/16th Gordie Bonin BubbleUp Trans Am Funnycar
Ian McLaren replied to Ian McLaren's topic in WIP: Drag Racing Models
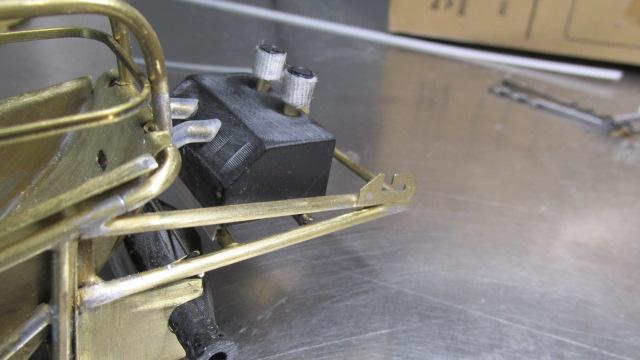
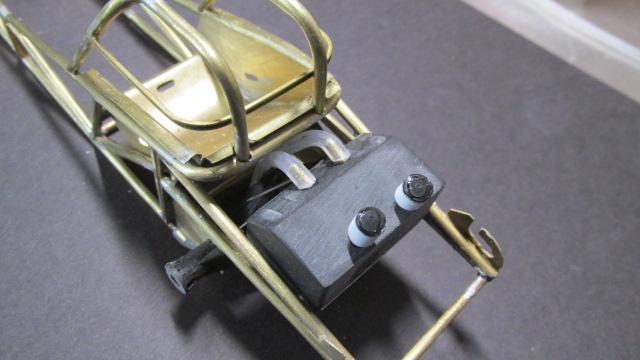
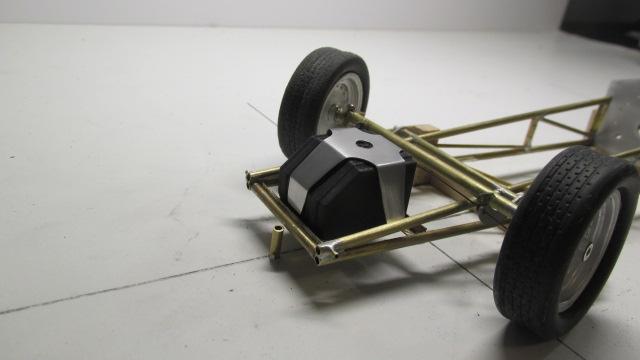
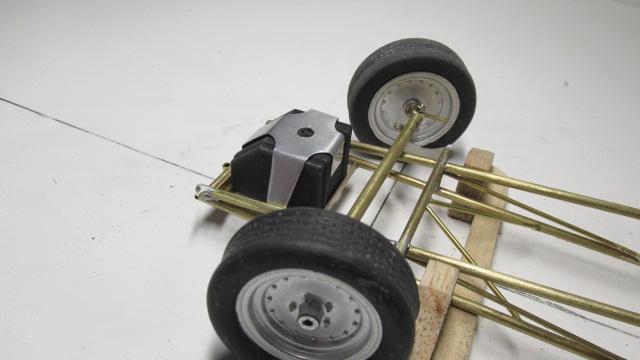
Puke tank system rear components (tank, filters and hoses) fabricated amd test fitted. Have to add a drain, hose clamps and hardware
- 190 replies
-
- 3
-
-
- scratch built
- brass chassis
- (and 1 more)
-
’72 Dodge Demon Drag Racer 1/25 scale
Ian McLaren replied to AmericanMuscleFan's topic in WIP: Drag Racing Models
Some of your best work yet -
’72 Dodge Demon Drag Racer 1/25 scale
Ian McLaren replied to AmericanMuscleFan's topic in WIP: Drag Racing Models
It's time for another little update and I don't know when the next one will be because the low season for my favorite hobby is fast approaching. Francis your updates never disappoint and this one is no exception, other than the part about life intruding on your modeling time, which is very much a reality for most of us. Looking forward to your next update. The rear suspension assembly is amazing! -
Straightliner59 said I made the tops for the inner door panels, and added a trim strip, to give it a more finished look. For the strip, I started with .060" half-round, and laid it on the benchtop, between two strips of metal banding I'd picked up somewhere, in one of the board yards I used to work at. Then, I only needed to sand across them all, until the top of the half-round was flattened. That made the half-round not just look like a strip of half-round. I like this approach very much, The rest of the interiour is coming along very nicely.
-
full detail 1/16th Gordie Bonin BubbleUp Trans Am Funnycar
Ian McLaren replied to Ian McLaren's topic in WIP: Drag Racing Models
Swindahl front funny car suspension late 70s, correct scaled stainless tubing and rod ends will replace overscale radius rods and centerlink as well as scale nuts and bolt installed at final assembly. I have not seen this particular front suspension system modeled before. This run of chassis was primarily found with either Trans Am or Corvette bodies. From what I can gather there were somewhere between 10 - 15 of these built with some minor differences the buggest one being mounting the torsion bar ahead of the axle rather than behind, I'm not sure which version was first, but the Bubble Up car had it behind the axle and I think it was an earlier car
- 190 replies
-
- 4
-
-
- scratch built
- brass chassis
- (and 1 more)
-
full detail 1/16th Gordie Bonin BubbleUp Trans Am Funnycar
Ian McLaren replied to Ian McLaren's topic in WIP: Drag Racing Models
Thank you so much Roger. It's not so much skill, as it is patience and paying attention to and learning from other modelers the best ways to approach certain tasks. Also no matter what your budget is always buy the best tools you can afford. The modeling is better and in most cases turns out to be cheaper in the long run. A good set of files is usually less than and cheap set that is replaced by better set later on, and should out last both of them. -
full detail 1/16th Gordie Bonin BubbleUp Trans Am Funnycar
Ian McLaren replied to Ian McLaren's topic in WIP: Drag Racing Models
Thanks Daniel this is my third rack, the first was styrene, the second was mostly brass but had some sytrene bars added and this one will be all metal (some aluminum details). This one is by far the sturdiest and most accurate and so far the easiest to do. Once you get the heat deal handled (very hot and quick with a few heat sinks) brass starts to show itself as one of the easier building methods. Thanks for your tips!- 190 replies
-
- 1
-
-
- scratch built
- brass chassis
- (and 1 more)
-
full detail 1/16th Gordie Bonin BubbleUp Trans Am Funnycar
Ian McLaren replied to Ian McLaren's topic in WIP: Drag Racing Models
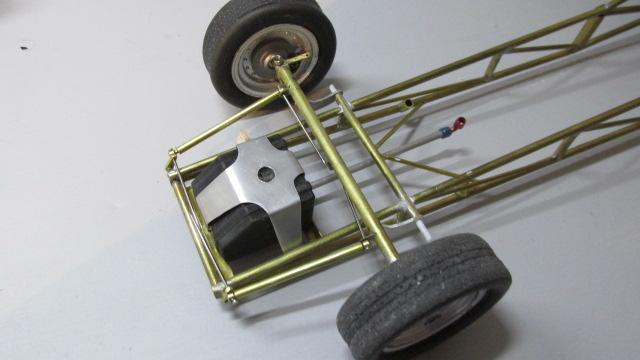
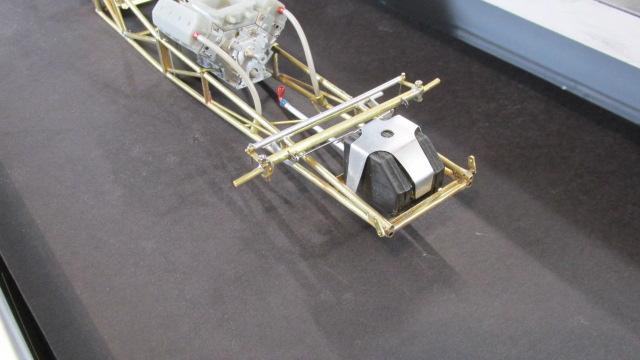
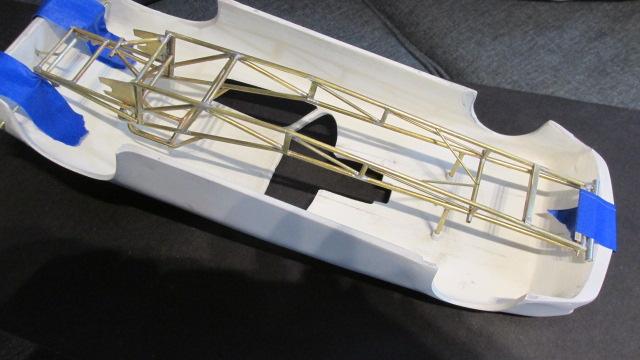
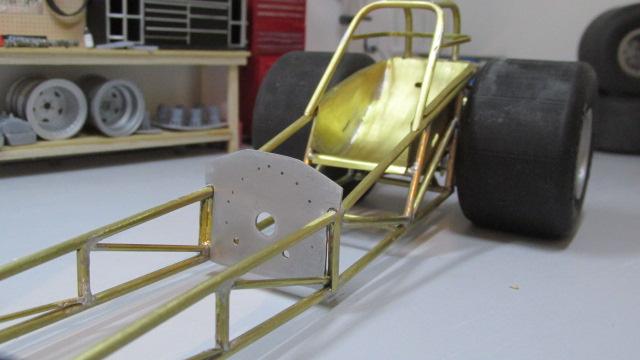
Starting to add bits and pieces to the chassis, front radius bar mounts integrated with the twin front body lock strikers,front part of the fuel system fabricated as well as puke tank initial plumbingand the start of the side engine mounts. Rear motor plate has the firewall sealing surface added as well
- 190 replies
-
- 2
-
-
- scratch built
- brass chassis
- (and 1 more)
-
Good progress Daniel, I like the pencil trick and the aluminum work is looking very good as well!
-
full detail 1/16th Gordie Bonin BubbleUp Trans Am Funnycar
Ian McLaren replied to Ian McLaren's topic in WIP: Drag Racing Models
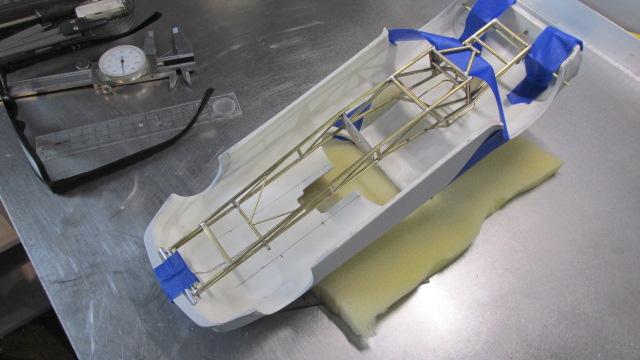
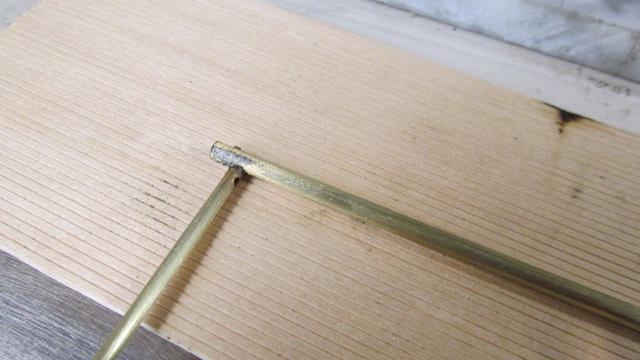
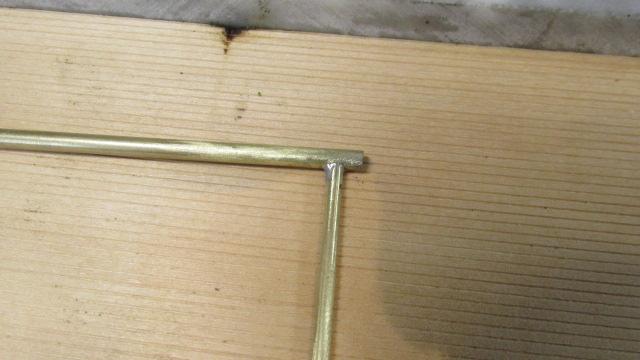
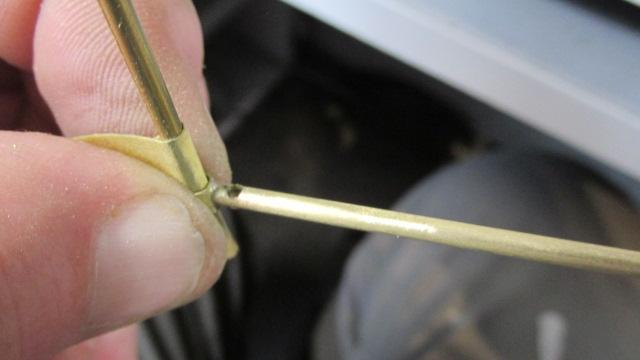
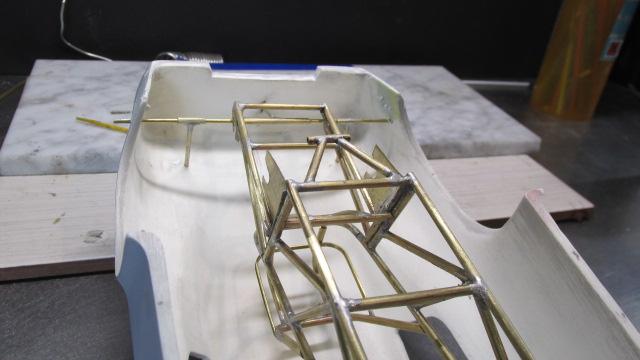
I said I would show the process for the front tree supports. Here it is. Mounting the body Part 2 Starting on the front body mount structure (measurments based on 3/32 frame rails but the process is the same for any size) Main support posts are .093 in diameter which I fish mouthed to fit the 1/8th tubing that will form the saddles themselves, ID is the same as the OD of the frame rails. Next drill a .090 hole parallel to the notch ( it may be eisier to drill the hole first as aligning the notch to the hole is easier than the other way around). Next clean all of the pieces with 320 grit to promote solder adhesion. secure the now cleaned 1/8 tube in preparation for soldering as shown (I used aluminum furnace tape to hold the parts as is stands up to the heat of the process) Make sure to put flux on the areas where you are going to attach the support tubes. Cover the fished mouth end of the supports with flux (the tooth picks are to keep the solder out of the holes and also alignment guides). Solder the pieces together as shown and clean the joints. Then cut the saddle tube to release the supports, trim to size for width ( be carefull here as cutting and or grinding can heat the joint to the point the solder will melt). I used a disc sander to grind away the top half on the saddle tube (again be mindful of the heat) You now have a chassis stand that just needs to be cut to length to set the ride height. The photo show how I mount the supports to the body but you can choose you own path here. I use this method as it allows easy instaallation and removal that will be necessary throughout the res of the body mounting process. On final painting and assembly the plastic tubes on the body with be sanded down to scale for a proper bodymount plate. I hope this will be of use for some of you. Next will be adding bracing and support bars to stablize the main support tubes
- 190 replies
-
- 3
-
-
- scratch built
- brass chassis
- (and 1 more)
-
full detail 1/16th Gordie Bonin BubbleUp Trans Am Funnycar
Ian McLaren replied to Ian McLaren's topic in WIP: Drag Racing Models
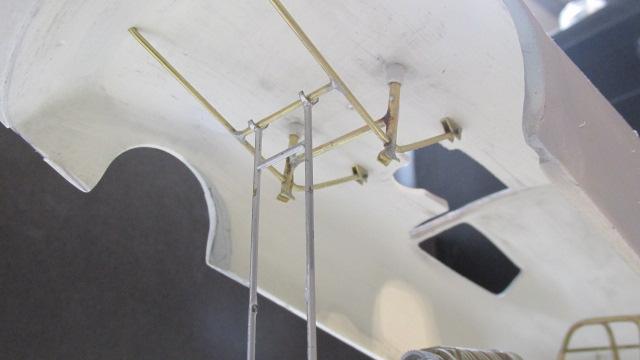
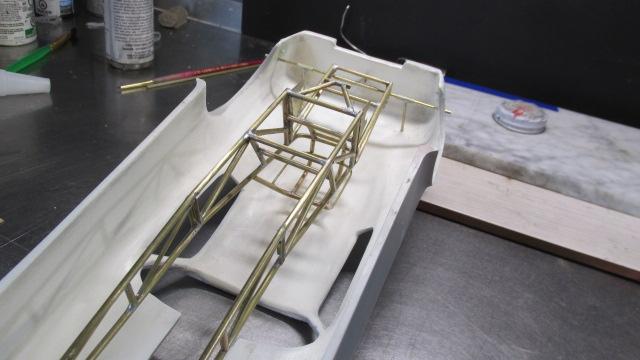
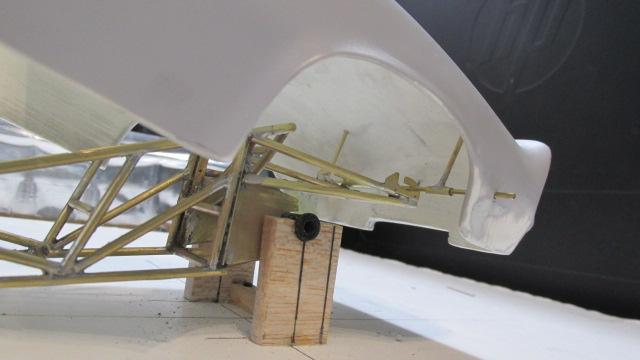
Back to the chassis and body support structures.Rear body retaining bracket built and attached , rear body support structure fabricated and installed temporarily (removeable for paints and other construction, front body stands fabricated and support bars added( also removable for further painting and tin work fabrication and installation). Final ride height set ( a bit lower in the front). This just about wraps up the structural work. Now it's about adding the detailing items, tin , brackets, lines and hoses, drive train etc. Still a lot to do but the basic frame work is now set. I'll post how the main supporting structure was fabricated shortly.
- 190 replies
-
- 3
-
-
- scratch built
- brass chassis
- (and 1 more)
-
full detail 1/16th Gordie Bonin BubbleUp Trans Am Funnycar
Ian McLaren replied to Ian McLaren's topic in WIP: Drag Racing Models
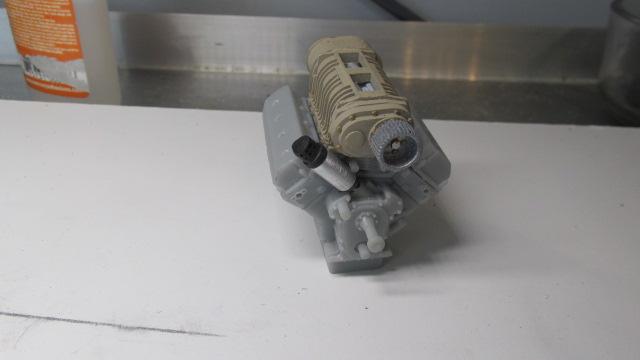
Setting the chassis and body aside for a bit to work on the LPH1320 Keith Black Hemi. Constructed an Ed Pink style 14-71 blower and a vertex style Magneto, the block, heads and valve covers were as close as you can get right out of the package.
- 190 replies
-
- 1
-
-
- scratch built
- brass chassis
- (and 1 more)
-
full detail 1/16th Gordie Bonin BubbleUp Trans Am Funnycar
Ian McLaren replied to Ian McLaren's topic in WIP: Drag Racing Models
John thank you so much, I love it when I can help other modelers learn something new or remind people of old tricks that still work. -
full detail 1/16th Gordie Bonin BubbleUp Trans Am Funnycar
Ian McLaren replied to Ian McLaren's topic in WIP: Drag Racing Models
If either one of us manages to traverse the miles (kilometers) between our provinces perhaps we can in person.- 190 replies
-
- 1
-
-
- scratch built
- brass chassis
- (and 1 more)
-
I'm liking where you are going with this model, as usual the work is top notch. I know all too well the mood shift after an intense long term project but I can assure you it disipates fairly quickly. Glad to see you working on the though, it's a good sign.
-
’72 Dodge Demon Drag Racer 1/25 scale
Ian McLaren replied to AmericanMuscleFan's topic in WIP: Drag Racing Models
Running out of superlatives, just know I'm following and remian awe struck. The brake assemblies are next level! -
full detail 1/16th Gordie Bonin BubbleUp Trans Am Funnycar
Ian McLaren replied to Ian McLaren's topic in WIP: Drag Racing Models
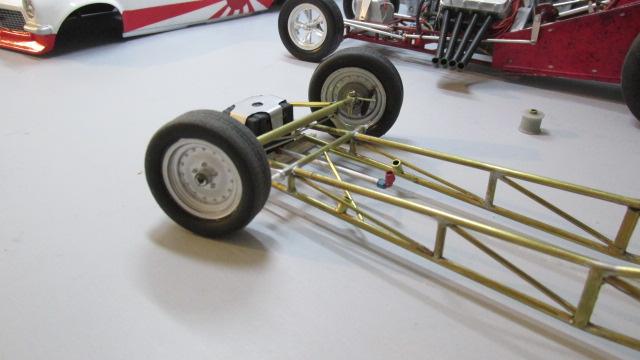
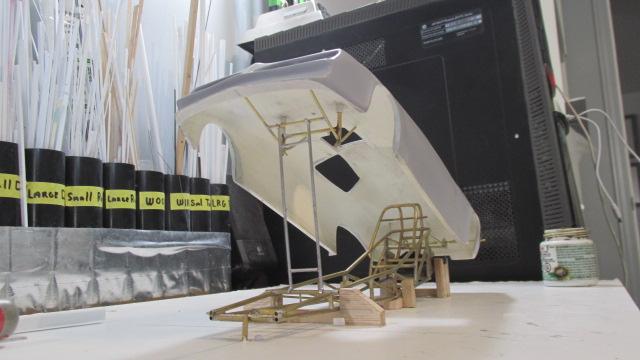
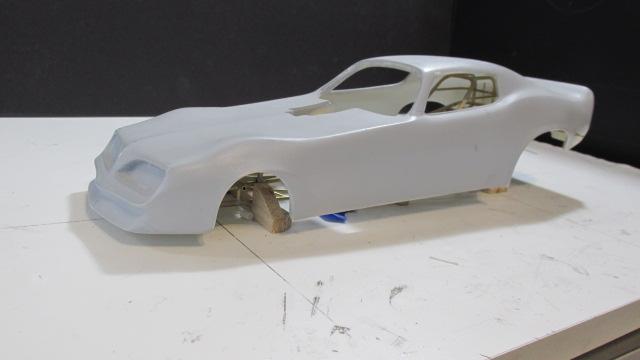
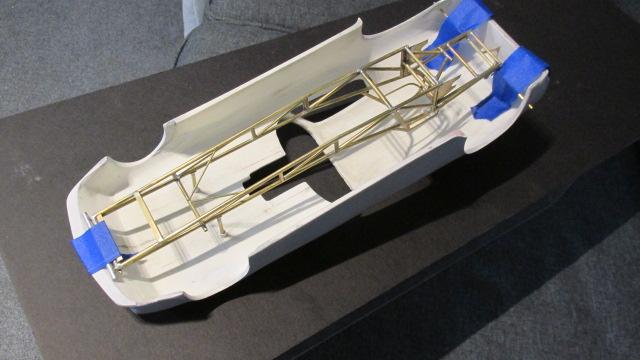
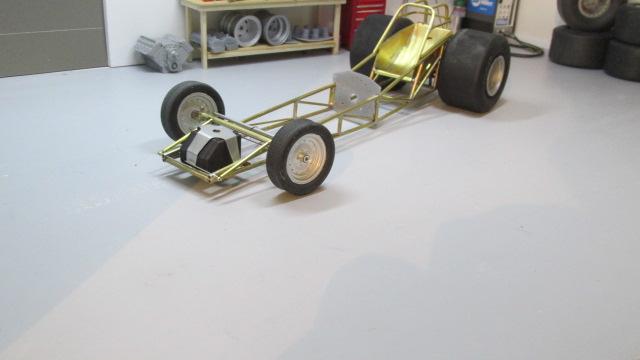
A milestone dayThe first time the body has been fitted over the chassis, and the first time that the chassis is supported by both its front and rear axles as a roller. Tonight we drink!
- 190 replies
-
- 4
-
-
- scratch built
- brass chassis
- (and 1 more)
-
full detail 1/16th Gordie Bonin BubbleUp Trans Am Funnycar
Ian McLaren replied to Ian McLaren's topic in WIP: Drag Racing Models
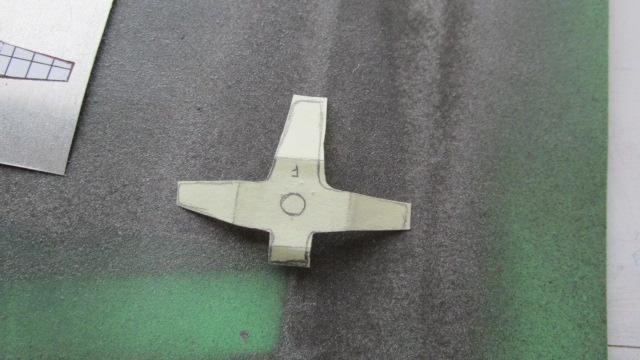
Fuel tank hold down bracket now added, also added image of the original rough template, corrected template on graph paper and cut out aluminum part before final shaping and polishing
- 190 replies
-
- 1
-
-
- scratch built
- brass chassis
- (and 1 more)