RCprofile.JPG.6b95b19b856bf00a3becd6aeaaa48f3b.JPG)
Ian McLaren
-
Posts
1,371 -
Joined
-
Last visited
Content Type
Profiles
Forums
Events
Gallery
Everything posted by Ian McLaren
-
RCprofile.thumb.JPG.1691ea753d0f0897fdc1b2510cf06775.JPG)
full detail 1/16th Gordie Bonin BubbleUp Trans Am Funnycar
Ian McLaren replied to Ian McLaren's topic in WIP: Drag Racing Models
Daniel your brass work is incredible, it's you I'm trying to keep up with. I can't wait for you to bring the Surfers chassis back out so I can pick your brain some more.- 190 replies
-
- 1
-

-
- scratch built
- brass chassis
- (and 1 more)
-
full detail 1/16th Gordie Bonin BubbleUp Trans Am Funnycar
Ian McLaren replied to Ian McLaren's topic in WIP: Drag Racing Models
Firstly, thank you Francis it does work fairly well. When I read your question it struck me as slightly odd and then I realized that it was a great question to which I didn't have an immeadiate answer. When we had the fab shop, chassis were built with tube, with the only questions being 4130 or mild steel and what size. I have always used tube for the vast majority of my chassis, but your question made me really think it through. Rod would seem to have advantages, more surface area in the joints for better adhesion, bends could be made with out crushing, less likely to bend, so why not use it. Tubing also has advantages, the open ends look right, butt joints with an internal sleeve are much stronger than any flush butt joint, it's much easier to drill a hole into the center cavity for a pin joint and perhaps the biggest one is that tubes are much easier to fishmouth than a rod, making fabrication some what quicker. Price wise the difference is very small and availability is usually good for both. So the question remains why use tube instead if rods for a chassis? Cause that's what their made of I guess. LOL- 190 replies
-
- 2
-
-
- scratch built
- brass chassis
- (and 1 more)
-
full detail 1/16th Gordie Bonin BubbleUp Trans Am Funnycar
Ian McLaren replied to Ian McLaren's topic in WIP: Drag Racing Models
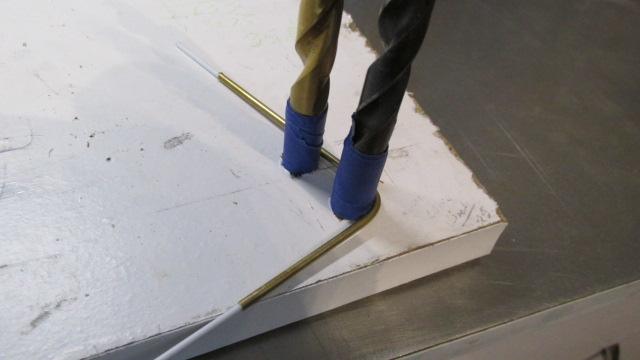
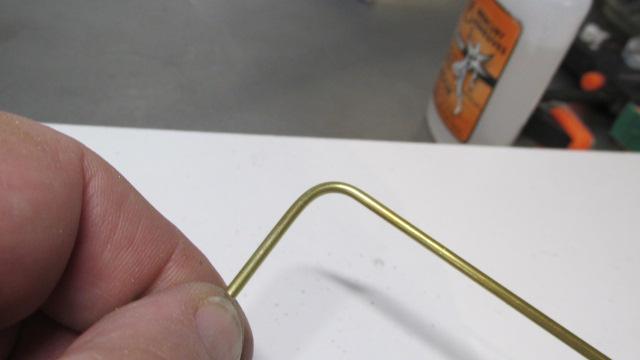
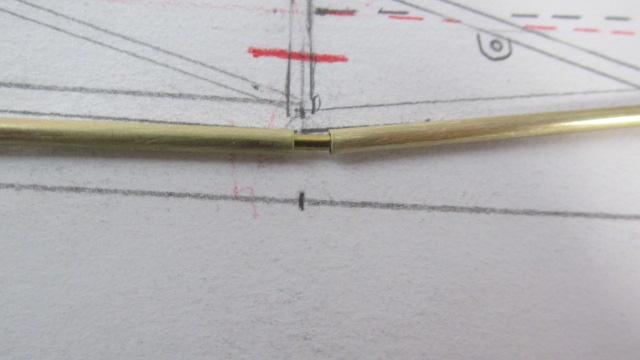
Base chassis assembled, and some photos of how it was supported to soldered. Also I posted the photos of how I made the bends in the rear upper bar using 3/32" brass tubing ,.060 white styrene rod stuffed in the tube and three drill bits to form the radius. The tape was used to adjust the size accros the chassis and also to protect the brass tube from damage. Simple and will work on most sizes of tube and a reasonable radius (not too tight)
- 190 replies
-
- 4
-
-
- scratch built
- brass chassis
- (and 1 more)
-
full detail 1/16th Gordie Bonin BubbleUp Trans Am Funnycar
Ian McLaren replied to Ian McLaren's topic in WIP: Drag Racing Models
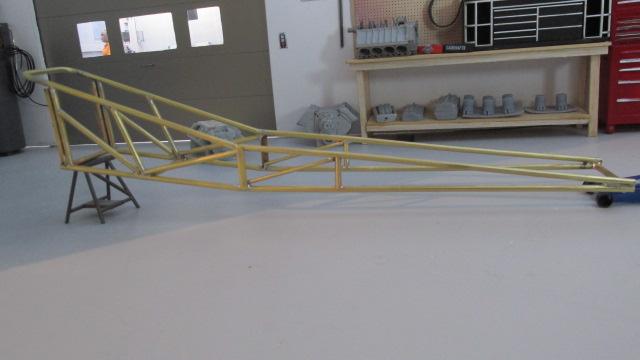
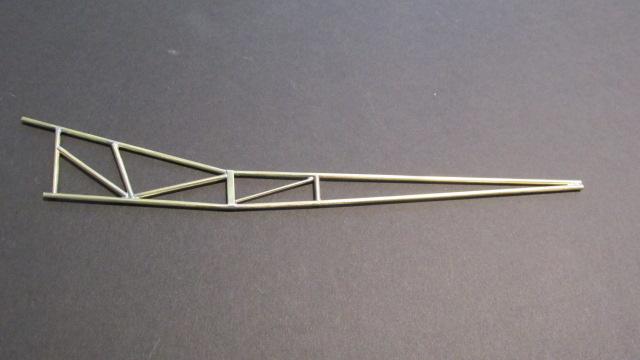
Further progress on the Swindahl style chassis, all major bars now in place, should be able tp assemble the basic chassis shortly
- 190 replies
-
- 3
-
-
- scratch built
- brass chassis
- (and 1 more)
-
full detail 1/16th Gordie Bonin BubbleUp Trans Am Funnycar
Ian McLaren replied to Ian McLaren's topic in WIP: Drag Racing Models
Chassis is moving from drawing to the assembly jig, construction now under way.
- 190 replies
-
- 1
-
-
- scratch built
- brass chassis
- (and 1 more)
-
’72 Dodge Demon Drag Racer 1/25 scale
Ian McLaren replied to AmericanMuscleFan's topic in WIP: Drag Racing Models
If it wasn't for the dime in some of the photos, this would simply be an article in Hot Rod Magazine about someone building a real car. The fidelity to scale is off the charts. Amazing! -
full detail 1/16th Gordie Bonin BubbleUp Trans Am Funnycar
Ian McLaren replied to Ian McLaren's topic in WIP: Drag Racing Models
I'm glad you like it Francis, I kind of thought this one might be in your wheel house, even though is has no doors. I too like the era when you could tell what kind of car it was without having to look a the painted on grill and tail lamps. I'm also going to put in more tips and tutorials on how I have done things, as there is still going to be quite a bit of scratch building on this one.- 190 replies
-
- 1
-
-
- scratch built
- brass chassis
- (and 1 more)
-
full detail 1/16th Gordie Bonin BubbleUp Trans Am Funnycar
Ian McLaren replied to Ian McLaren's topic in WIP: Drag Racing Models
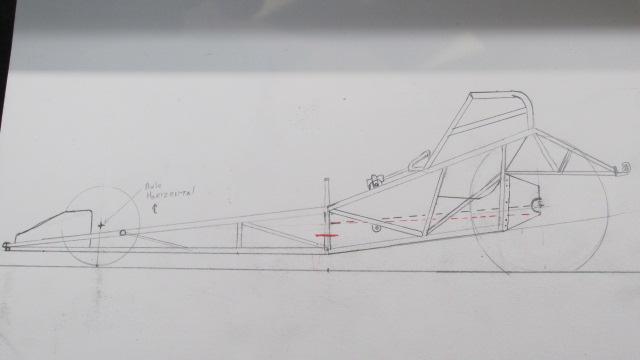
Thank you John, Here is a bit of an insight to what is going on. This is my drawing of the Swindahl chassis that this car used, I'm still doing research on it but I'm pretty sure the bulk of it is fairly accurate. The tapered chassis and front suspension were quite different from the norm. Someone may have already modeled this chassis at some time but I;m not aware of and I'm almost positive it has never been offered in kit form.
- 190 replies
-
- 2
-
-
- scratch built
- brass chassis
- (and 1 more)
-
full detail 1/16th Gordie Bonin BubbleUp Trans Am Funnycar
Ian McLaren replied to Ian McLaren's topic in WIP: Drag Racing Models
Although I just officially started this post yesterday, I have been chipping away at the body around finishing a 1/25 Beretta Promod for a friend. The first photo is of the Flashpoint T/A body before the changes started next to a 1/25th Comp Resins body that wasn't much closer. The modifications done to this point are, remove the front ProMod style air dam and replace it with a more stock style front spoiler that is also much narrower, the front fenders ahead of the wheel wells were also narrowed and also tucked under to visually narrow the nose of the car. The side window openings have also been modified to be closer to the real car. the blower hole in the hood area has been roughly extended as the motor will sit out further forward than was allowed for in the body, and the hood profile in that area was flattened as well. Blisters were also added above the front wheels to allow for a reduce ride height and also to provide move clearance at speed when the front of the body presses down due to the airflow (this was actually the primary reason the were installed on the cars back then). The front wheel openings were move foward and up to better match the real cars 125 inch wheel base ( the Flashpoint body was built to fit the Revell chassis which measure 120 inch between the wheels). Finally I trimmed the body sides of the car starting with1/16th inch shorter at the front wheel wells to 5/16th at the rear wheel wells to back date the look of the original body. The body now looks much better but I am probably going to have to trim a little more for the correct look, but that will have to wait till the body can be set on the chassis at the correct ride height
- 190 replies
-
- 7
-
-
- scratch built
- brass chassis
- (and 1 more)
-
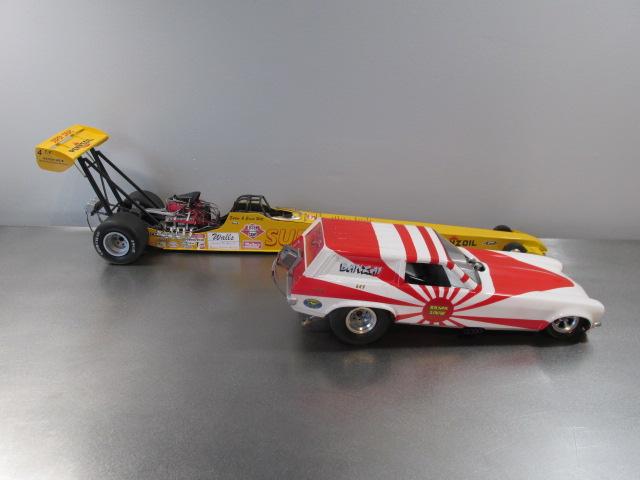
This is my latest project and perhaps most ambitious. I have wanted to build this car in 1/16th literally for decades but it always got put off of for one thing or another. The major hurdle was finding a 1/16th Trams Am body that was suitable and also gathering enough reference material to allow me to do justice to a car I saw run on numerous occaisions and also one that I was familiar with most of the people involved. The car was run primarily out of the Edmonton Alberta just less than 200 miles from my home and we ran at the same tracks several times. The car itself was alway one of my favorites and Gordie was one of the most personable people I have ever had the pleasure to know. Close friends, no, but we did talk during the race weekend more often than not. Late last year Nick Bradshaw of Flashpoint Resins solve the body issue with a very nice resin cast 77-78 Trans Am. It was going to need some substancial alterations to back date it to resemble the car above but at least I now had a starting point. The other stumbeling block was the Swindahl chassis which as far as I know has never been represented in kit form. I also have never seen anyone model one (but there may very well be some out there) and finding photos of the correct version of the chassis has been difficult. Swindahl was primarily a Top Fuel chassis builder who eventually revolutionized how Top Fuel Chassis were designed and built. This particular chassis was as far as I can tell only used in this form for a handfull of Trans Am and Corvette funnycars over a two or three year span. I have studdied many photos over the last few months and have come up with what I think is a fairly close approximation of that chassis but I am still researching, as there are a few minor areas that have not shown up in any of the photos I have seen. I chose the car as it was campained in 1978 because it to me has the most personality. It is truly a weapons grade competition car, not much chrome, simplified graphics, non polished mag blower, natural cast injector and barely polished hat as well as a very unique front suspension and steering system. I hope that you will like where this build is going, and I will also include how and why some of the details and finishes were accomplished. At anytime please feel free to comment on what you see and if something I'm doing that is not correct let me know as I do not know everything about this car or its history.
- 190 replies
-
- 3
-
-
- scratch built
- brass chassis
- (and 1 more)
-
’72 Dodge Demon Drag Racer 1/25 scale
Ian McLaren replied to AmericanMuscleFan's topic in WIP: Drag Racing Models
No words? -
1/16th Scale 1988 rear engine dragster, 282 inch wheelbase
Ian McLaren replied to Ian McLaren's topic in Drag Racing
Thank you so much Edgar, your comments are much appreciated! -
’72 Dodge Demon Drag Racer 1/25 scale
Ian McLaren replied to AmericanMuscleFan's topic in WIP: Drag Racing Models
All I can do is shake my head in amazement, how you can machine a complex piece like the carrier in this scale, when in full size, casting it is the most convenient and practicle way it can be produced by the manufacturer, is beyond me. So much fun to watch though! -
1/16th Scale Top Fuel Dragster Eddie Hill 4:99
Ian McLaren replied to Ian McLaren's topic in WIP: Drag Racing Models
Thank you Tim, I'm glad you liked it. Sorry fot the tease but I am realy excited about this next funnycar build. I saw the real car run in 78 and knew most of the people involved. The past three years have been spent researching the car and primarily the chassis as well as locating suitable parts. Finally finding a body that while being different from the original, can be modified to a suitable replica, is allowing me to move from research to a workable build plan. I have a 1/25 scale ProMod Nitrous Beretta I have to finish for a friend and owner of the real car first (another two to three weeks I hope) and then I can start to concentrate on the Firebird. By the way welcome back, we missed you. -
Good morning Tim, I'm so glad to see that you are returning to the bench, you were missed my friend and welcome back!
-
’72 Dodge Demon Drag Racer 1/25 scale
Ian McLaren replied to AmericanMuscleFan's topic in WIP: Drag Racing Models
I'm just going to echo what Daniel said, simply amazing! -
1/16th Scale Top Fuel Dragster Eddie Hill 4:99
Ian McLaren replied to Ian McLaren's topic in WIP: Drag Racing Models
Thank you very much Mike! Having seen the kind of work you turn out your words mean a lot! The next car is more up you alley, full brass 1978 Swindahl chassis, funny car, it's also a (been thinking about this one for years kind of deal) project and is going to be my most ambitious. model yet- 78 replies
-
- 3
-
-
- scratch built
- super shops
- (and 2 more)
-
1/16th Scale 1988 rear engine dragster, 282 inch wheelbase
Ian McLaren replied to Ian McLaren's topic in Drag Racing
Thank you Mark, yes doing this in 1/16th pretty much guaranteed that practicaly everything had to be either scratch built or custom printed, the dual barrel vavle fuel system also complicated the proceedure as well. Glad you liked it! -
1/16th Scale Top Fuel Dragster Eddie Hill 4:99
Ian McLaren replied to Ian McLaren's topic in WIP: Drag Racing Models
Francis thank you so much for the kind words, when they come from you they really mean a lot. As per usual with my projects this one took on a life of its own. When I first started it three years ago it was a test piece with a view to building one of these with a brass chassis. Then it sat for two year, eventually ending up in a box when we moved. When I rediscovered it last year it occured to me that the generic chassis could with a few changes pass for Hills 4:99 car. And we're off! LOL This has now been added to Finished drag race models.- 78 replies
-
- 2
-
-
- scratch built
- super shops
- (and 2 more)
-
1/16th Scale 1988 rear engine dragster, 282 inch wheelbase
Ian McLaren posted a topic in Drag Racing
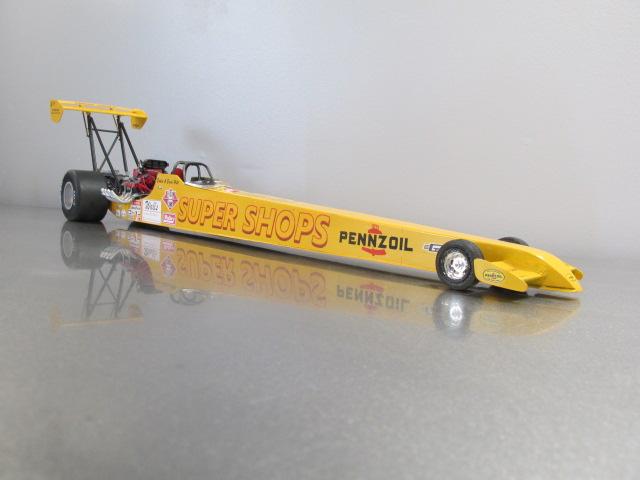
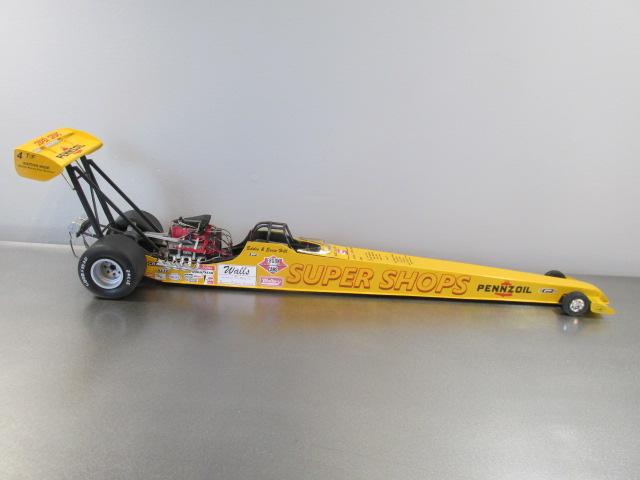
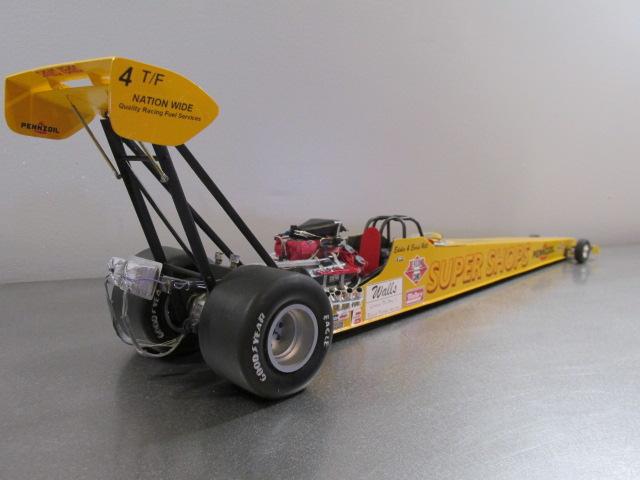
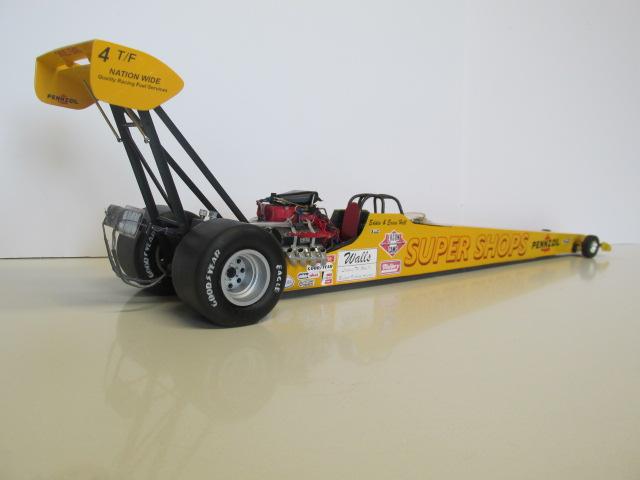
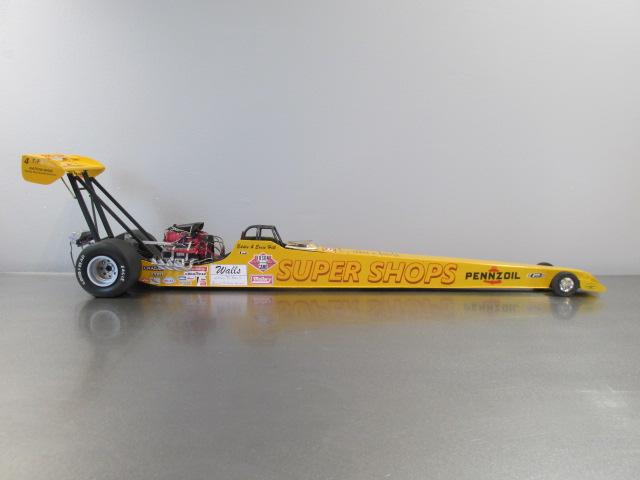
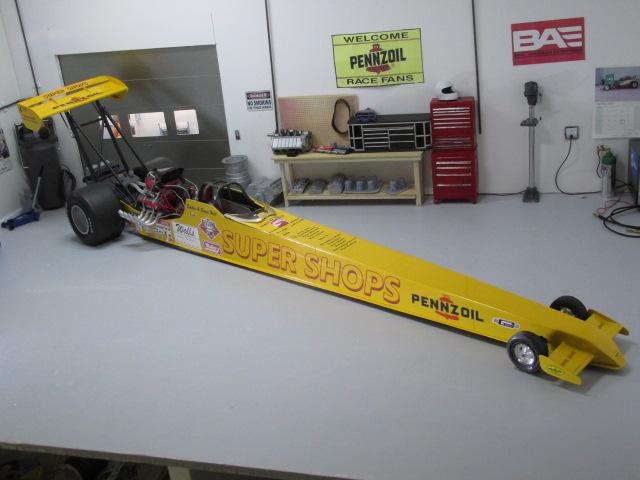
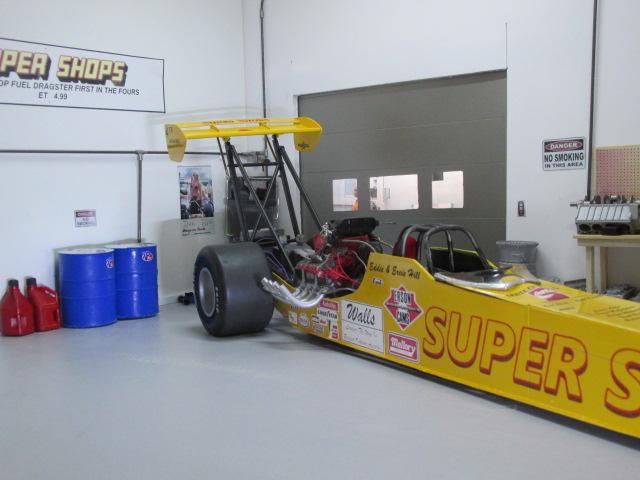
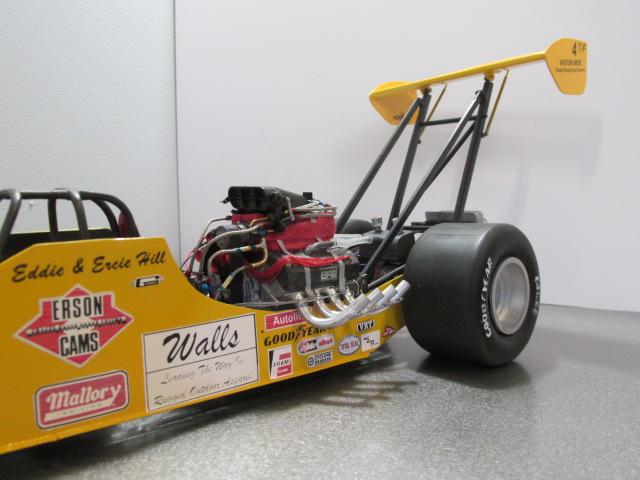
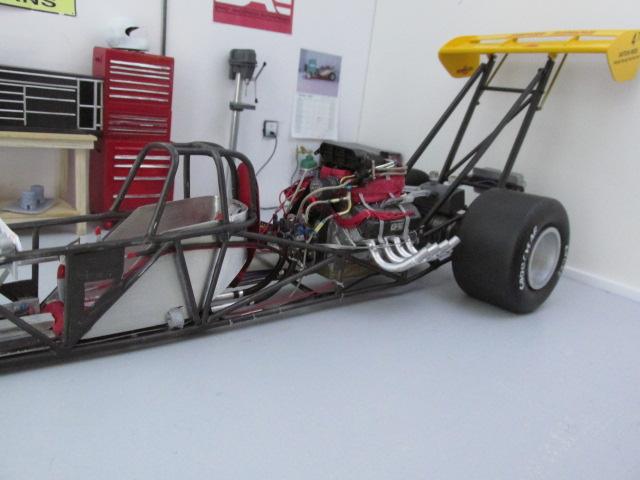
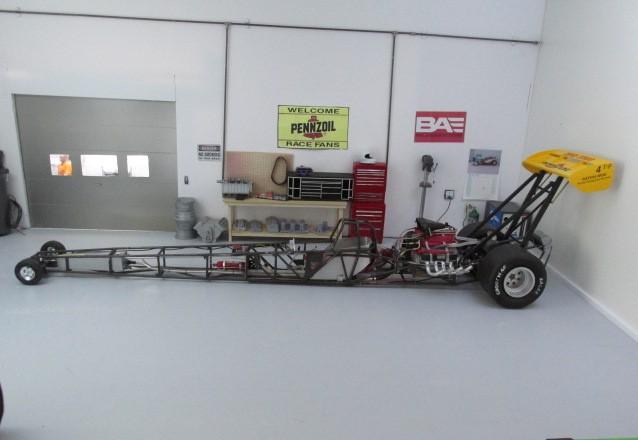
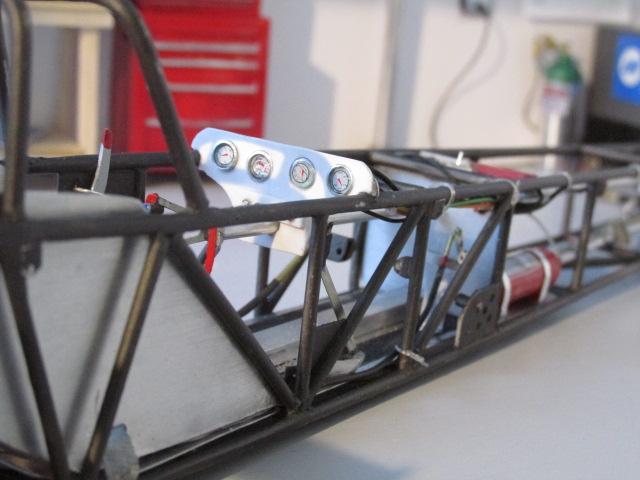
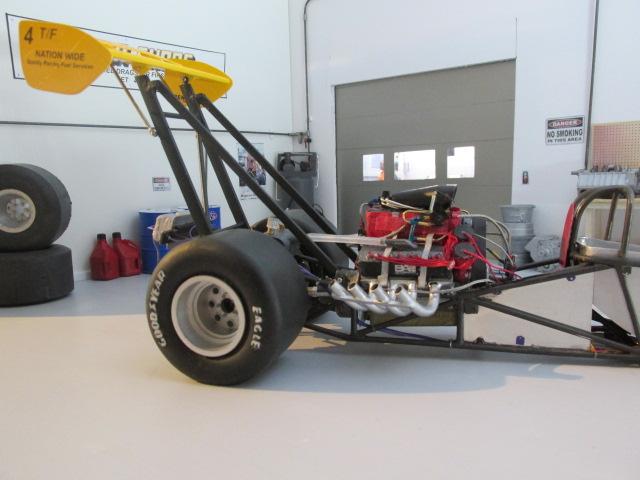
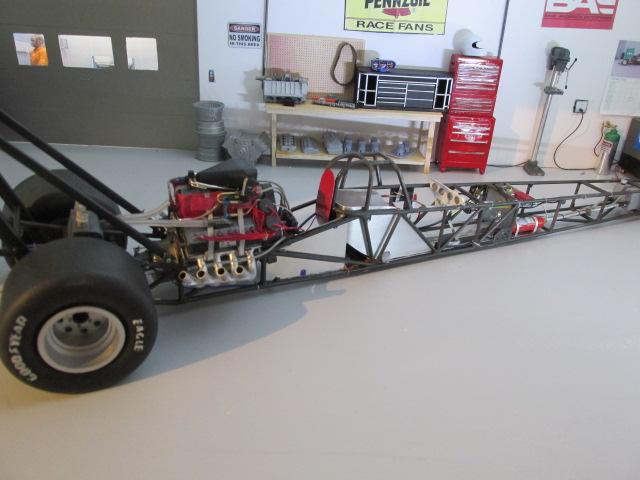
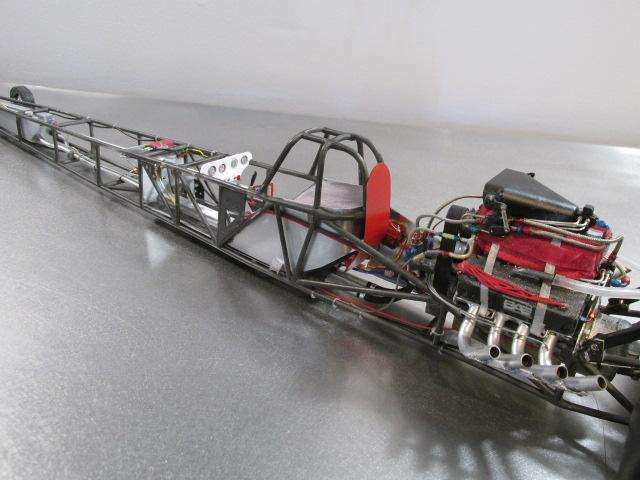
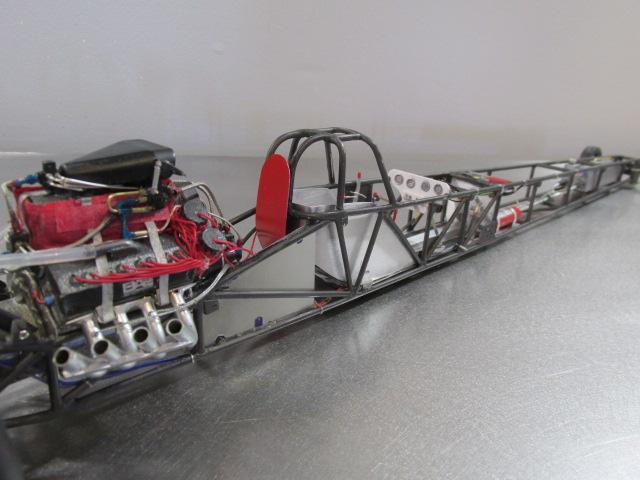
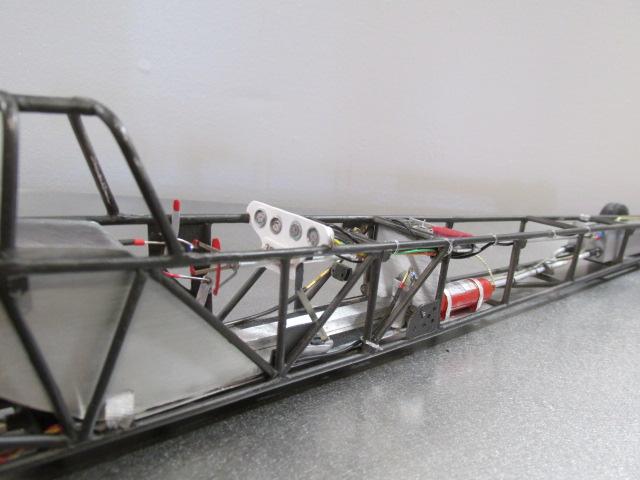
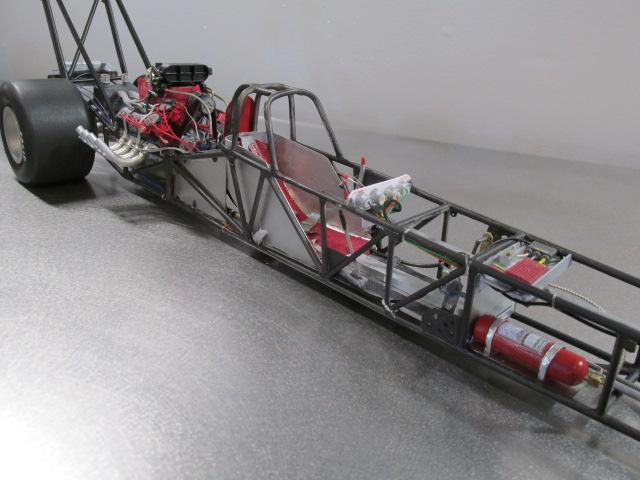
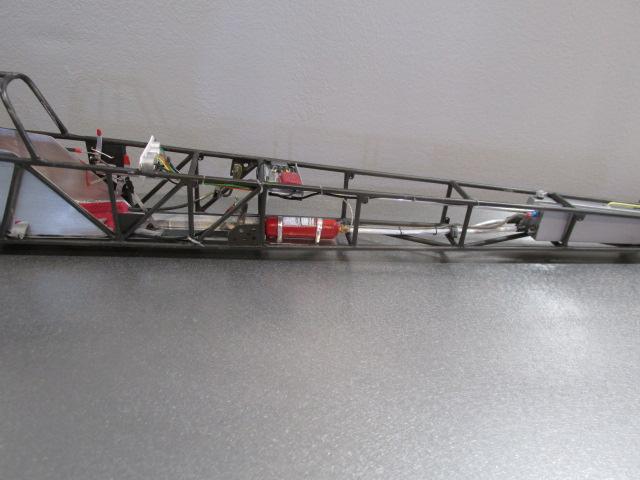
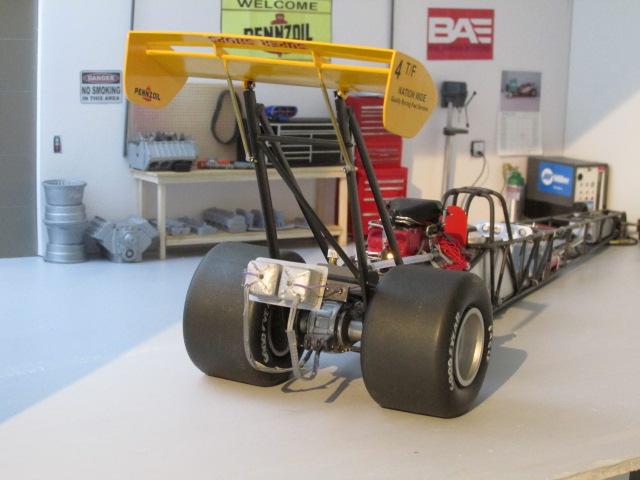
My tribute to Eddie Hills "First in the Fours" 1988 dragster. For as famous as this car is, there is not a lot of detailed information. I talked to many people about specific information on the car, including some of the crew members from that year, gathered as many photos as I could find and came up with what I believe is a reasonable overall representation of the car. Areas which I could not document, I used era appropriate systems or parts from similar cars from that year. The engine with its dual barrel valve fuel system is quite close to the original. The model is almost totally scratch built, chassis, body, differential, rear wing assy,drivers seat (aluminum), exhaust headers (brass), fuel tank and many of the accessories. Parts 3D printed by me include, slicks, rear wheels, bellhousing,reverser, 14-71 blower, ignition coils and mags,and so on. The decals were drawn on GIMP and printed by myself., After market parts were from RB Motion, Future Attractions, Perfect Parts and Ron Olsen.
-
1/16th Scale Top Fuel Dragster Eddie Hill 4:99
Ian McLaren replied to Ian McLaren's topic in WIP: Drag Racing Models
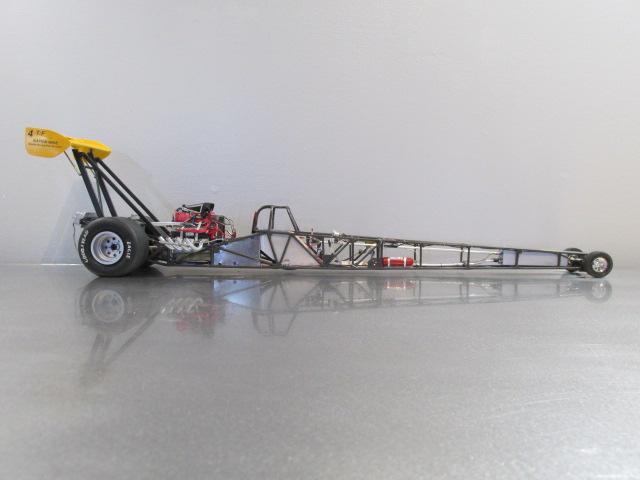
There are a couple of small items that I will address in the next few days but they won't affect the photos, so for all intents and purposes here is the finished project. Posting to finished models as well.
- 78 replies
-
- 1
-
-
- scratch built
- super shops
- (and 2 more)
-
1/16th Scale Top Fuel Dragster Eddie Hill 4:99
Ian McLaren replied to Ian McLaren's topic in WIP: Drag Racing Models
Thank you Randy for the kind words, wrapping this one up very shortly. -
1/16th Scale Top Fuel Dragster Eddie Hill 4:99
Ian McLaren replied to Ian McLaren's topic in WIP: Drag Racing Models
Thanks Daniel, this is going to wrap up pretty quickly from here.- 78 replies
-
- 1
-
-
- scratch built
- super shops
- (and 2 more)
-
1/16th Scale Top Fuel Dragster Eddie Hill 4:99
Ian McLaren replied to Ian McLaren's topic in WIP: Drag Racing Models
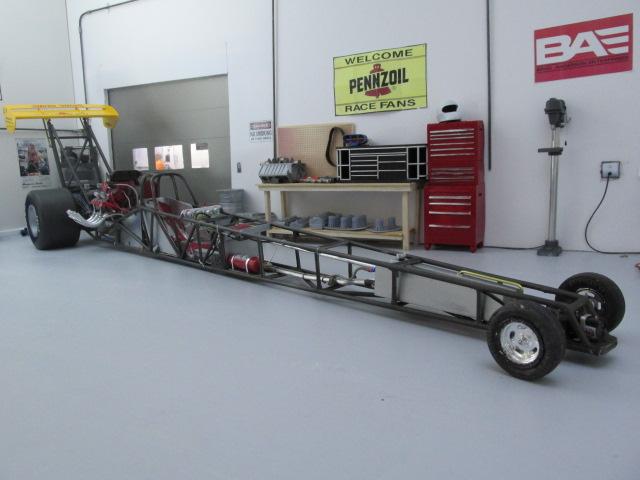
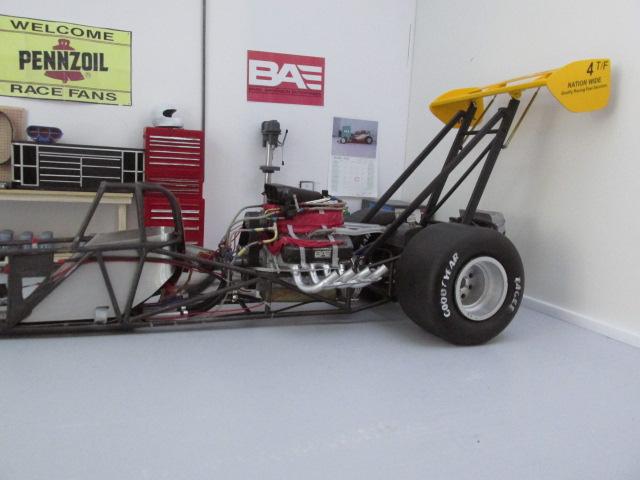
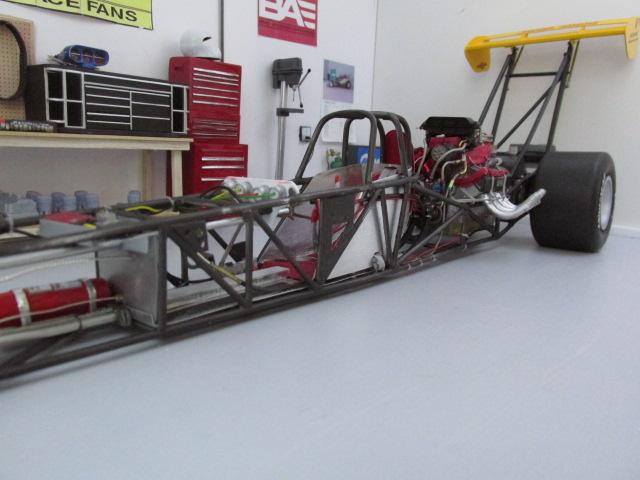
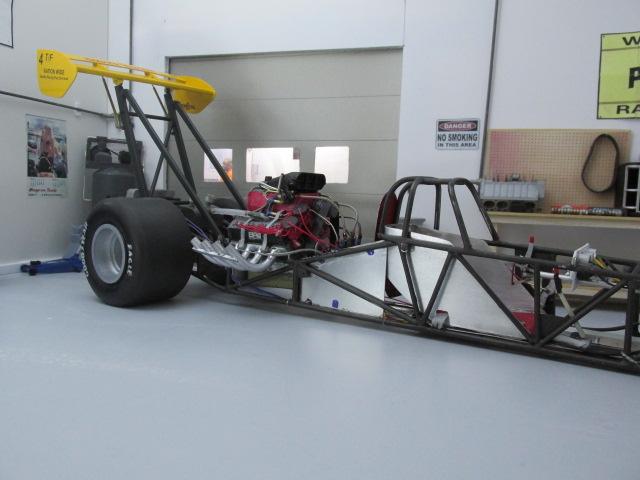
Drive train is installed in the chassis, wires and hoses plus some subassemblies to install and it's photo time.
-
Nostalgia Fuel Dragster--Blower Manifold (01/28/23)
Ian McLaren replied to Straightliner59's topic in WIP: Drag Racing Models
Daniel it has been a pleasure and absolute honor to watch you resurect and then complete this model, the amount of time effort and detail you have managed to incorperate into this project is truly staggering. This has certianly become a bench mark model that has set a standard that will difficult to achieve by any modeler, but will also serve as a goal to strive for. Your dedication and willingness to not settle for good enough, going back and redoing so many different parts of the model shows through in the photos (and yes the camera is the toughest critic of all. I would be remiss in not mentioning that your entire project with your excellent "how I did this tips" has also made better modelers out of anyone who followed along on your journey. You have enrichened the modeling community here and for that I thank you. With nothing in the photos to suggest this is anything but a fuel size functiong vehicle I would say, mission accomplished! Very very well done my friend!