
RCprofile.JPG.6b95b19b856bf00a3becd6aeaaa48f3b.JPG)
Ian McLaren
-
Posts
1,360 -
Joined
-
Last visited
Content Type
Profiles
Forums
Events
Gallery
Everything posted by Ian McLaren
-
RCprofile.thumb.JPG.1691ea753d0f0897fdc1b2510cf06775.JPG) Just finished the custom made belt set, scratch built release mechanism, printed hardware, some left over photo etch pieces and 3M medical tape. Finished off with custom printed SFI certification, warning, and manufacturer tags. I used a light blueSharpie marker to color the belts.
Just finished the custom made belt set, scratch built release mechanism, printed hardware, some left over photo etch pieces and 3M medical tape. Finished off with custom printed SFI certification, warning, and manufacturer tags. I used a light blueSharpie marker to color the belts.
- 352 replies
-
- 4
-

-
- brass
- tube chassis
- (and 2 more)
-
Nostalgia Fuel Dragster--Blower Manifold (01/28/23)
Ian McLaren replied to Straightliner59's topic in WIP: Drag Racing Models
Your work on the magneto has me shaking my head, fantastic work my friend! -
Your detailing is remarkable, very well done my friend!
-
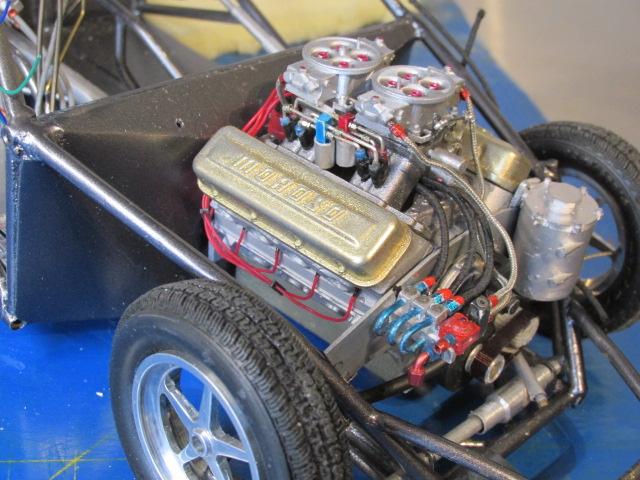
Progress on the chassis, not completed but enough done to finalize some clearances so the body now slides on with minimal assistance and at the correct ride height, had to add aditional clearance for inner door skins and adjust the cutouts in the lower fenders for the headers. Seat belts and some additional wiring as well as the adjustable brake pedal assemble to add. Just about to the point of installing the last three cage bars and final paint and touchups.
- 352 replies
-
- 1
-
-
- brass
- tube chassis
- (and 2 more)
-
Major sub assembly test fit. steering gear, struts and brake calipers and lines permanently fitted, final assemble now properly under way on the chassis, but still quite a bit to complete. Once that is completed the body will be addressed and then mated to the chassis
-
Nostalgia Fuel Dragster--Blower Manifold (01/28/23)
Ian McLaren replied to Straightliner59's topic in WIP: Drag Racing Models
I'll have to look at this line, I have a huge sporting goods store about 5 minutes from our home. Also the progress is great. -- respect! -
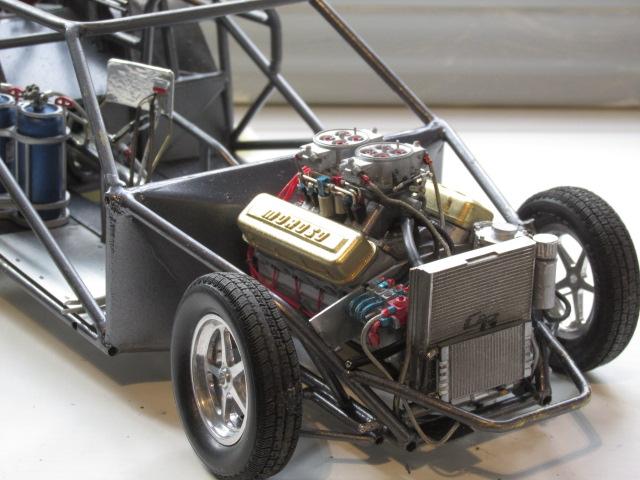
Most of the engine related plumbing complete, dry sump, remote breather,trans cooler and lines now back to the chassis to finish up before final engine installation
- 352 replies
-
- 3
-
-
- brass
- tube chassis
- (and 2 more)
-
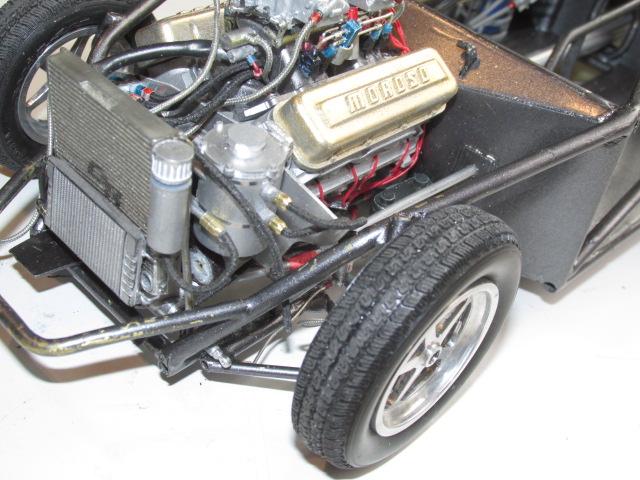
Spent a bit of time on the engine as it determines much of what happens to the plumbing of the front half of the chassis. Starting to resemble an actual car instead of three boxes of misc. parts..
- 352 replies
-
- 2
-
-
- brass
- tube chassis
- (and 2 more)
-
Nostalgia Fuel Dragster--Blower Manifold (01/28/23)
Ian McLaren replied to Straightliner59's topic in WIP: Drag Racing Models
The lines and fittings look great, and your friend is technically correct but if that valve is in the idle chech valve line you could leave it there as a trimmer in case the check valve leaks internally or sticks open. If it's left open the circuit works normally but if the check valve malfunctions as stated it will lean out the idle circuit and if stuck fully open may lean out the entire fuel curve somewhat. if the manual valve was then closed it would stop some or all of the bypass, therefore enrichening the engine as the bypass works opposite to what most people think, as you are limiting the fuel going back to the tank more fuel is available to the engine. It becomes a safety measure rather than a tuning aid. I do like your other explanation as that would add somee interet and humour to the story. -
Nostalgia Fuel Dragster--Blower Manifold (01/28/23)
Ian McLaren replied to Straightliner59's topic in WIP: Drag Racing Models
Great update Daniel, you have outdone yourself on the fuel system, everything looks great! -
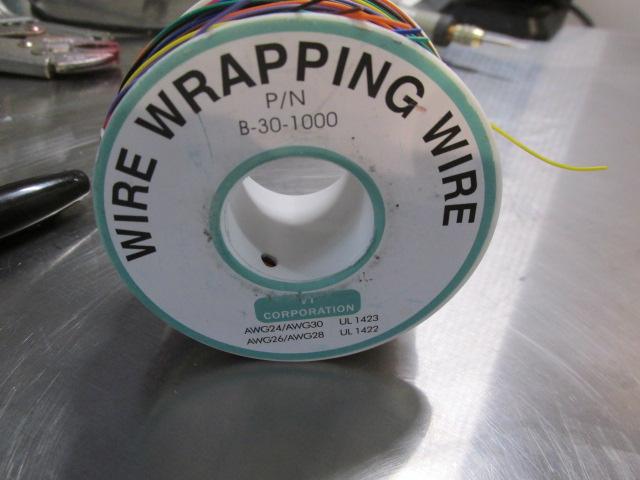
Model Building Tip Tired of paying too much for three feet of a single color detailing wire. here's a deal from Amazon.ca 260 meters / roughly 800 feet, pcv coated wire wrapping wire that has all of the colors on one spool. the OD of the wire is nominally .022" it bends easily and stays where you put it (very little spring back), Admittedly this will be of the most use on 1/16th scale and up. best part is the price $17.89 per roll CDN or about $0.03 per foot B08YRN46BP MUZIEBA. Just as an aside I paid $2.00 less as there is or was a redeamable coupon offered as well. Its real use is as a binding wire to secure parts together when soldering and also sees use in model railroading.
-
Pogress continues steering gear, master cylinder and line lok intstalled and plumbed.
- 352 replies
-
- 1
-
-
- brass
- tube chassis
- (and 2 more)
-
It depends on the age of the car, some dragsters had a wiring harness that was comprised by a mag kill wire. Others like your current project are like trying to wire the space shuttle.
-
Today I started assembly of the chassis, starting from the middle and working my out of the cage one wire at a time. Order of assembly is critical as there is not much area.,even in this scale and access is going to get progressivly more difficult, I think I'm going back to dragsters and funnycars after this. LOL
-
Sorry Daniel, last night when I replied to your question I stated I used 1/4" material when I fact it was 1/8th" sorry for the confustion
-
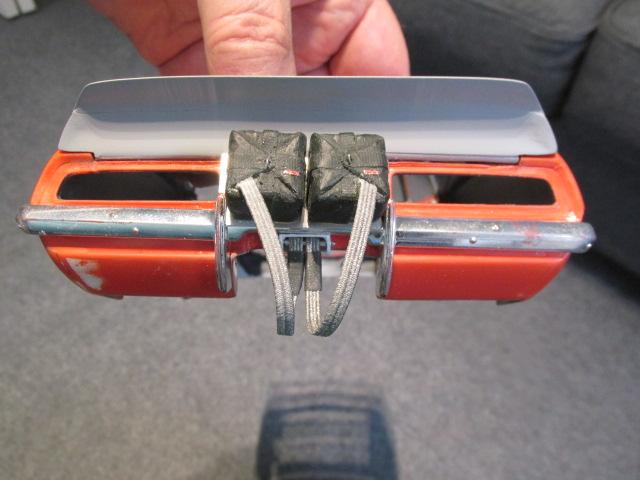
Thank Daniel, I used 1/4" Soft & Easy Stretch interface sold by fabricland here in Canada. It has 4 very small elastic cords woven into it and I used the white. To get this effect I stretched it between two poles and sprayed it lightly with Stainless Steel anti corrosion coating ( made by SEM), once released the effect is quite good. To get the loops I took 1/4 inch black shrink tube that I stretched to a larger size to get the cord through. Heated the shrink tube and it's done.
- 352 replies
-
- 1
-
-
- brass
- tube chassis
- (and 2 more)
-
Parachute attaching point and lanyardsbuilt and test fitted Parachutes are hand carved by me and now castable (these are the first two castings)
- 352 replies
-
- 1
-
-
- brass
- tube chassis
- (and 2 more)
-
Firebottle assy finished and going in a box to await final assembly, pressure gauges added to both bottles
- 352 replies
-
- 1
-
-
- brass
- tube chassis
- (and 2 more)
-
Nostalgia Fuel Dragster--Blower Manifold (01/28/23)
Ian McLaren replied to Straightliner59's topic in WIP: Drag Racing Models
Love the butterflies, stealing the idea for the throttle shaft and retaining the butterflies and the fuel tank is a definate improvement. Two thumbs up! -
’72 Dodge Demon Drag Racer 1/25 scale
Ian McLaren replied to AmericanMuscleFan's topic in WIP: Drag Racing Models
It looks great Francis, more than enough to convey the look you are going for. Good to have you back if only for a bit.; -
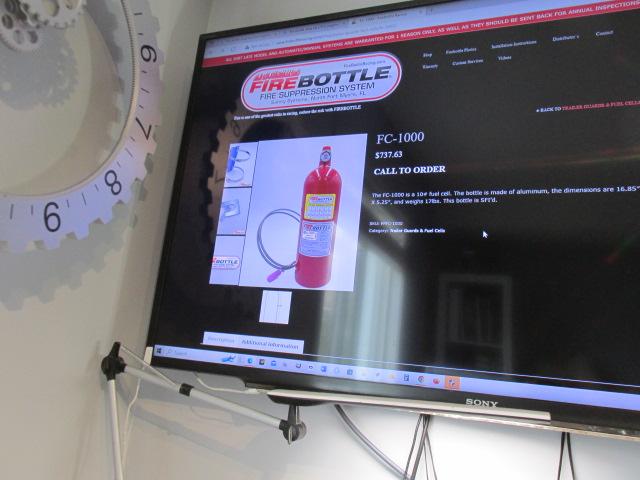
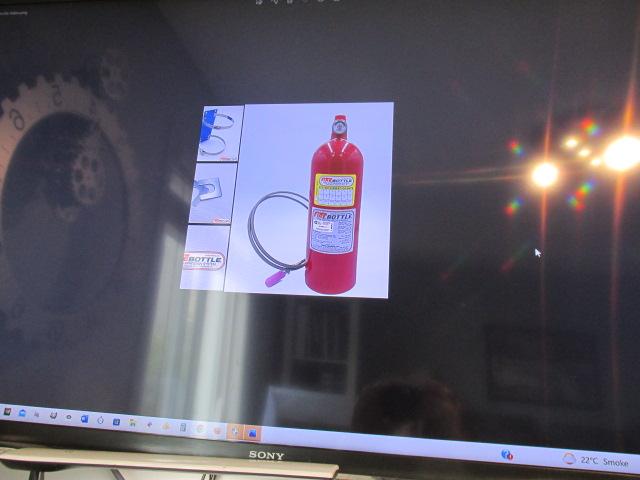
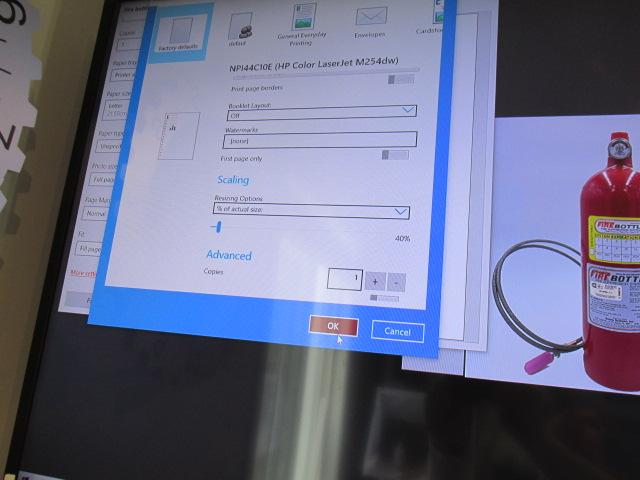
Quick and dirty decals. These are for those parts (like a fire bottle) that you may need to spice up a project but you either don't have a sheet with it on it, it's not available in your scale or it's for a manufacturer that no one has done a decal for. Also if you can print your own is it worth the decal paper and the time to scale it properly All you need is a color printer clear tape and some paper. Lastly these are not for on the body as they end up fairly thick depending on the paper and tape you use. In my case the fire bottle decal are in the interior and will only be seen through the rear window. HERE'S THE PROCESS Find a color picture of what you need on the net. Save the photo to your computor, Pull up the photo and print it. Measure the image compaired to what you need and calculate how much larger or smaller you need it. Print it a second time and used the printed scaling option to resize the printed image. Reprint and compair and adjust as necessary. Once you have it the correct size print as many as you need.. Used the clear tape to cover and protect you new decal and cut them out. Fasten to the model with a suitable glue (contact cement , glue stick, etc)
- 352 replies
-
- 2
-
-
- brass
- tube chassis
- (and 2 more)
-
More detailing started, Rear section of the fire supression system, line routing finalized tanks require decals (have to make as I can't locate suitable ones in 1/12th) and bracket fasterers
-
Thanks John, There are more details on the way
-
’72 Dodge Demon Drag Racer 1/25 scale
Ian McLaren replied to AmericanMuscleFan's topic in WIP: Drag Racing Models
It's good to hear from you Francis, awaiting your return! -
Mock up of electronics tray tp make sure it still fits.
- 352 replies
-
- 2
-
-
- brass
- tube chassis
- (and 2 more)
.JPG.d7487d4f80e4b1260356516a45666077.JPG)
.JPG.5b0a4f71613b0c2f807719071ec3031e.JPG)
.JPG.764cf2a1a0d7b80daf011e18ea7d4b60.JPG)
.JPG.dfd5c670234cb70ce784da44d71c9cfd.JPG)


.JPG.1d25dc05c92be72469024515a6305d10.JPG)
.JPG.8b4e9694895fb31611810d695cc9e37d.JPG)