Jürgen M.
-
Posts
1,783 -
Joined
-
Last visited
Content Type
Profiles
Forums
Events
Gallery
Everything posted by Jürgen M.
-

Freightliner FLC
Jürgen M. replied to Jürgen M.'s topic in WIP: Model Trucks: Big Rigs and Heavy Equipment
Thanks Wolf! I'm glad you like my build. I began 3D designing and printing about two and a half years ago! My first own design was a Marmon cabover! Quite easy due to it's box like cab. From then on I learned and tried and improved my skills! Anyone can do it! 😊 -
Freightliner FLC
Jürgen M. replied to Jürgen M.'s topic in WIP: Model Trucks: Big Rigs and Heavy Equipment
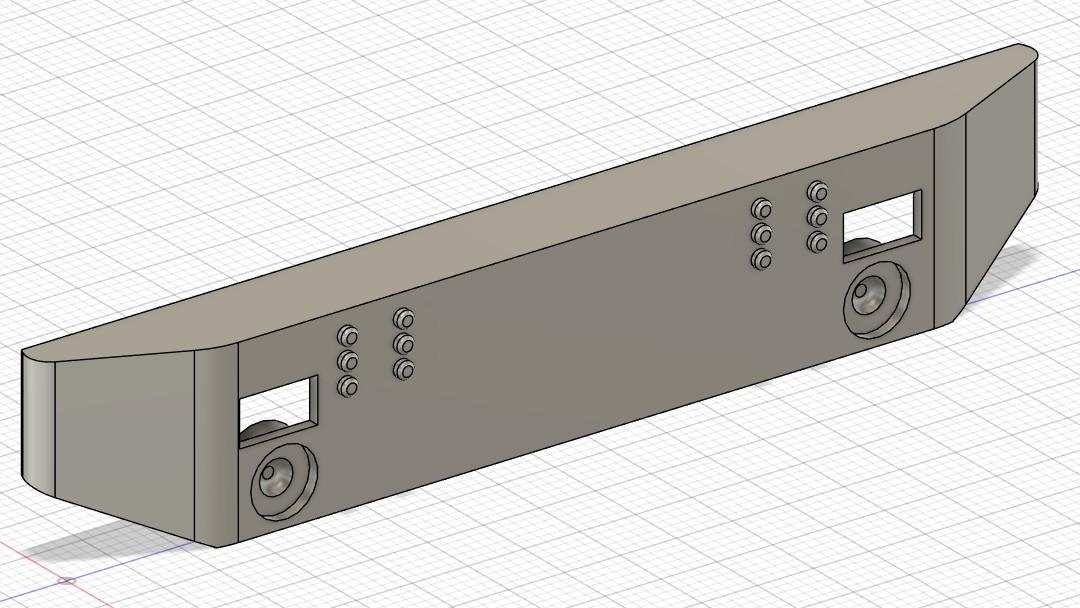
This is the idea of the new bumper! I tried to keep the impression of a classic FLC bumper with a touch of heavy duty! It's in print at the moment. Hope it fits!
-
Freightliner FLC
Jürgen M. replied to Jürgen M.'s topic in WIP: Model Trucks: Big Rigs and Heavy Equipment
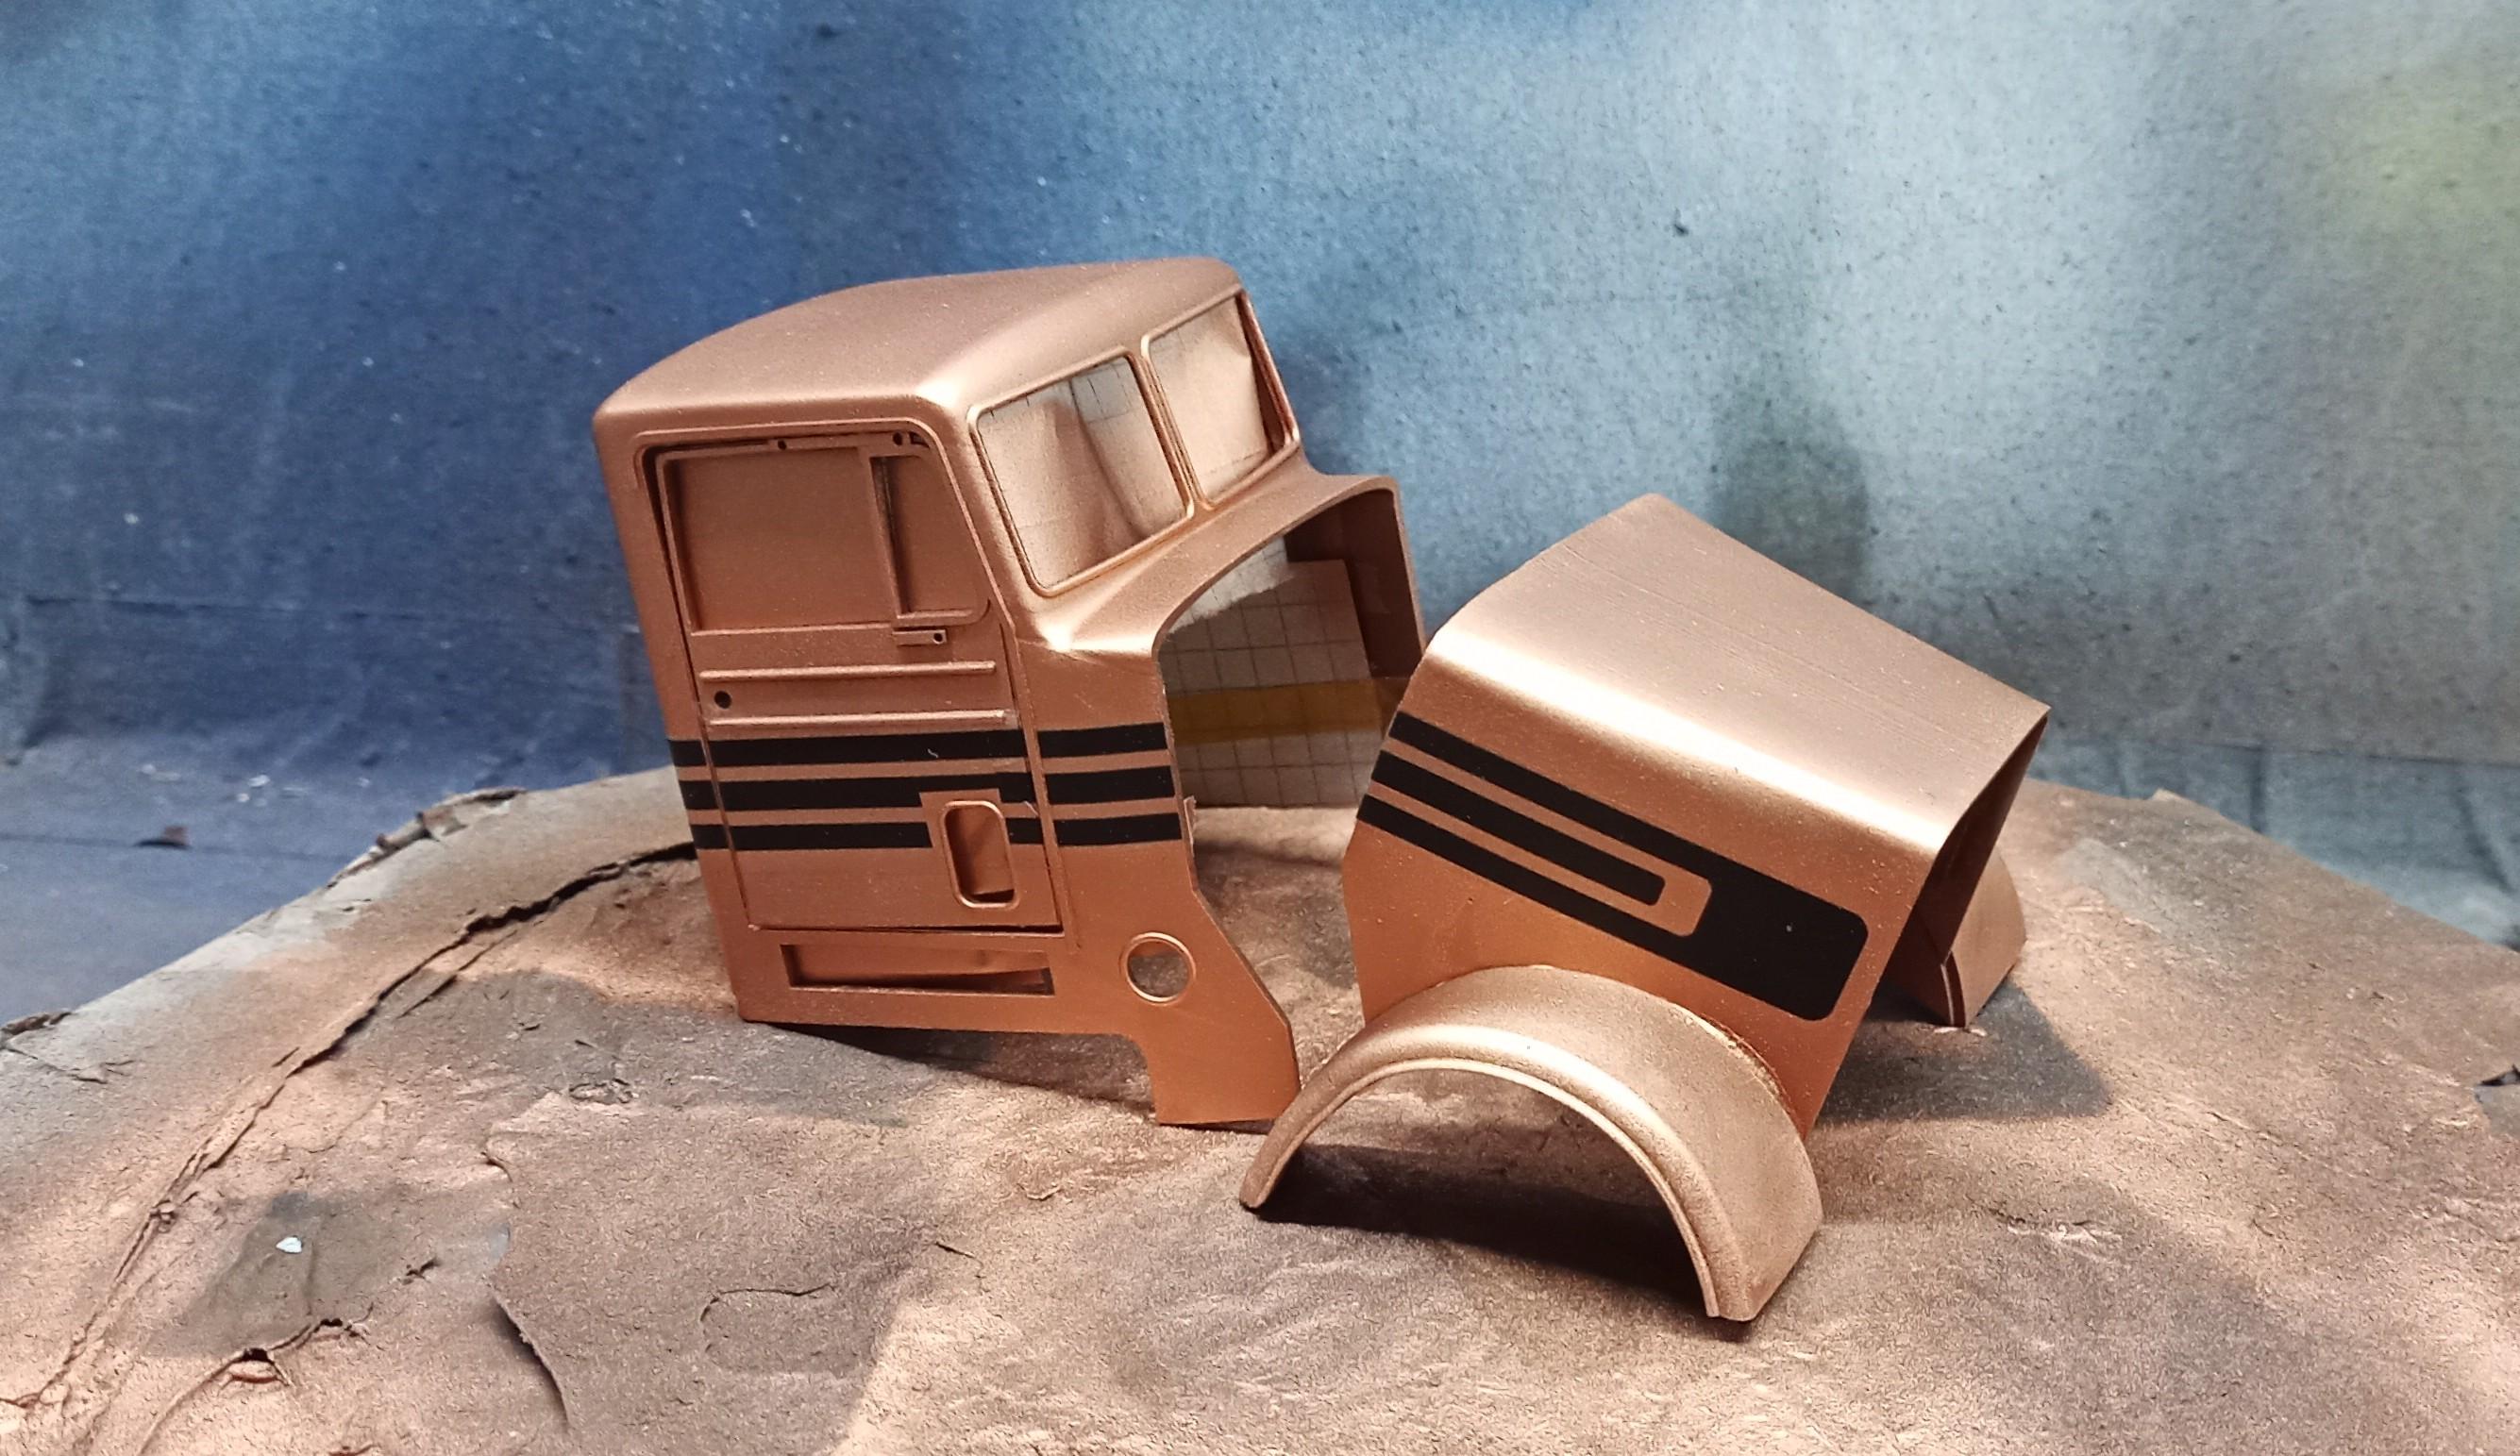
Thanks Brian! I think it will be the correct consequence. Maybe I'll leave the roof black though. Here's another mock-up with the primered box: And a closer look at the grille:
-
Freightliner FLC
Jürgen M. replied to Jürgen M.'s topic in WIP: Model Trucks: Big Rigs and Heavy Equipment
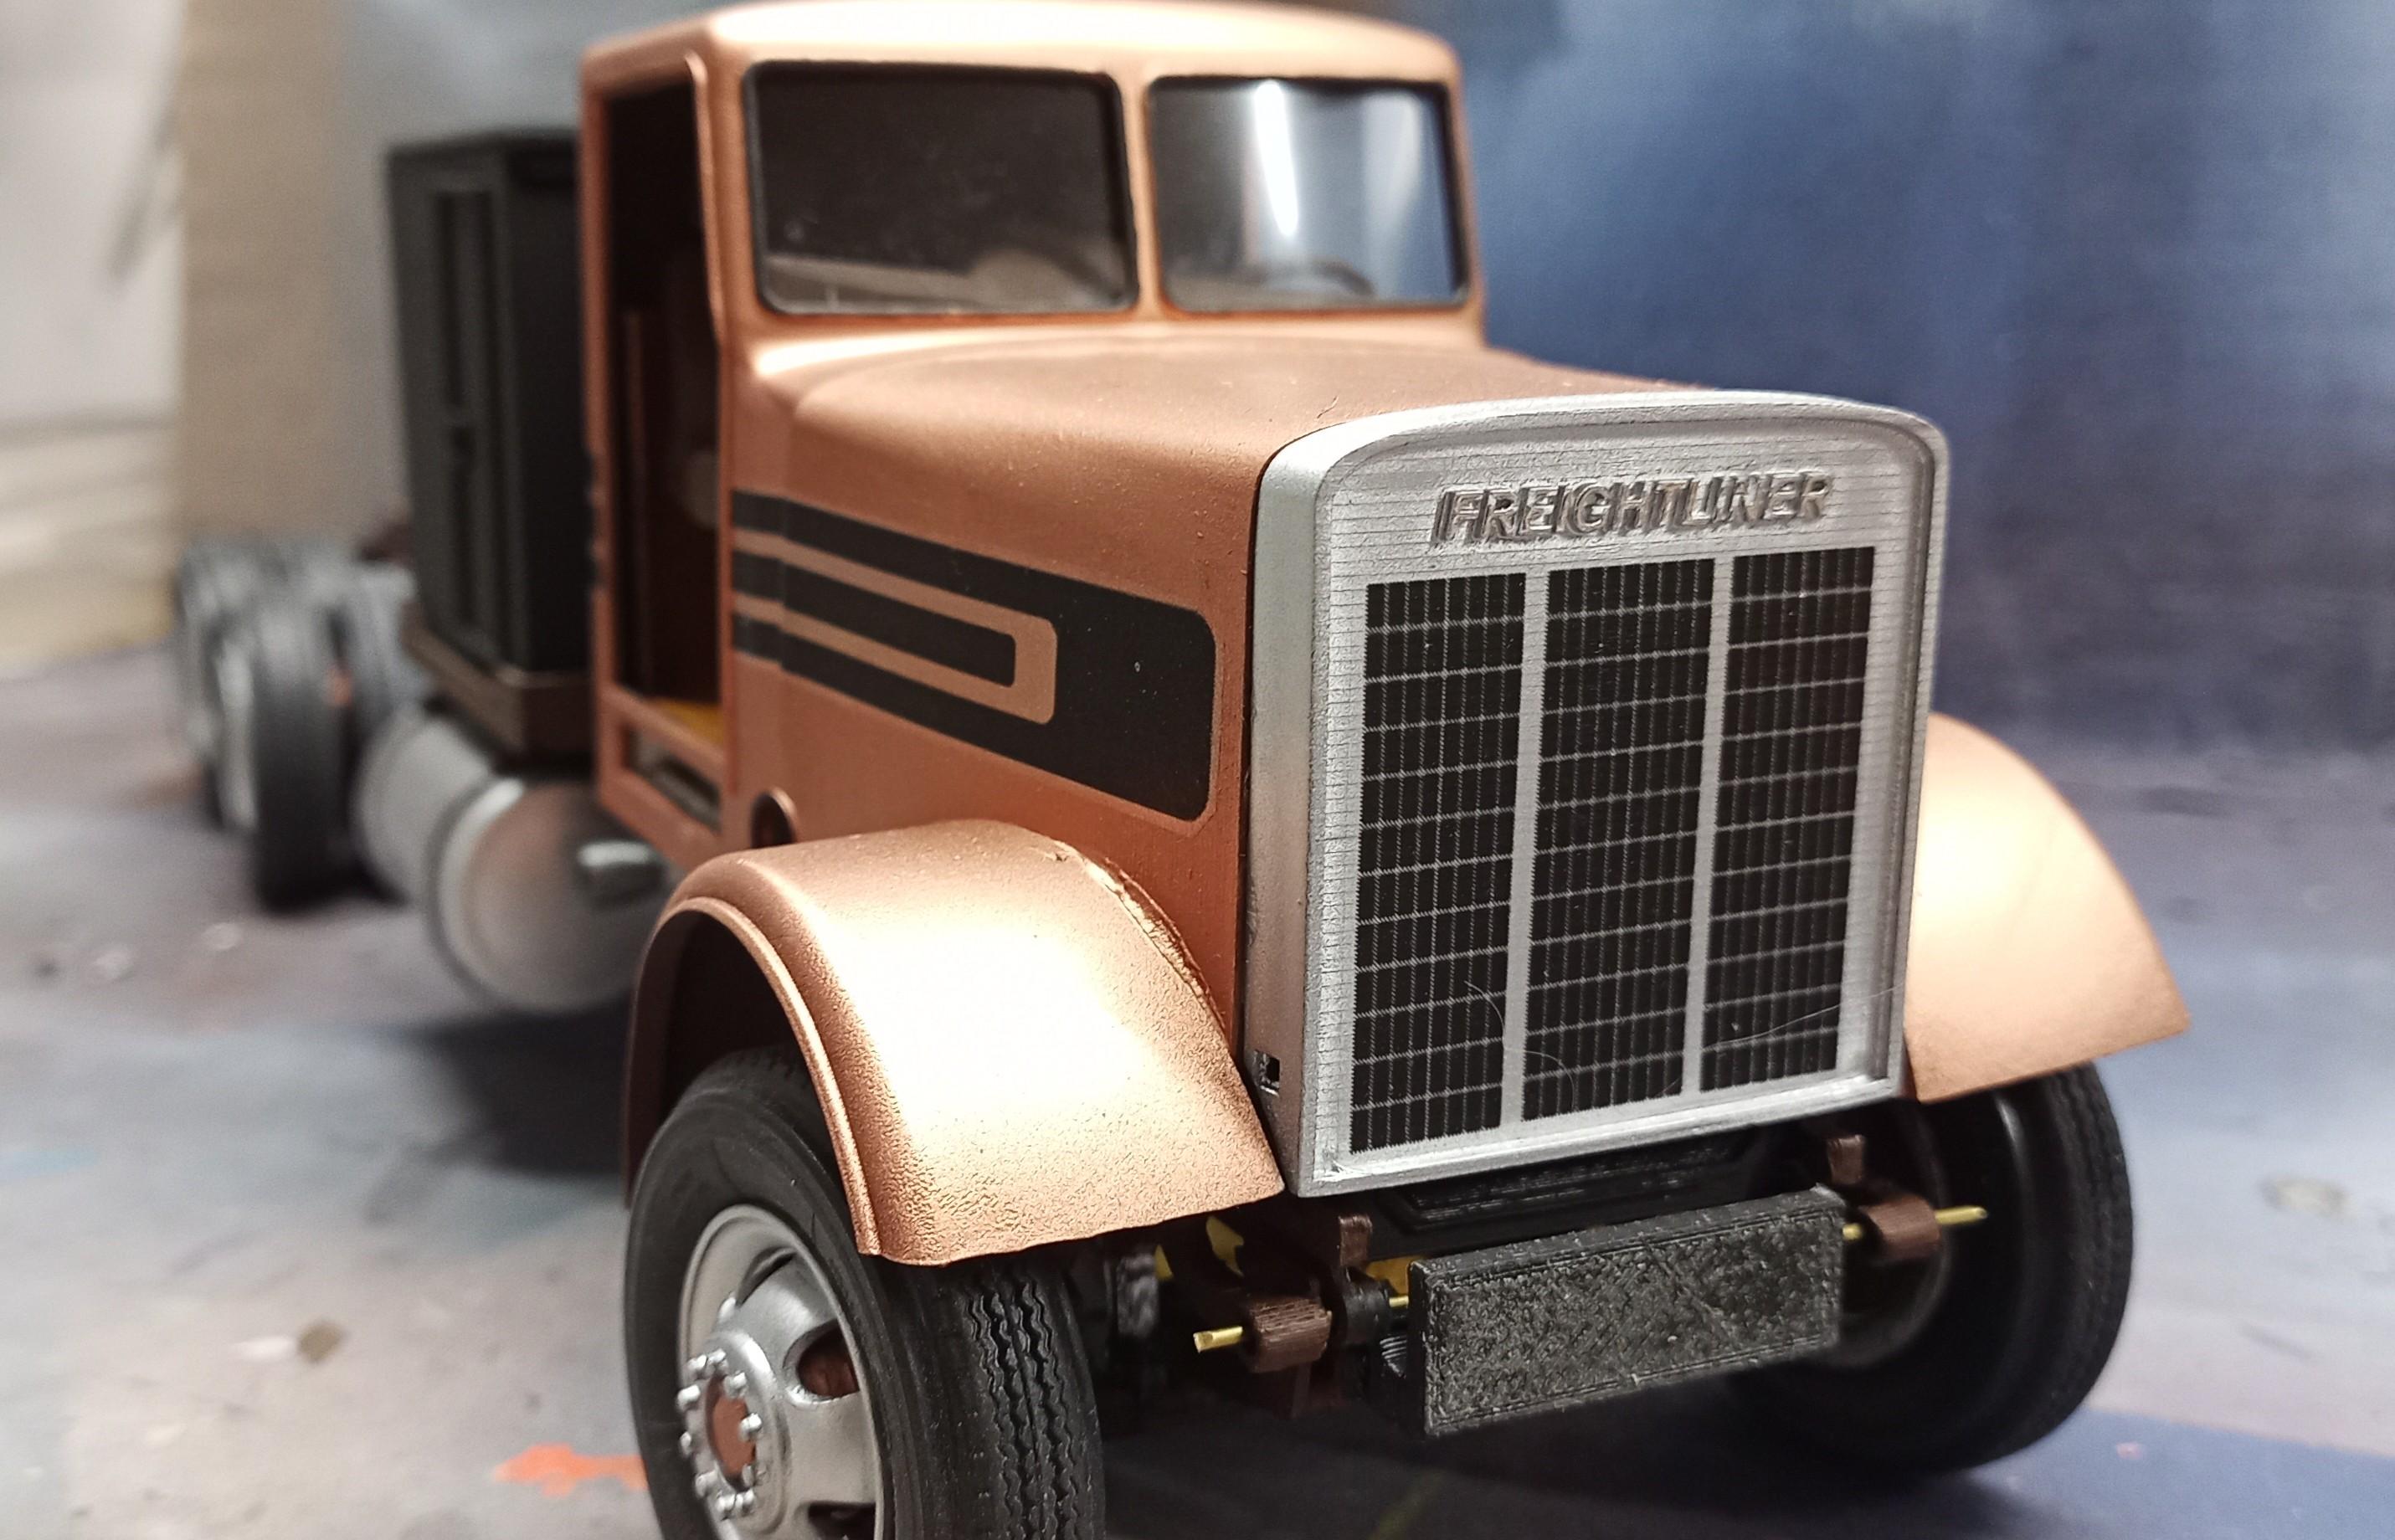
Thanks pal! You can have my files if you like. No back dating neccessary! 😉 The grille mesh by the way is a decal! Just like the holes in the stack heat shield will be! I know, it could be done in hardware too but I admit, it's laziness that made me do it this way! I'm afraid I'll have to use a different bumper too. It's a bit too wide. I had reduced the width of the whole truck before printing and must have forgotten to adjust the bumper. I can use it for a future build though. Nothing's waisted. Since it's going to be a kind of service truck I'll have to think of a bumper design that fits the truck type and its purpose. -
Freightliner FLC
Jürgen M. replied to Jürgen M.'s topic in WIP: Model Trucks: Big Rigs and Heavy Equipment
Mock-up with the hood. Still have to work on the alignment but not bad for the first shot.
-
Freightliner FLC
Jürgen M. replied to Jürgen M.'s topic in WIP: Model Trucks: Big Rigs and Heavy Equipment
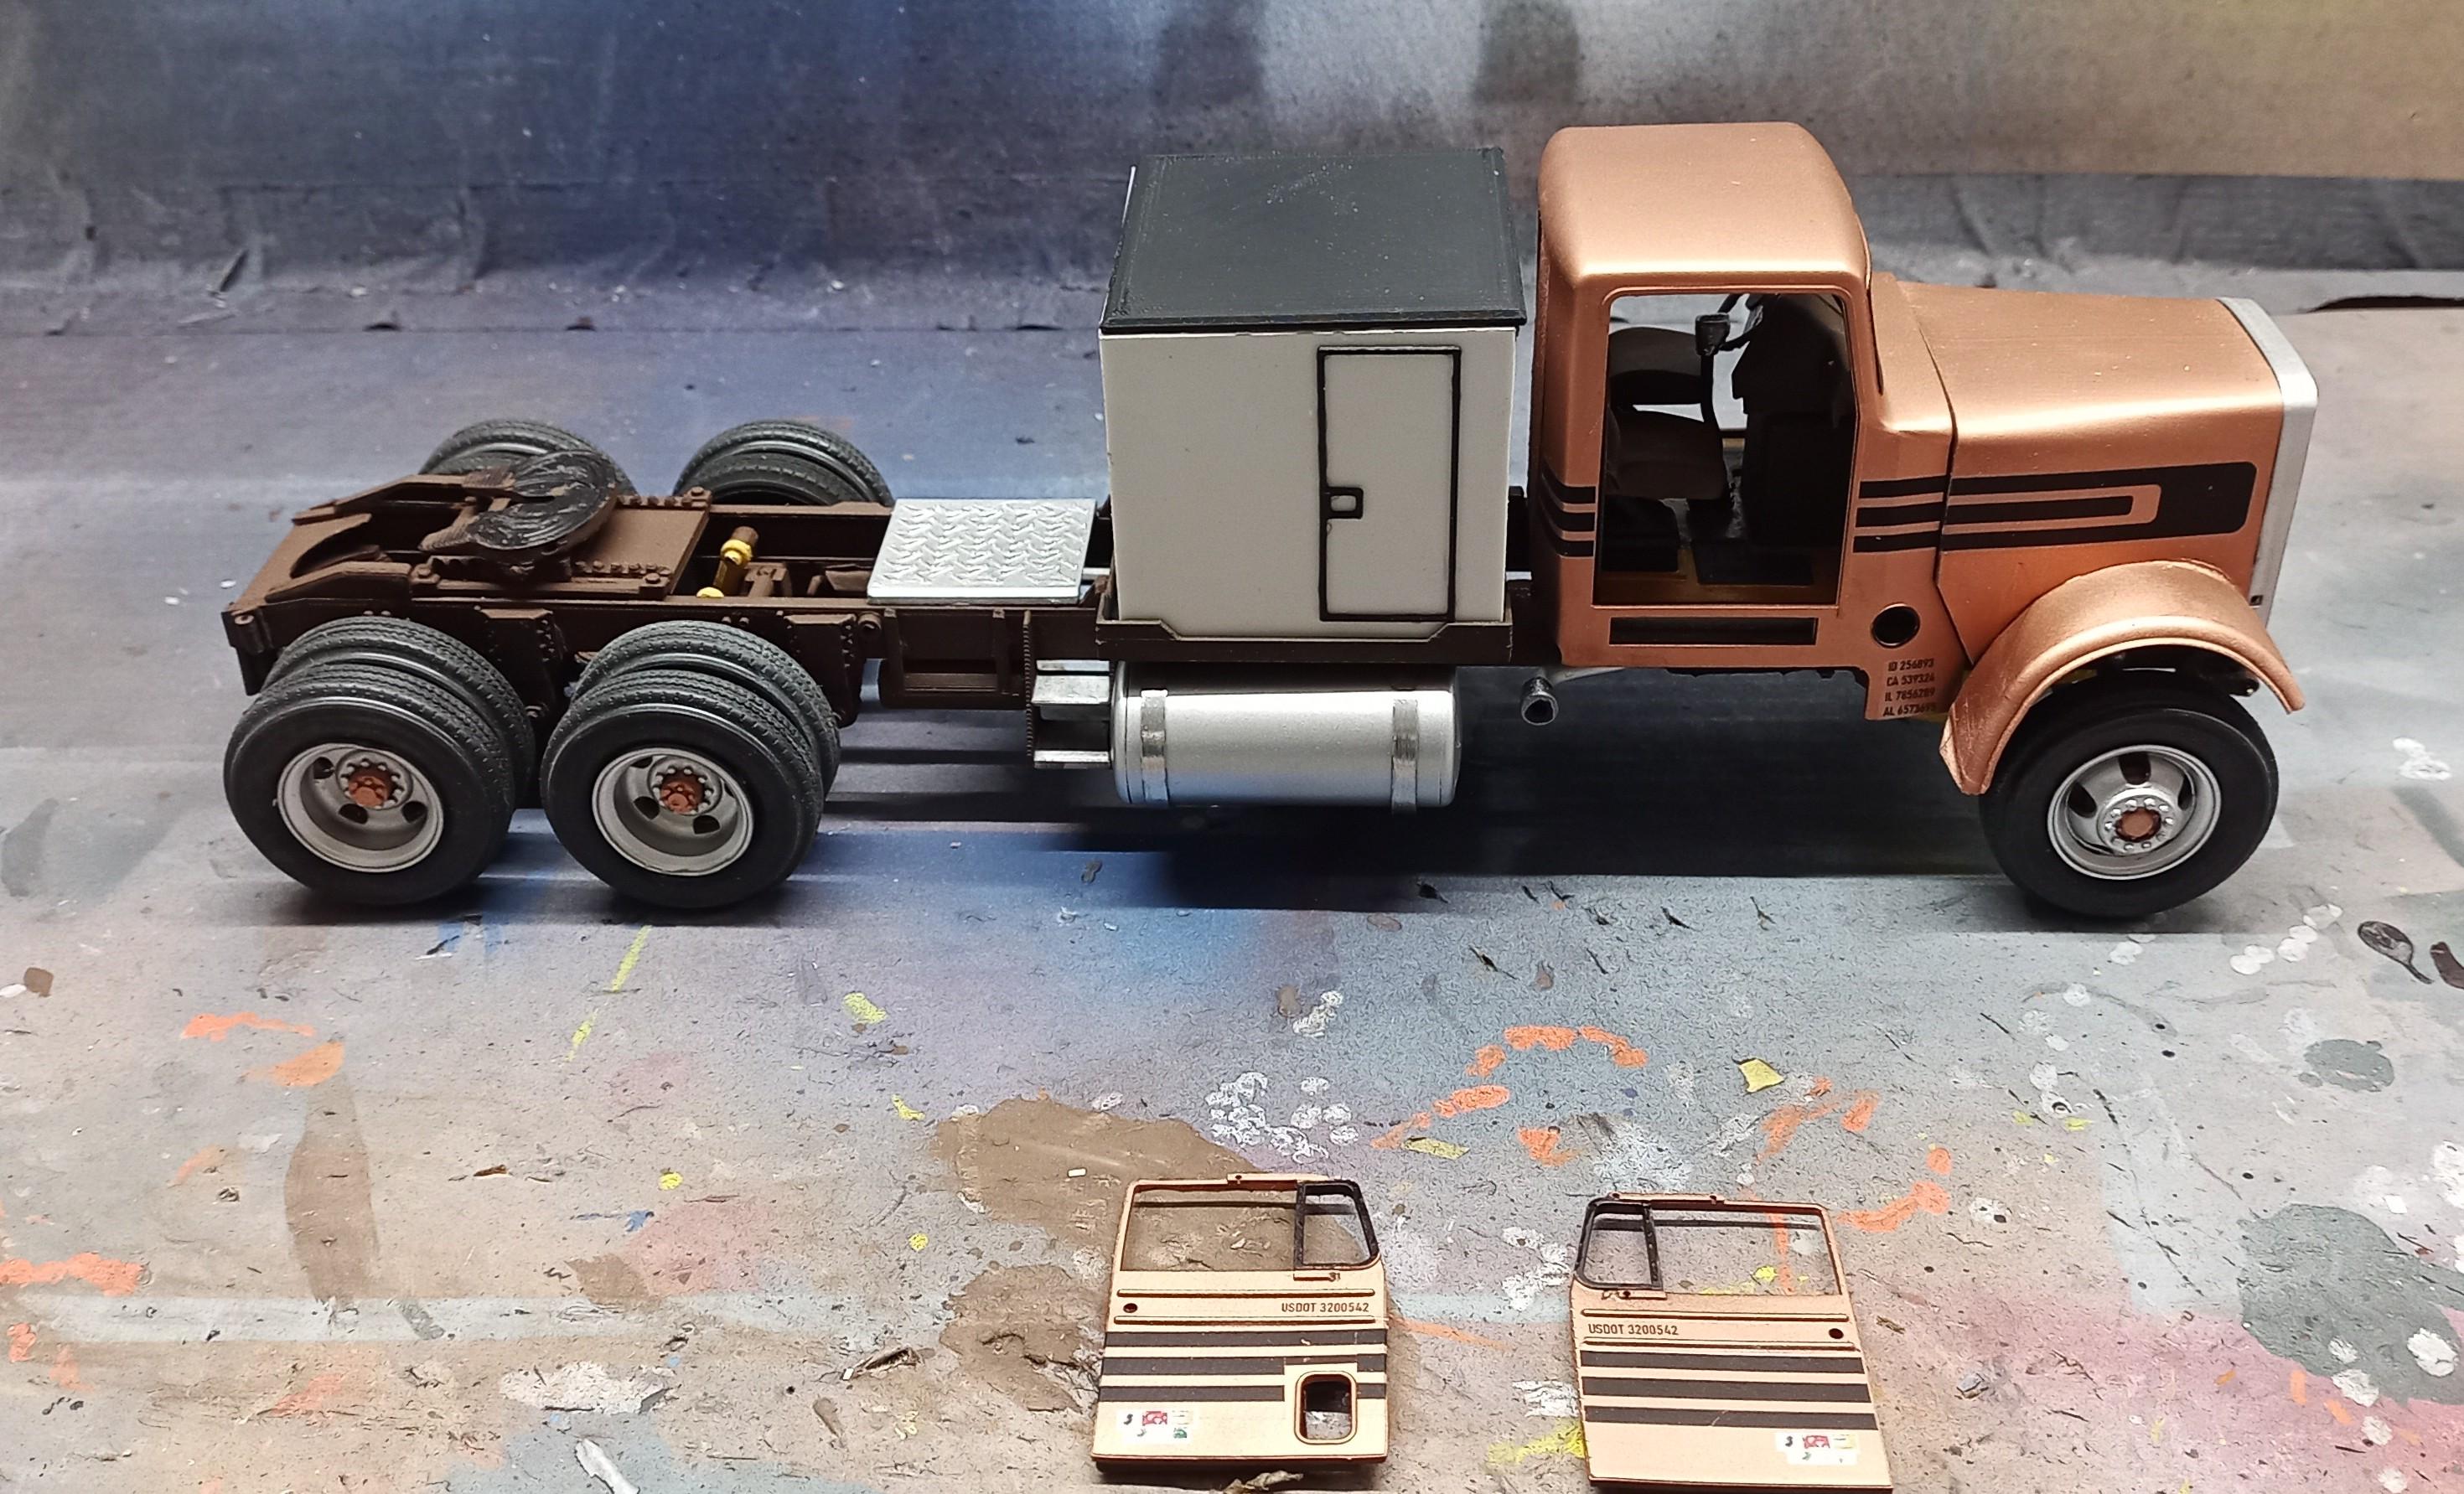
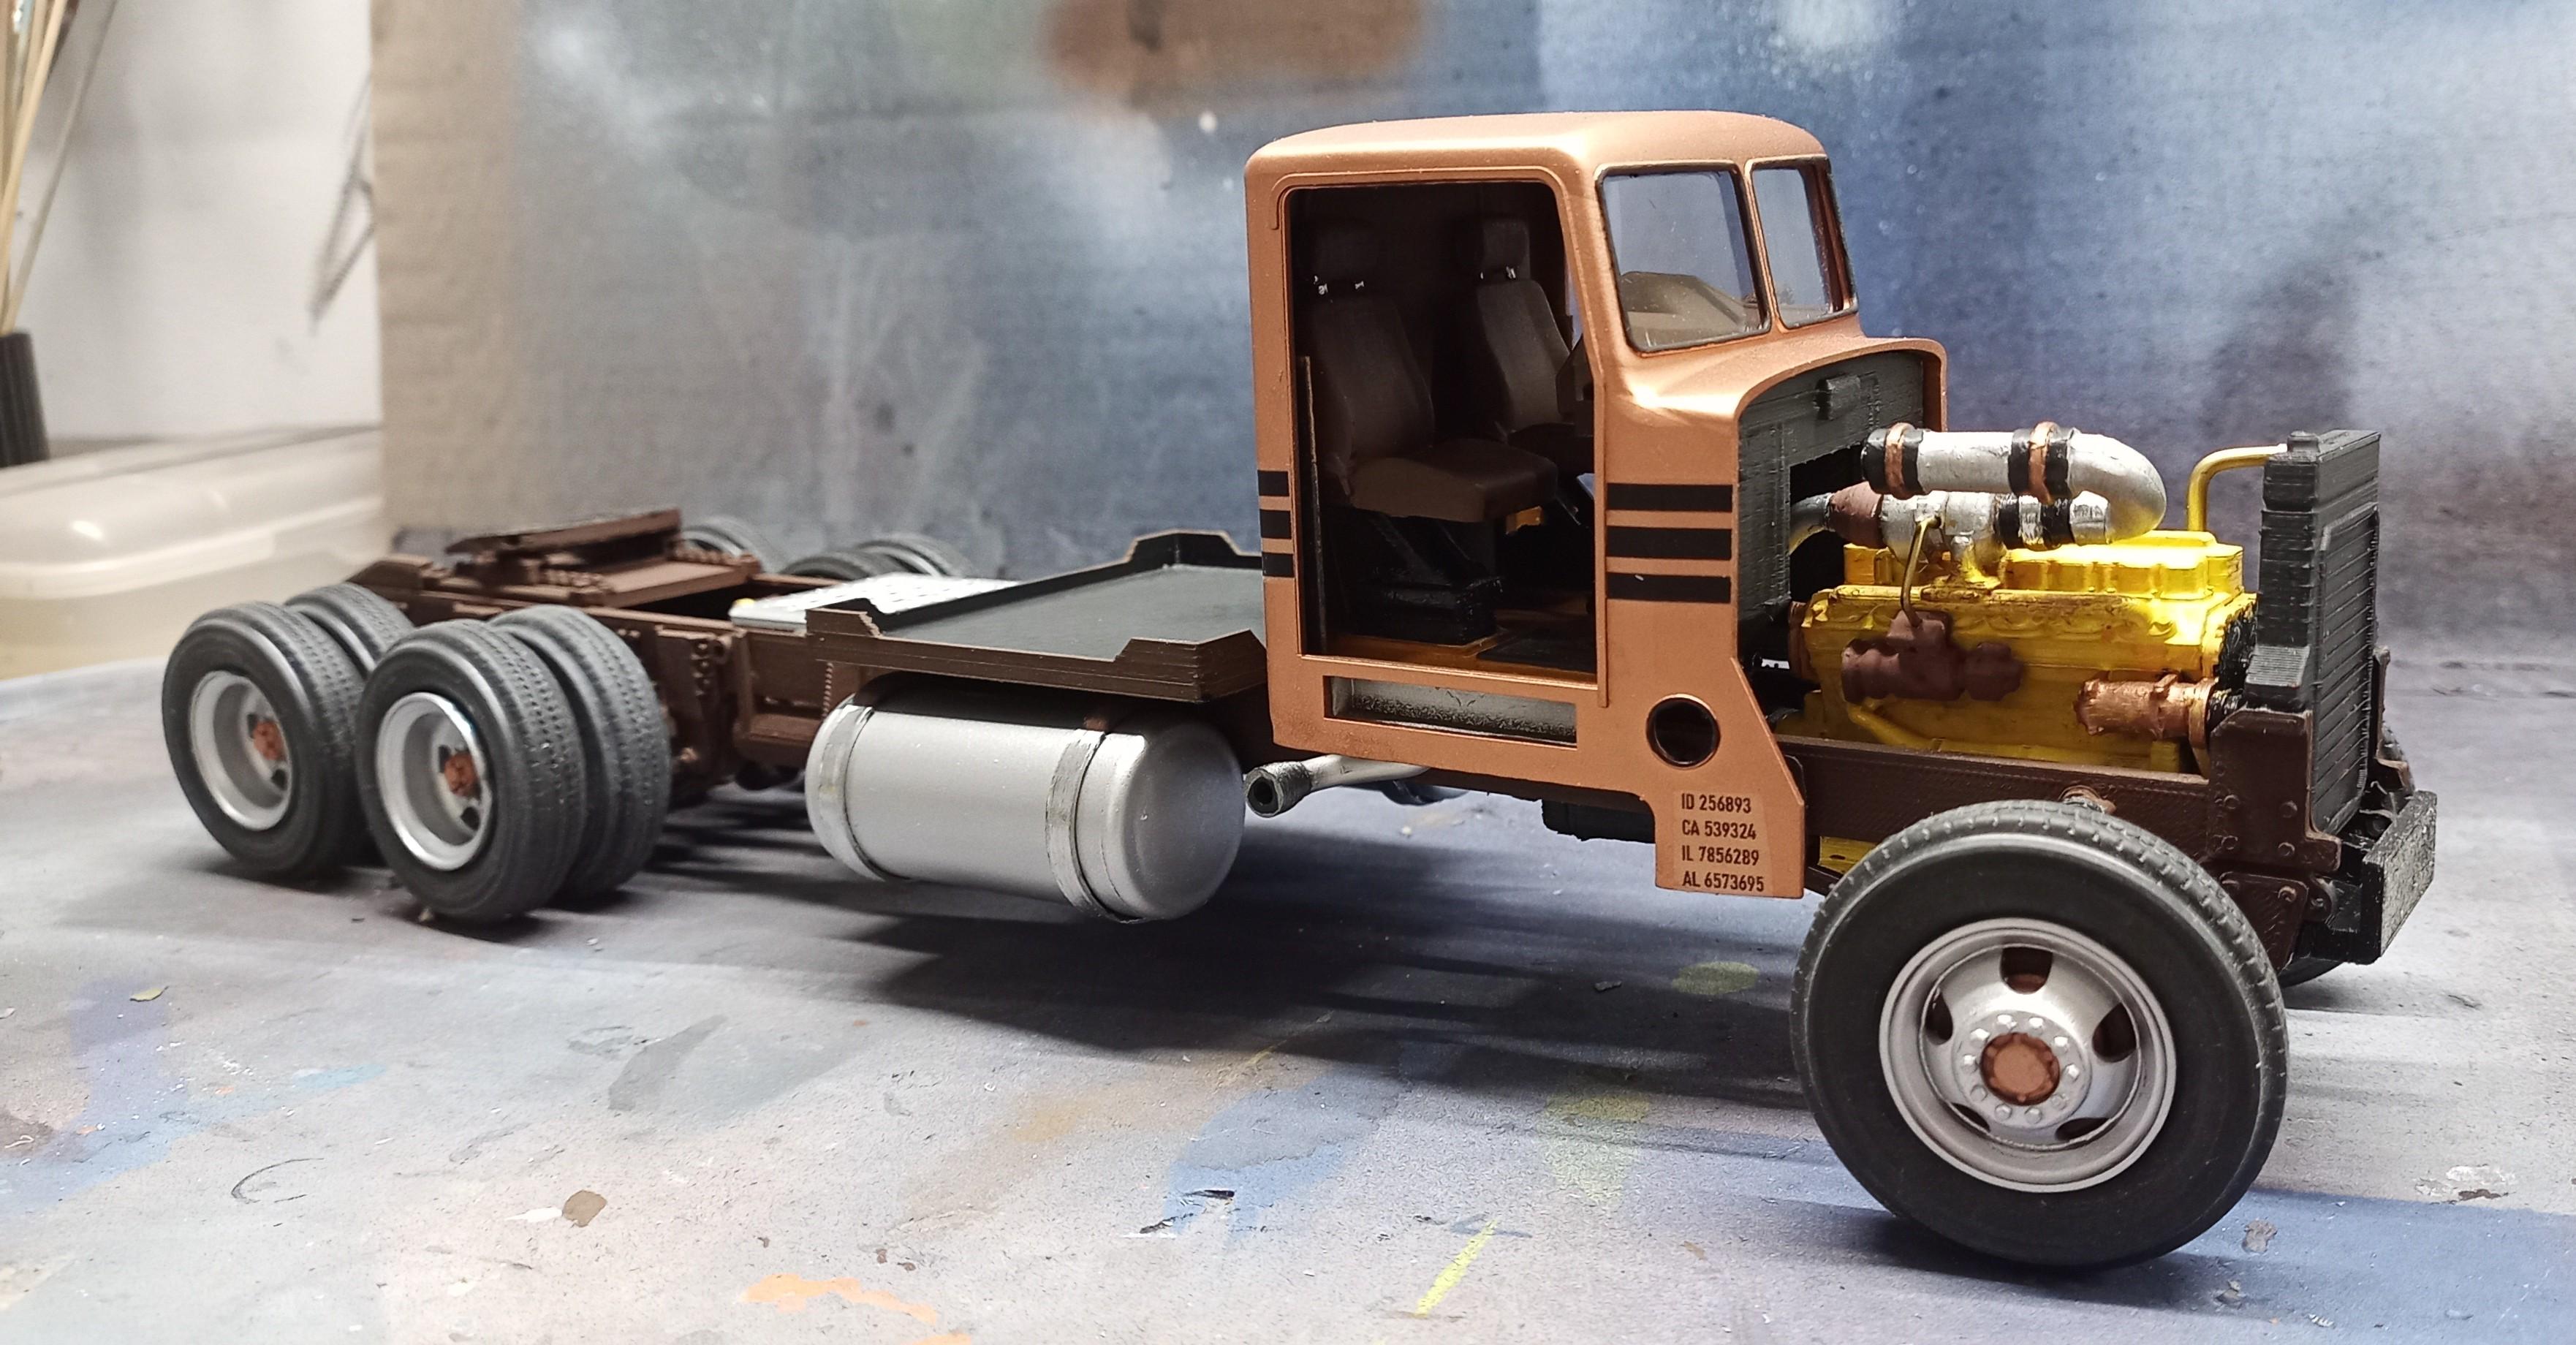
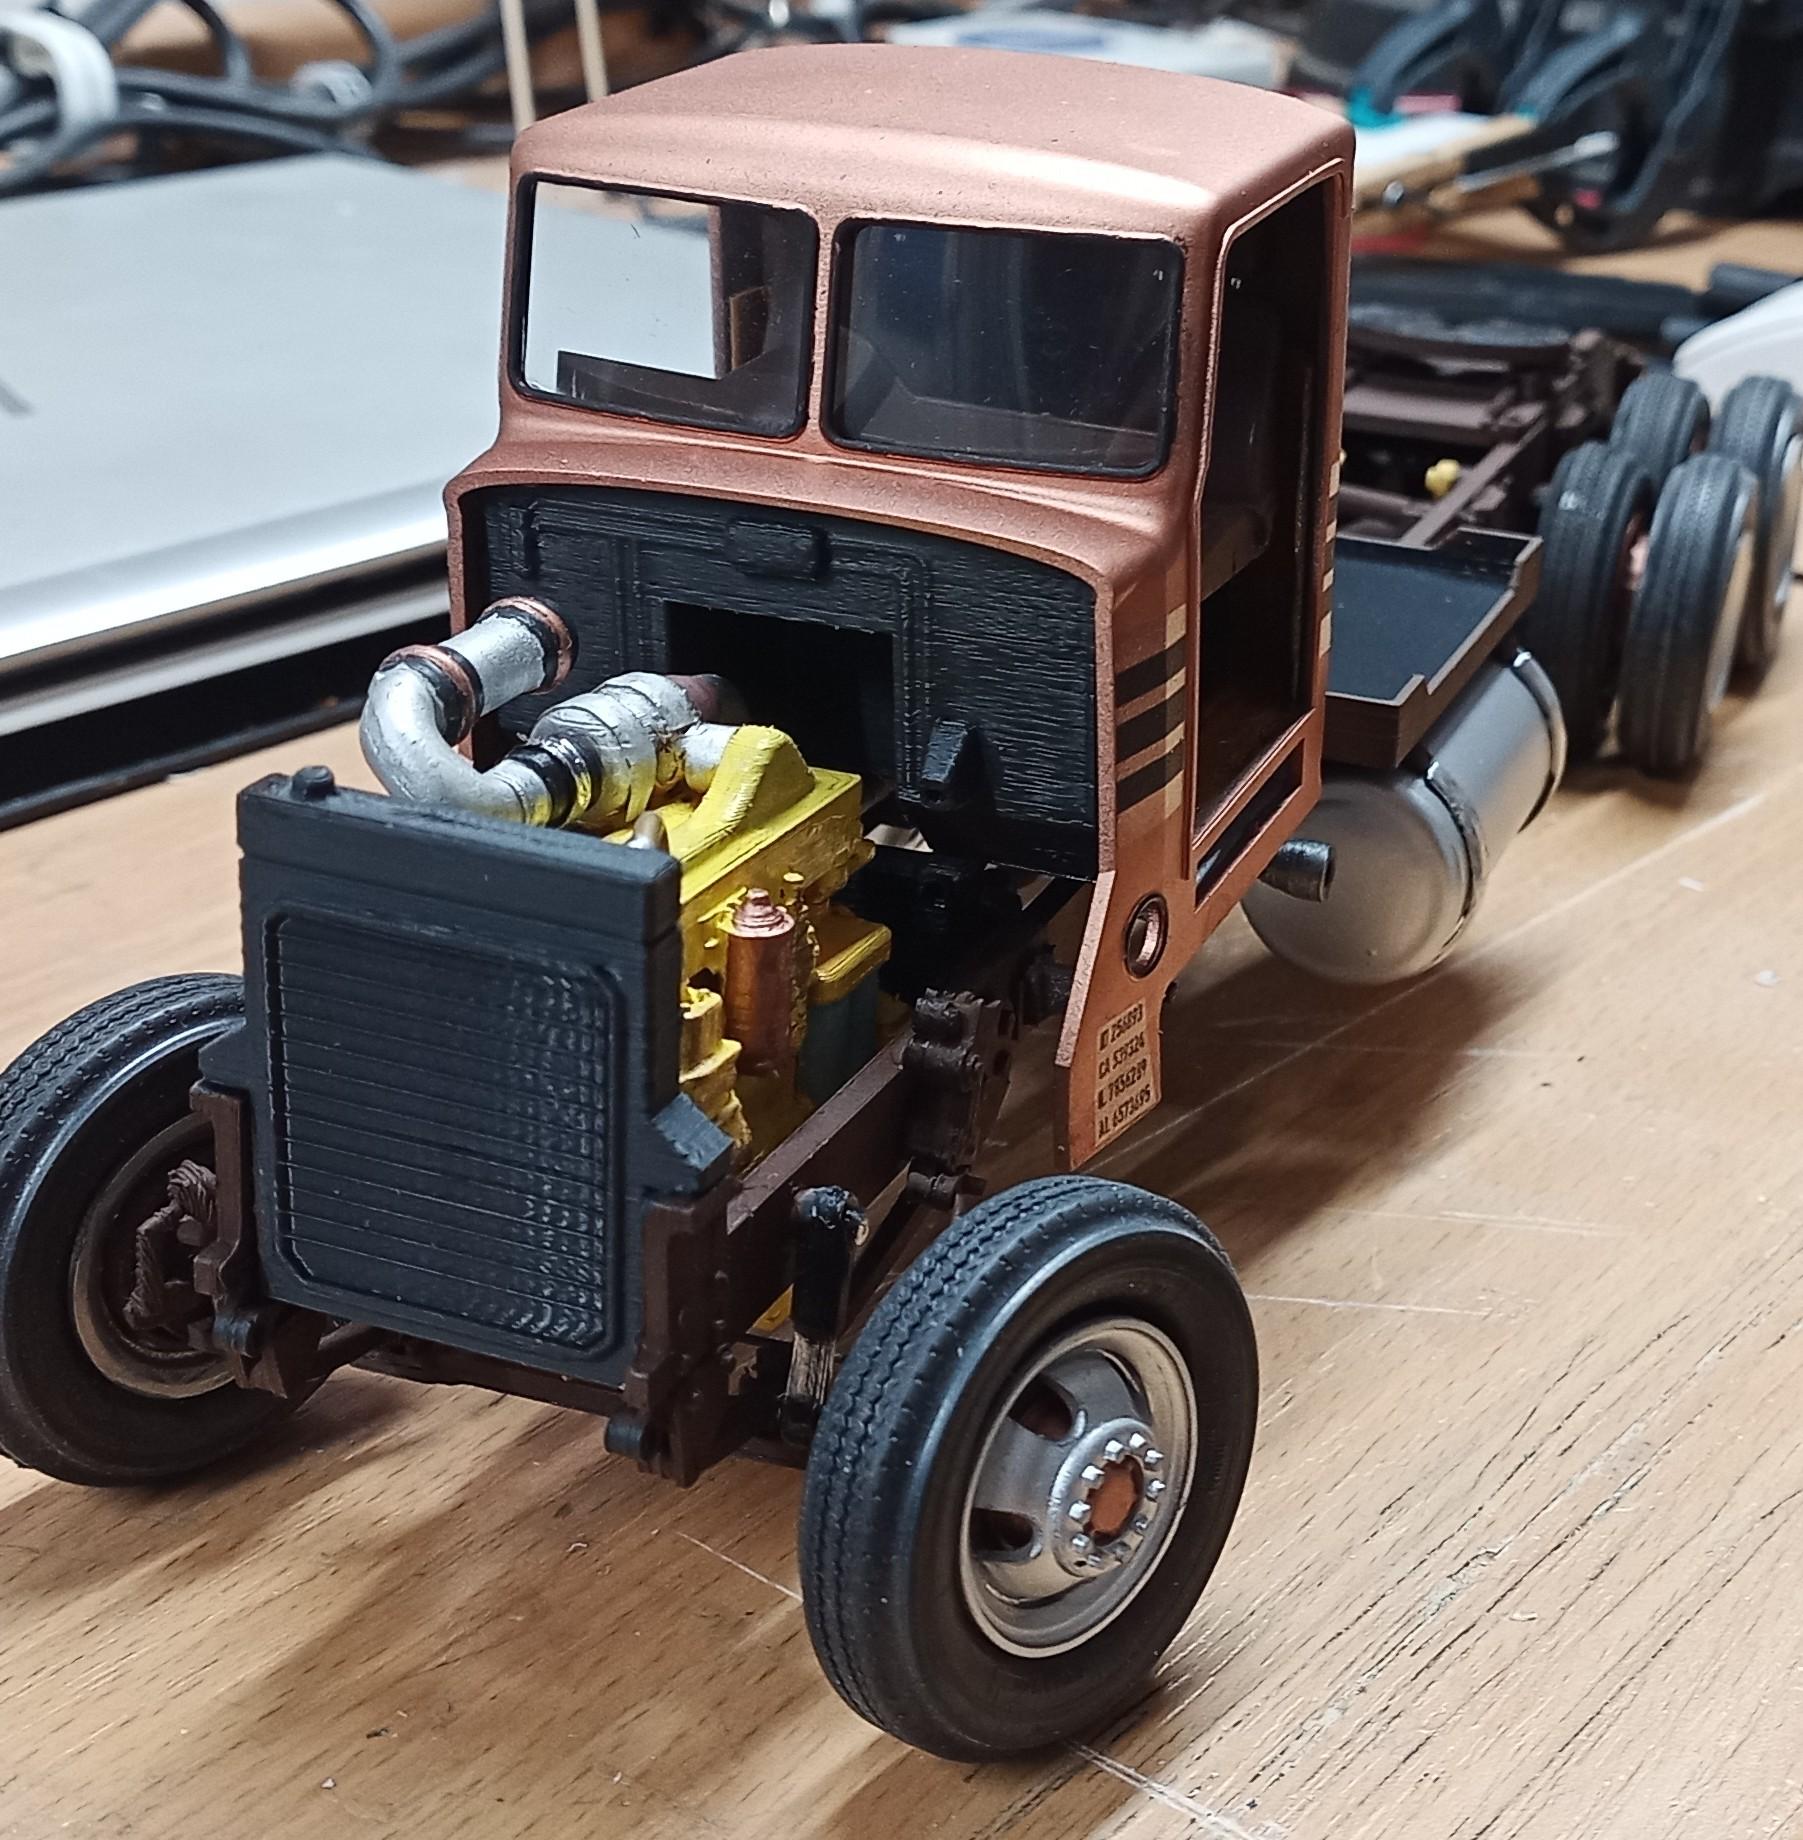
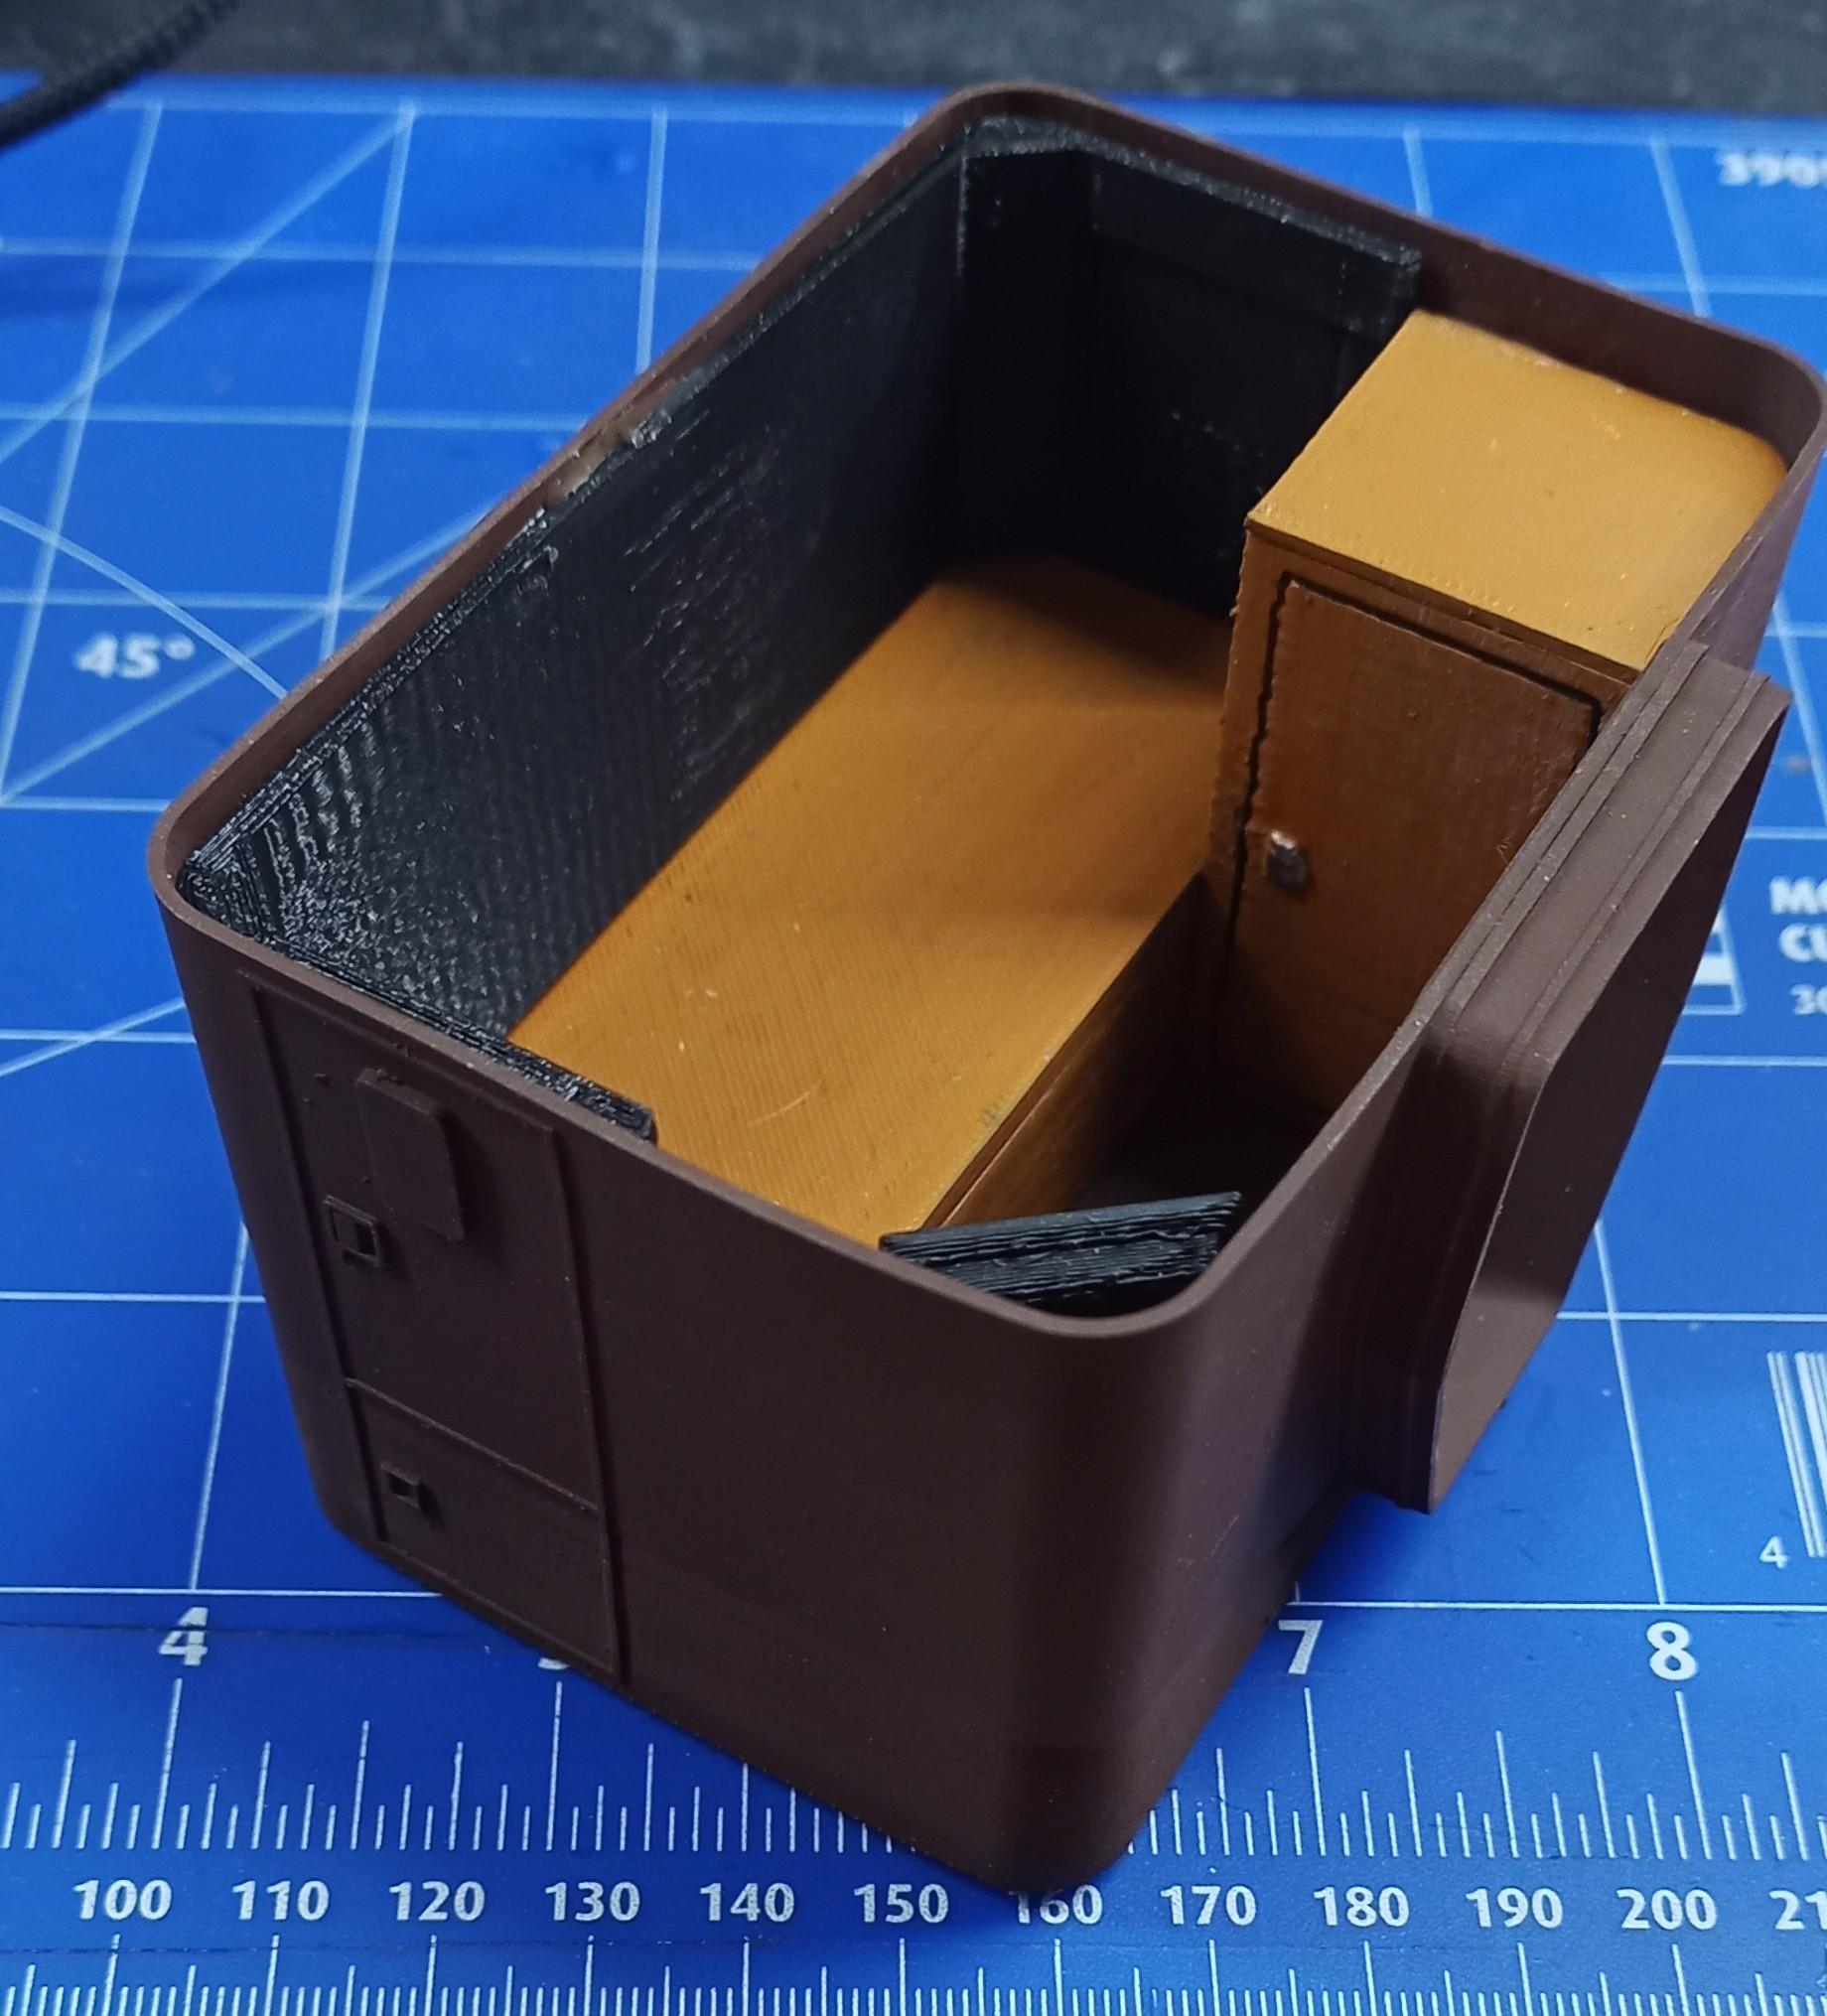
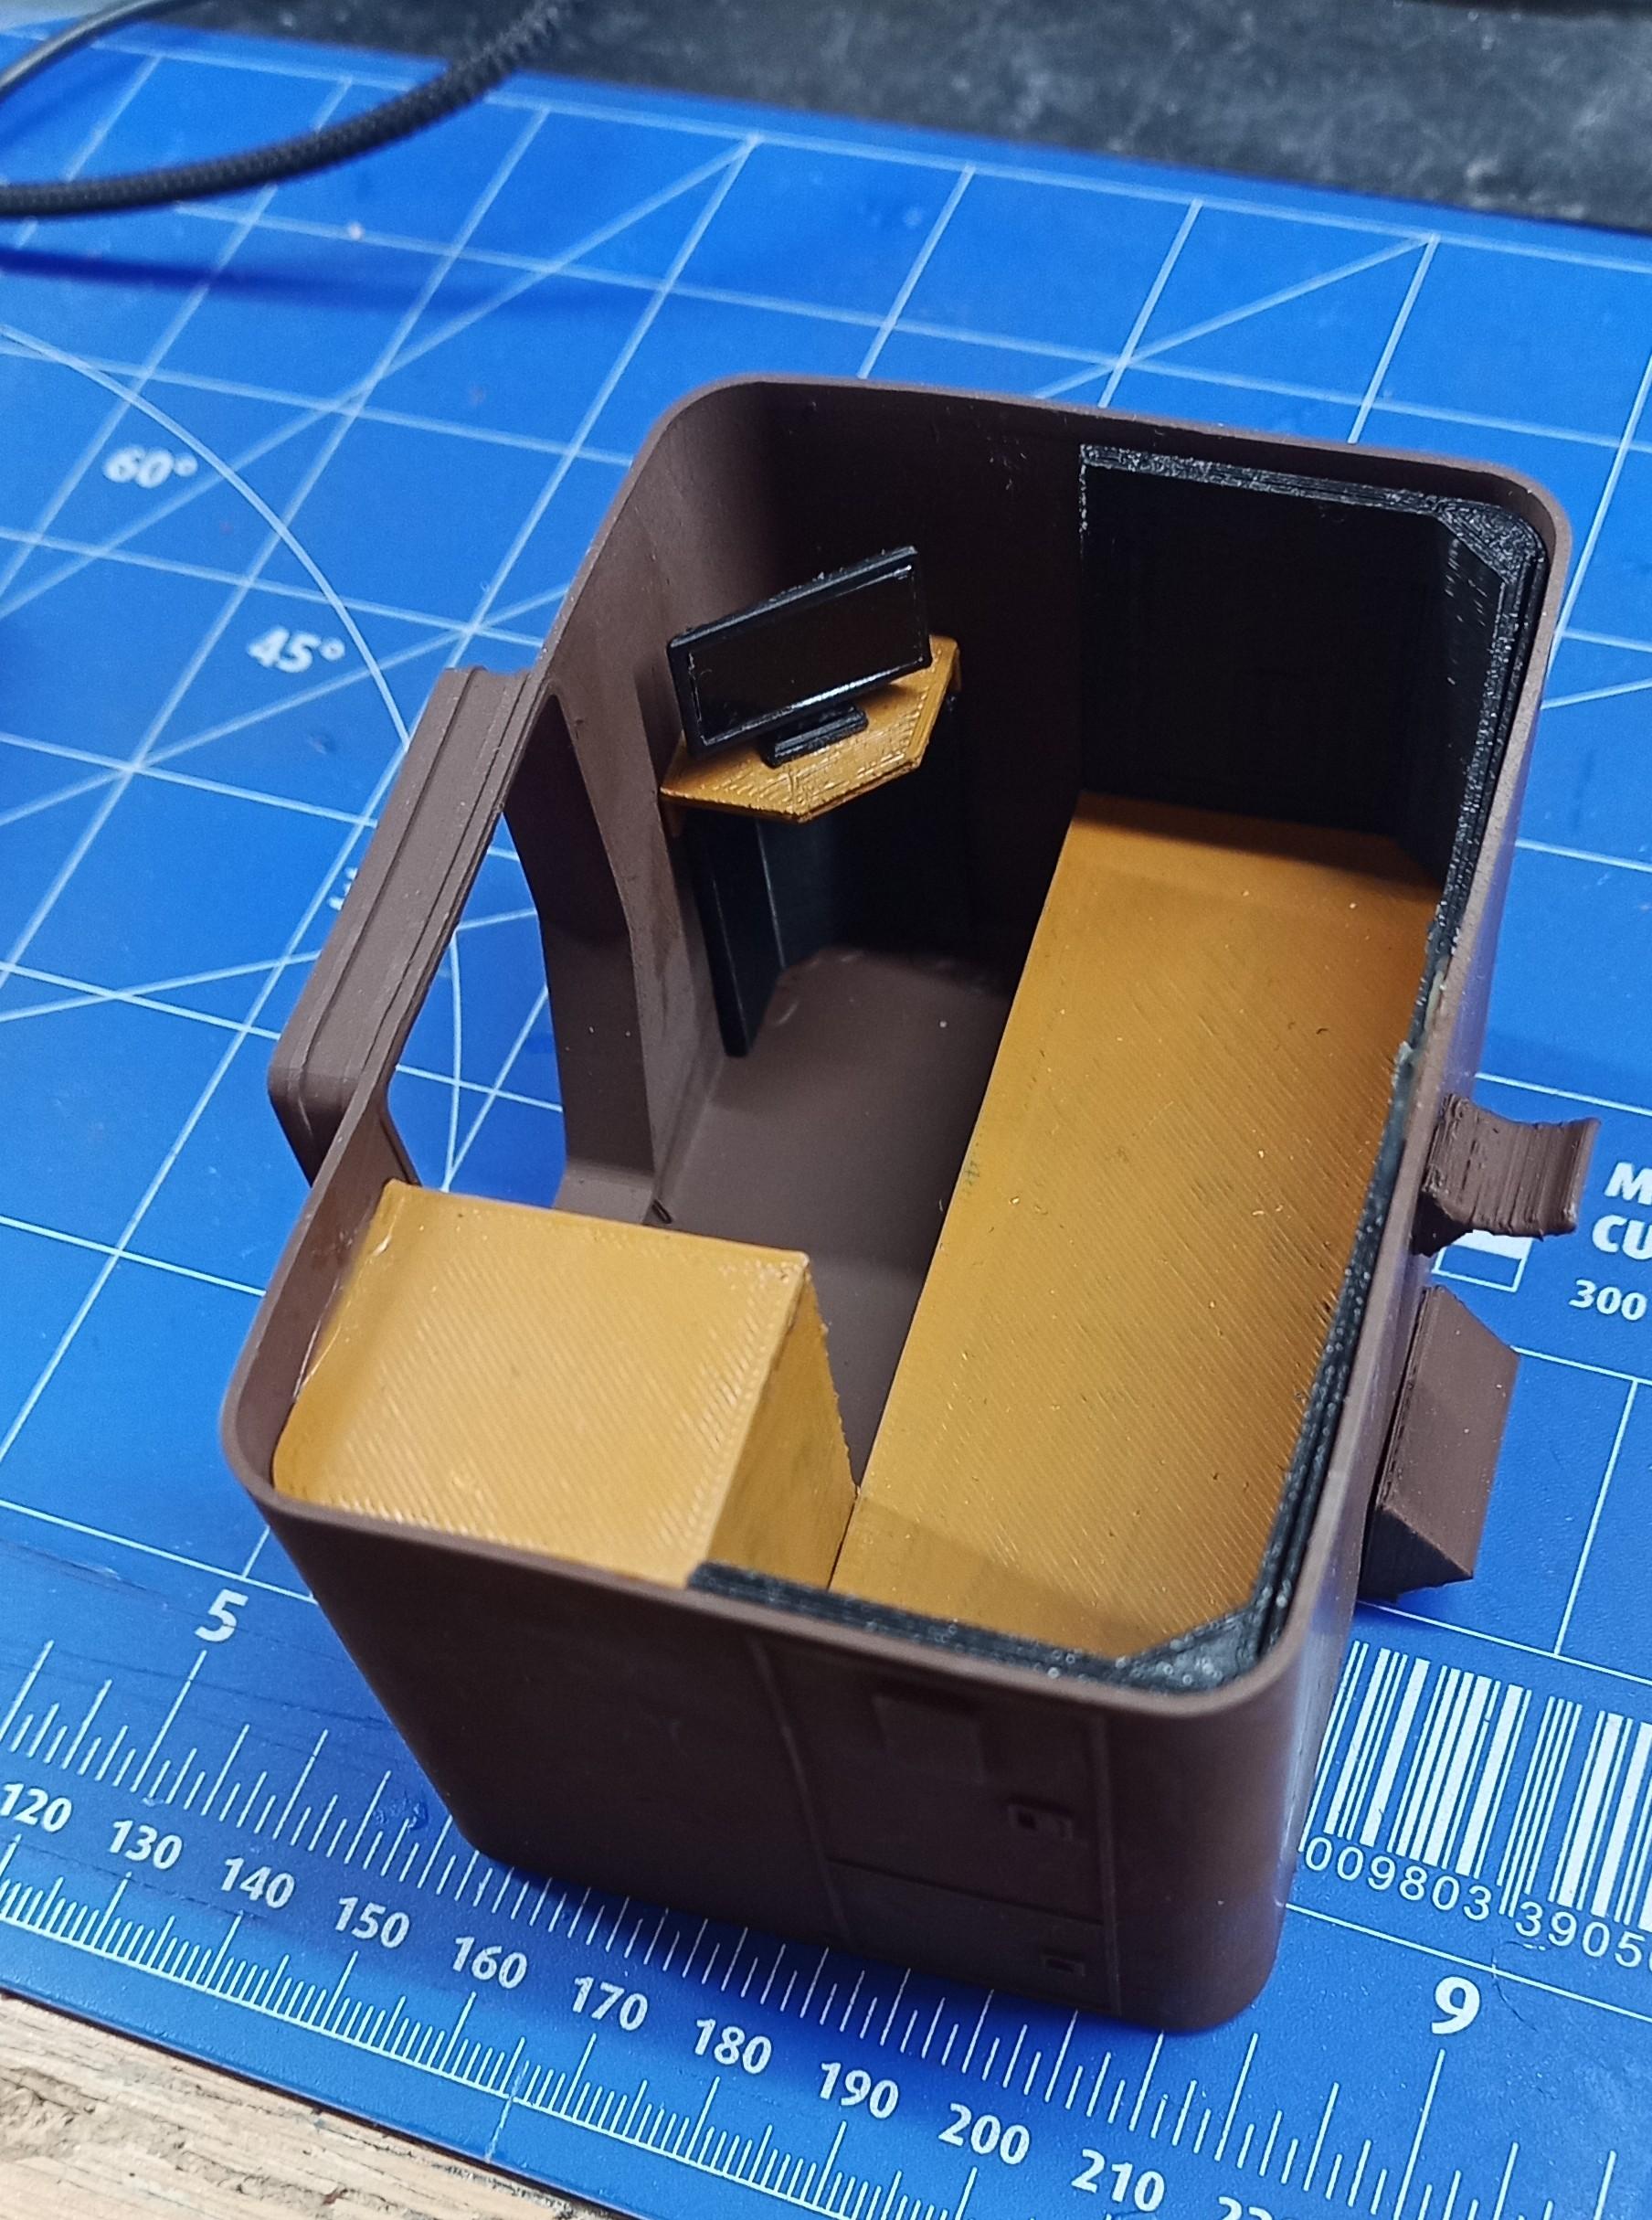
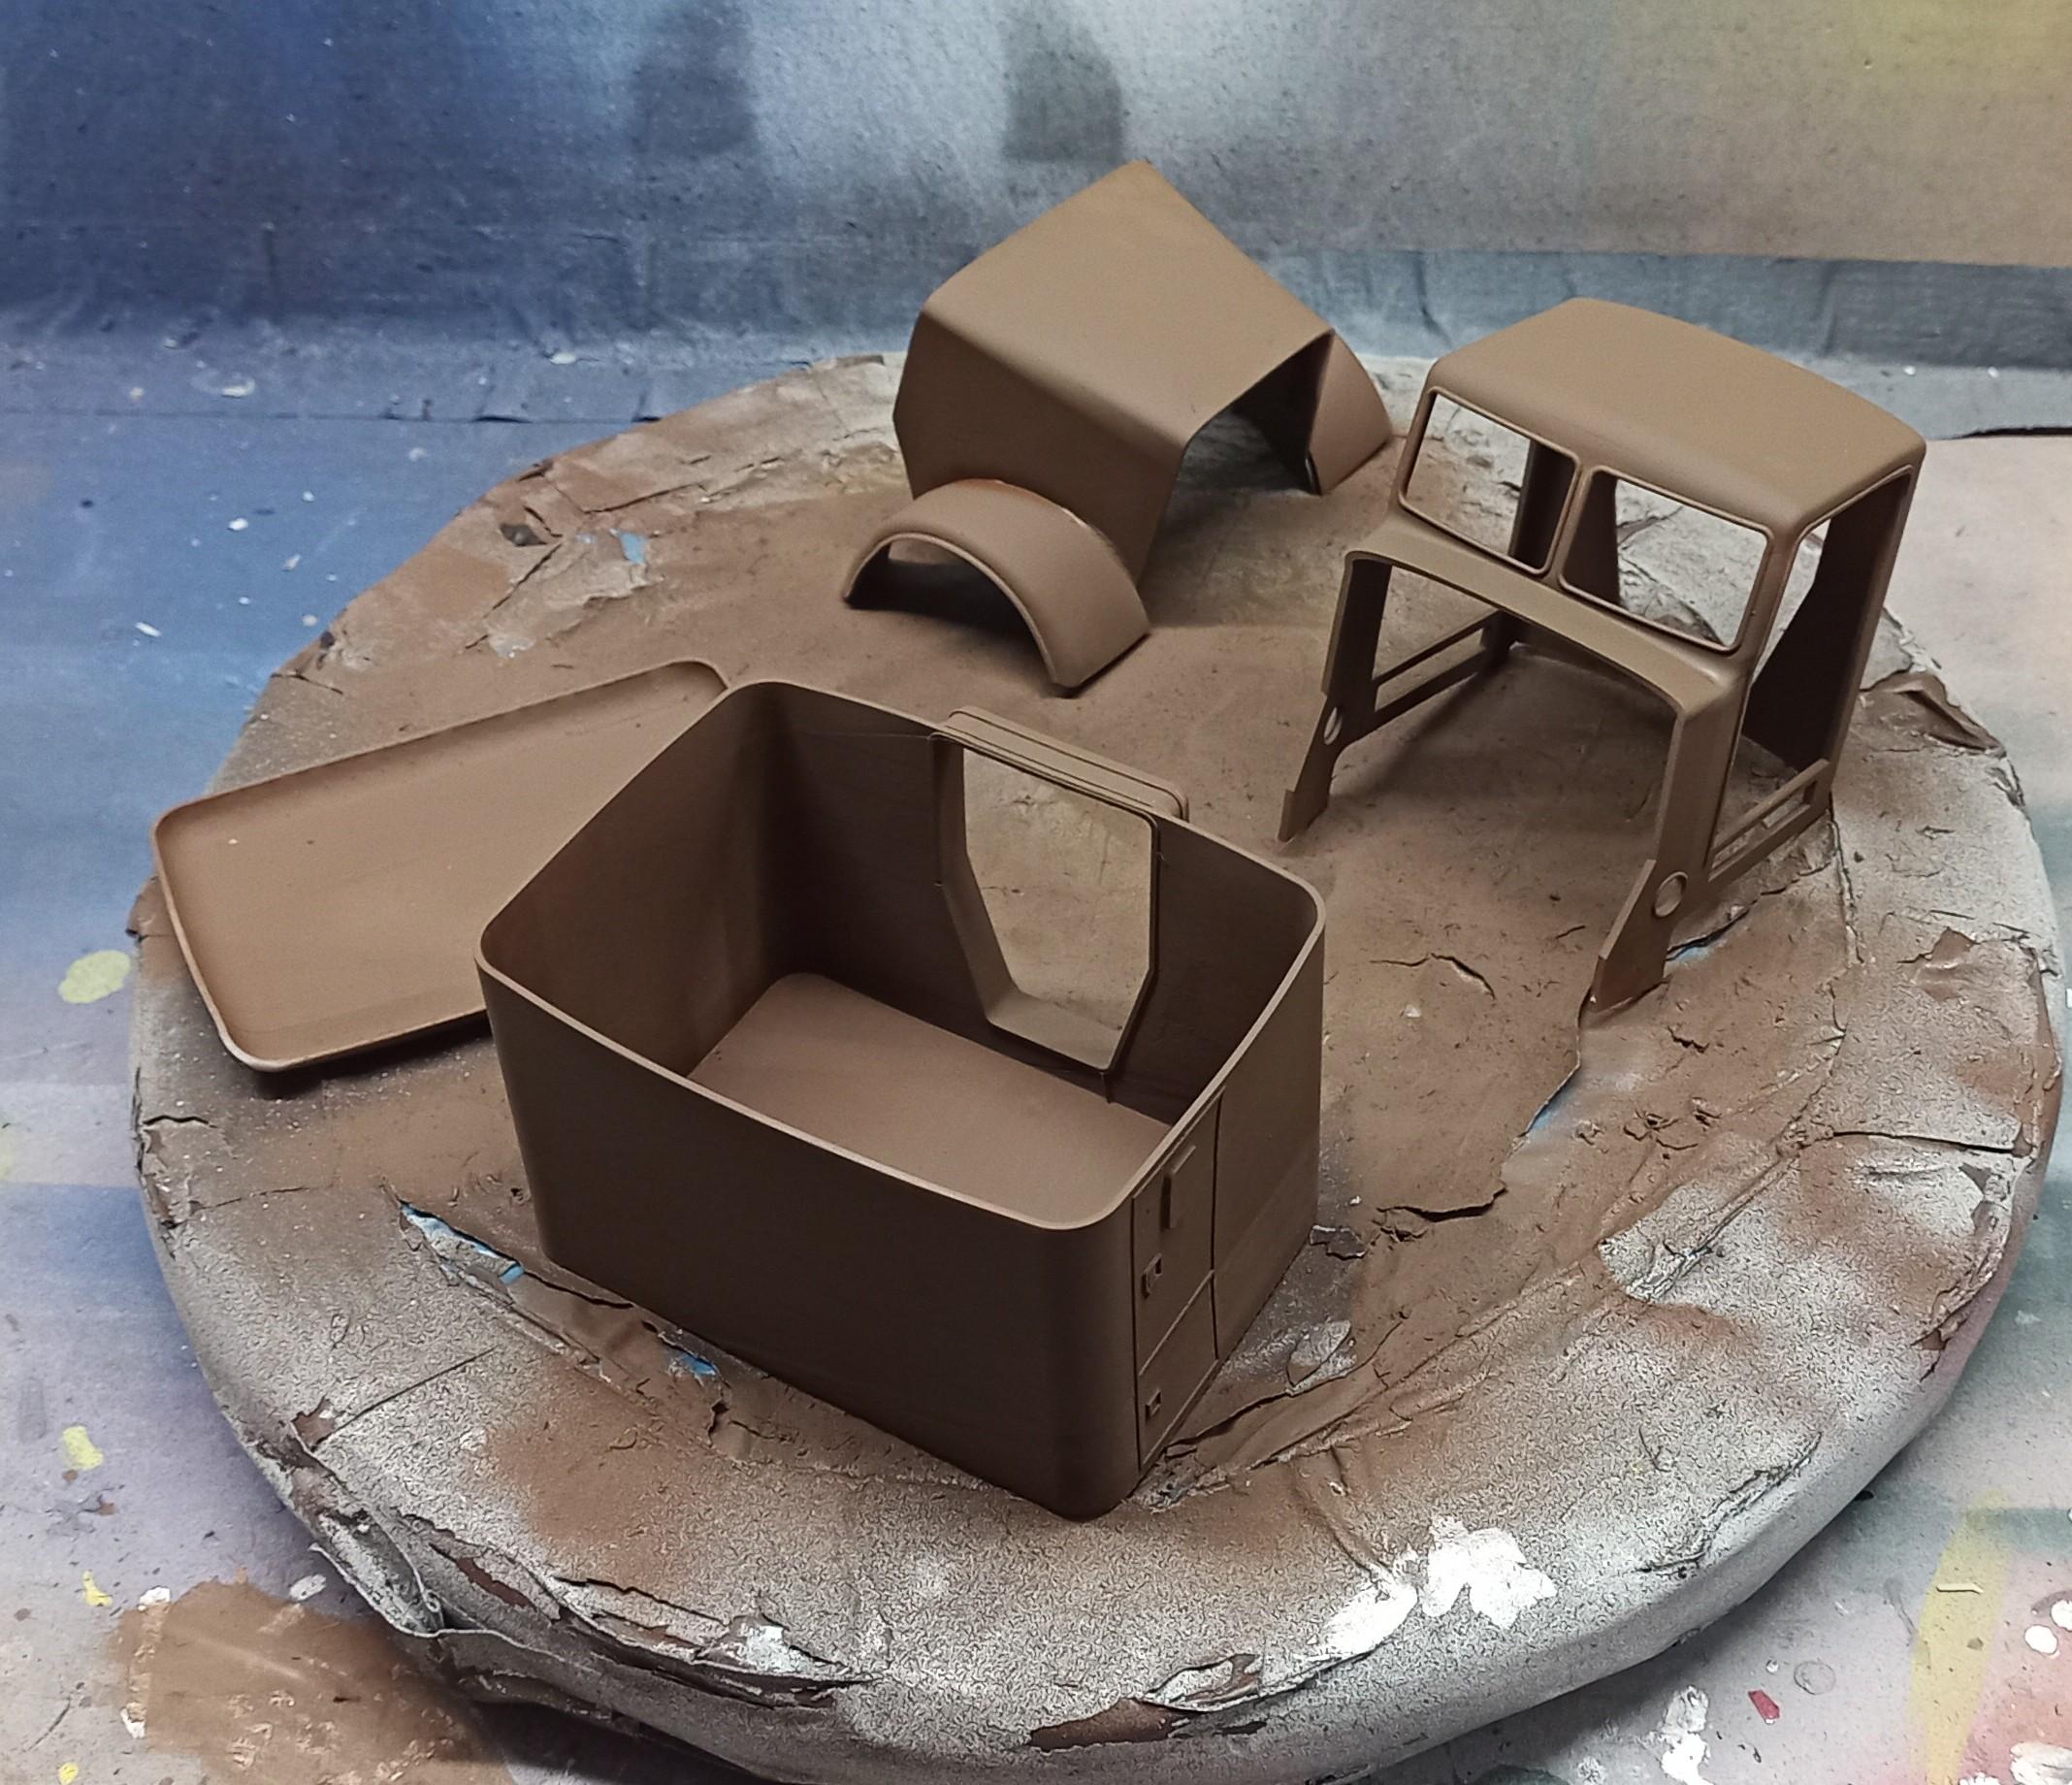
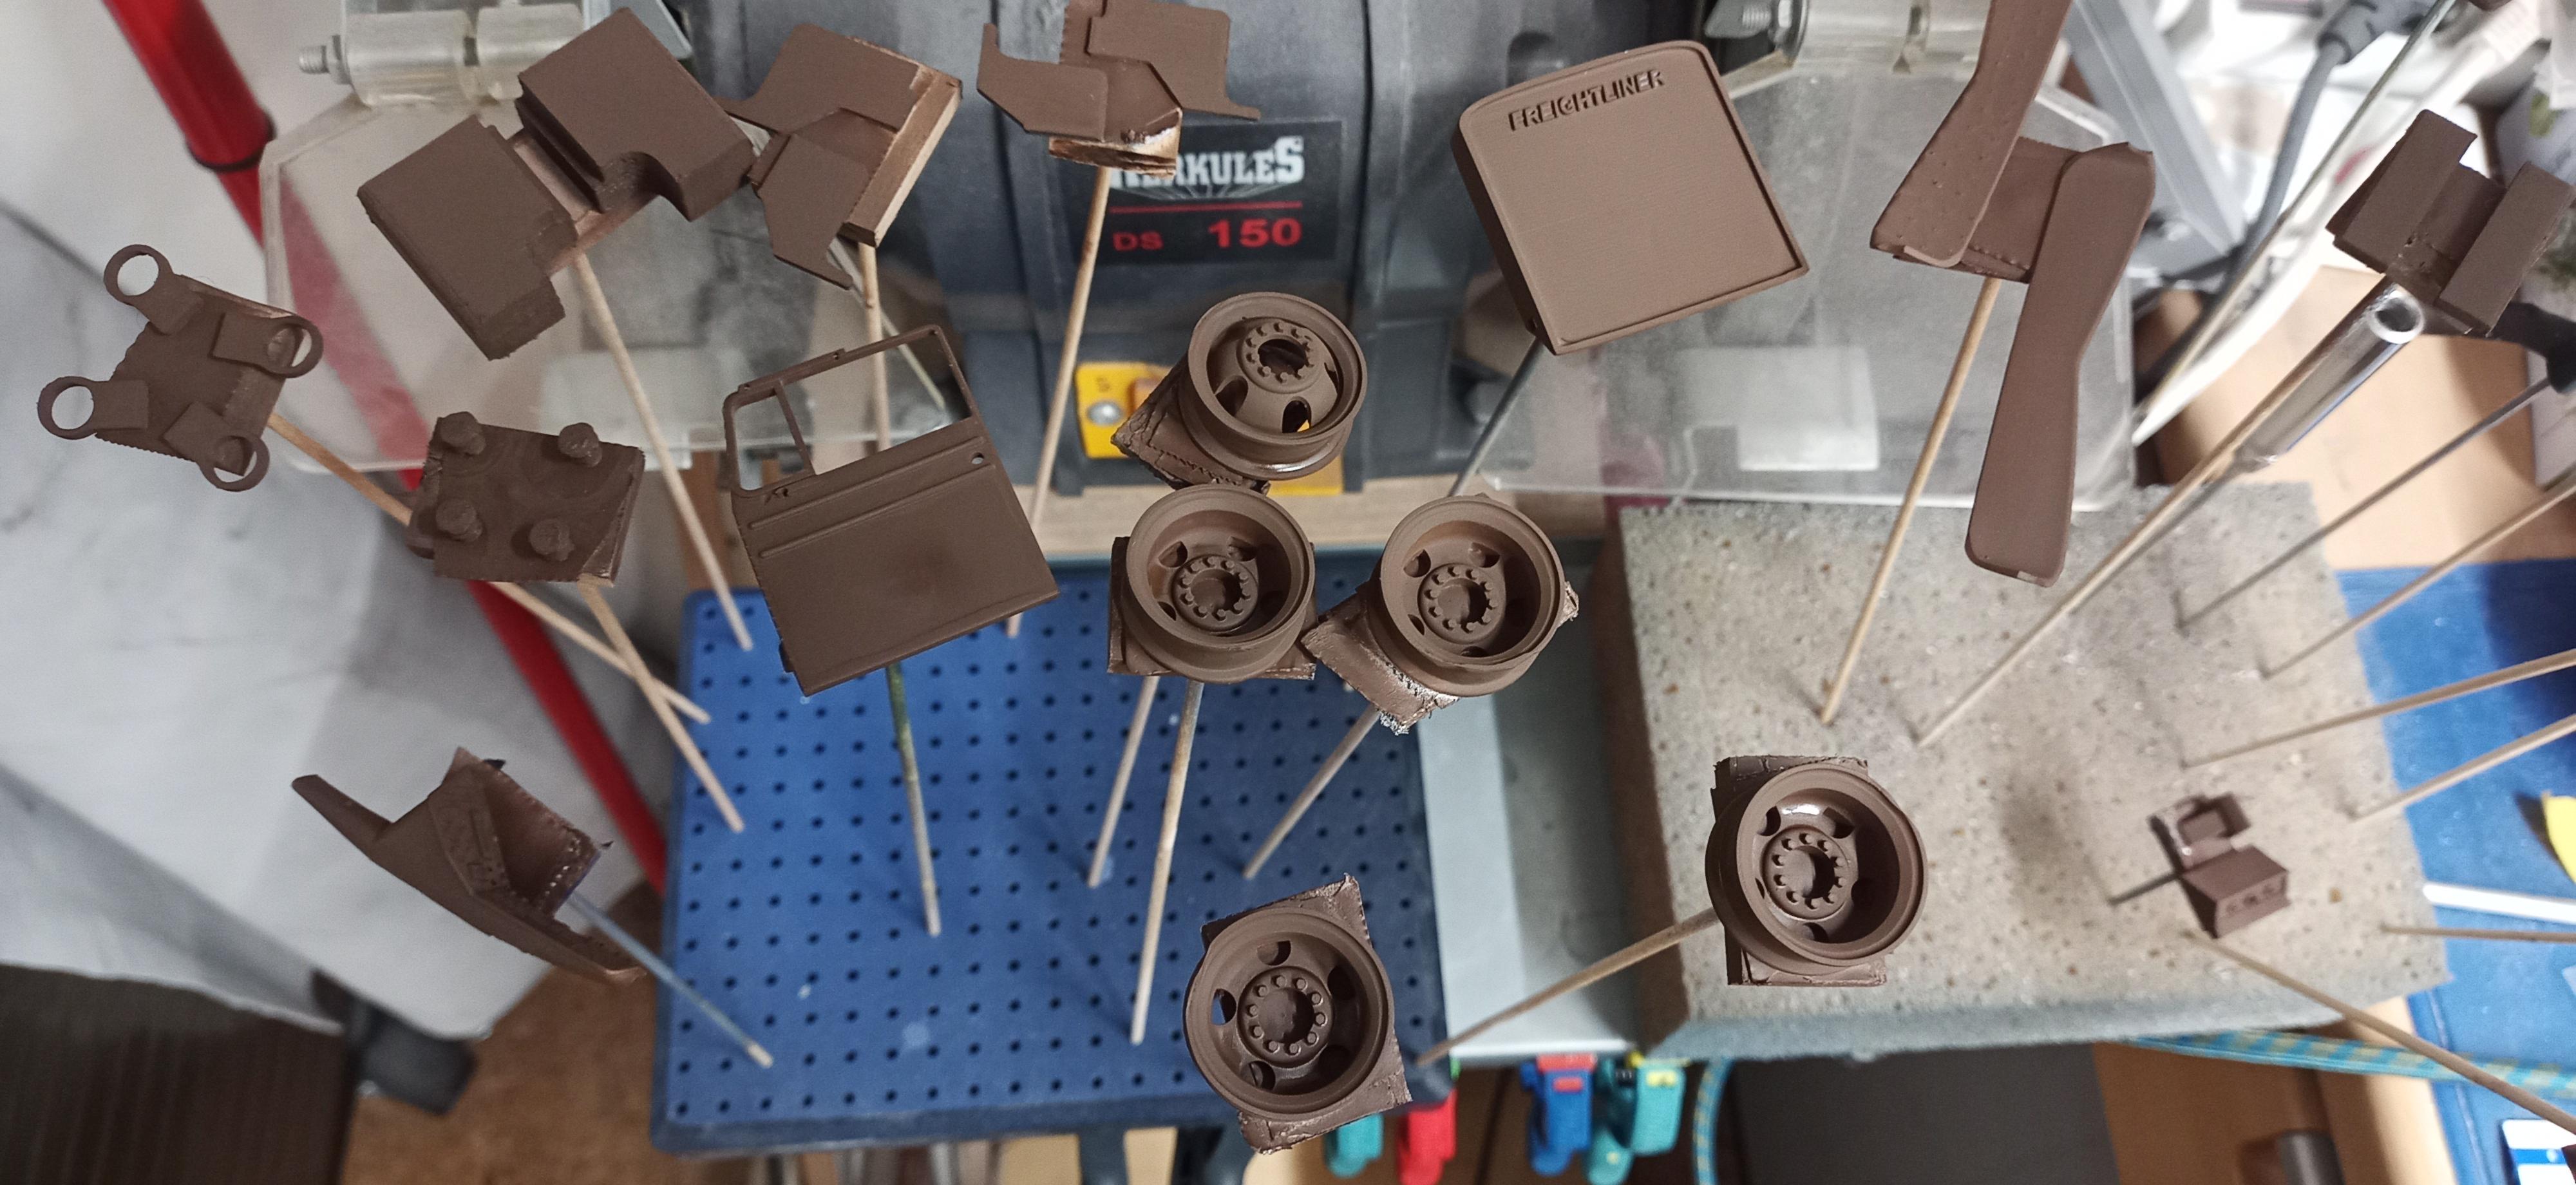
I had to make a bumper support cause the ones on the chassis were a bit too short. (I hadn't designed the hood hinges at the time I had made the frame rails! Made new door hinges too. I unfortunately ruined the first ones. The service box still looks a bit strange but when it's painted it'll look better. Still have to work on the edges too. I made the box of styrene sheet and printed the door frames. I'm still undecided which color to paint the box. Either the dull chrome finish like the fuel tanks, black or copper like the cab. Still have enough time to think about it!
-
Freightliner FLC
Jürgen M. replied to Jürgen M.'s topic in WIP: Model Trucks: Big Rigs and Heavy Equipment
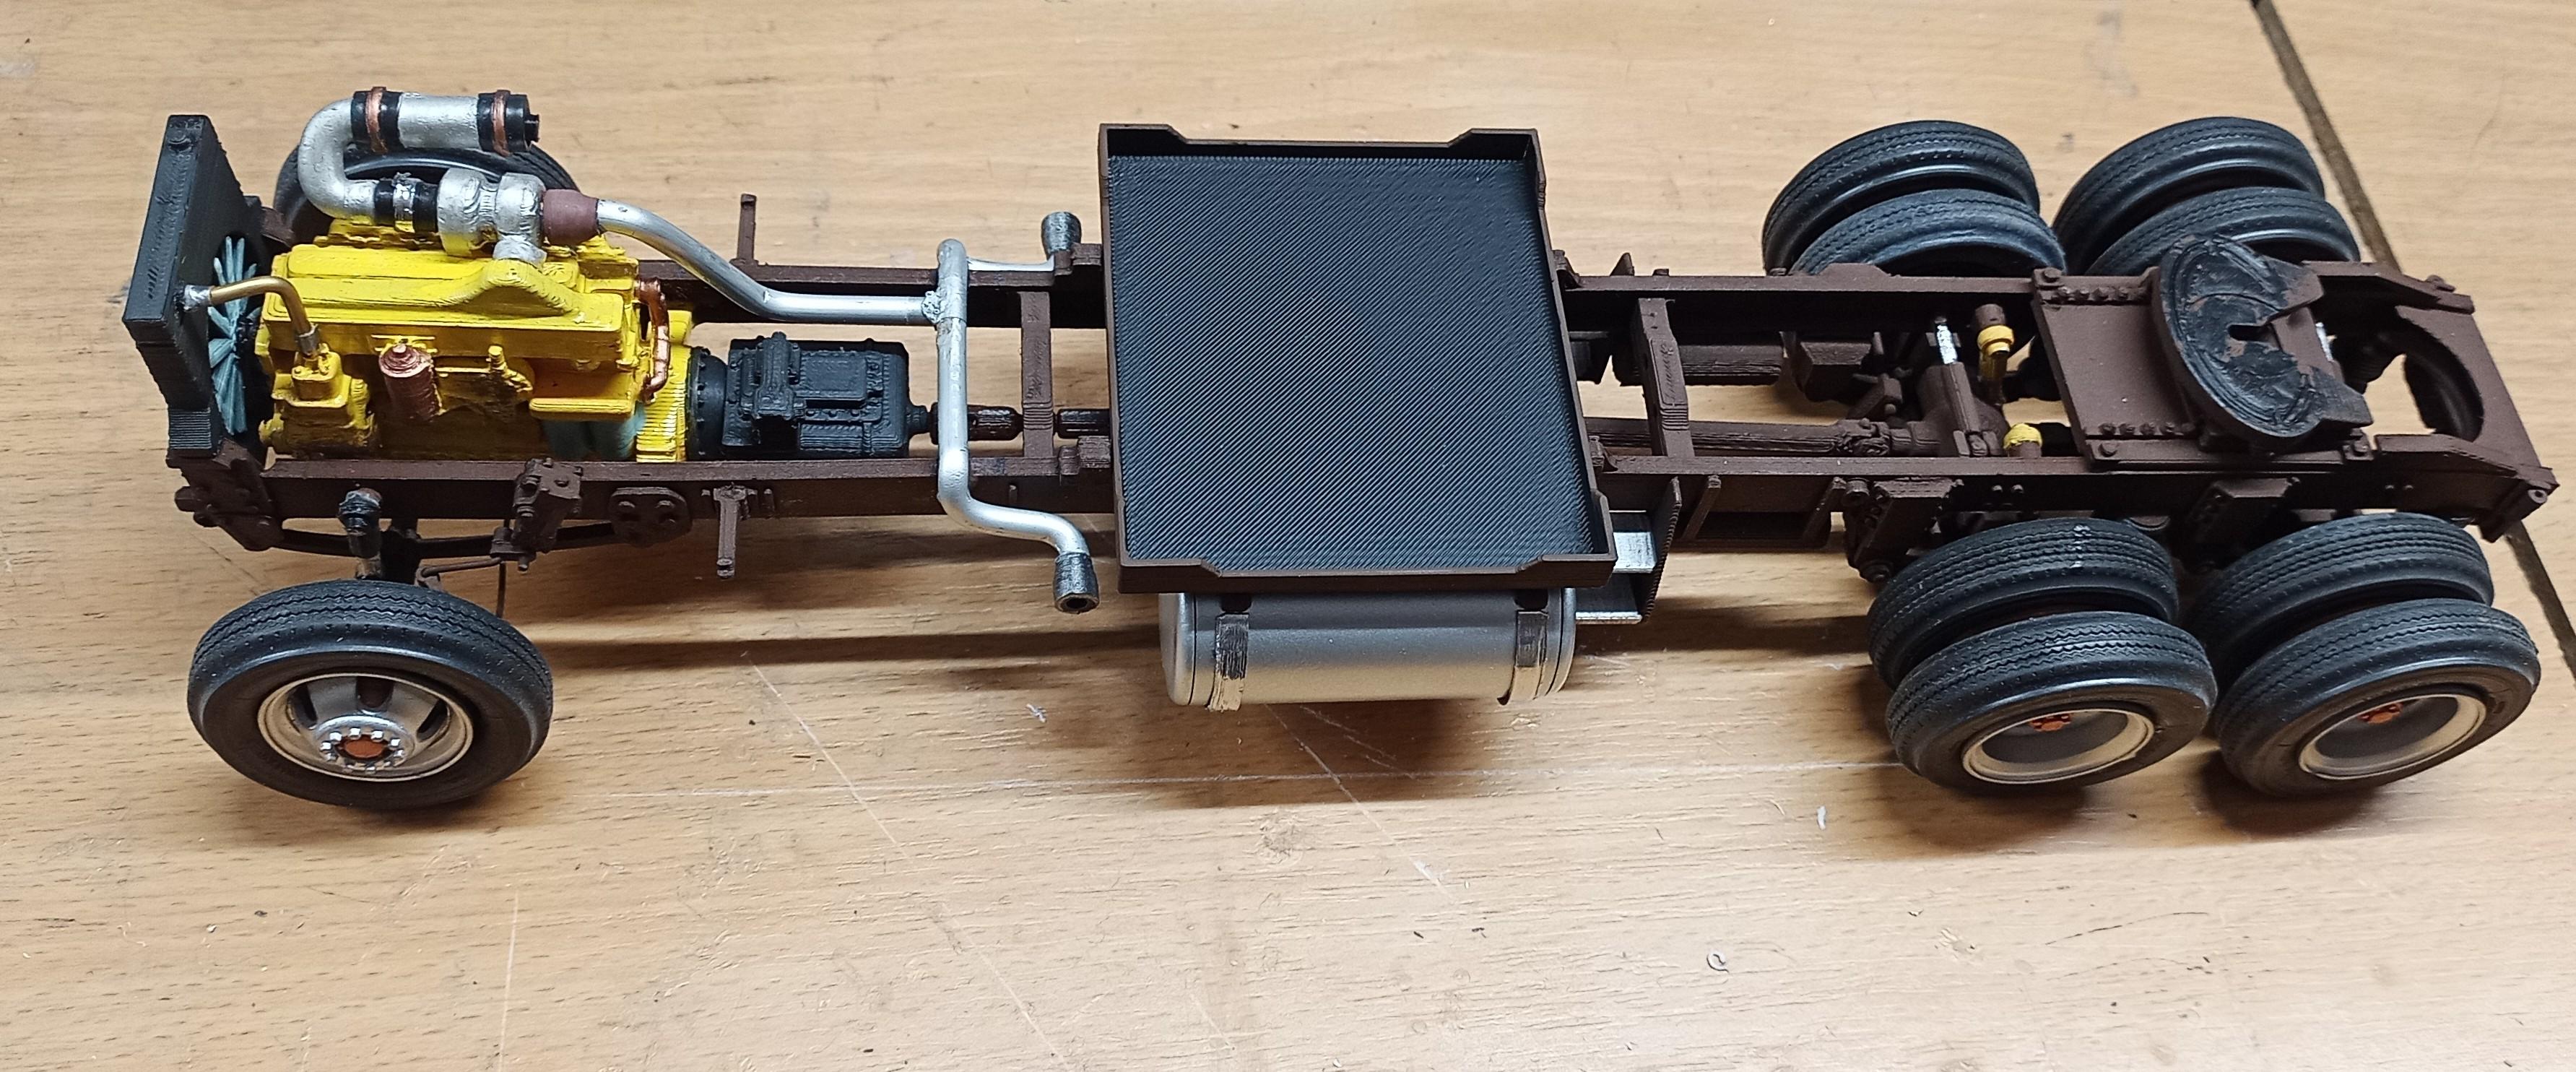
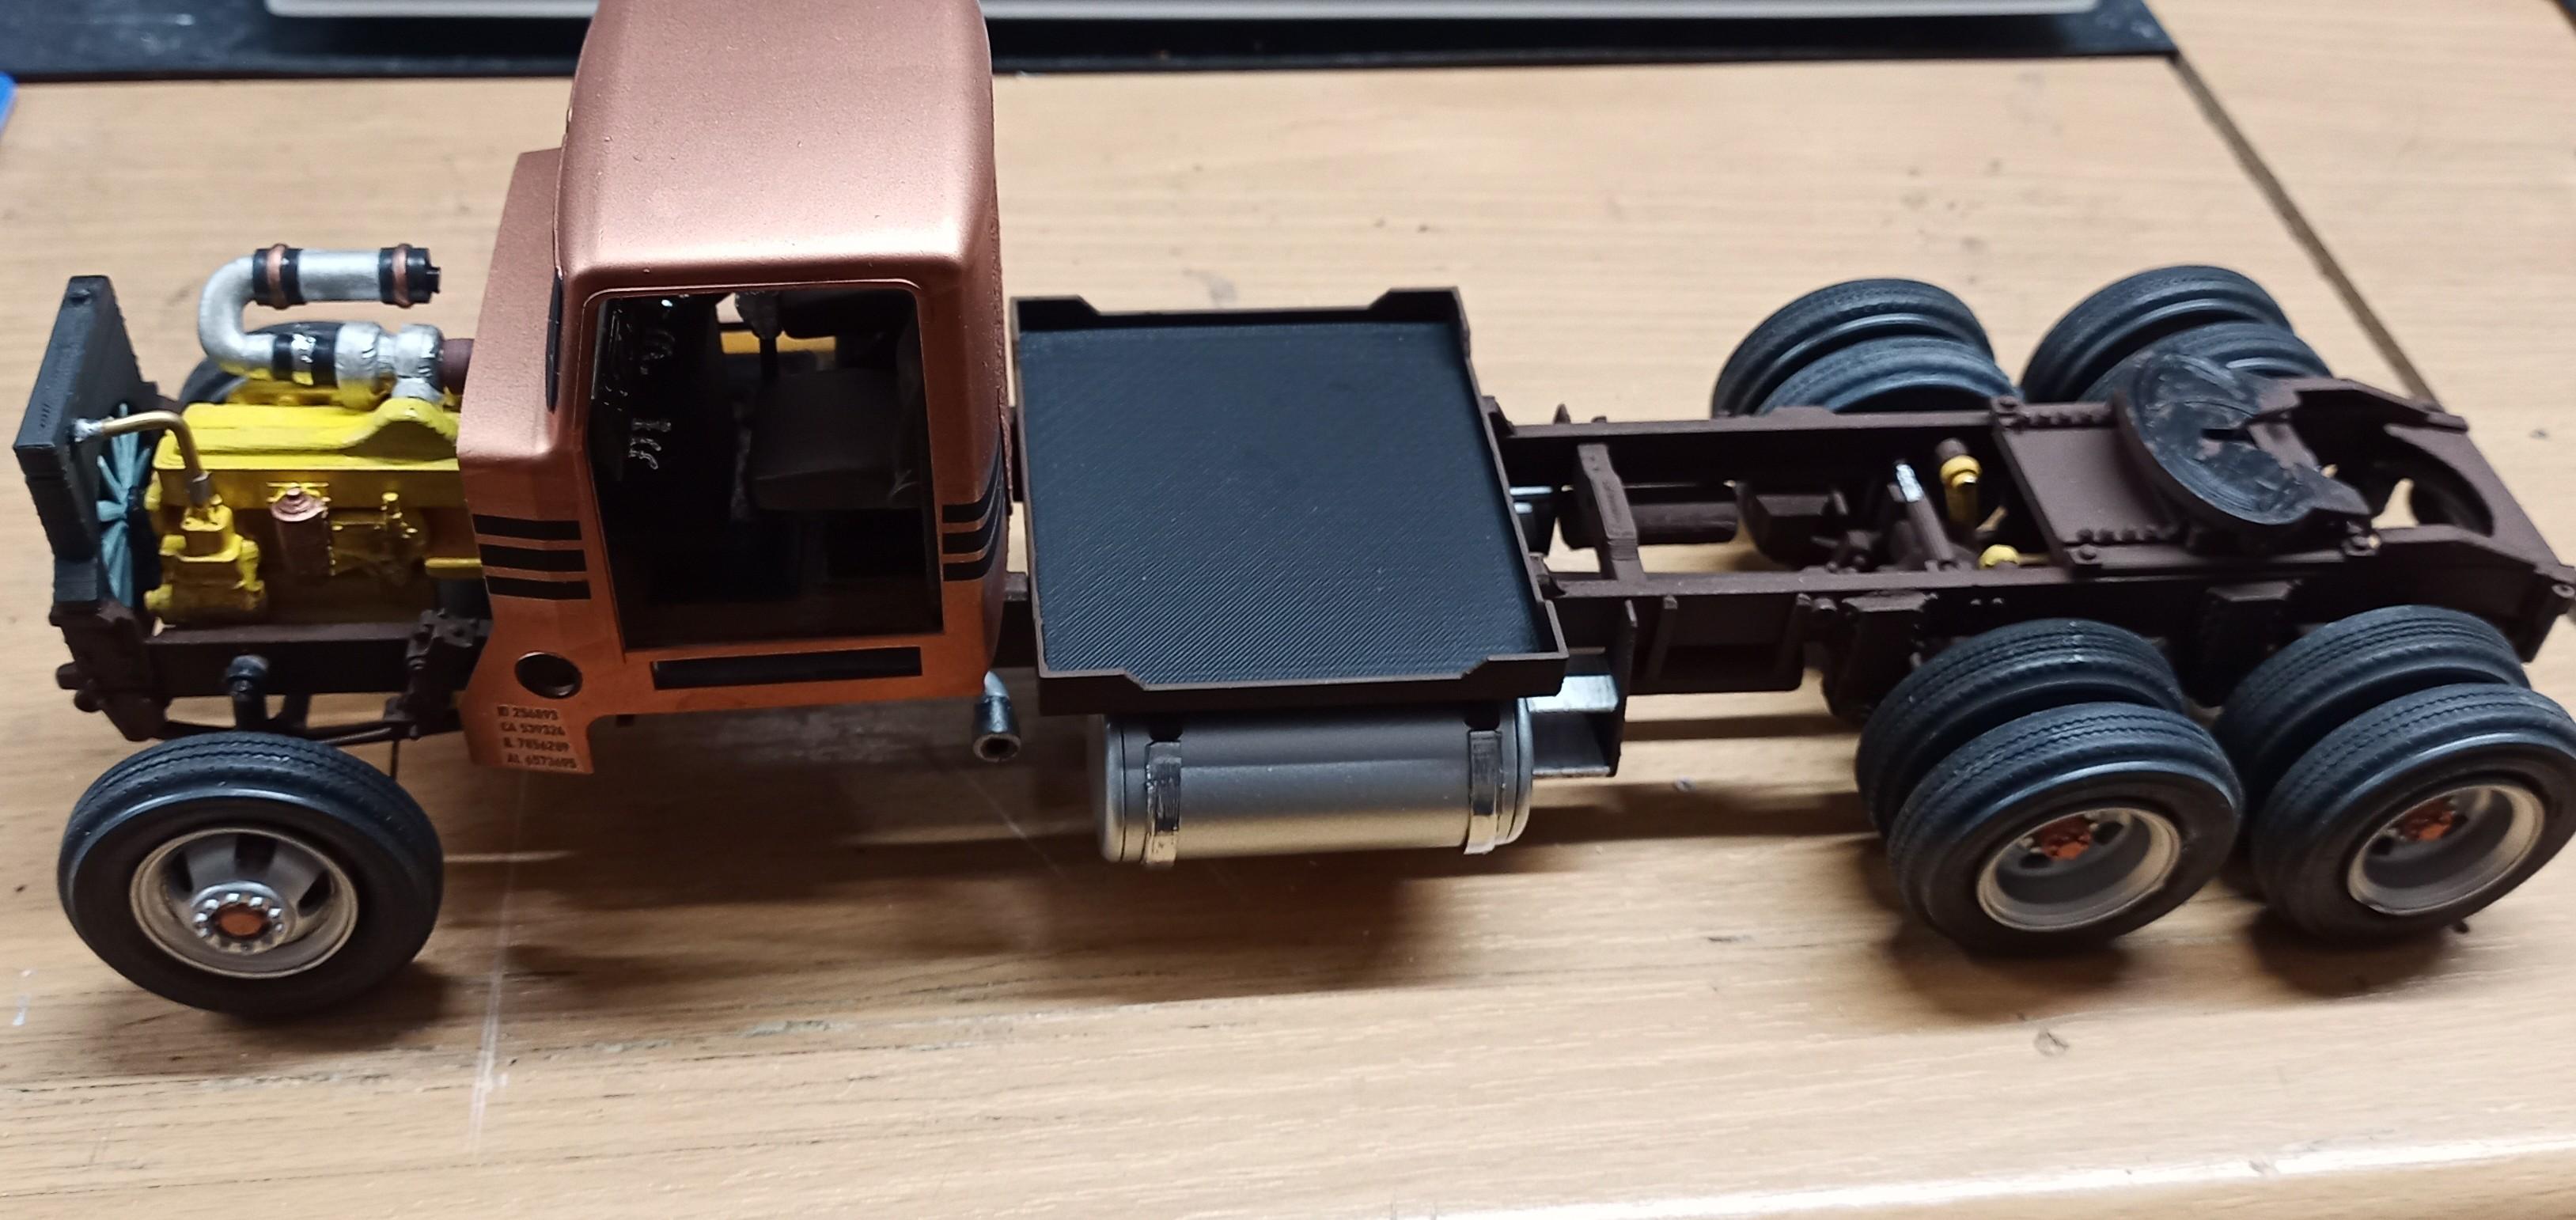
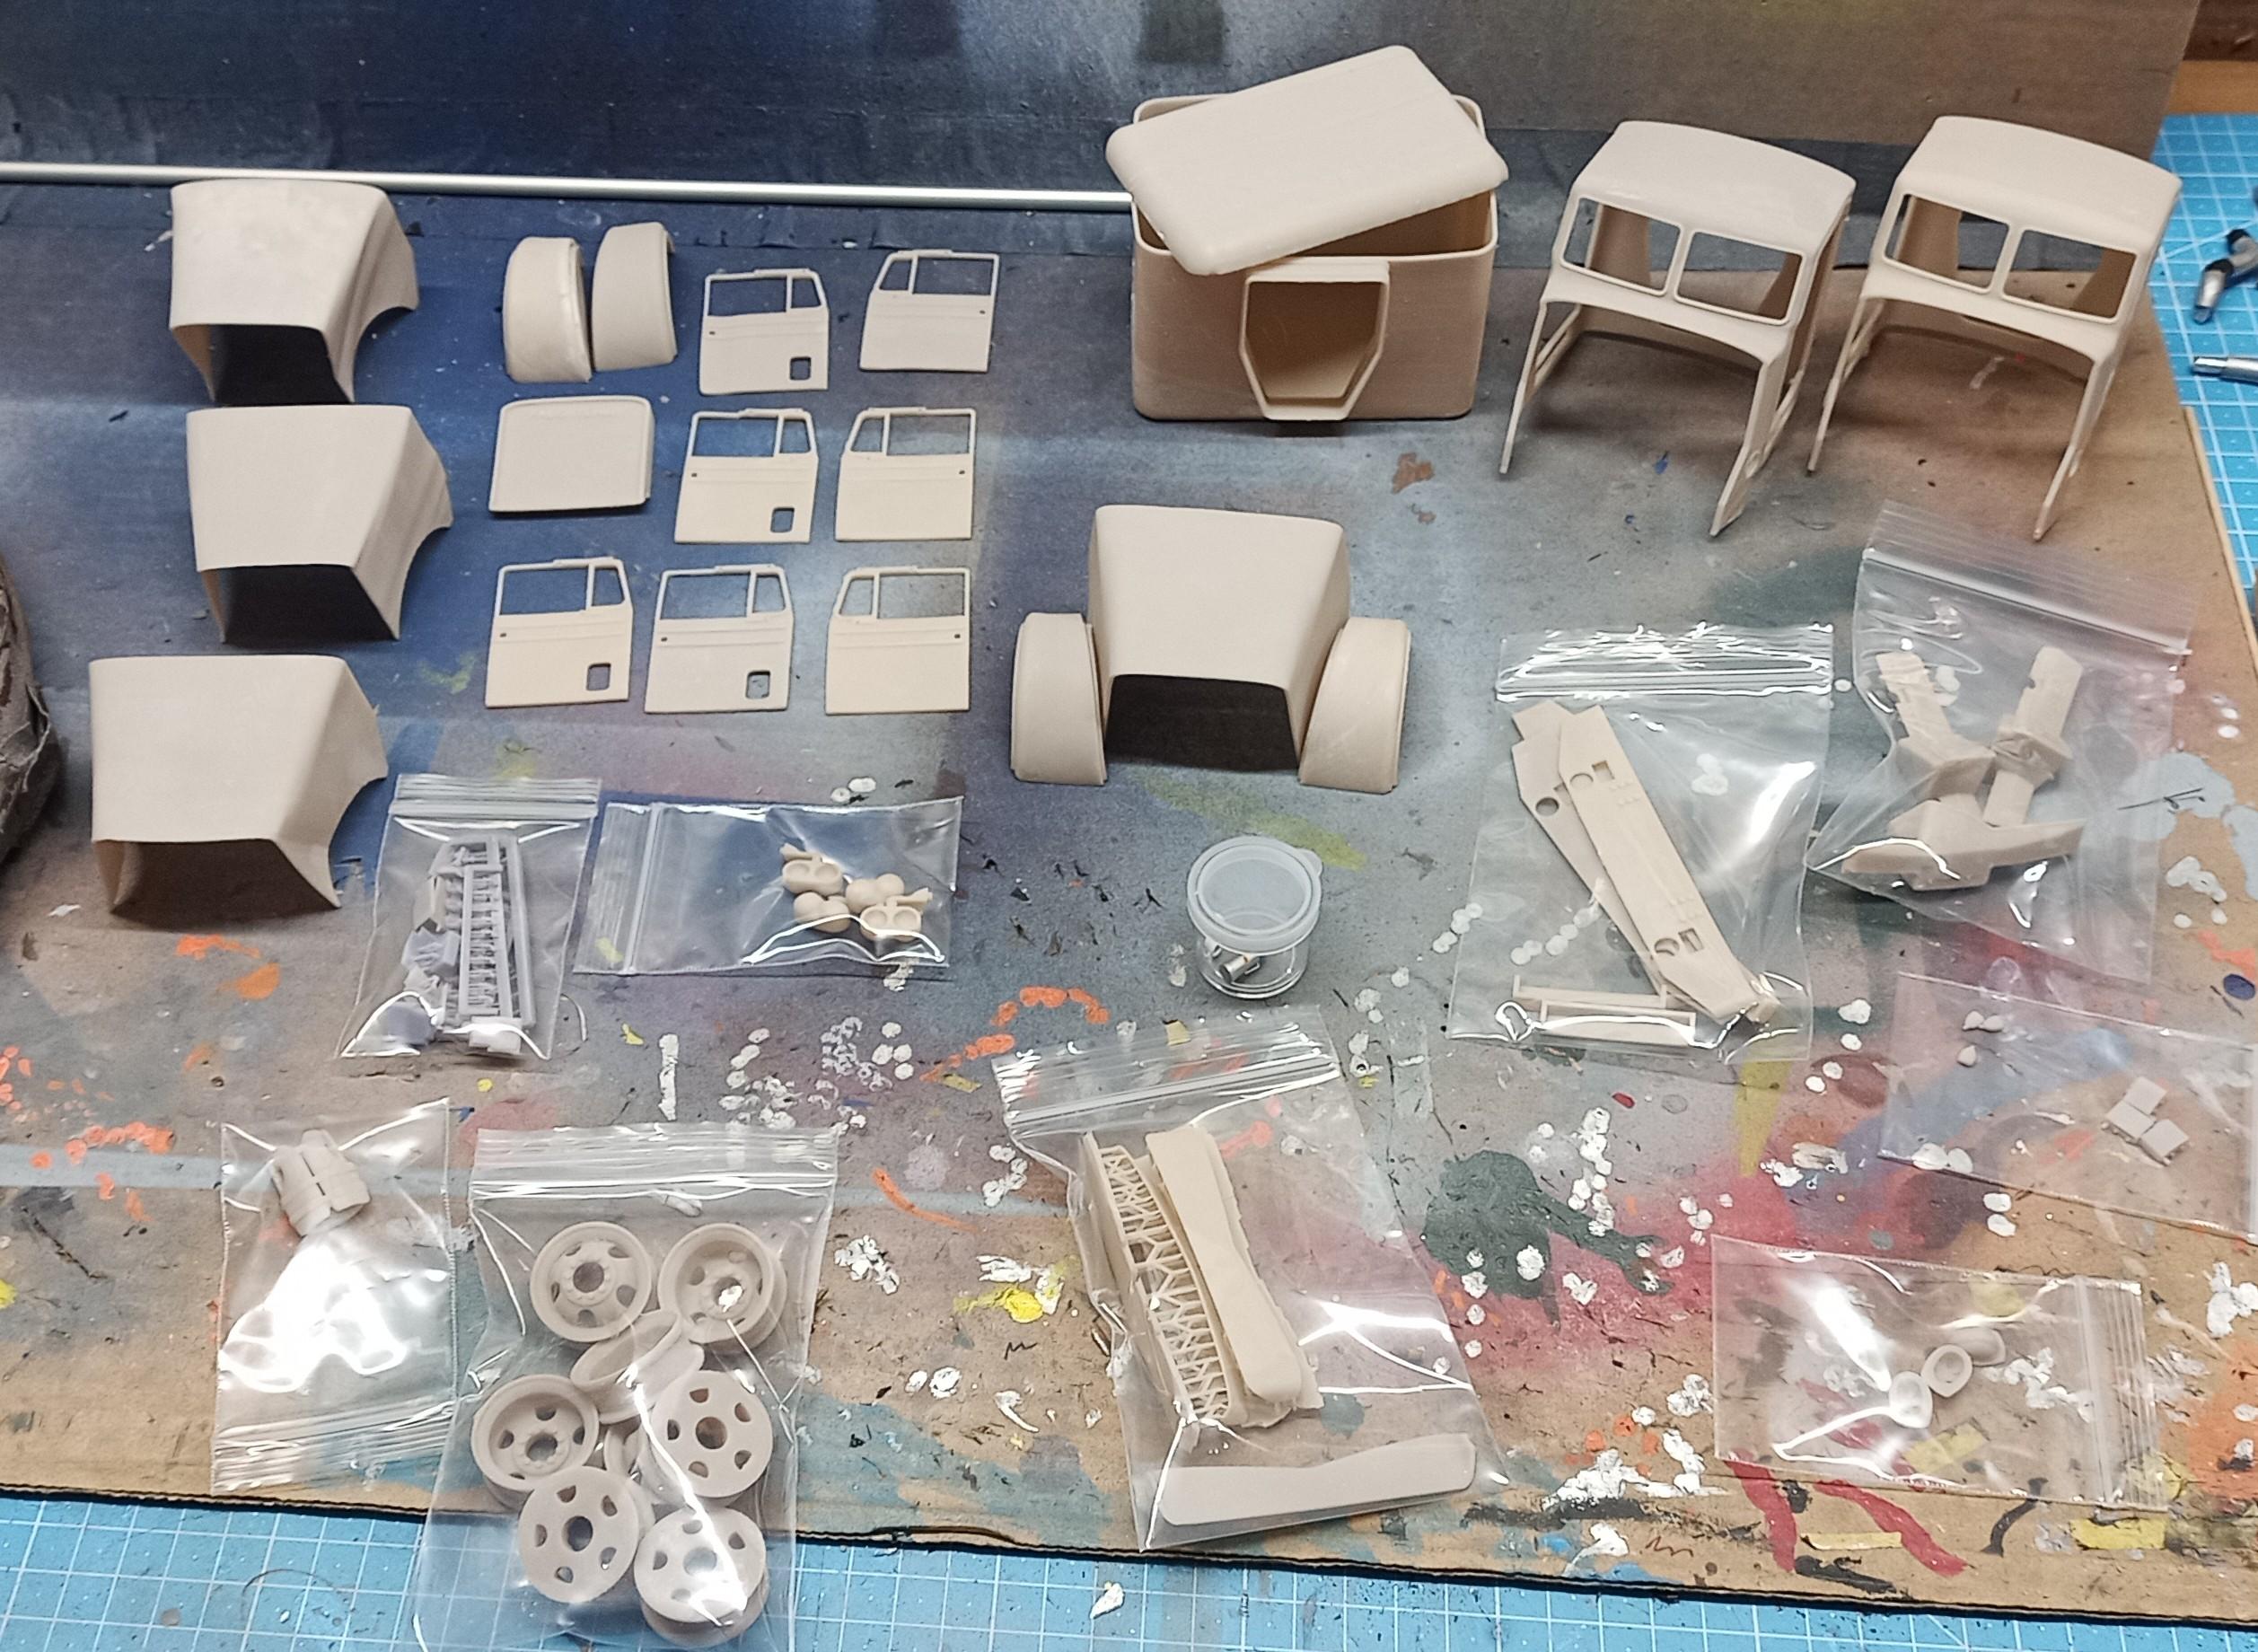
Got the interior assembled a bit more. And here's a little mock-up of the cab and service box Plattform. Windshield is glued in and I'm proud to say, without glue marks! The service box will be scratch built except for the roof and doors.
-
Freightliner FLC
Jürgen M. replied to Jürgen M.'s topic in WIP: Model Trucks: Big Rigs and Heavy Equipment
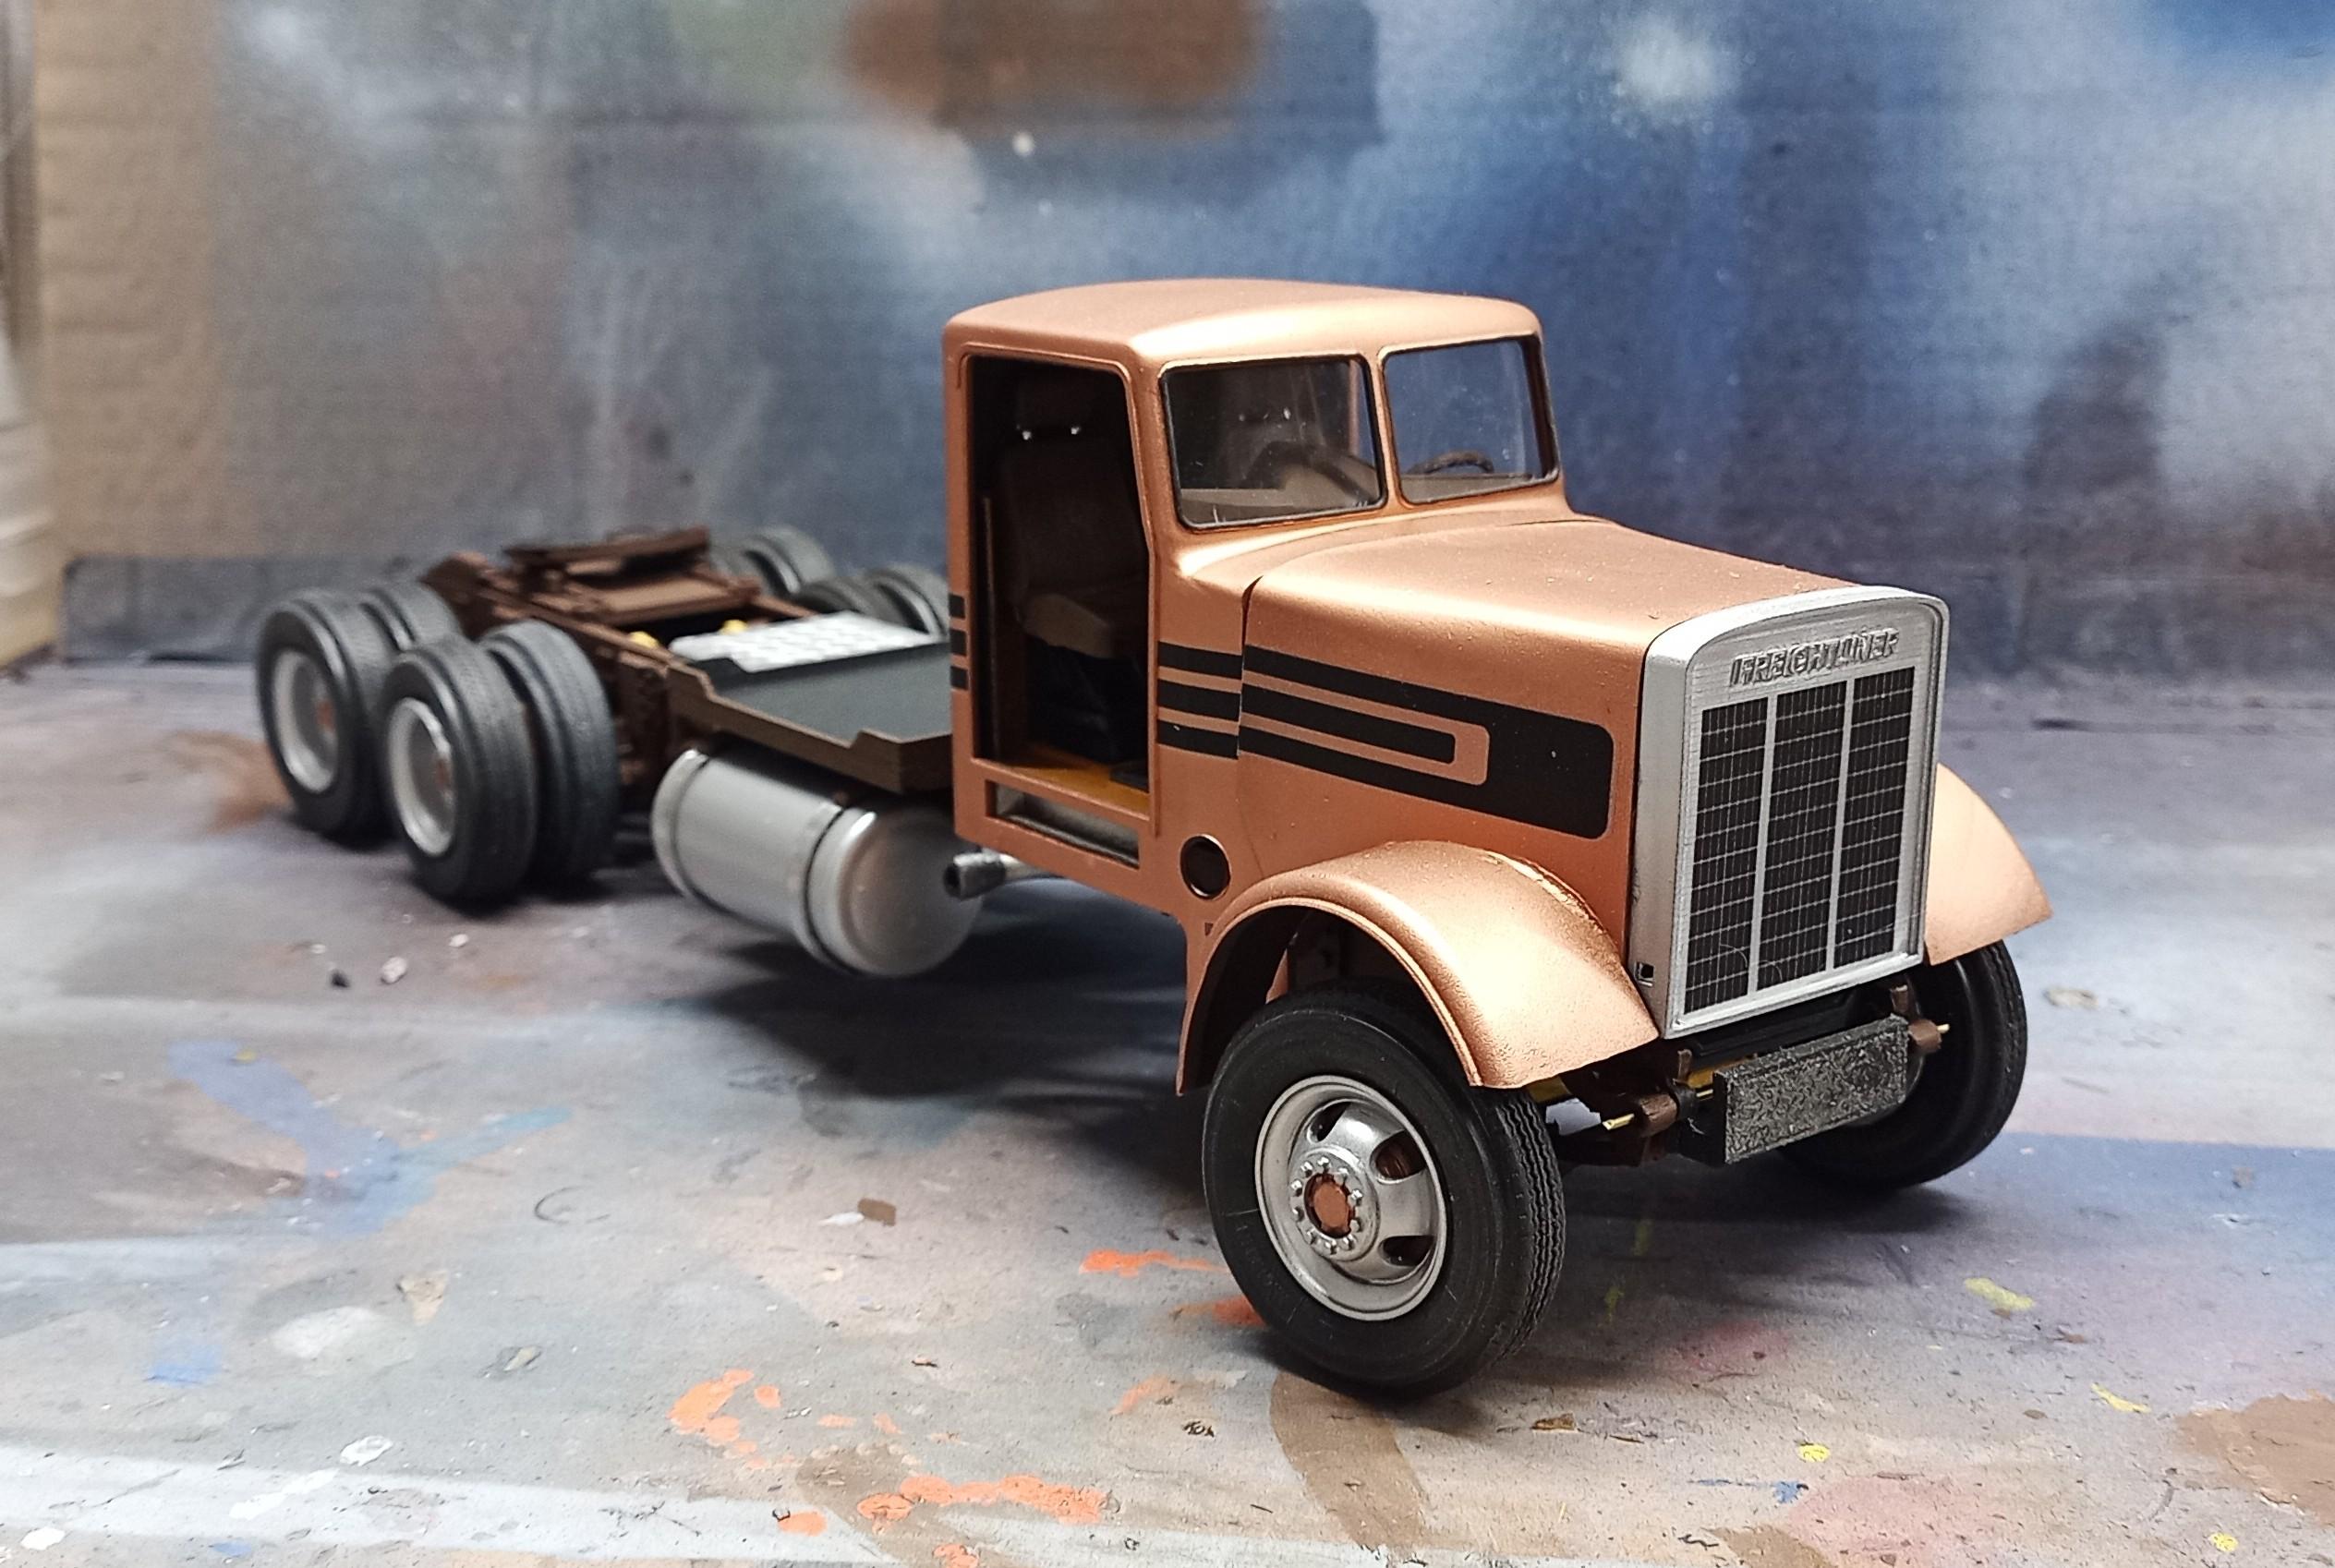
Thank you guys. I like the wheels too. I saw them on a Freightliner in a pic and thought, those I want. I designed them myself and printed by Bren they look really good. Concerning the sleeper, that you might see on one of my next builds. I decided to install a service box instead. Hope it turns out the way I expect! Here's the first pic of the painted cab and hood with decals on: A few smaller decals still to apply, then clear coat and window seals and then assembly!
-
Freightliner FLC
Jürgen M. replied to Jürgen M.'s topic in WIP: Model Trucks: Big Rigs and Heavy Equipment
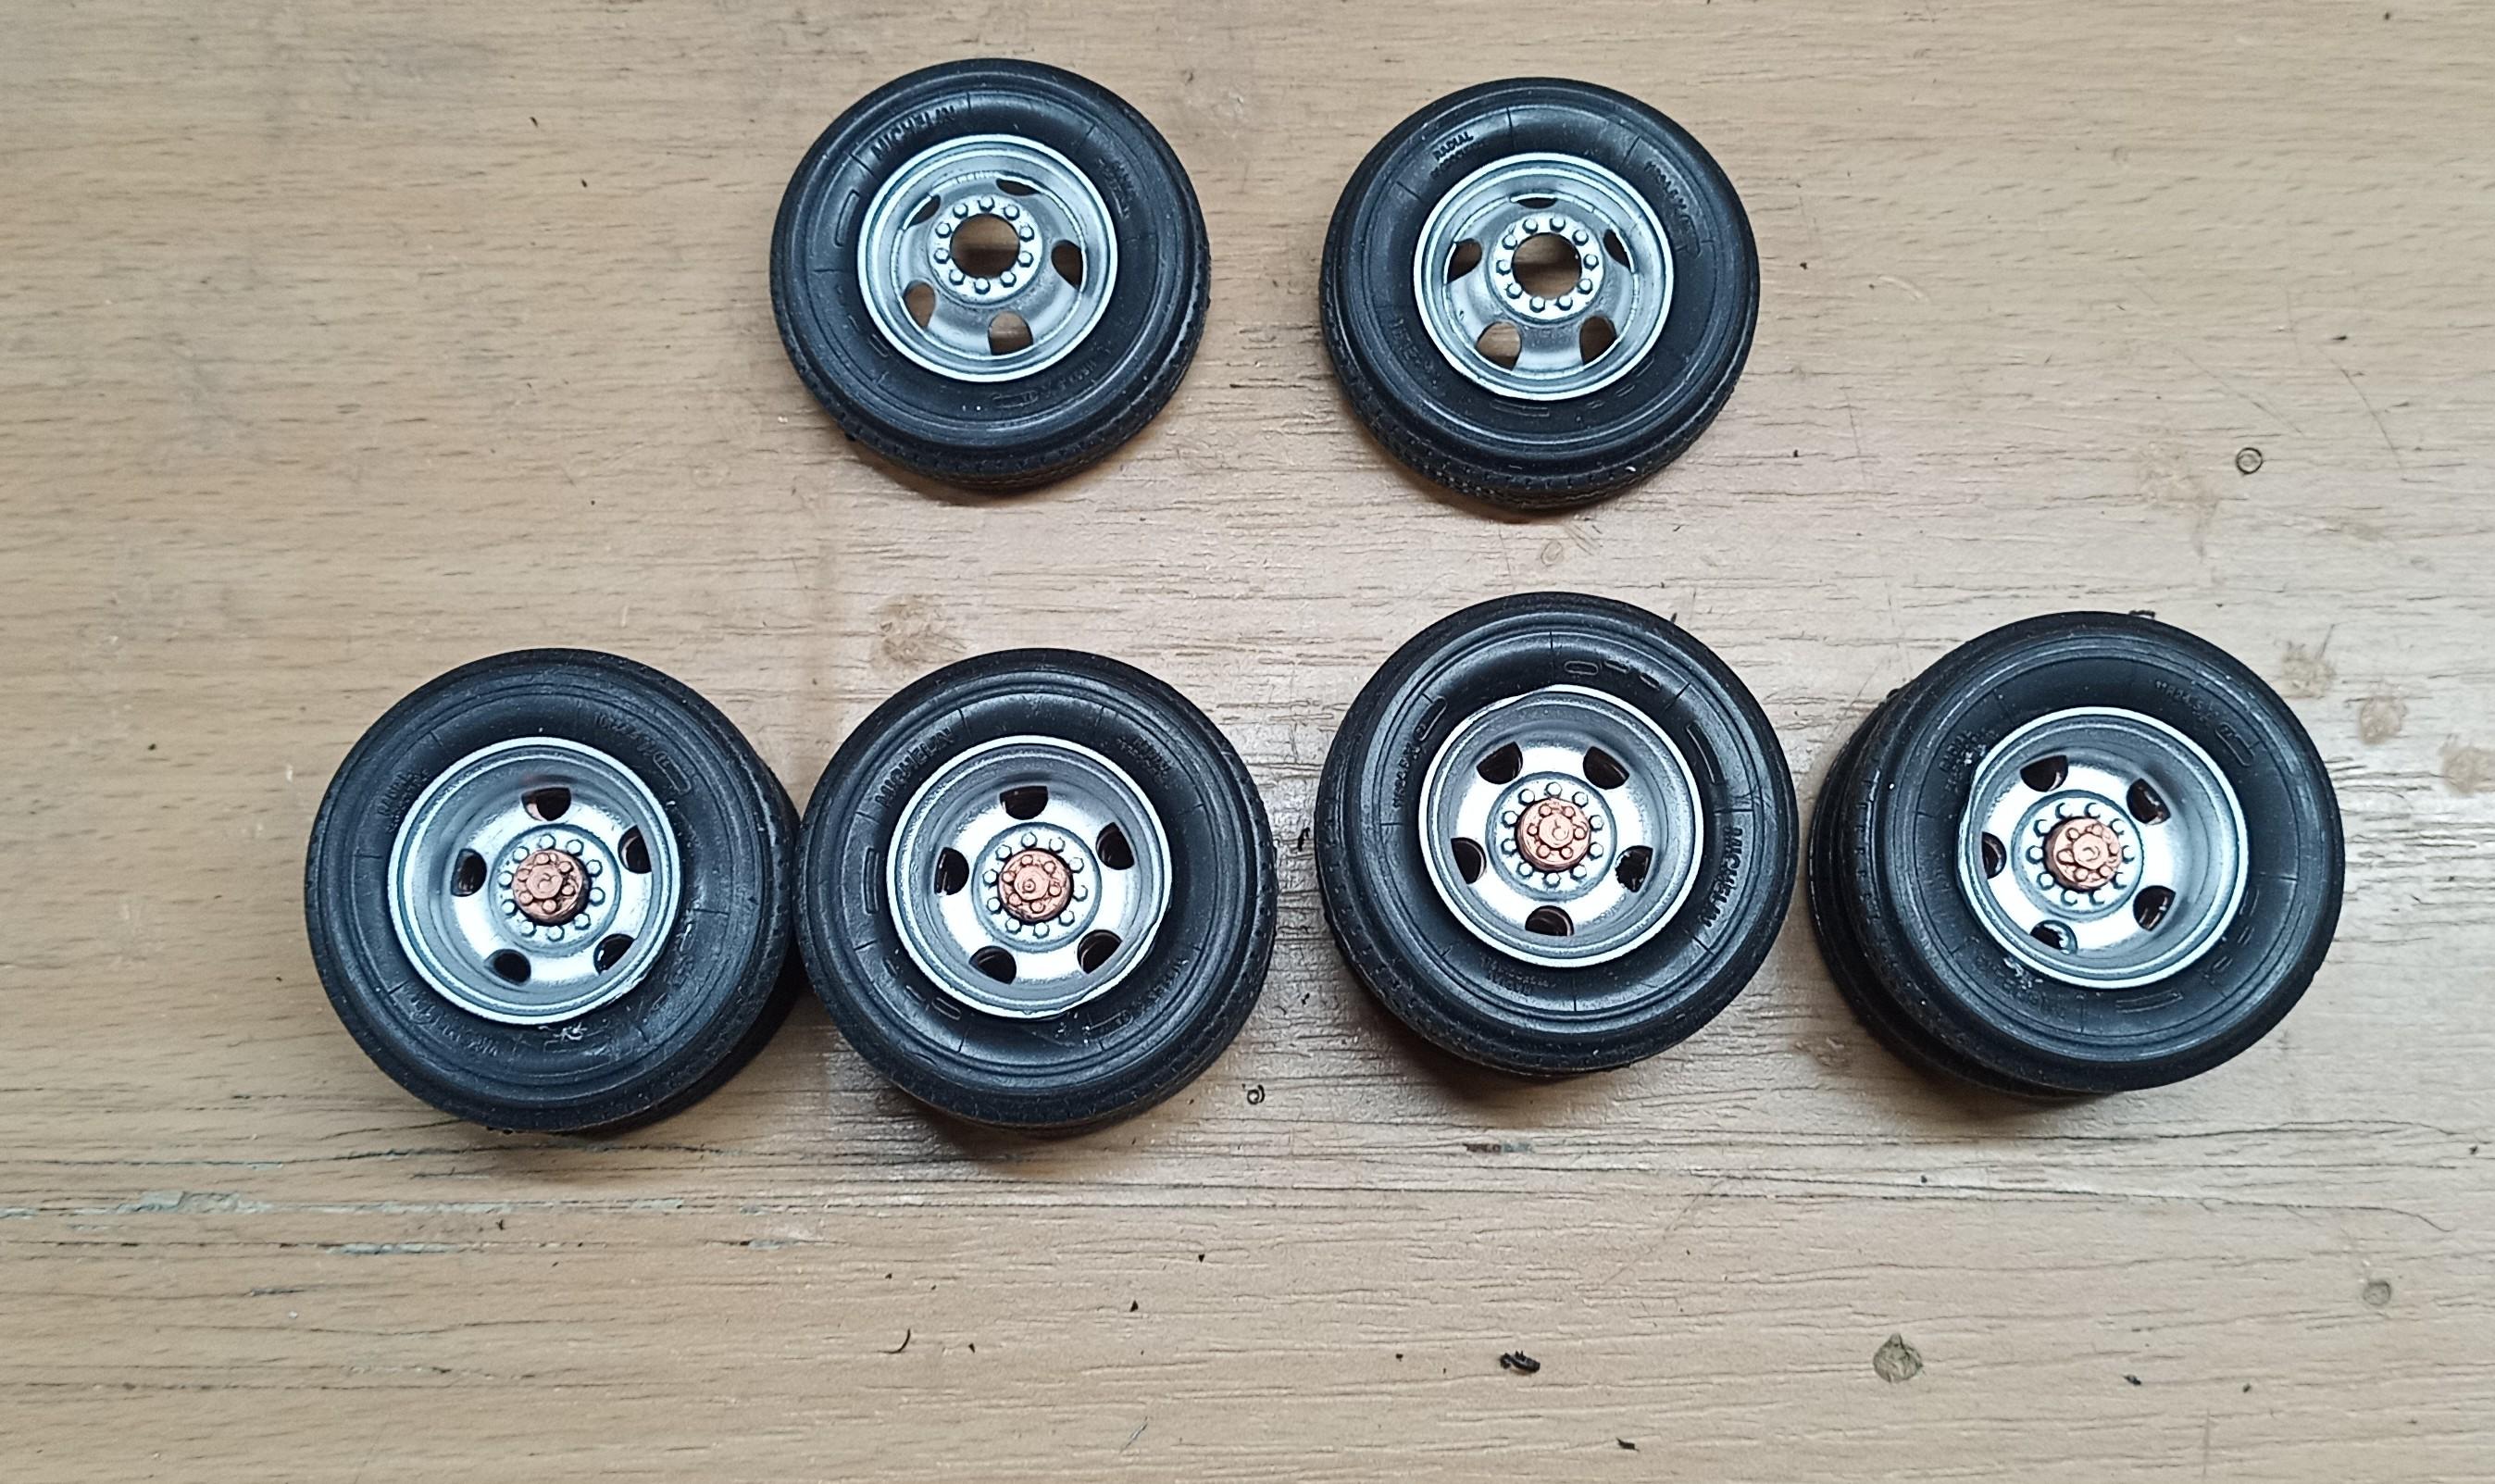
Thanks pal! I'm actually thinking of not using the sleeper for this build but putting a sort of a tool box there like on service trucks, but not as big. A bit smaller than the sleeper. Tires are Revell soft rubber tires. I stole them from my Marmon conventional. I'll put Italeri ones on that with new rims! Seperate construction site! The rims are painted with the same dull chrome finish as the fuel tanks. I like that stuff. Just ordered a new can the other day. It went empty today! -
Freightliner FLC
Jürgen M. replied to Jürgen M.'s topic in WIP: Model Trucks: Big Rigs and Heavy Equipment
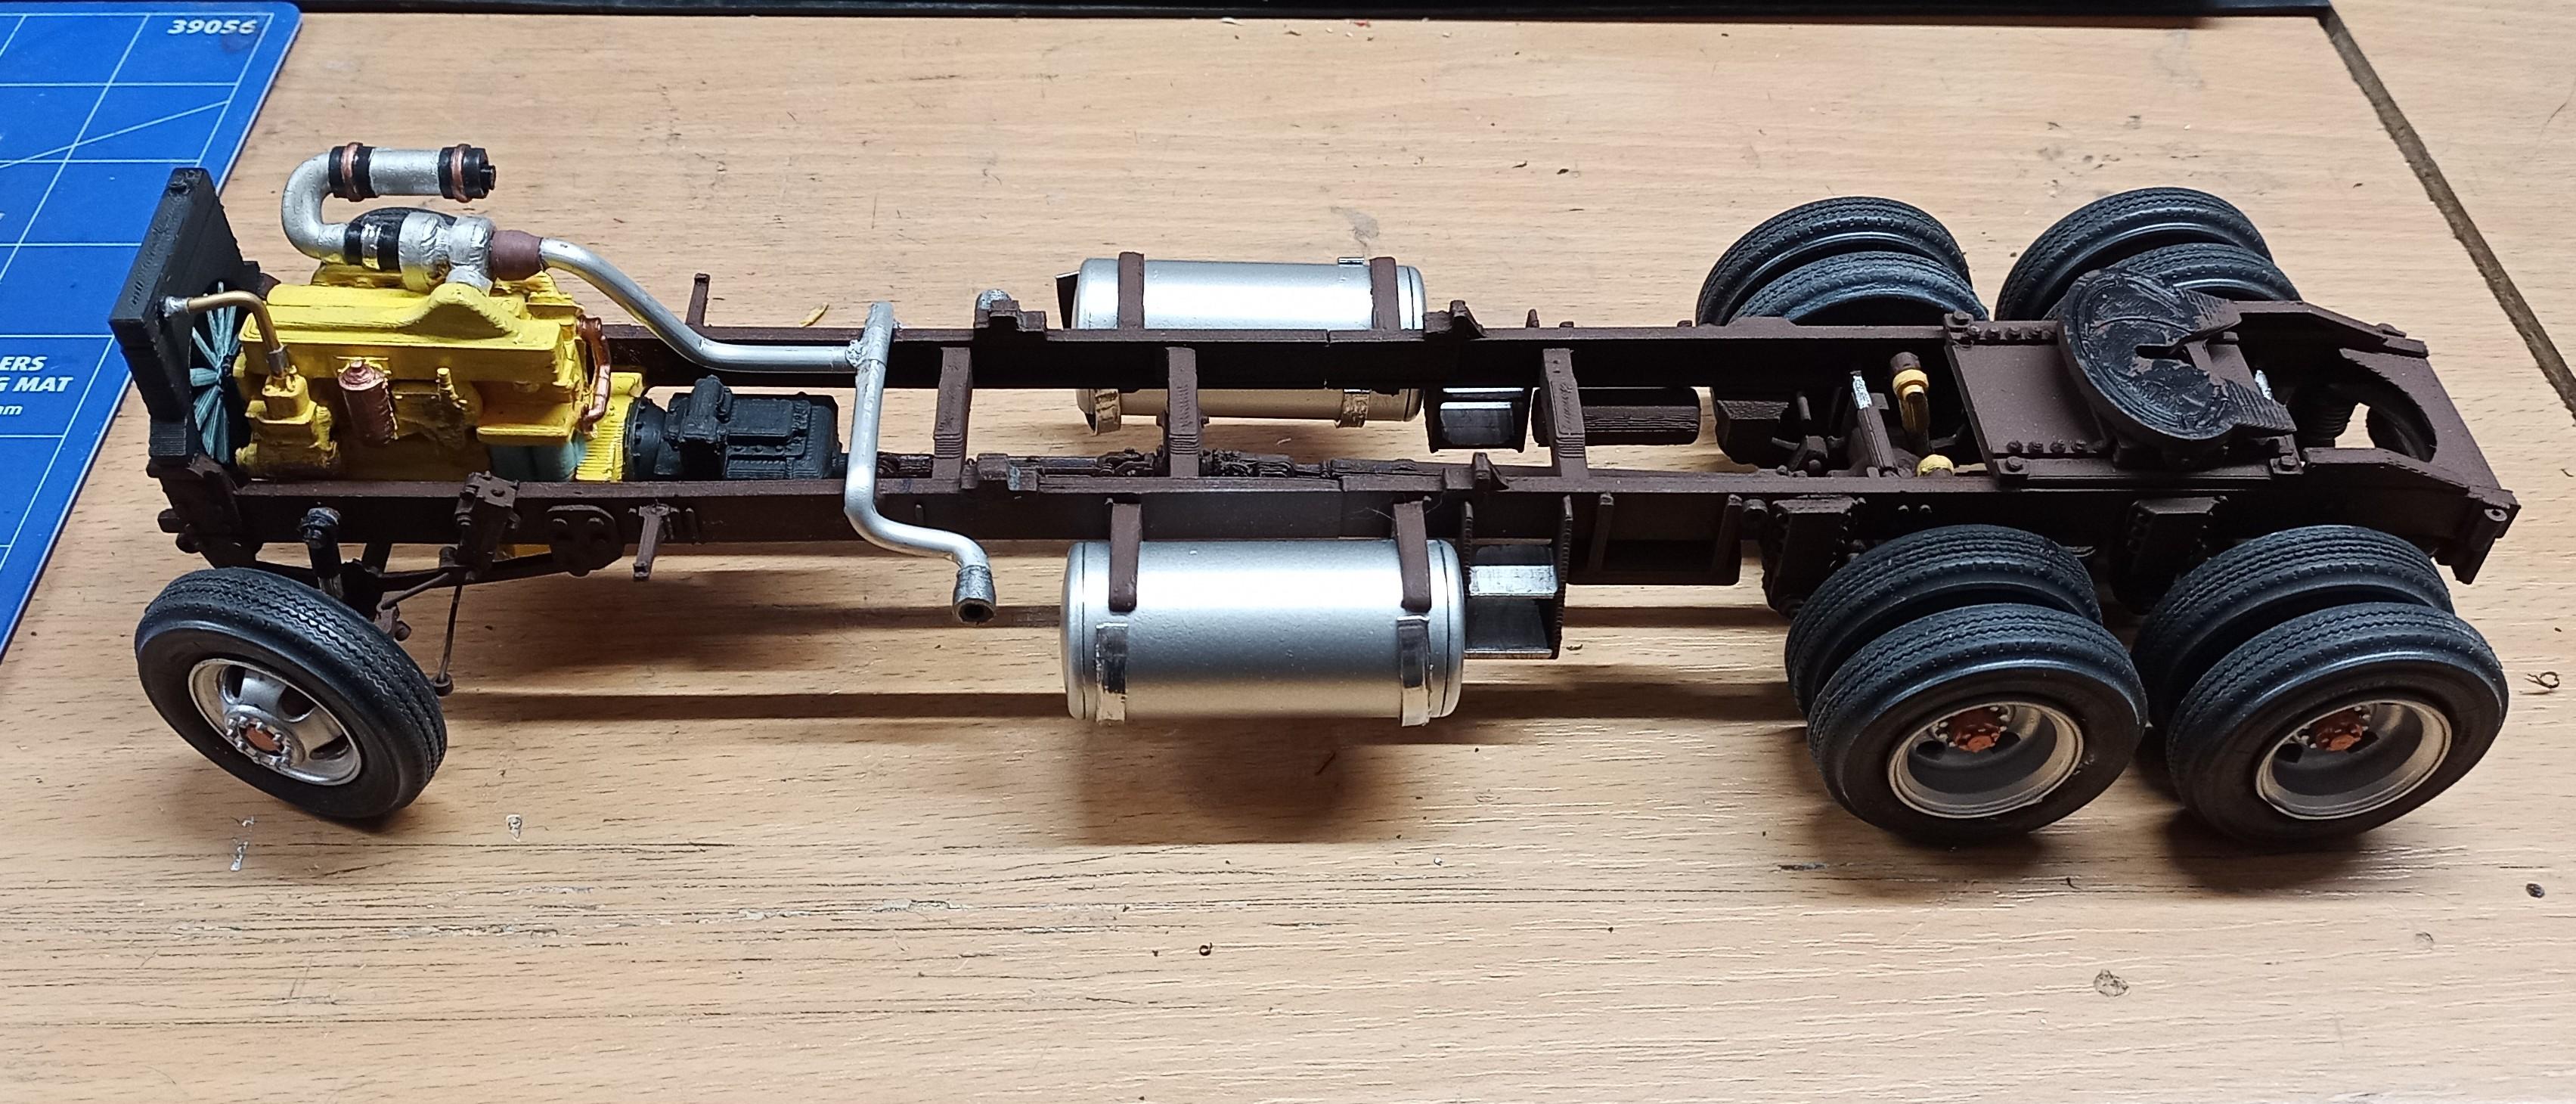
A bit of progress: Assembled the wheels... ... and mounted them:
-
Freightliner FLC
Jürgen M. replied to Jürgen M.'s topic in WIP: Model Trucks: Big Rigs and Heavy Equipment
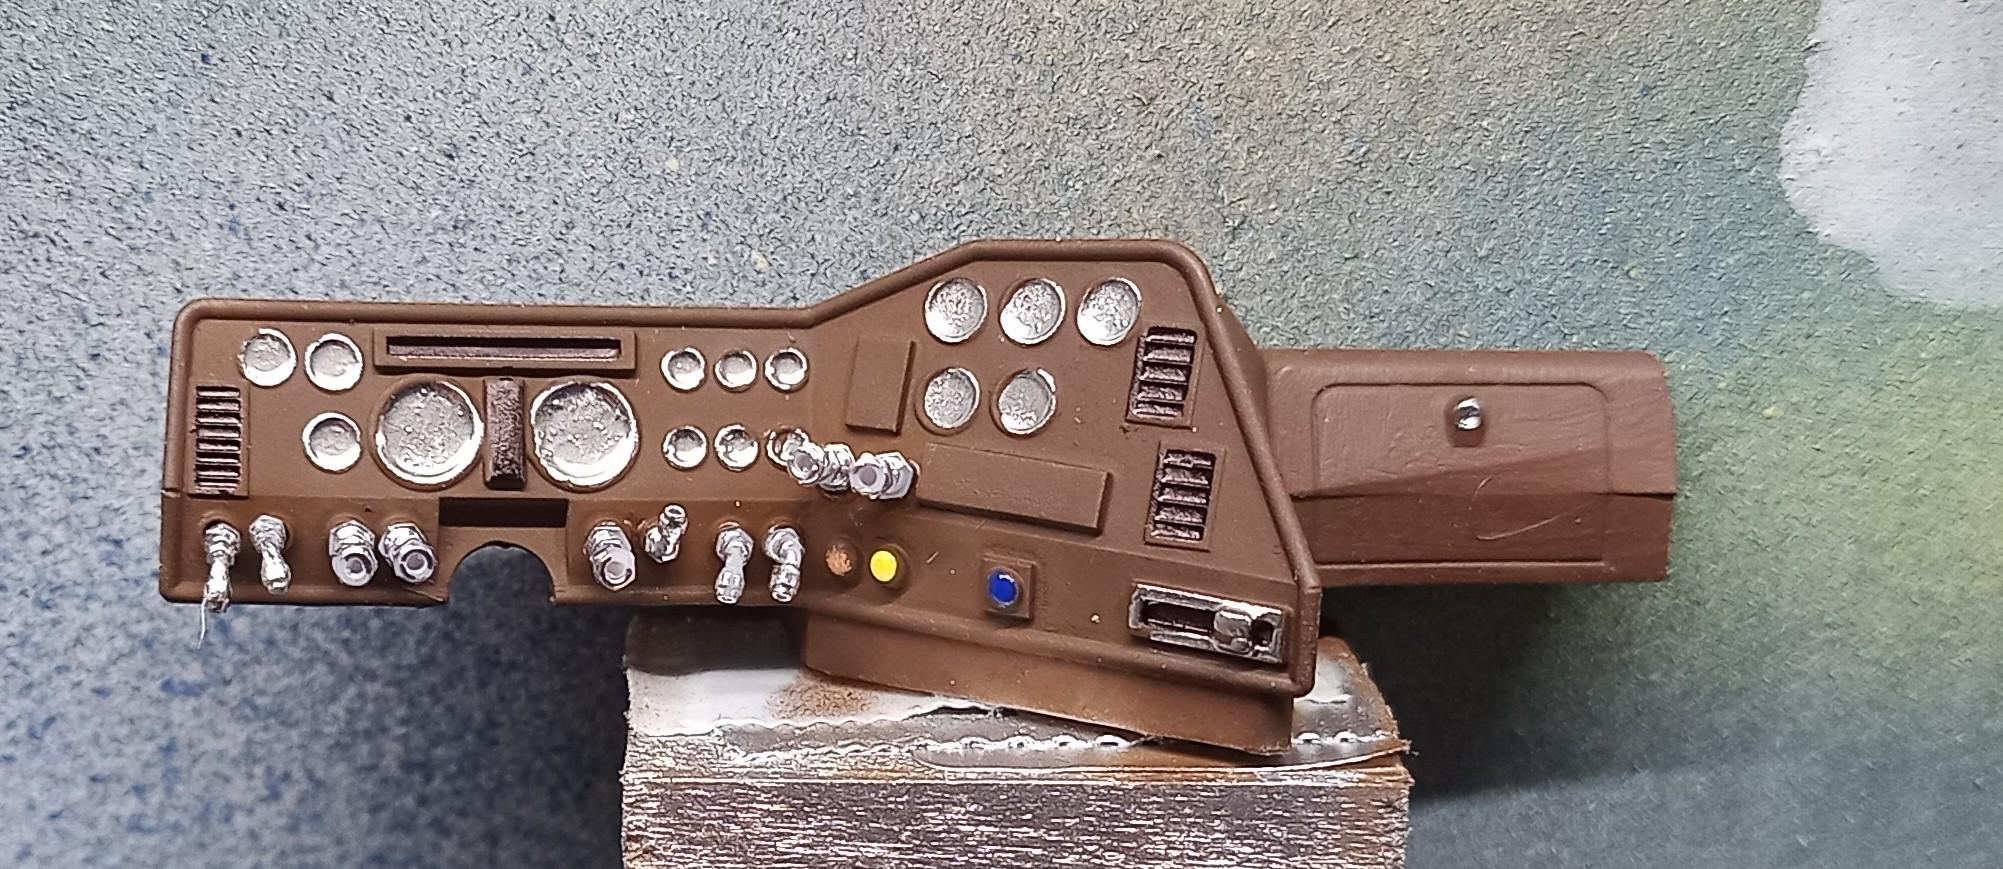
Sleeper is more or less furnished. Didn't do much on that cause it won't be visible anyway! And I did some work on the dash: I'm quite satisfied! But it's not finished yet.
-
California Special
Jürgen M. replied to Rockford's topic in WIP: Model Trucks: Big Rigs and Heavy Equipment
Doing what you do with these 1/32 models is amazing and shows that you're playing in an own league! Just cause you're building a bit smaller models doesn't mean they're below any standards. If we can talk of standards at all then you're putting them sky high mate! Your skills are outstanding! -
Freightliner FLC
Jürgen M. replied to Jürgen M.'s topic in WIP: Model Trucks: Big Rigs and Heavy Equipment
Thanks Bren! Hope not to disappoint anyone! I keep seeing the next steps before I can even make them. Next step is to furnish the sleeper and put on the roof so the whole thing can be painted. I designed a two way cross member for inside the sleeper so the walls can be pulled a bit to the inside. Should work out with 0.5mms of clearance on each side. Wouldn't want to have a convex appearance when it's closed. -
Kenworth W-925 (mild custom)
Jürgen M. replied to Gary Chastain's topic in WIP: Model Trucks: Big Rigs and Heavy Equipment
Looks perfect. You should be a truck customizing architect. You have knowledge and skills! -
Freightliner FLC
Jürgen M. replied to Jürgen M.'s topic in WIP: Model Trucks: Big Rigs and Heavy Equipment
Thanks Brian! Hope it'll turn out as I expect it to. This truck was always one of my favorites! -
Freightliner FLC
Jürgen M. replied to Jürgen M.'s topic in WIP: Model Trucks: Big Rigs and Heavy Equipment
And that from a guy with your skills and abilties! Thanks very much! Glad you like it. Don't forget the beer! You'll need it to over see mistakes! 😉 -
California Special
Jürgen M. replied to Rockford's topic in WIP: Model Trucks: Big Rigs and Heavy Equipment
Looks perfect! Good idea with the ruler! I in the meantime discovered steel wool in different grains as quite effective, especially for getting rid of printing lines. You can sand edges without destroying the radius! You have to be careful though. It's not without risk. I like where this is going. I'll stay tuned! -
Freightliner FLC
Jürgen M. replied to Jürgen M.'s topic in WIP: Model Trucks: Big Rigs and Heavy Equipment
Thanks Jeff! I'm sure it'll be a nice build. Thanks to these smooth parts the painted surfaces should come out pretty nice! The first parts are primered. I hope to apply the base coat tomorrow as well as the dull chrome effect on rims, grille, sun visor and side steps.
-
Freightliner FLC
Jürgen M. replied to Jürgen M.'s topic in WIP: Model Trucks: Big Rigs and Heavy Equipment
The Show can go on! Got my parts from Bren! Now I can proceed with primering. A big thanks to Bren! He helped me out once more so I can complete my build!
-
59 Chevy Task Force
Jürgen M. replied to Jürgen M.'s topic in WIP: Model Trucks: Pickups, Vans, SUVs, Light Commercial
Thanks! Nice build! 👍 -
59 Chevy Task Force
Jürgen M. replied to Jürgen M.'s topic in WIP: Model Trucks: Pickups, Vans, SUVs, Light Commercial
Is there an amt kit-number to that? Looks really good! -
59 Chevy Task Force
Jürgen M. replied to Jürgen M.'s topic in WIP: Model Trucks: Pickups, Vans, SUVs, Light Commercial
OK, thanks for that information. I'll have a look. -
Hi everyone. Most of you will not know me yet. I'm normally at home in 'big rigs and heavy equipment'! What I'm doing here? To begin with, I'm a fan of the movie 'Convoy' and I've already built 7 rigs from the movie. Since my shelf has become quite full and there are no more trucks from the movie I really want to build I decided to build these two vehicles to fill up the shelf: First one is this 59 Chevy Task Force 3100: My question: Does anyone here know if there's a kit in 1/25 scale I could use? The box I would scratch build or print. I only need the pick-up truck. If there's none on the market I'll have to design it myself. I was just hoping I wouldn't have to! This will be the second one: This Chartreuse micro bus. As far as I can see, basically also a Chevy , quite similar to the Task Force but larger. I'd be happy to get any information on potential kits of this one too. Thanks in advance for any Infos. Jürgen
-
Western Star 4900 FA plow truck
Jürgen M. replied to BK9300's topic in WIP: Model Trucks: Big Rigs and Heavy Equipment
That flag looks cool. Great idea! Is a chrome pen an option on the door handles? I like using them for these small parts! -
1961 Chevy C-60 Wrecker
Jürgen M. replied to RoninUtah's topic in Model Trucks: Big Rigs and Heavy Equipment
Nice work Ron! You're finishing one after another. The argosy, now this one! And in a perfect quality! It's always fun to see your builds! Keep going!