Jürgen M.
-
Posts
1,726 -
Joined
-
Last visited
Content Type
Profiles
Forums
Events
Gallery
Everything posted by Jürgen M.
-
Thank you Brian! I actually do have enough room on the shelf but the conventional belongs to the 'Convoy' so the cabover will have to make friends with the other trucks! 😉 I also switch once in a while and take models out of the cabinet and exchange them with ones from the shelf. That way the Brockway cabover will surely be close to its brother sometime!
-
 This is going to be another hi-complexity build! I'll be following curiously! Good thing you got enough coffee!
 -
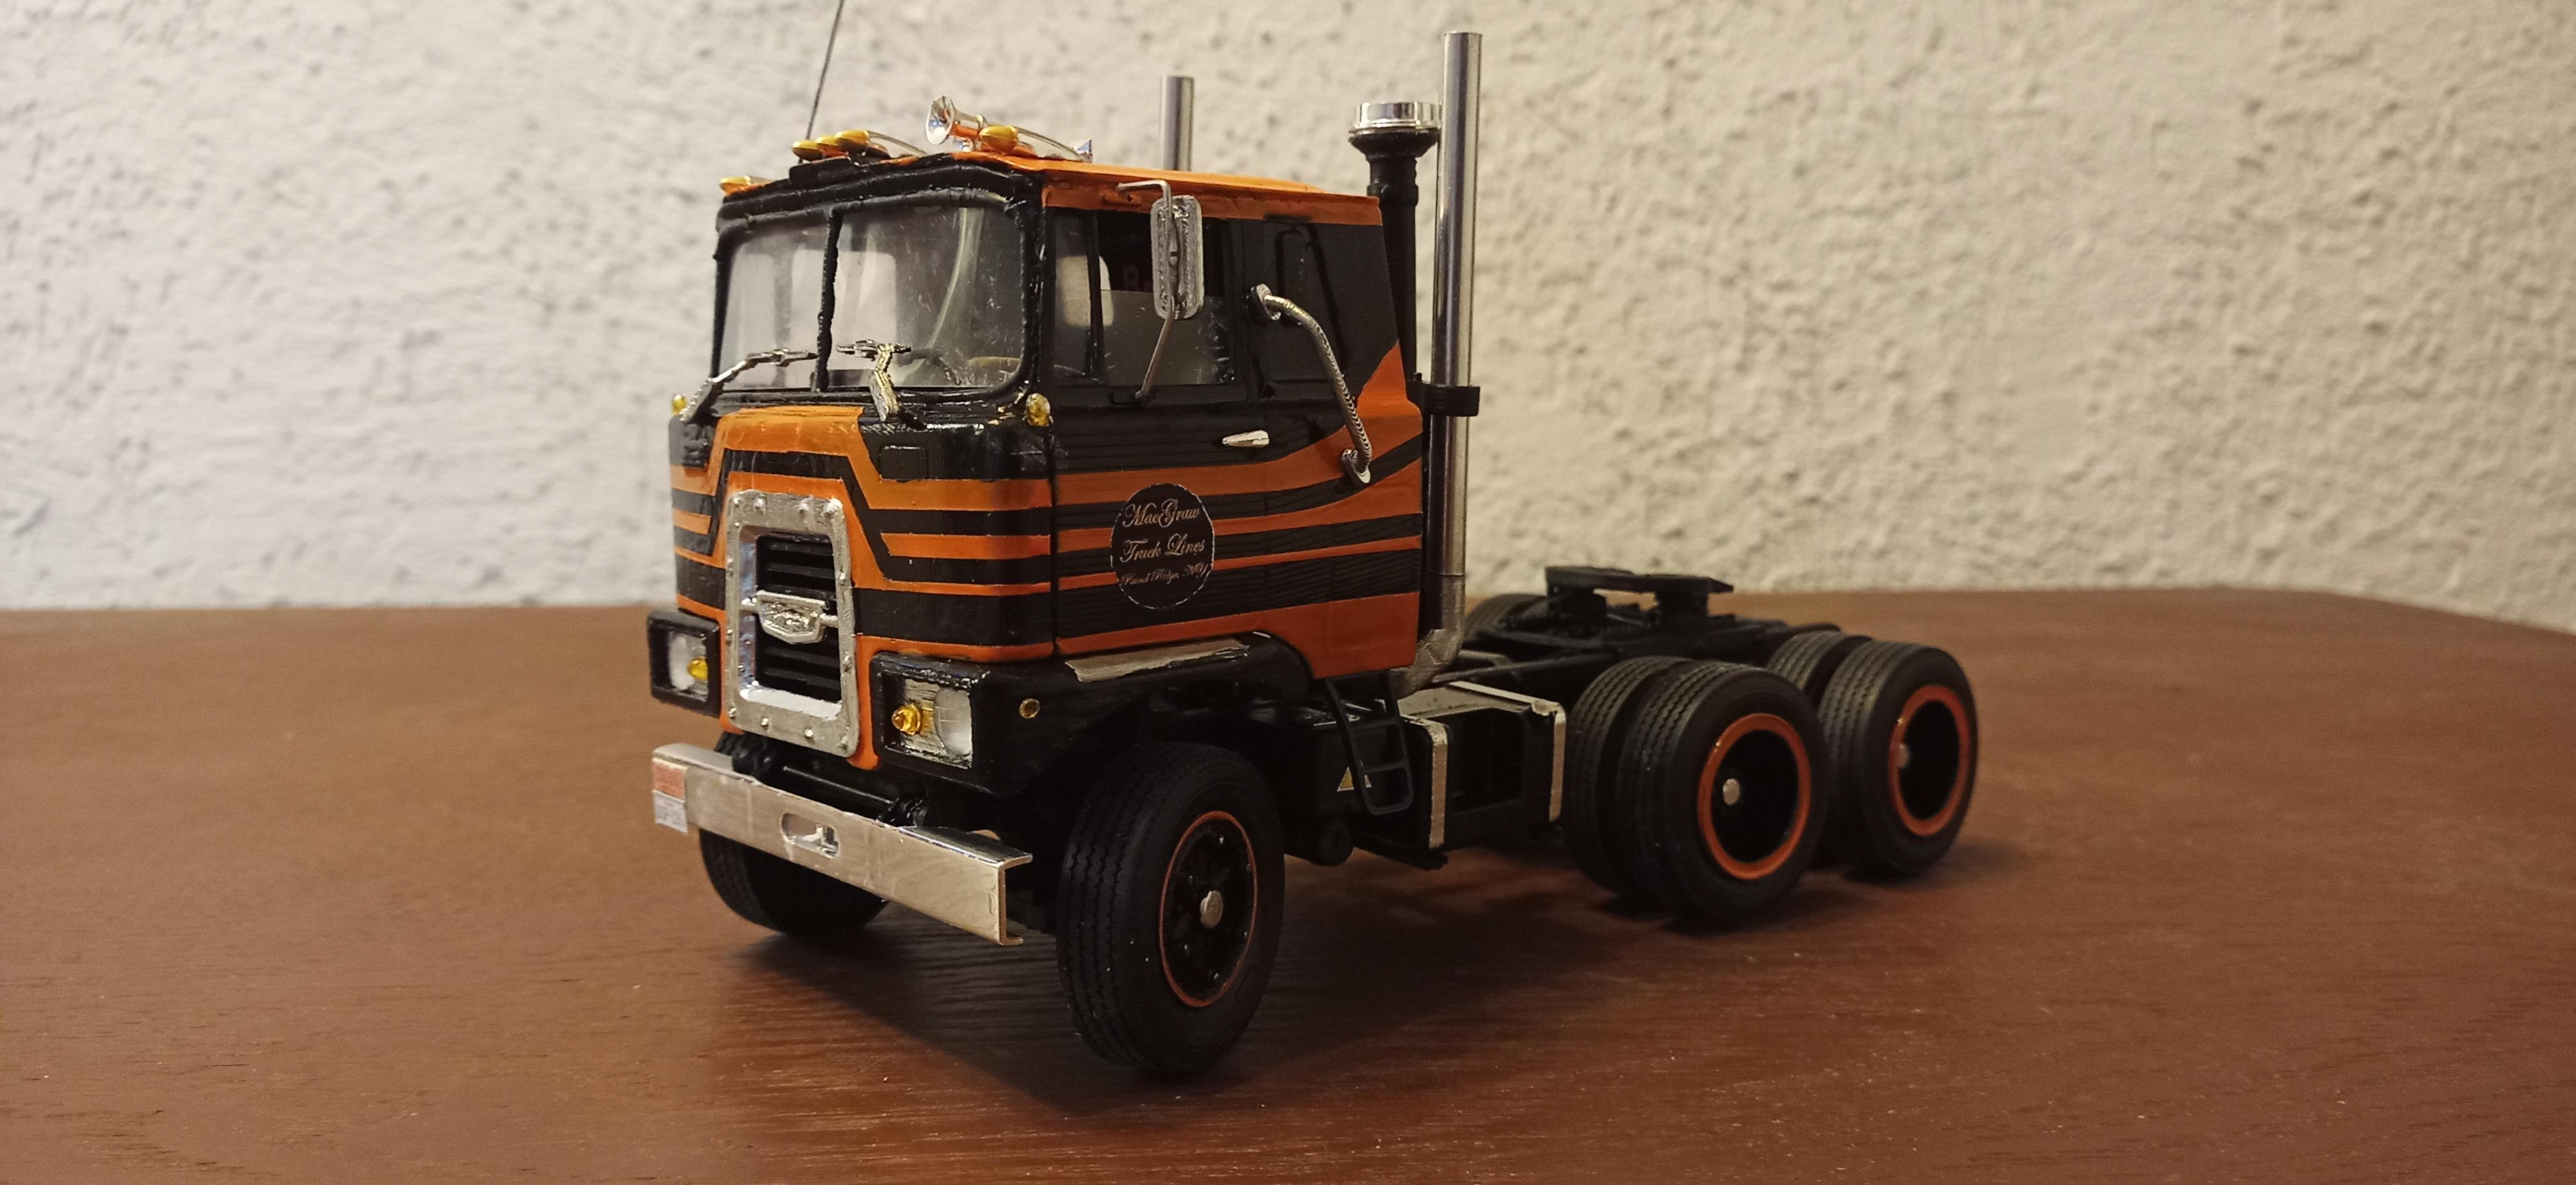
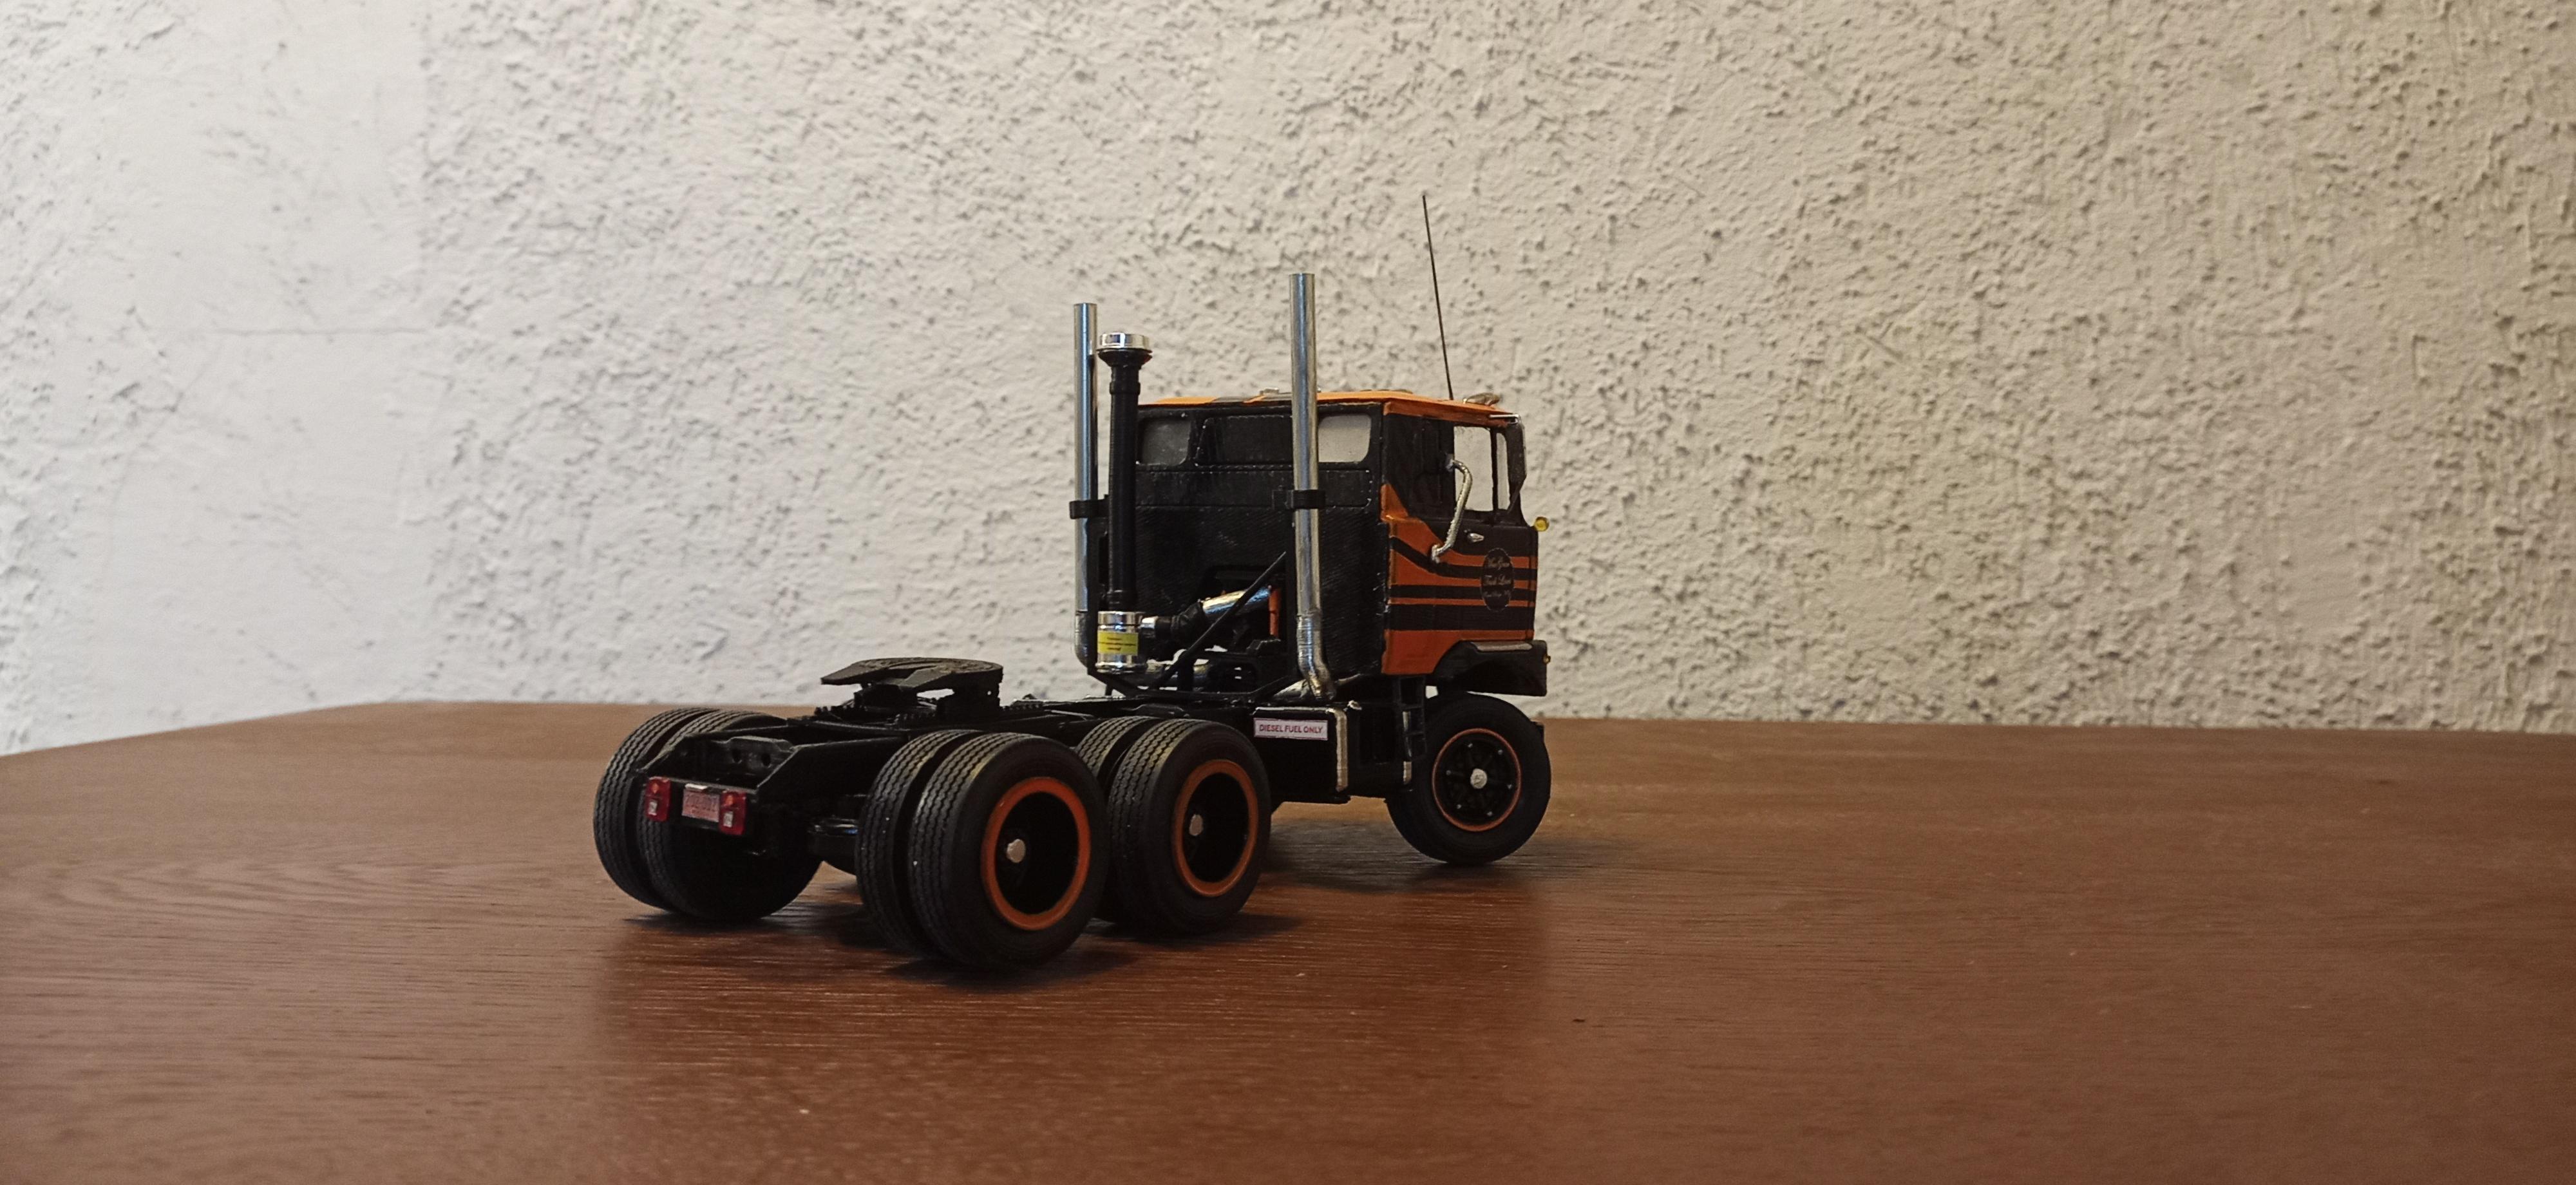
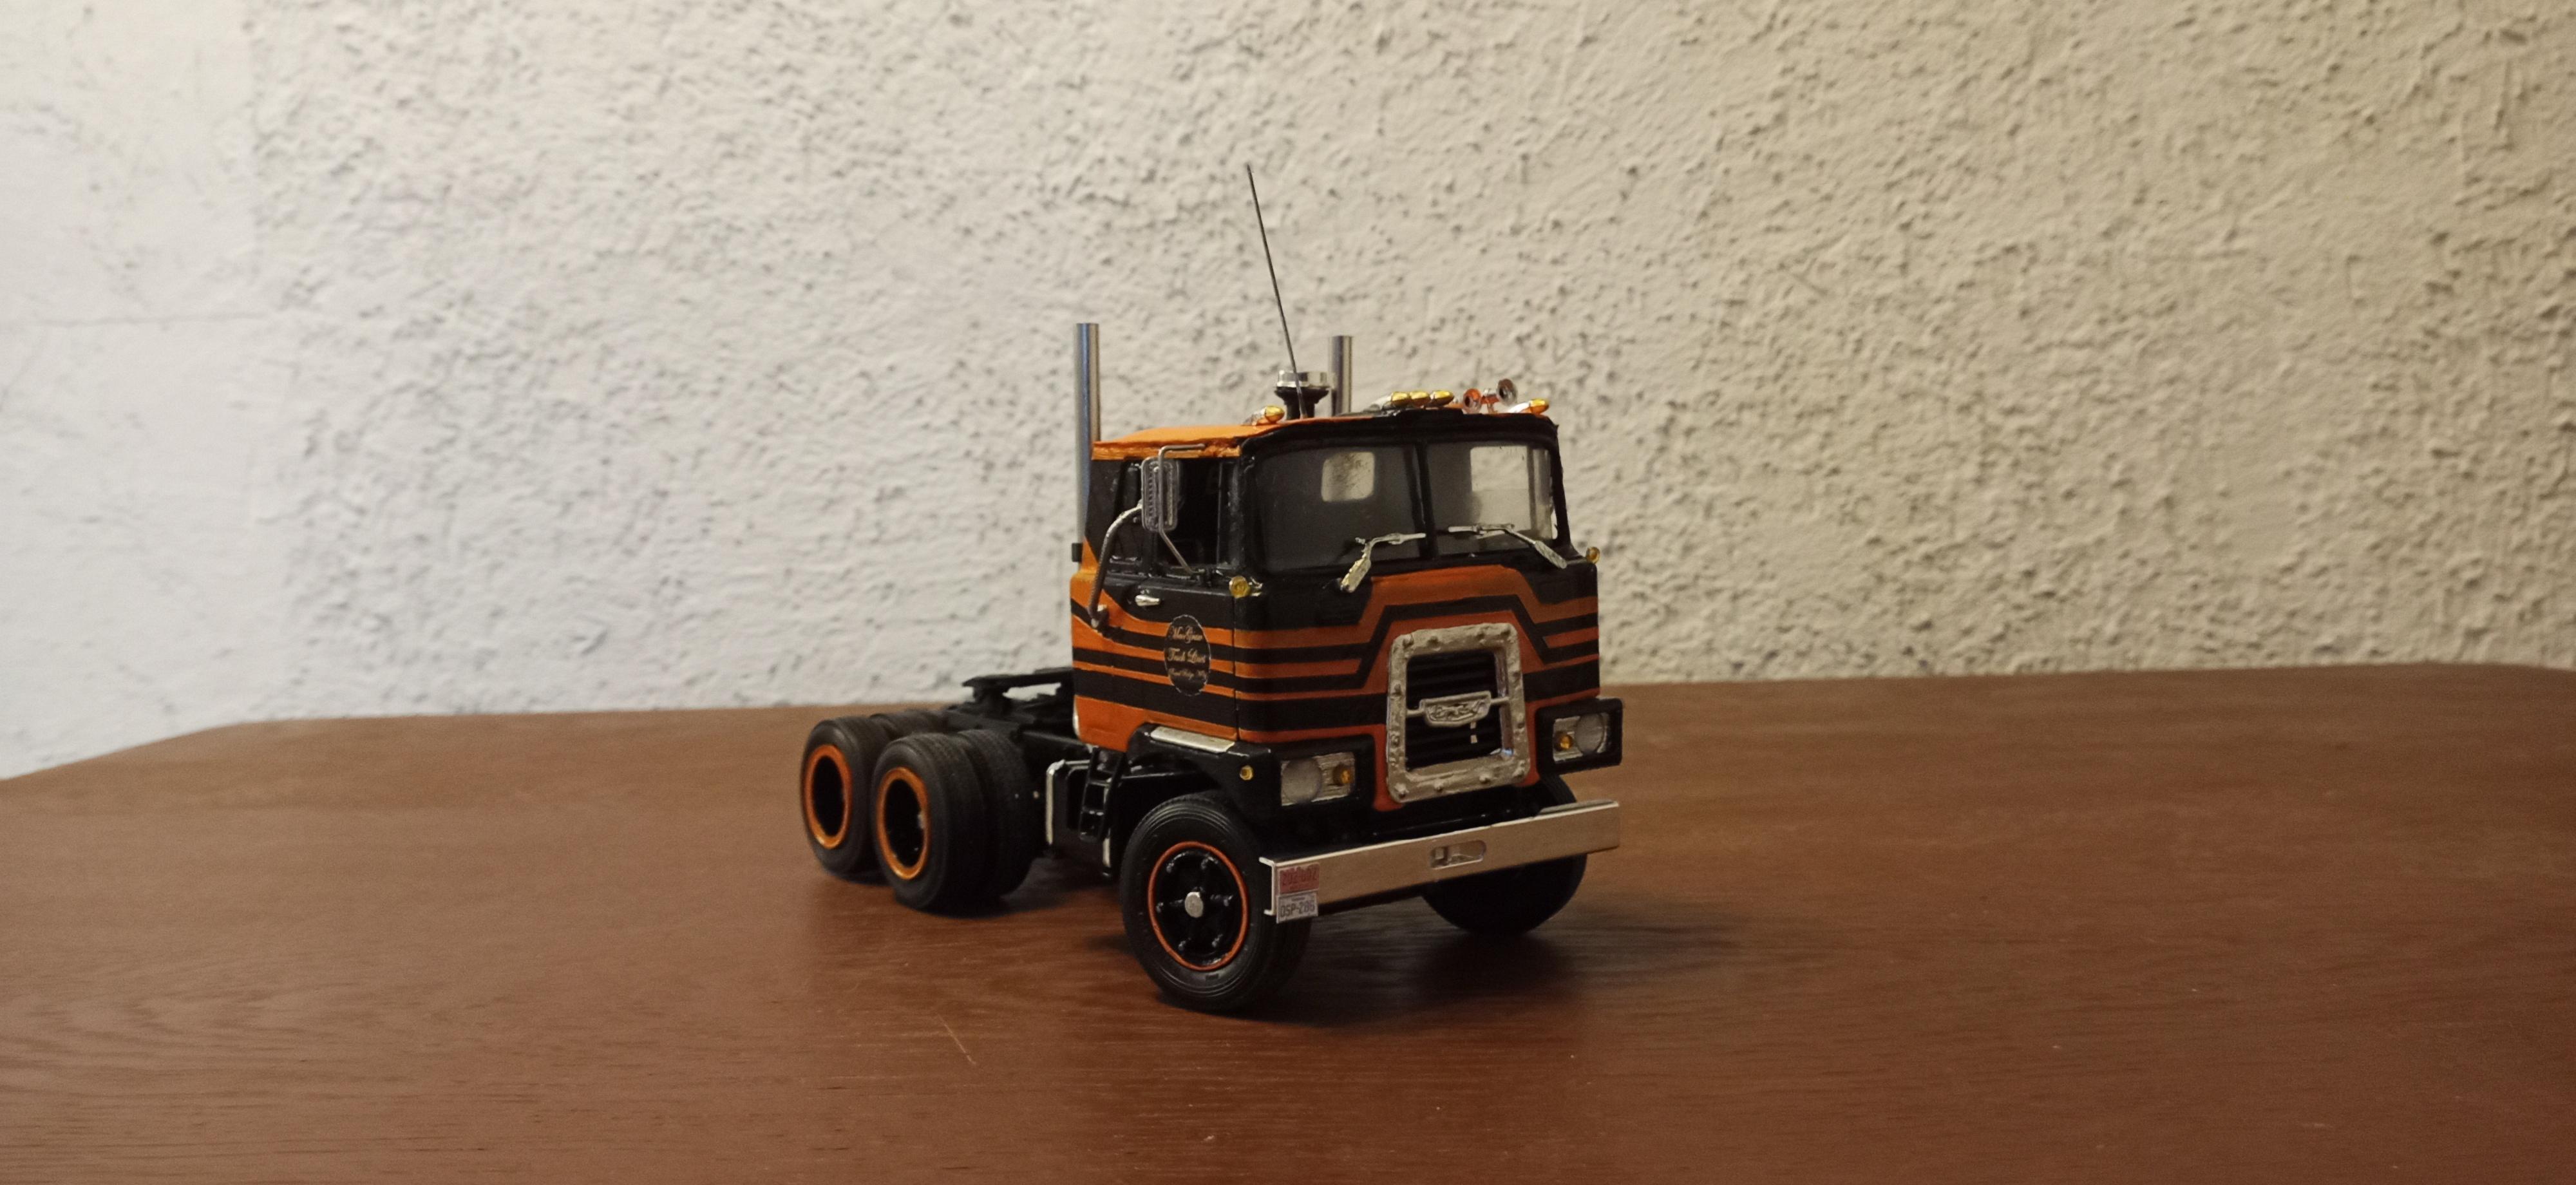
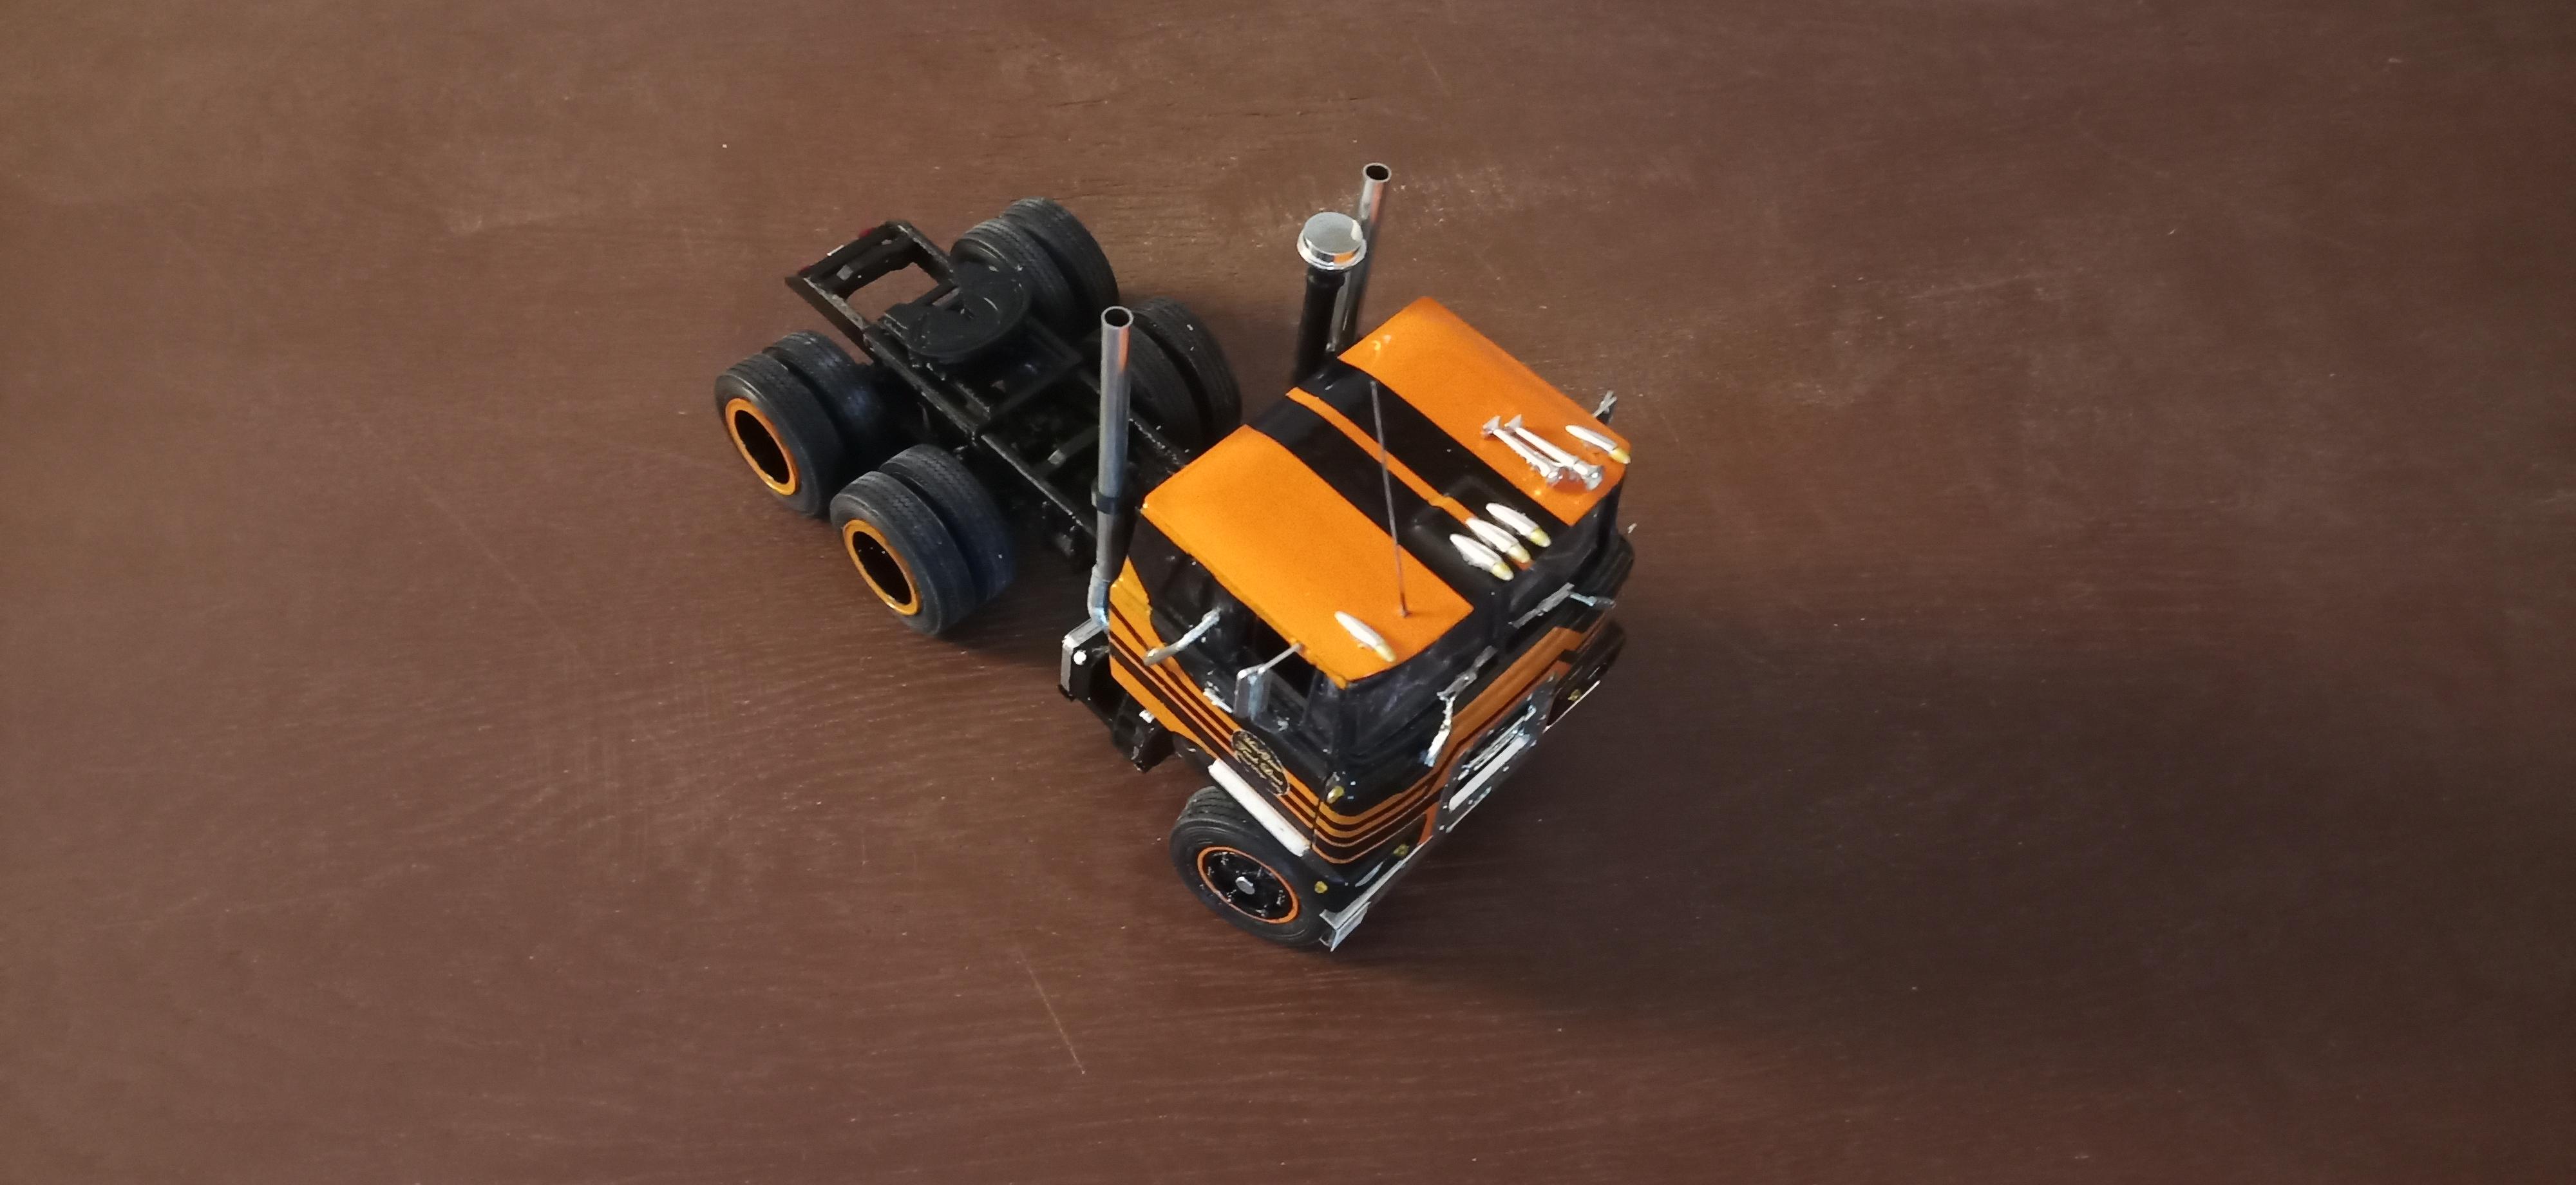
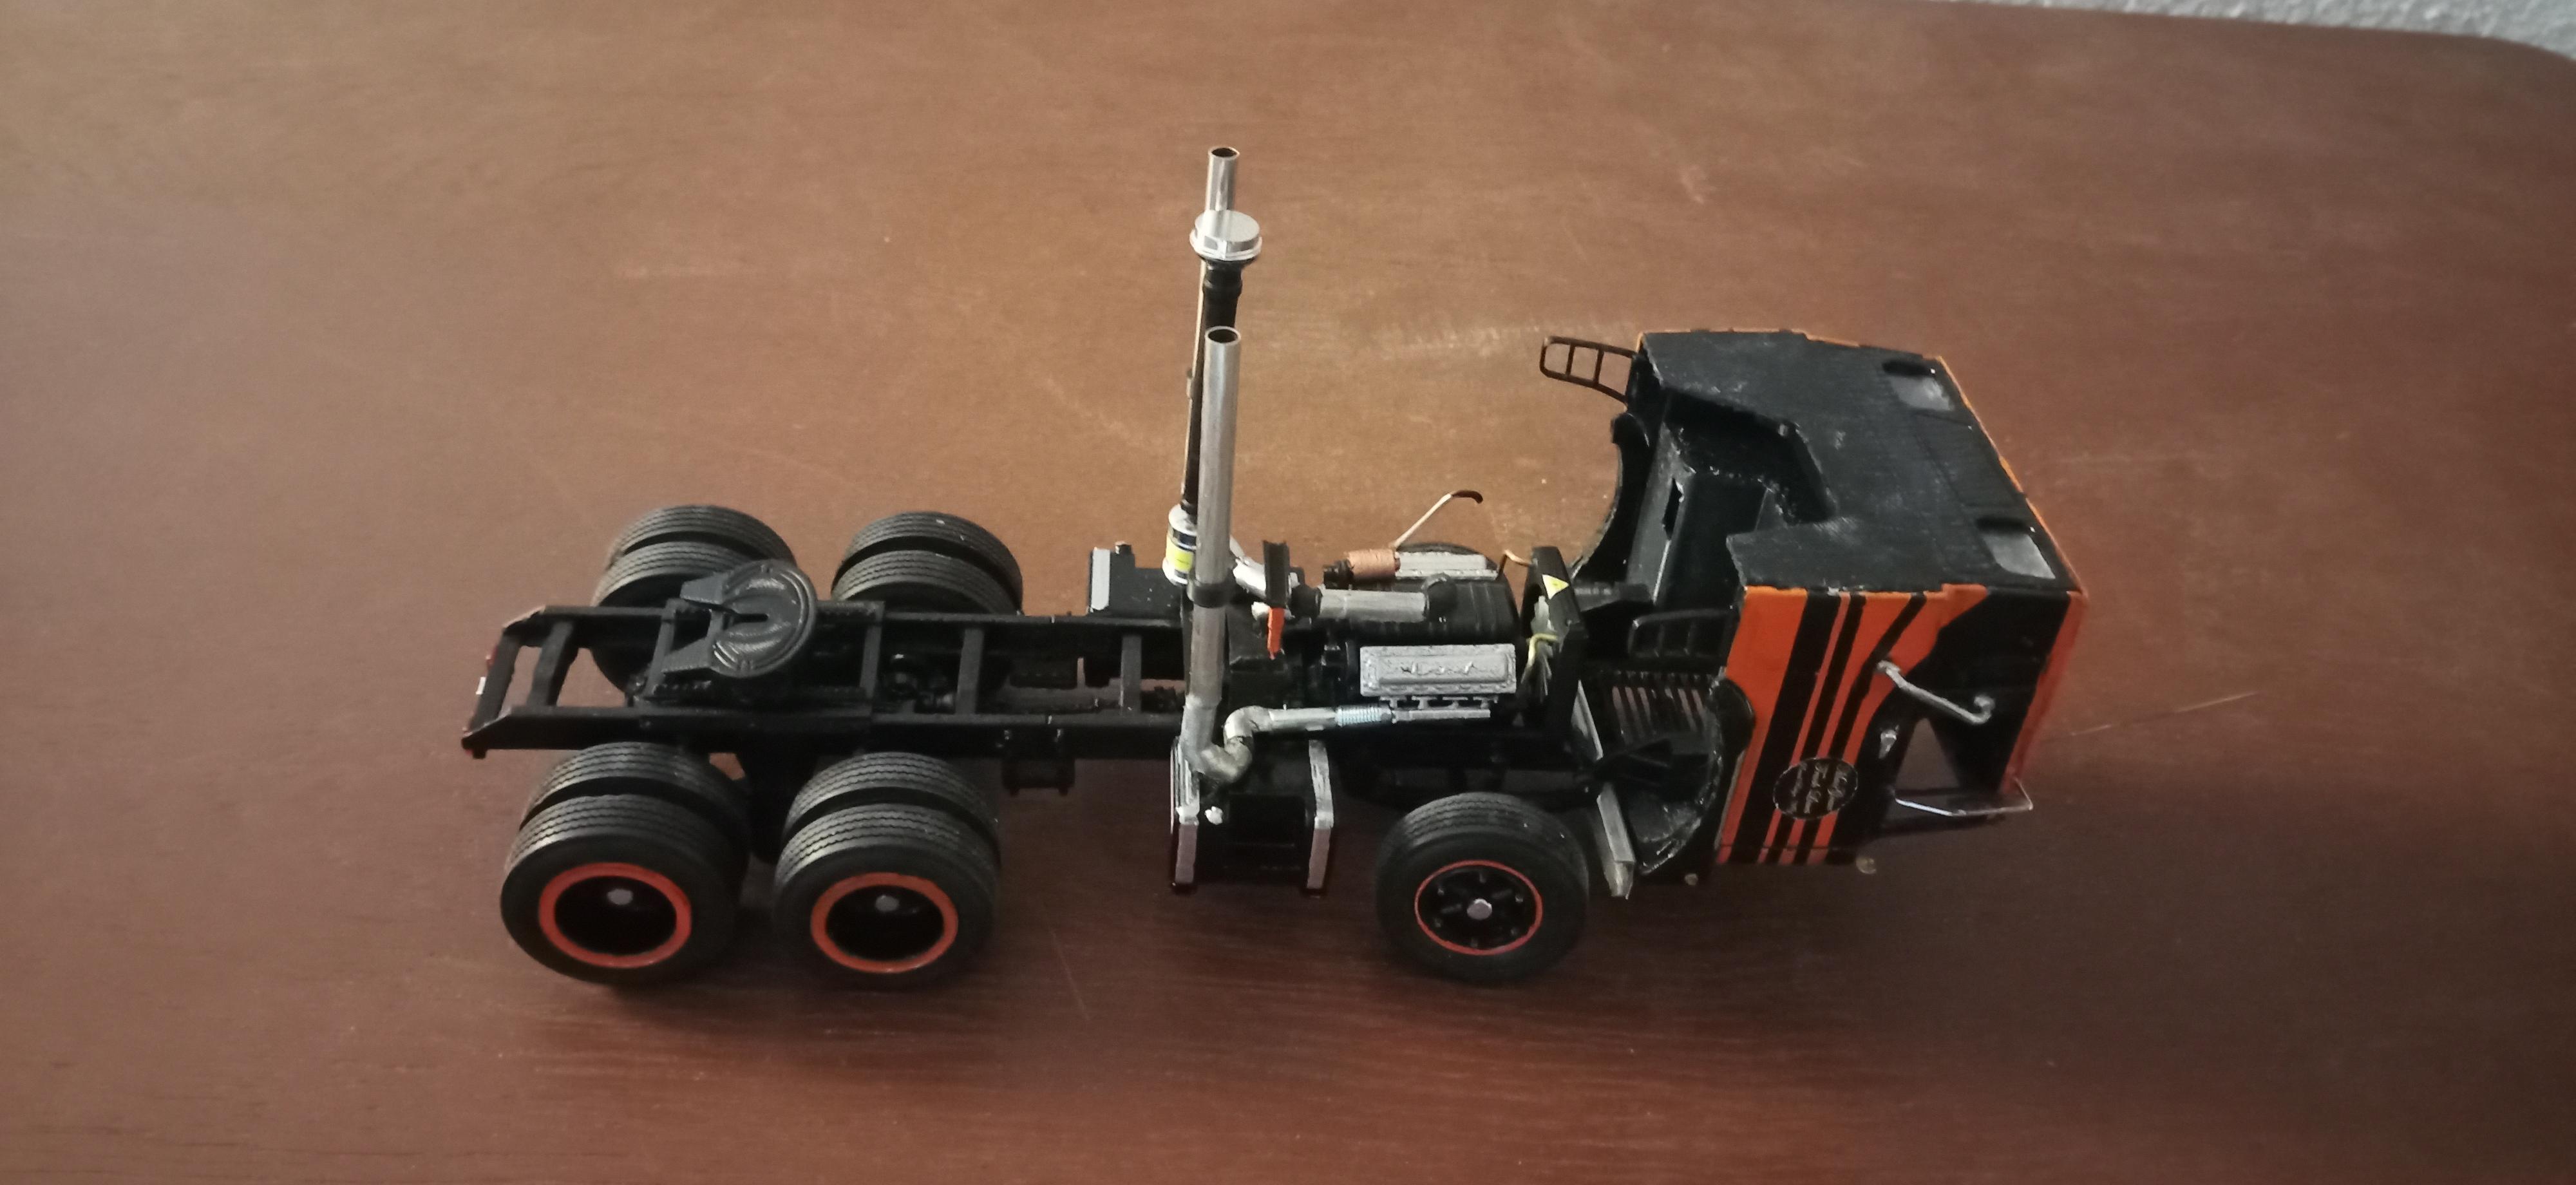
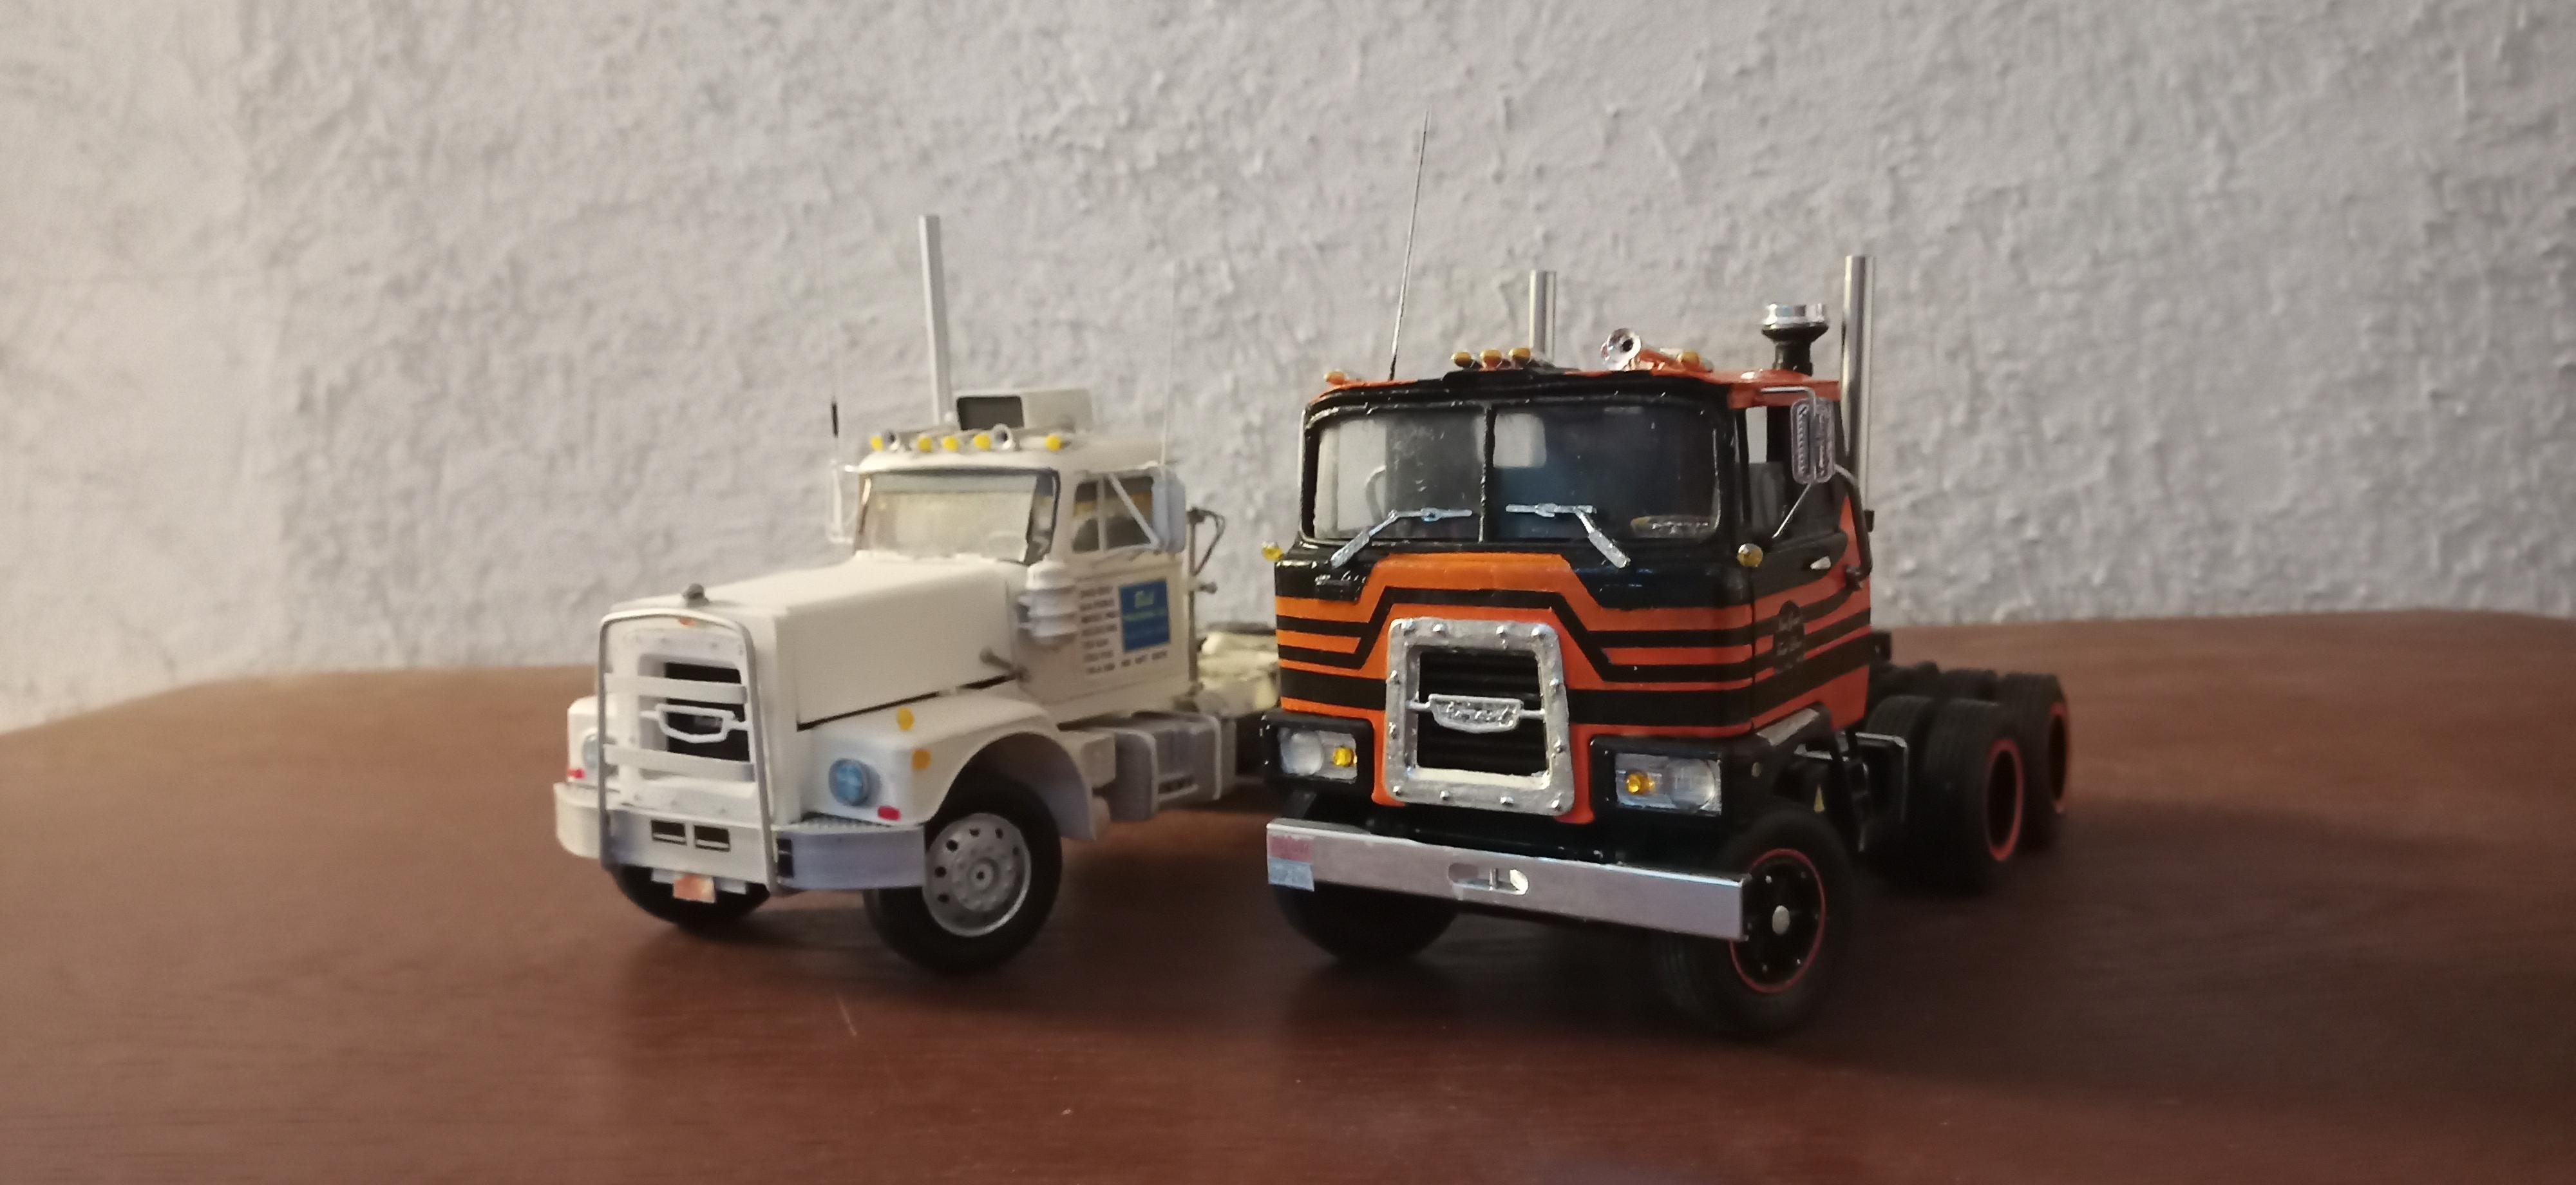
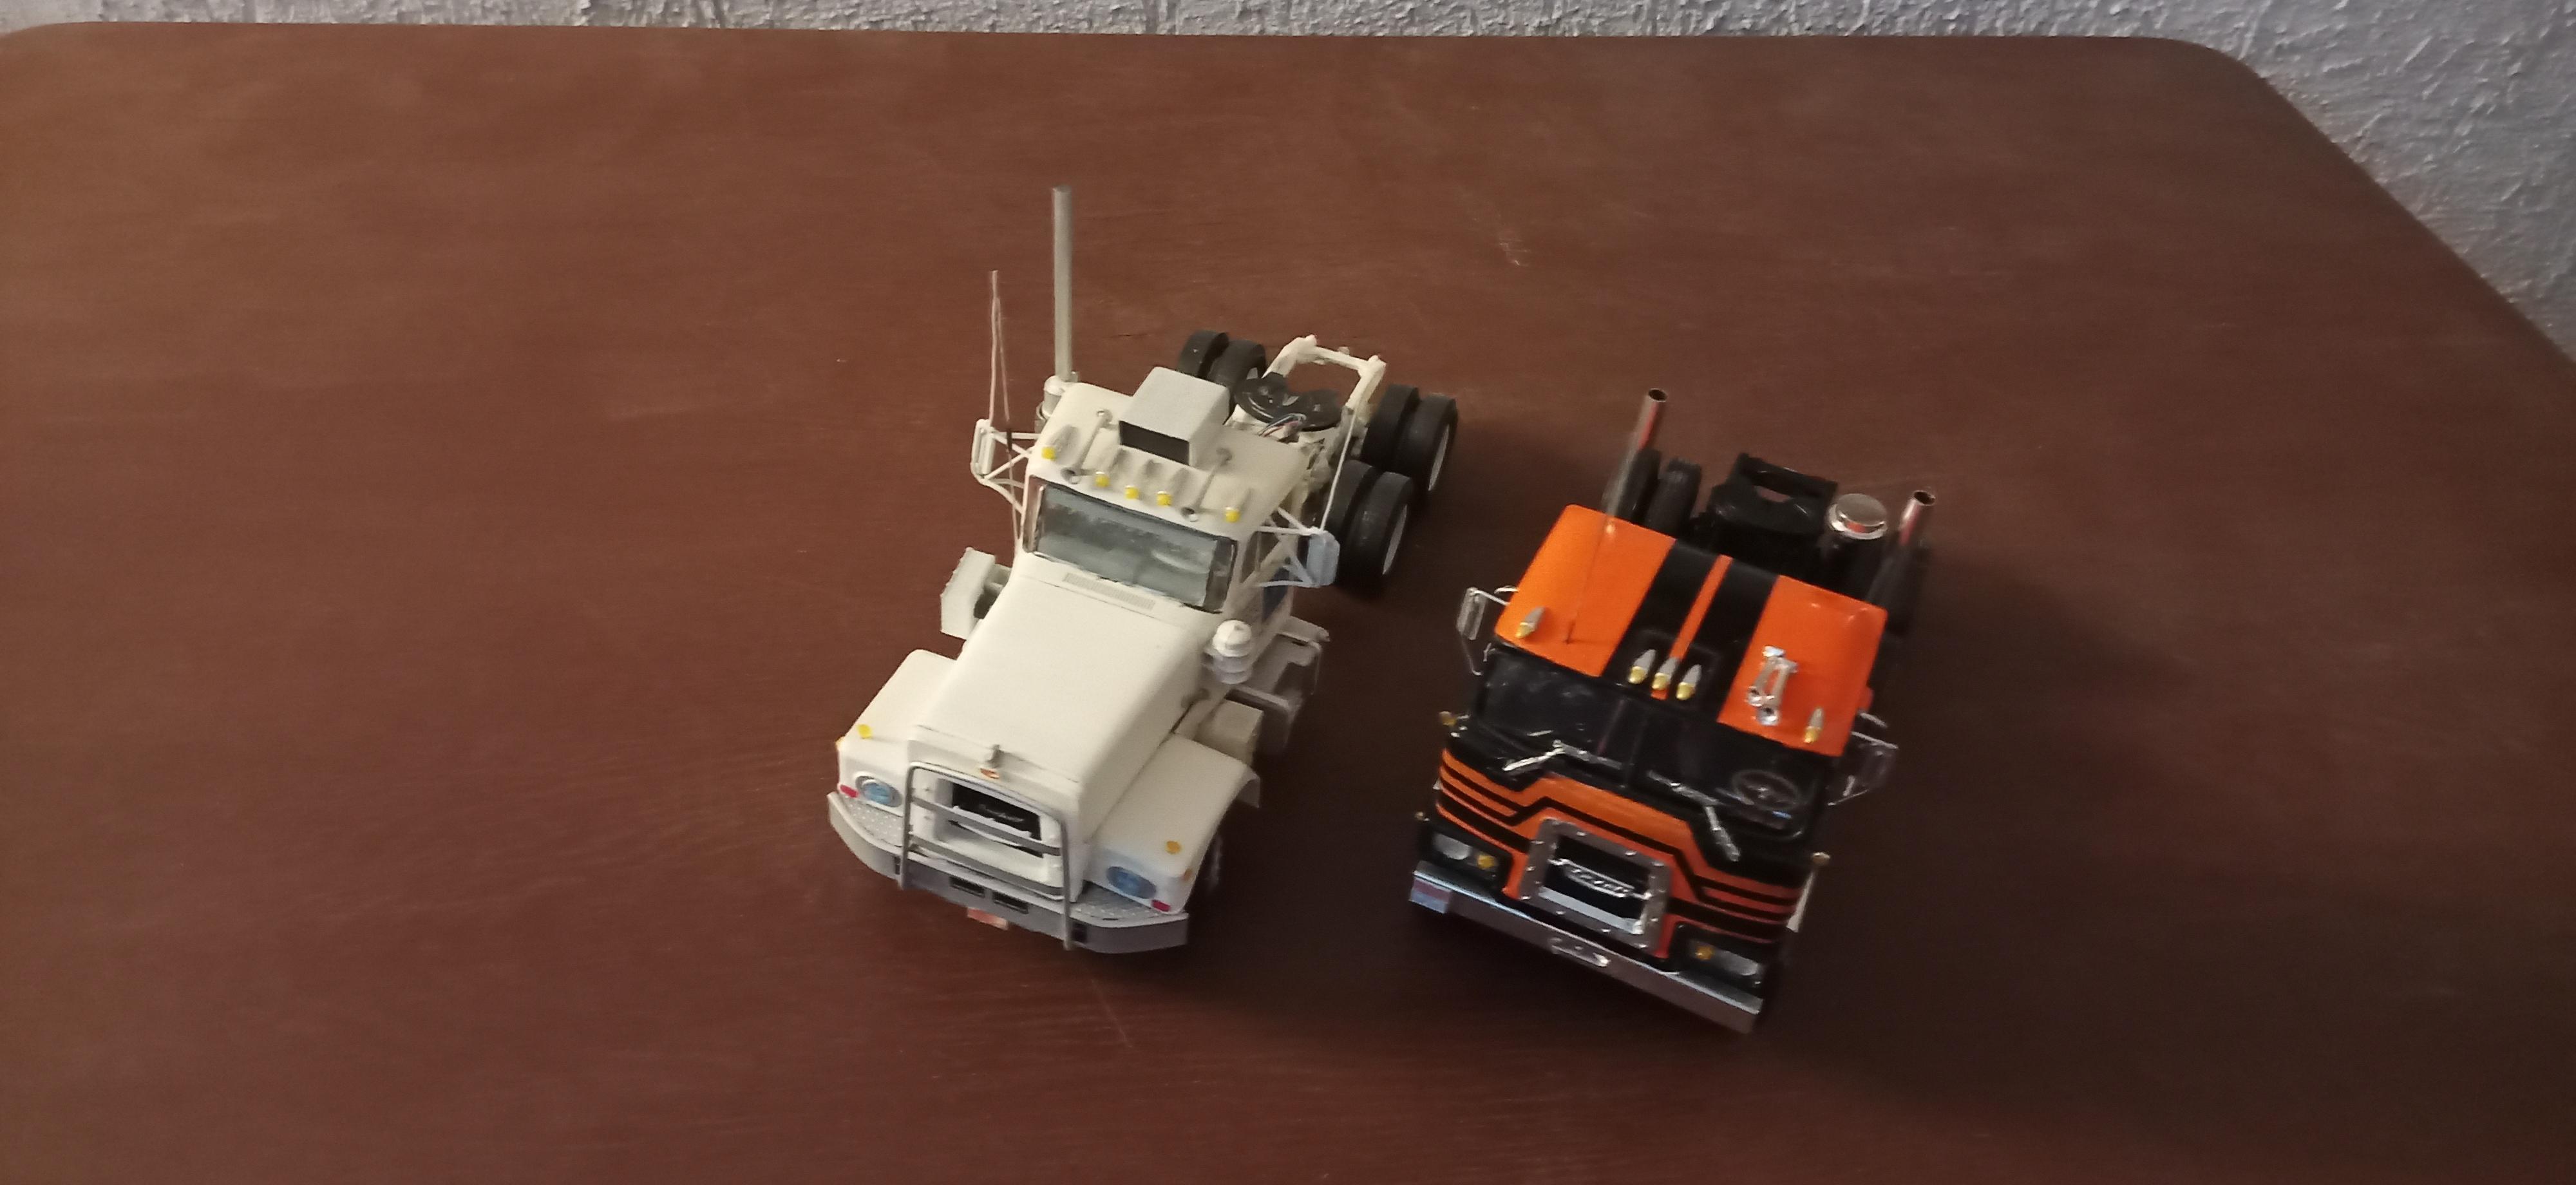
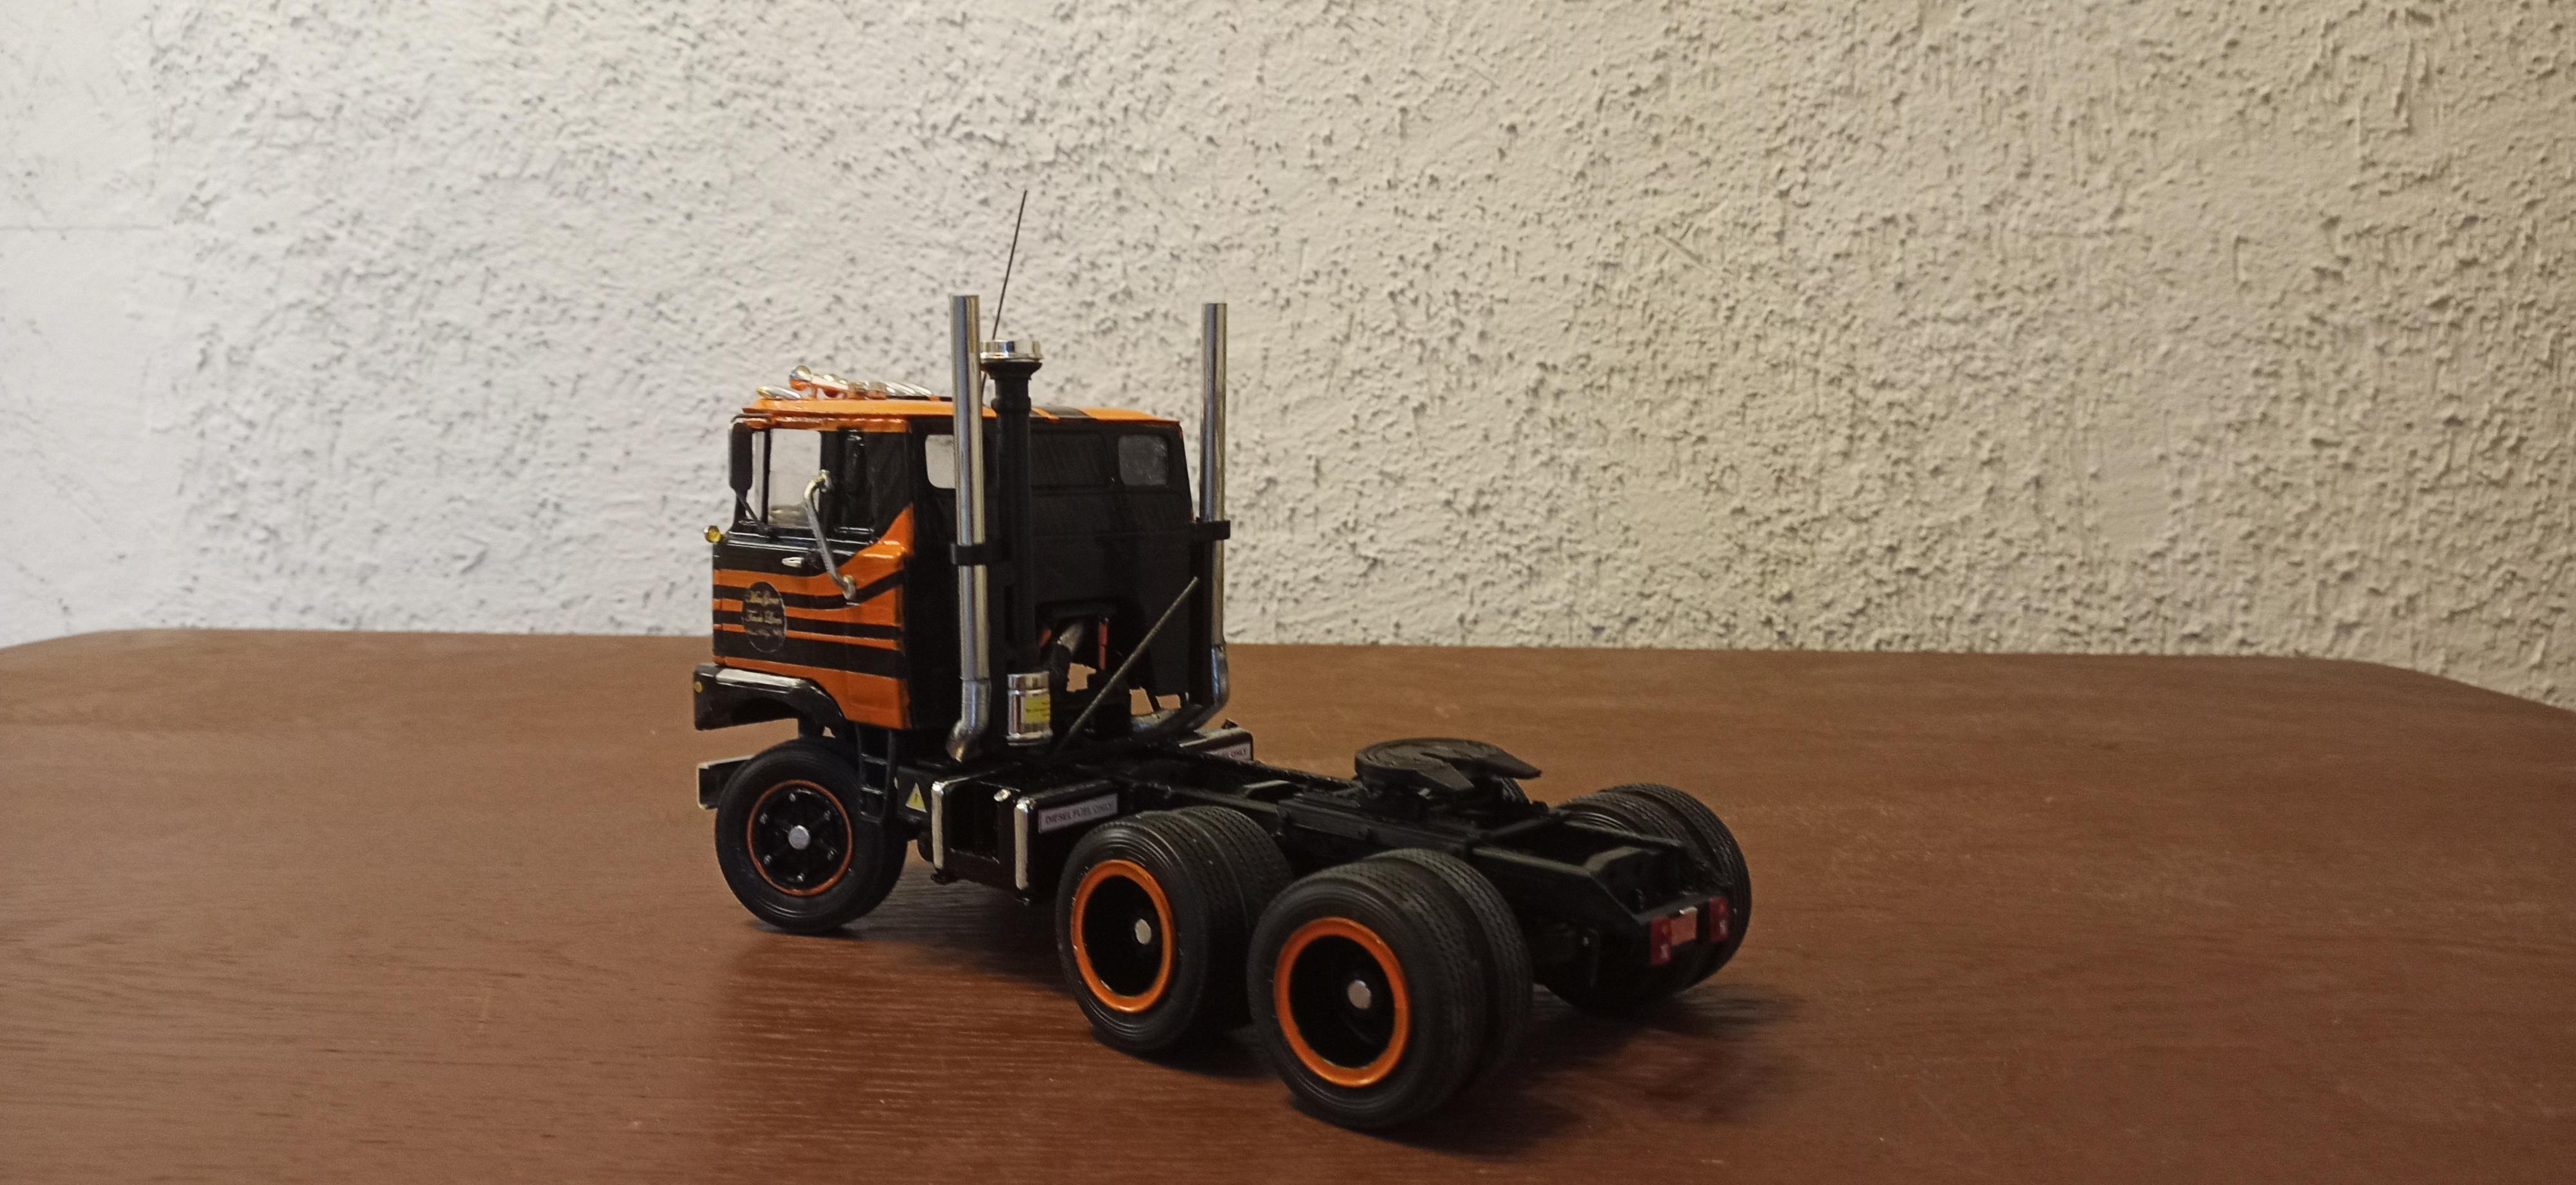
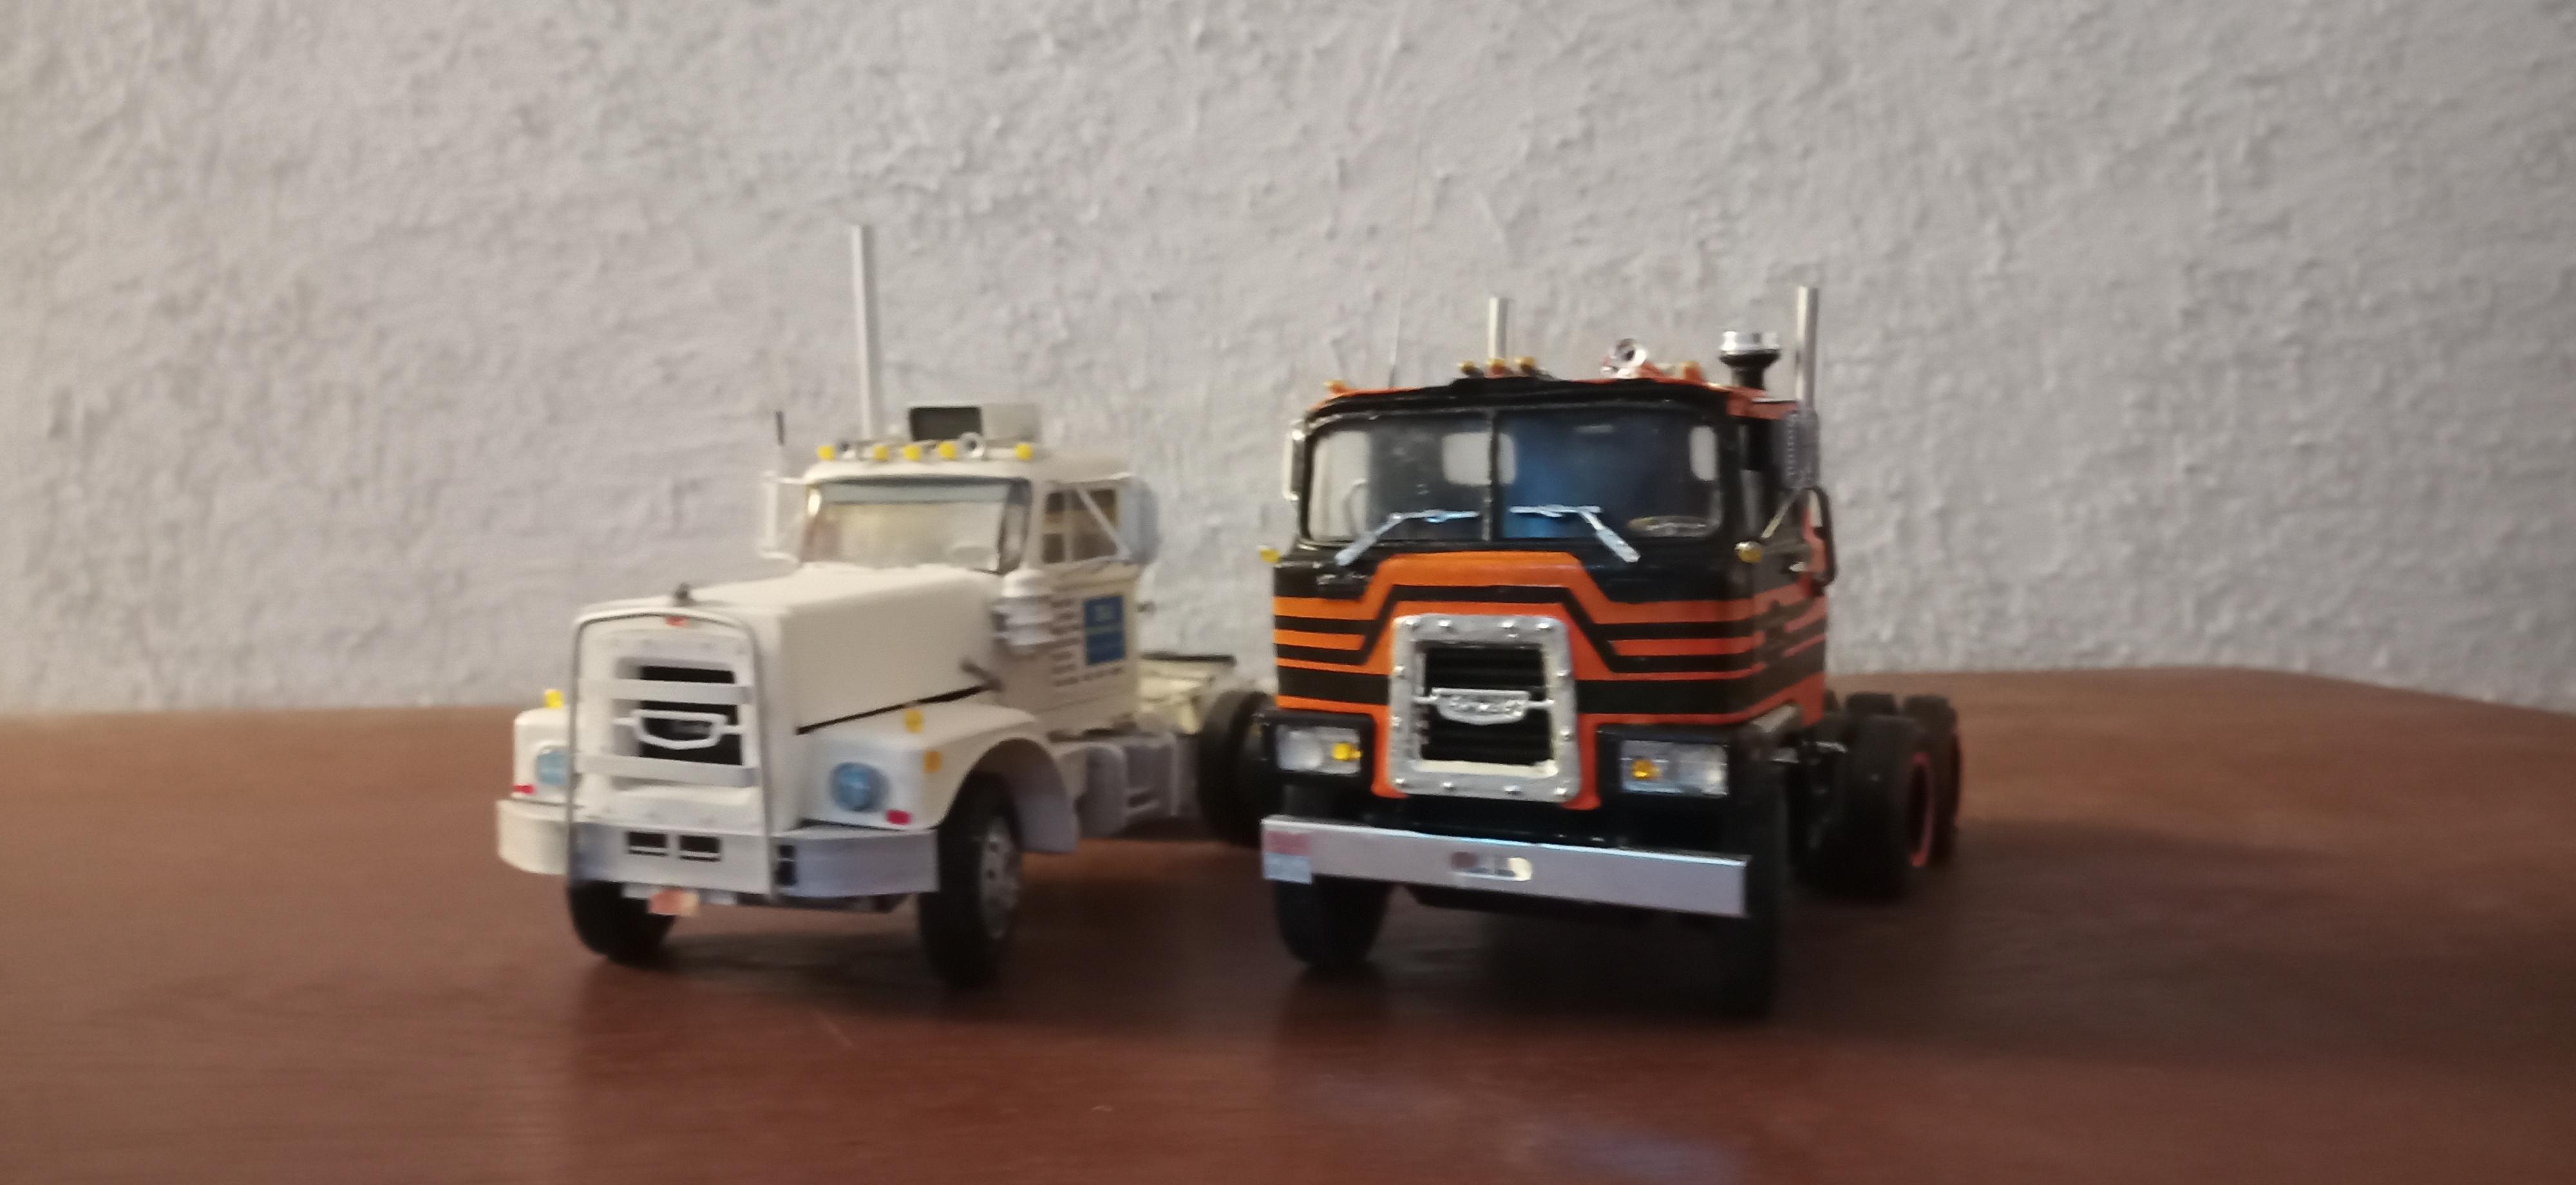
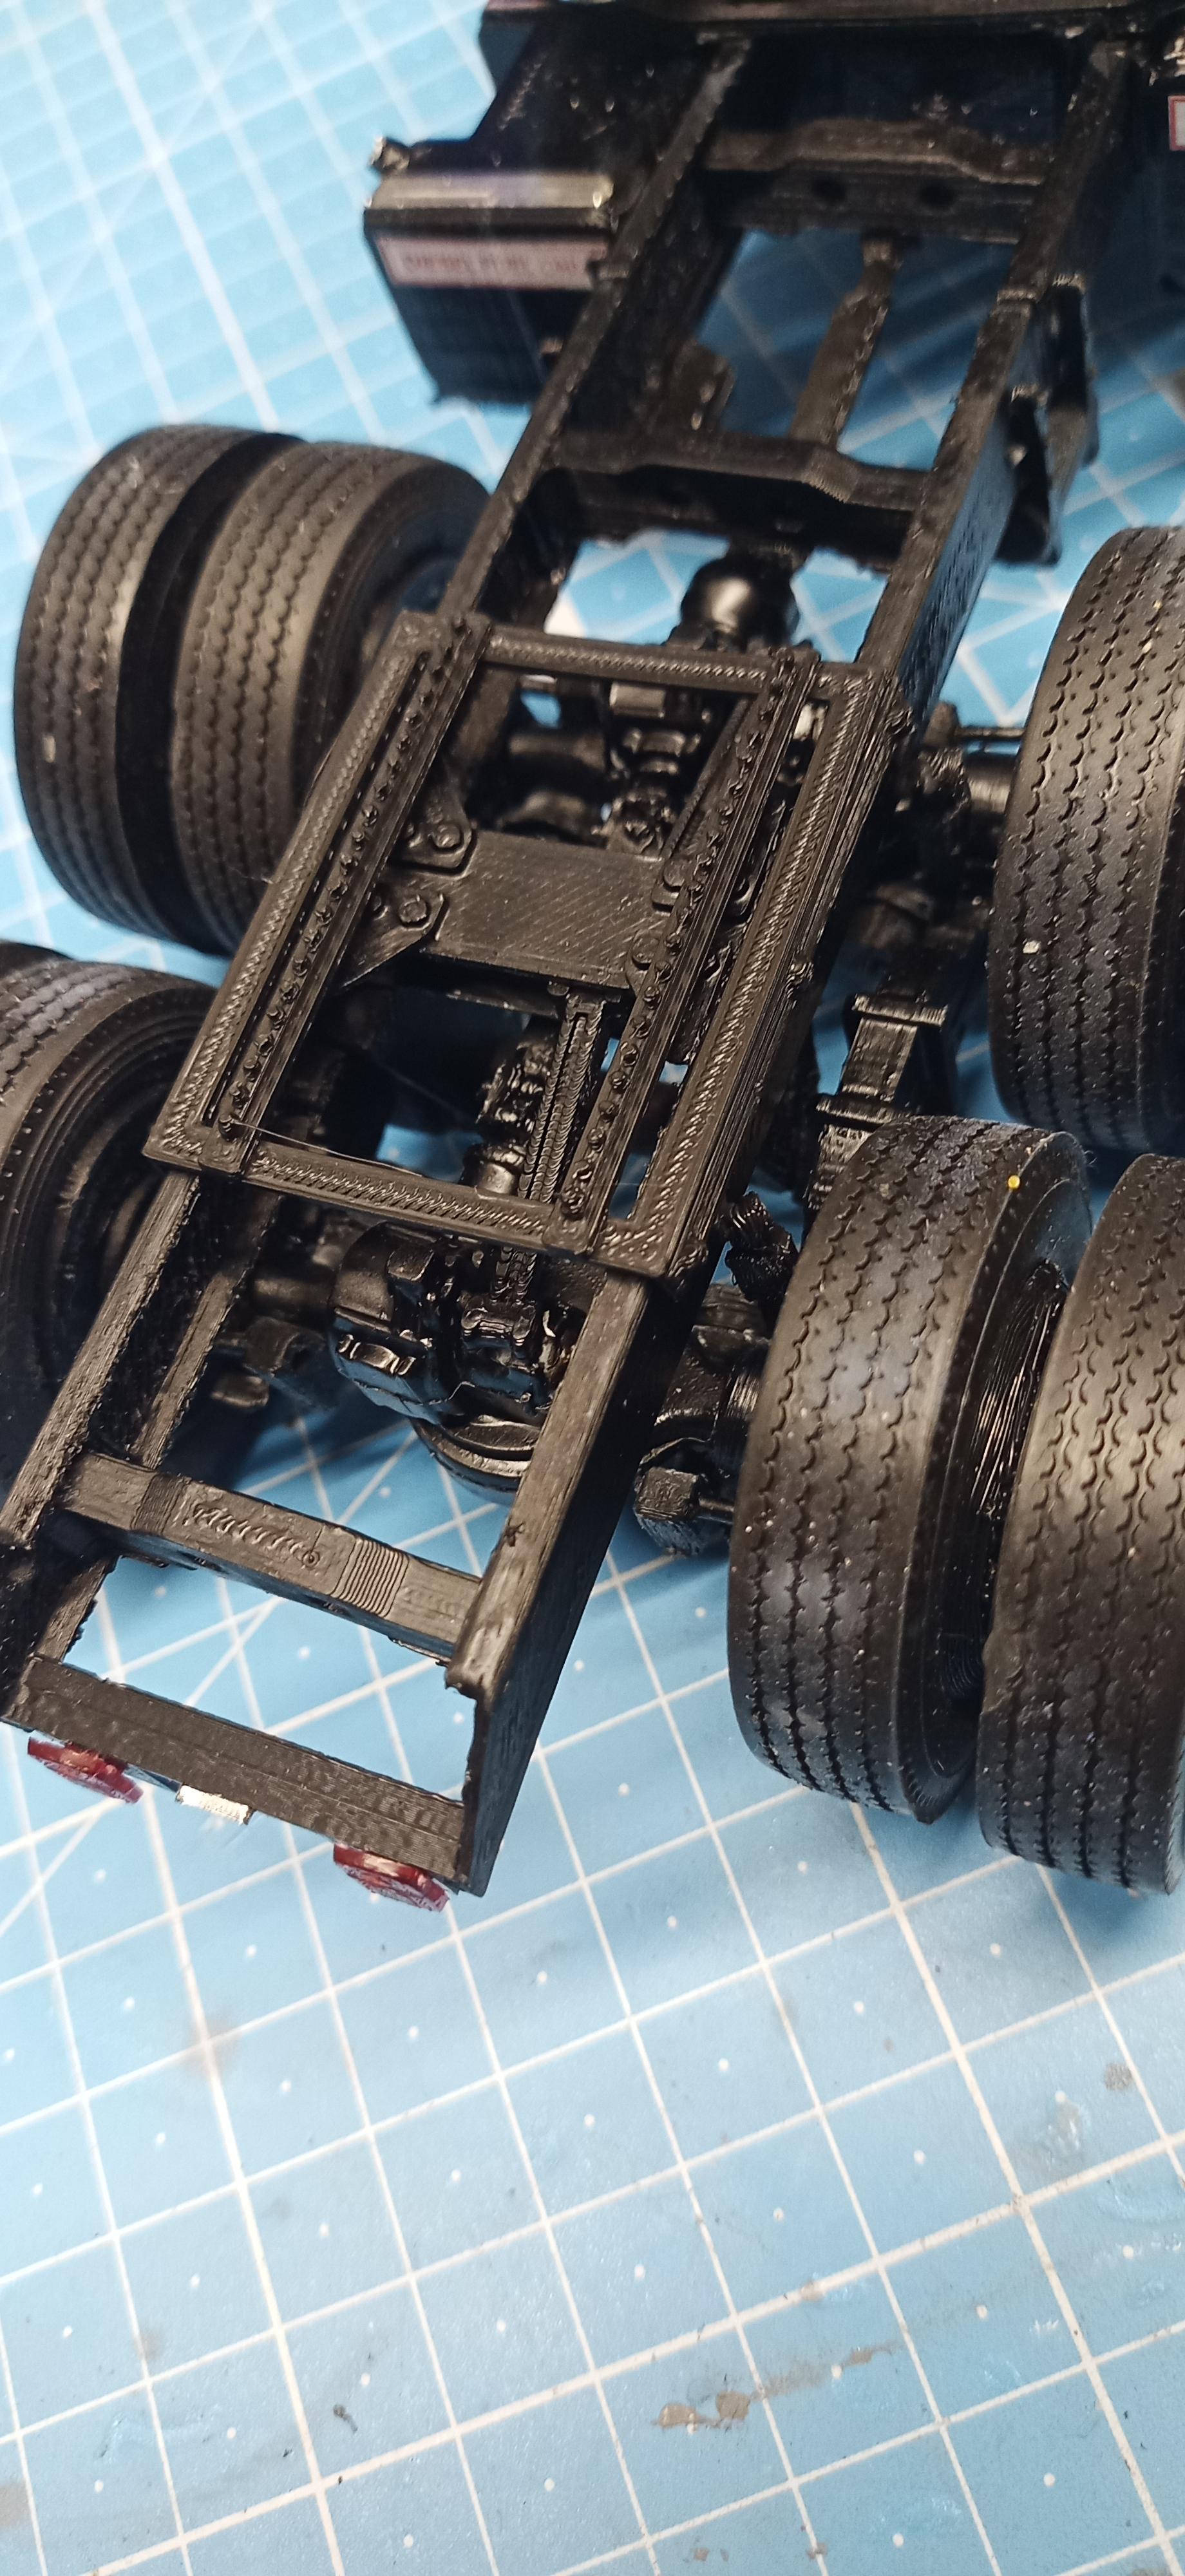
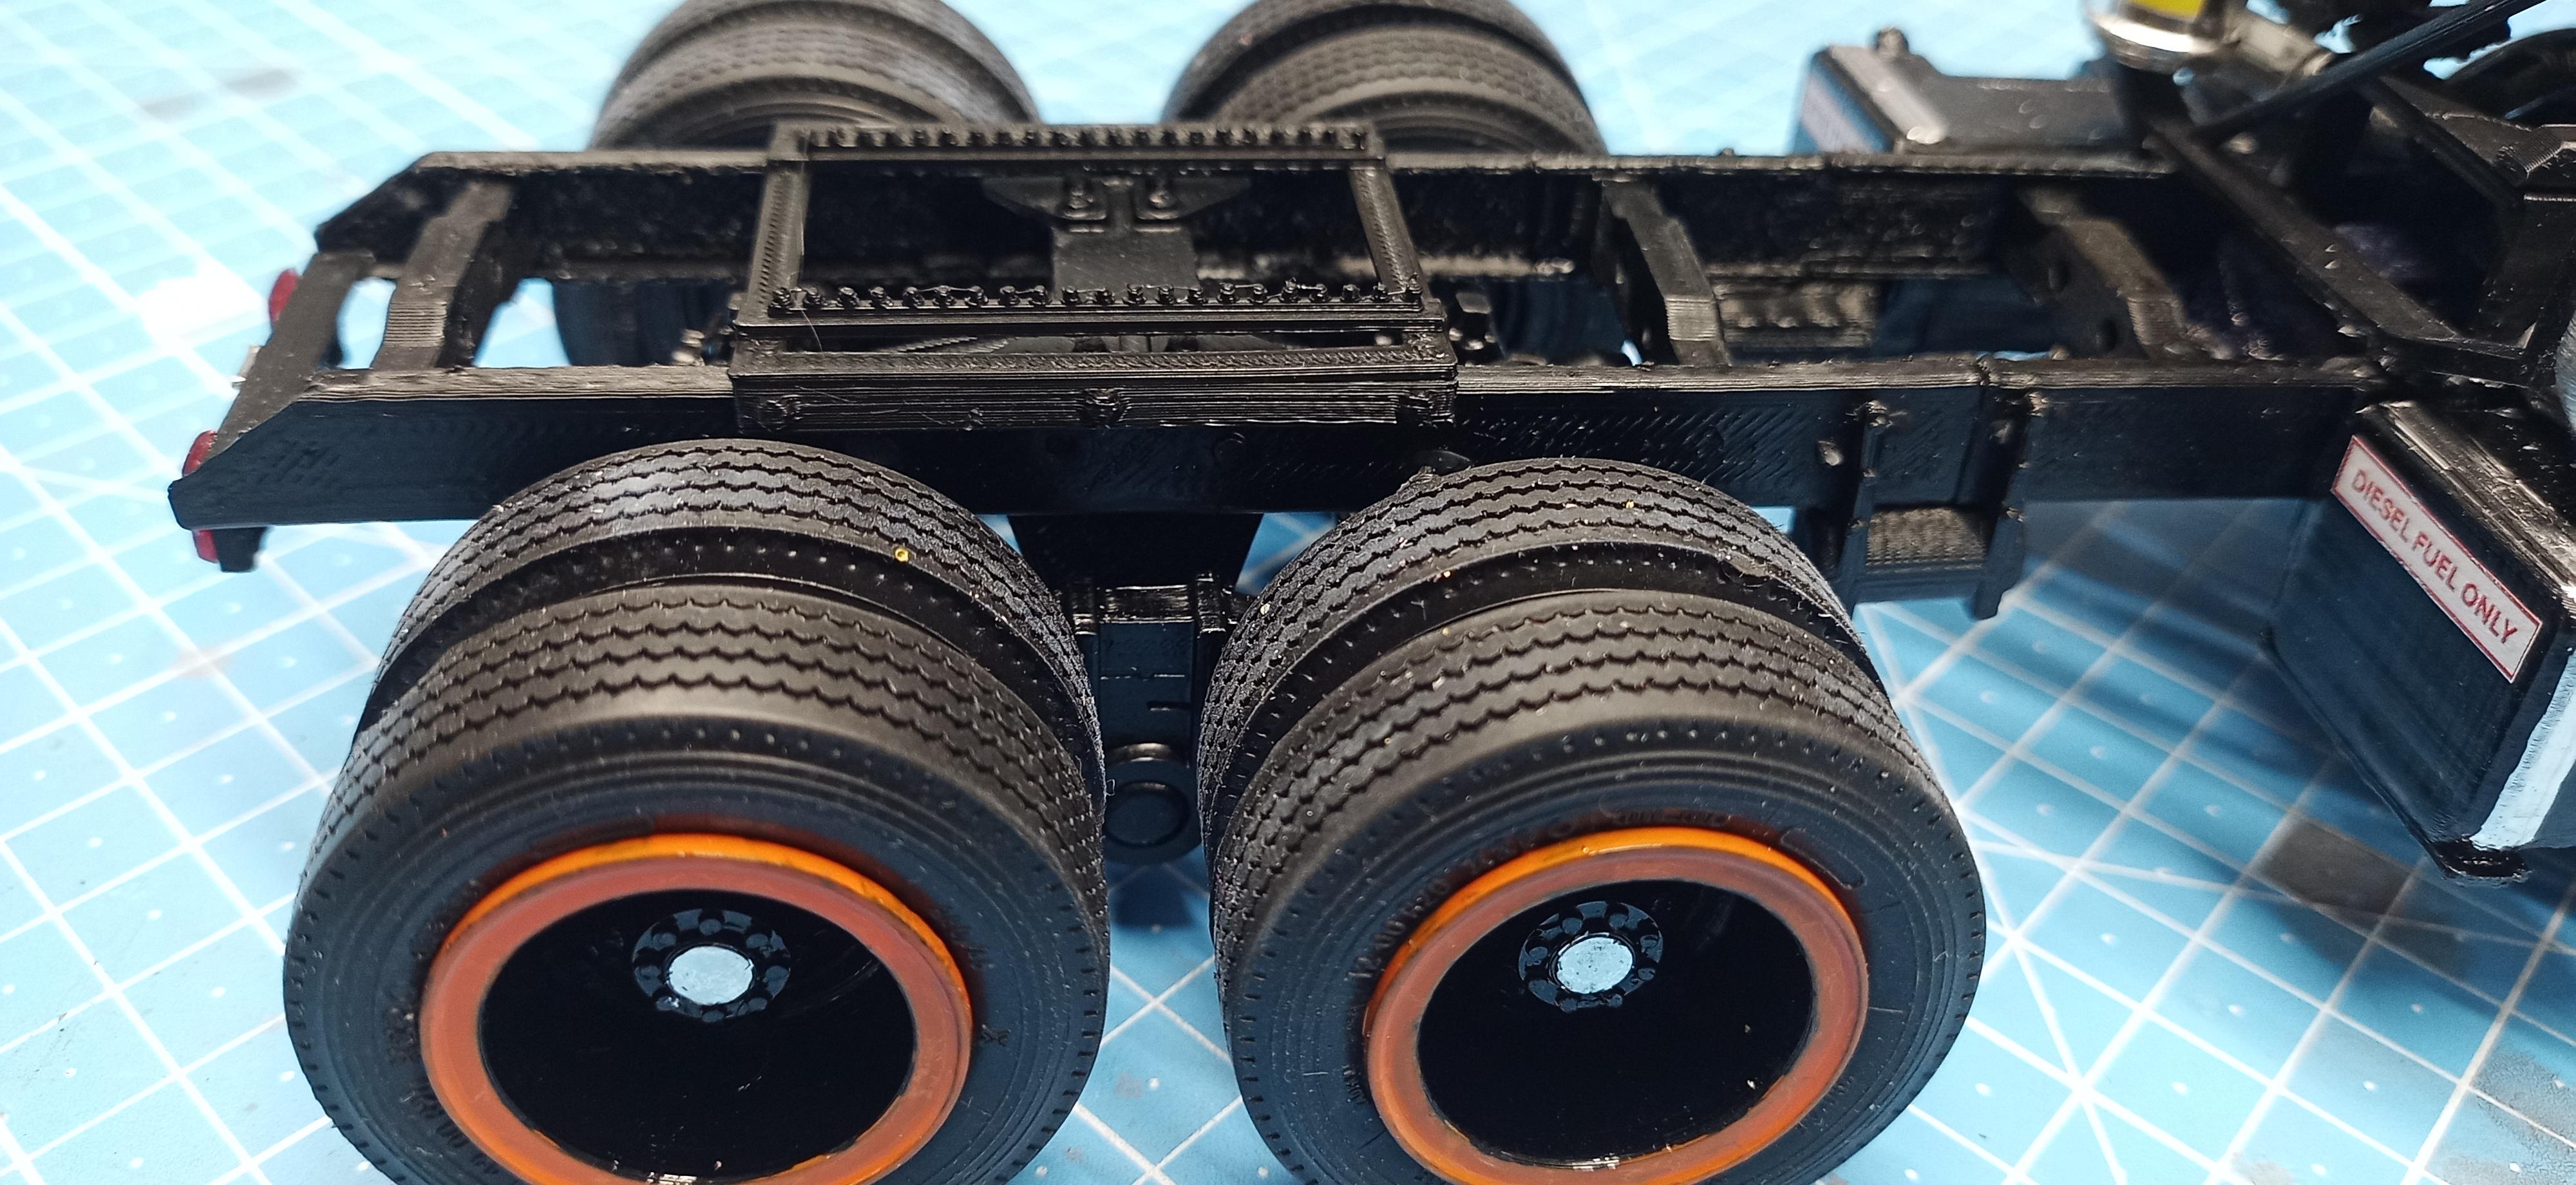
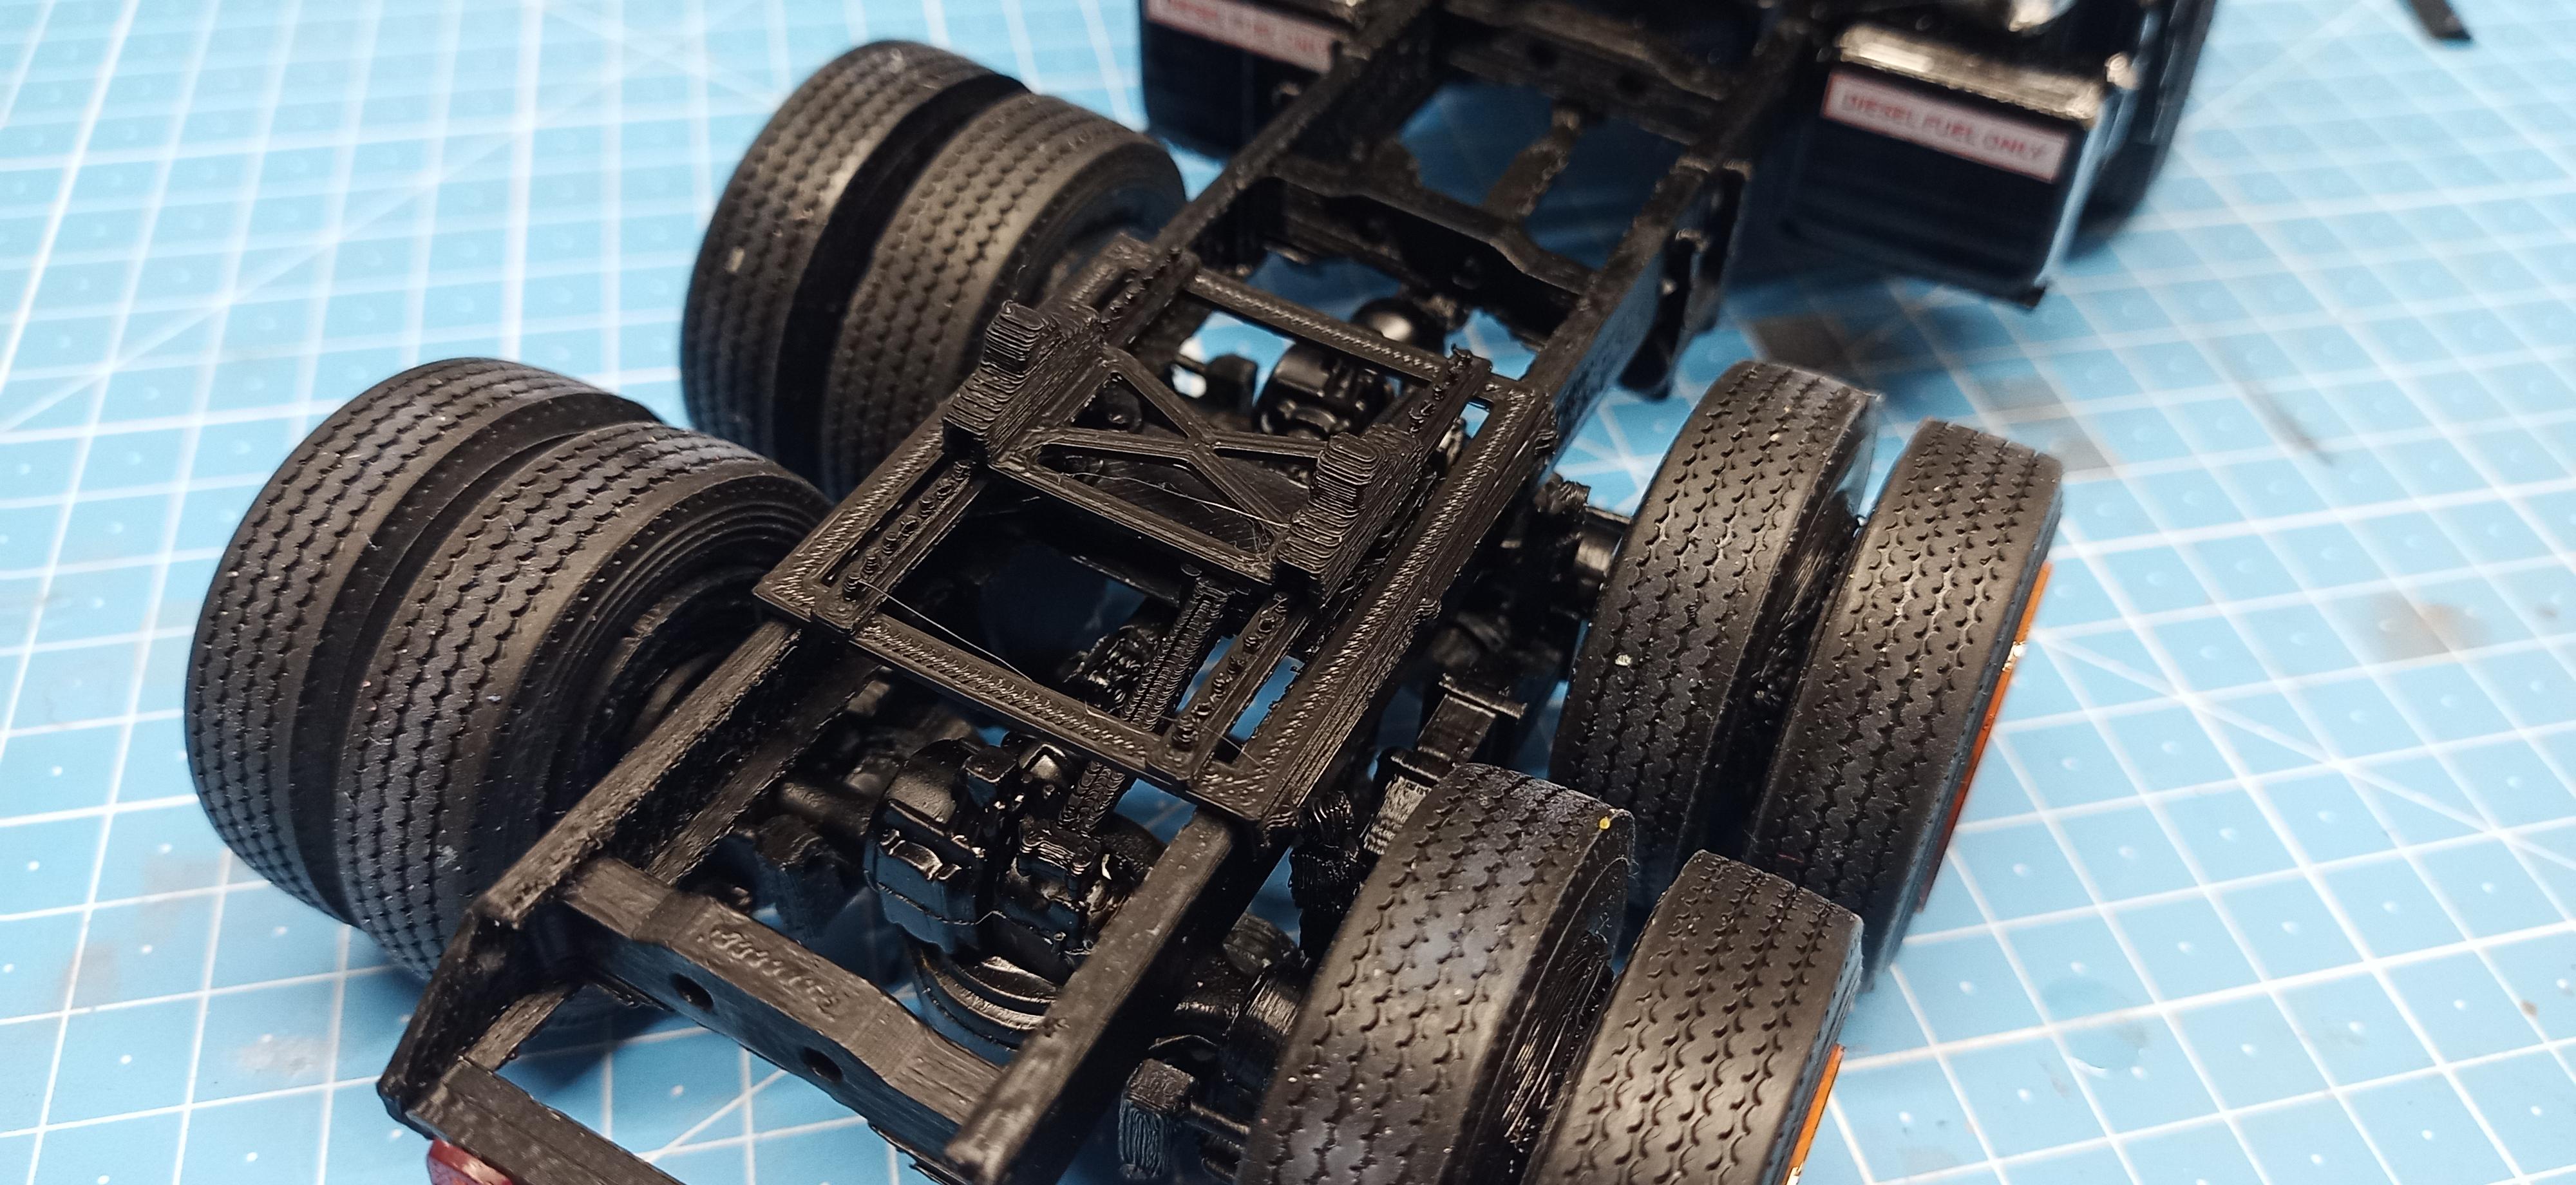
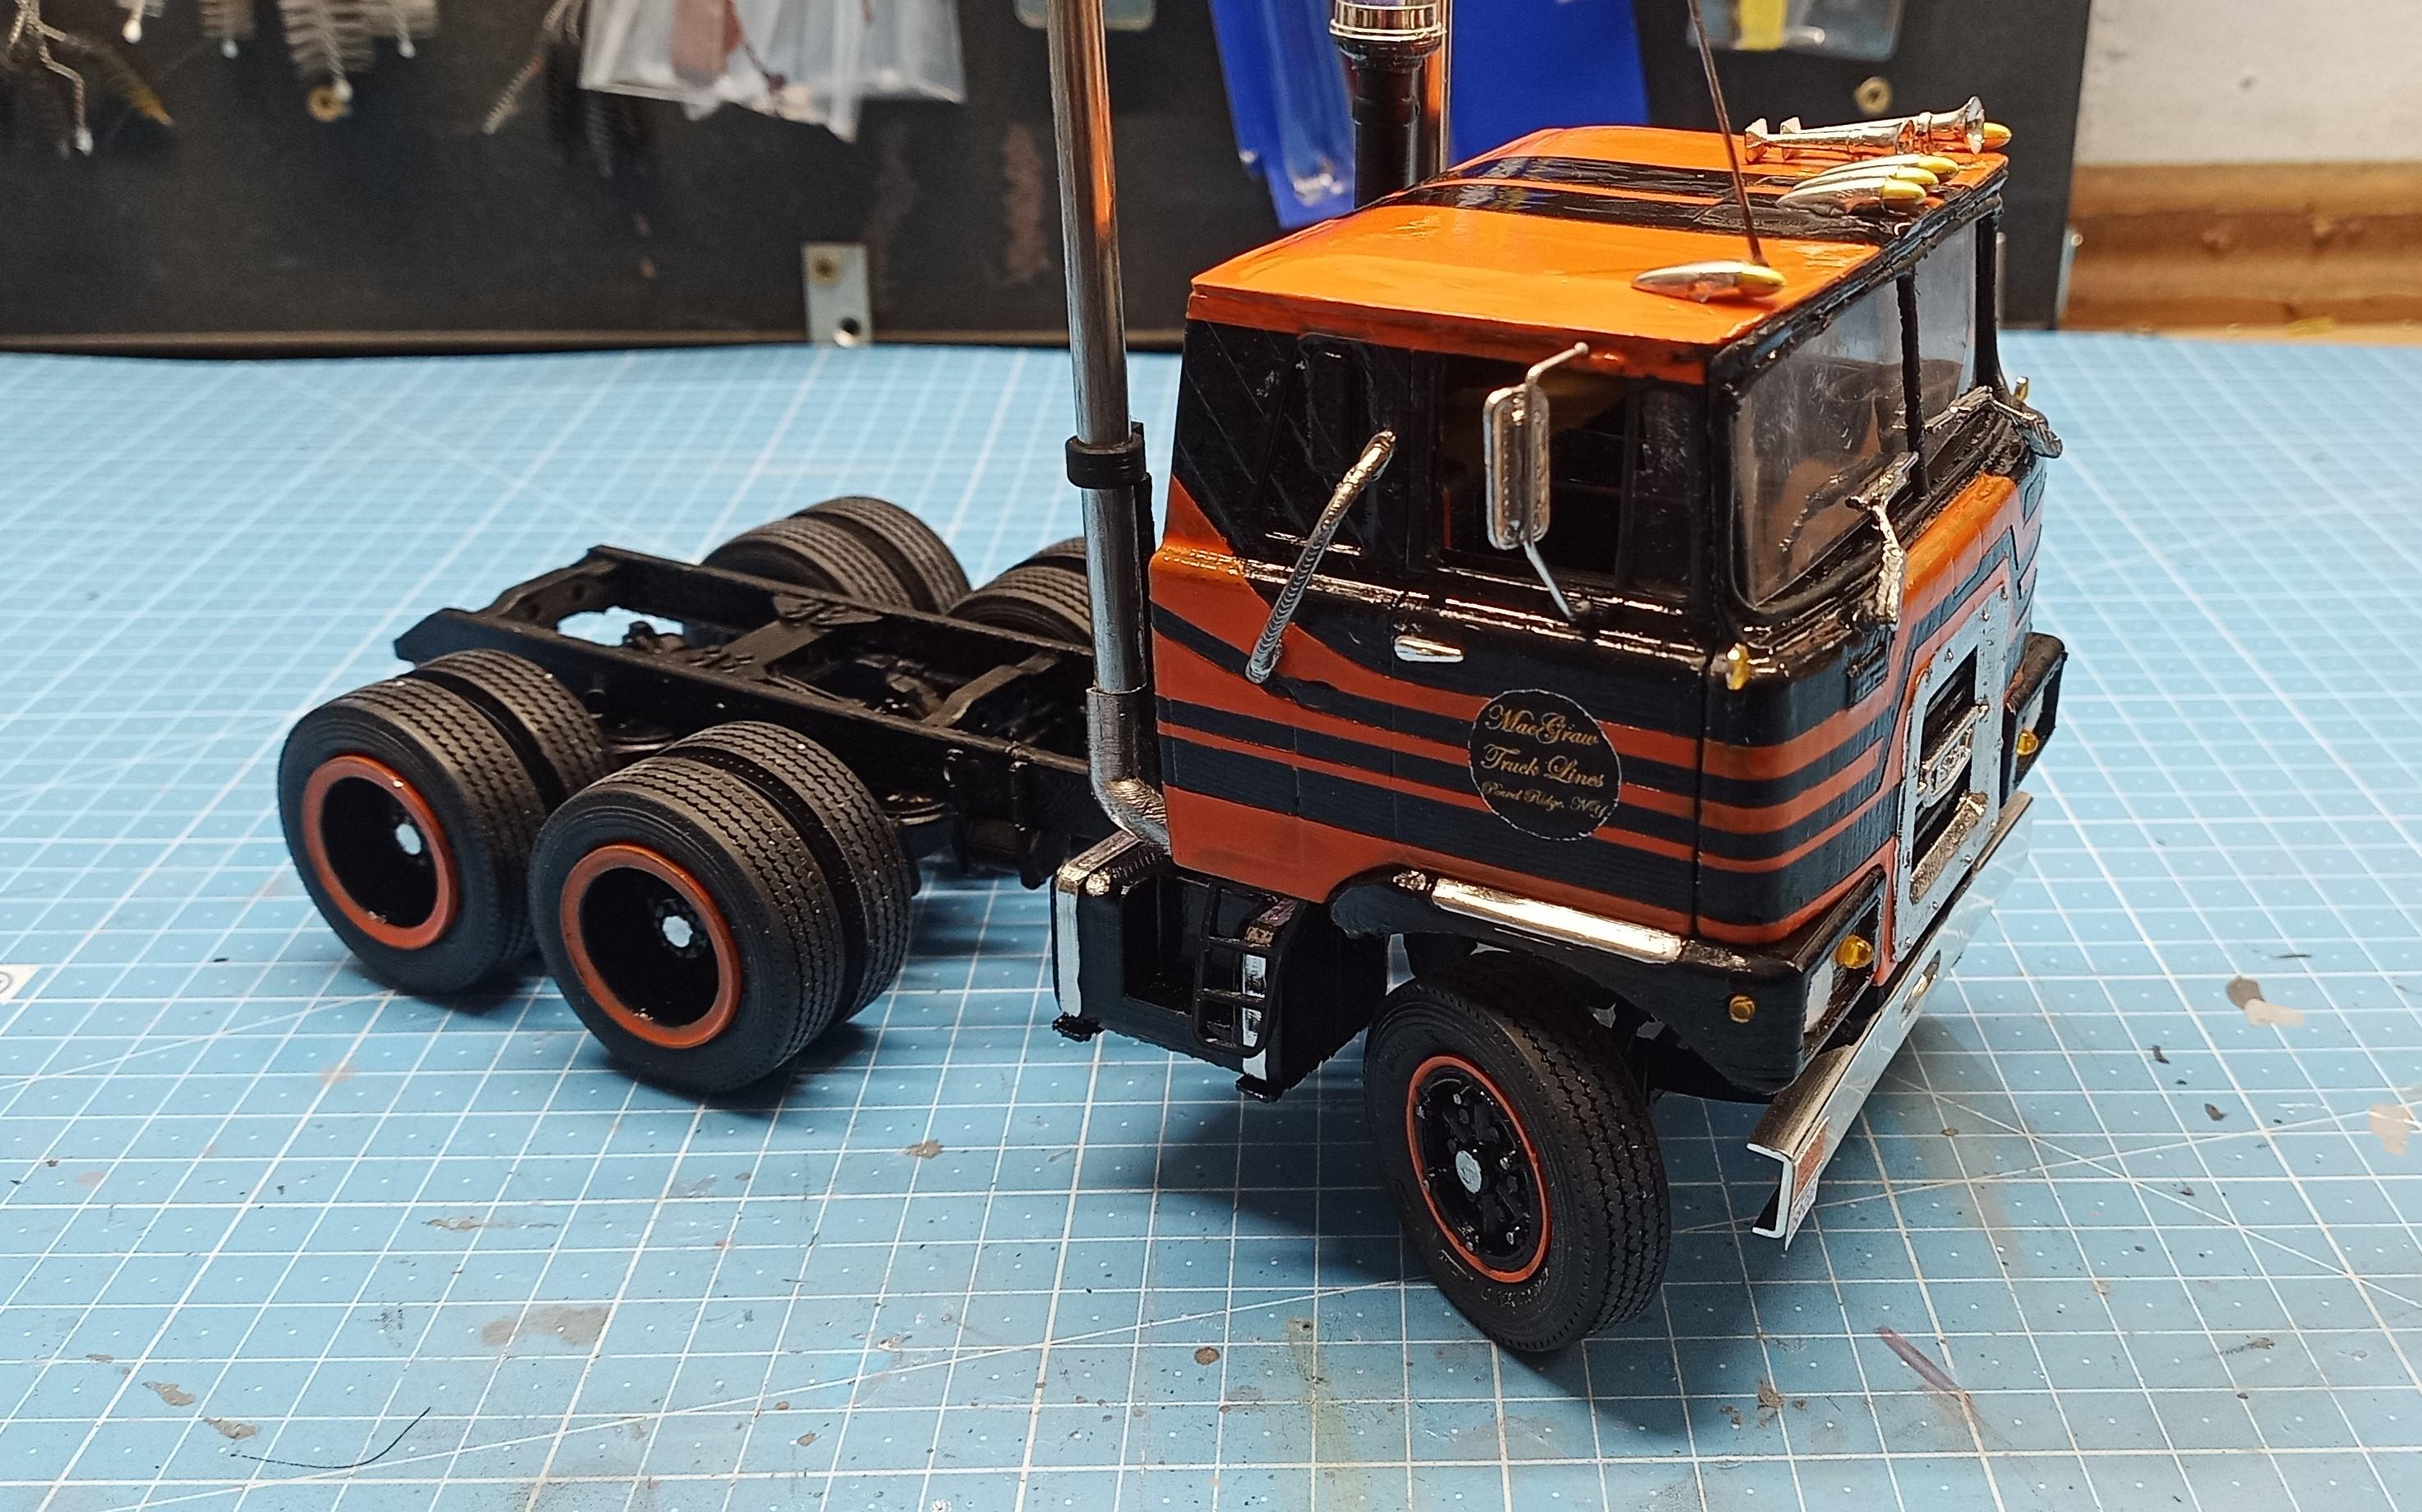
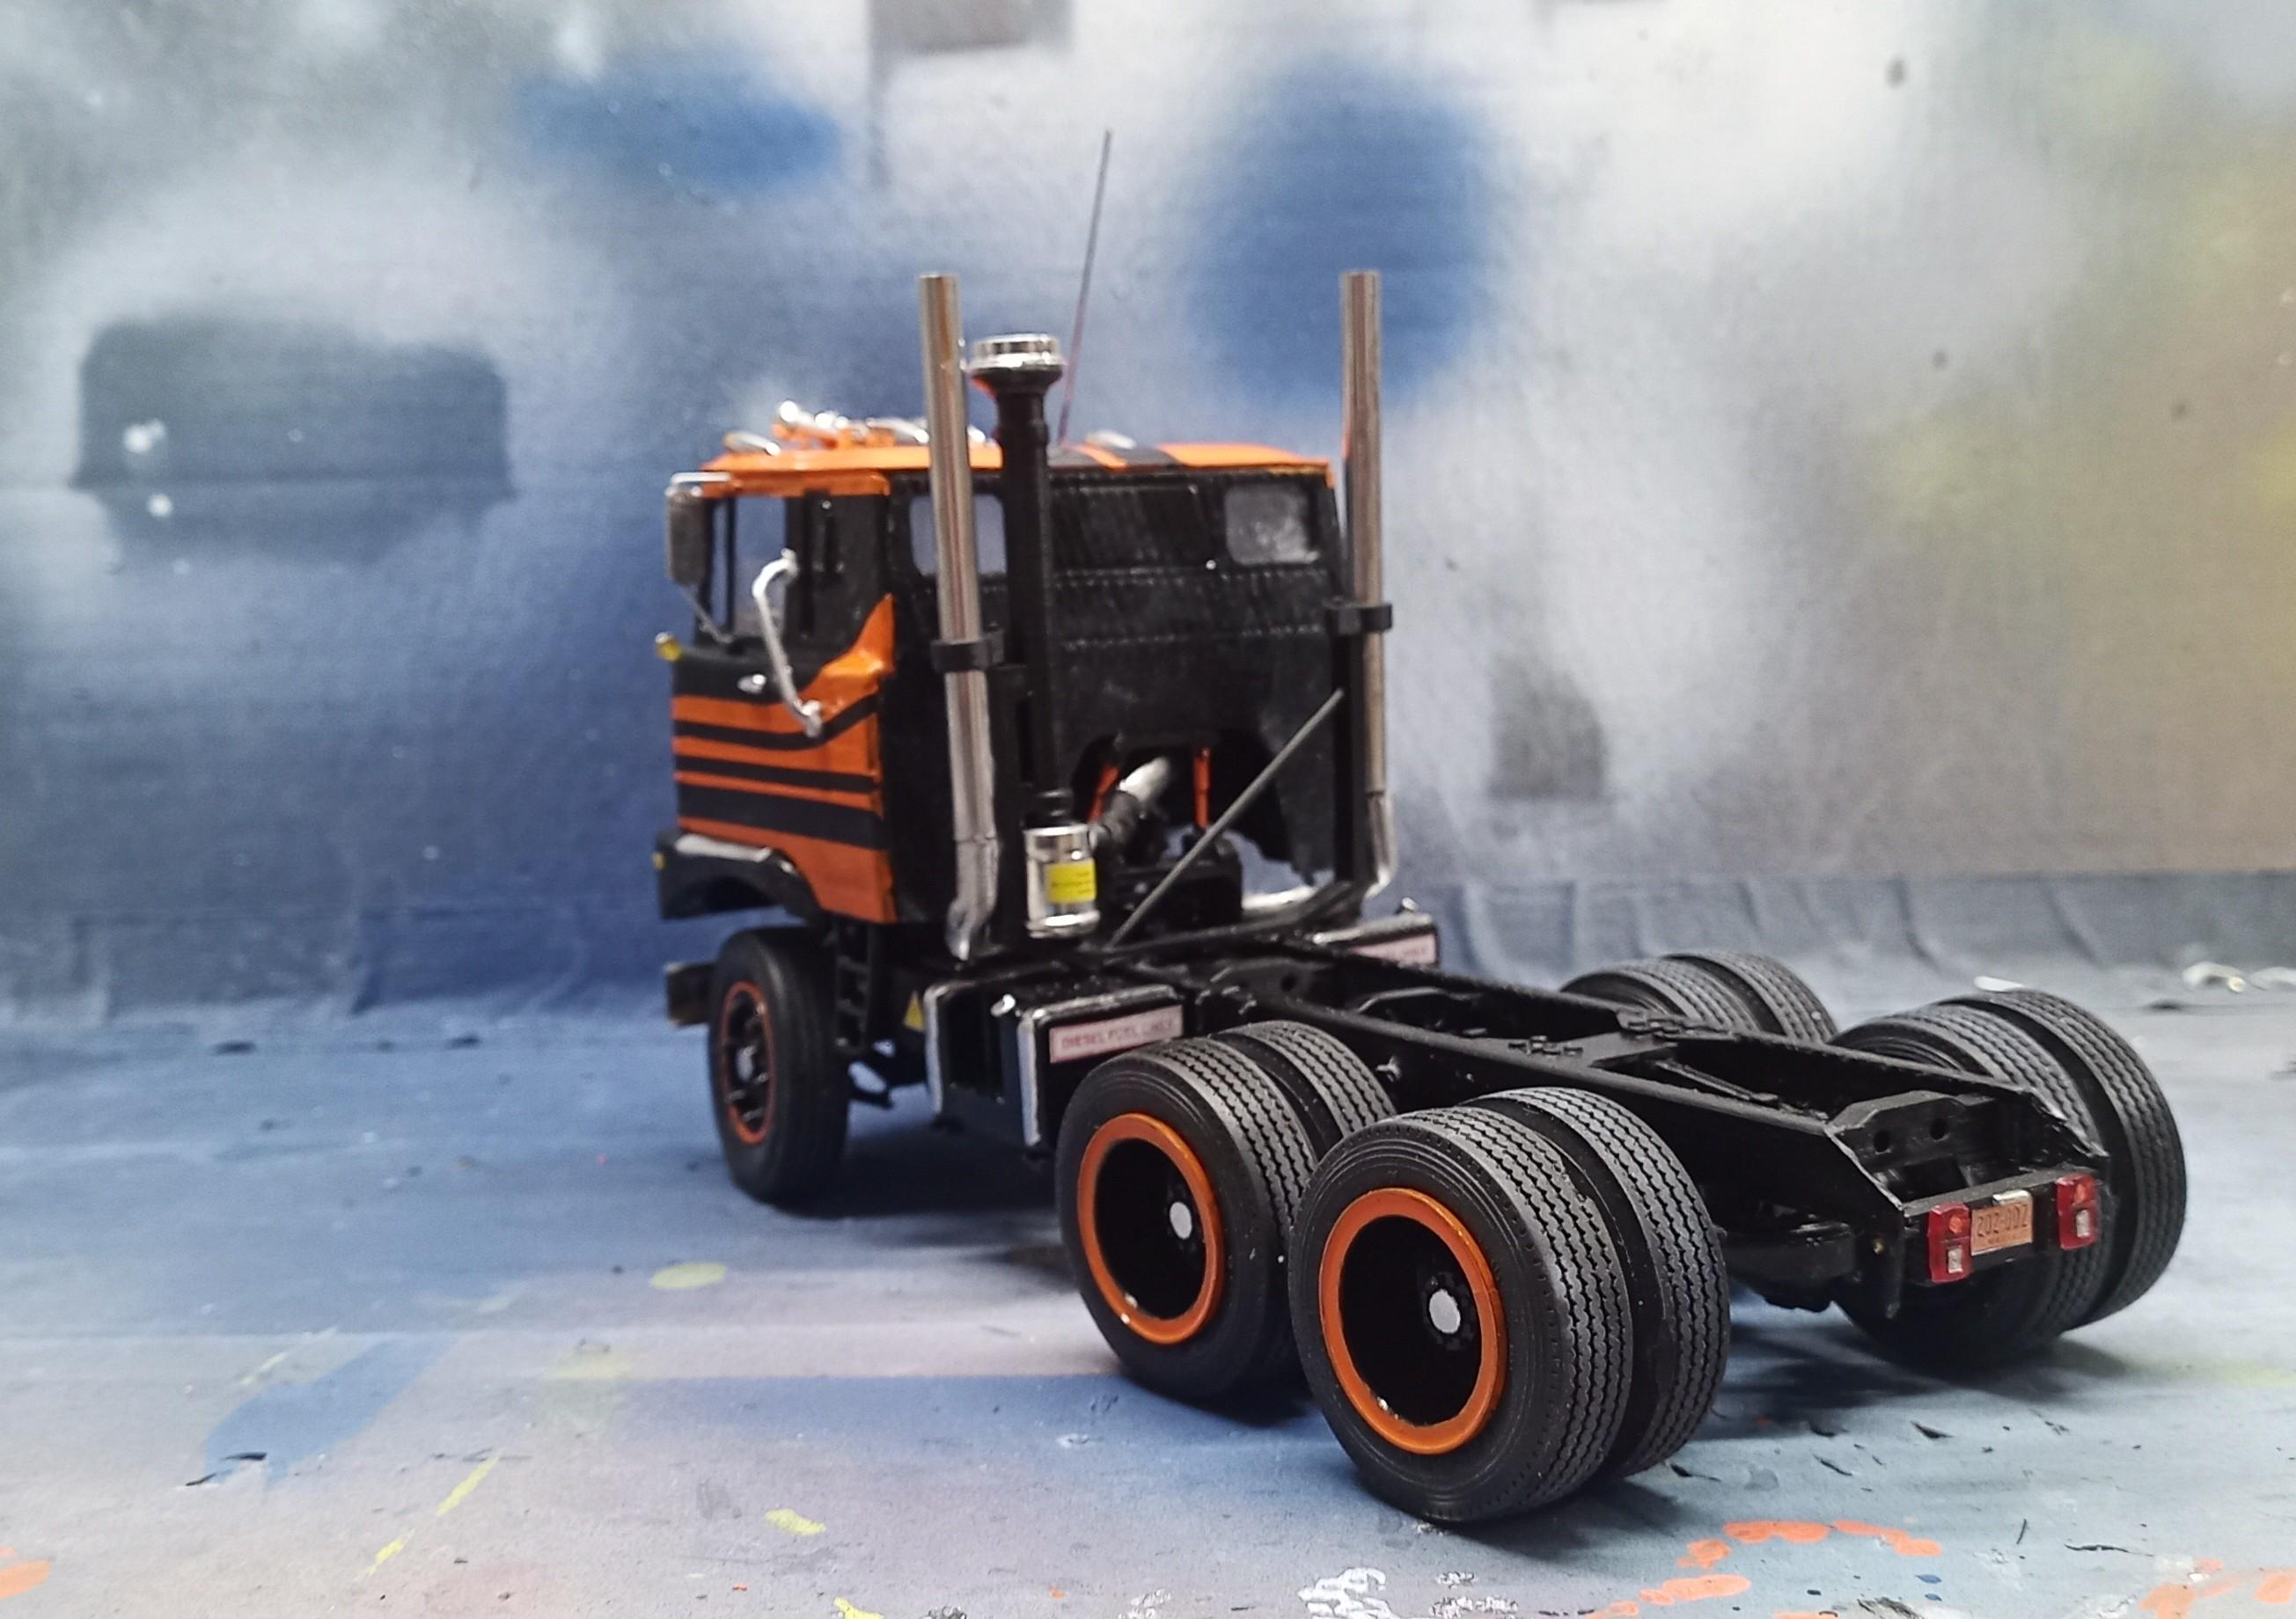
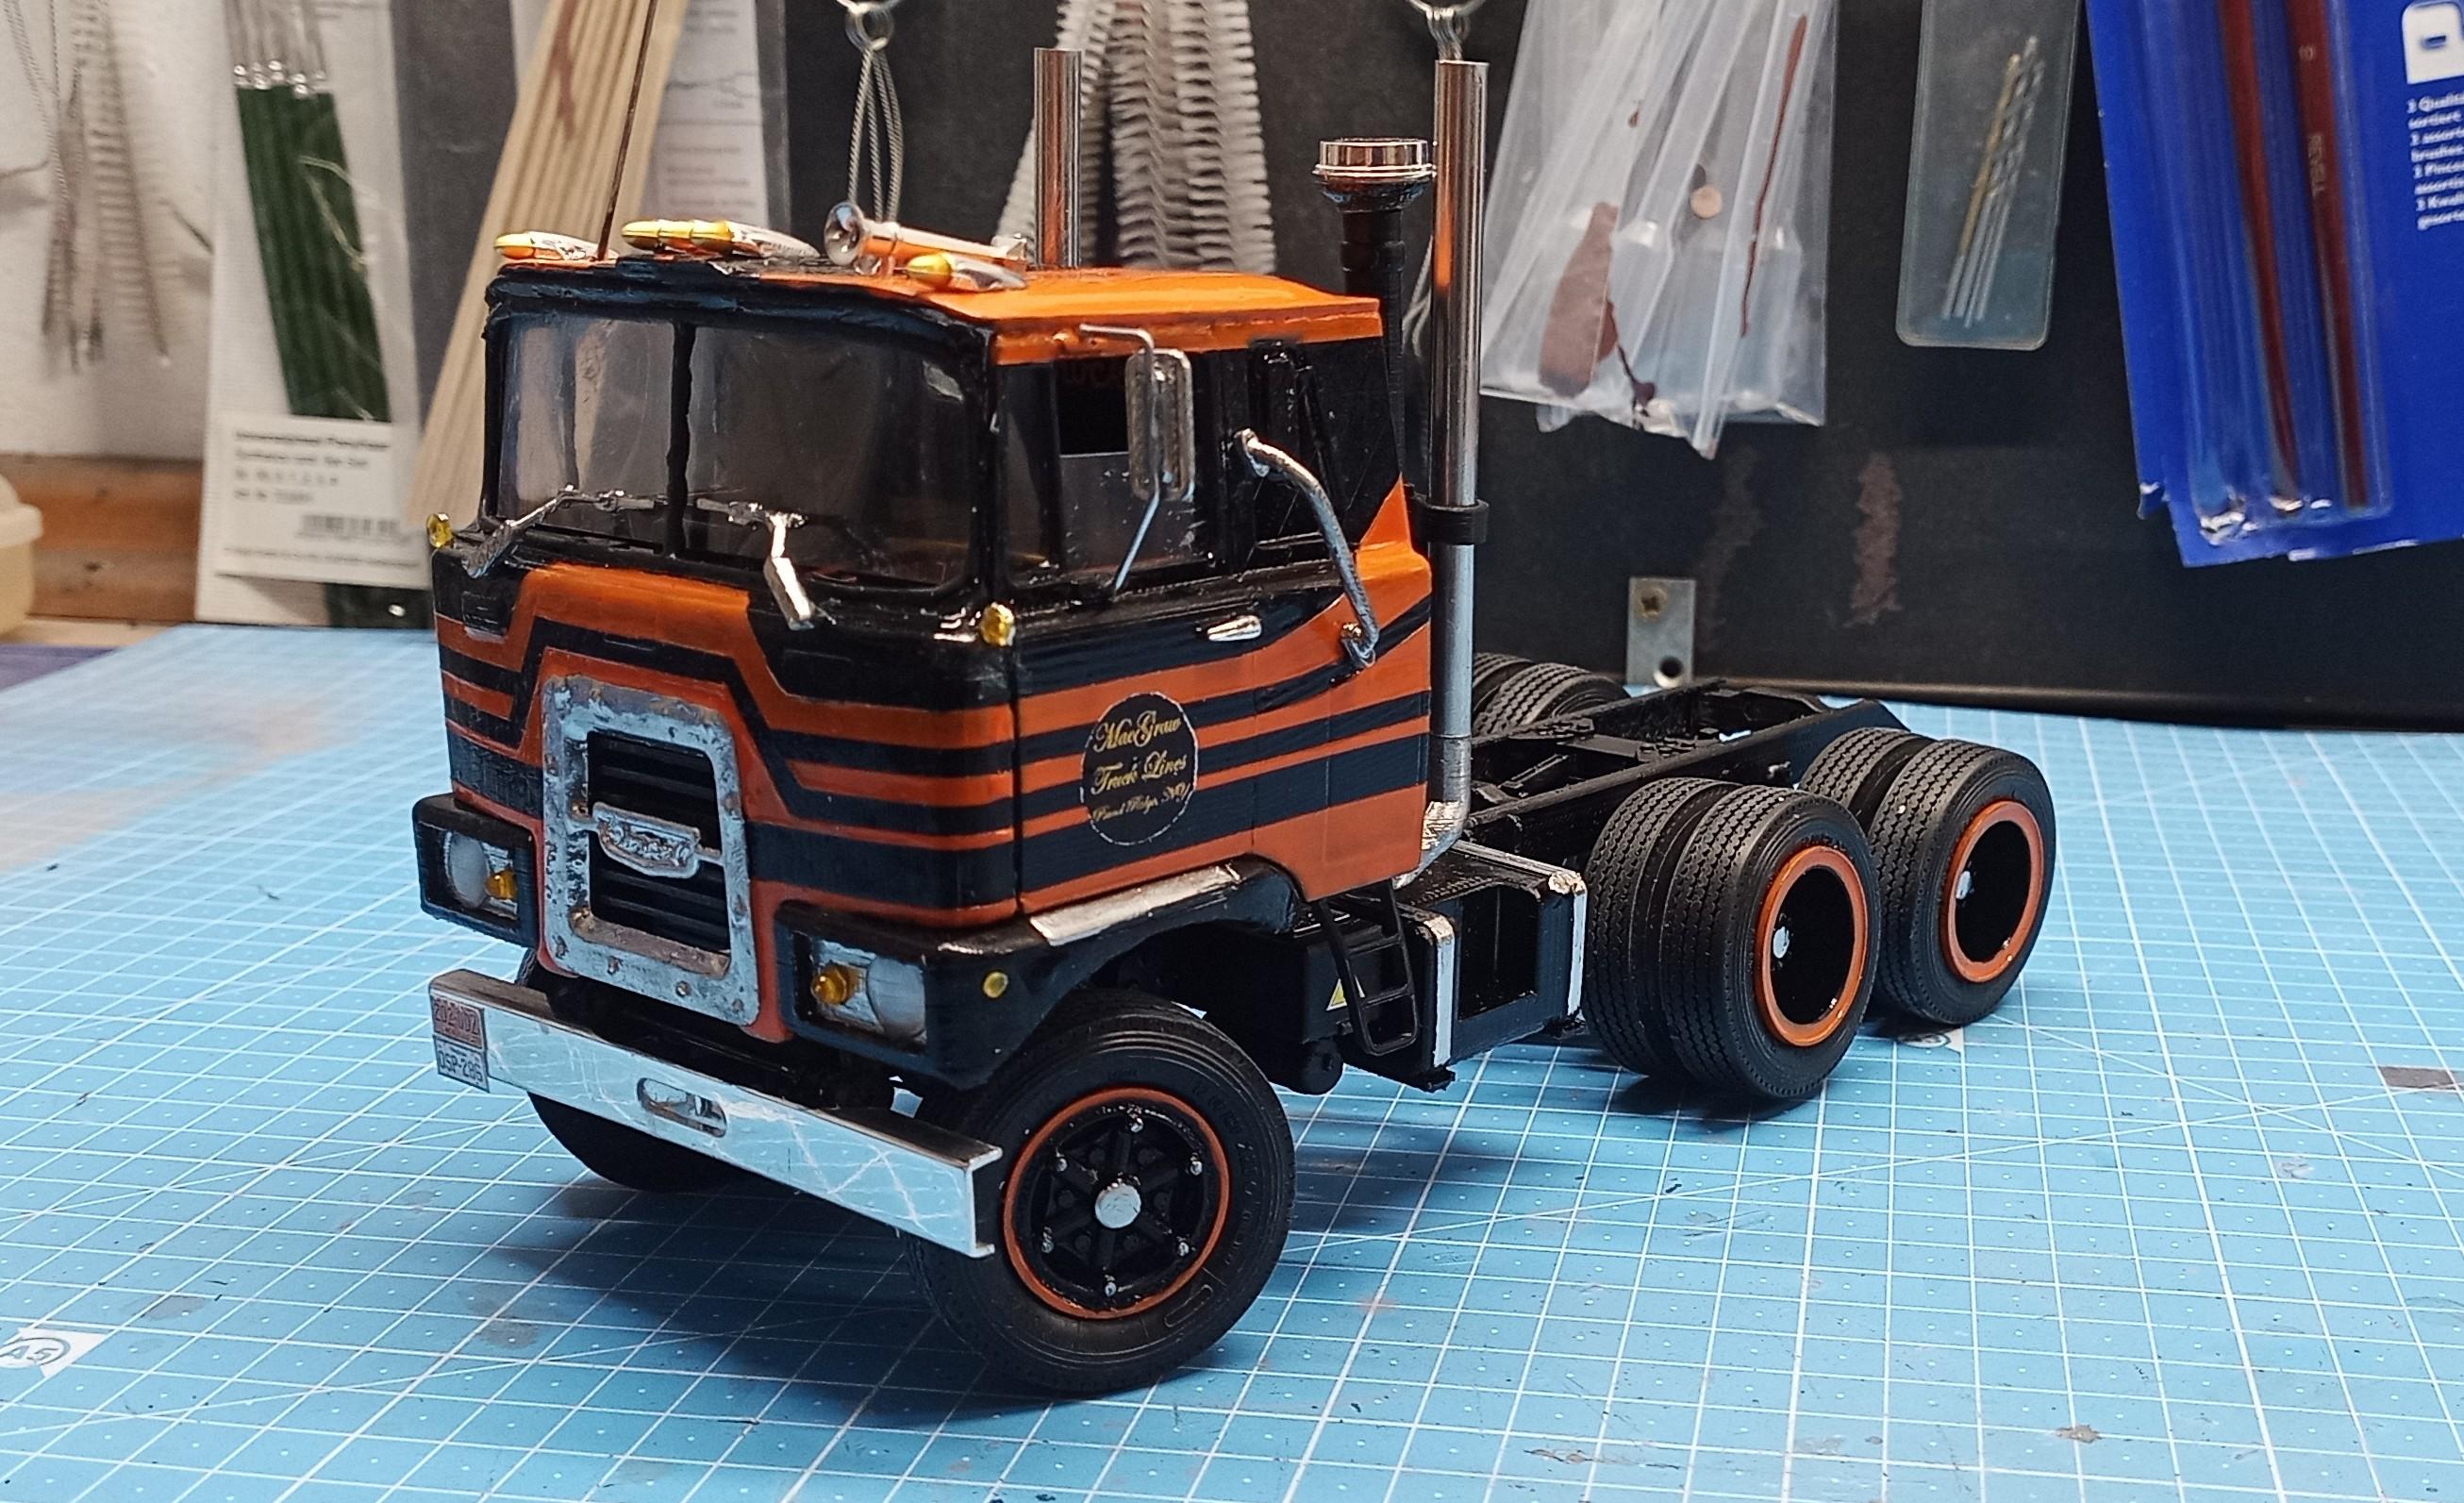
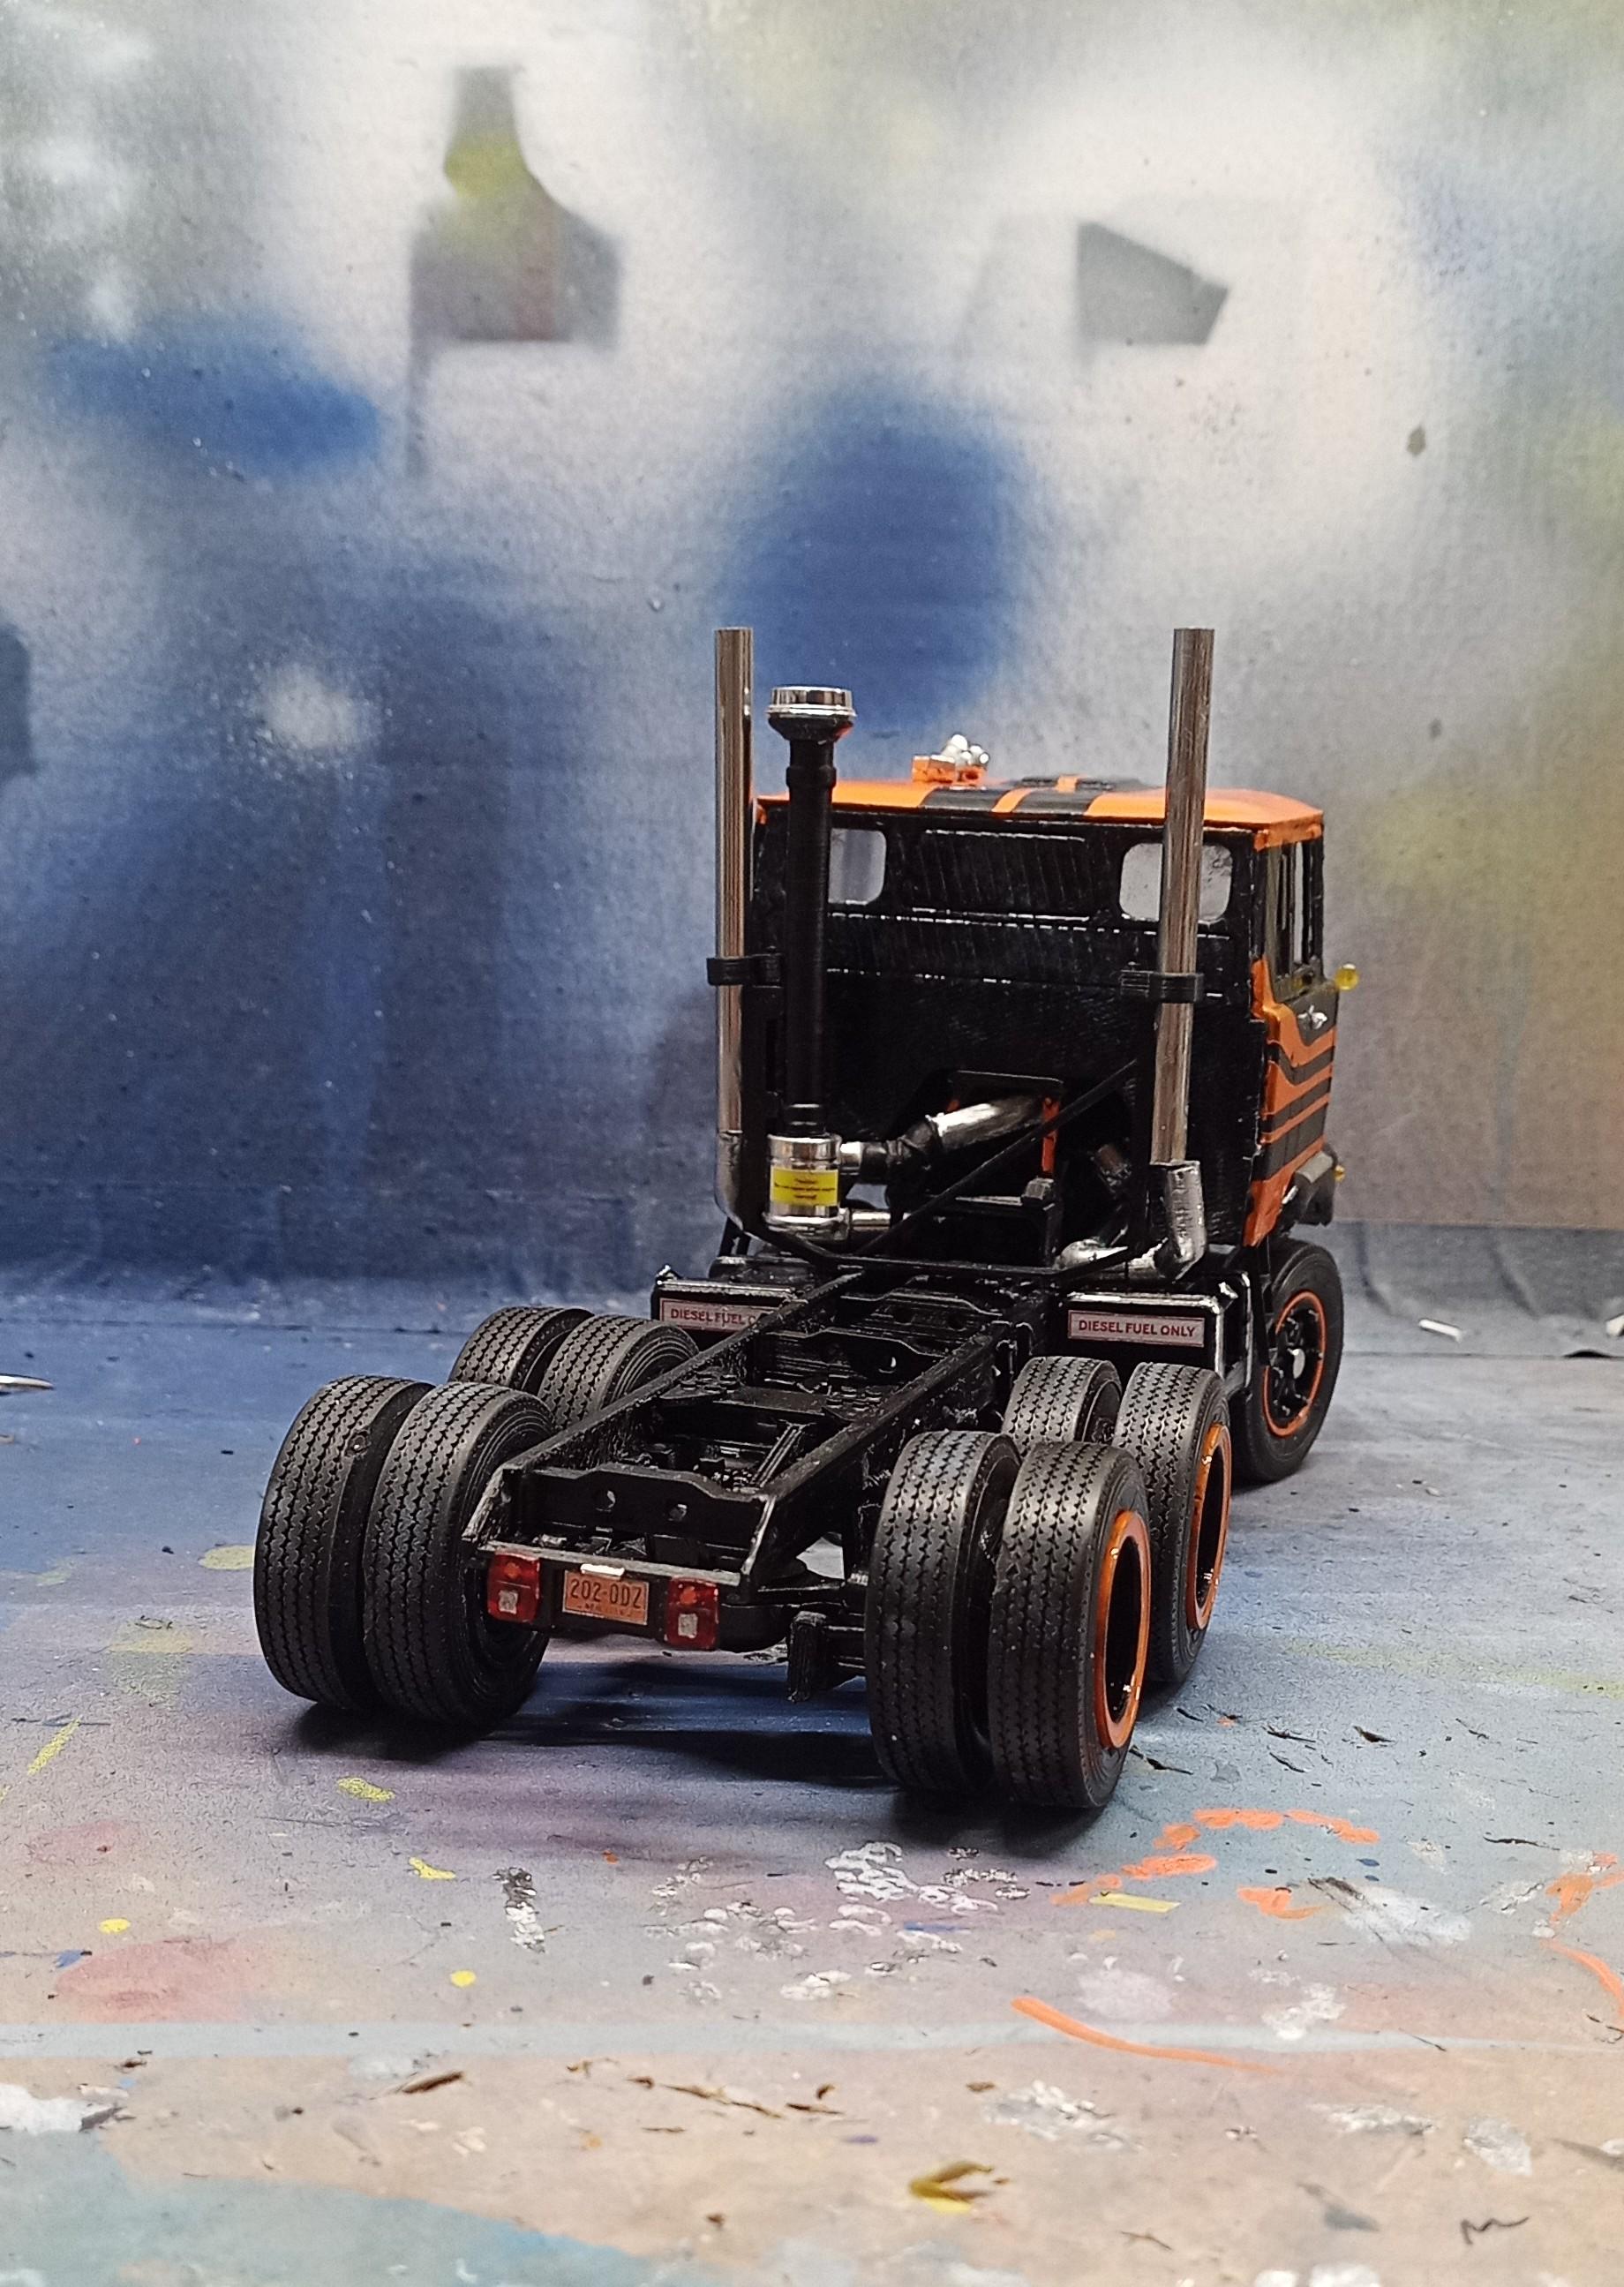
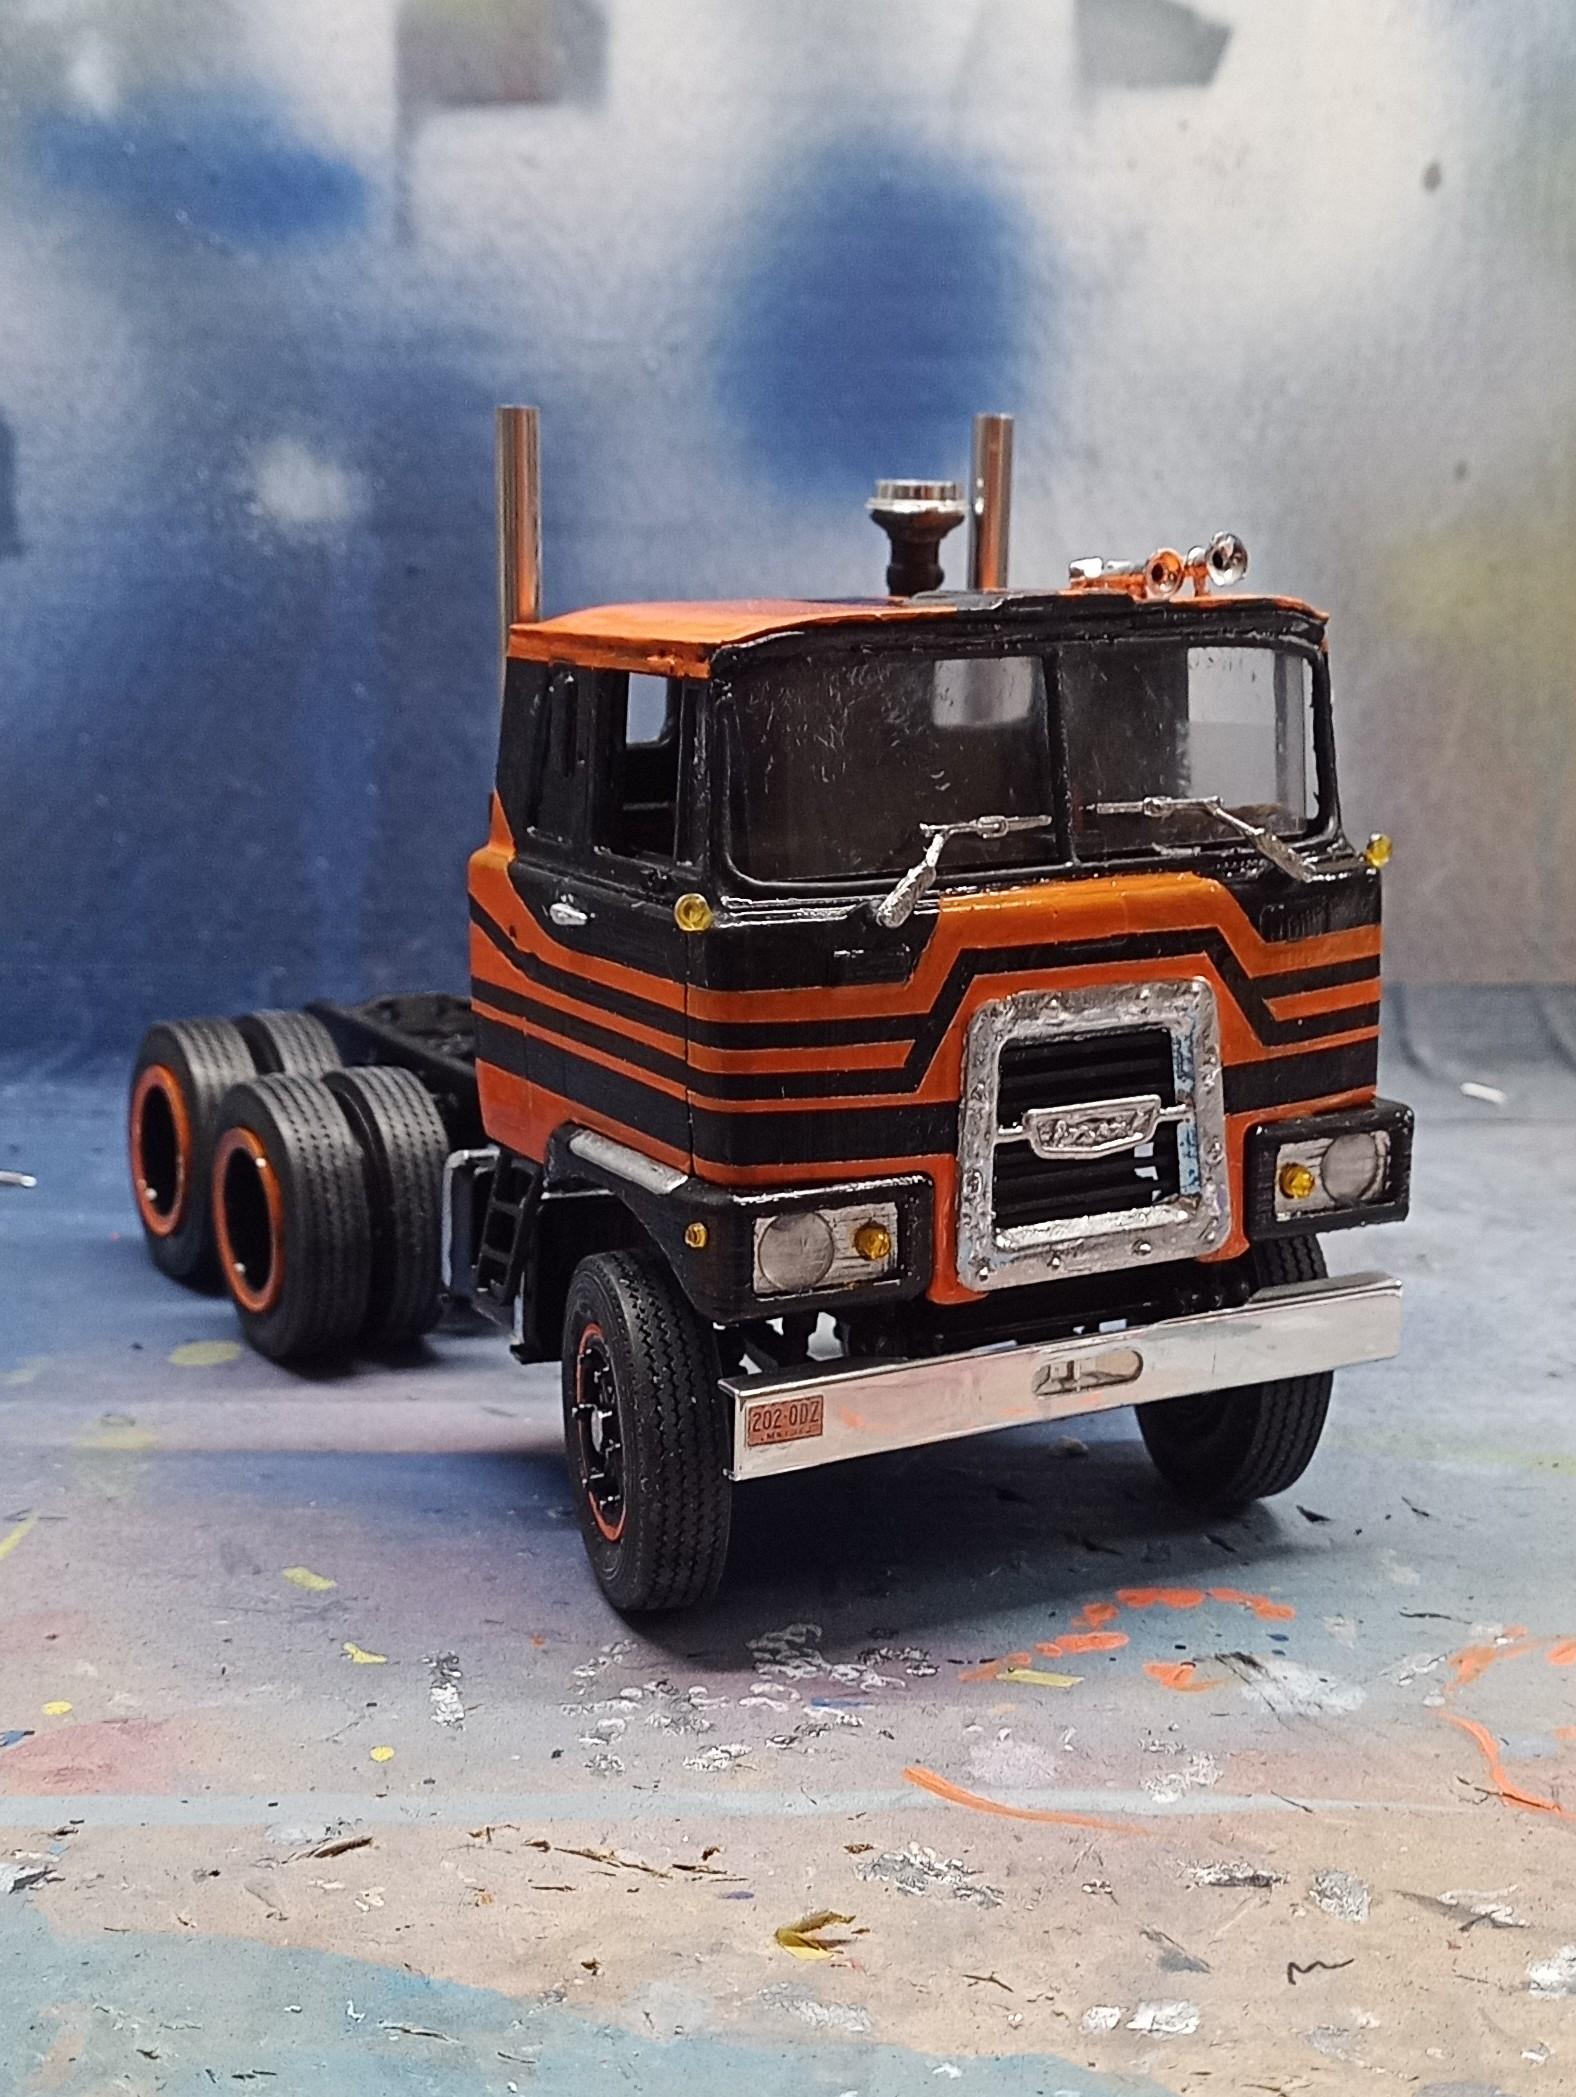
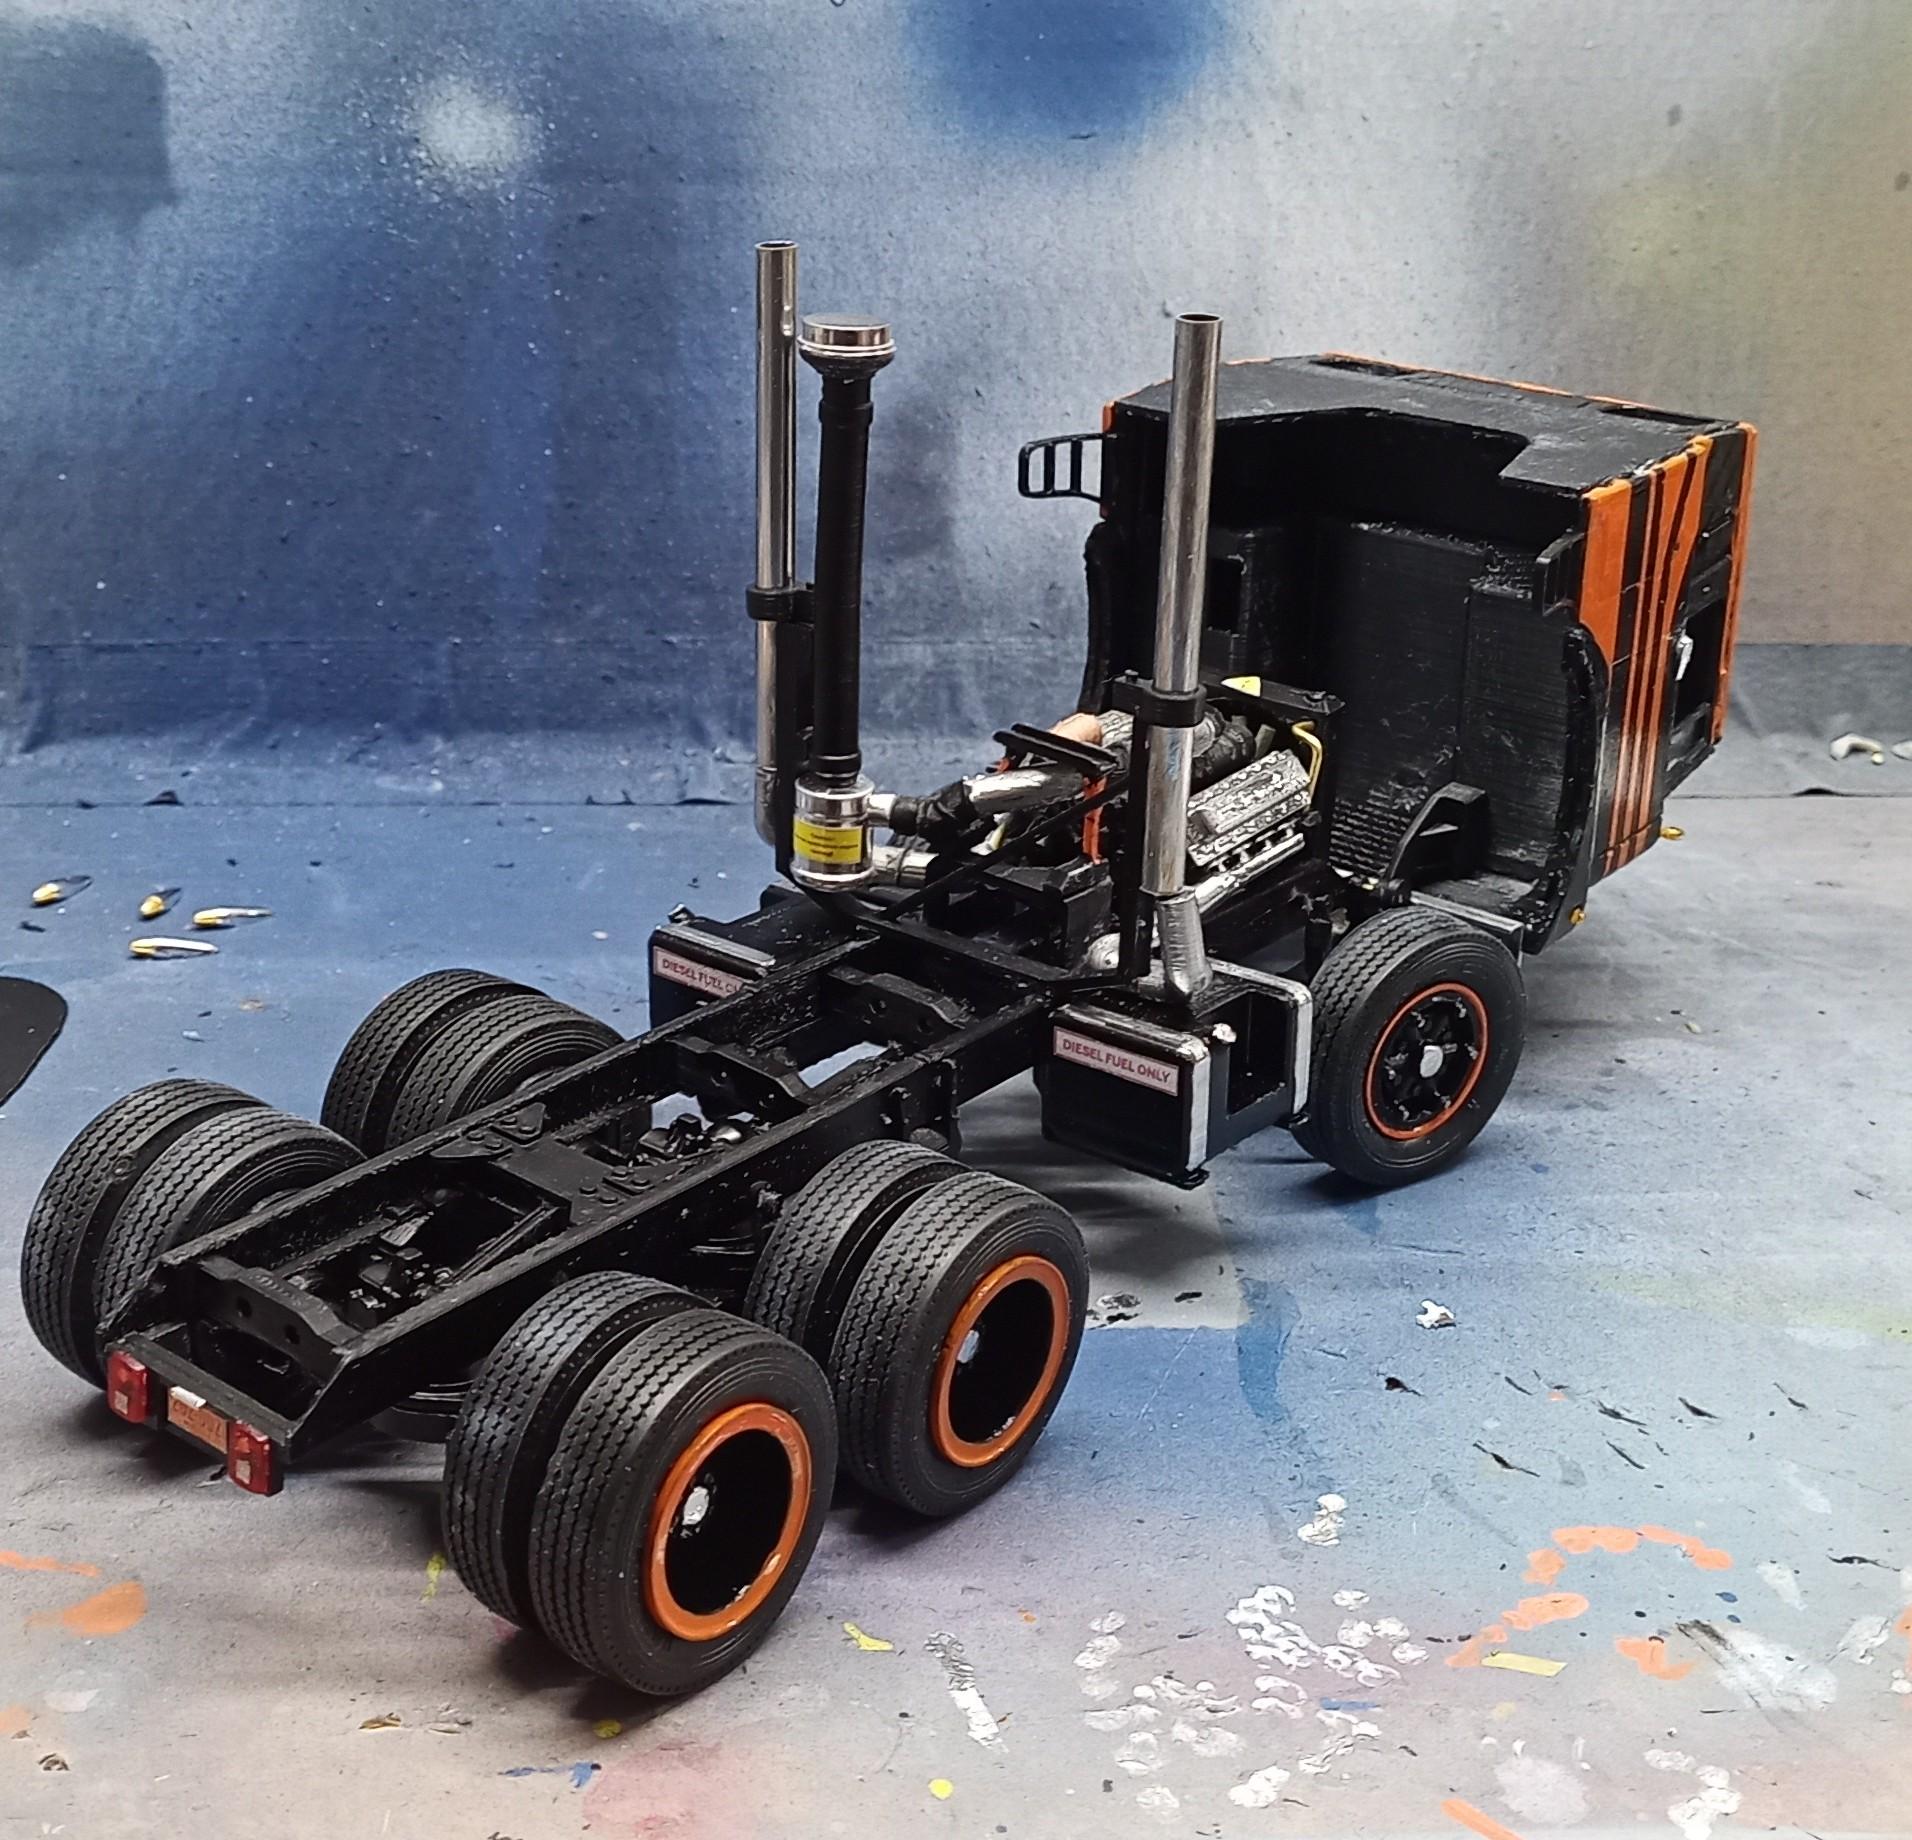
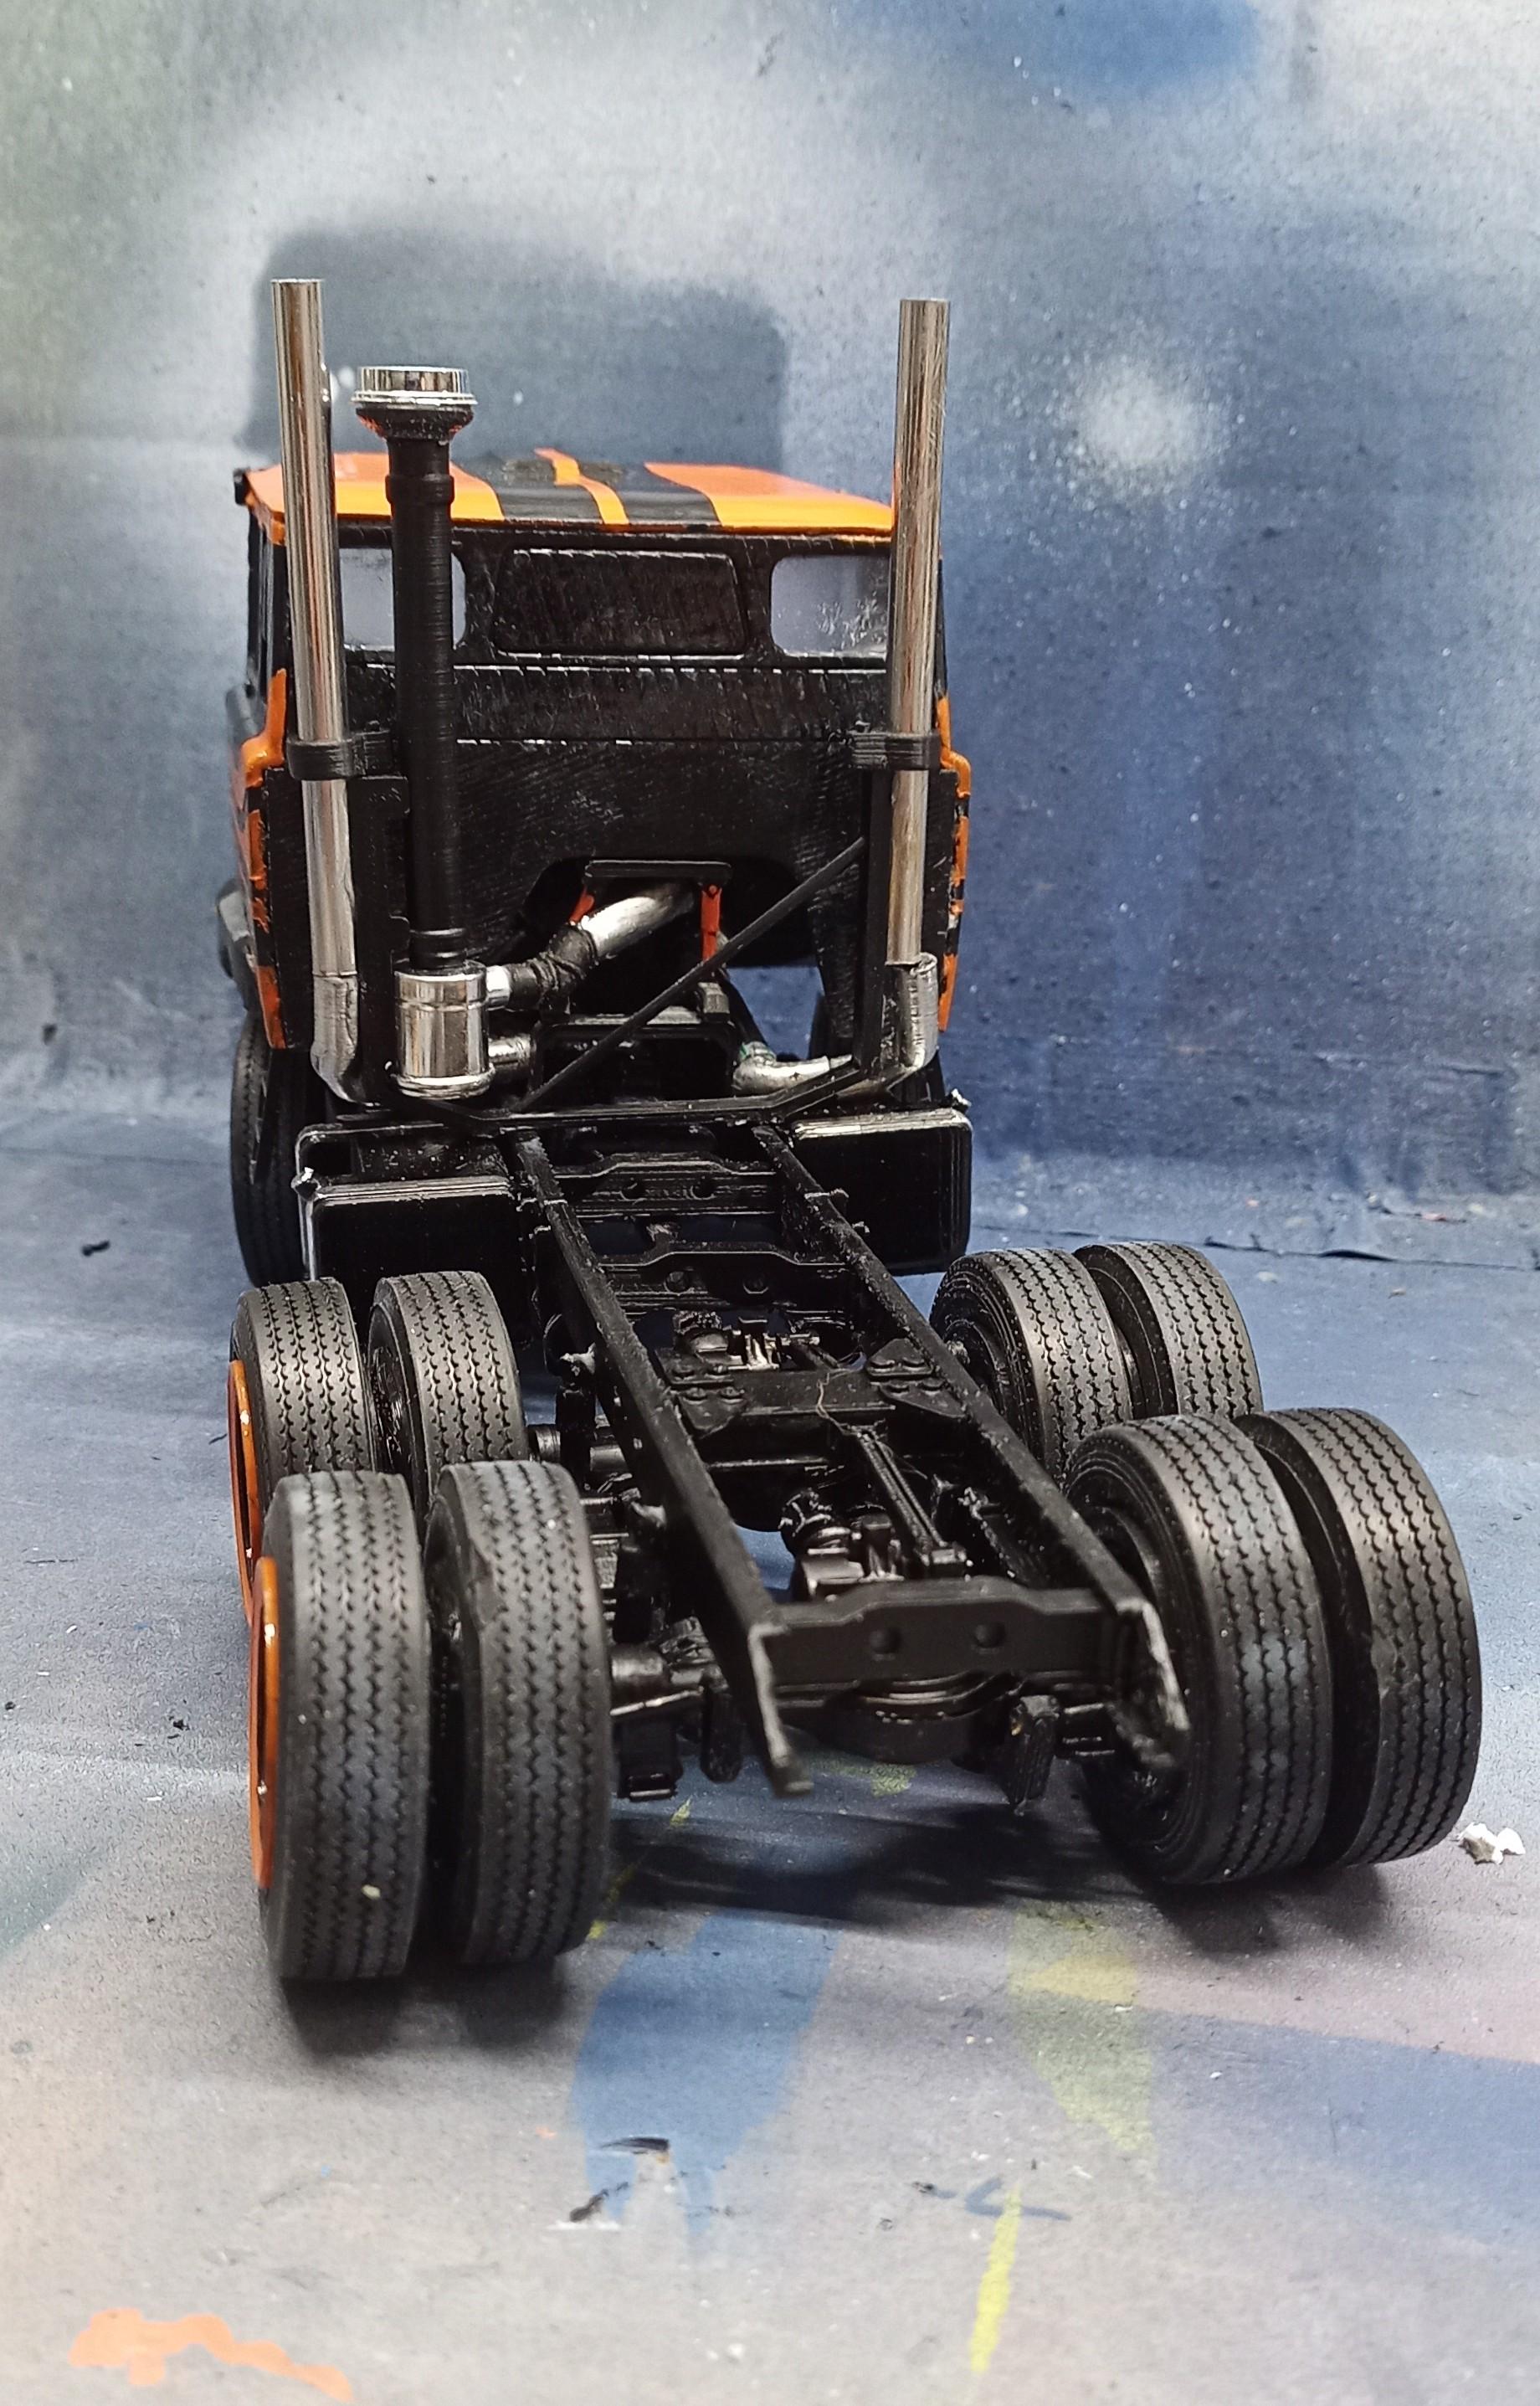
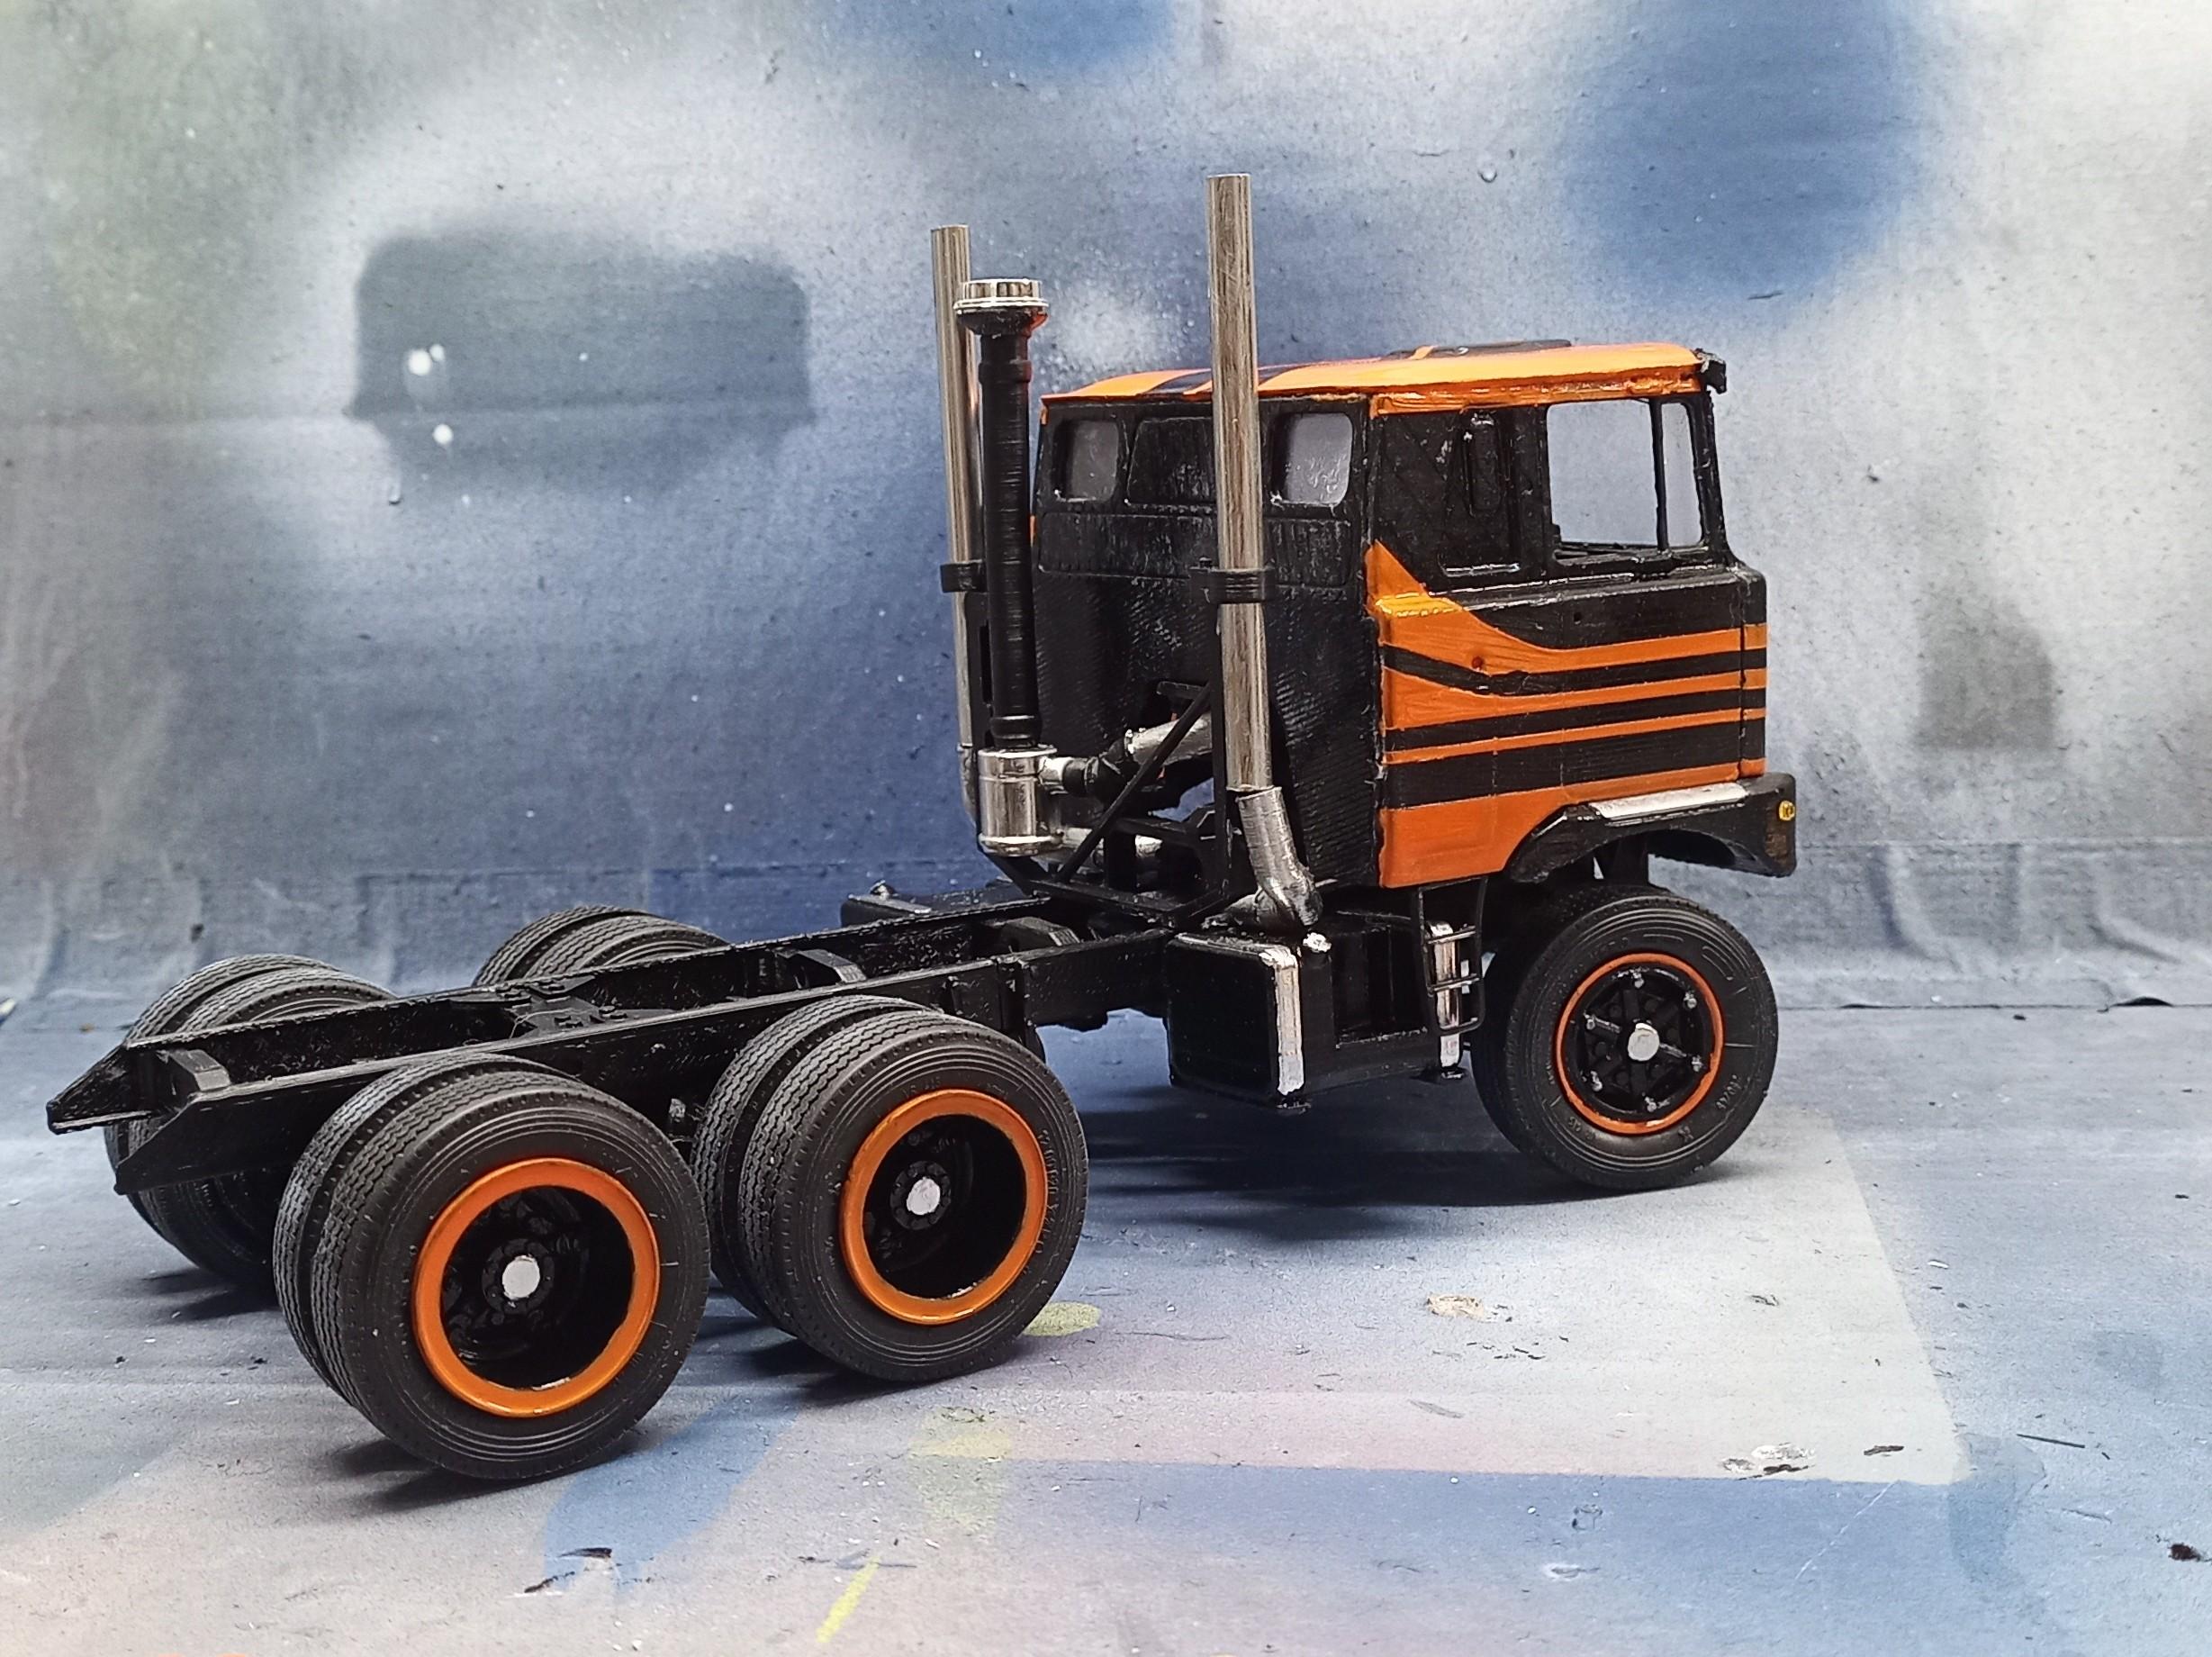
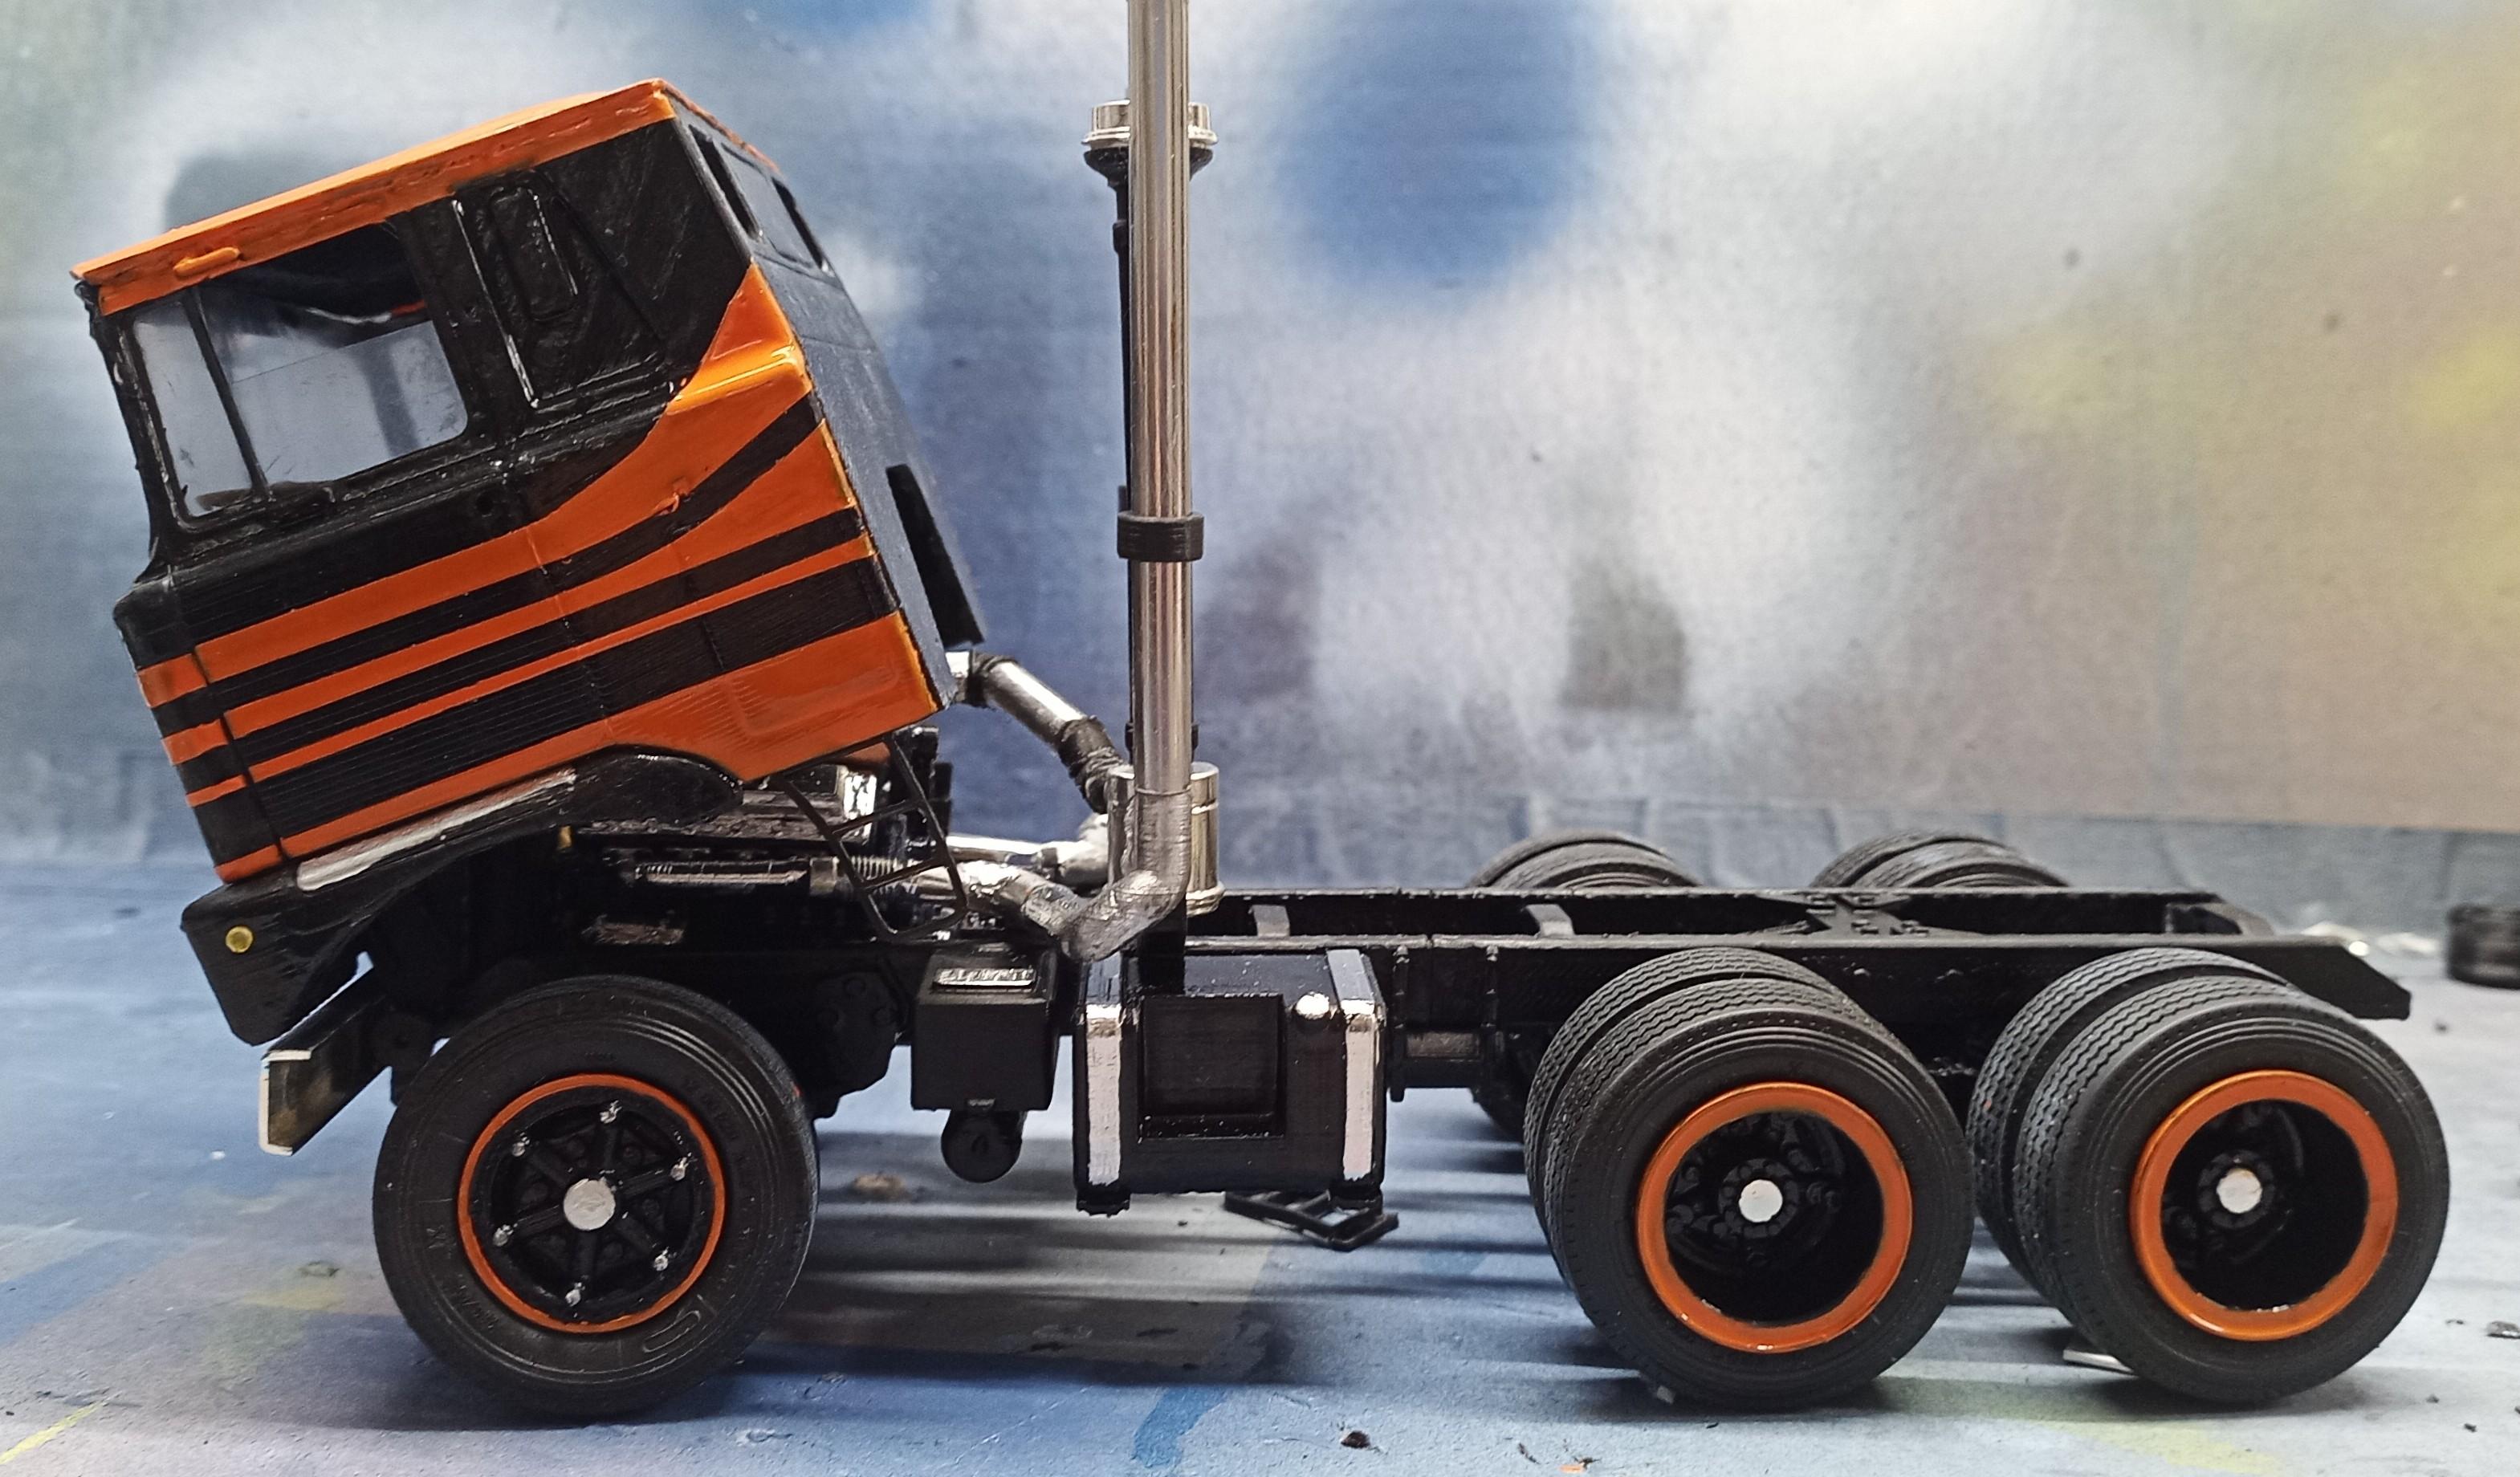
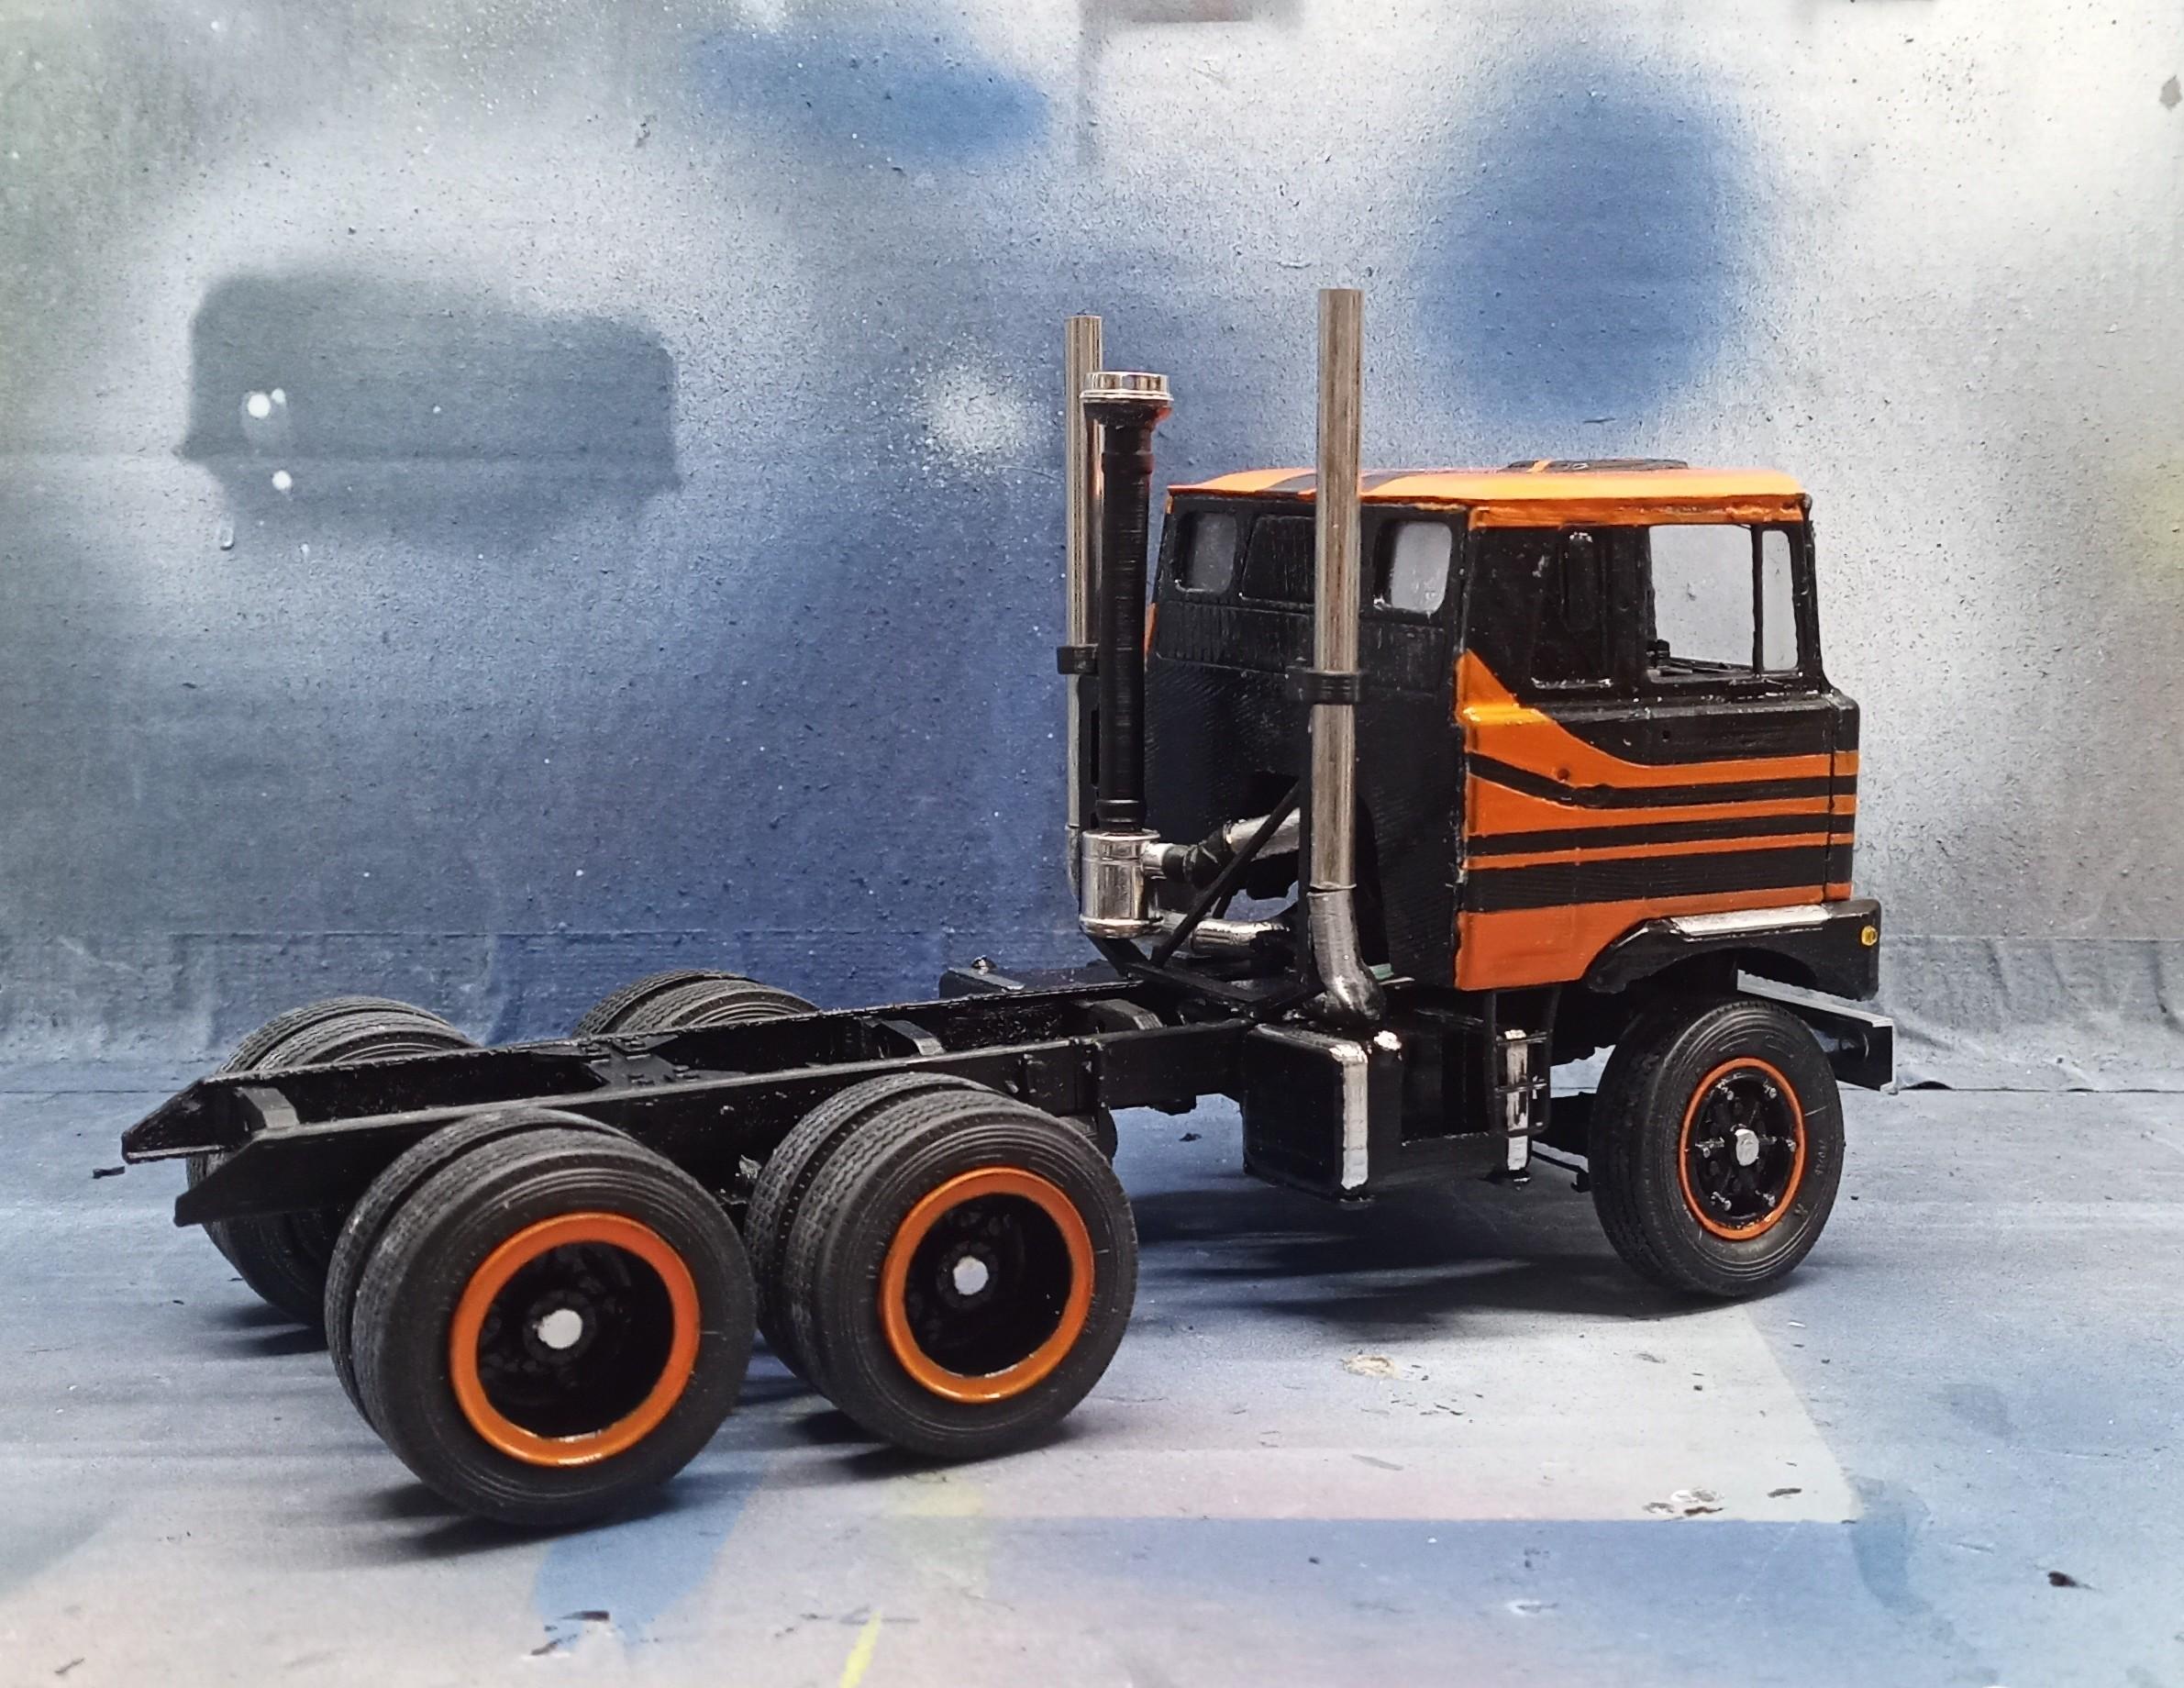
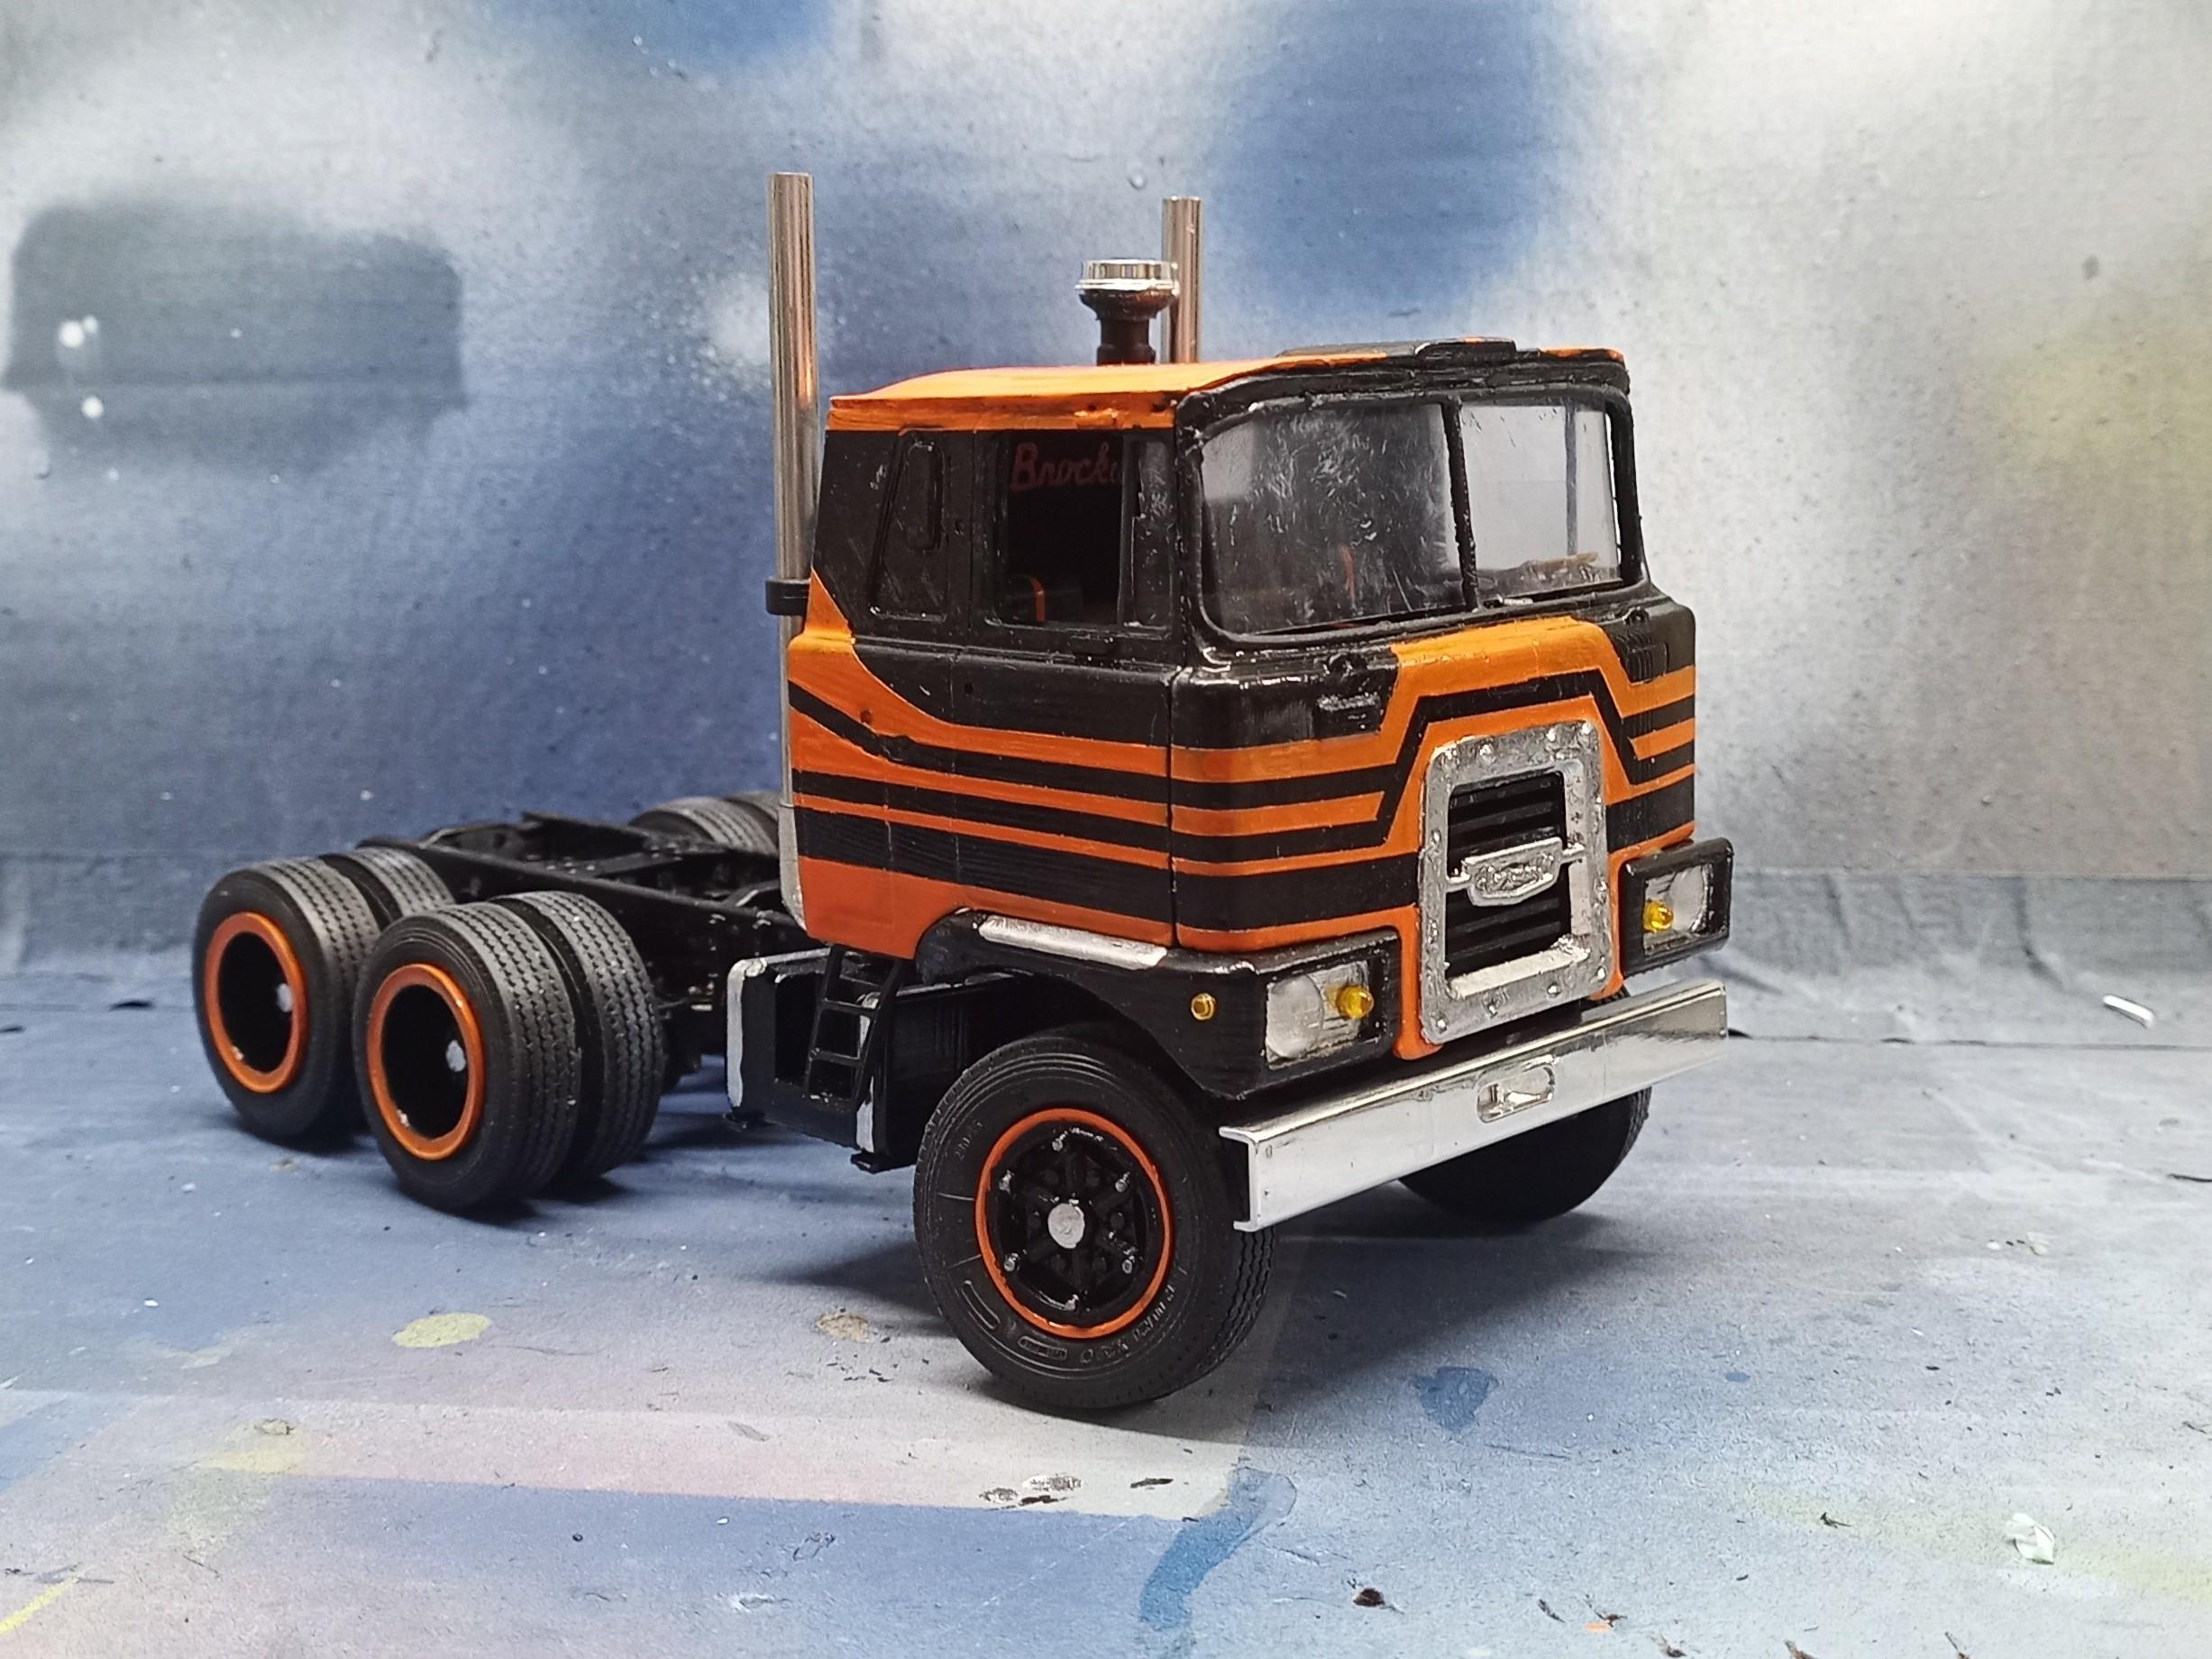
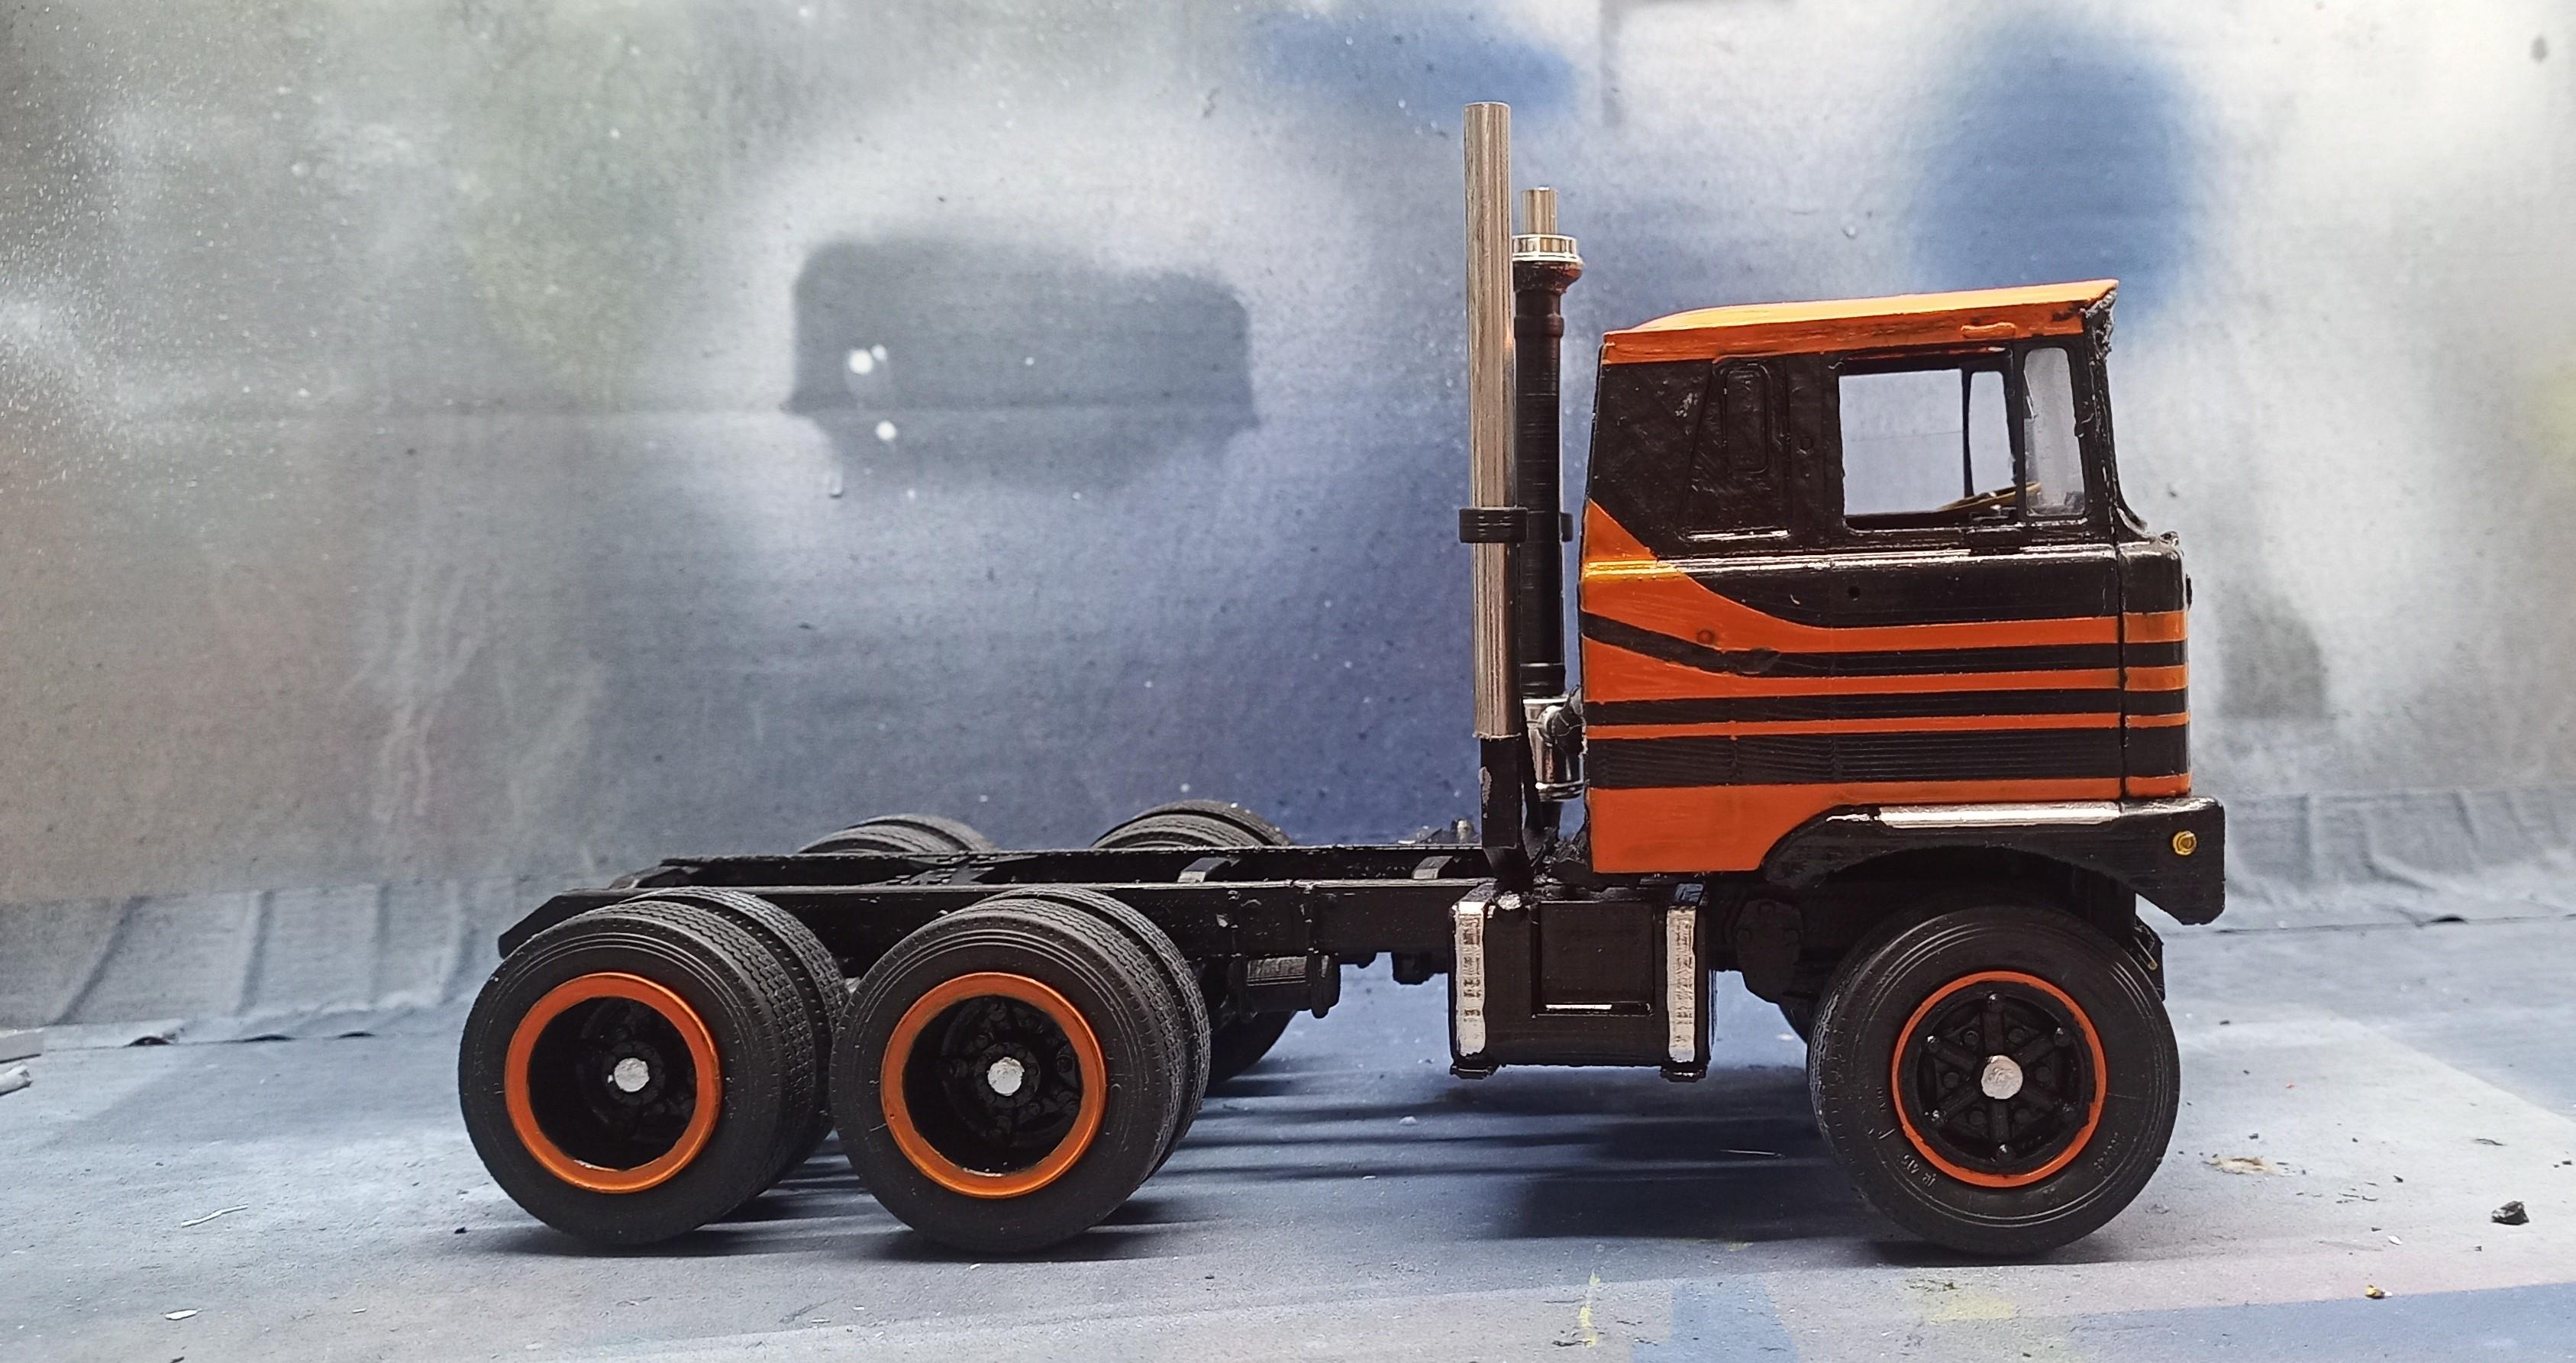
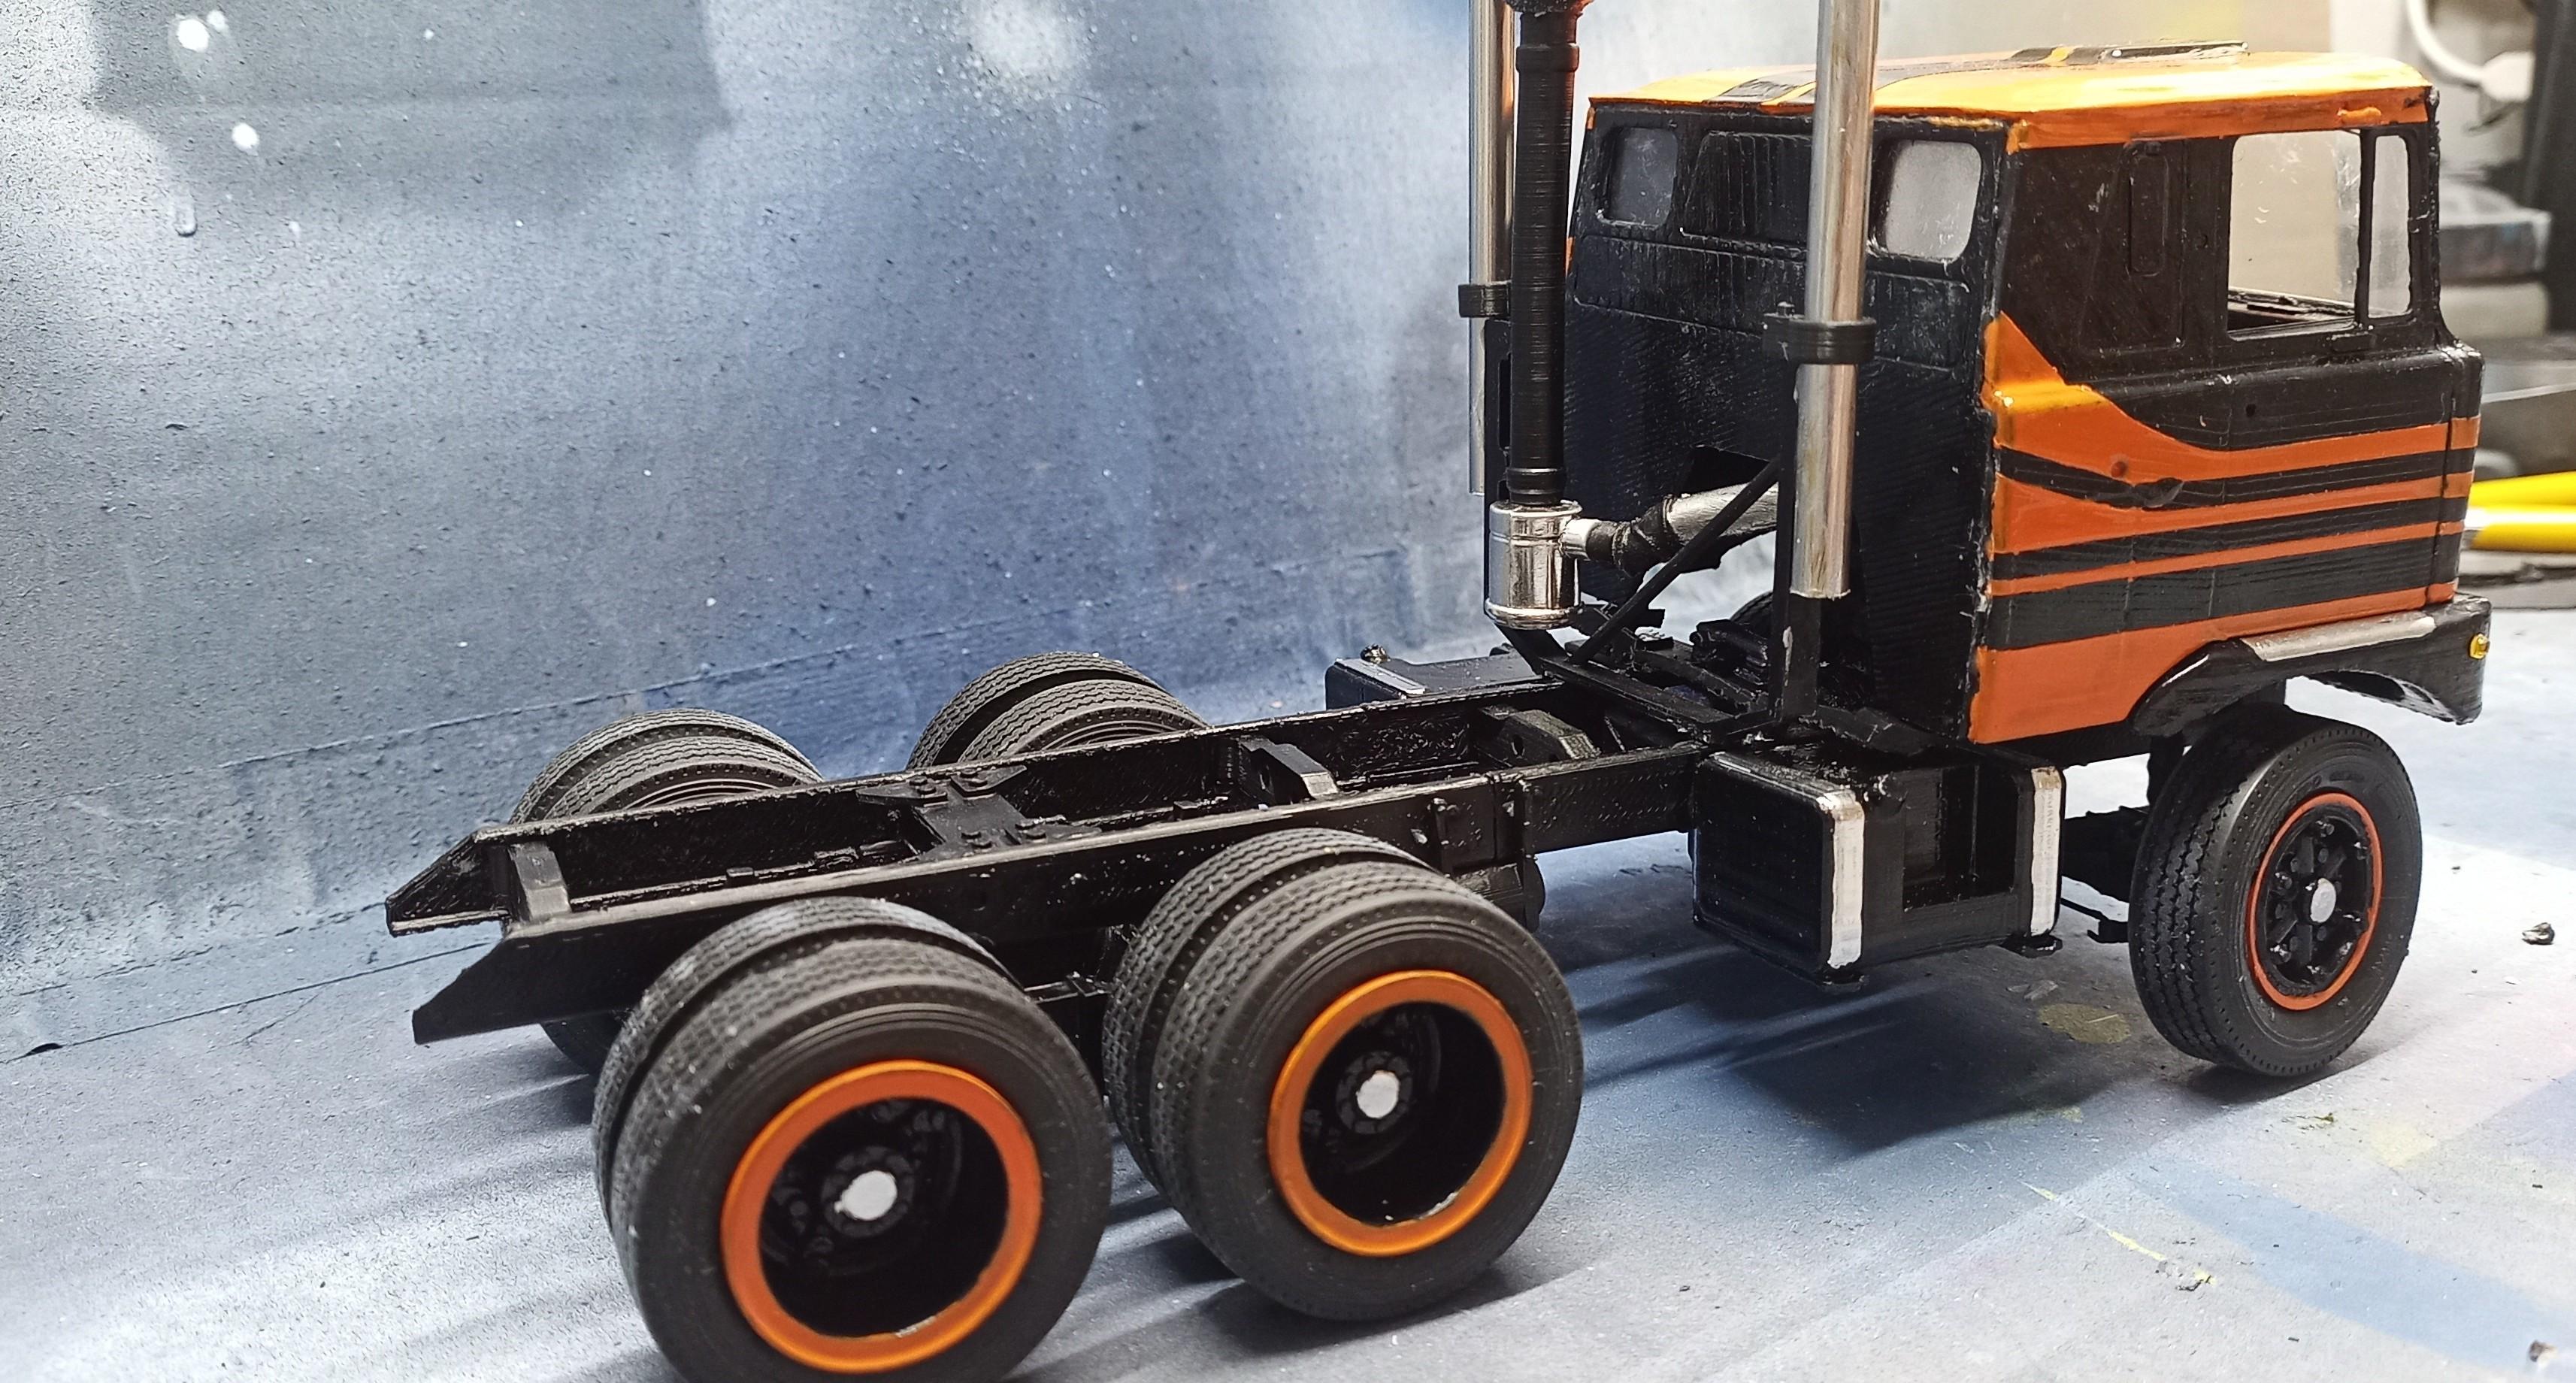
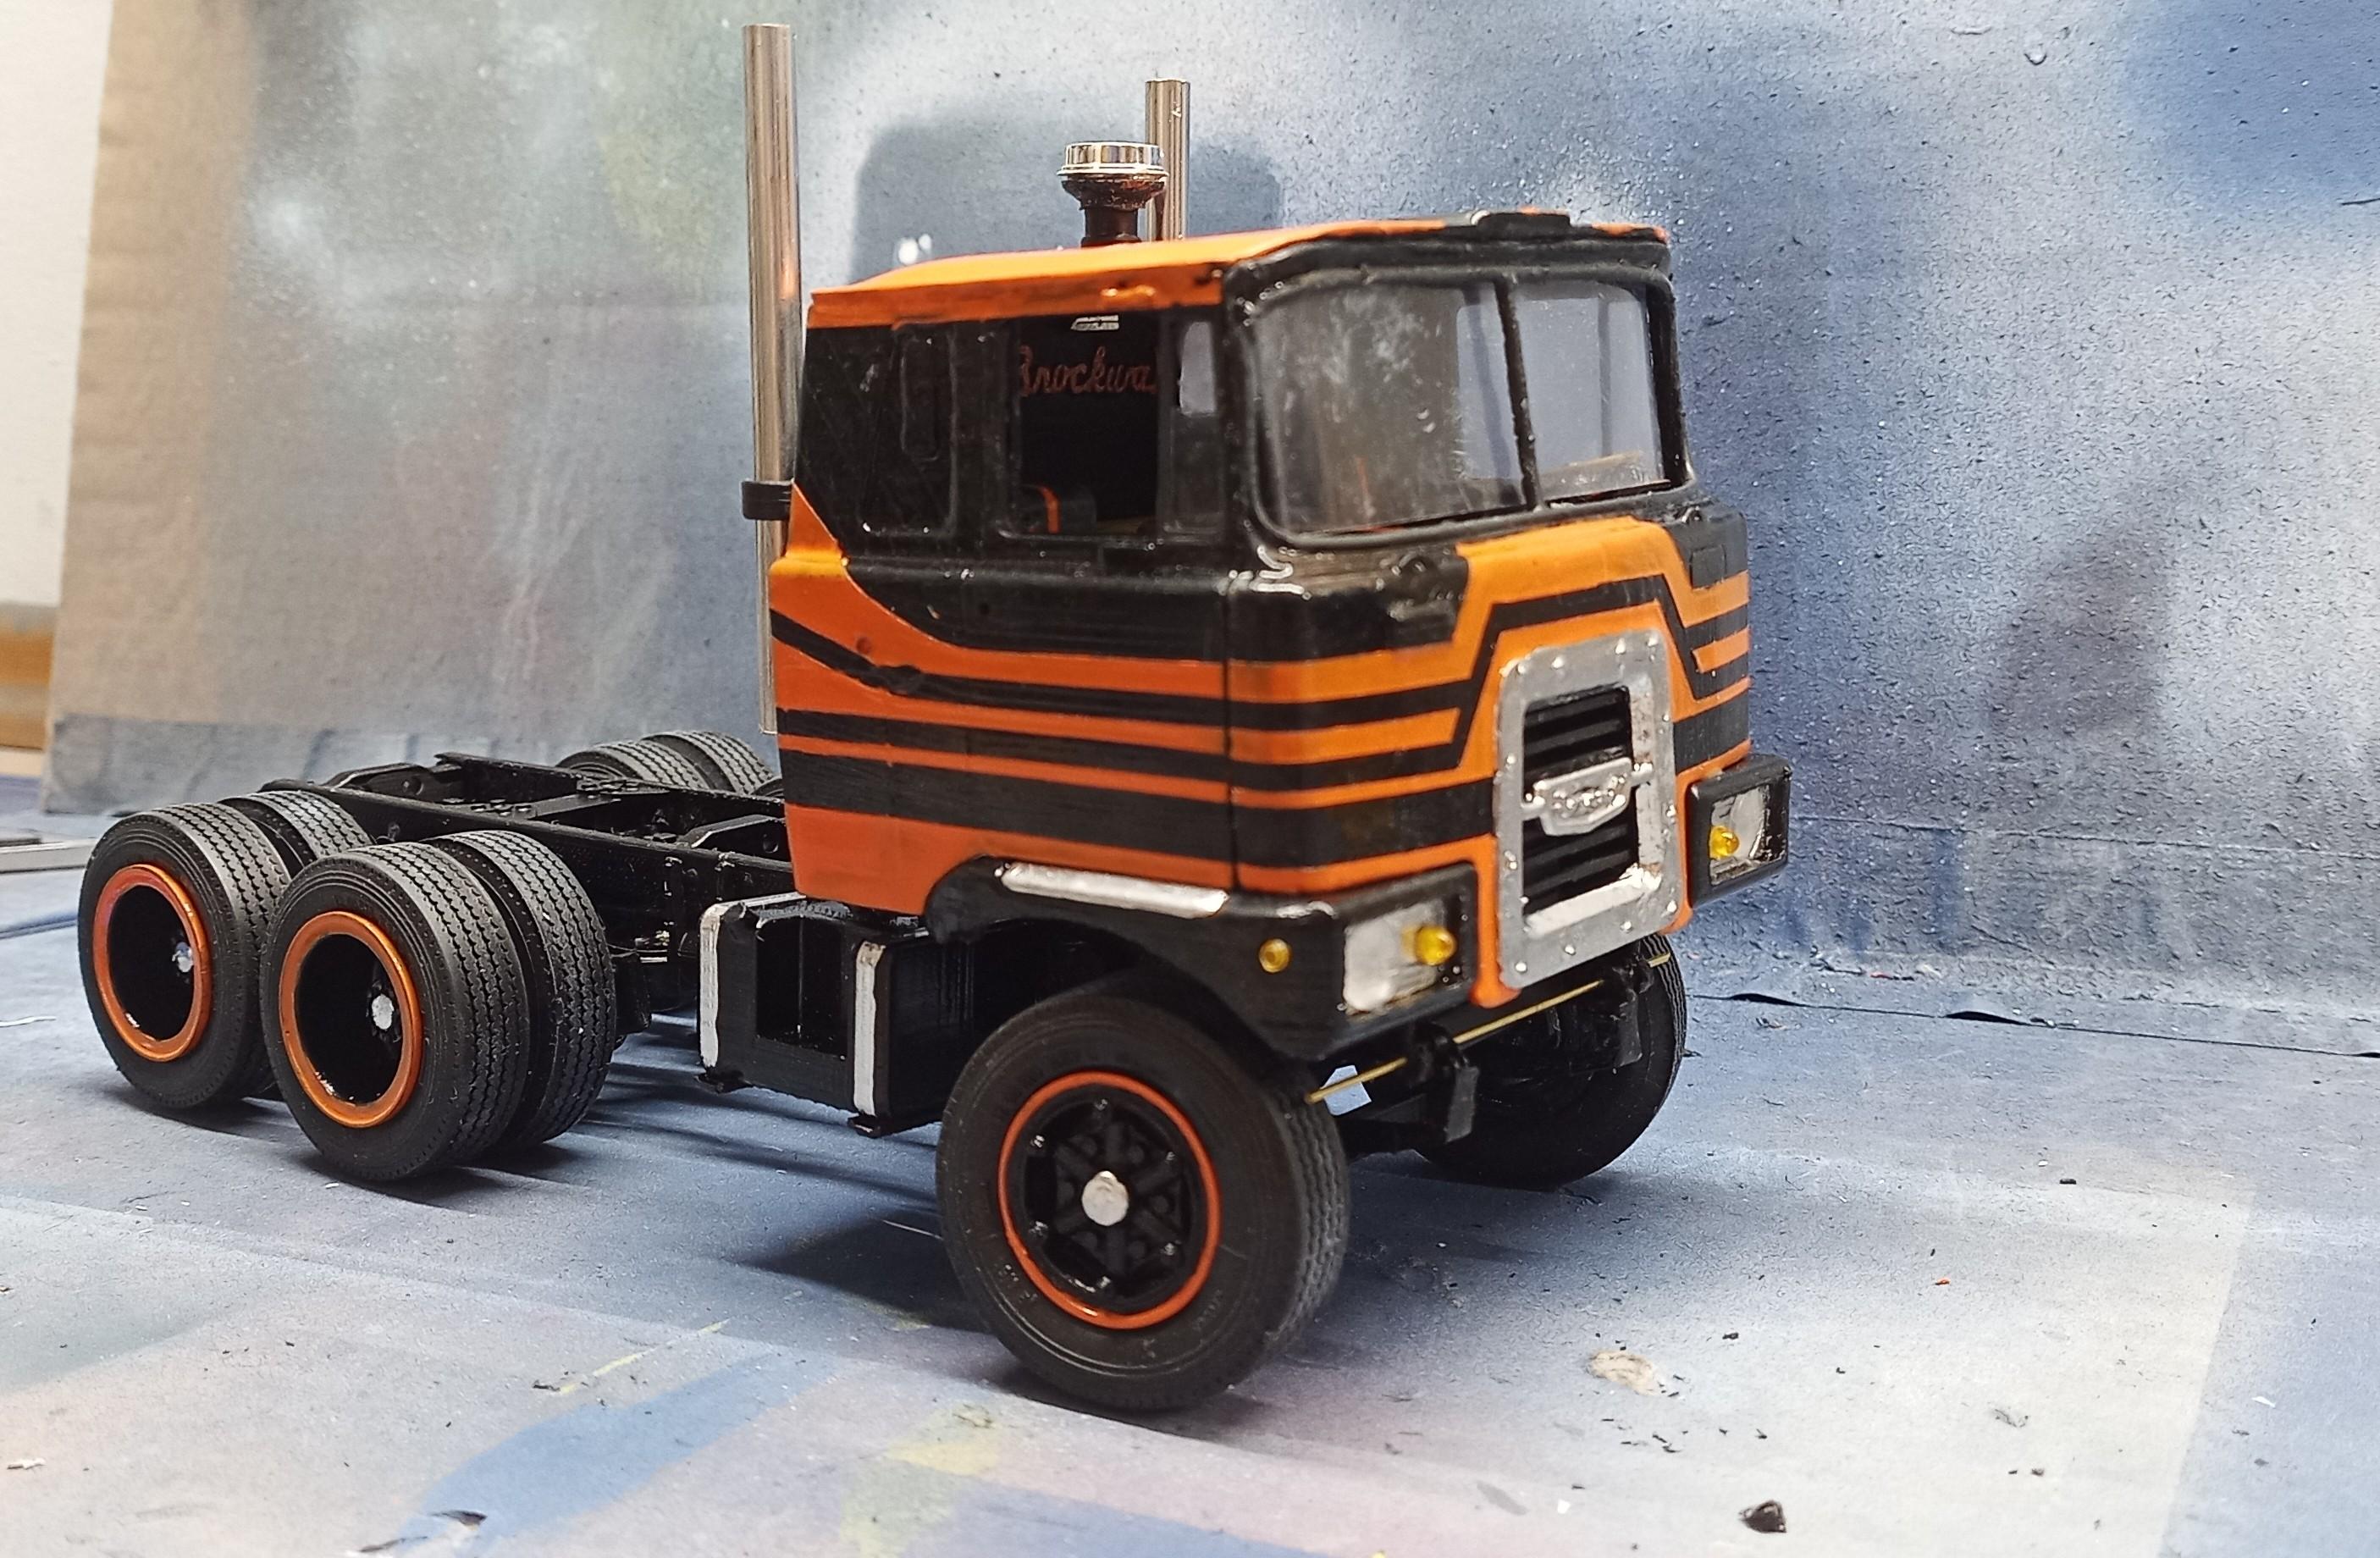
Hi everyone, I finished this Brockway 459 yesterday and wanted to share it. For those of you who missed the build, it's almost completely designed and printed. The tires, antenna, bumper, marker lights, shifter, stacks and windows are box parts or scratch. Still it consists of 170 printed parts. I tried to 'hide' the print lines in the cab by using a distracting paint scheme and a few primer coats. Didn't work perfectly but a little at least. The windows are made of 0.2mm transparent foil which unfortunately warped and snapped a bit out of place after having glued it in. Seems I need a better quality. OK, enough of story telling. Hope you enjoy it. The shifter is sort of customized. I didn't leave much space for it to fit between dog house and driver seat so I made one with a long grab handle instead of a ball. At least it fits and slides in perfectly when closing the cab. There are also quite a few other things I had to 'customize' not having had enough details due to a lack of pics but I somehow got it together! I also designed a new slide plate for the fifth wheel since I didn't want to totally cover up the view onto the chassis and drive train. Here's two pics together with the 'Widow Woman' Brockway from Convoy. I always like to make a cabover and a conventional of each make. Thanks for dropping in!

-
Brockway 459
Jürgen M. replied to Jürgen M.'s topic in WIP: Model Trucks: Big Rigs and Heavy Equipment
Calling it finished: I know it's not perfect but it's finished! It did turn out better than I had expected though but I learned a few things and hope to be able to use this knowledge in my next project, what ever it might be. My goal was to build a 'brother' for the 'Widow Woman' Brockway. As I said I try to make at least one cabover and one conventional of each make. They won't be together on the shelf but not far away from eachother! I'll post it under glass tomorrow. Thanks to all of you for your encouraging comments and for showing interest in my build. Hope my next one will be better and will find your likes!
-
Brockway 459
Jürgen M. replied to Jürgen M.'s topic in WIP: Model Trucks: Big Rigs and Heavy Equipment
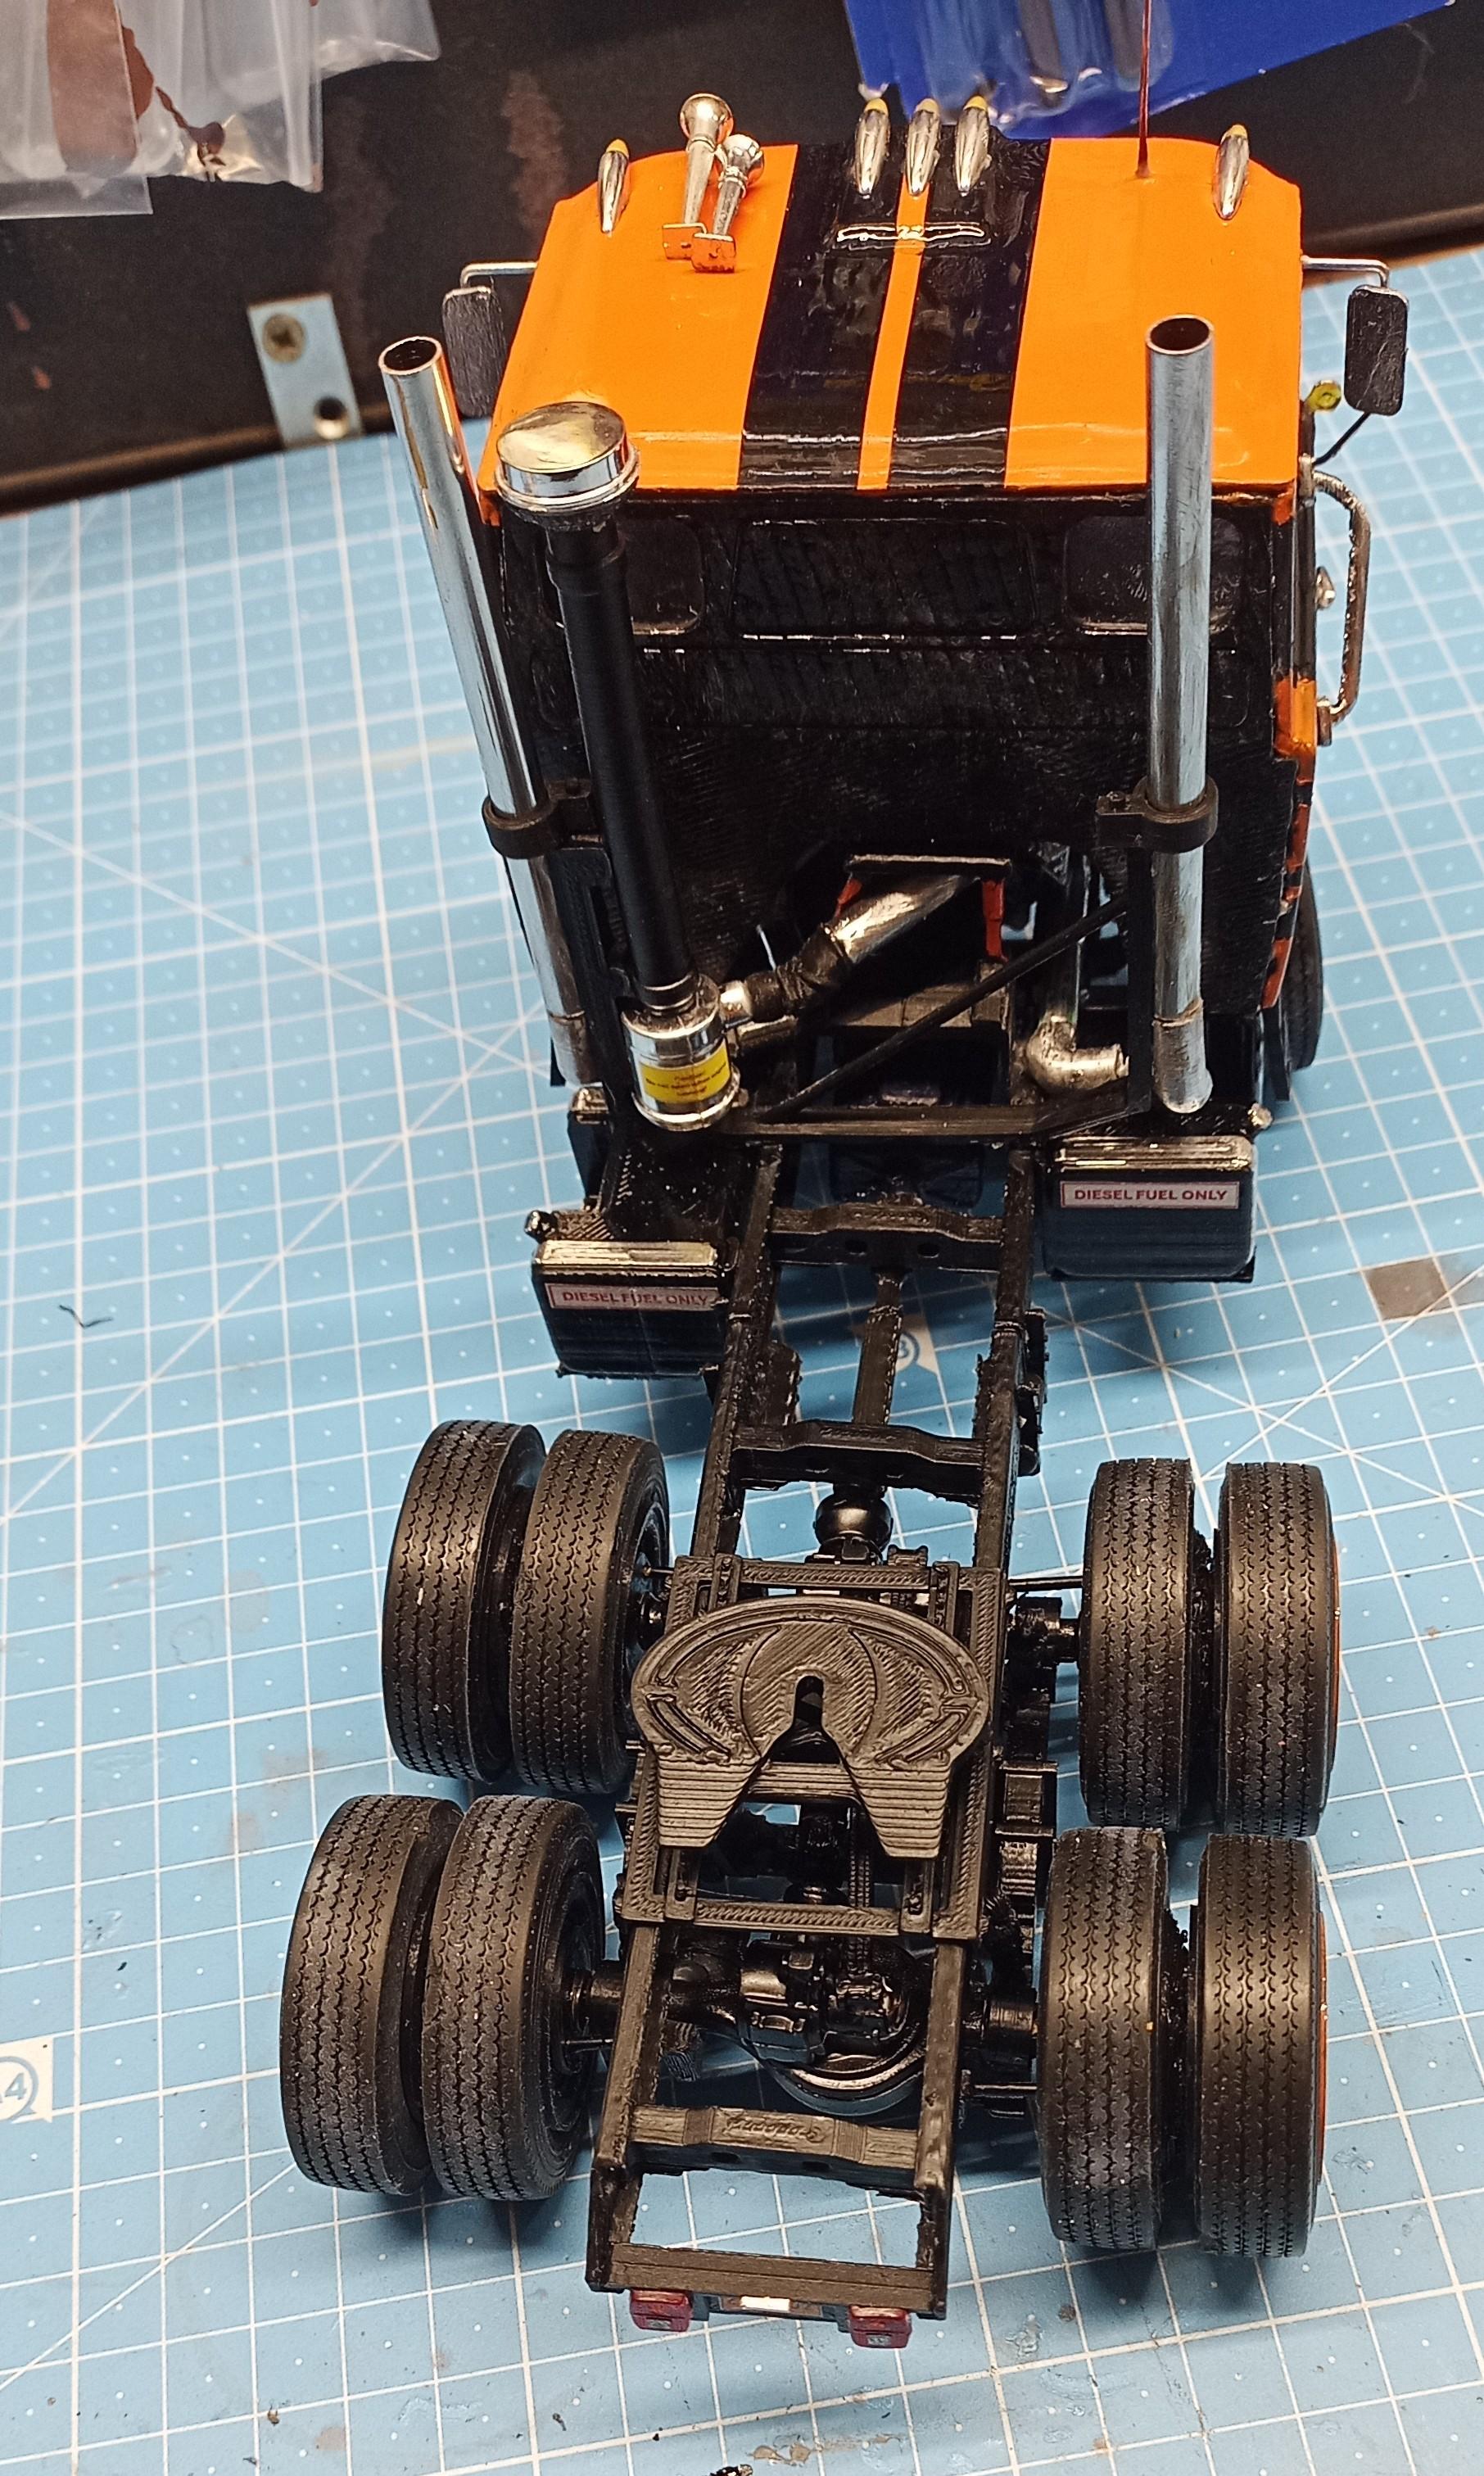
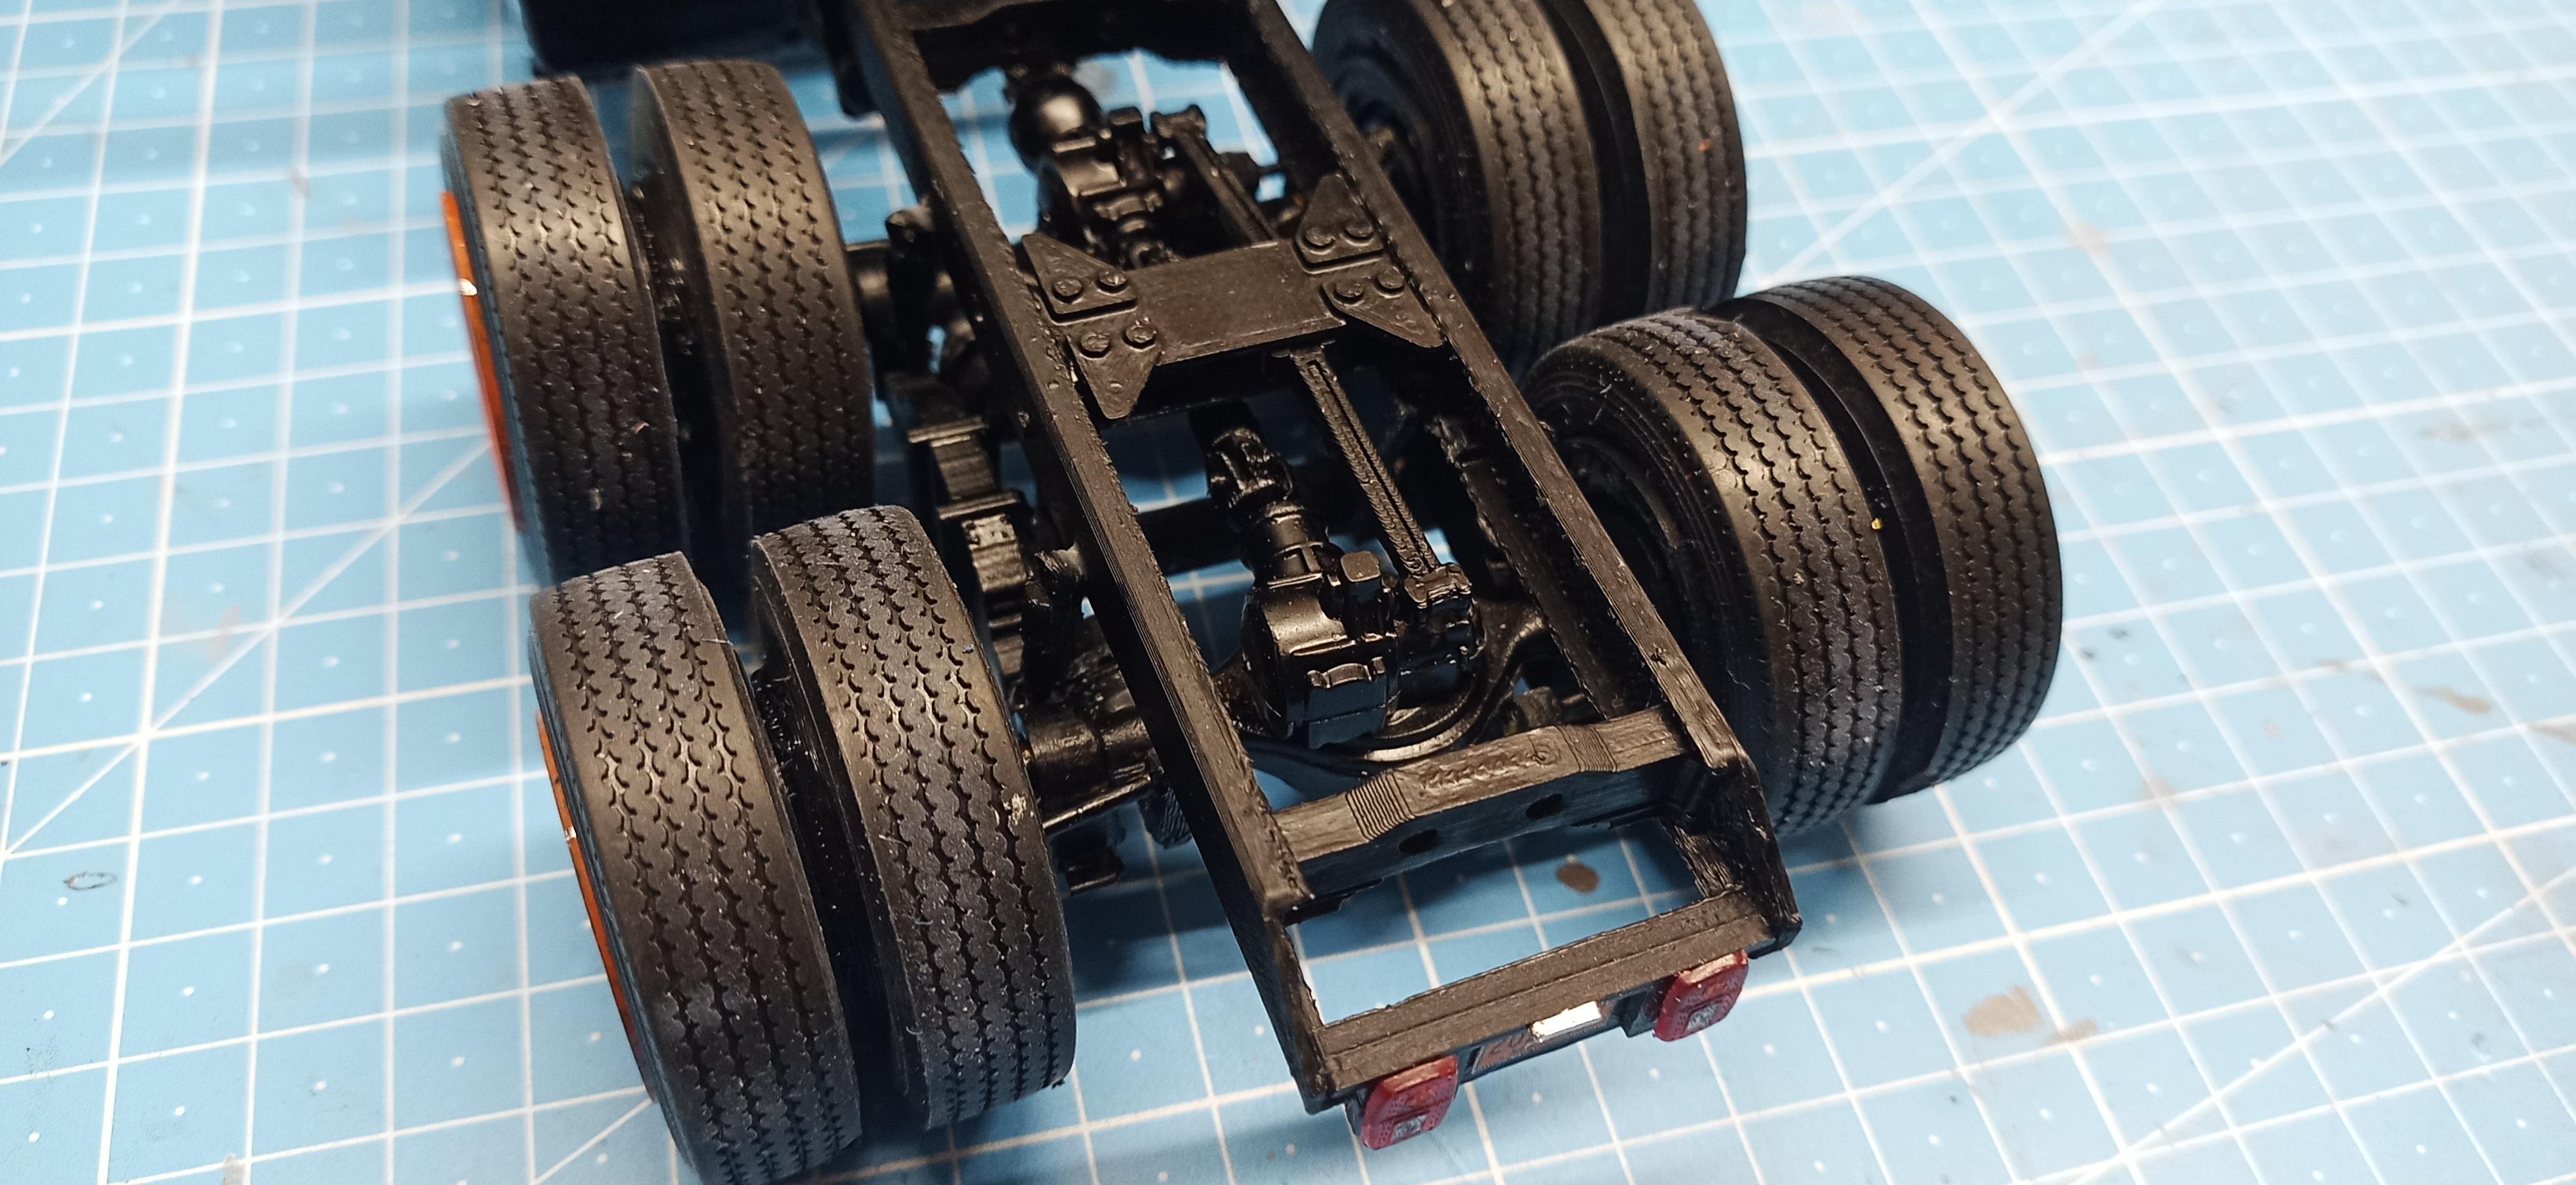
Fifth wheel is mounted. Looks OK! A bit more fine tuning and hopefully tomorrow it'll be ready for the shelf!
-
Brockway 459
Jürgen M. replied to Jürgen M.'s topic in WIP: Model Trucks: Big Rigs and Heavy Equipment
😆 Looking at your builds I can only say you're a genius! More realistic is not possible! -
Brockway 459
Jürgen M. replied to Jürgen M.'s topic in WIP: Model Trucks: Big Rigs and Heavy Equipment
Thanks Brian! A nice compliment from a pro builder like you! I'm really flattered! -
Brockway 459
Jürgen M. replied to Jürgen M.'s topic in WIP: Model Trucks: Big Rigs and Heavy Equipment
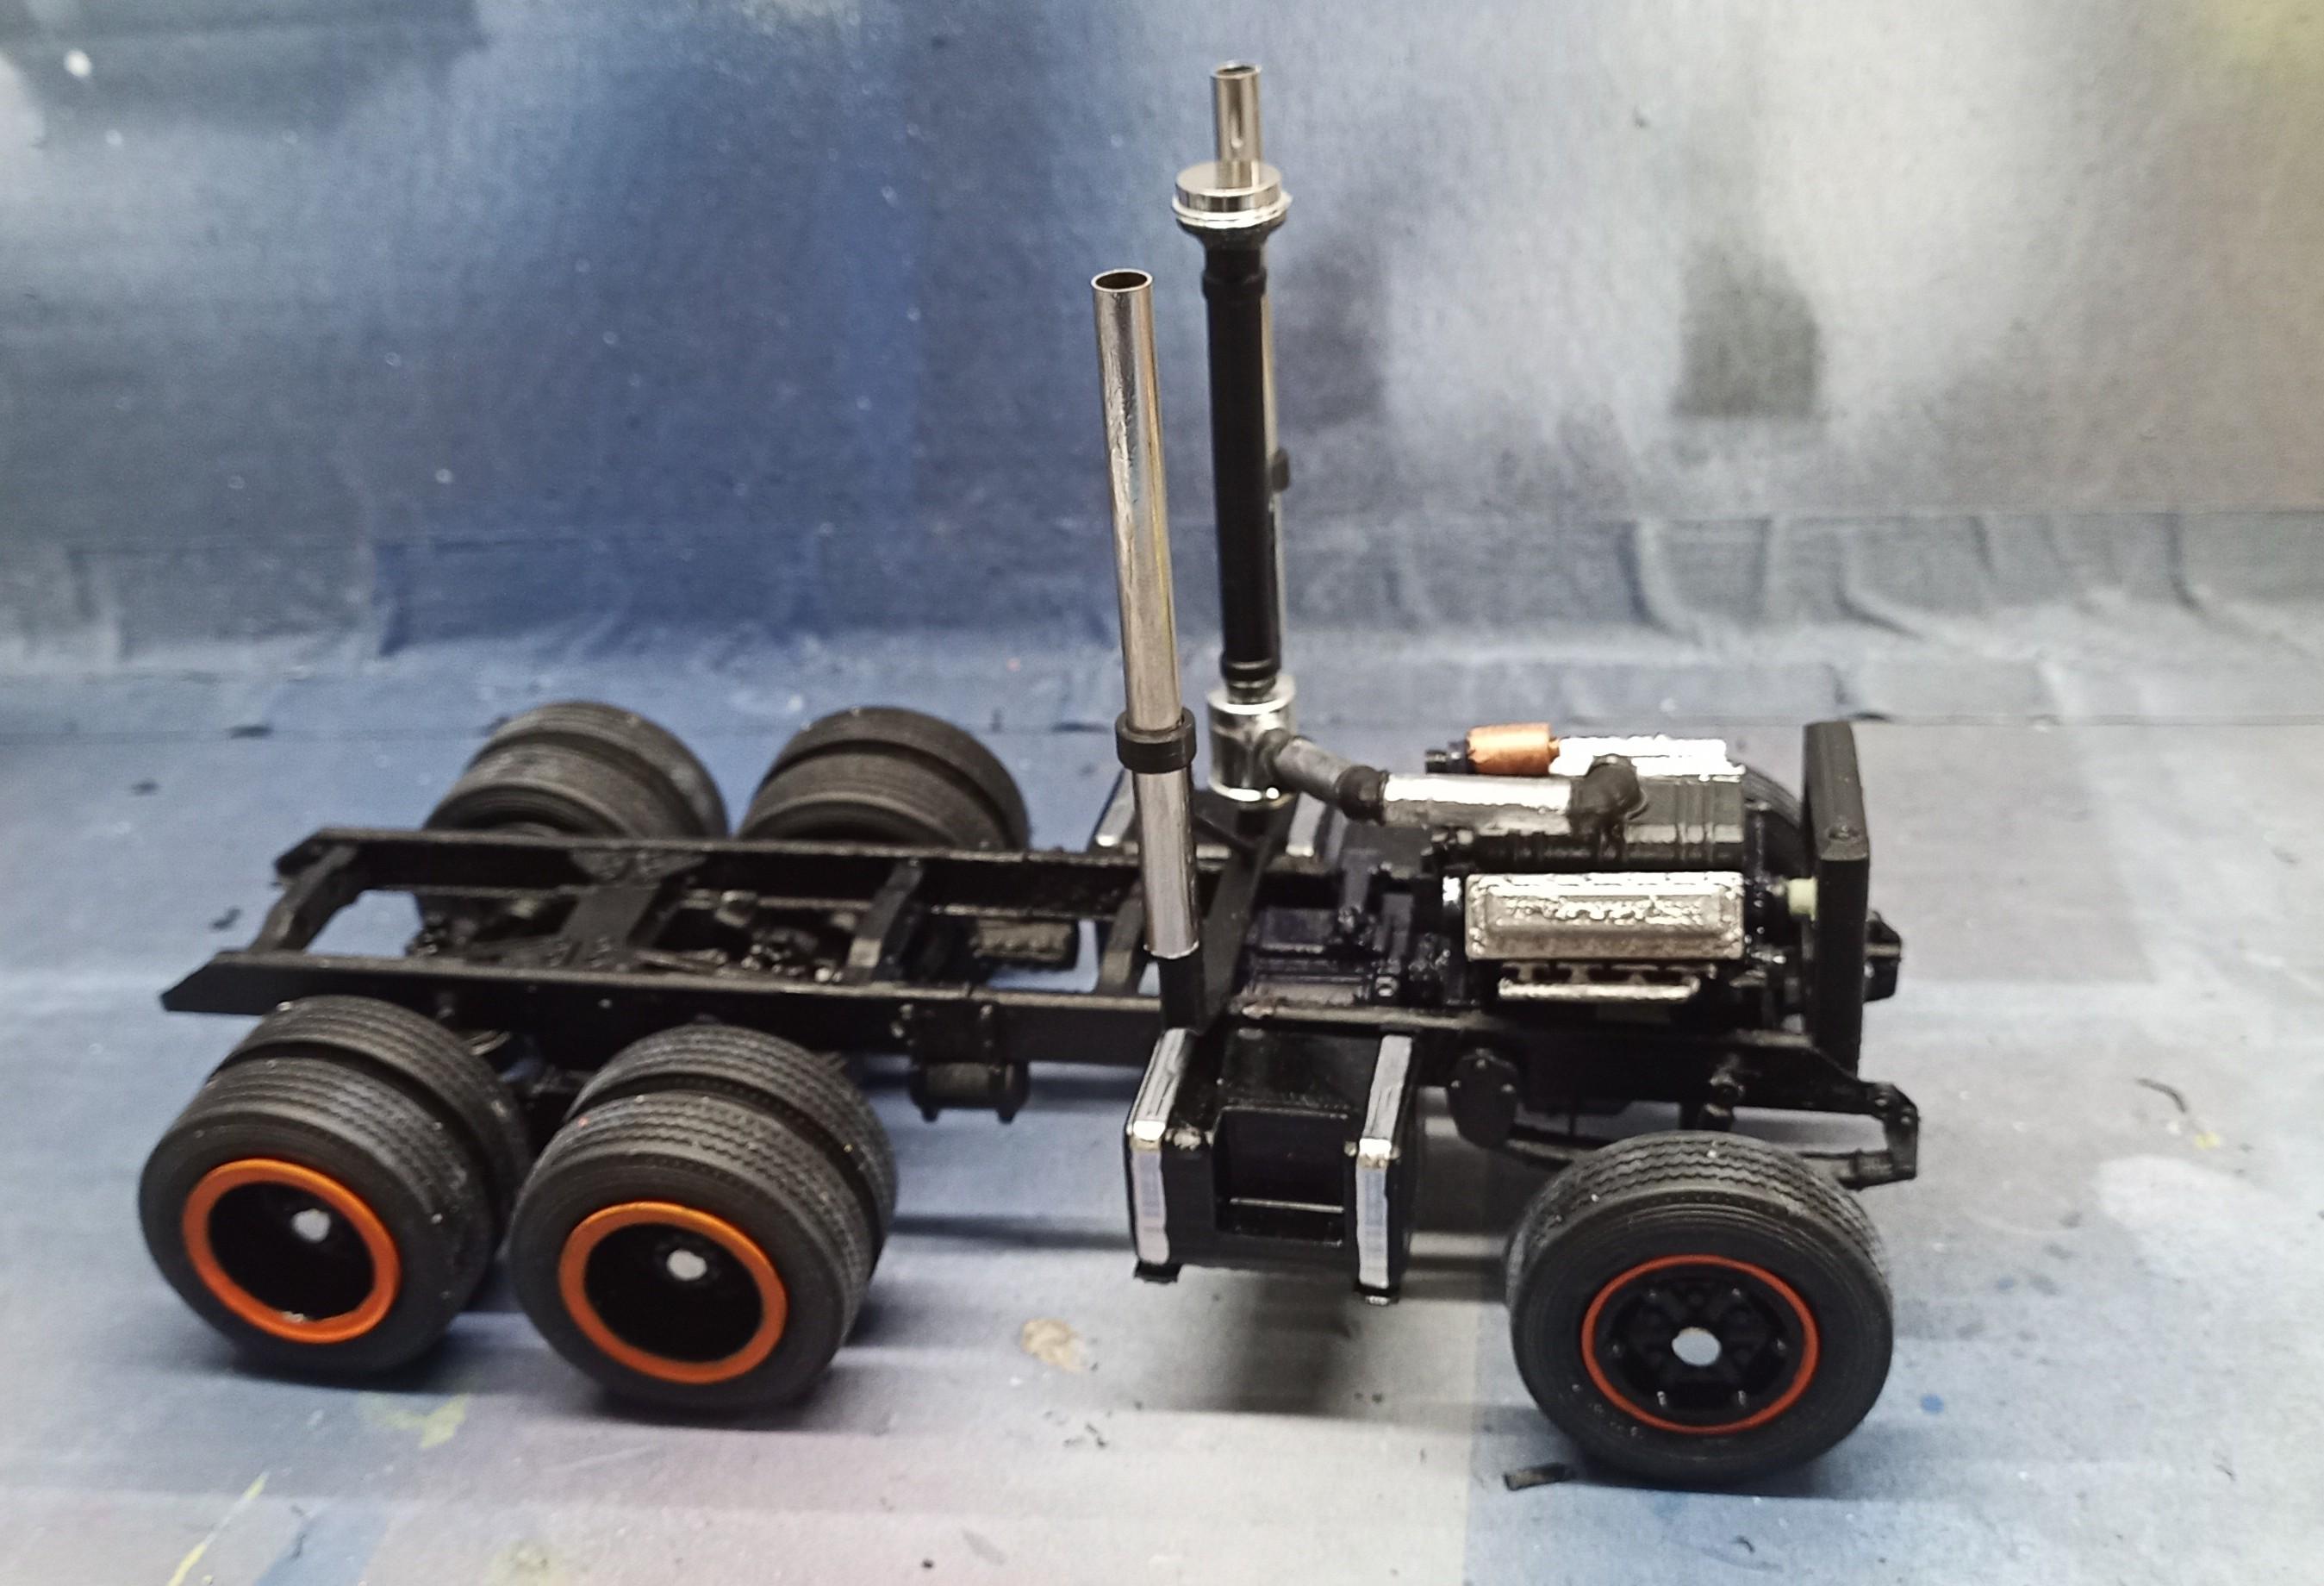
This is my self designed sliding plate: (is that the correct term?) The fifth wheel is in print!
-
Brockway 459
Jürgen M. replied to Jürgen M.'s topic in WIP: Model Trucks: Big Rigs and Heavy Equipment
Thanks Pal! The mirrors are self made! Same I used for the Big Nasty build! The orange is Revell no. 30. Funny is, I just now realized that we both used orange on our current builds! 😂 -
Brockway 459
Jürgen M. replied to Jürgen M.'s topic in WIP: Model Trucks: Big Rigs and Heavy Equipment
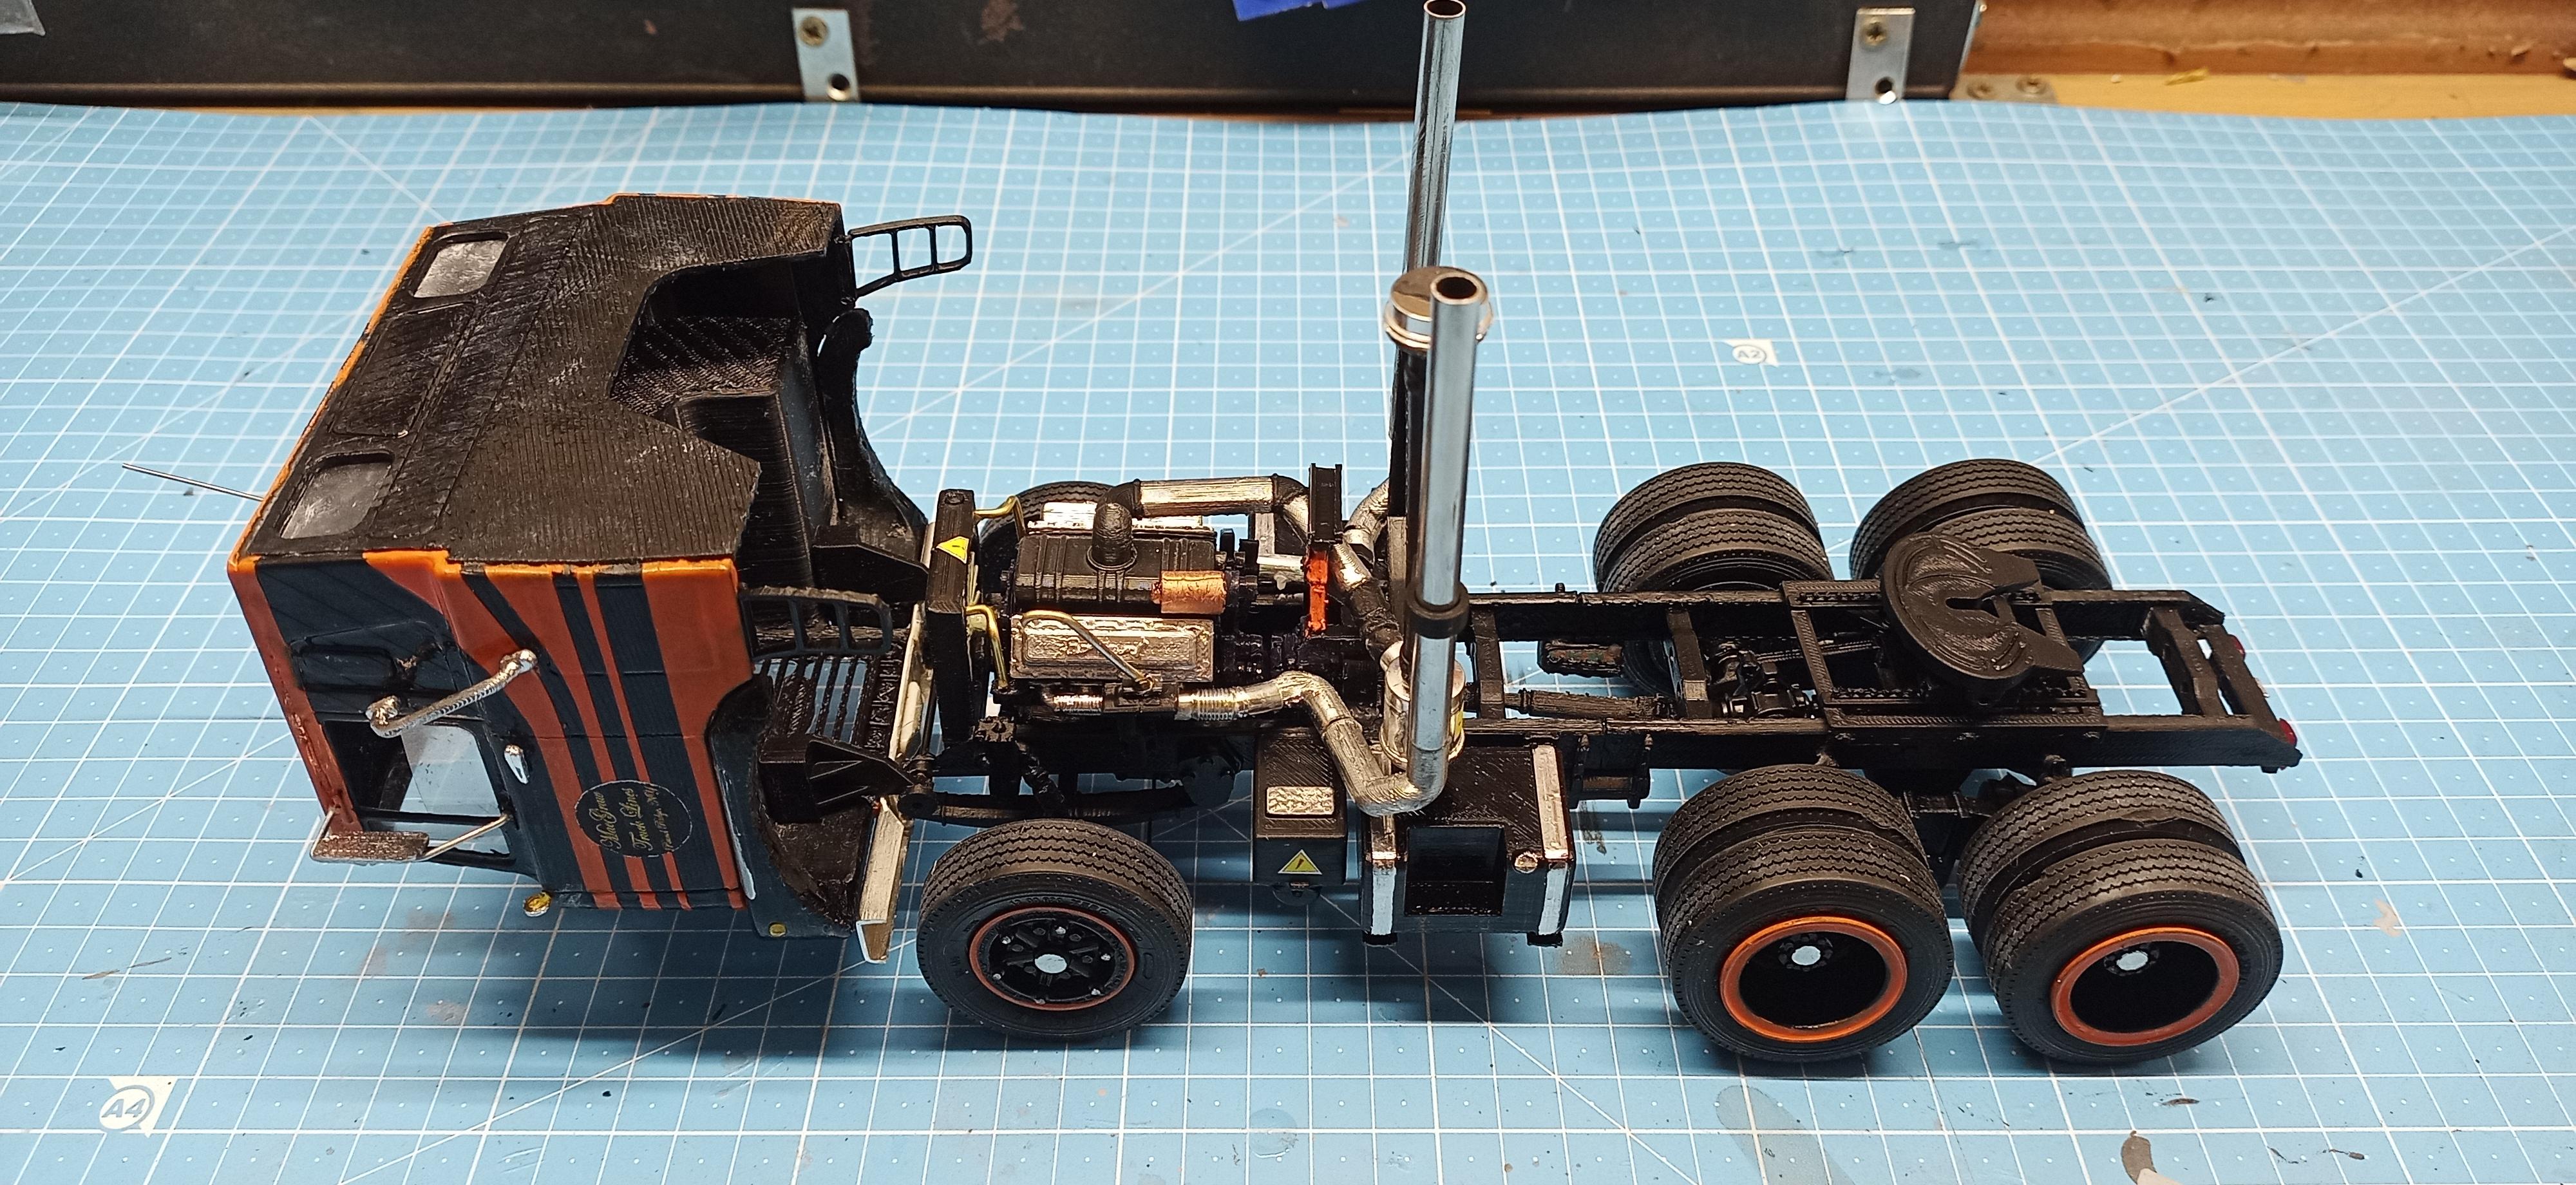
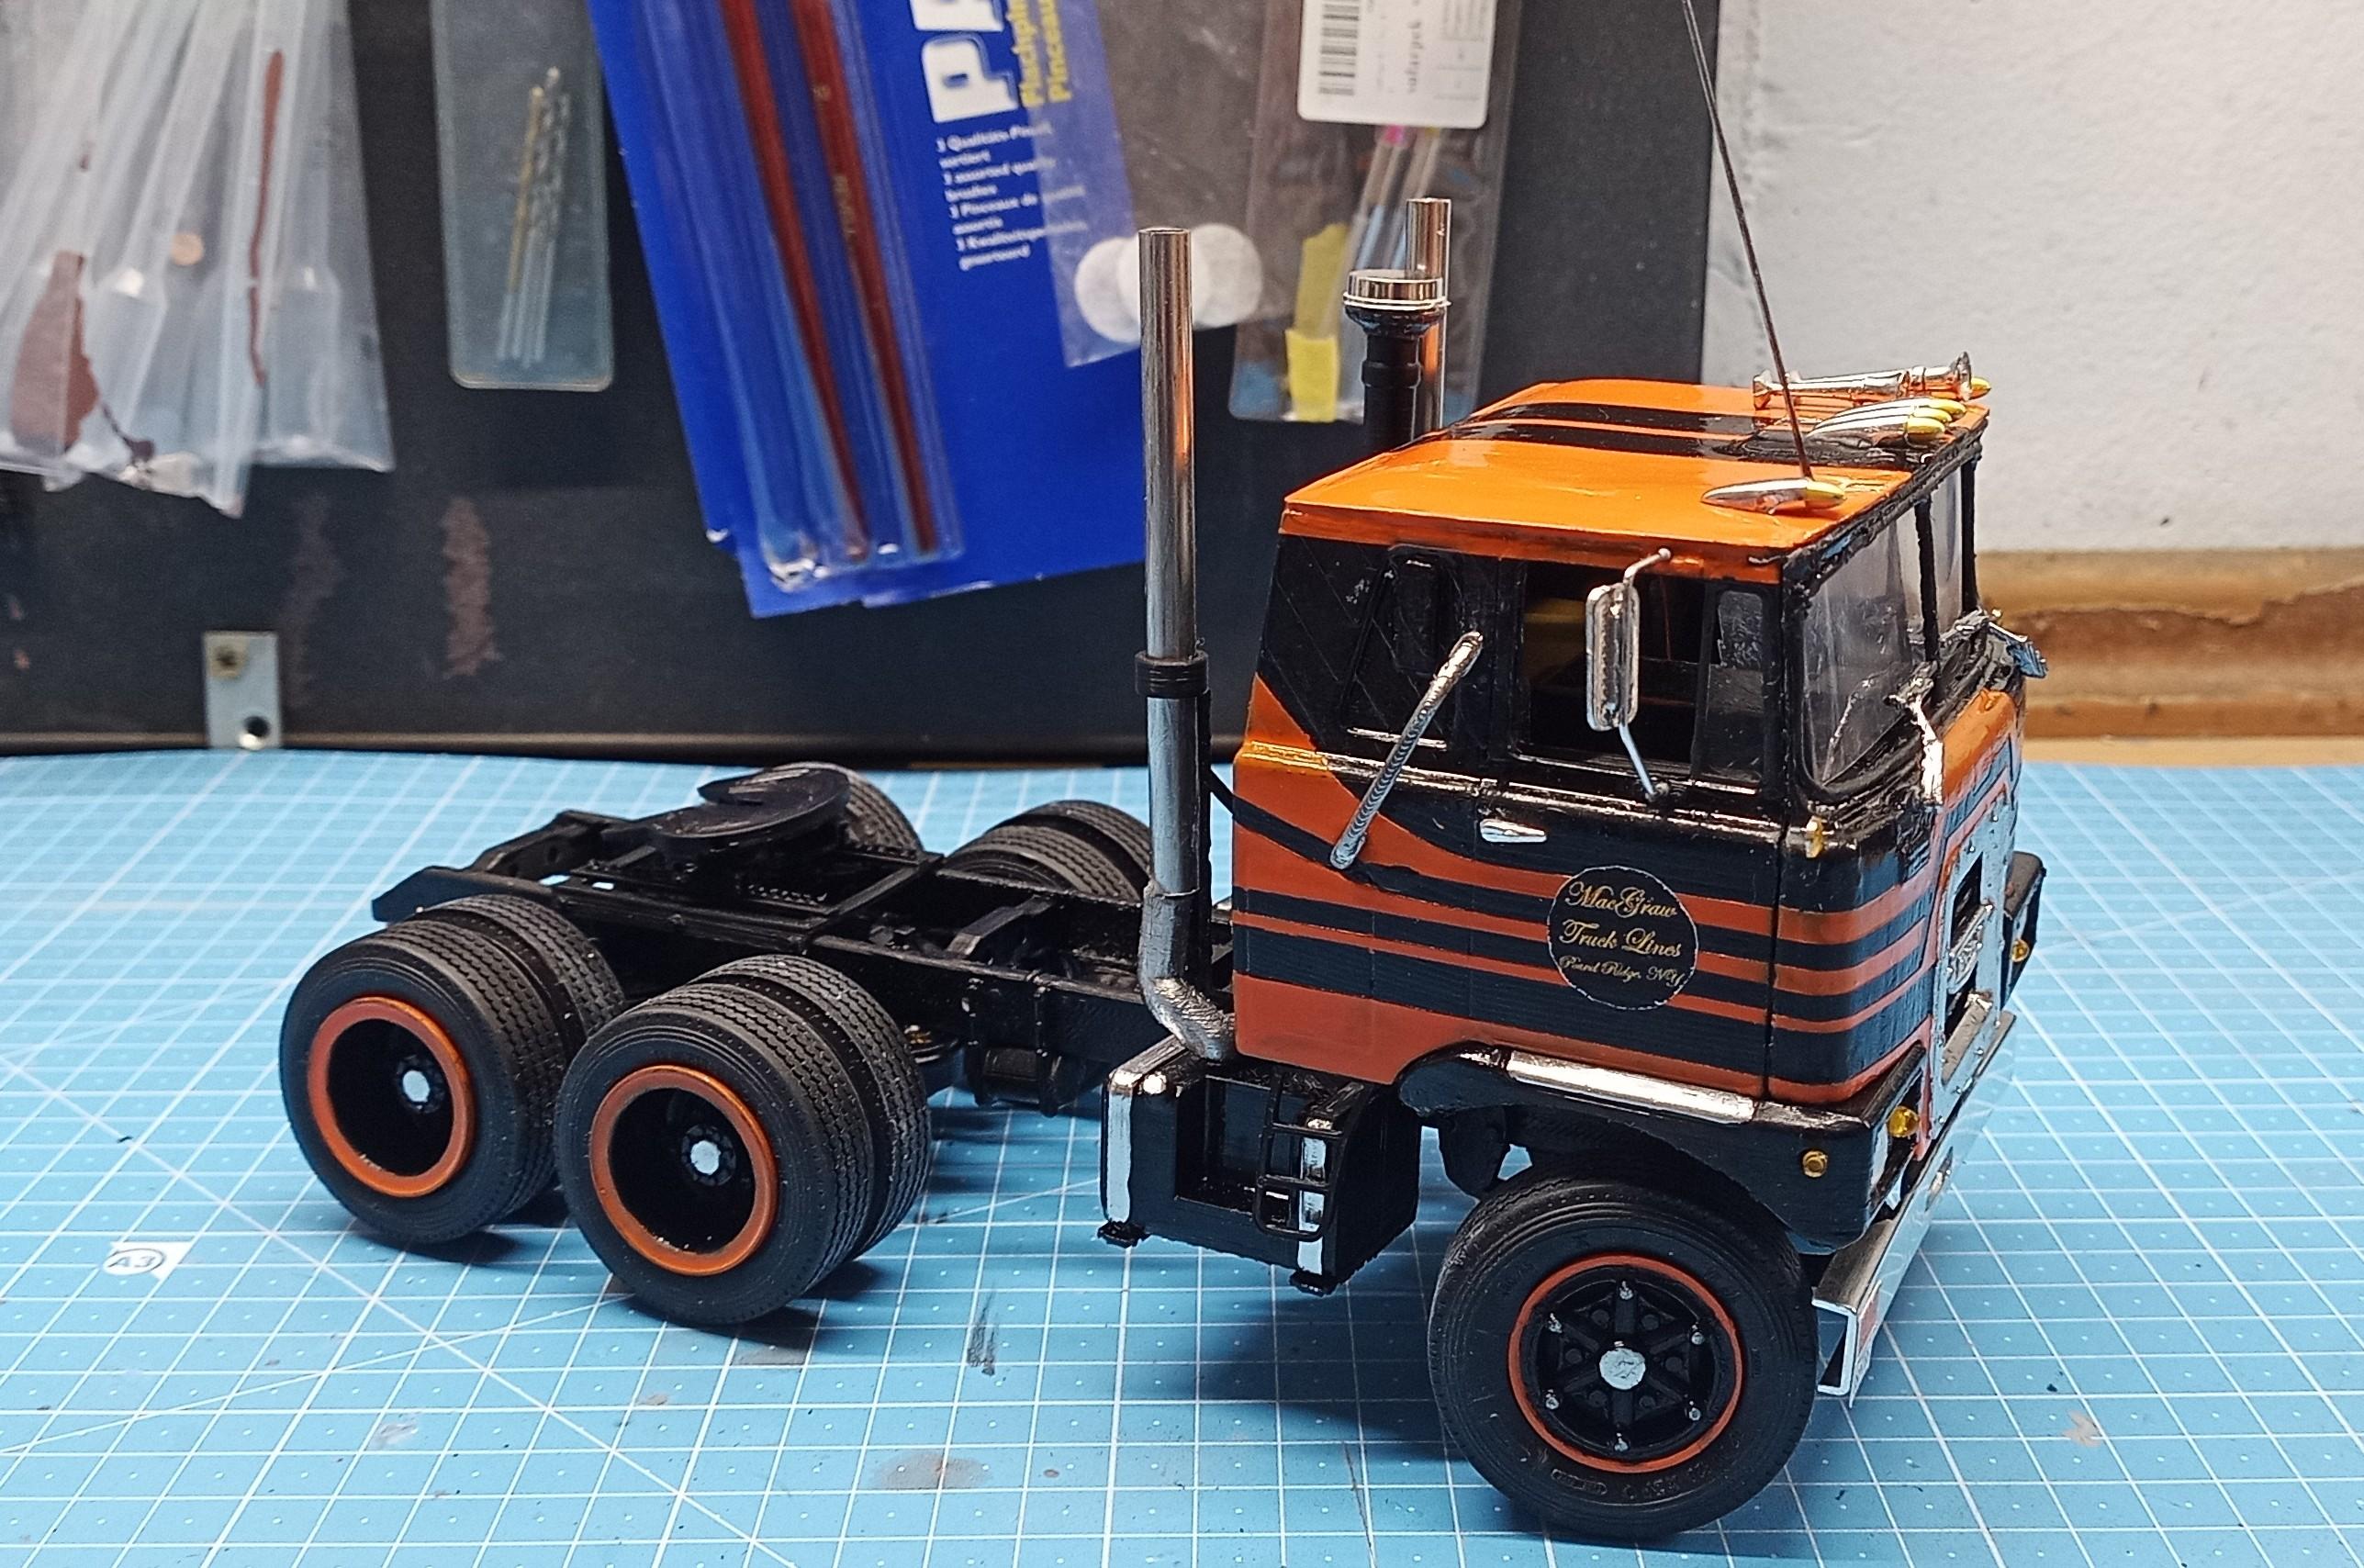
Got some more small stuff mounted: Marker lights, mirrors, grab handles, some decals, ... The decals on the doors are a tribute to Ali MacGraw who played "Melissa" in Convoy. She was born in Pound Ridge, NY. I originally didn't want to mount a fifth wheel because I somehow like the view onto the chassis and drive train. Means, I didn't want to cover it up by the sliding plate. BUT, I designed one that is open so the view is free! It's in print at the time so I'll show you later!
-
Brockway 459
Jürgen M. replied to Jürgen M.'s topic in WIP: Model Trucks: Big Rigs and Heavy Equipment
By the way, I decided for the chromed bumper again since the other ones I had printed or in the box weren't the right ones. Now I'll add marker lights, mirrors with brackets and some other stuff here and there. -
Brockway 459
Jürgen M. replied to Jürgen M.'s topic in WIP: Model Trucks: Big Rigs and Heavy Equipment
A bit of progress: At this point I must pay a long over due tribute to my pal Jeff. I had run out of transparent red and amber lights a few months ago and I asked Jeff if he new a place where I could get them, some after market place or so. He didn't but about a week later I had a little parcel in my mail box with quite a lot of these red and amber jigs, totally complete as they come in every AMT kit. That has made building for me much easier again and I want to thank you again Jeff for that wonderful gesture of kindness and generosity!
-
AMT Exterior Post Doubles Vans
Jürgen M. replied to Bren's topic in WIP: Model Trucks: Big Rigs and Heavy Equipment
That is such a real looking build! Amazing what techniques you have for weathering and building! Fascinating! -
Brockway 459
Jürgen M. replied to Jürgen M.'s topic in WIP: Model Trucks: Big Rigs and Heavy Equipment
I finally managed to "design" a cab rest. Took me a while to figure out a way to attach it to the frame underneath the rear cab wall with out having it collide with the exhaust system. Surely not authentic but I call it customized! 😇 The cab is levelled now so I can go to the next step. I wasn't quite satisfied with the bumper I had mounted. Since I had to remove it anyway I designed a new one (also customized). Hope it comes out as good as I expect. I'm printing it in two different positions so I can choose the better one! I also designed a visor but I'm not sure if it'll look good. The black thing you see is sort of a try out sun visor just to check the fit! More soon!
-
Brockway 459
Jürgen M. replied to Jürgen M.'s topic in WIP: Model Trucks: Big Rigs and Heavy Equipment
Thanks Ron! Amazing that no Brockway ever made it your way! Hope my build can compensate that a bit! 😉 -
Brockway 459
Jürgen M. replied to Jürgen M.'s topic in WIP: Model Trucks: Big Rigs and Heavy Equipment
Thanks Pal! Just trying to catch up with an old dog! 😉 -
Brockway 459
Jürgen M. replied to Jürgen M.'s topic in WIP: Model Trucks: Big Rigs and Heavy Equipment
Had to take off the bumper again. The cab didn't tilt far enough because I had positioned the bumper too far in. Now I can add the steering gear, shift tower, cab rest (which will be a challenge considering I used up lots of space installing the exhaust system) .... But that's one of the things you have to deal with when you design without looking at all the details on the real thing. -
Mack DM600/Leach Garbage Truck
Jürgen M. replied to Scott Eriksen's topic in WIP: Model Trucks: Big Rigs and Heavy Equipment
Nice and clean job Scott! I like those off set cabs. Maybe I should build one someday! I'm really enjoying those service truck builds! Garbage disposal, oil distributor, road maintanance, ... The closest I've come to that was probably my ACX with the shipping container but that's not really public service. Means, I might pick up one or the other idea if you guys don't mind! -
1970 Ford C 600
Jürgen M. replied to Biggu's topic in WIP: Model Trucks: Big Rigs and Heavy Equipment
That's the experience of an old modeller! 👍 Not only can old dogs learn new tricks, you can learn a lot from an old dog too! Thanks for sharing that idea Pal! 🙃 -
1970 Ford C 600
Jürgen M. replied to Biggu's topic in WIP: Model Trucks: Big Rigs and Heavy Equipment
I'm sure you are! Keep going! 😉 -
Brockway 459
Jürgen M. replied to Jürgen M.'s topic in WIP: Model Trucks: Big Rigs and Heavy Equipment
Finally got the exhaust system finished and the cab and bumper lined up. Now the small issues begin. Horns, marker lights, mirrors, wipers, ...
-
1970 Ford C 600
Jürgen M. replied to Biggu's topic in WIP: Model Trucks: Big Rigs and Heavy Equipment
I'm sure this will work out great Jeff! The fender style fits the truck perfectly! -
Brockway 459
Jürgen M. replied to Jürgen M.'s topic in WIP: Model Trucks: Big Rigs and Heavy Equipment
Thanks Pal! Didn't expect to get so many compliments on this one! Thanks to all of you who commented so positively. Hope to get this done by the weekend! -
Brockway 459
Jürgen M. replied to Jürgen M.'s topic in WIP: Model Trucks: Big Rigs and Heavy Equipment
First cab mock-up: Cab rest is still to be adjusted a bit but it's not far away!
-
Brockway 459
Jürgen M. replied to Jürgen M.'s topic in WIP: Model Trucks: Big Rigs and Heavy Equipment
Added the air intake hose and the radiator: Exhaust pipes to stacks didn't come out as I expected so I changed a few things and now they're in print again. Then cab gets hooked to chassis!