Nolan
-
Posts
28 -
Joined
-
Last visited
Recent Profile Visitors
877 profile views


Nolan's Achievements
MCM Regular (3/6)
-
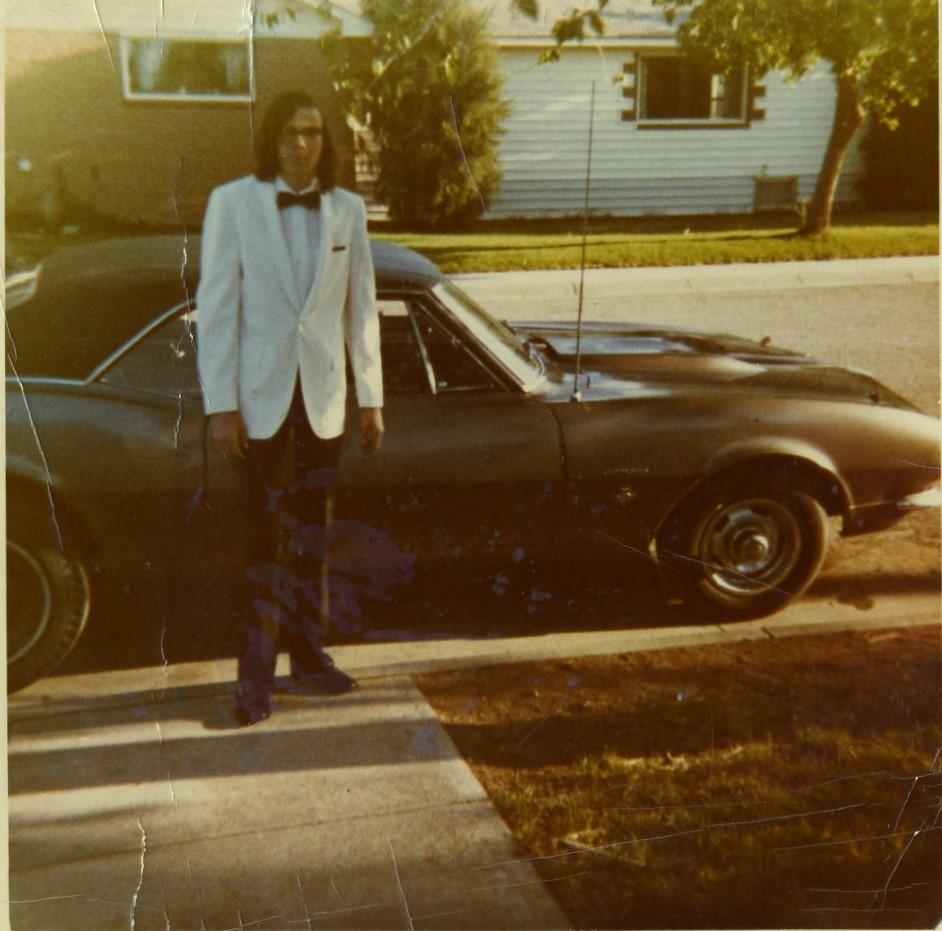
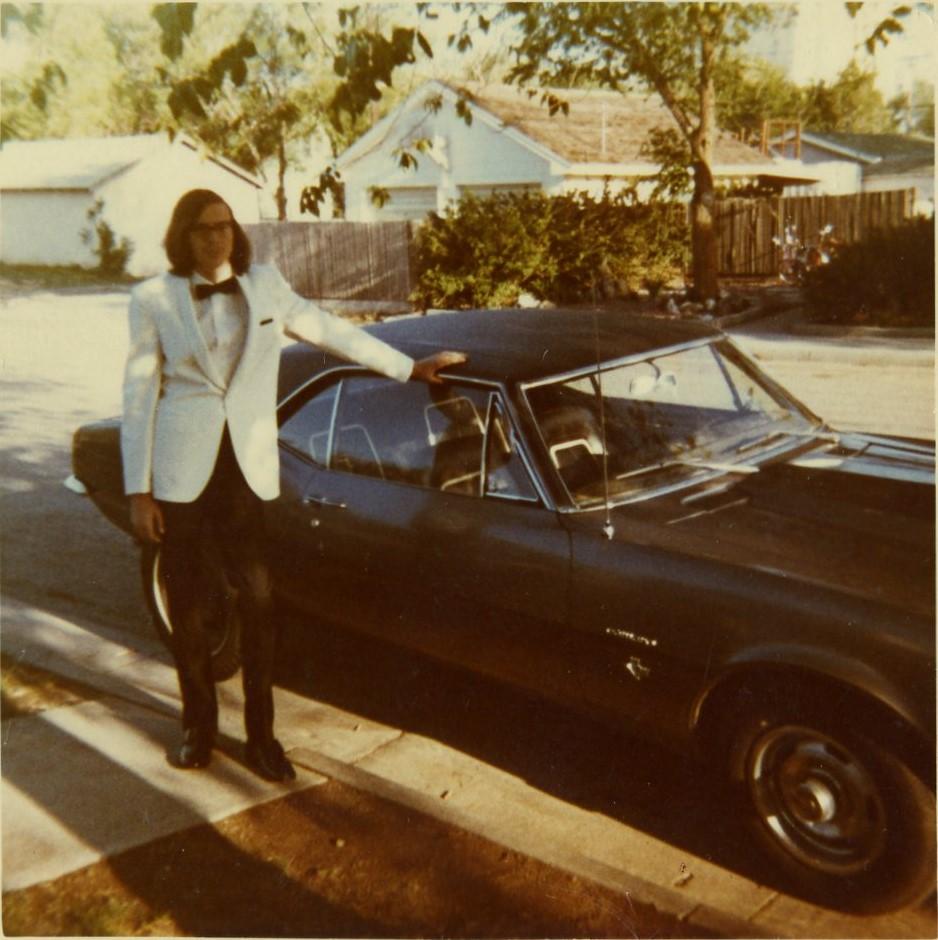
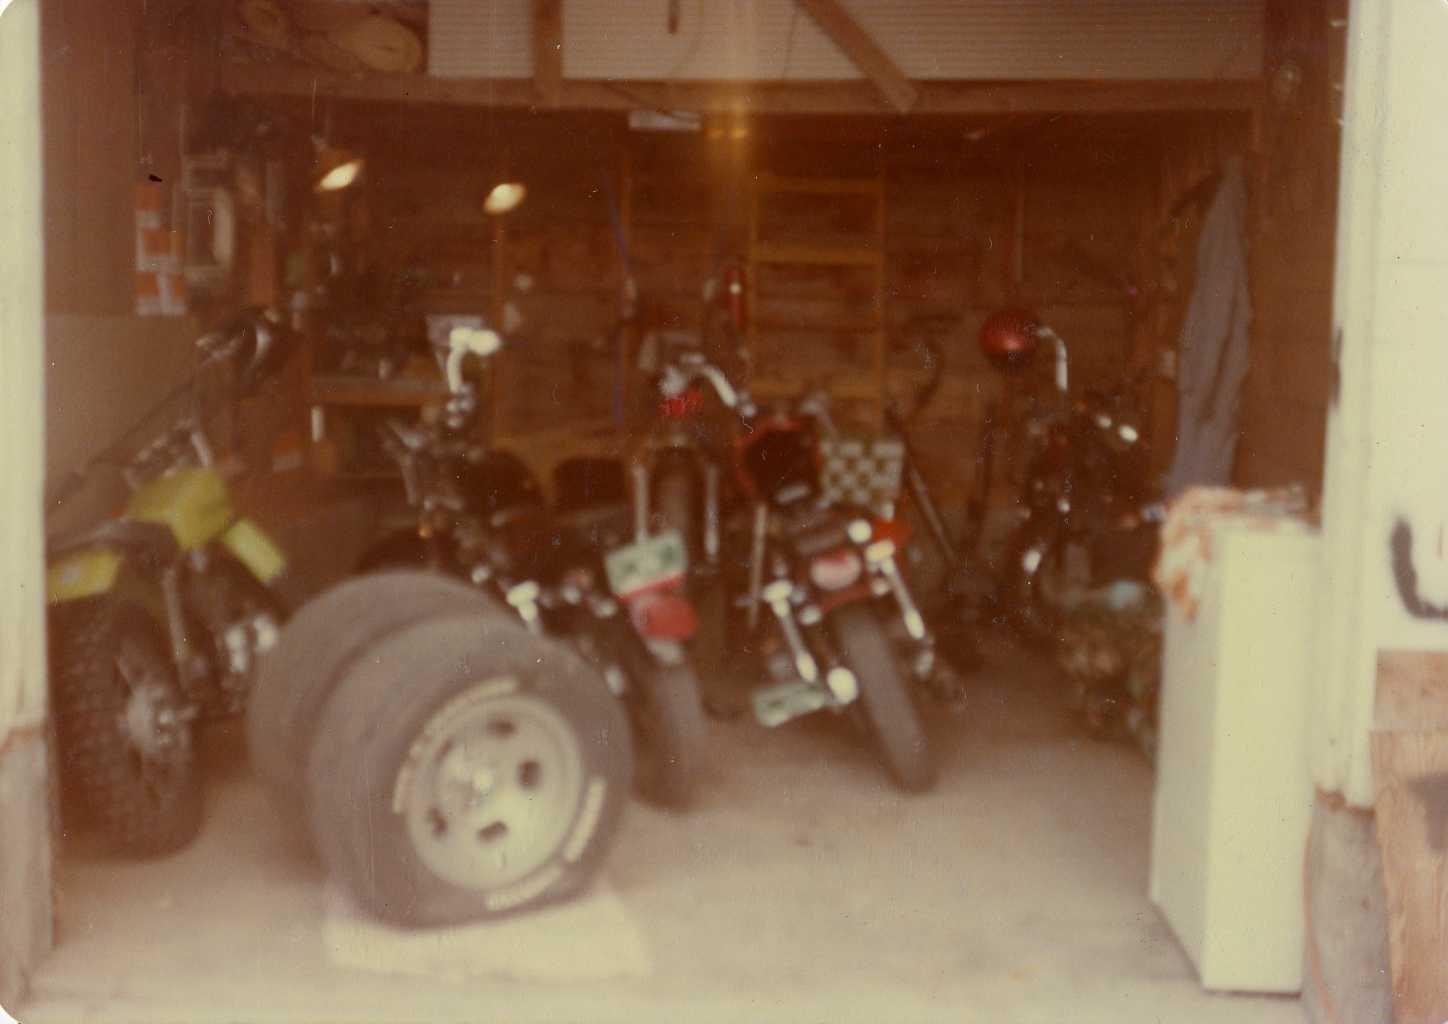
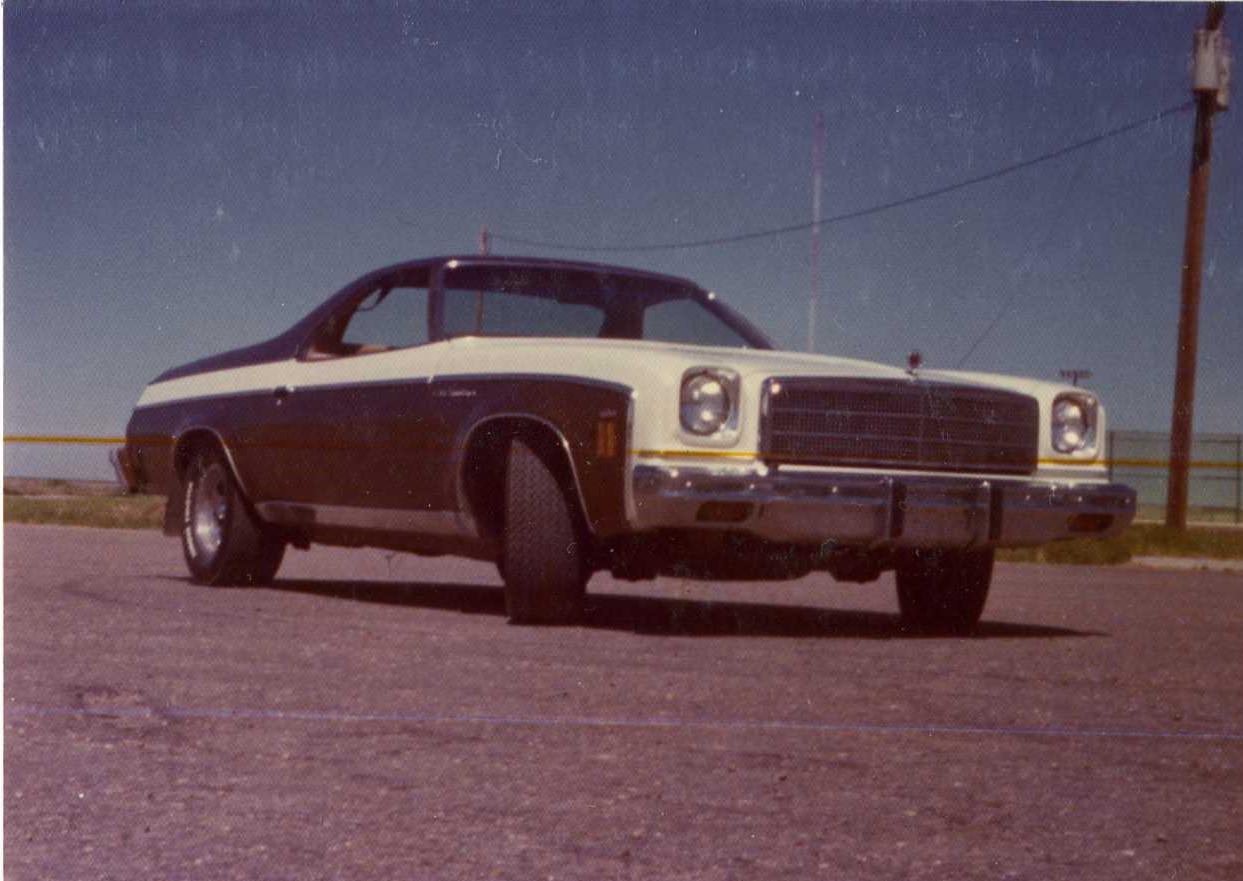
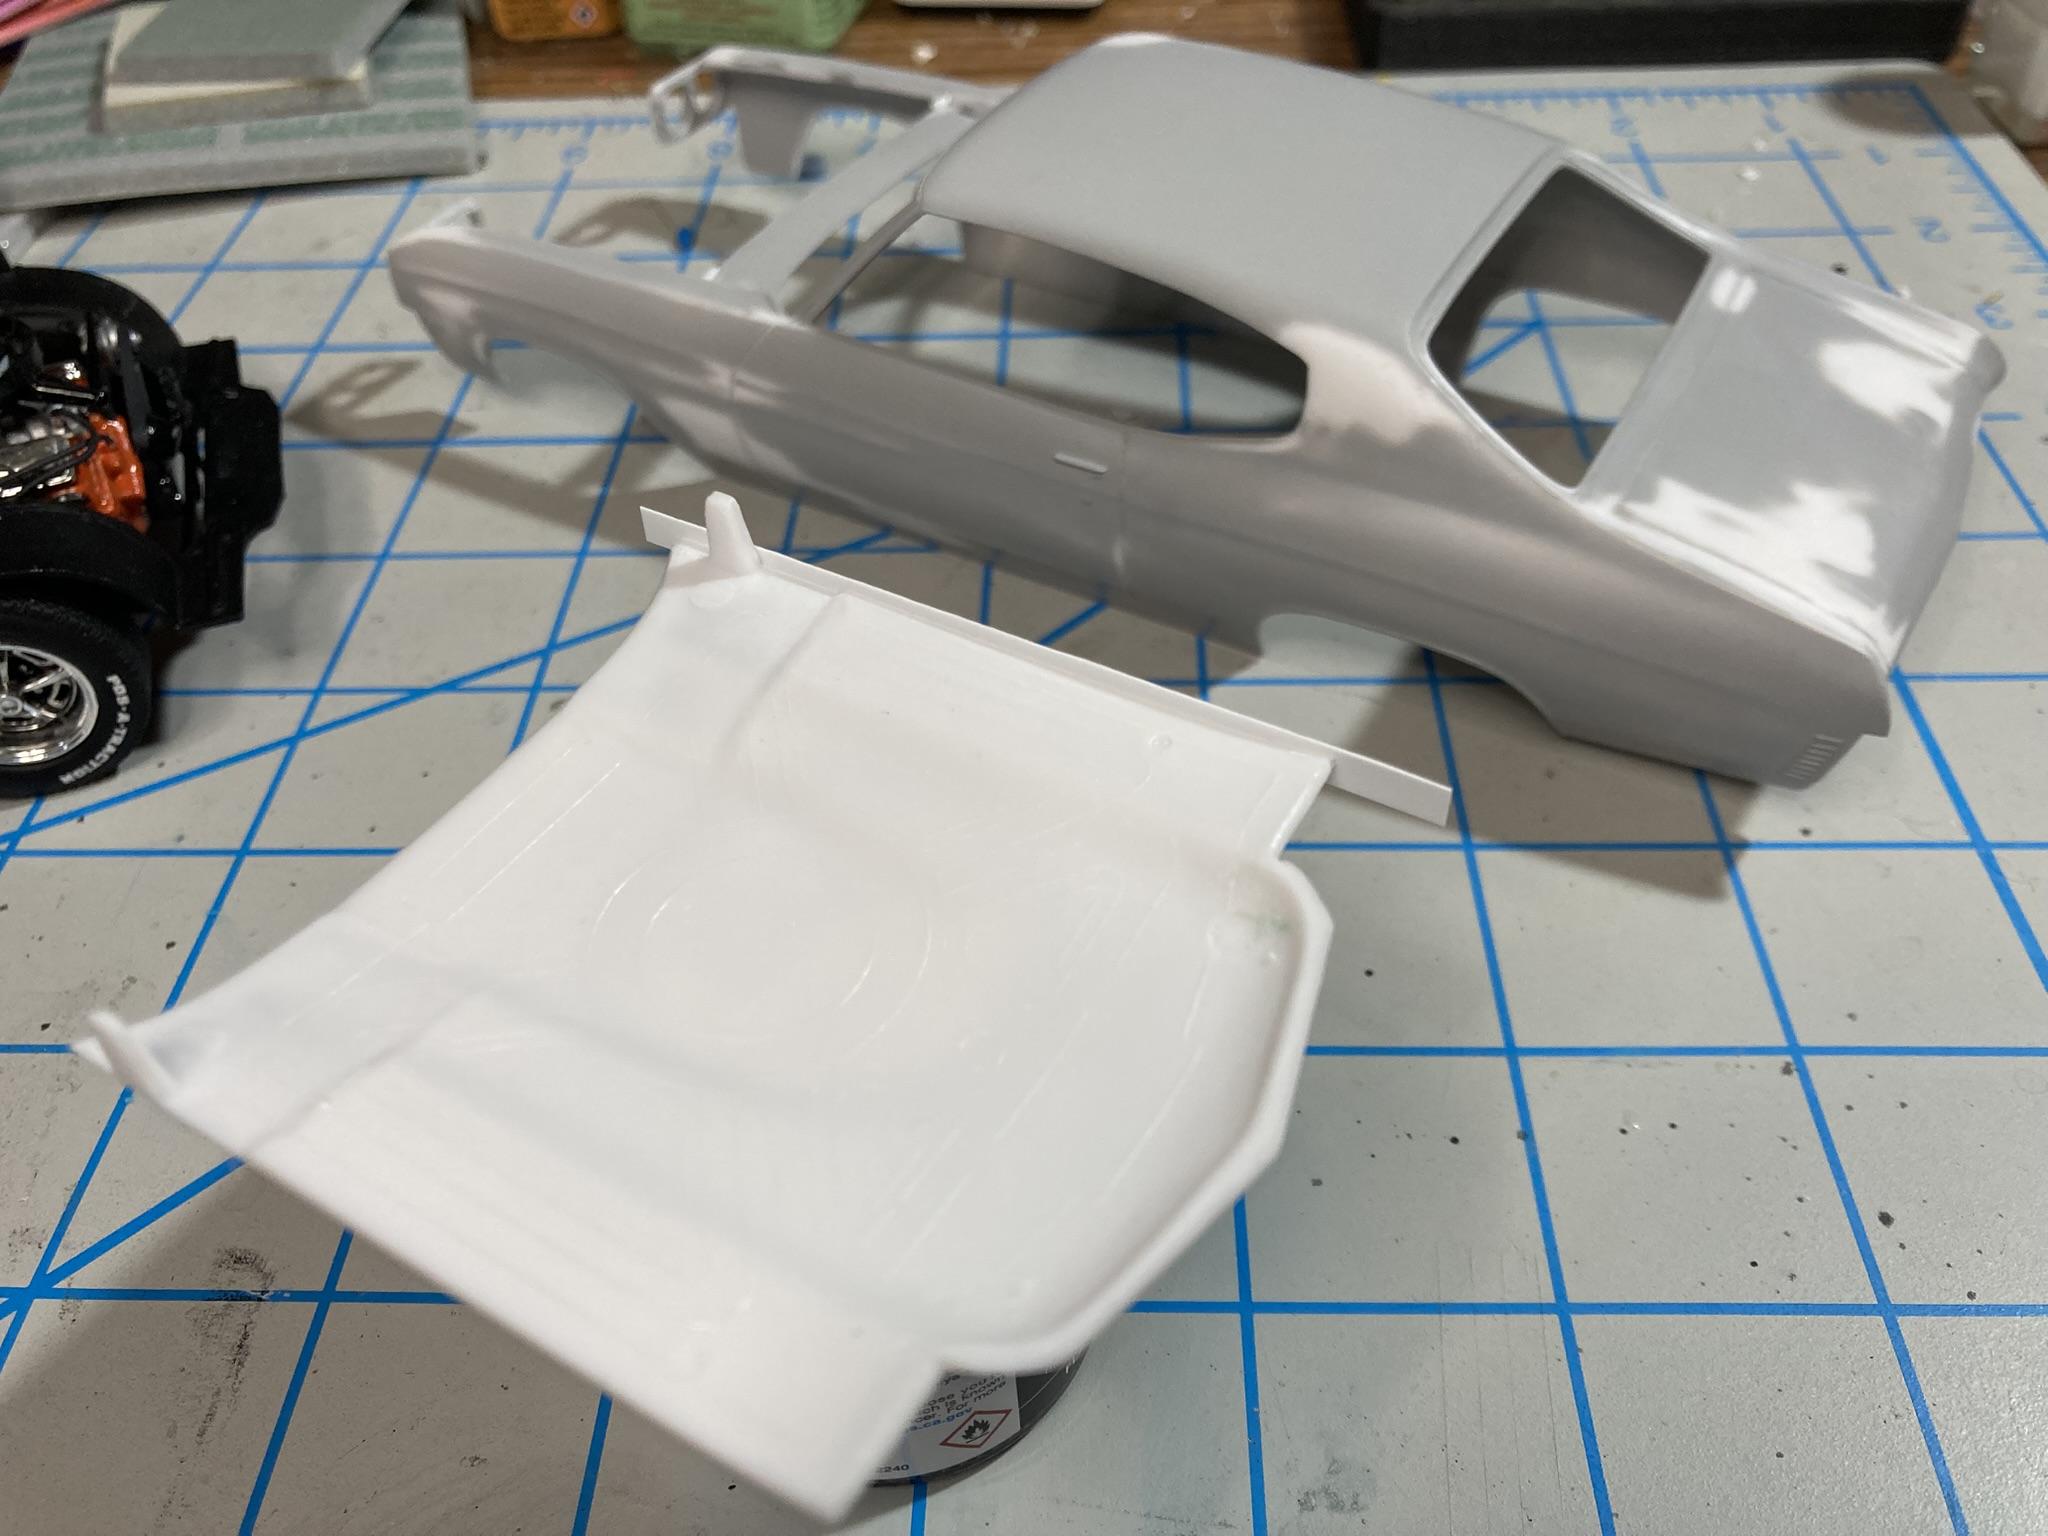
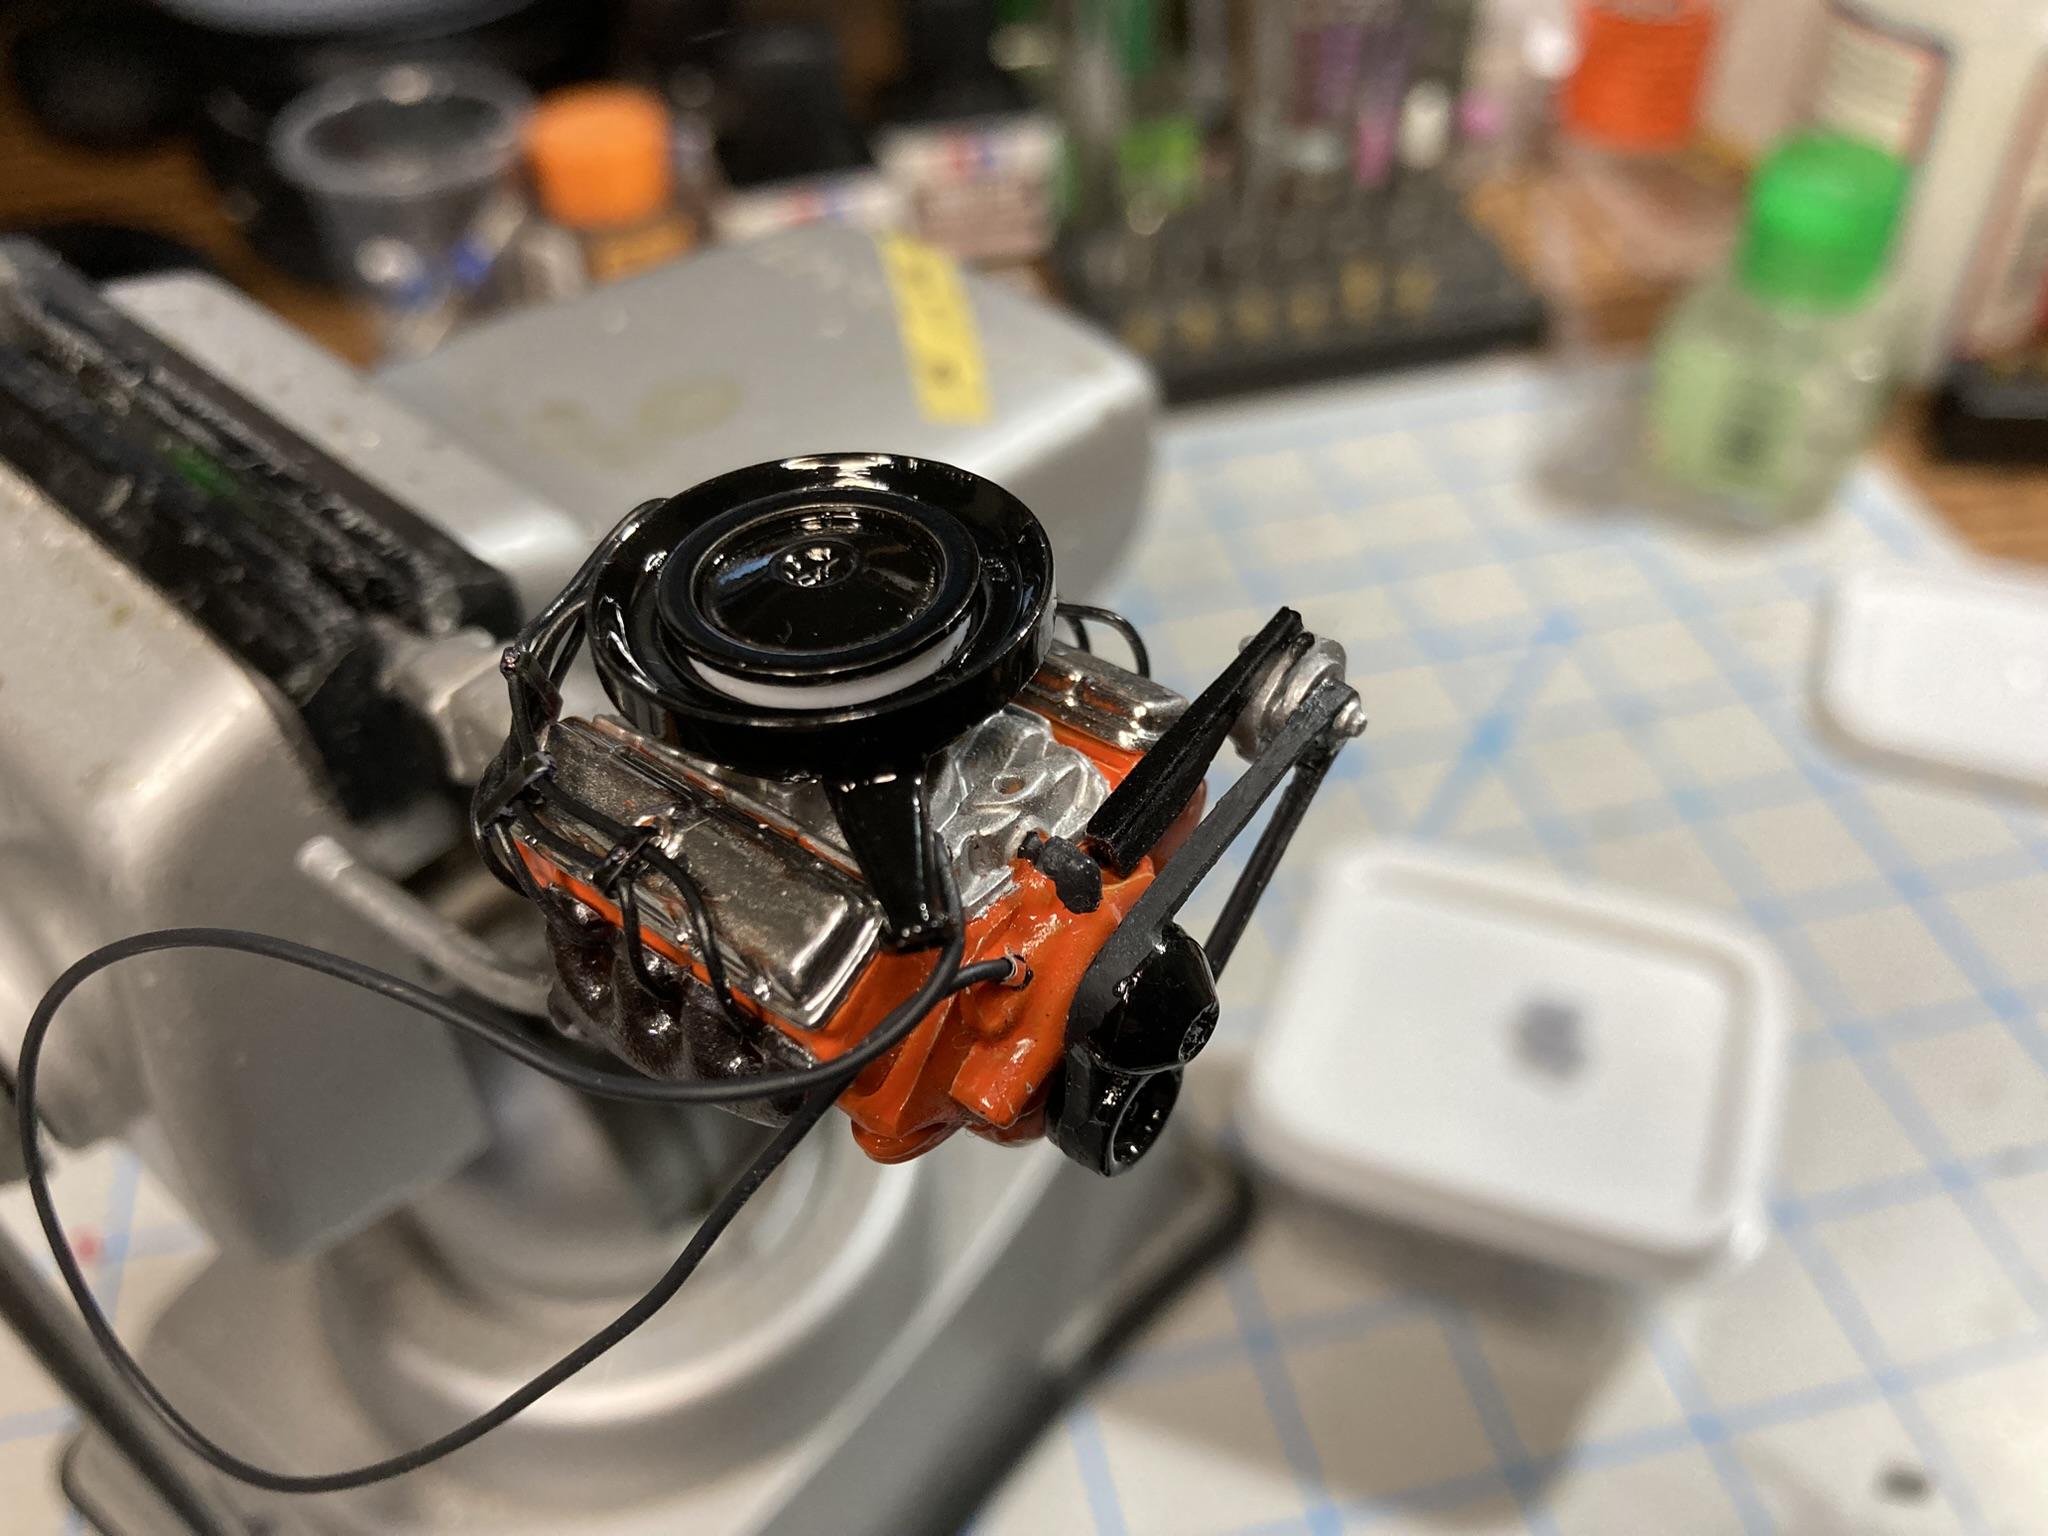
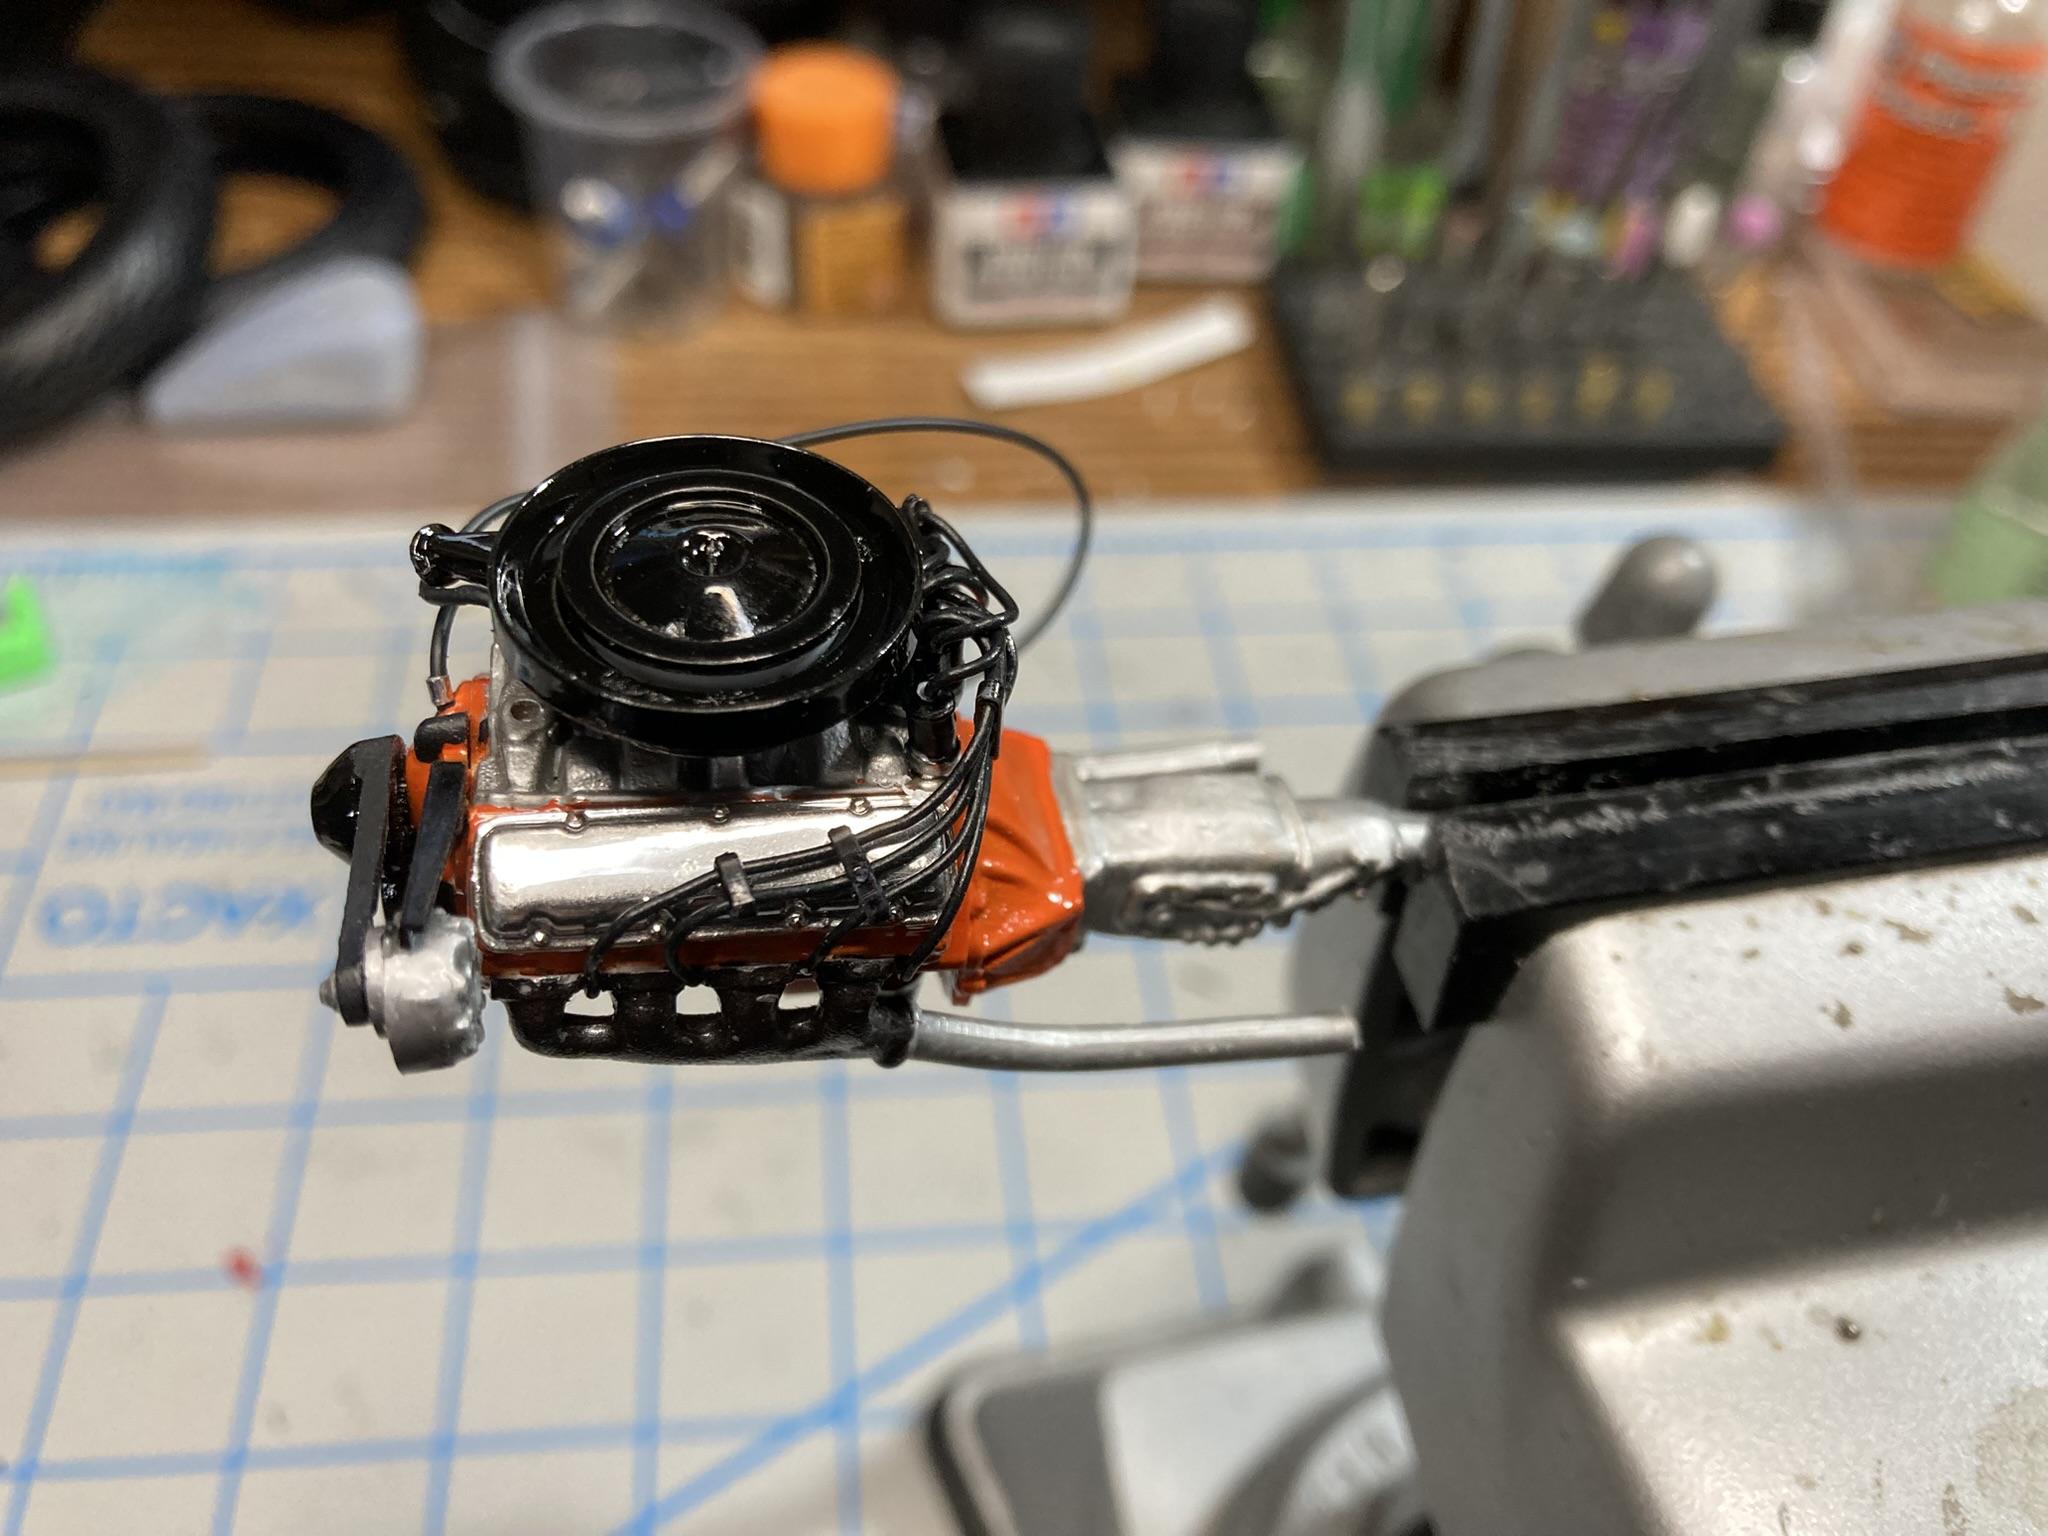
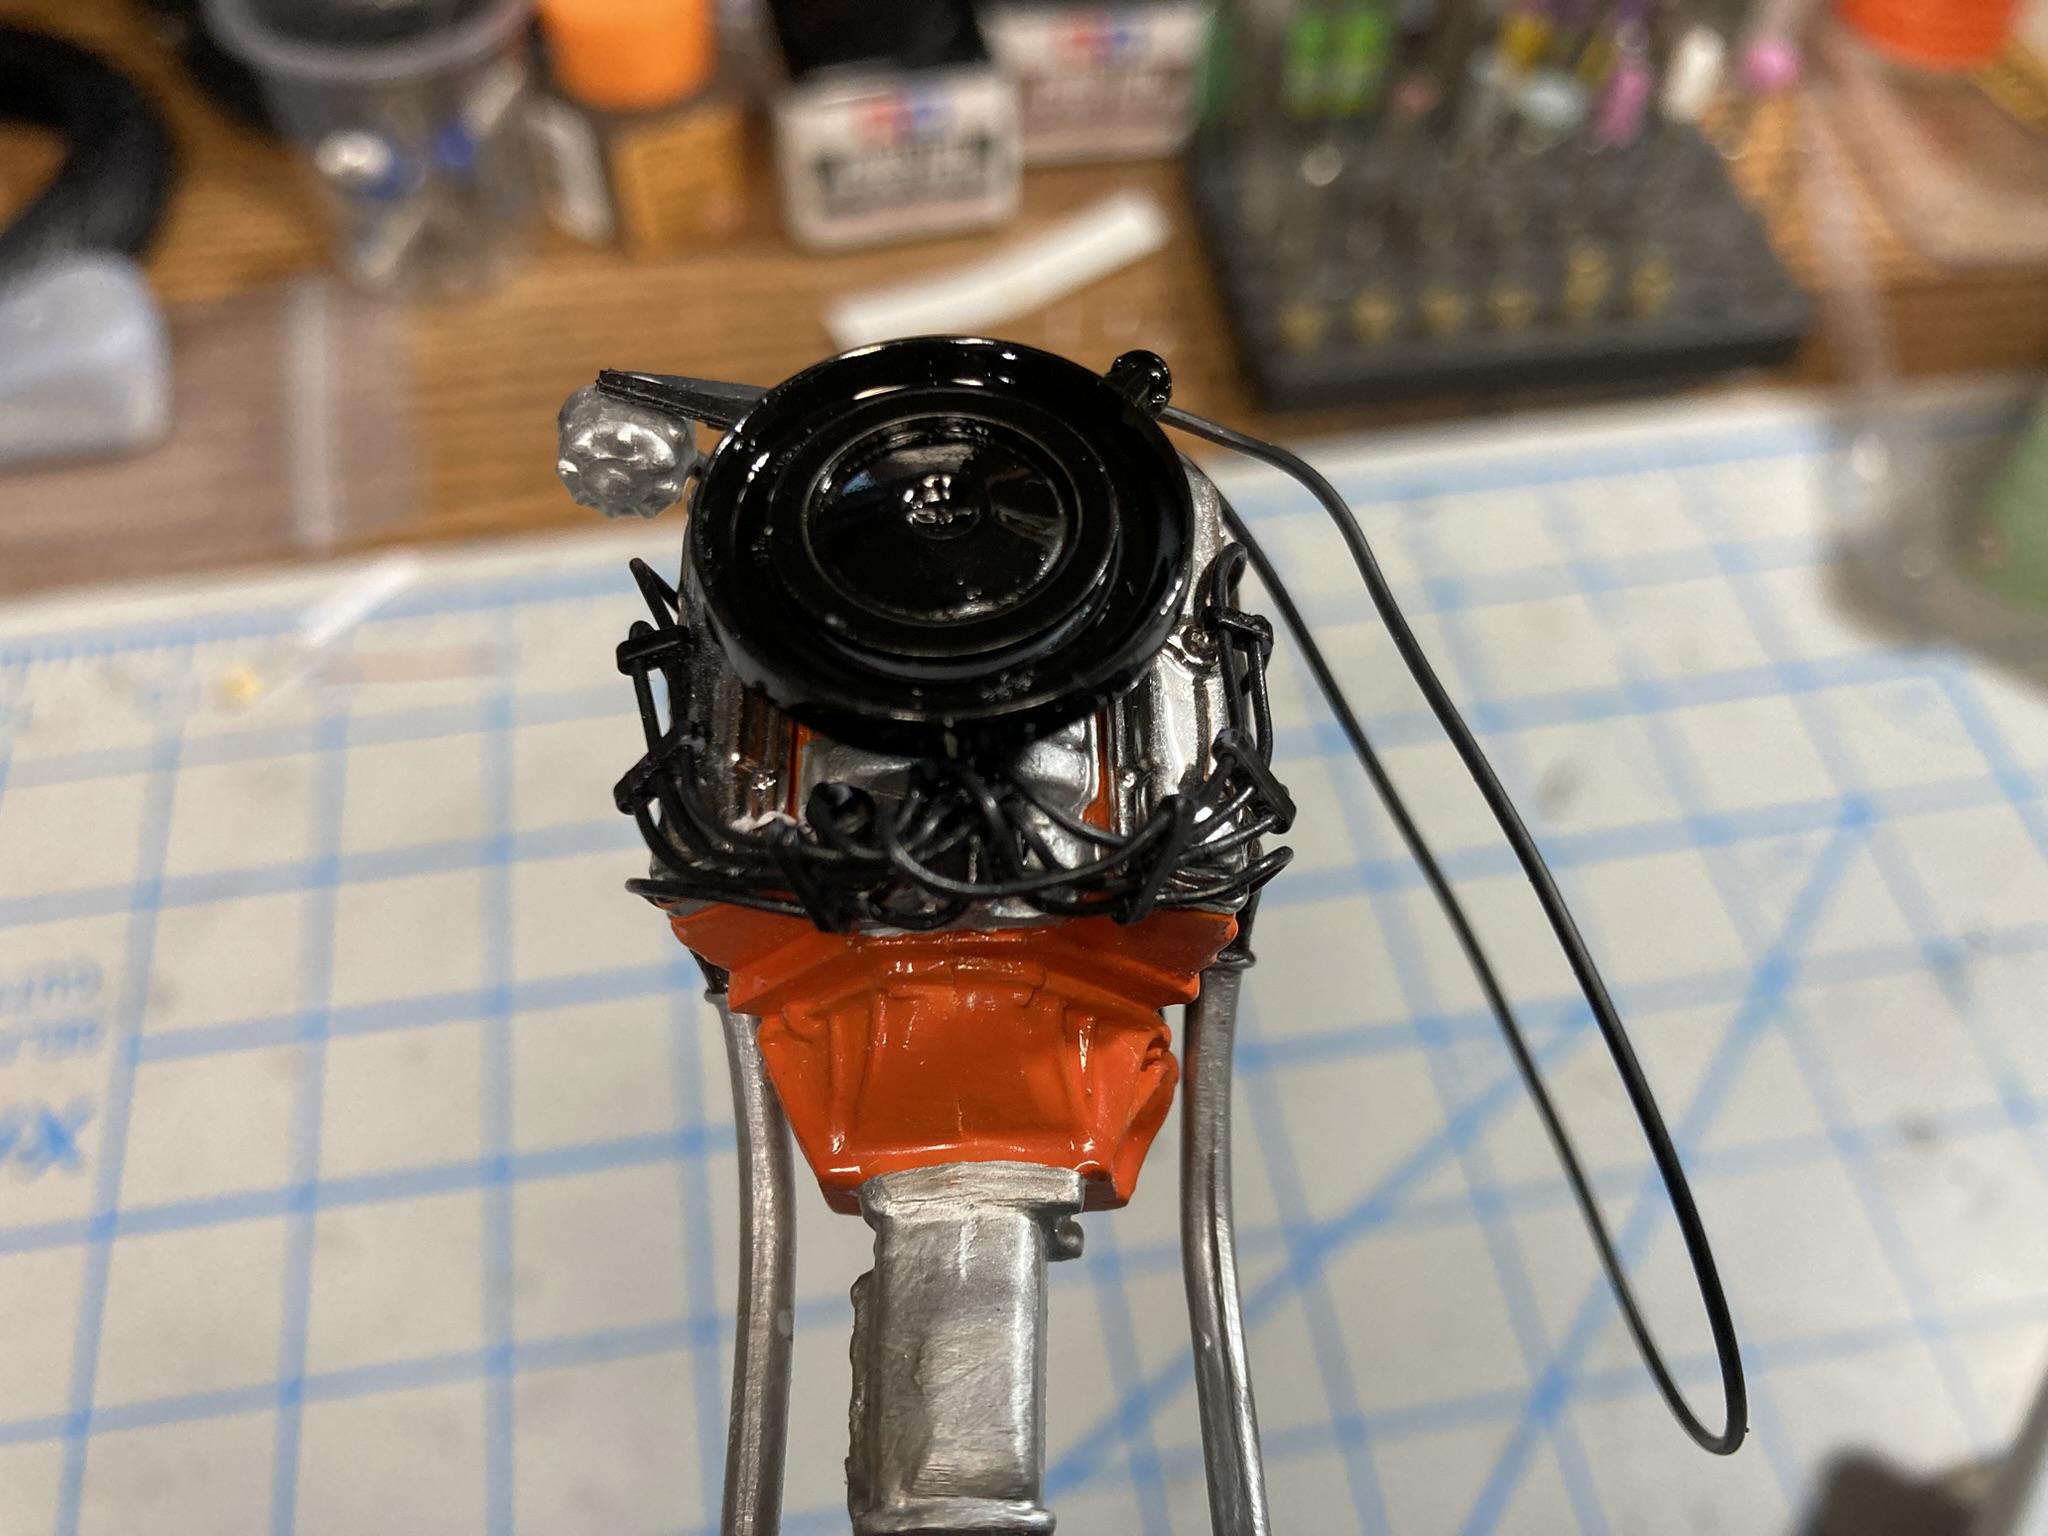
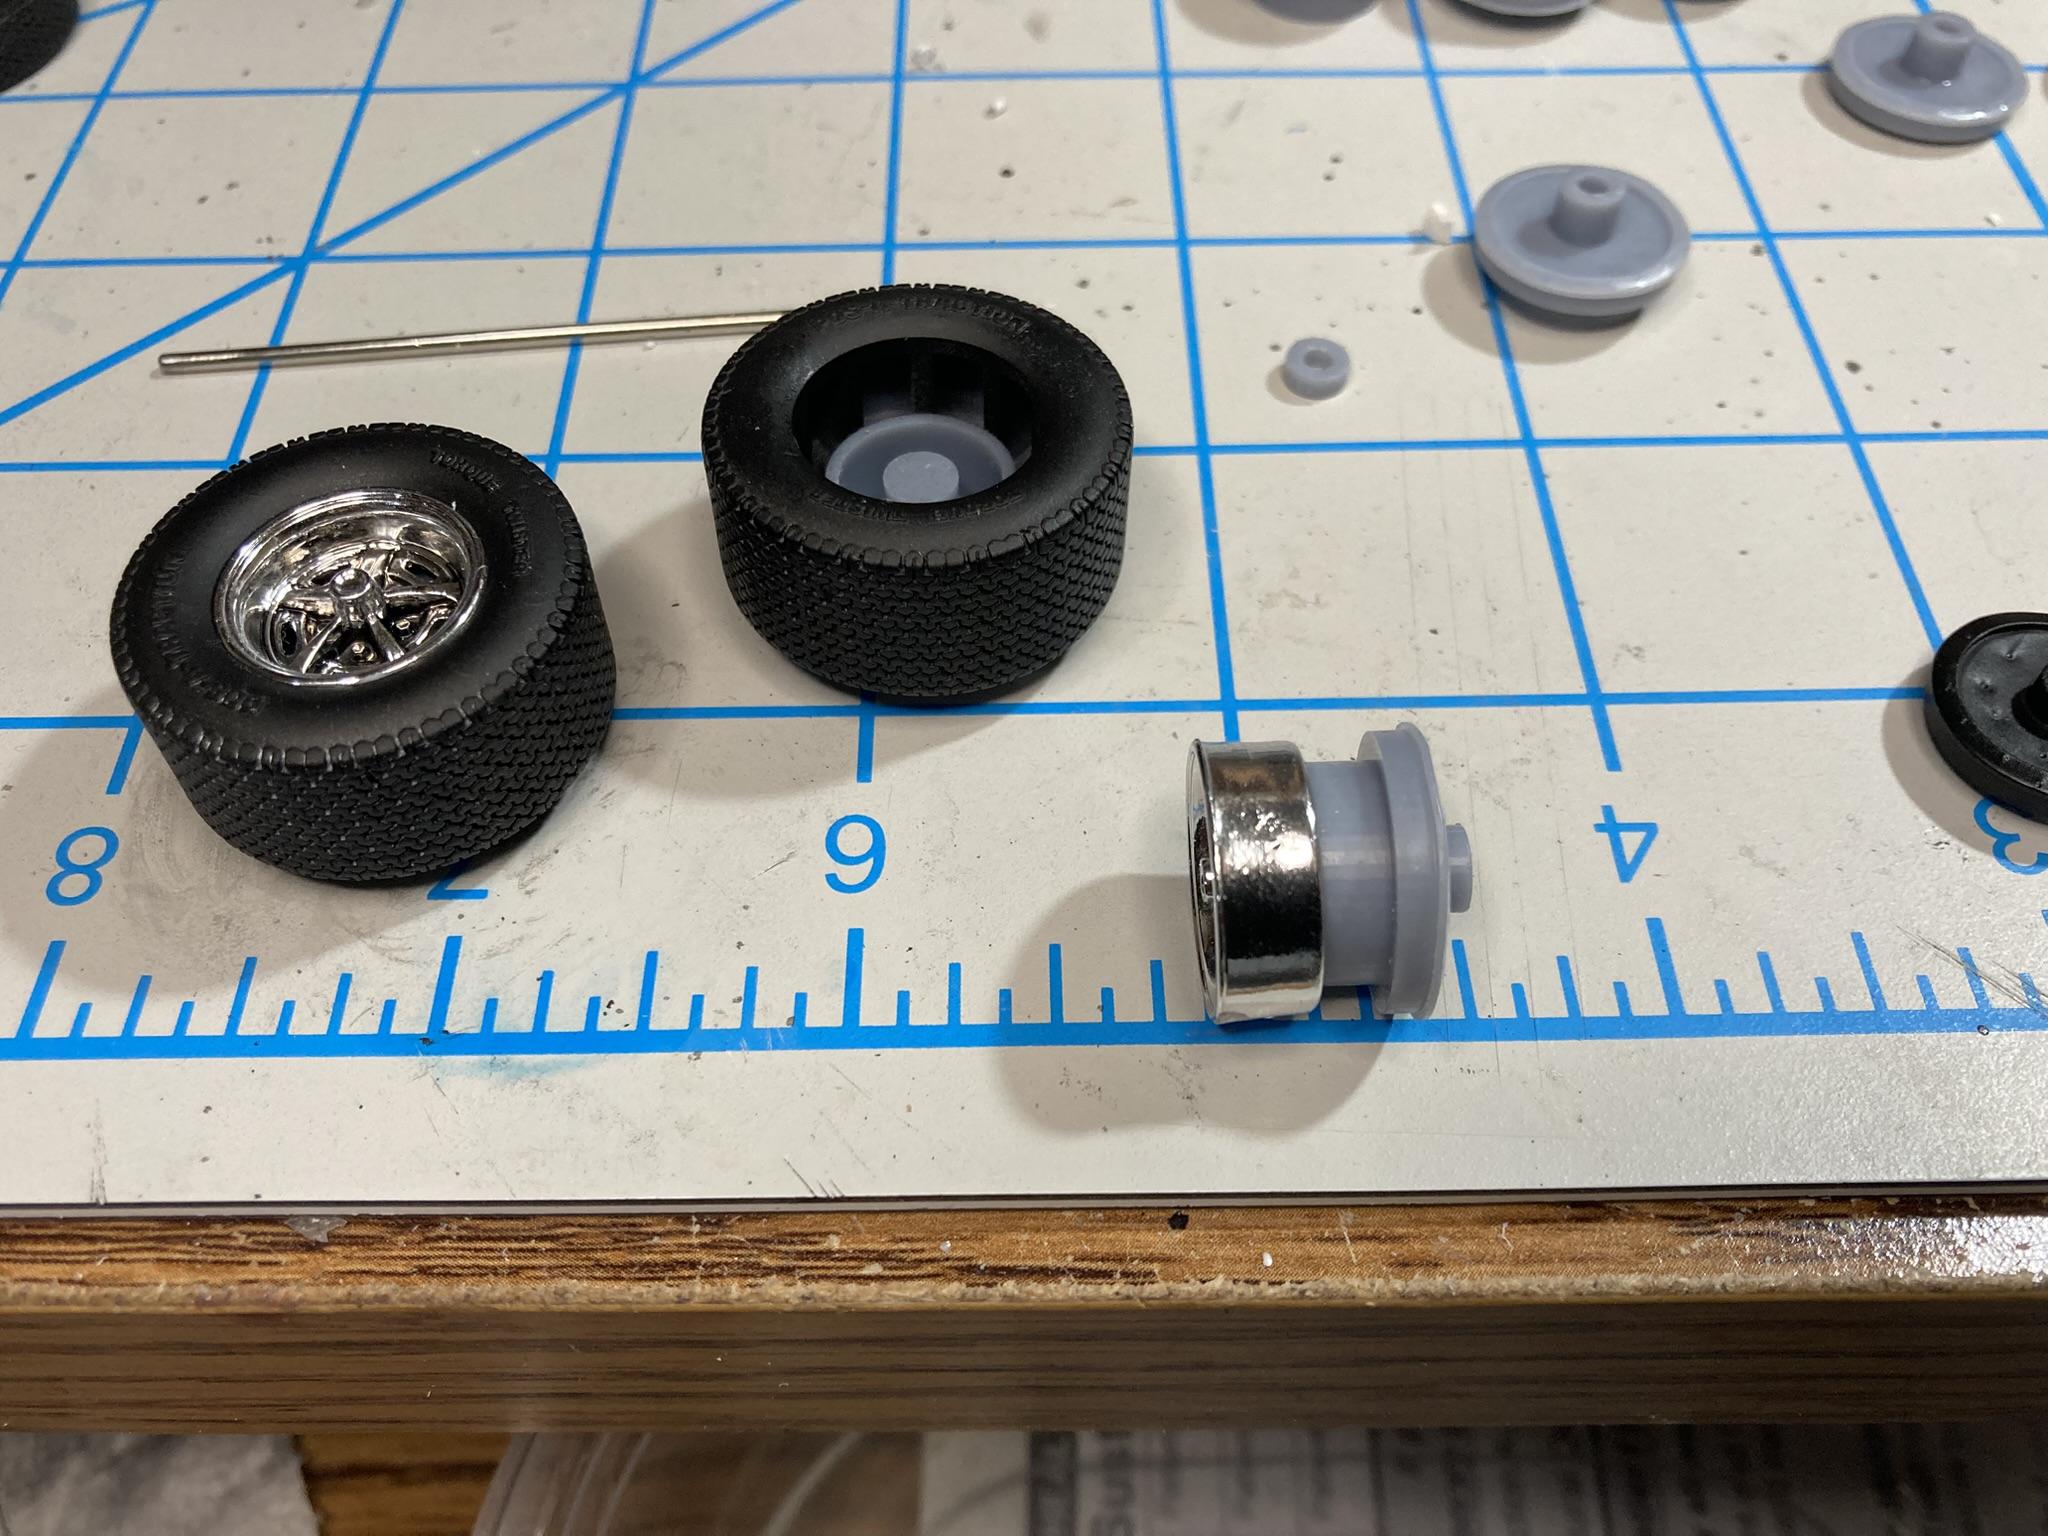
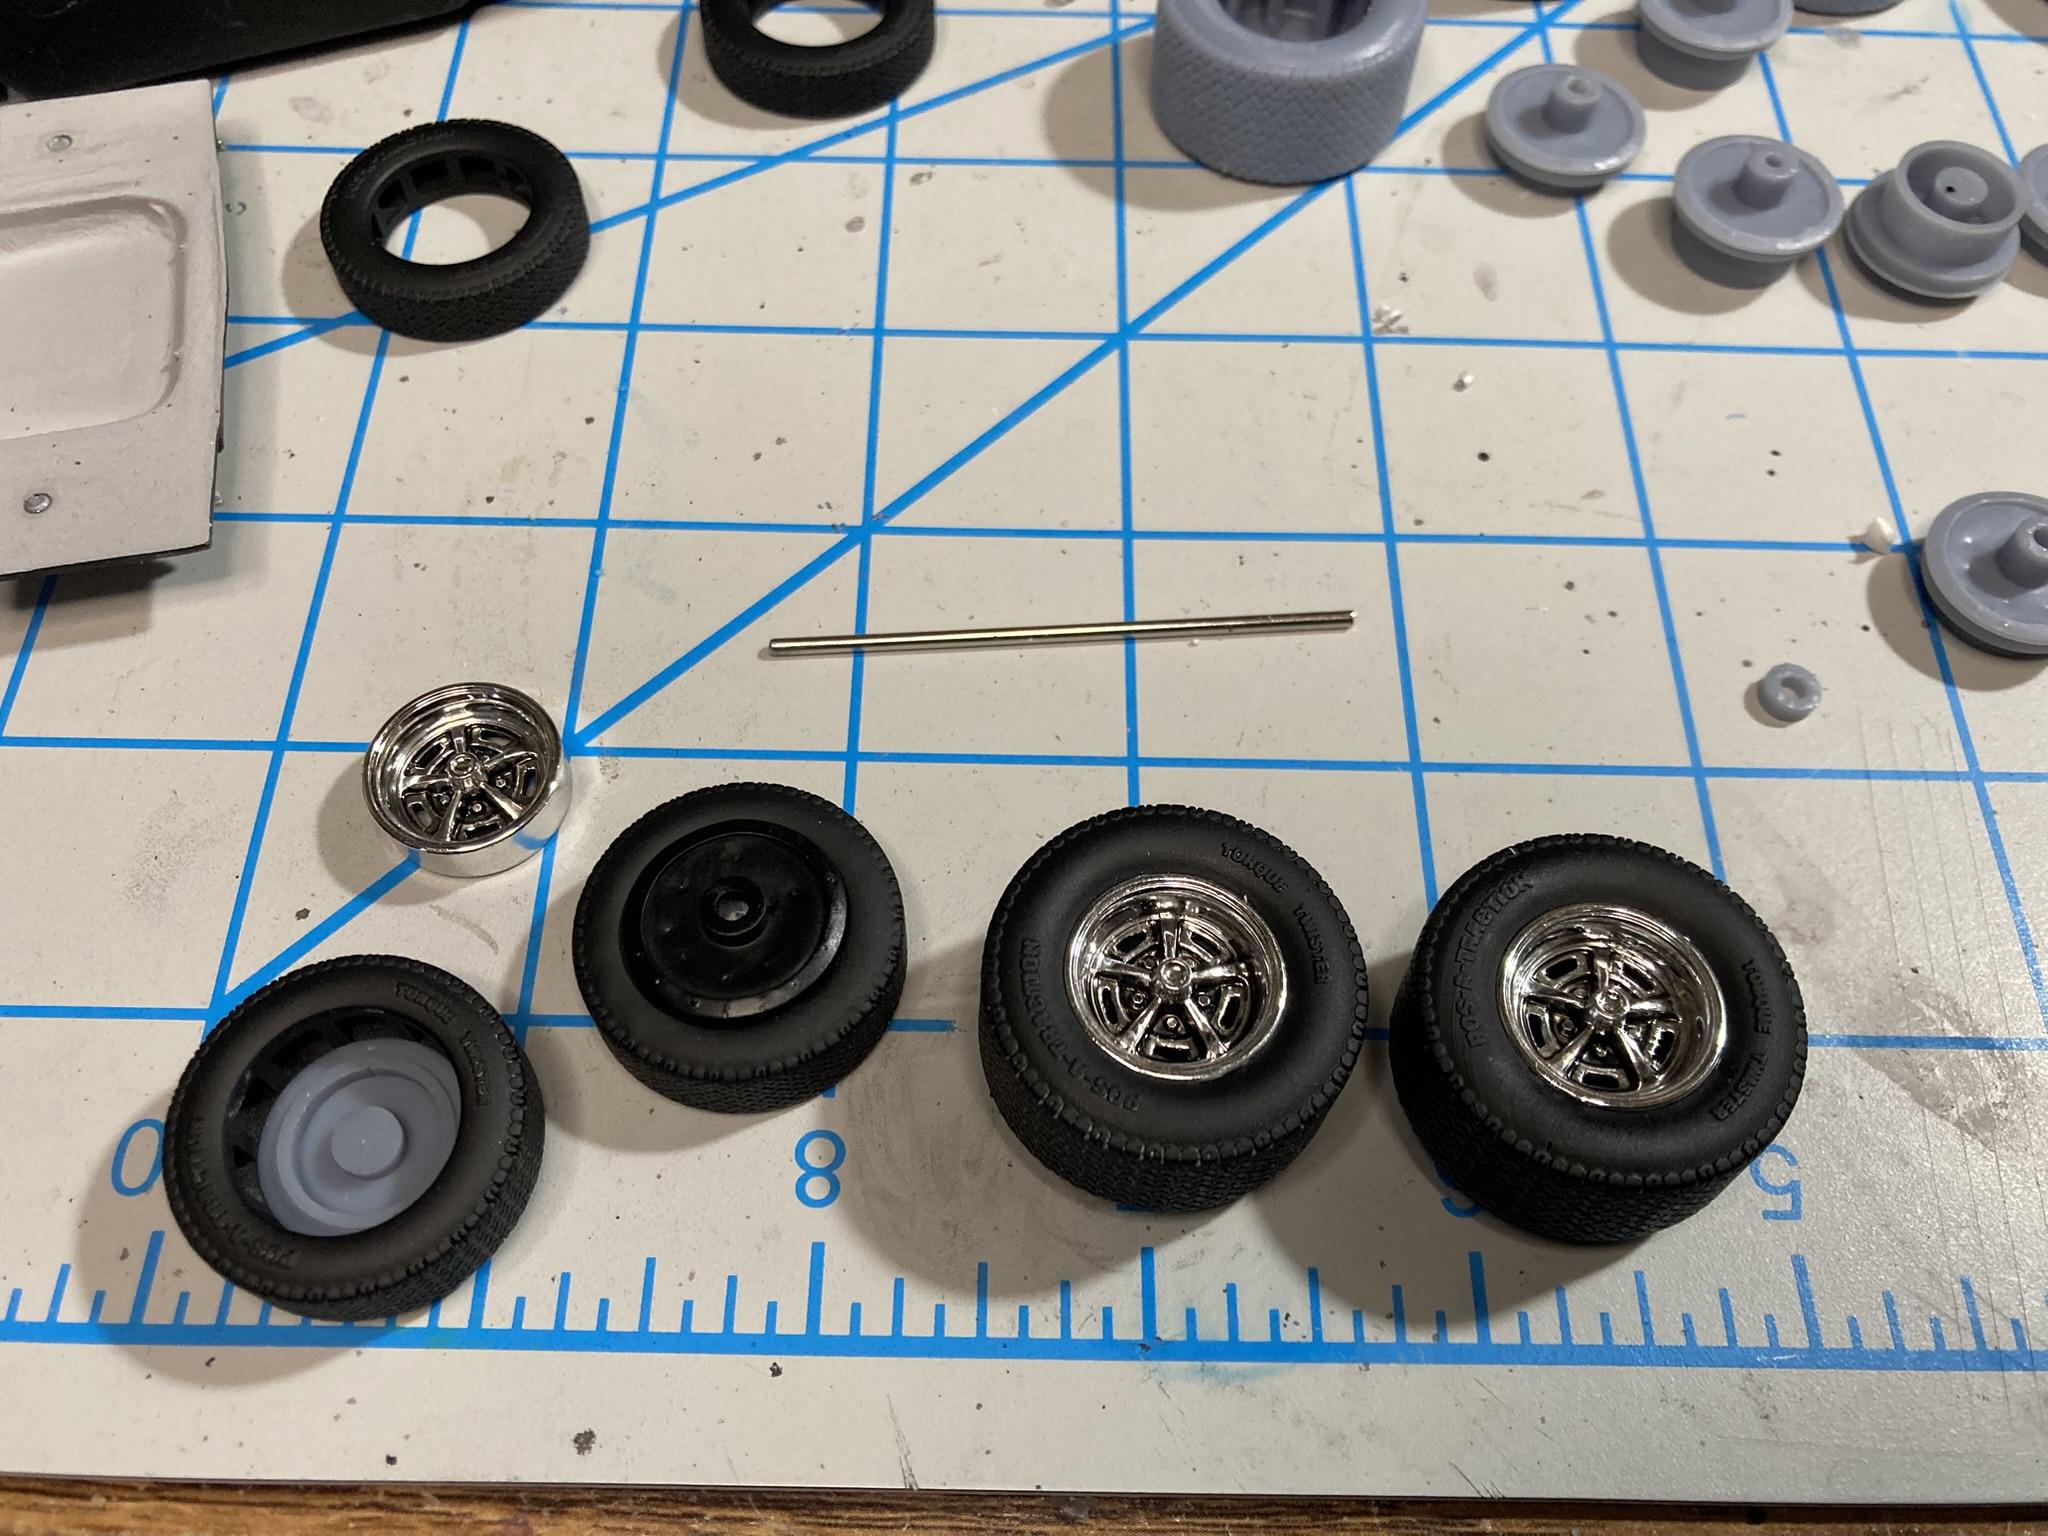
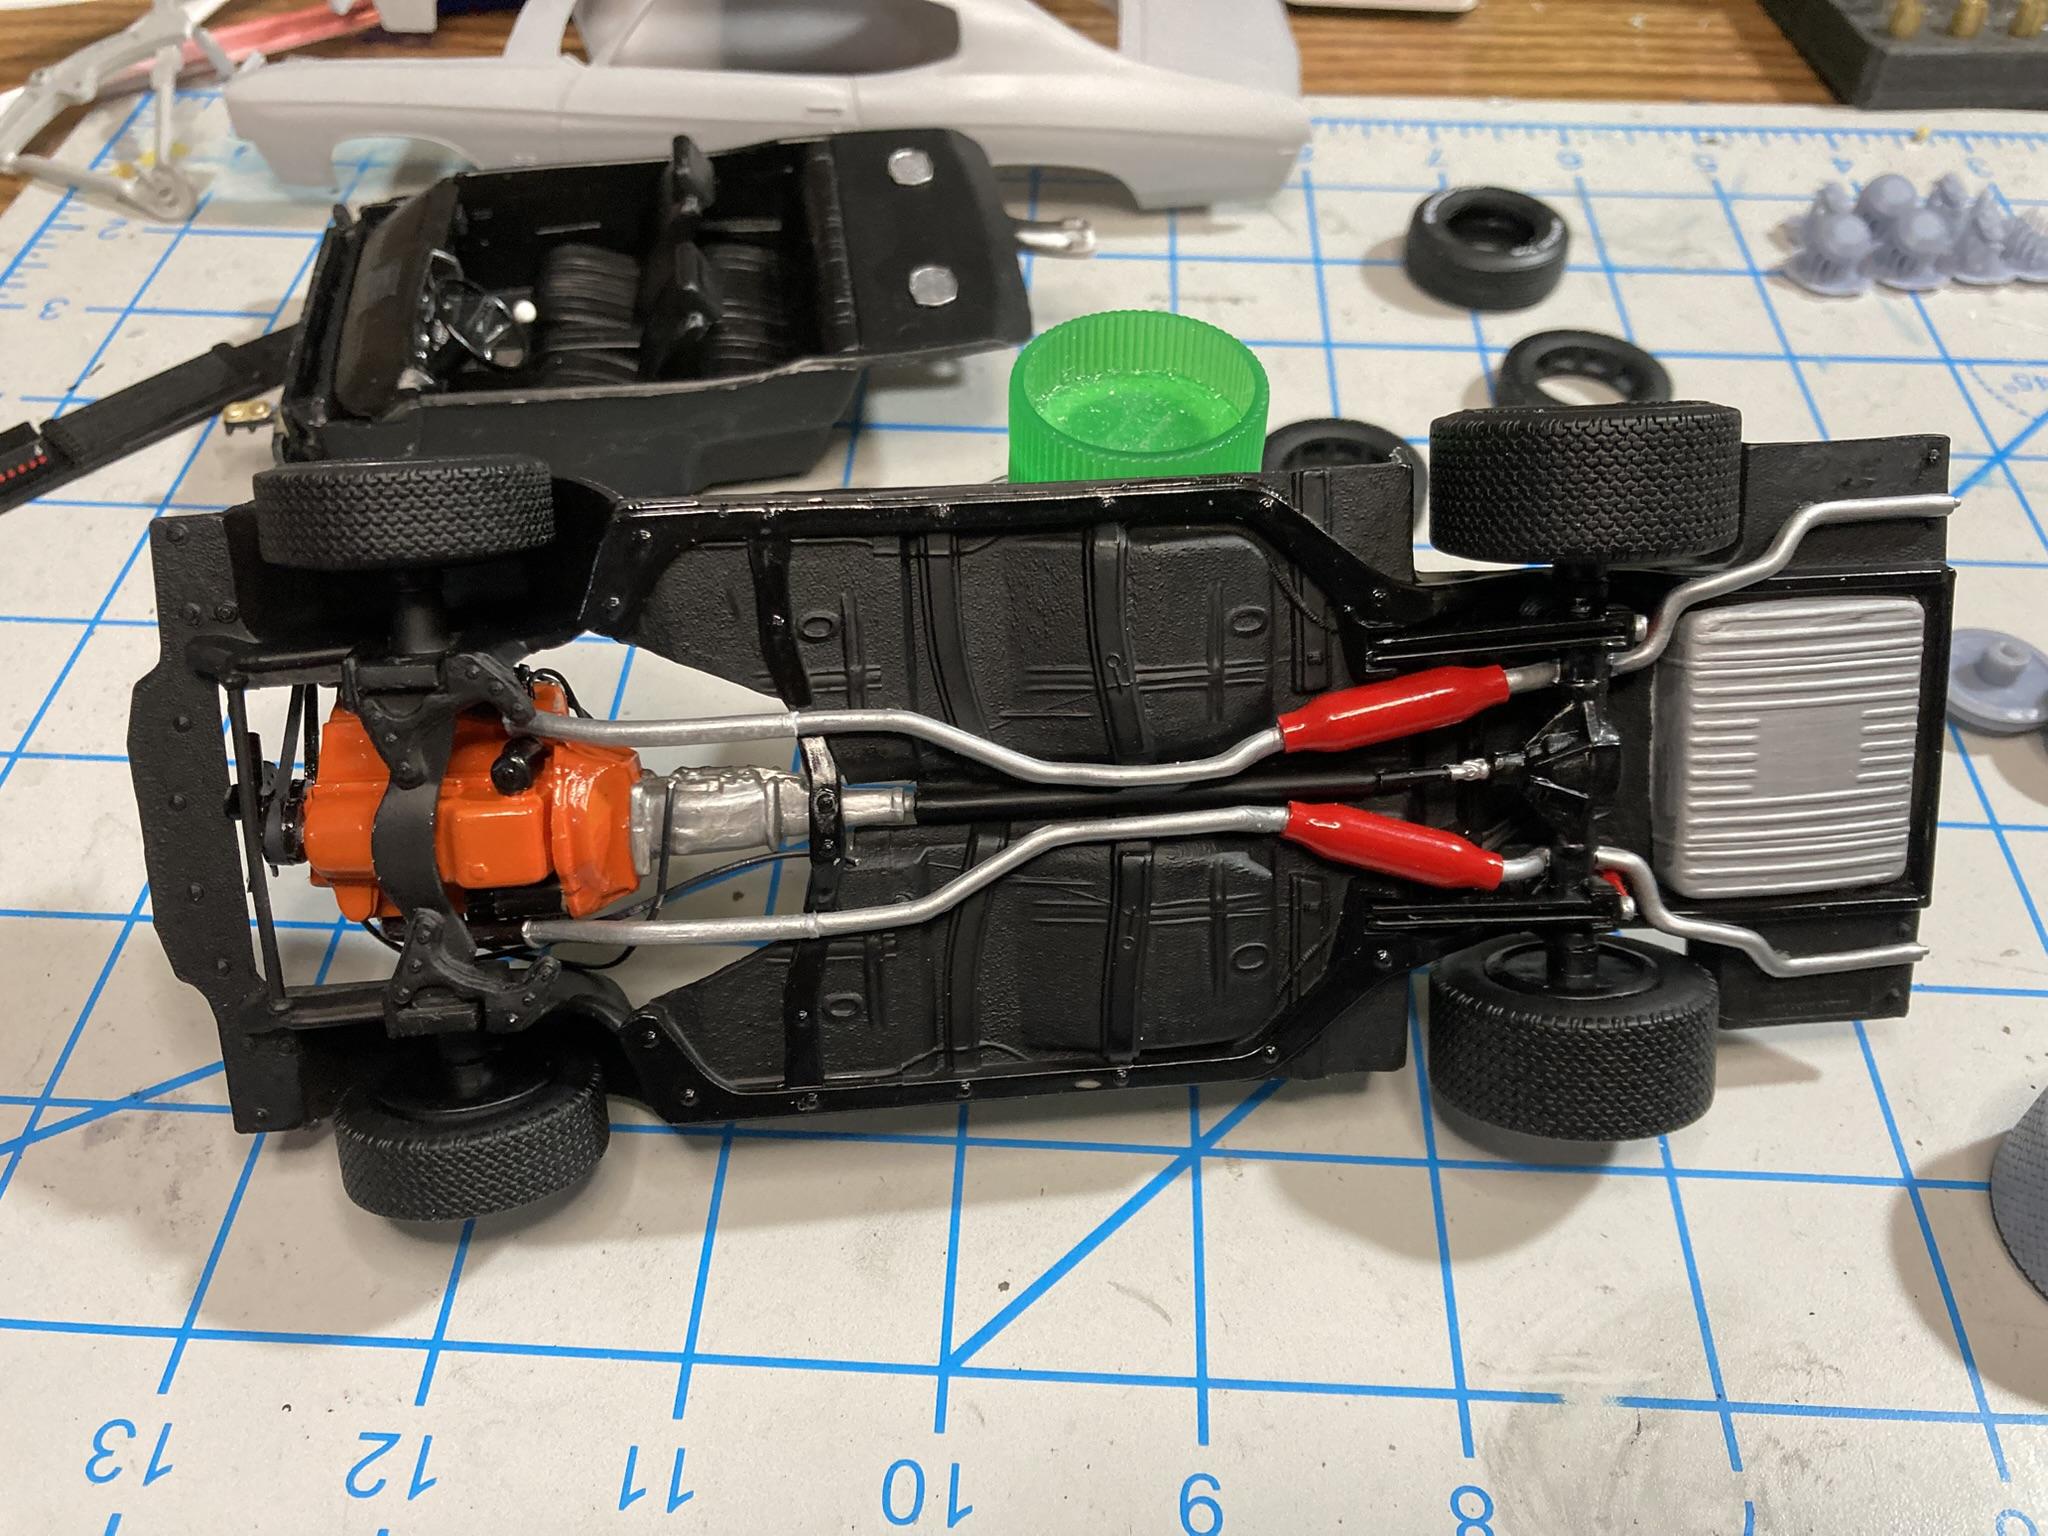
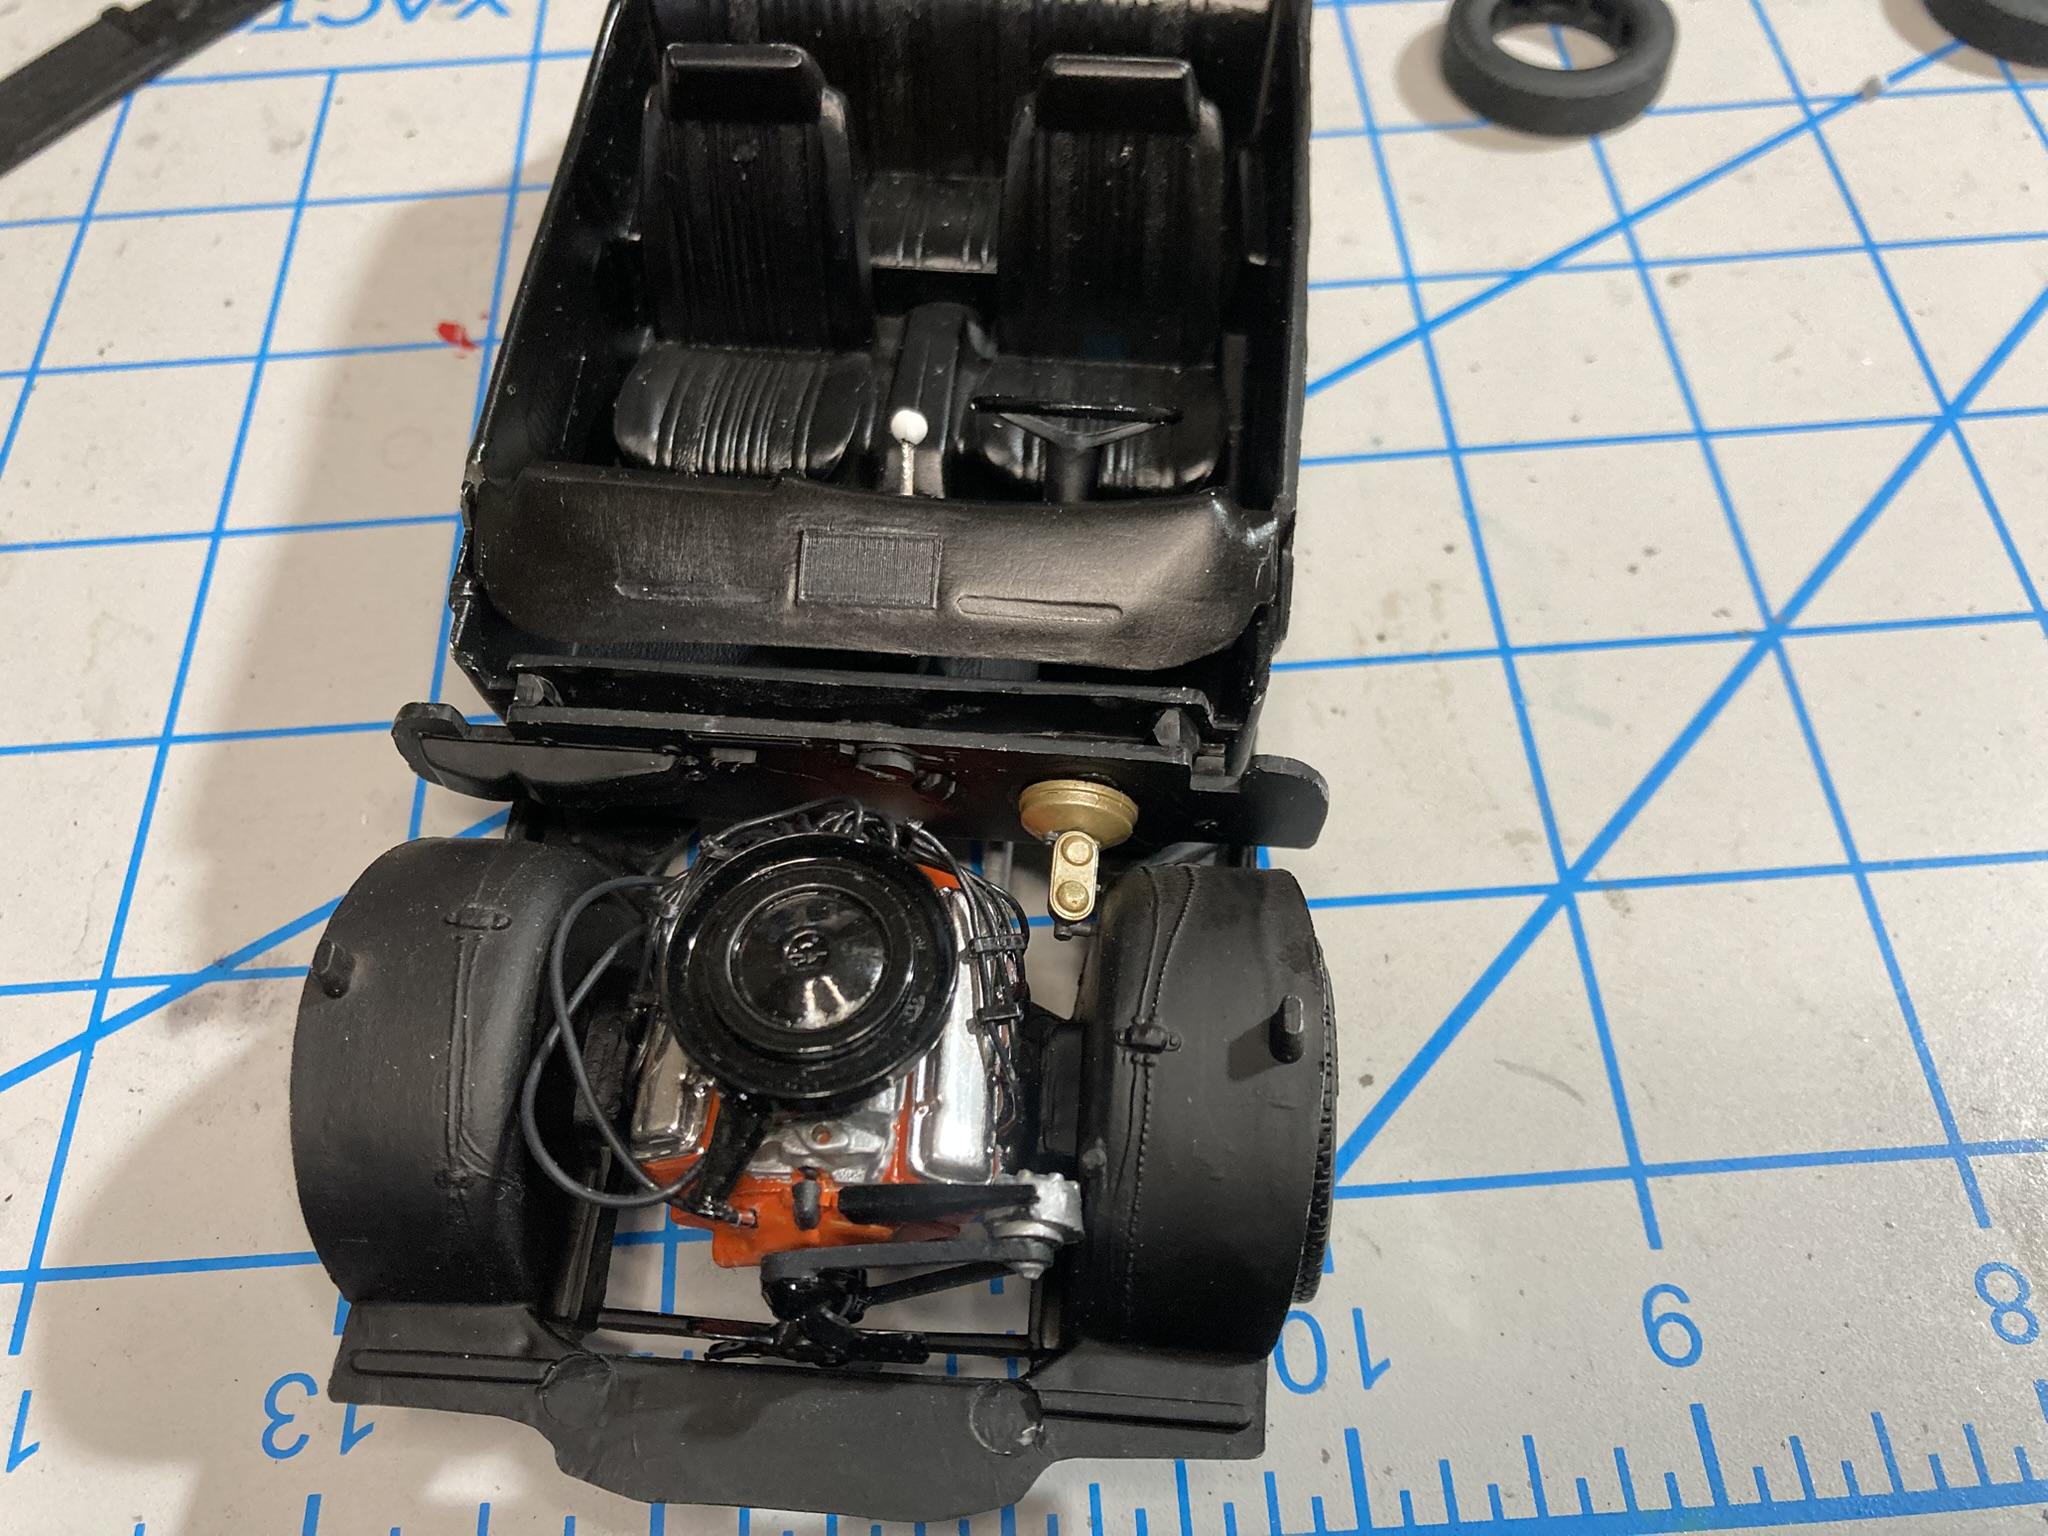
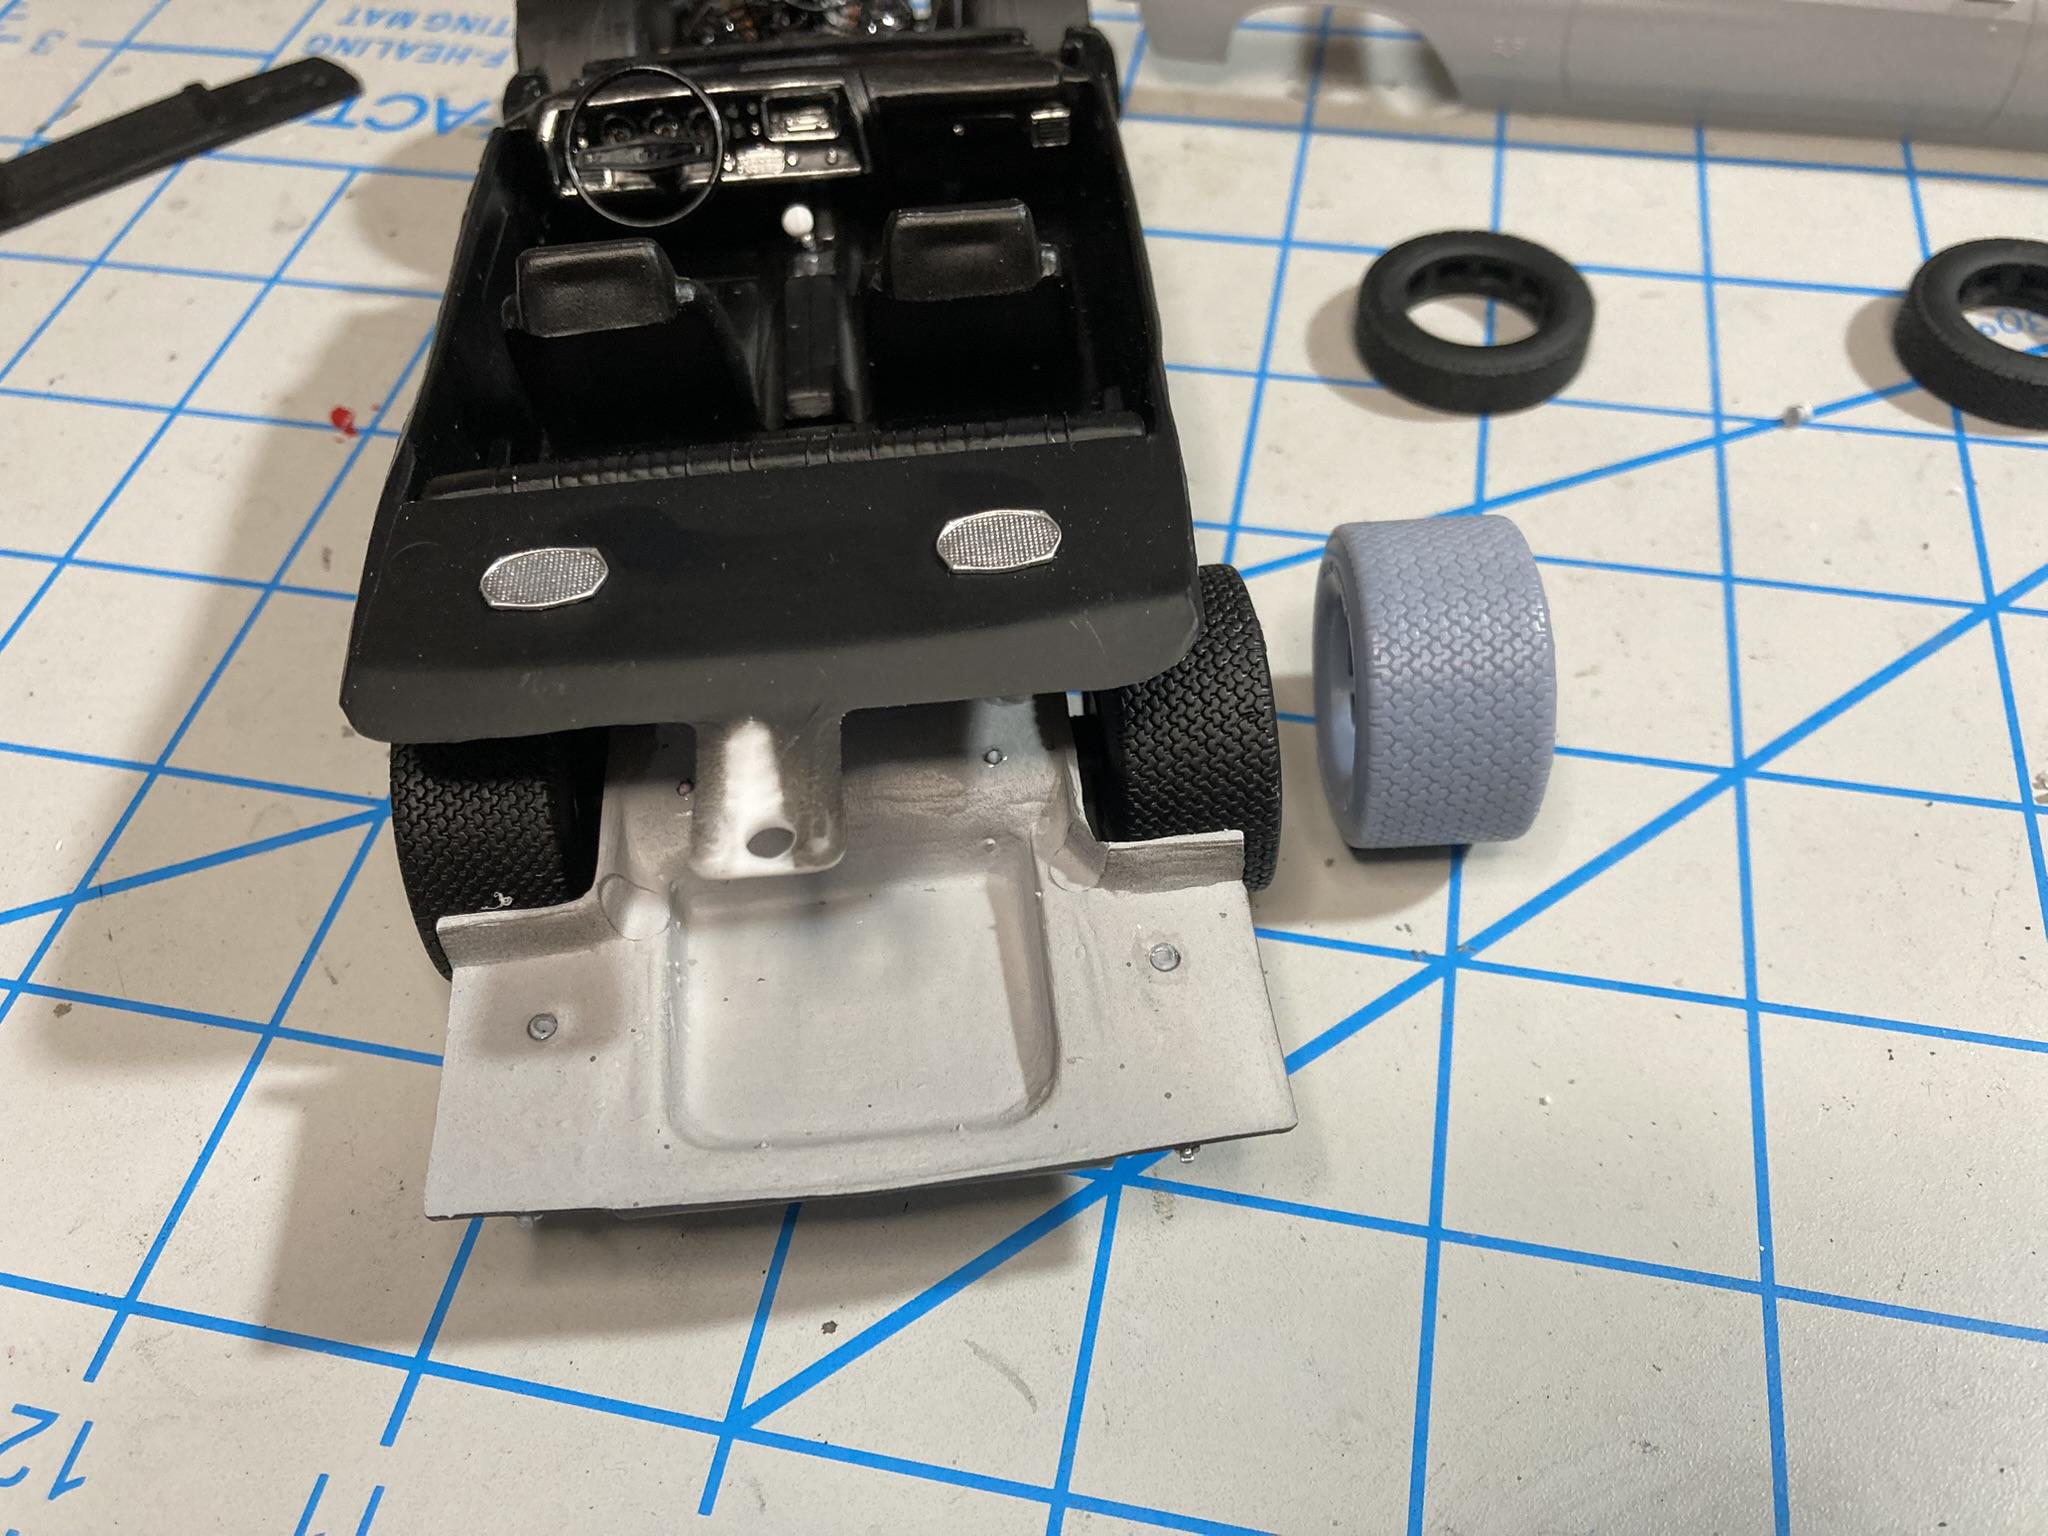
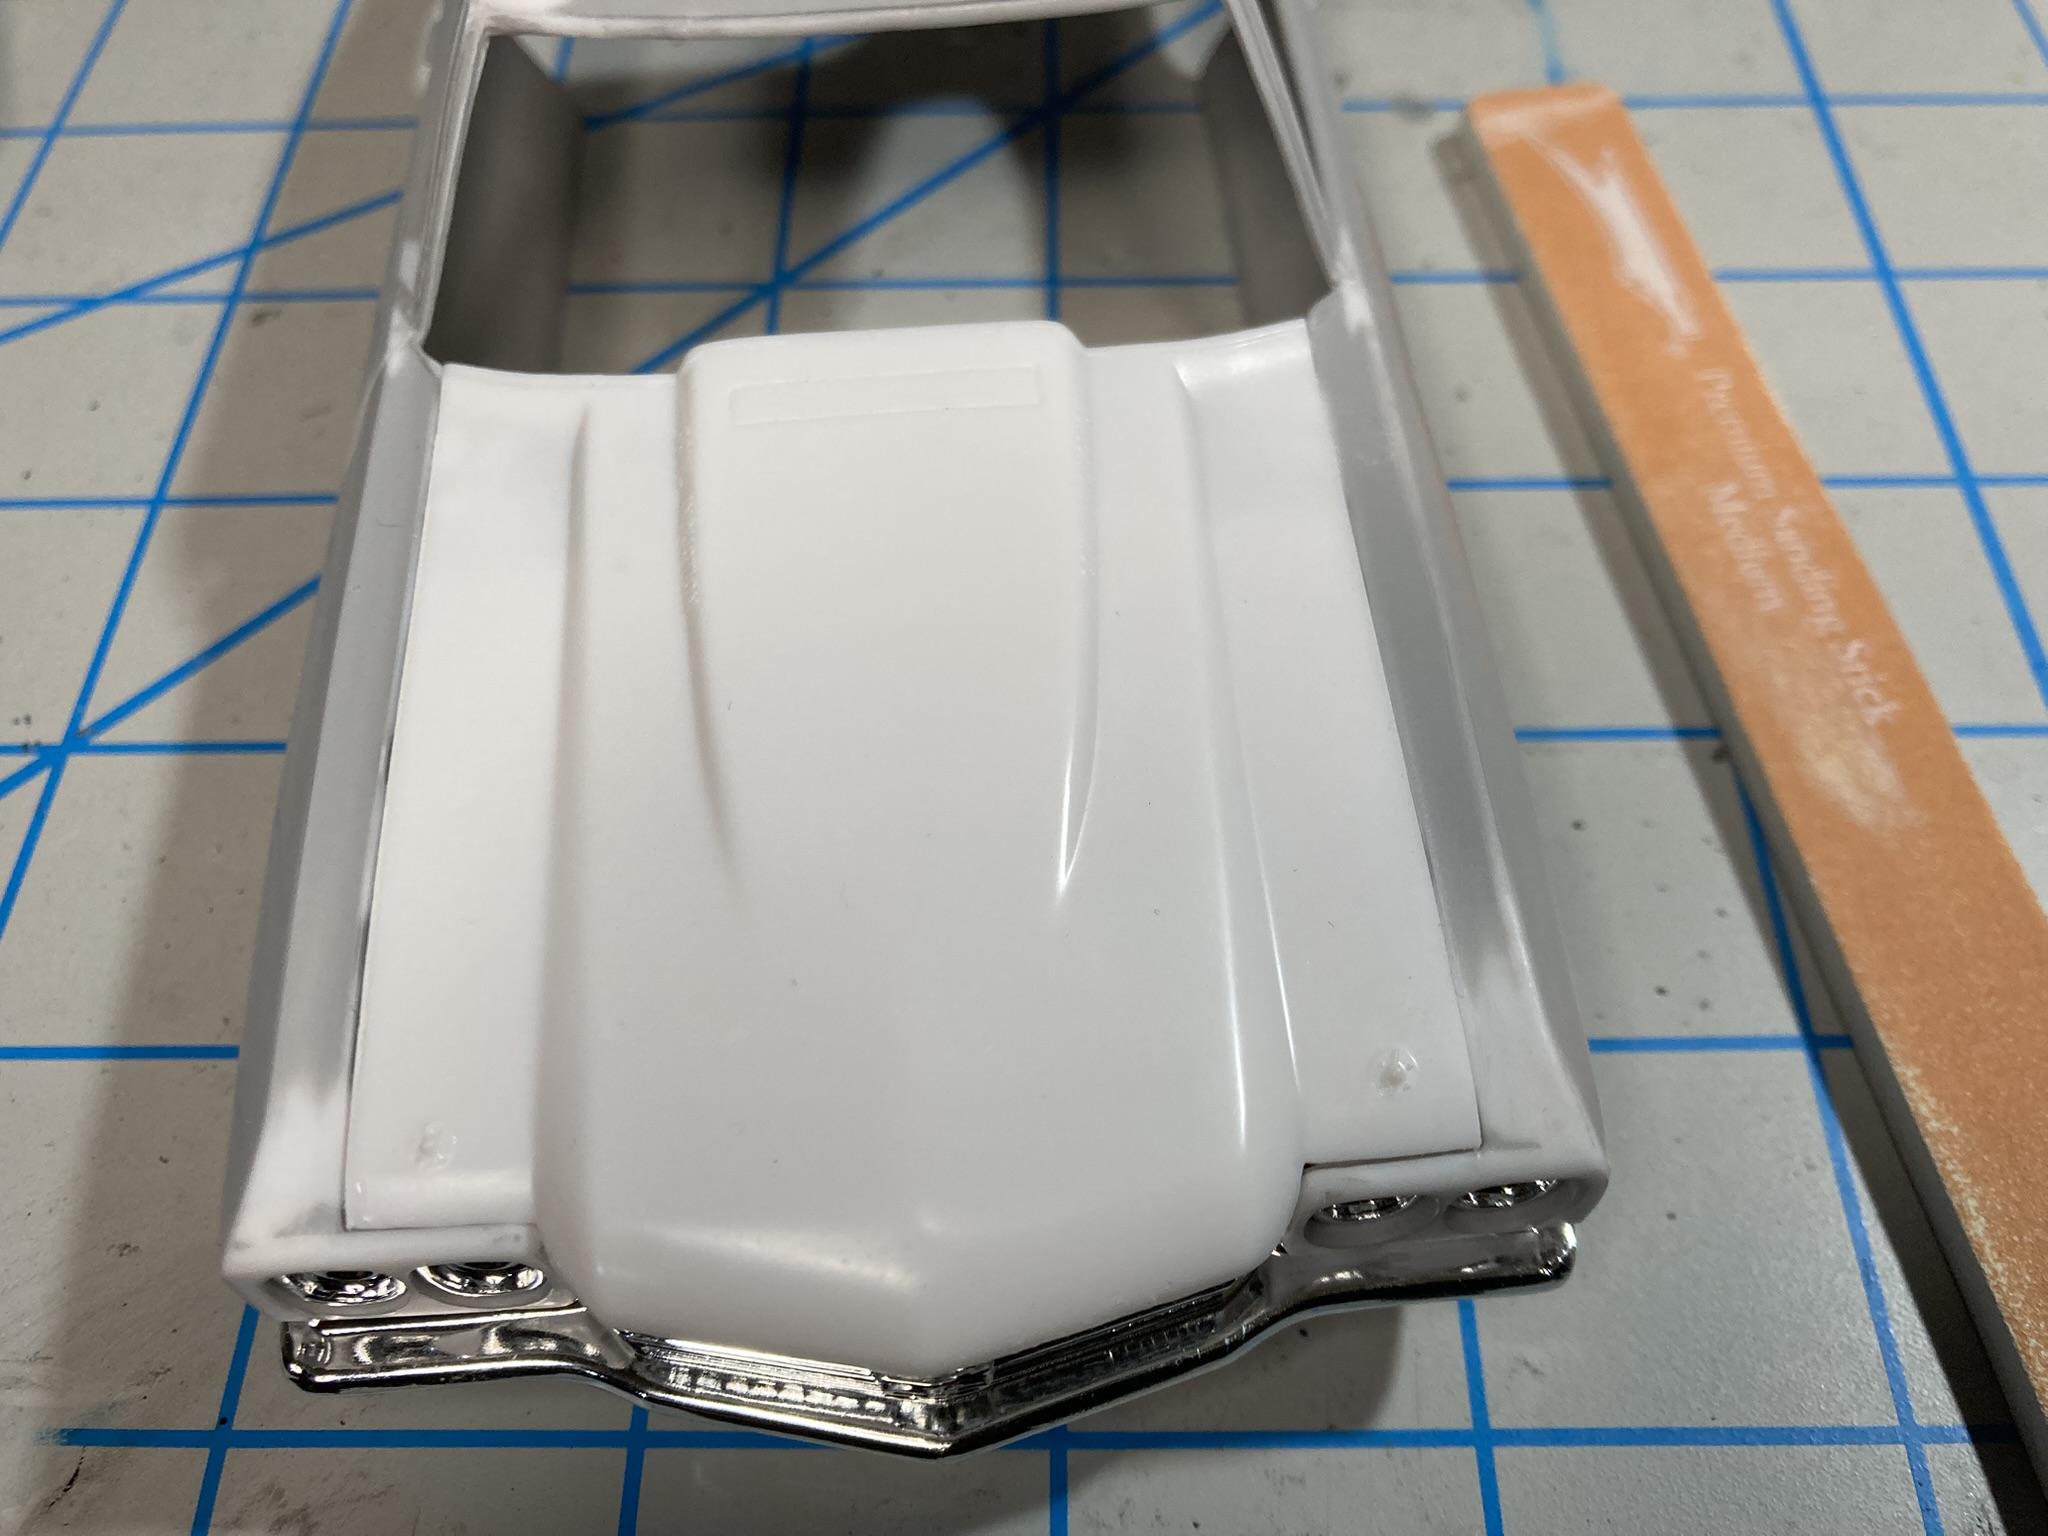
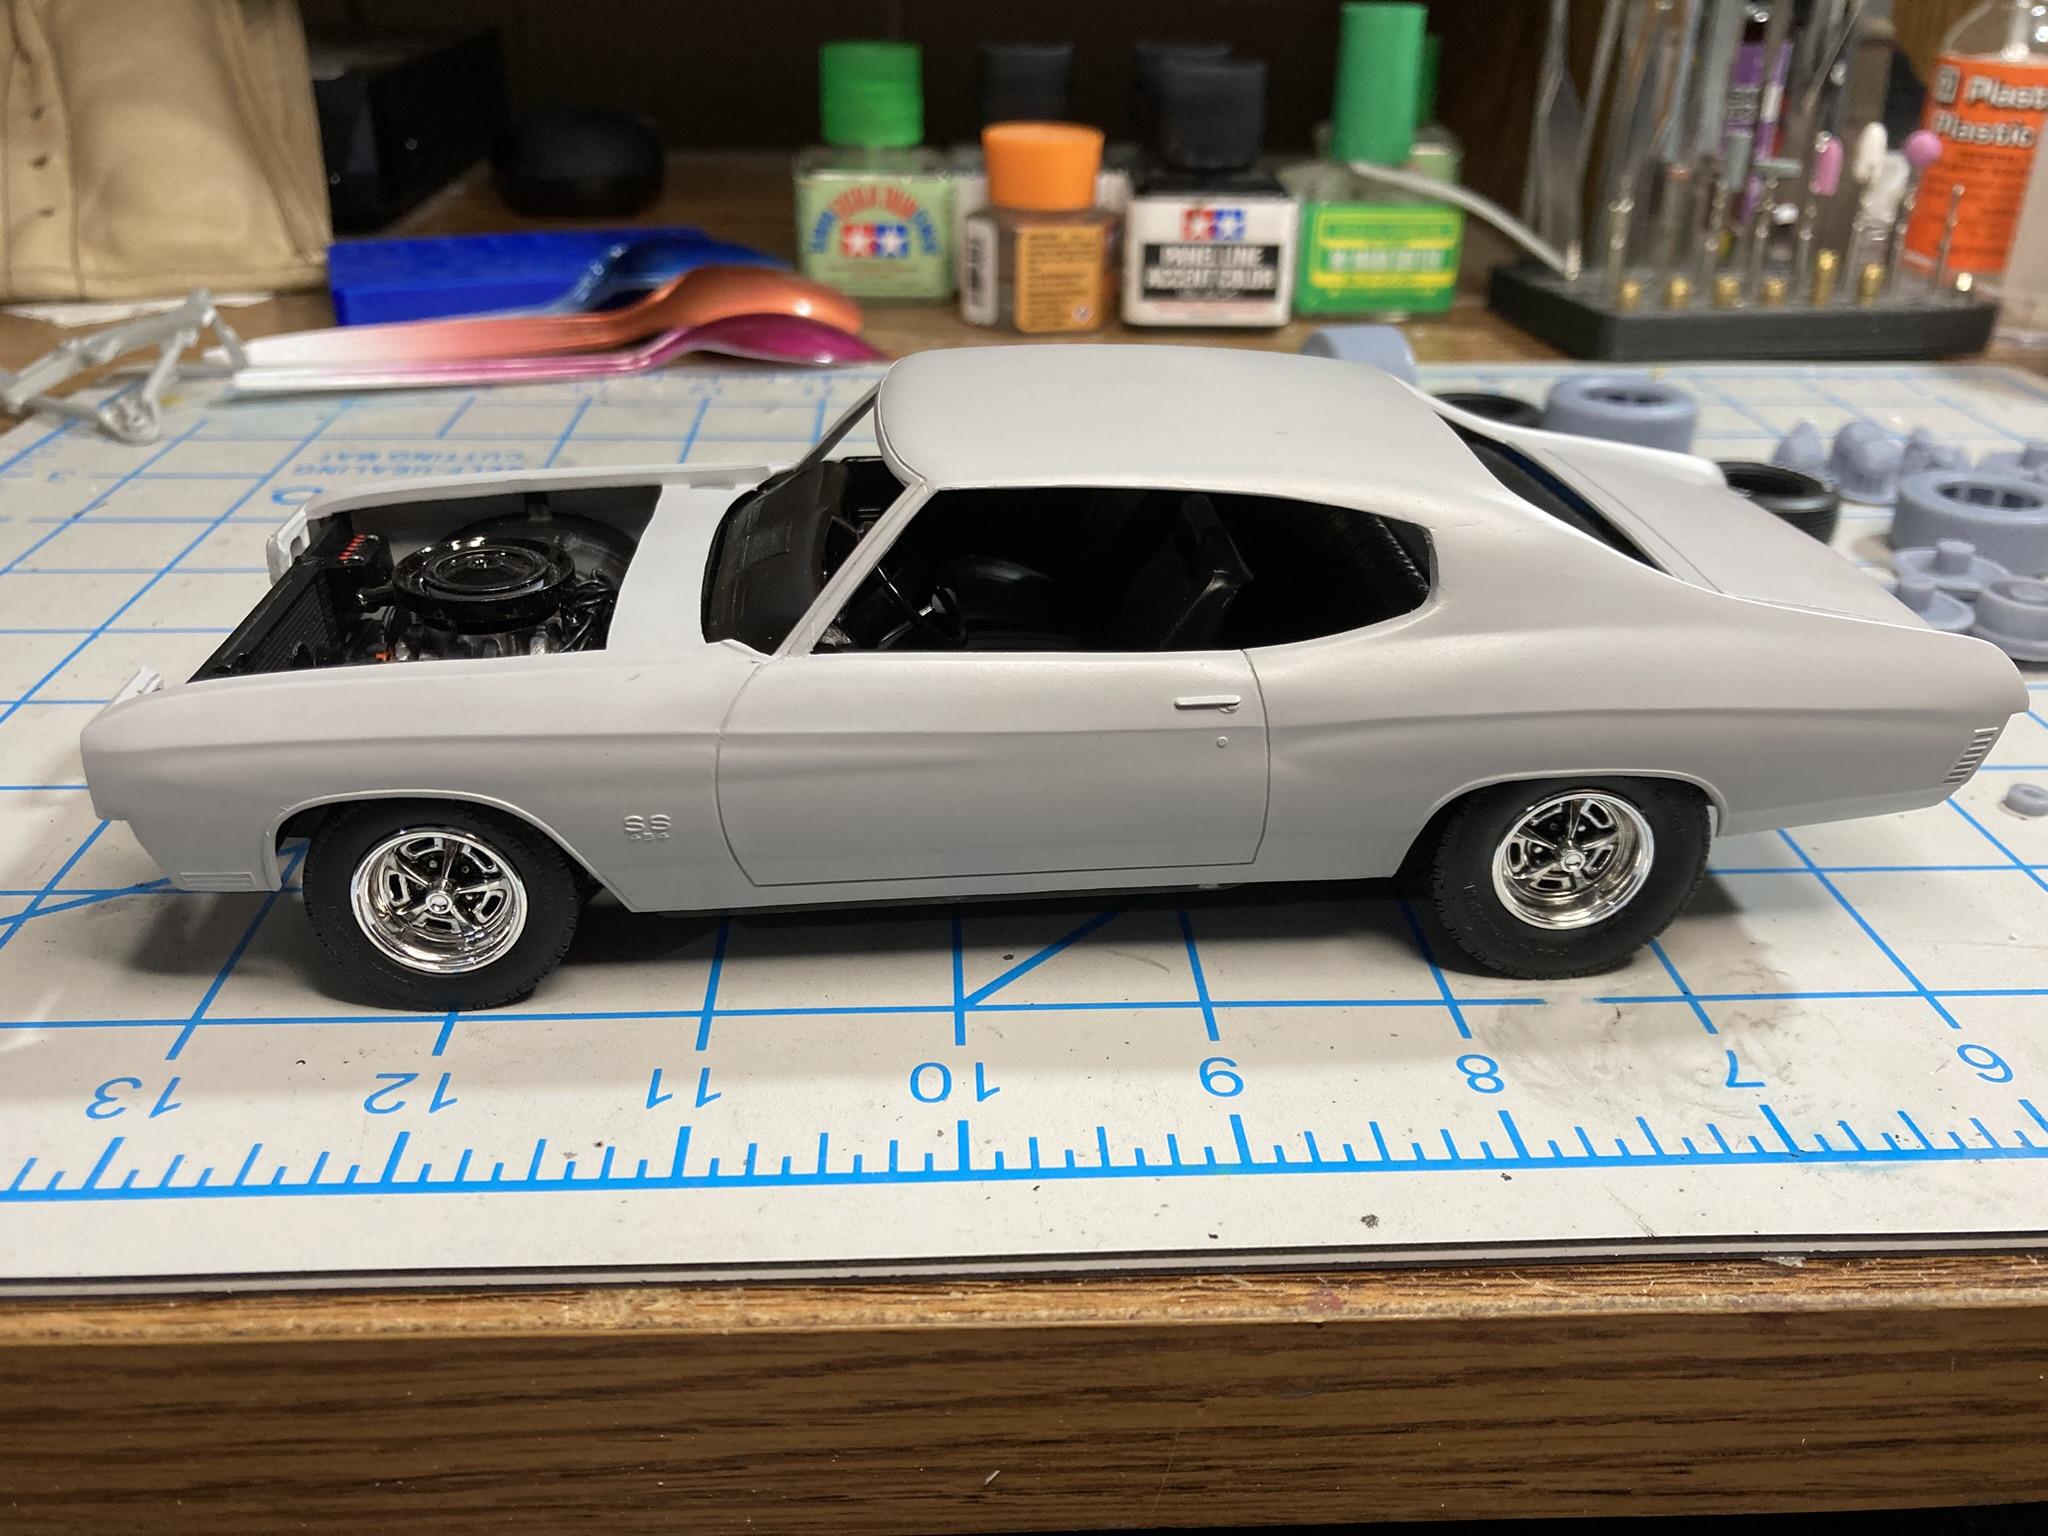
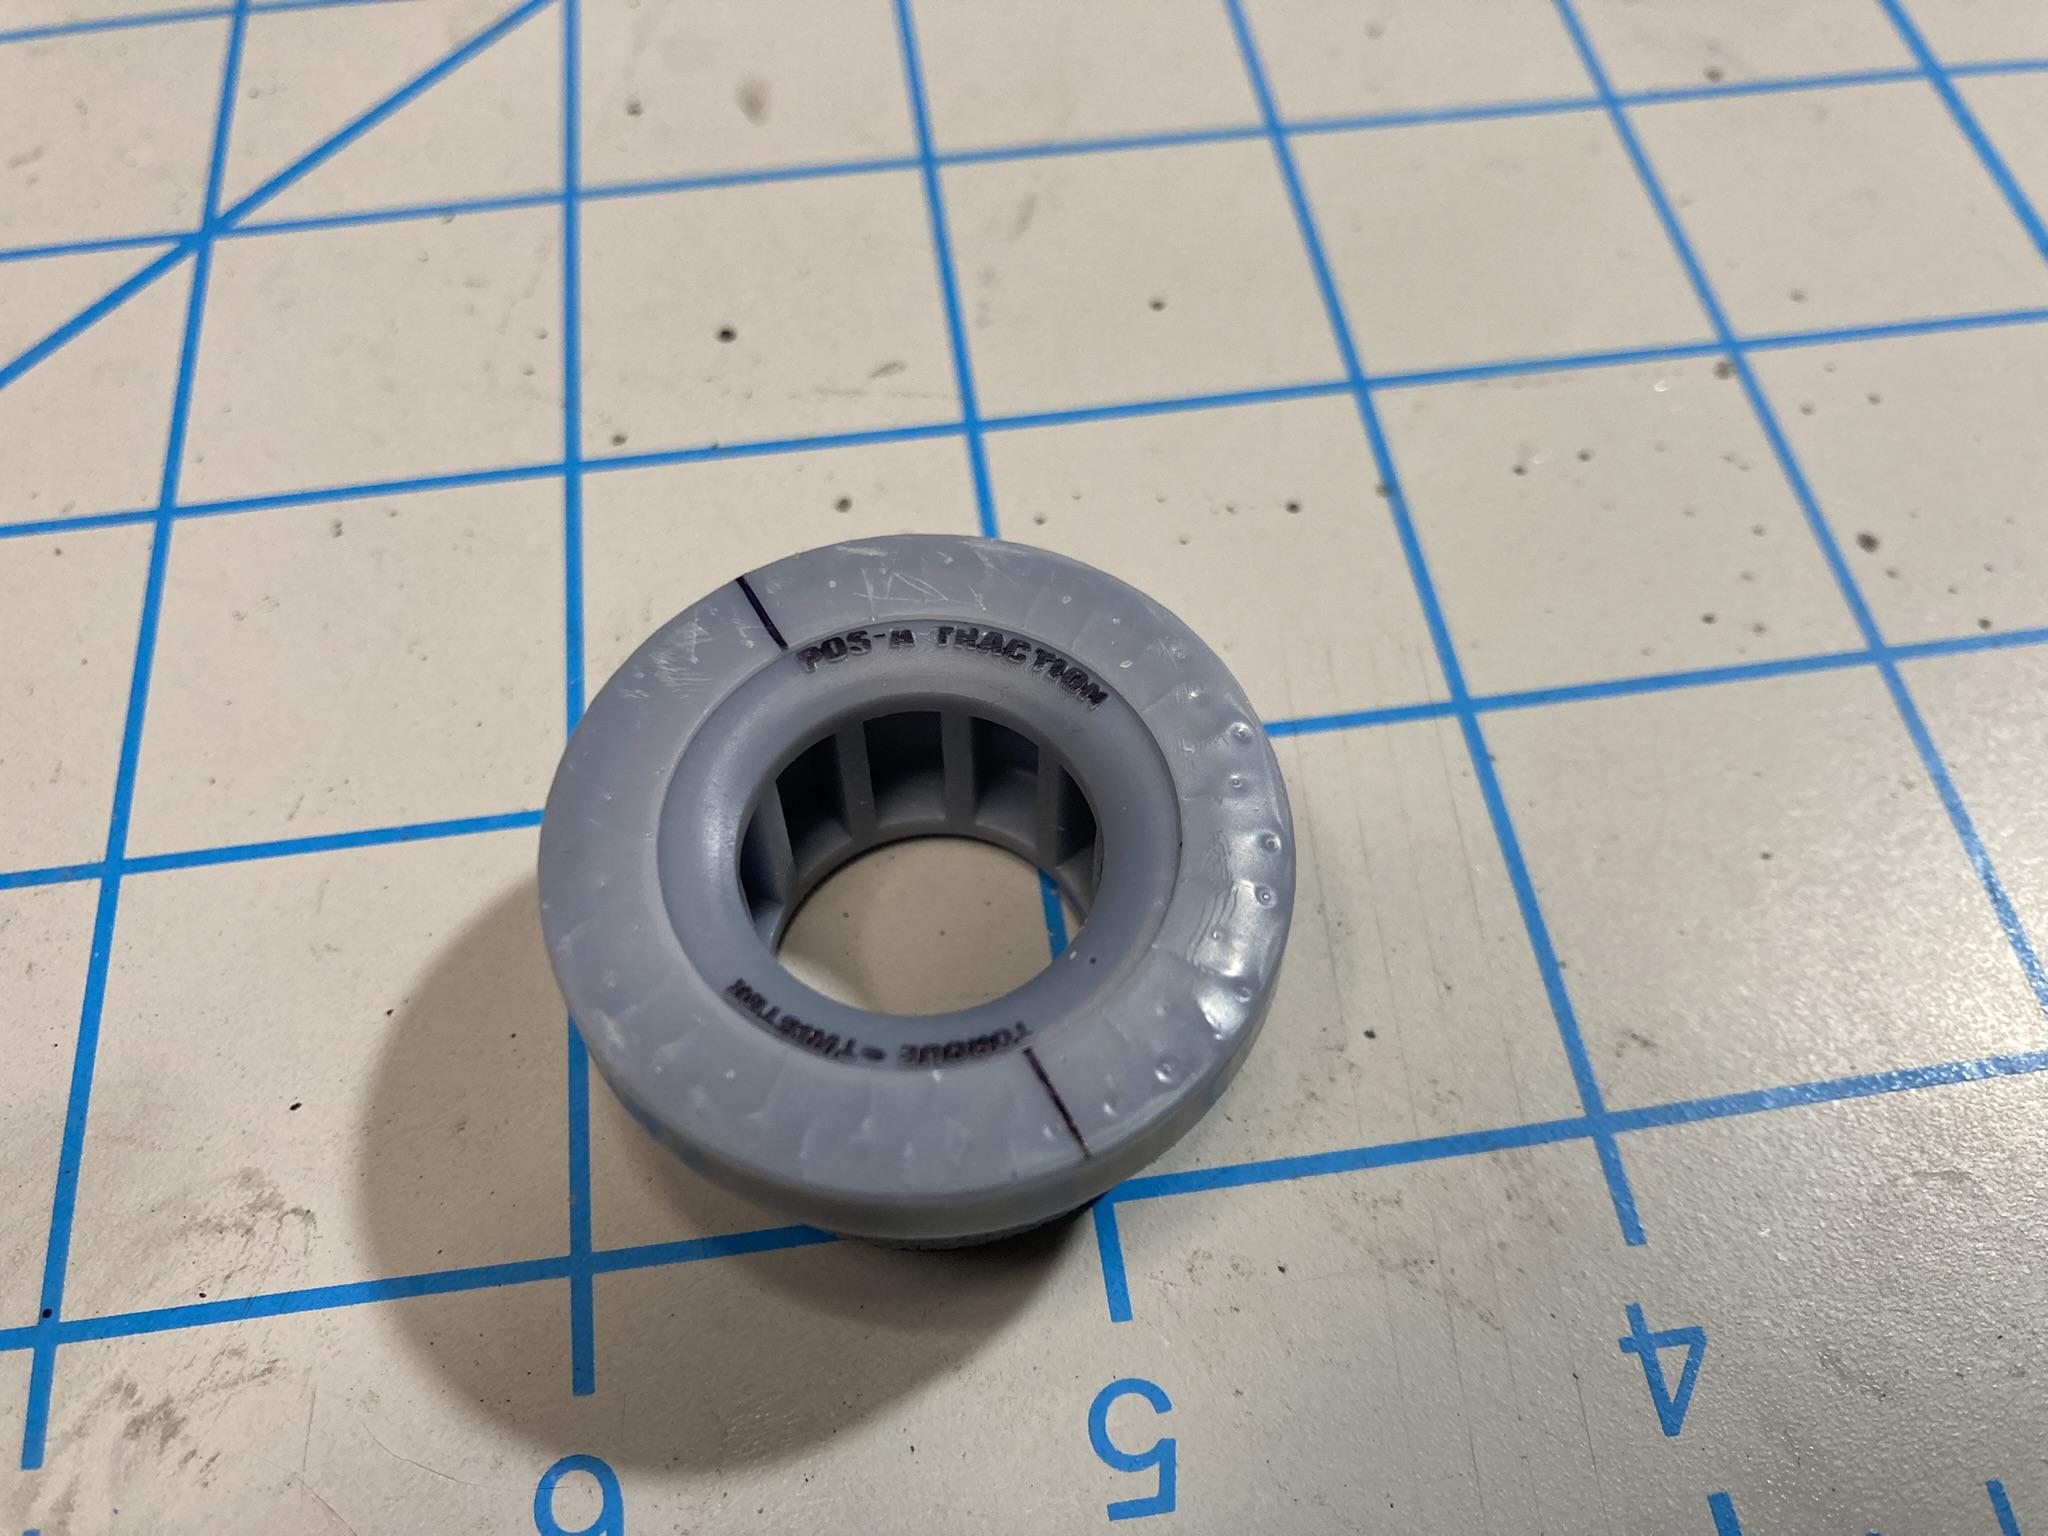
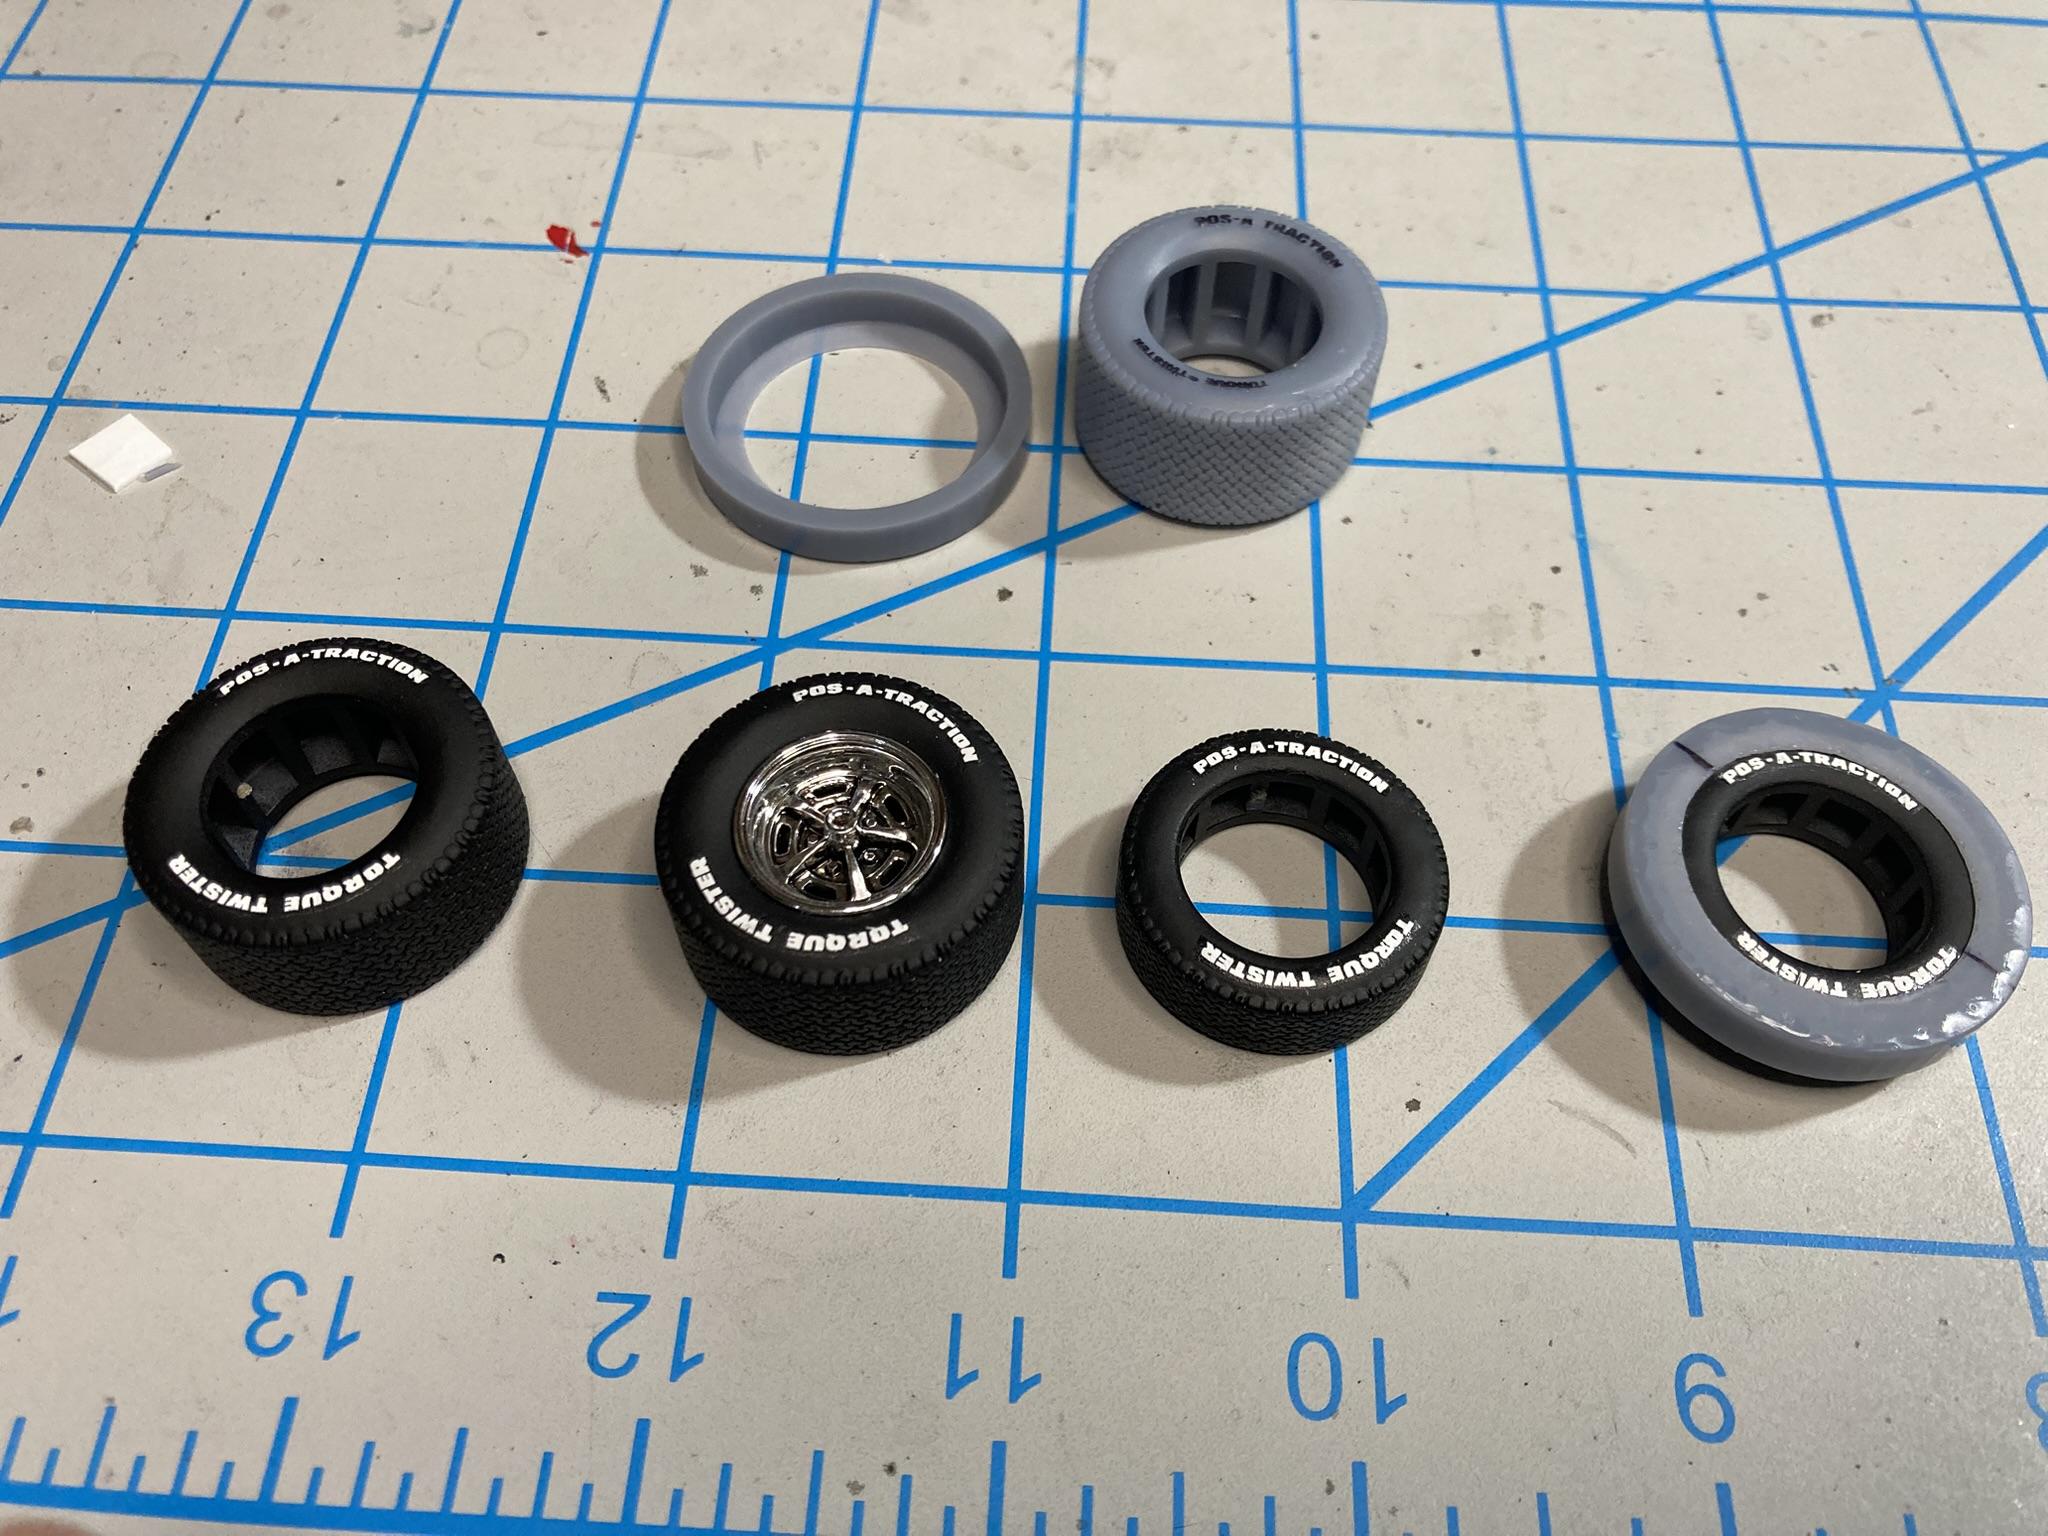
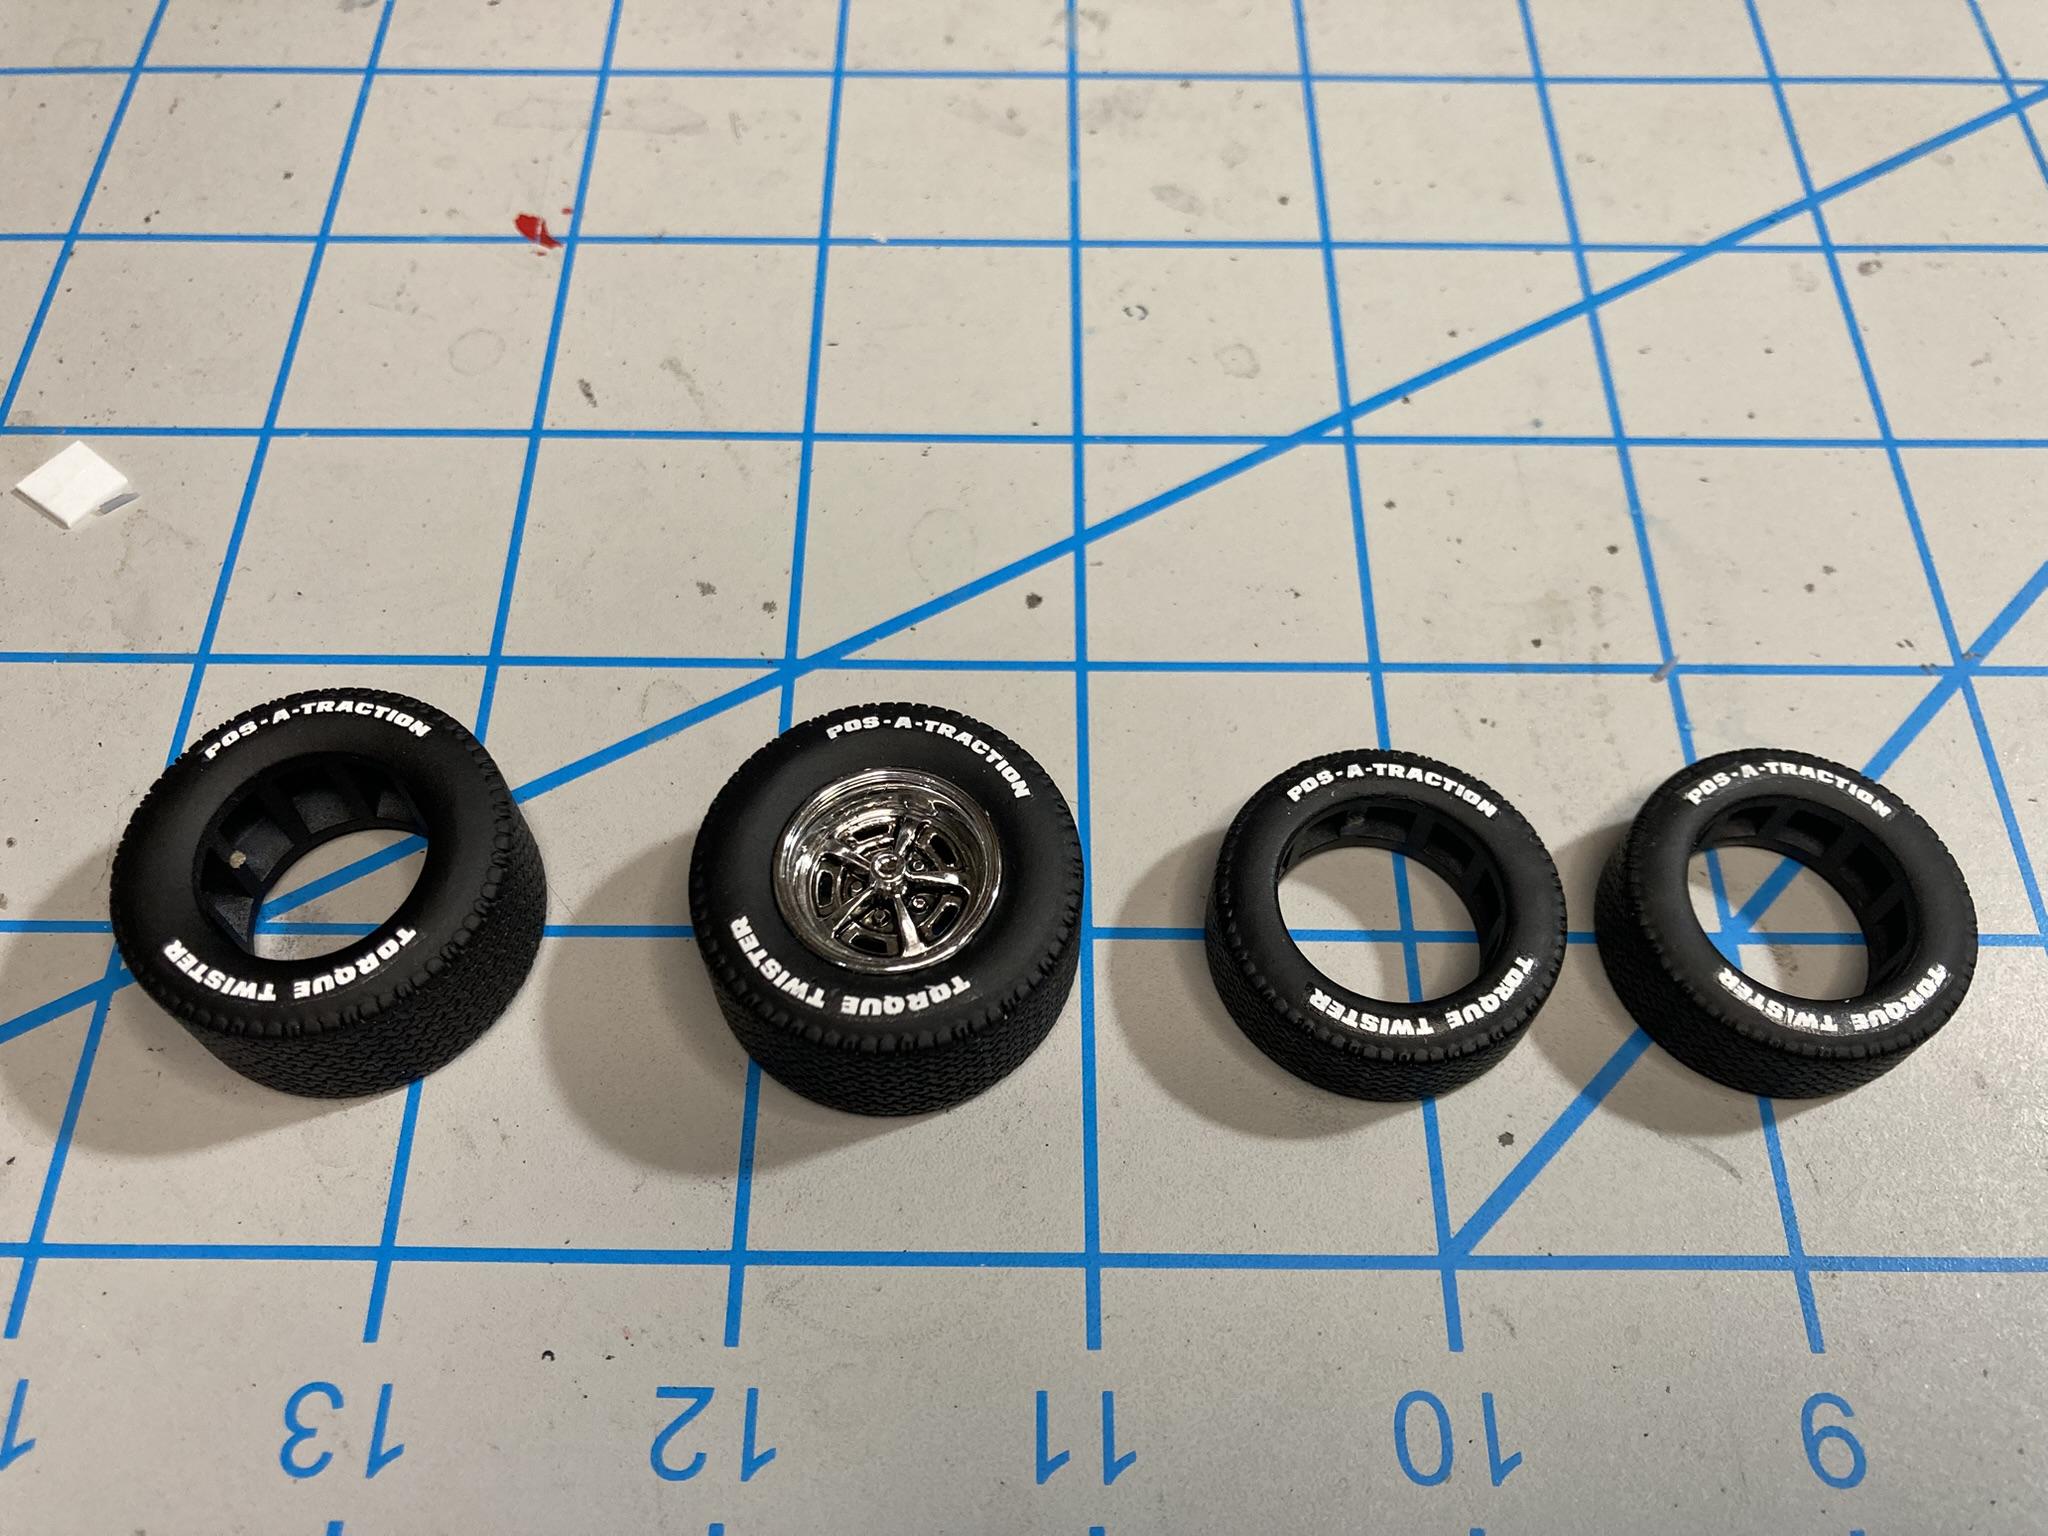
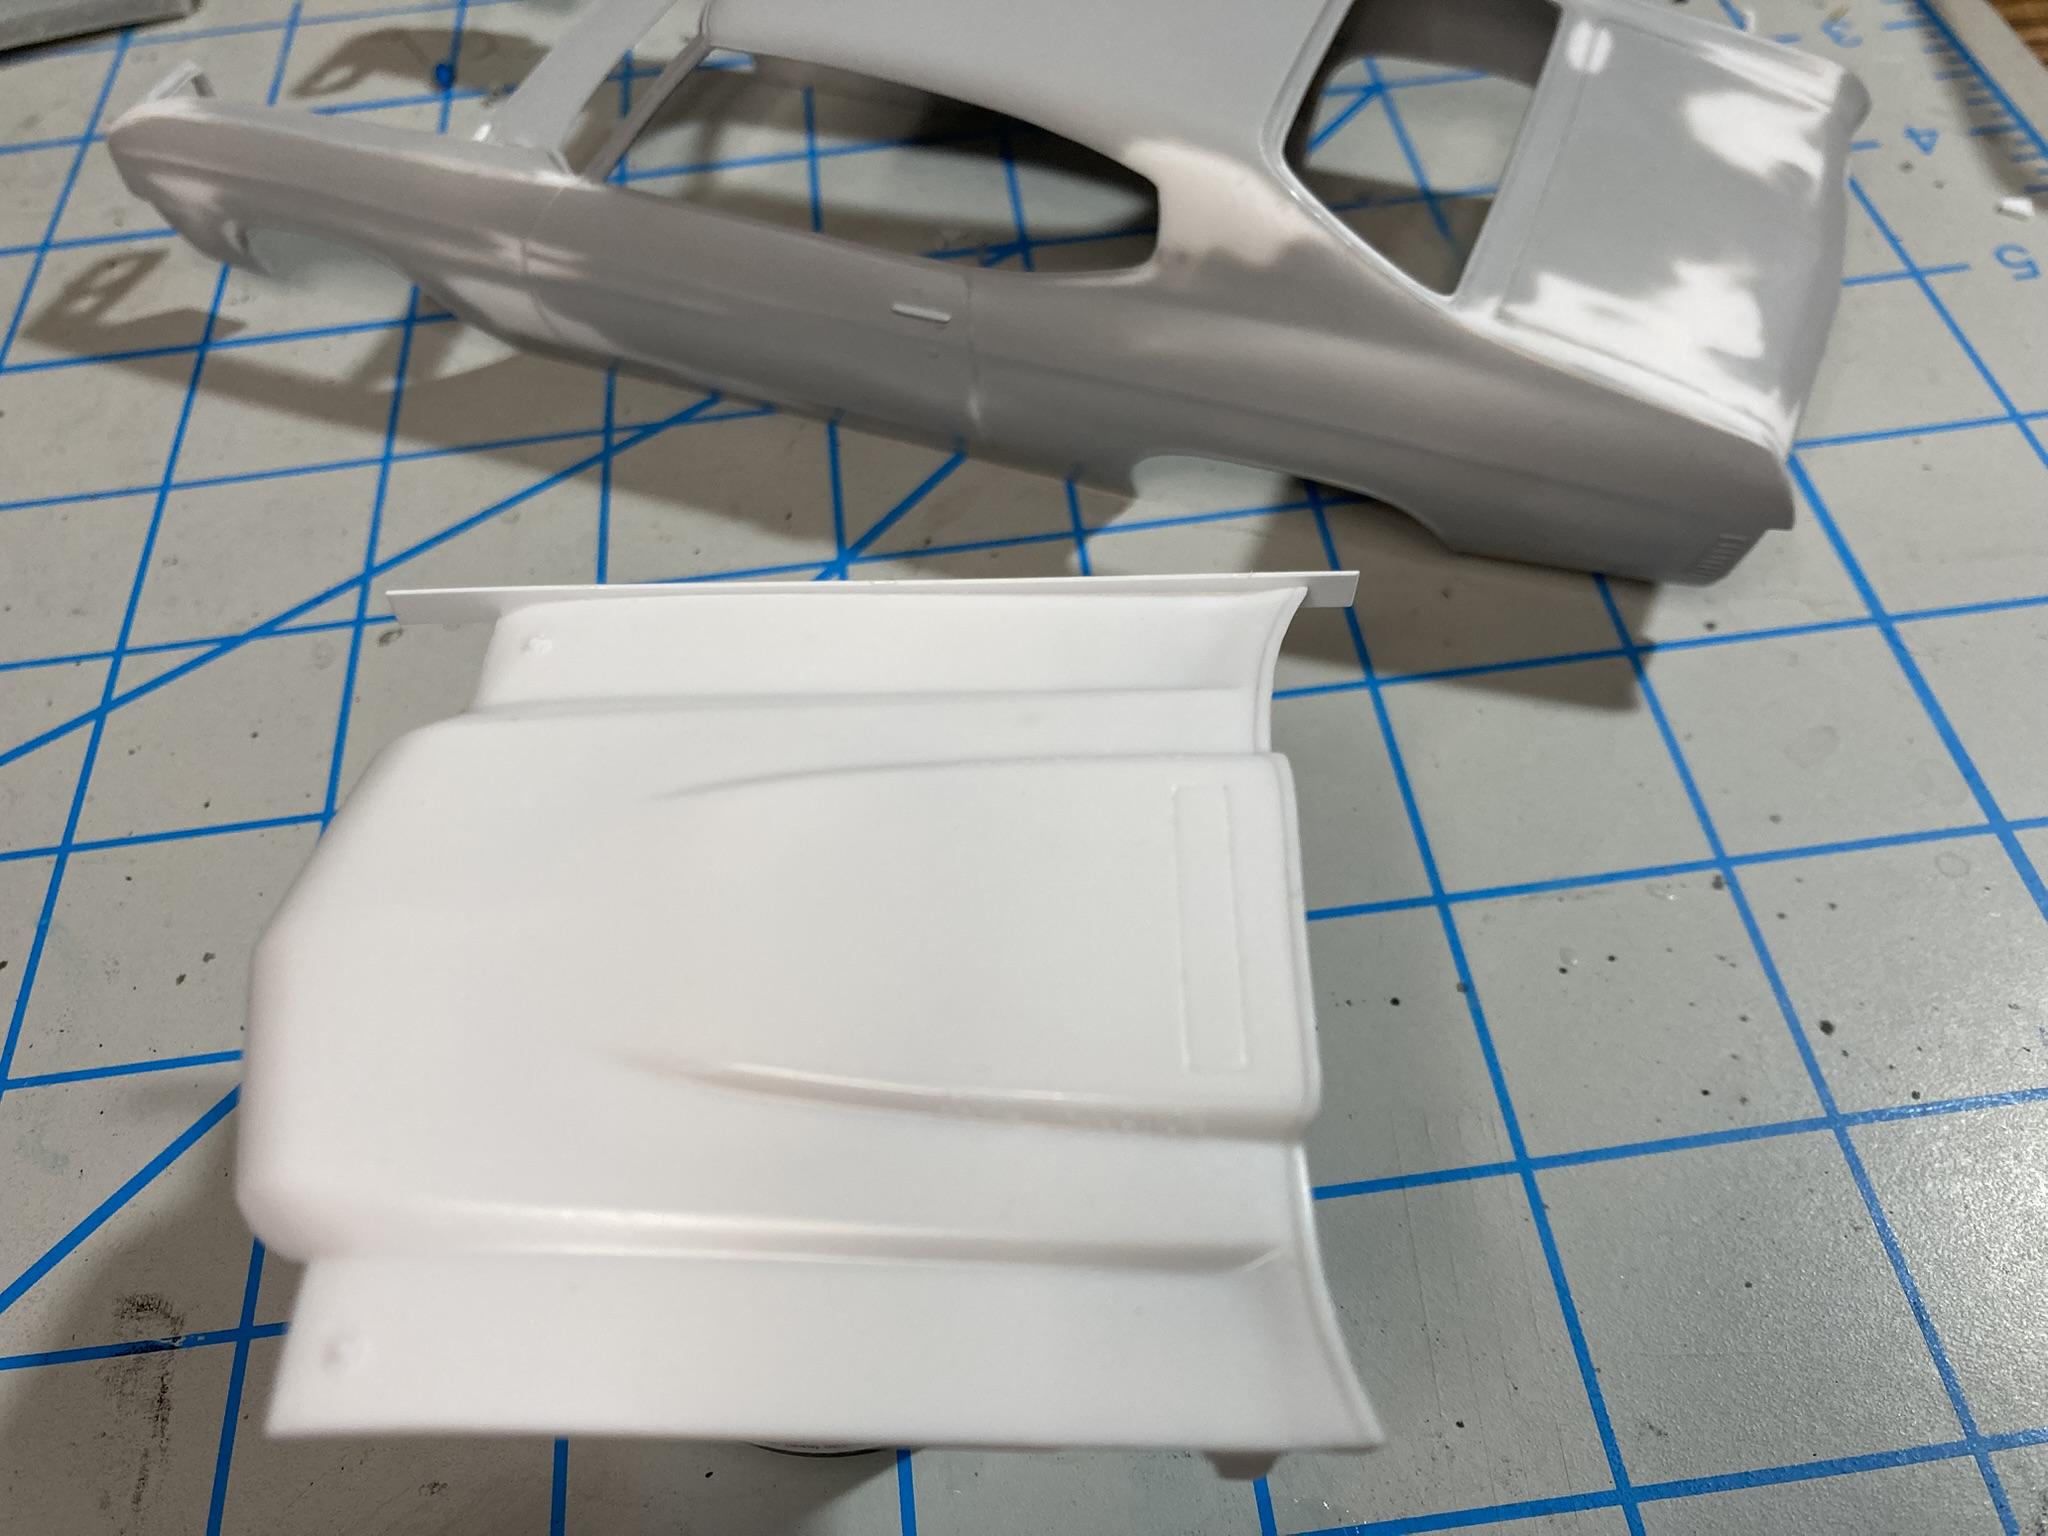
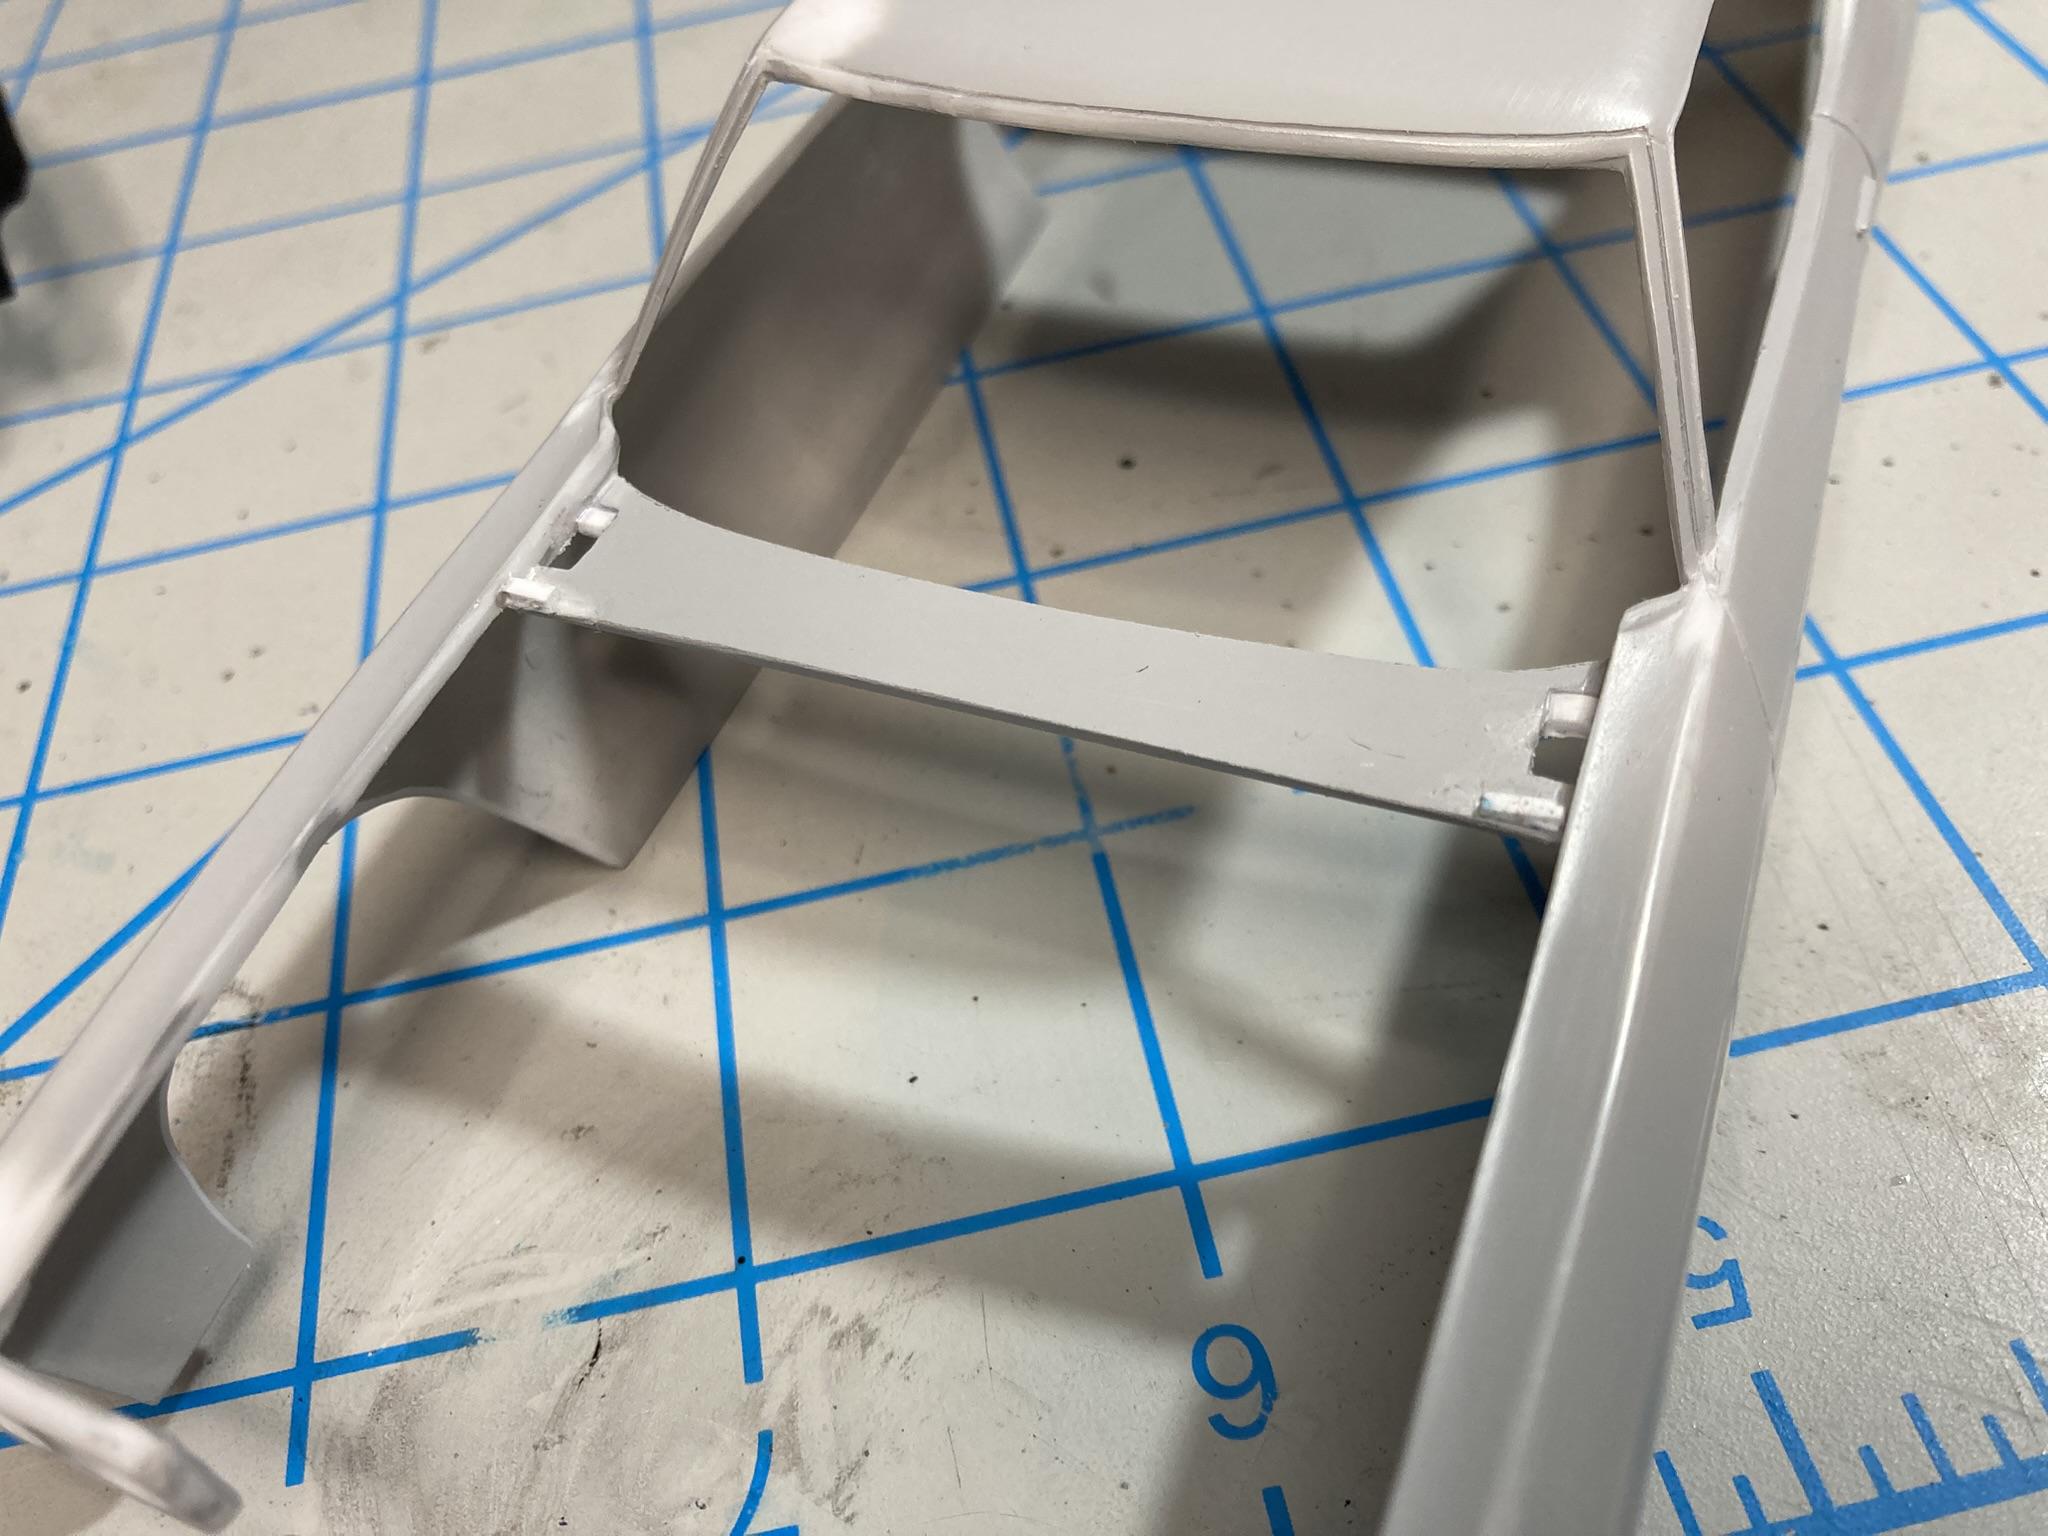
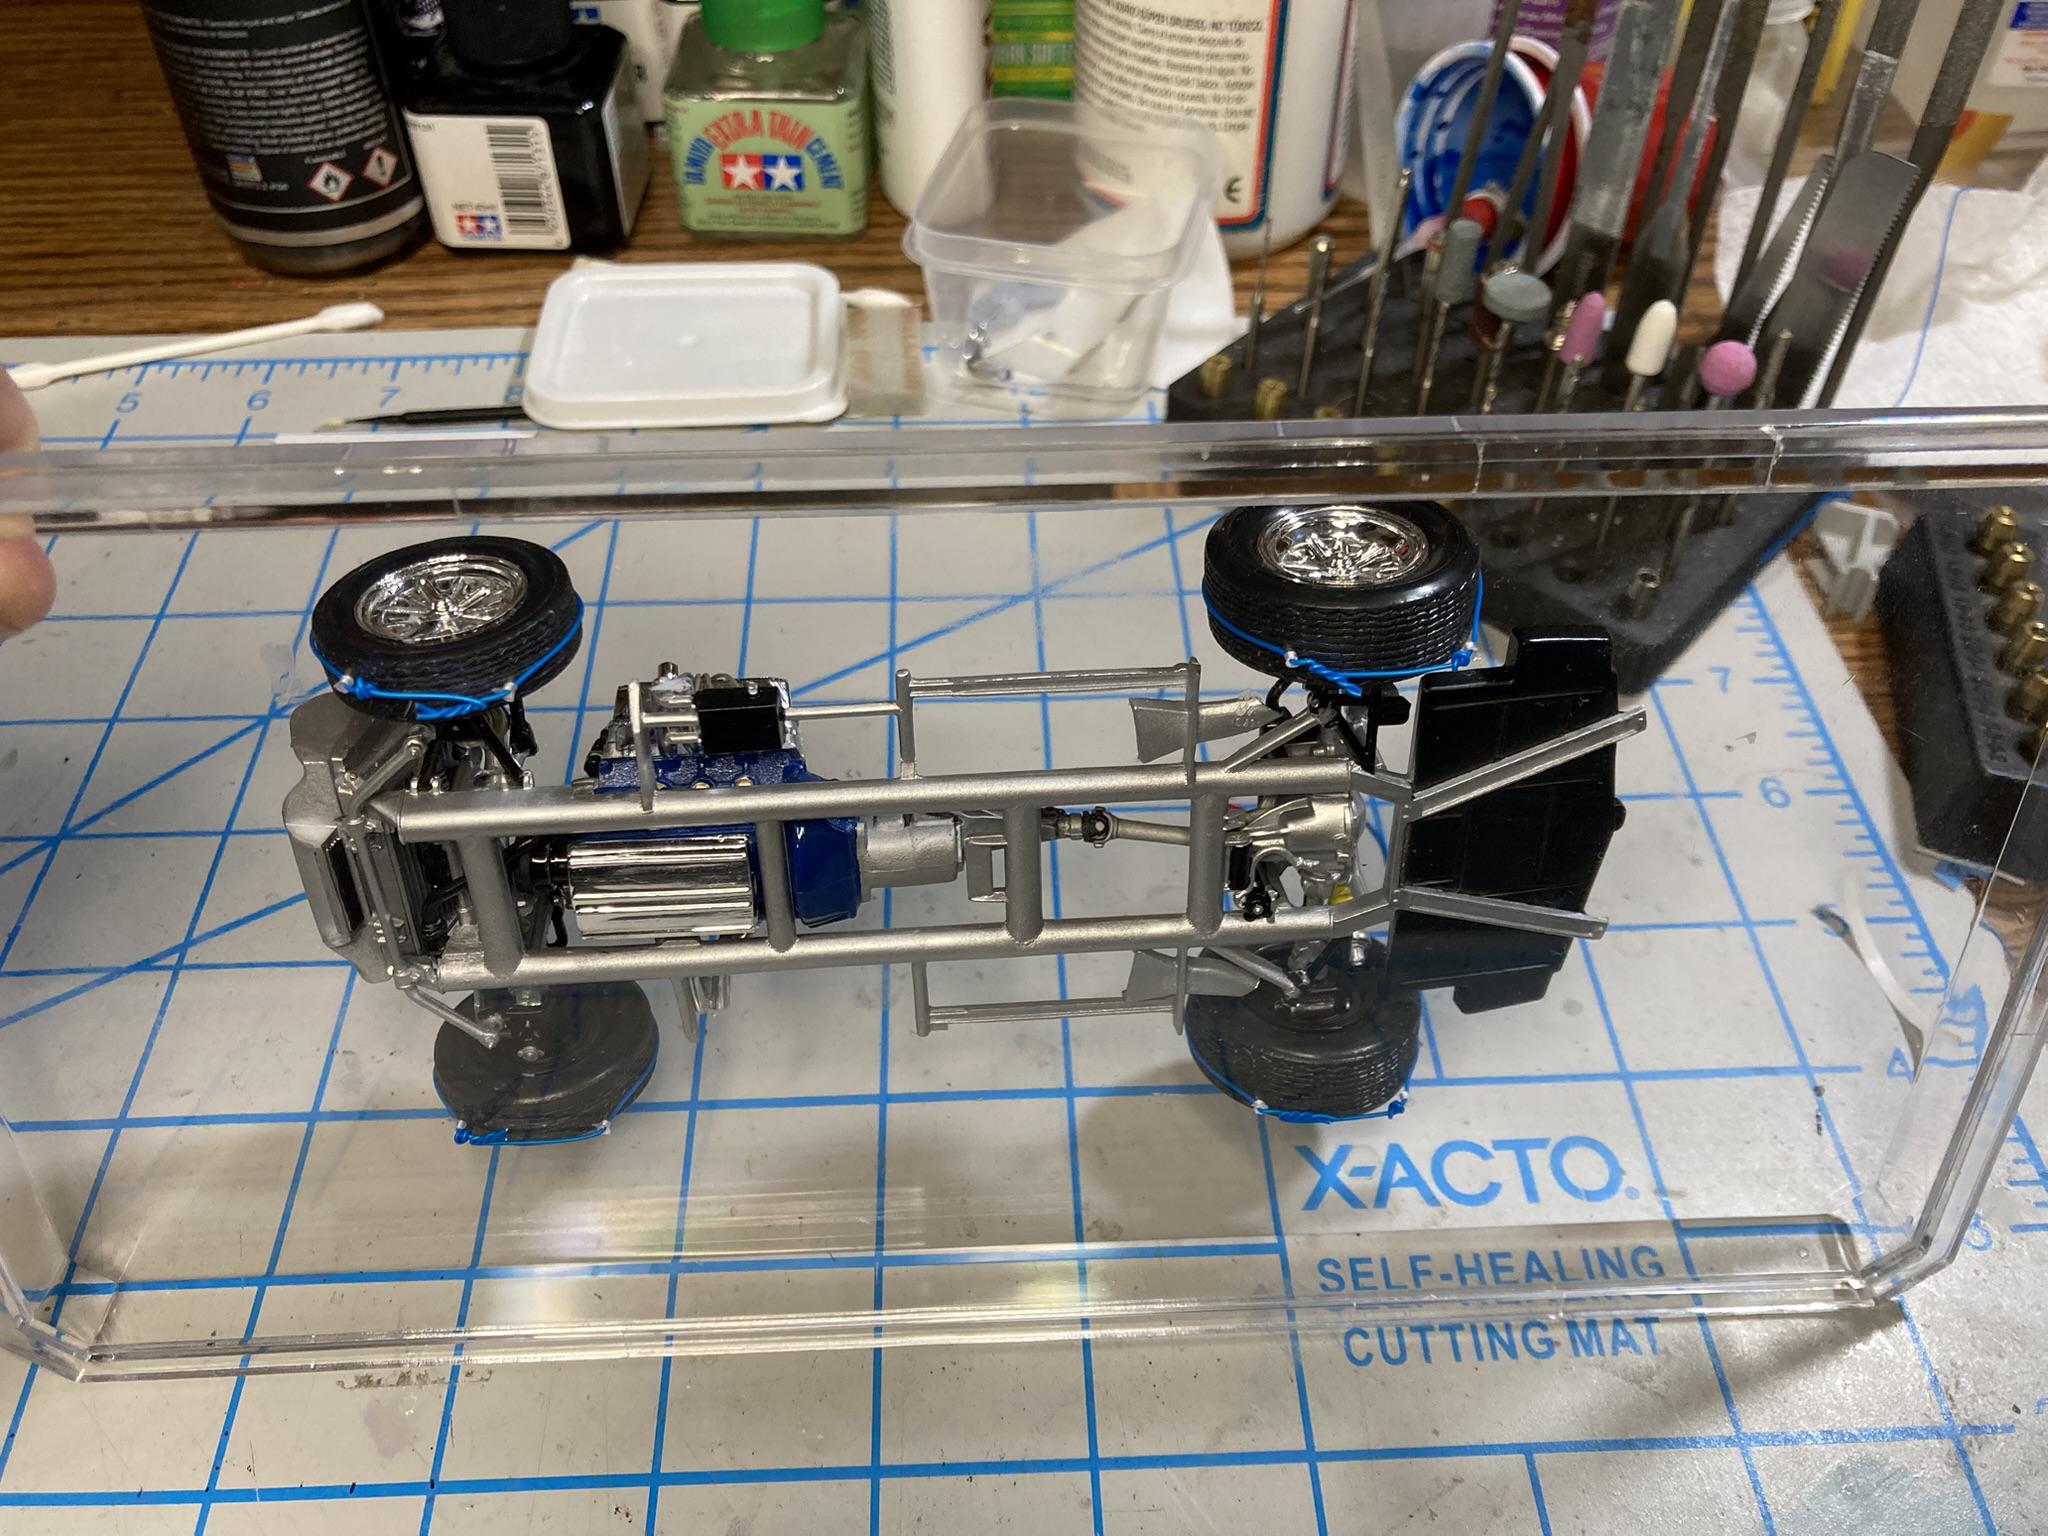
I’m building this as sort of tribute to one of my High School buddies who bought a ’70 SS396 Chevelle his Junior year (1971), it was Cranberry Red with White Stripes. He immediately smoked the rear tires down to the cords and put a set of Gabriel Hi-Jacker air shocks and the biggest set of tires any of us had ever seen. I don’t have any photos of Jimmy’s car, but I’m pretty sure they were Pos-A-Traction Torque Twisters. I remember the raised white lettering as being huge. Like Jim, I melted several sets of the L60-15 off my big block ’67 Camaro and later ran them front and rear on my ’74 El Camino. Next he put on a set of Cherry Bomb glass packs. I have a very fond memory of looking in my driver side rearview mirror and seeing Jimmy turn the corner behind me and just light the tires up in a cloud of tire smoke and the big block music of those Cherry Bombs! Ahh, good times! I’m sure everyone in my hometown shares those fond memories of the Big Block Hooligans, me, Jimmy’s SS396, Kenny’s ’67 SS396 Chevelle, Pinky’s ’71 LS6 454 Chevelle, Jerry’s SS396 ’69 Camaro, and Mitch’s L72 427 ’69 Vette. Our High School parking lot was a sea of big blocks. Fortunately, we all survived more horsepower than brains, sadly, several of the cars met tragic ends. I wish I had taken photos of the parking lot, every pickup had at least one rifle or shotgun in the rear window rack. It was a gravel lot, so we picked up lots of gravel rash from parking lot donuts. Me on Prom night One sad set of used up tires.. Back to the model, the kit has the usual problems of worn out molds, the inside of the body shows evidence of many repairs, large lumps, gashes, uneven thickness. The ejector pins under the trunk pushed up big bumps in the trunk lid. The A pillars were also pretty rough. The engine turned out well. I added a bracket for the alternator, painted the valve covers with Molotow, 3D printed a distributor and designed and printed wire looms and drilled out the kit ignition coil for the plug wires. Then, added some heater hoses. I modeled and printed some Cherry Bombs to replace the kit mufflers. They probably aren’t to scale, but I just sized them so I could cut off the stock mufflers and plug the cut off ends of the exhaust into the ends of the Cherry Bombs. Next time, I’ll add some muffler clamps to the 3D model. I also modeled and printed some better coil springs for the rear axle. I bought files for the Pos-A-Tractions Torque Twisters from ZFMW on Cults 3D and printed out all the various sizes to see what which would be the best fit, then modeled and printed some backing plates to space the tires where I wanted them. I used the 29 x 12’s on the rear and the 28 x 10’s on the front. I bought some tire lettering decals from Fireball Modelworks after trying to paint the raised lettering on the printed tires. The printed lettering is to scale, but my memory ain’t, so I used the oversized lettering I remember. To get them placed somewhat uniformly, I modeled and printed guides. I also bought a set of Brake Boosters and Master Cylinders from 1to1ScaleLeo on Cults 3D. The hood didn’t fit very well and was offset to the drivers side, so I added a .010 strip of Everygreen to the passenger side of the hood. That fixed the offset issue, and now it fits evenly. After I paint the body, I’ll narrow the hood down to allow for paint thickness before I paint the hood. I glued some spacers into the ‘hinge’ slots to move the hood forward to match the windshield moldings. To fix the height issues, I temporarily glued some pieces of Everygreen to the cowl ahead of the ‘hinge’ slots to raise the hood level with the fenders, then moved the spacers to the bottom of the hood and glued them in place. I have to wait to finish the height adjustment at the front of the hood until I get the Grill and Radiator Core Supports installed. I bought some Cranberry touch up paint, but it looks much darker than my memory suggests and the photos I see on the interwebs of '70 Chevelles, so I guess I'll have to try some other paints as well to see which matches my memory the best. More to come. Nolan

-
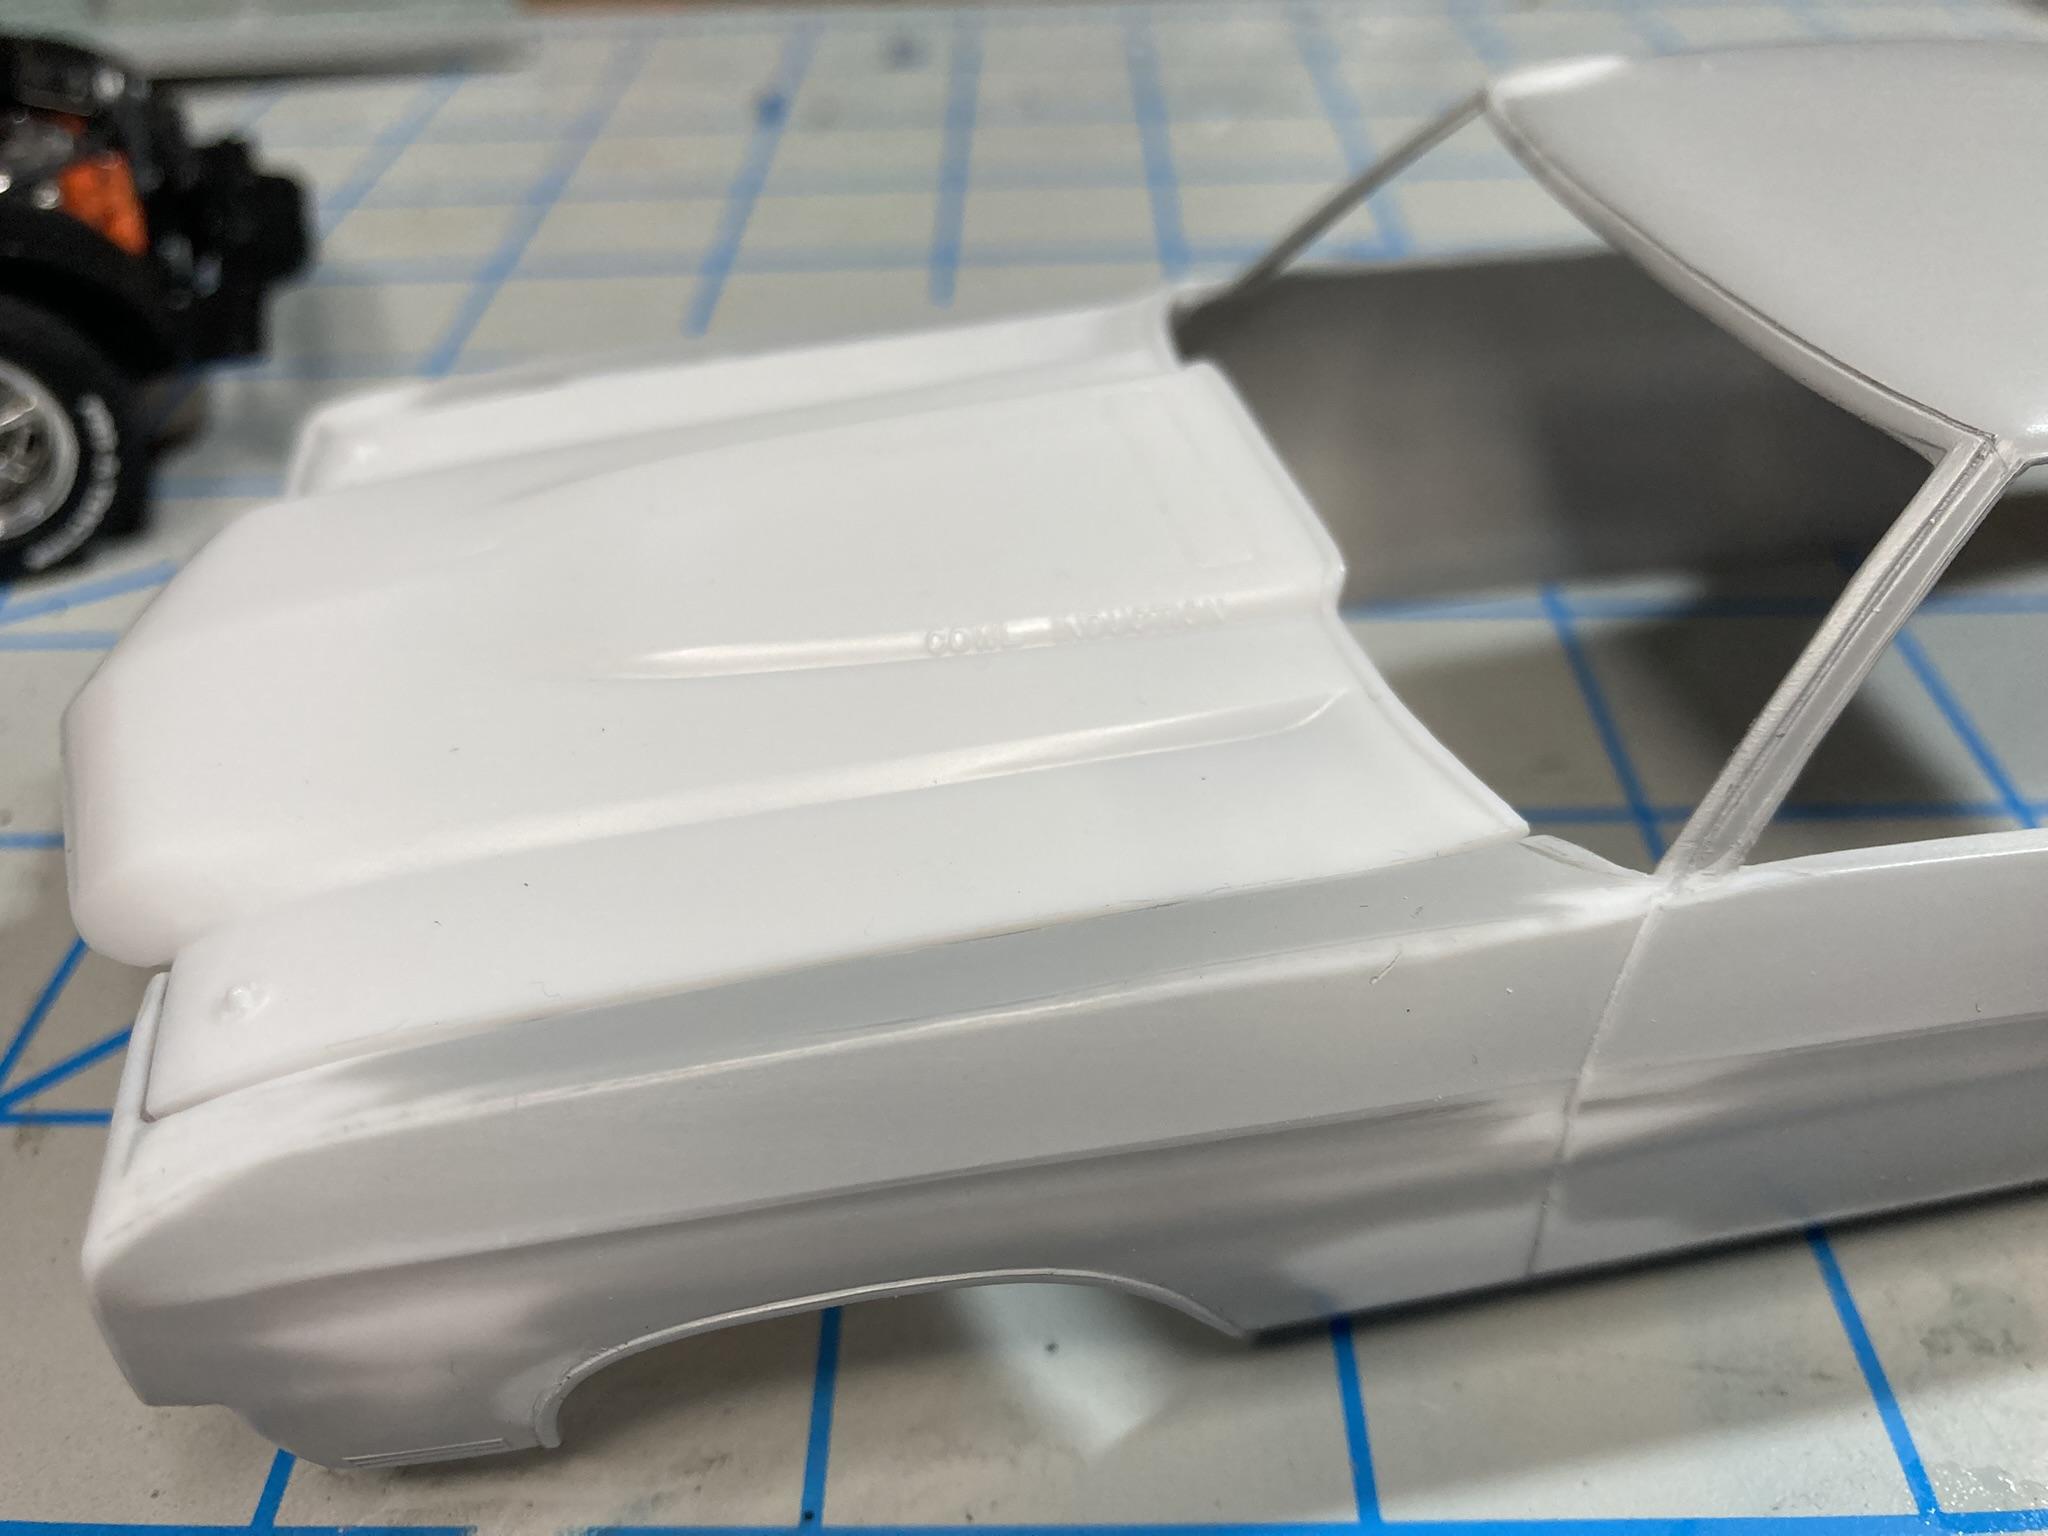
50+ years ago, I built the 1933 Willys Malco gasser. Evidently my memory isn’t what it used to be, or maybe I was just more accepting as a teenager, because I remember it being pretty cool. So I picked up the AMT Willys Van kit and thought I’d do something a little different and build the panel wagon instead of the coupe. Turns out 90 per cent of the kit is the coupe with a panel wagon body. The flip front end didn’t fit the body very well. To get the bottom of the front end to fit tighter to the body, I warmed it up and then pinched it in at junction between the fenders and side panels. Once it cooled I checked the fit and then repeated until it fit better. There wasn’t much lip for the front end to rest on the body, so I used some Evergreen .010 and .005 sheet to extend the lip and carved a deeper recess into the front end to match. I still have a little clean up to do with the back edge of the front end, but it’s much better. I replaced the non-functional hinge pins with some Evergreen .090” tube and then re-enforced the frame rails with some more Evergreen sheet (after I broke the driver’s side frame horn off, oopsie!) I don’t remember anything mounting to the two half moon scallops in the frame right behind the front cross member, I think I’ll fill those in to beef up the front of the frame some more. I cut another piece of the .090” tube to fit between the frame tubes and taped the frame, interior, body and front end together. Then ran a heavy pin through all 3 pieces of tubing and glued the middle tube to the front end and let everything set until the glue set up. Then I re-enforced all three tubes with some sprue goo. I cut out the floor pan to make room for the transmission and 3D printed a transmission tunnel after failing to make one out of sheet plastic. I also made some new motor mounts to let the motor set lower in the frame and move the engine slightly forward so it wasn’t touching the firewall. With the motor moved forward the kit cross member/drive shaft mount(?) has a gap to the transmission, so I will be move it slightly rearward to become a drive shaft hoop for the longer driveshaft. I made a transmission mount out of some more .090” tube and sheet styrene. I may remake the transmission mount out of some smaller diameter tube or rod, as the .090" tube looks a little out of scale. Lots more work to do, so more to come later. Nolan
-
Wow! I've seen plate glass that wasn't as smooth and flat as that paint! The vinyl top is literally icing on the cake. Nolan
-
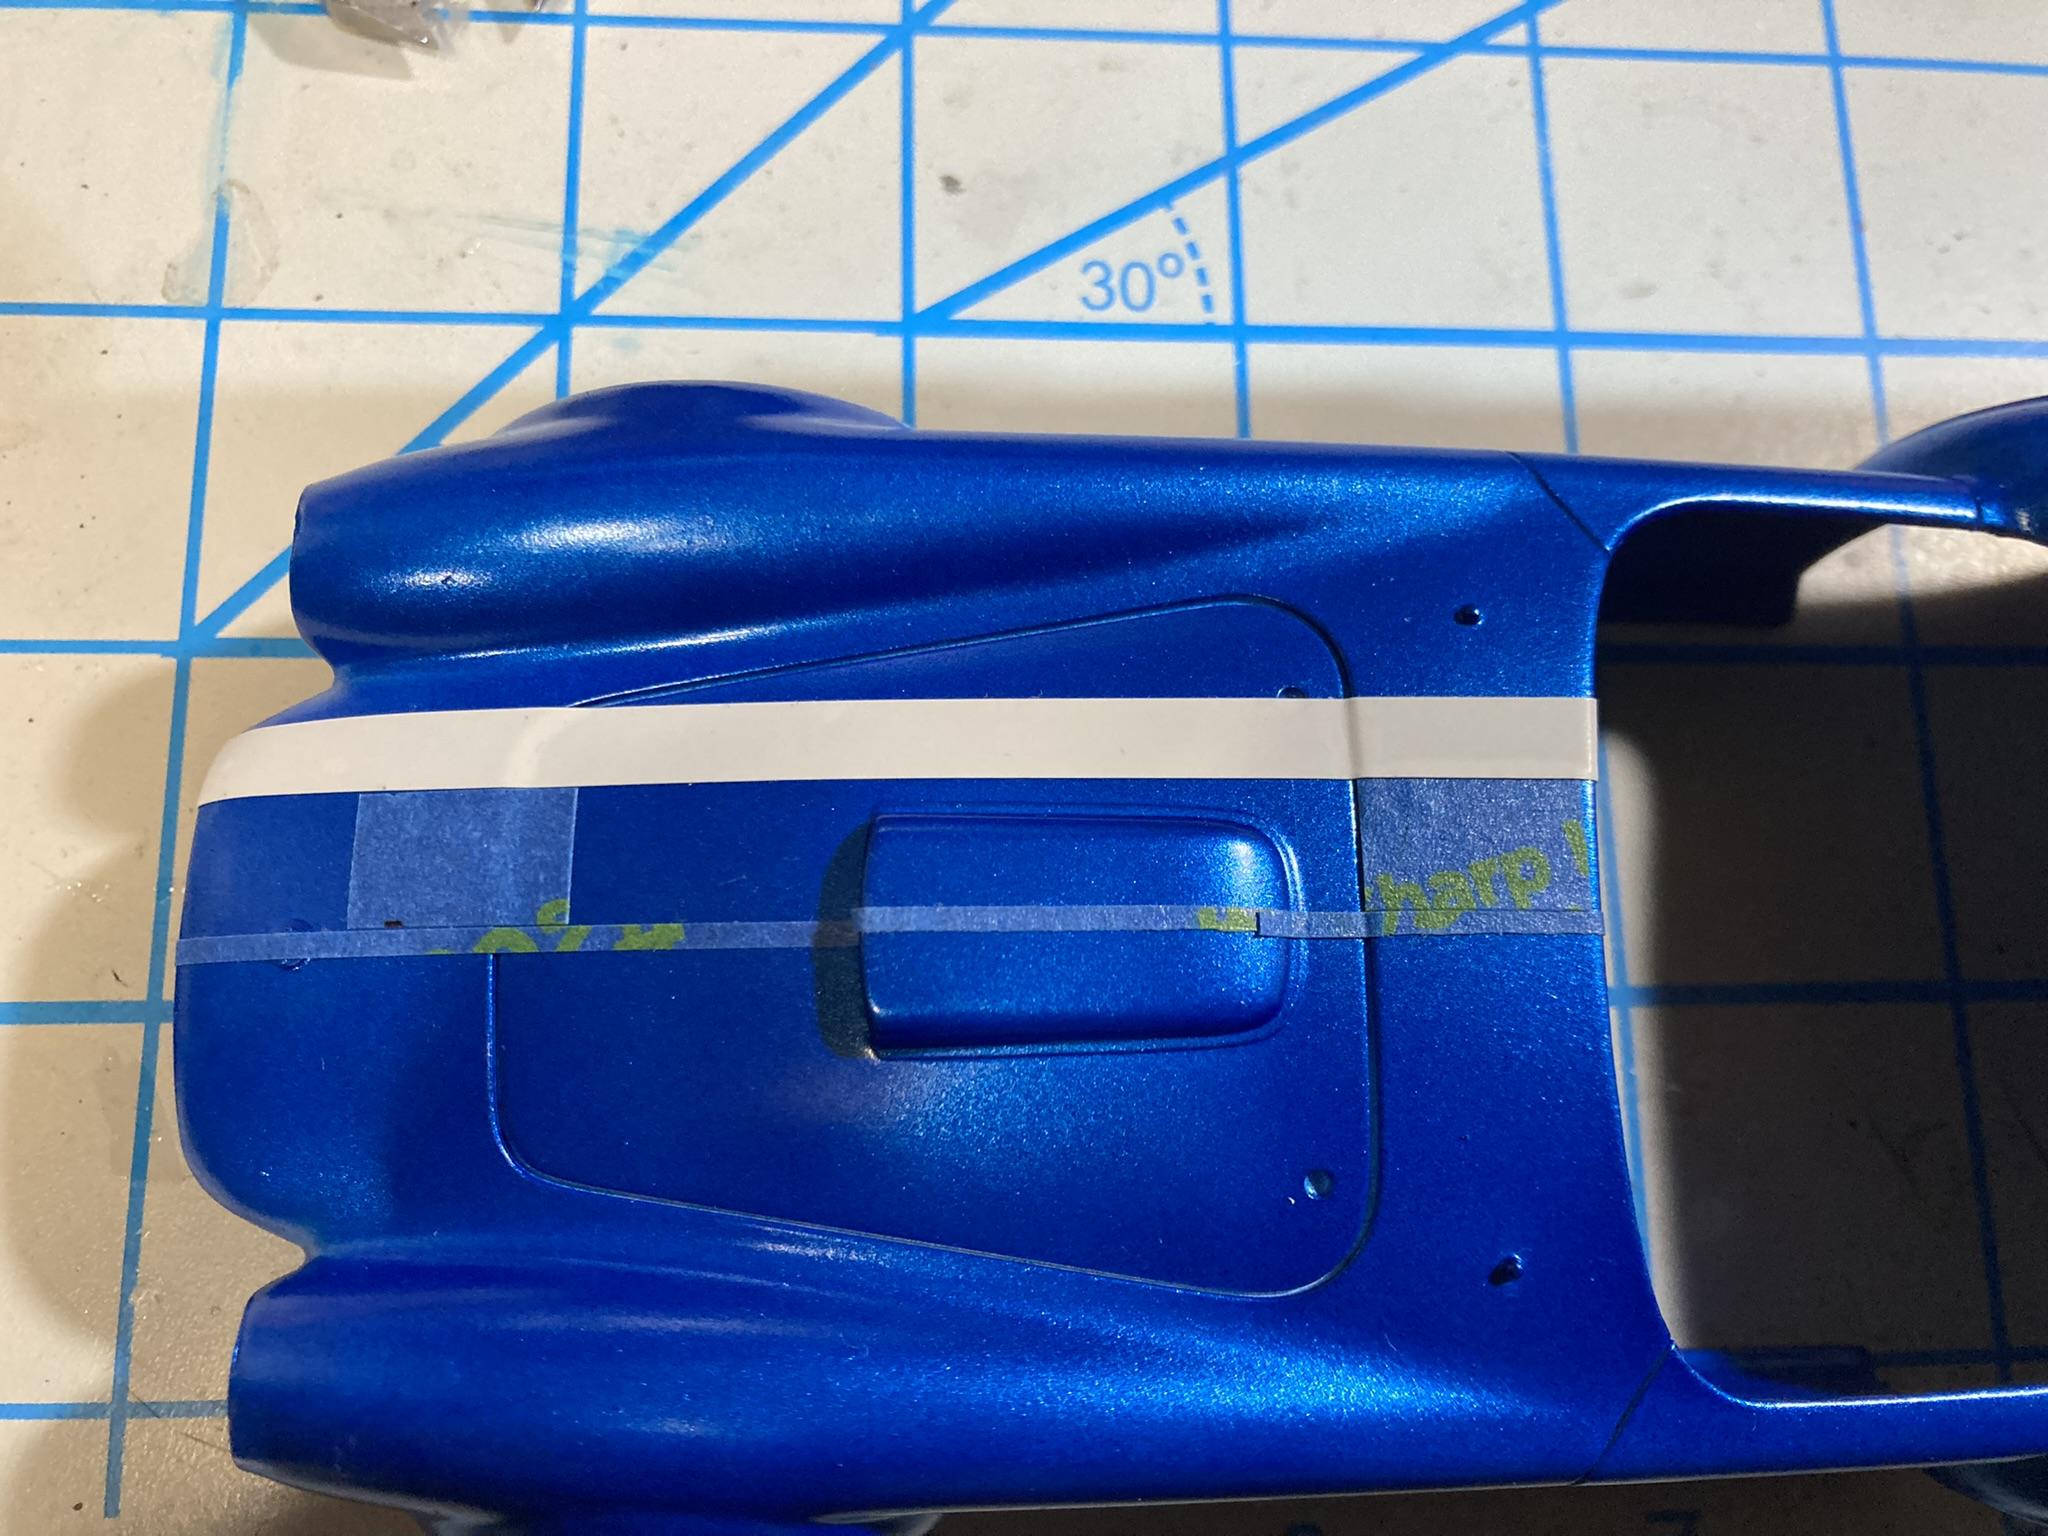
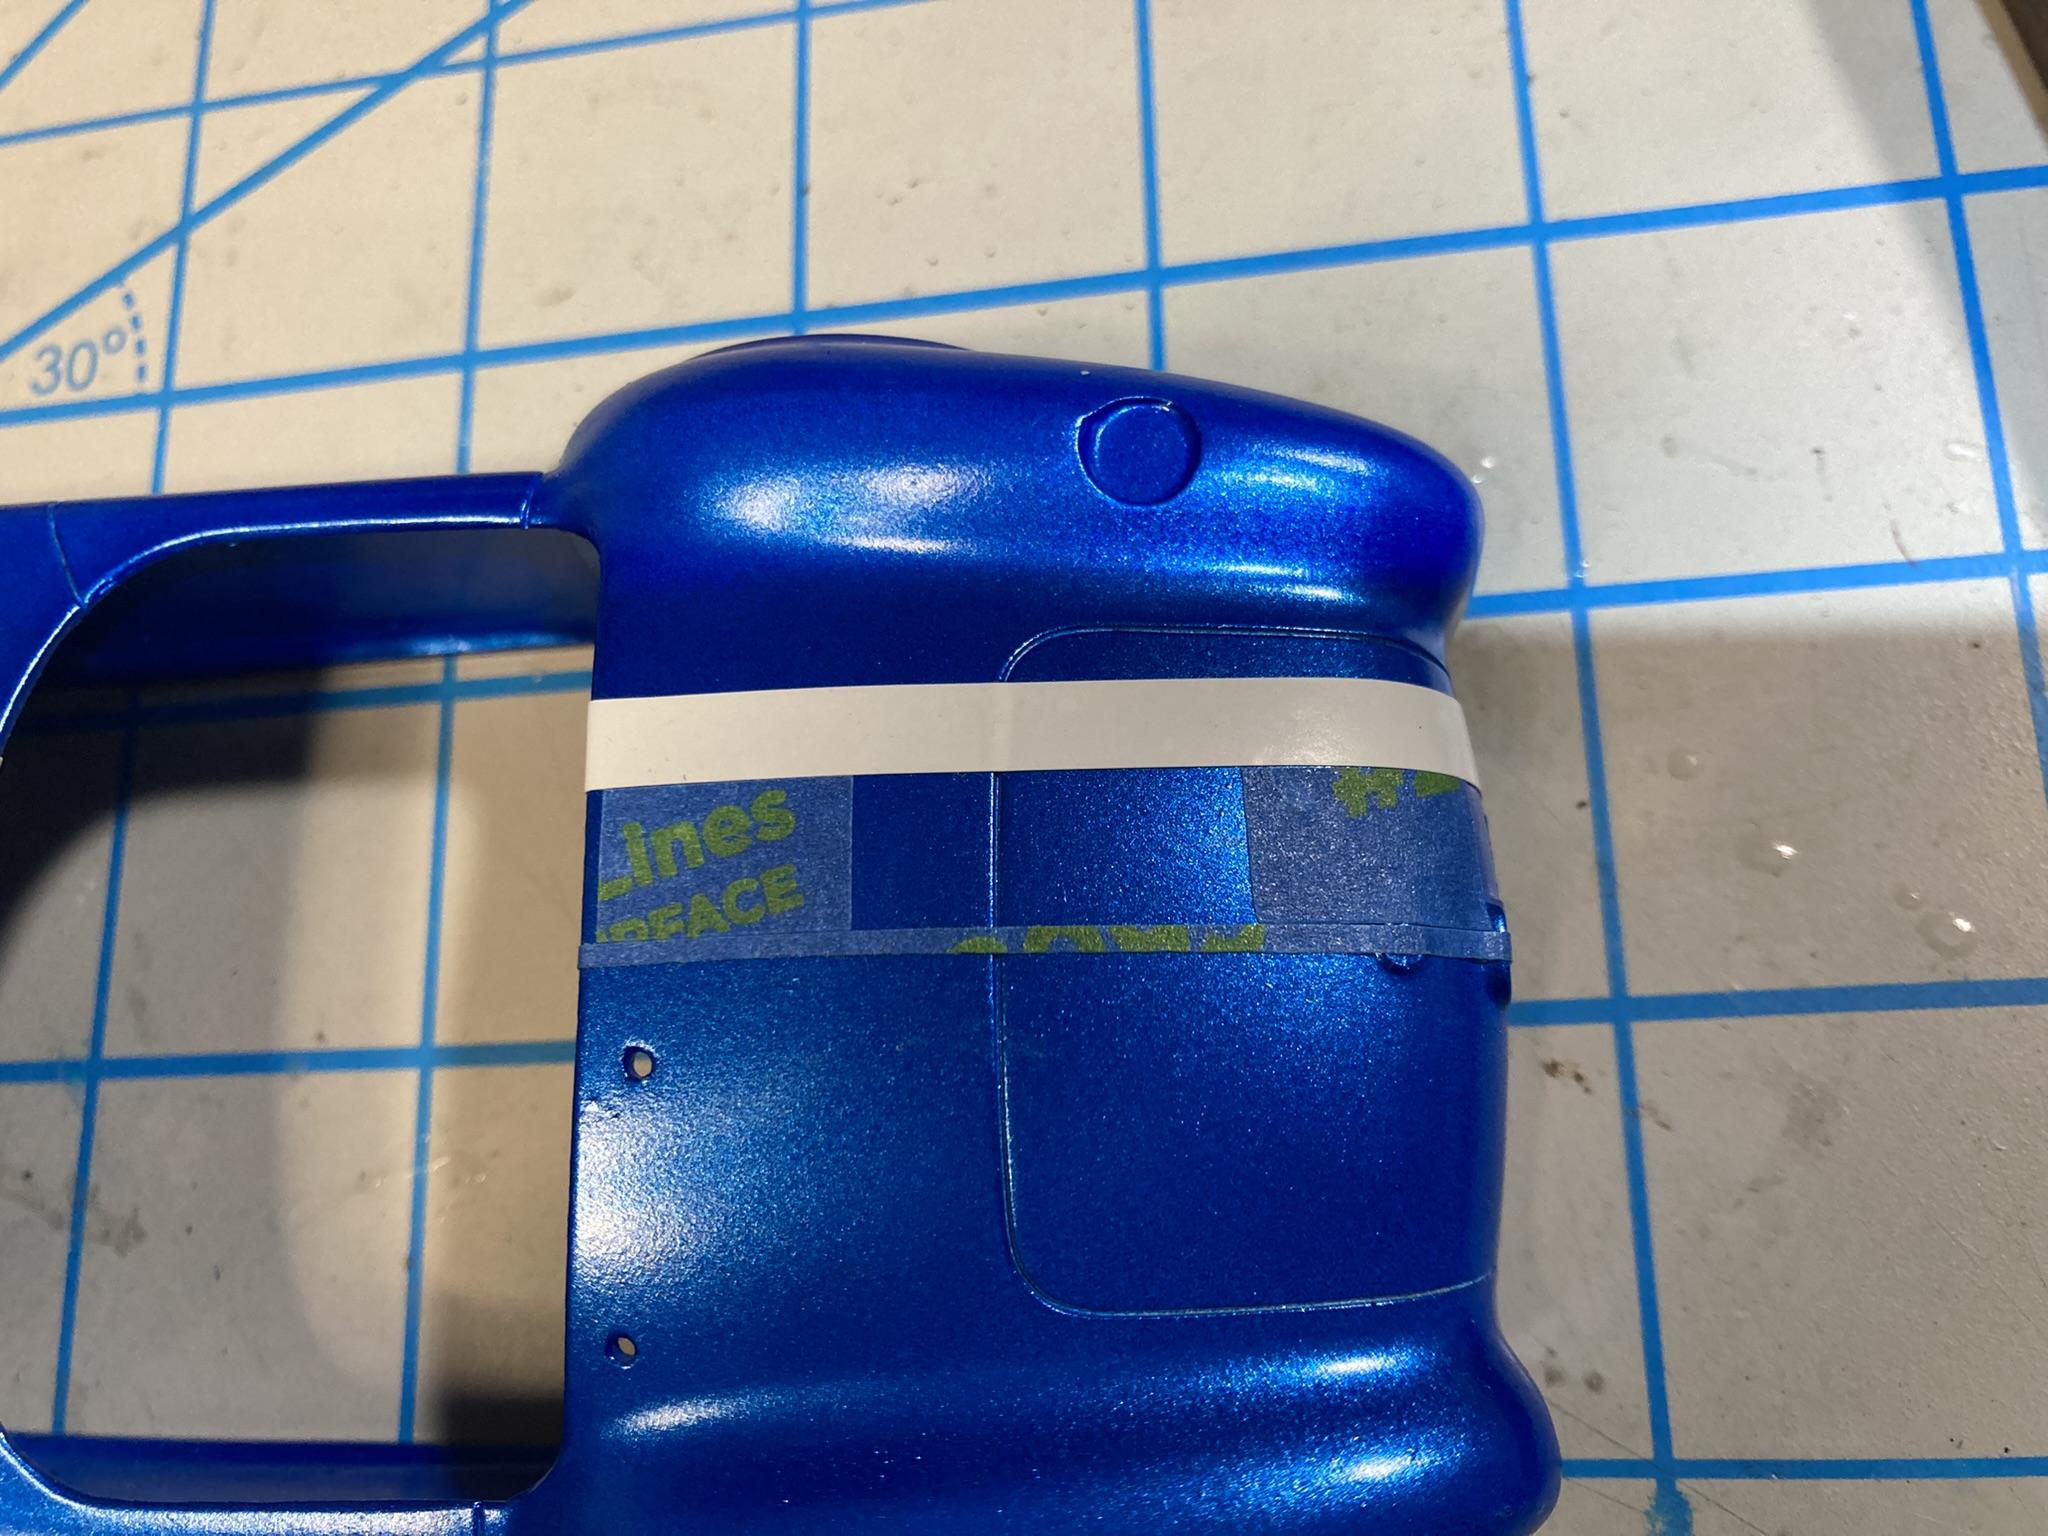
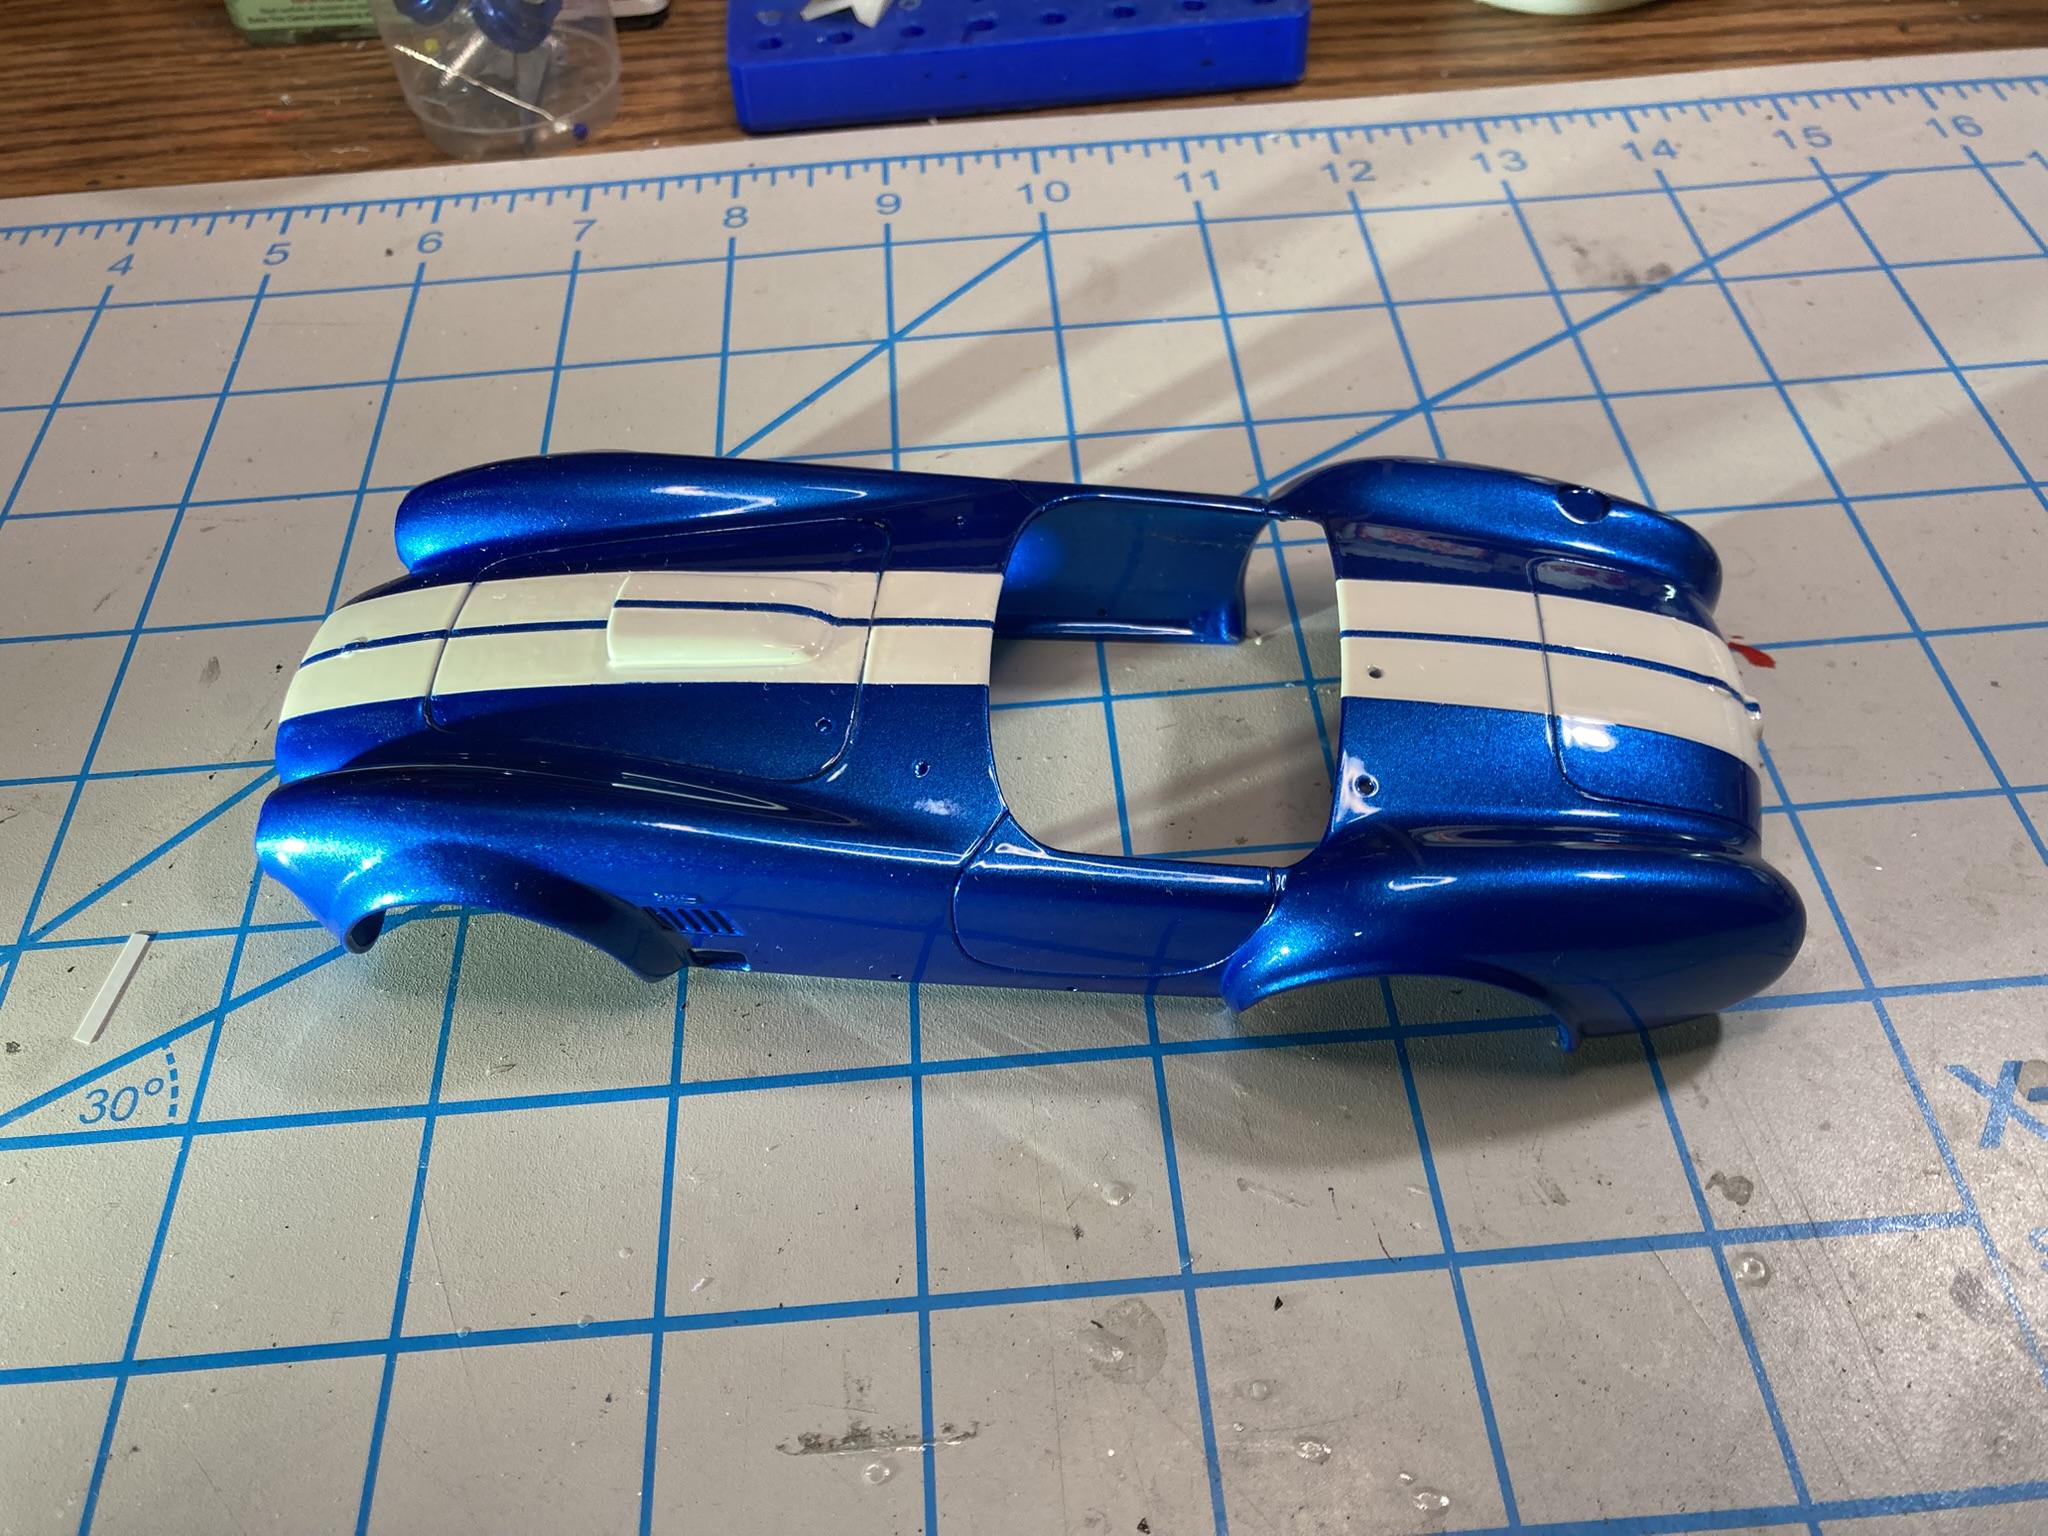
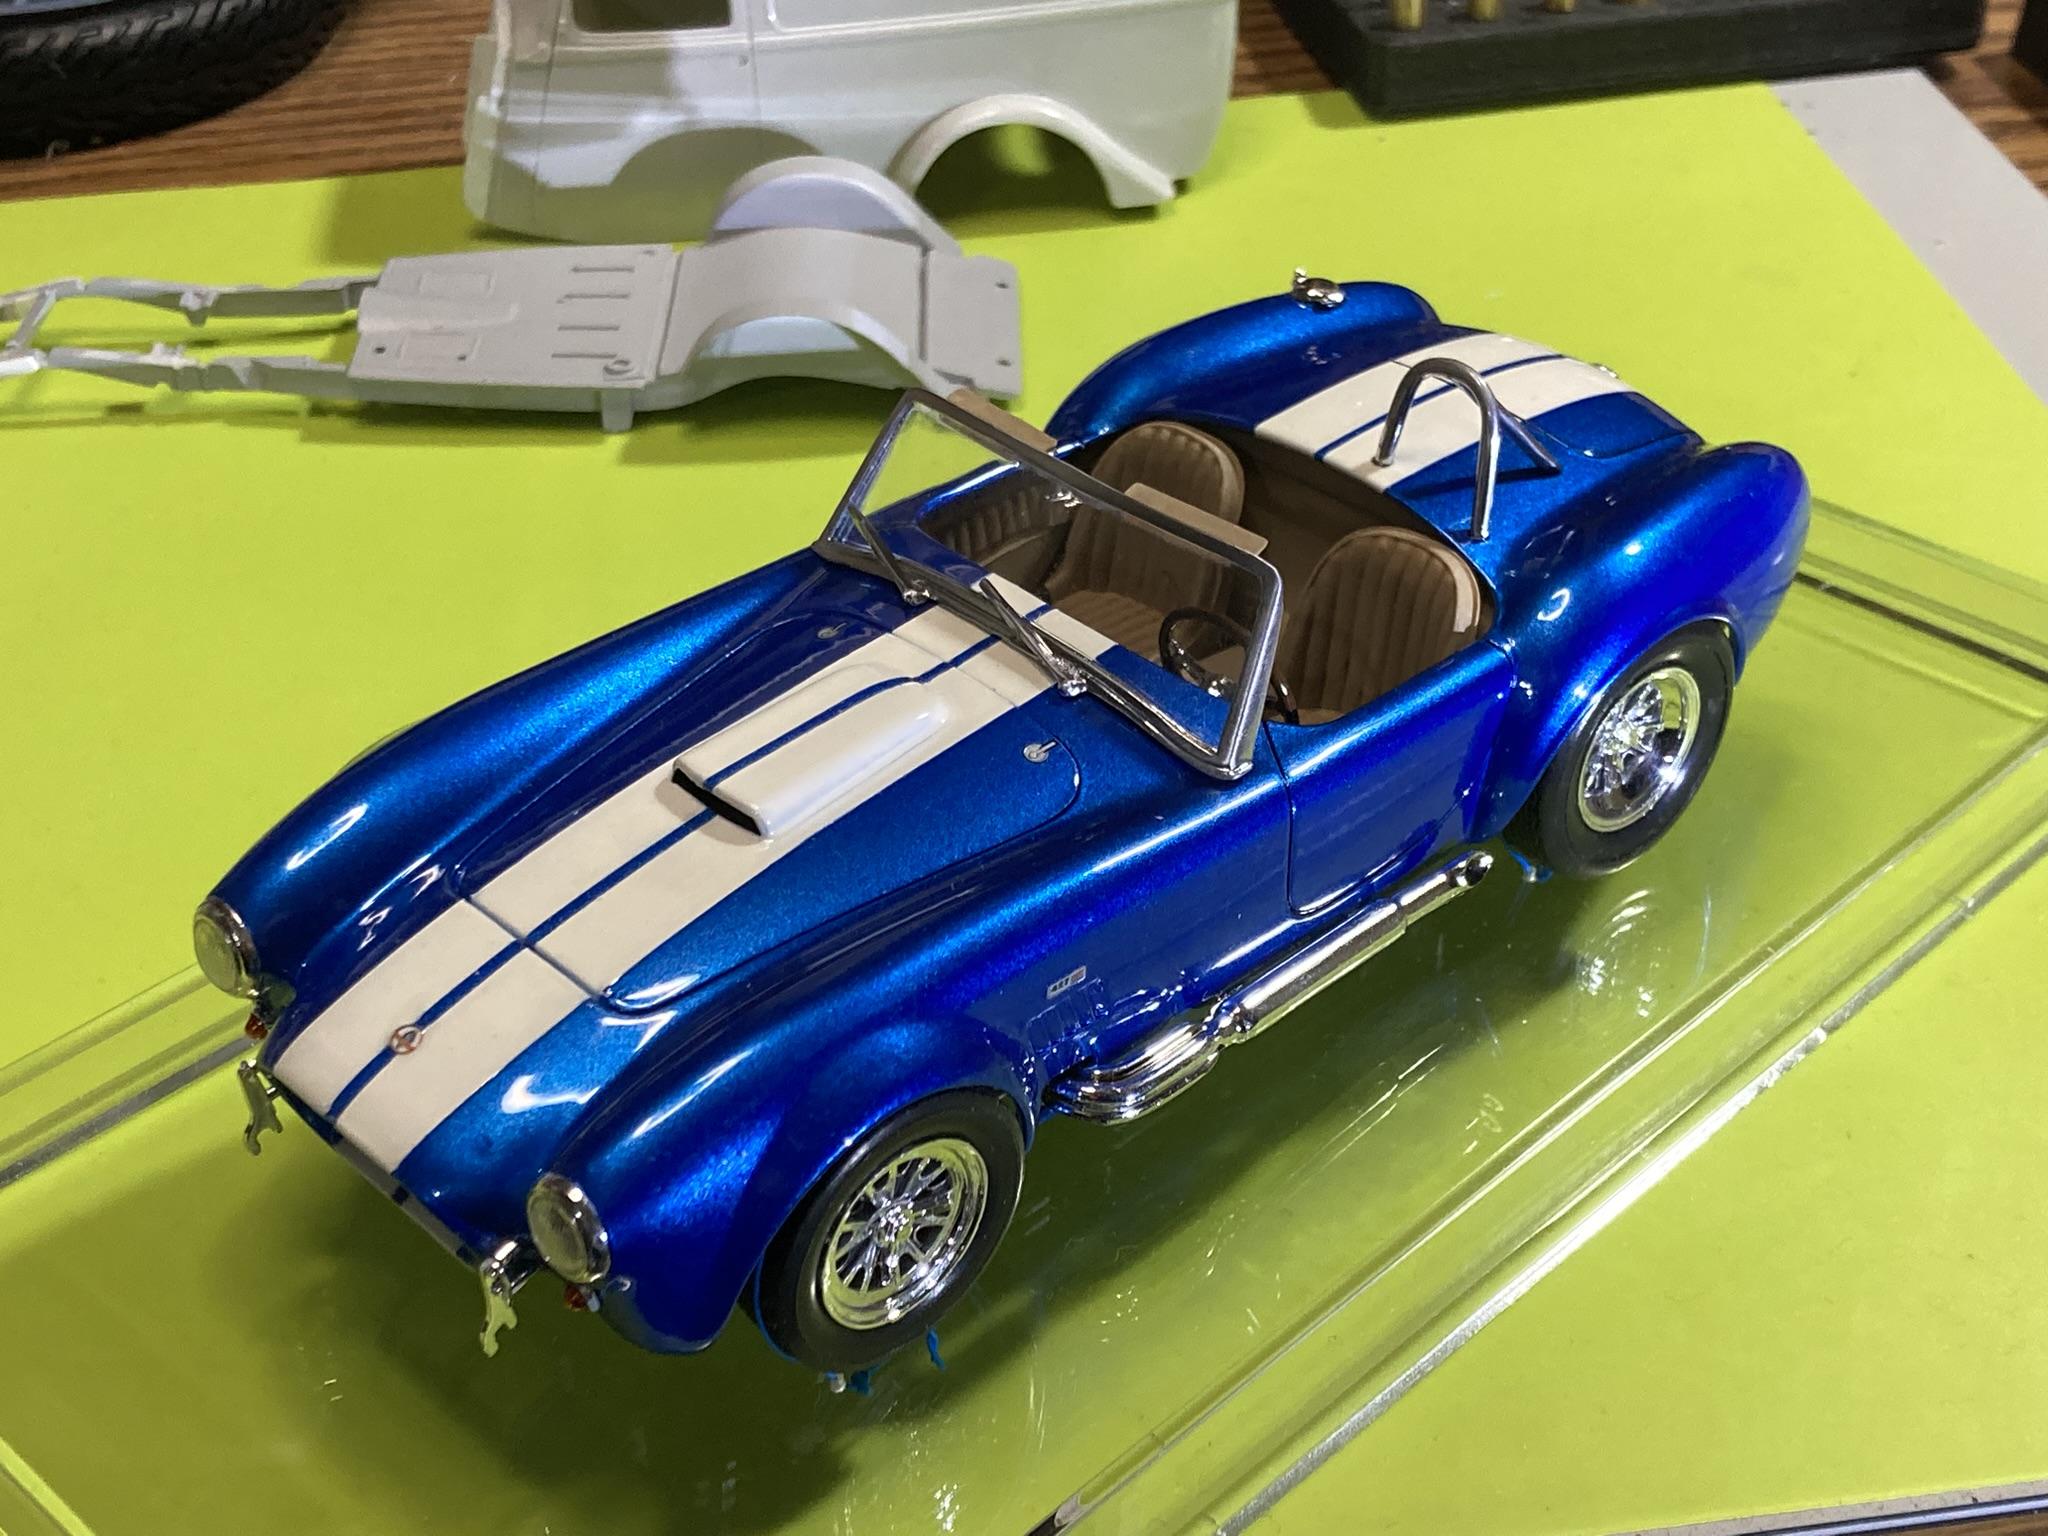
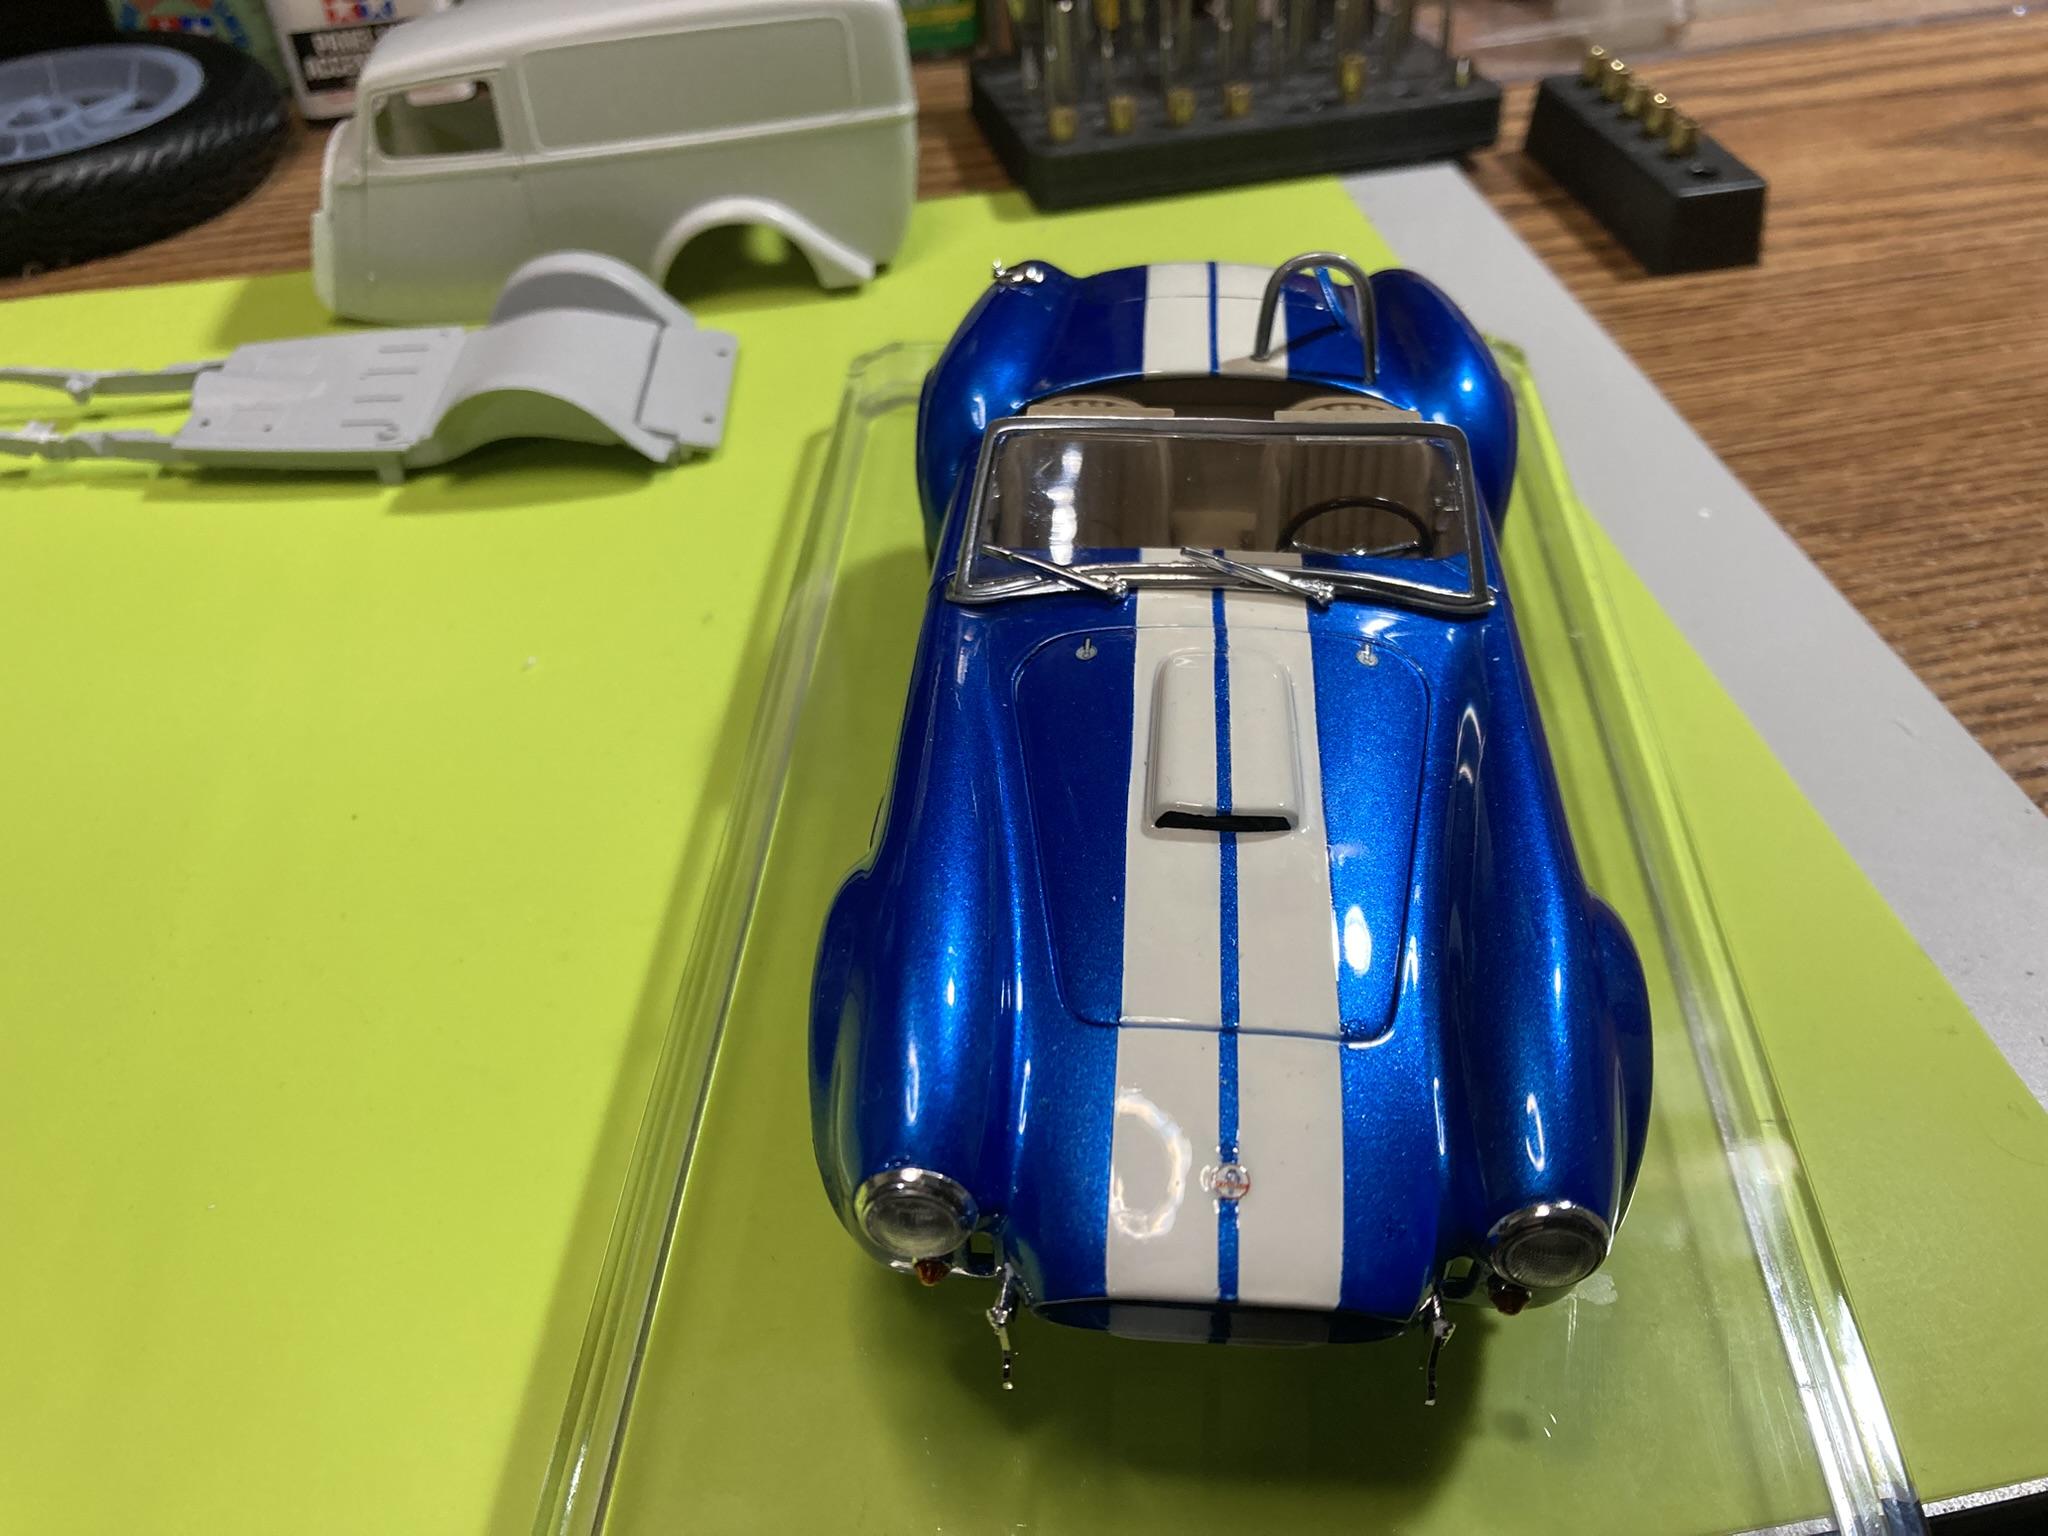
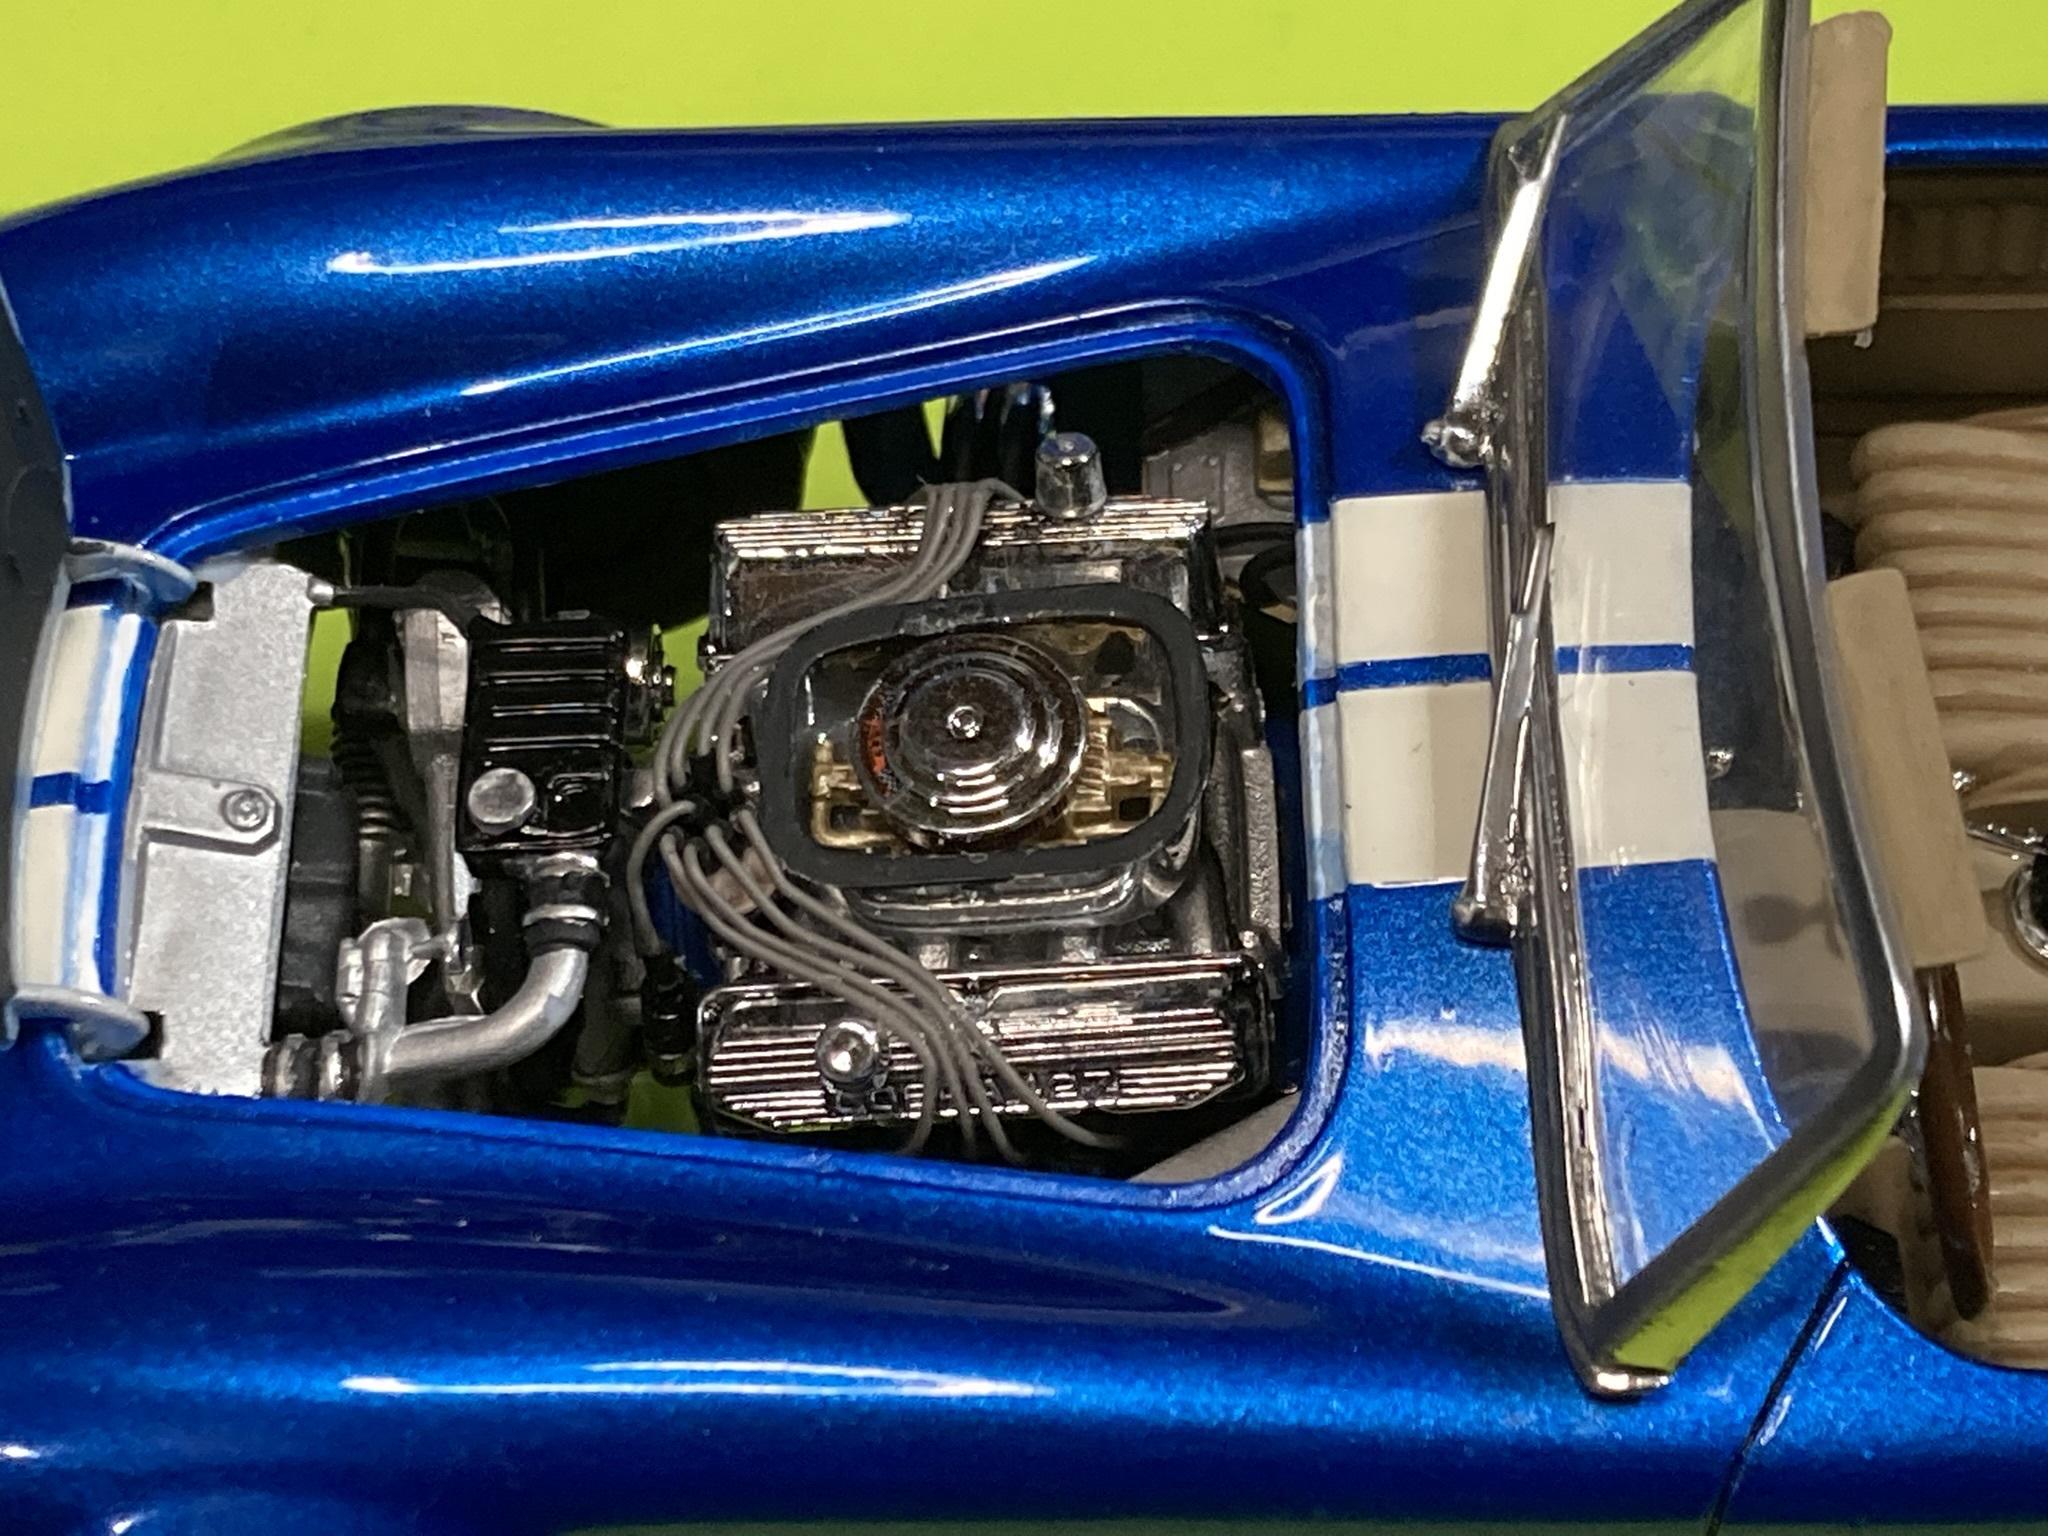
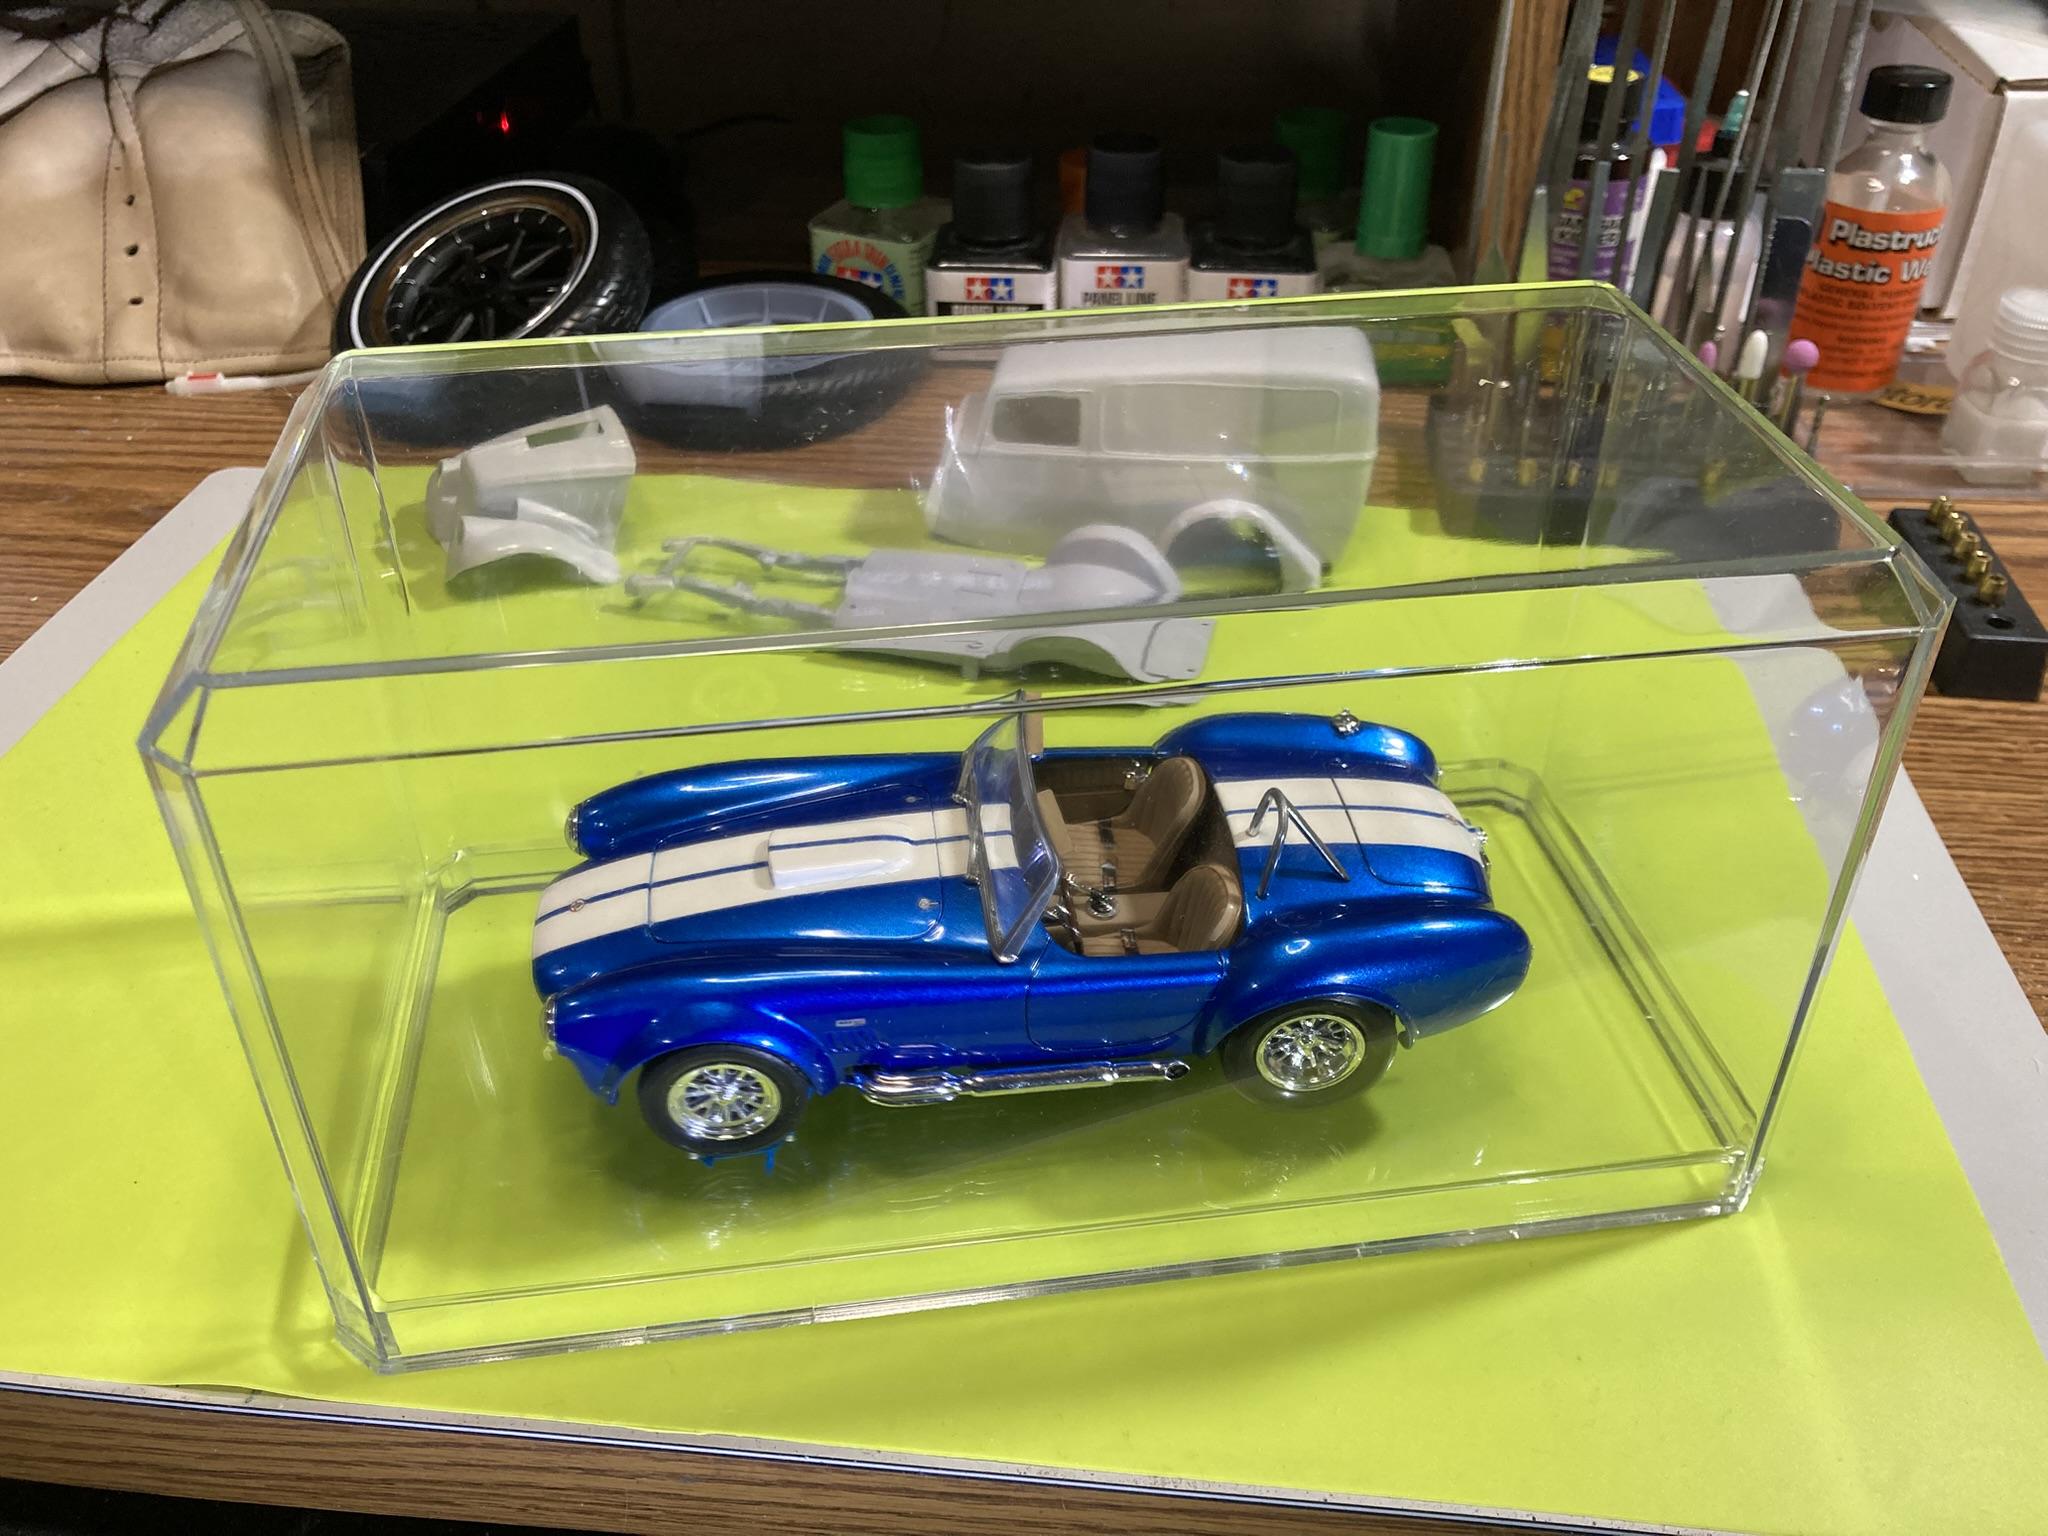
Finally finished the Cobra. The windshield was nearly a complete disaster (see the WIP thread https://www.modelcarsmag.com/forums/topic/196261-revell-shelby-427-cobra-sc-kit-14533/) The windshield frame was damaged straight out of the box and had a lot of flash. I stripped the chrome and smoothed up the frame, then painted it with Revell spray Chrome. The Revell chrome held up fairly well to all the handling involved in getting the windshield glued to the frame. In hindsight, I should have mounted the frame to the body and THEN installed the windshield, instead of vice versa. I used VMS Transpla Fix to glue the windshield to the frame. Pretty easy to work with and didn't immediately turn the chrome paint to aluminum paint! And as the title says "Under Glass" Nolan
- 17 replies
-
- 17
-

-

-

My 13 completed builds for 2024 plus a color change project.
Nolan replied to Dragonhawk1066's topic in Model Cars
Wow, nice work! 2024 was a very productive year. Love the Der Beetle Bug! I had all three, back in the day. I almost picked up a Der Volk Van at the NNL West, "Ein Beach Bunny Blitzen Box!" Nolan -
Who was building in the 60s?
Nolan replied to OldNYJim's topic in Model Building Questions and Answers
It worked. I forget which was the roughest grit or the smoothest, but I remember going to the drug store and sampling the various brands....before buying! Squeeze out some and rub between finger and thumb, yup, plenty of grit in this one. Kids, what are you going to do with 'em? Nolan -
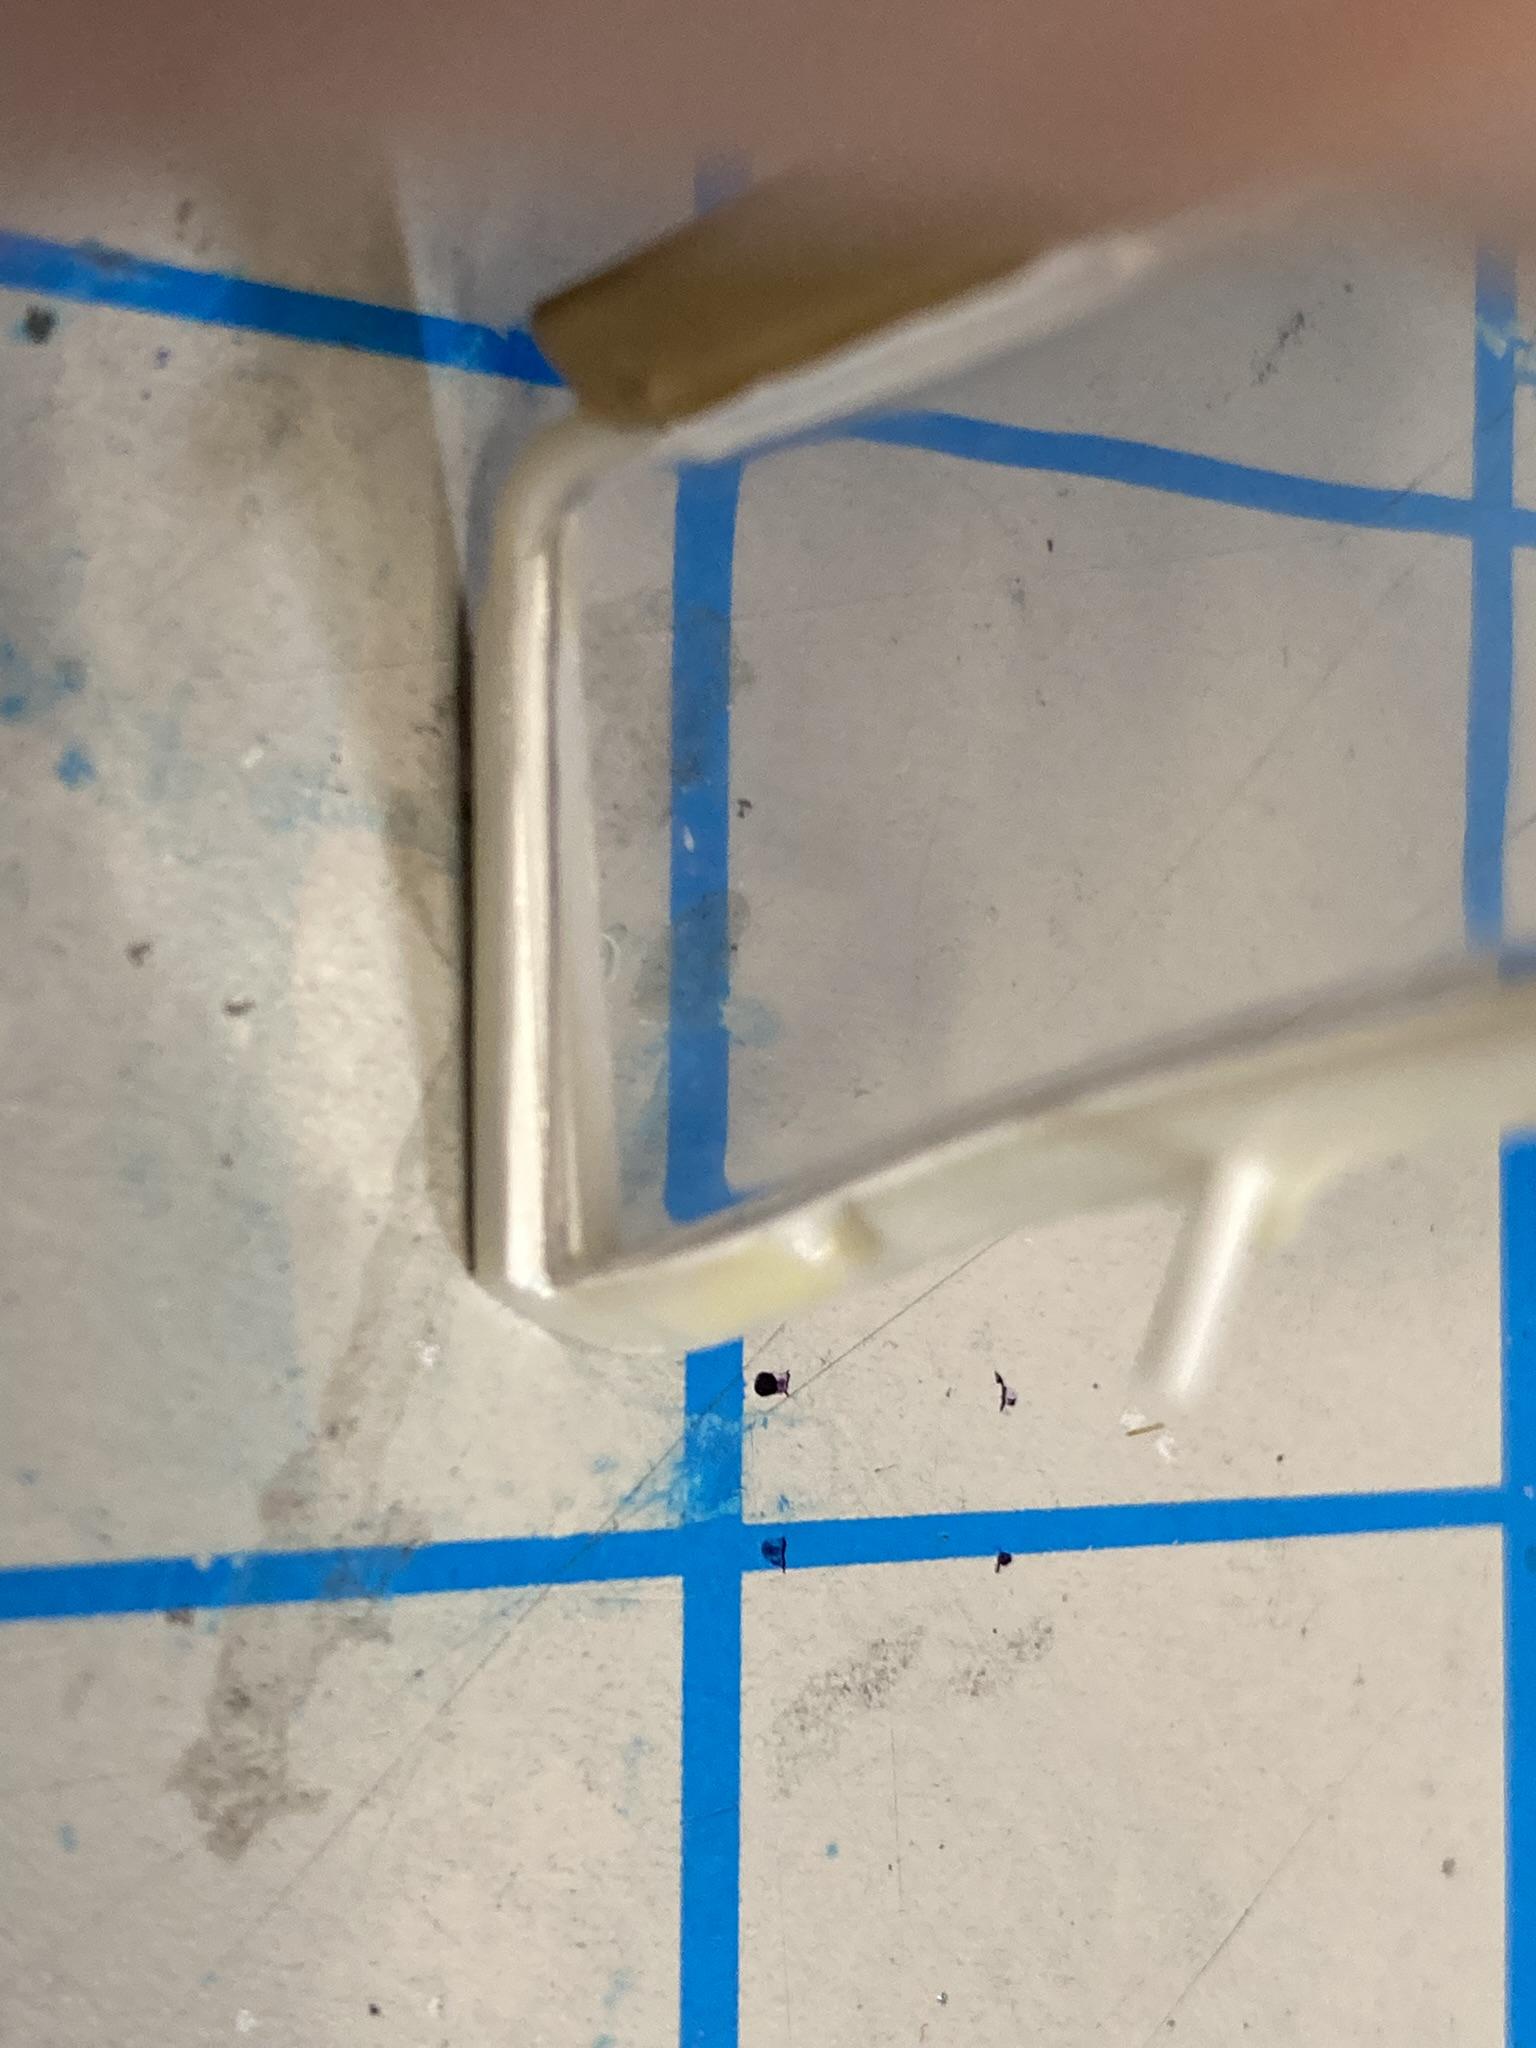
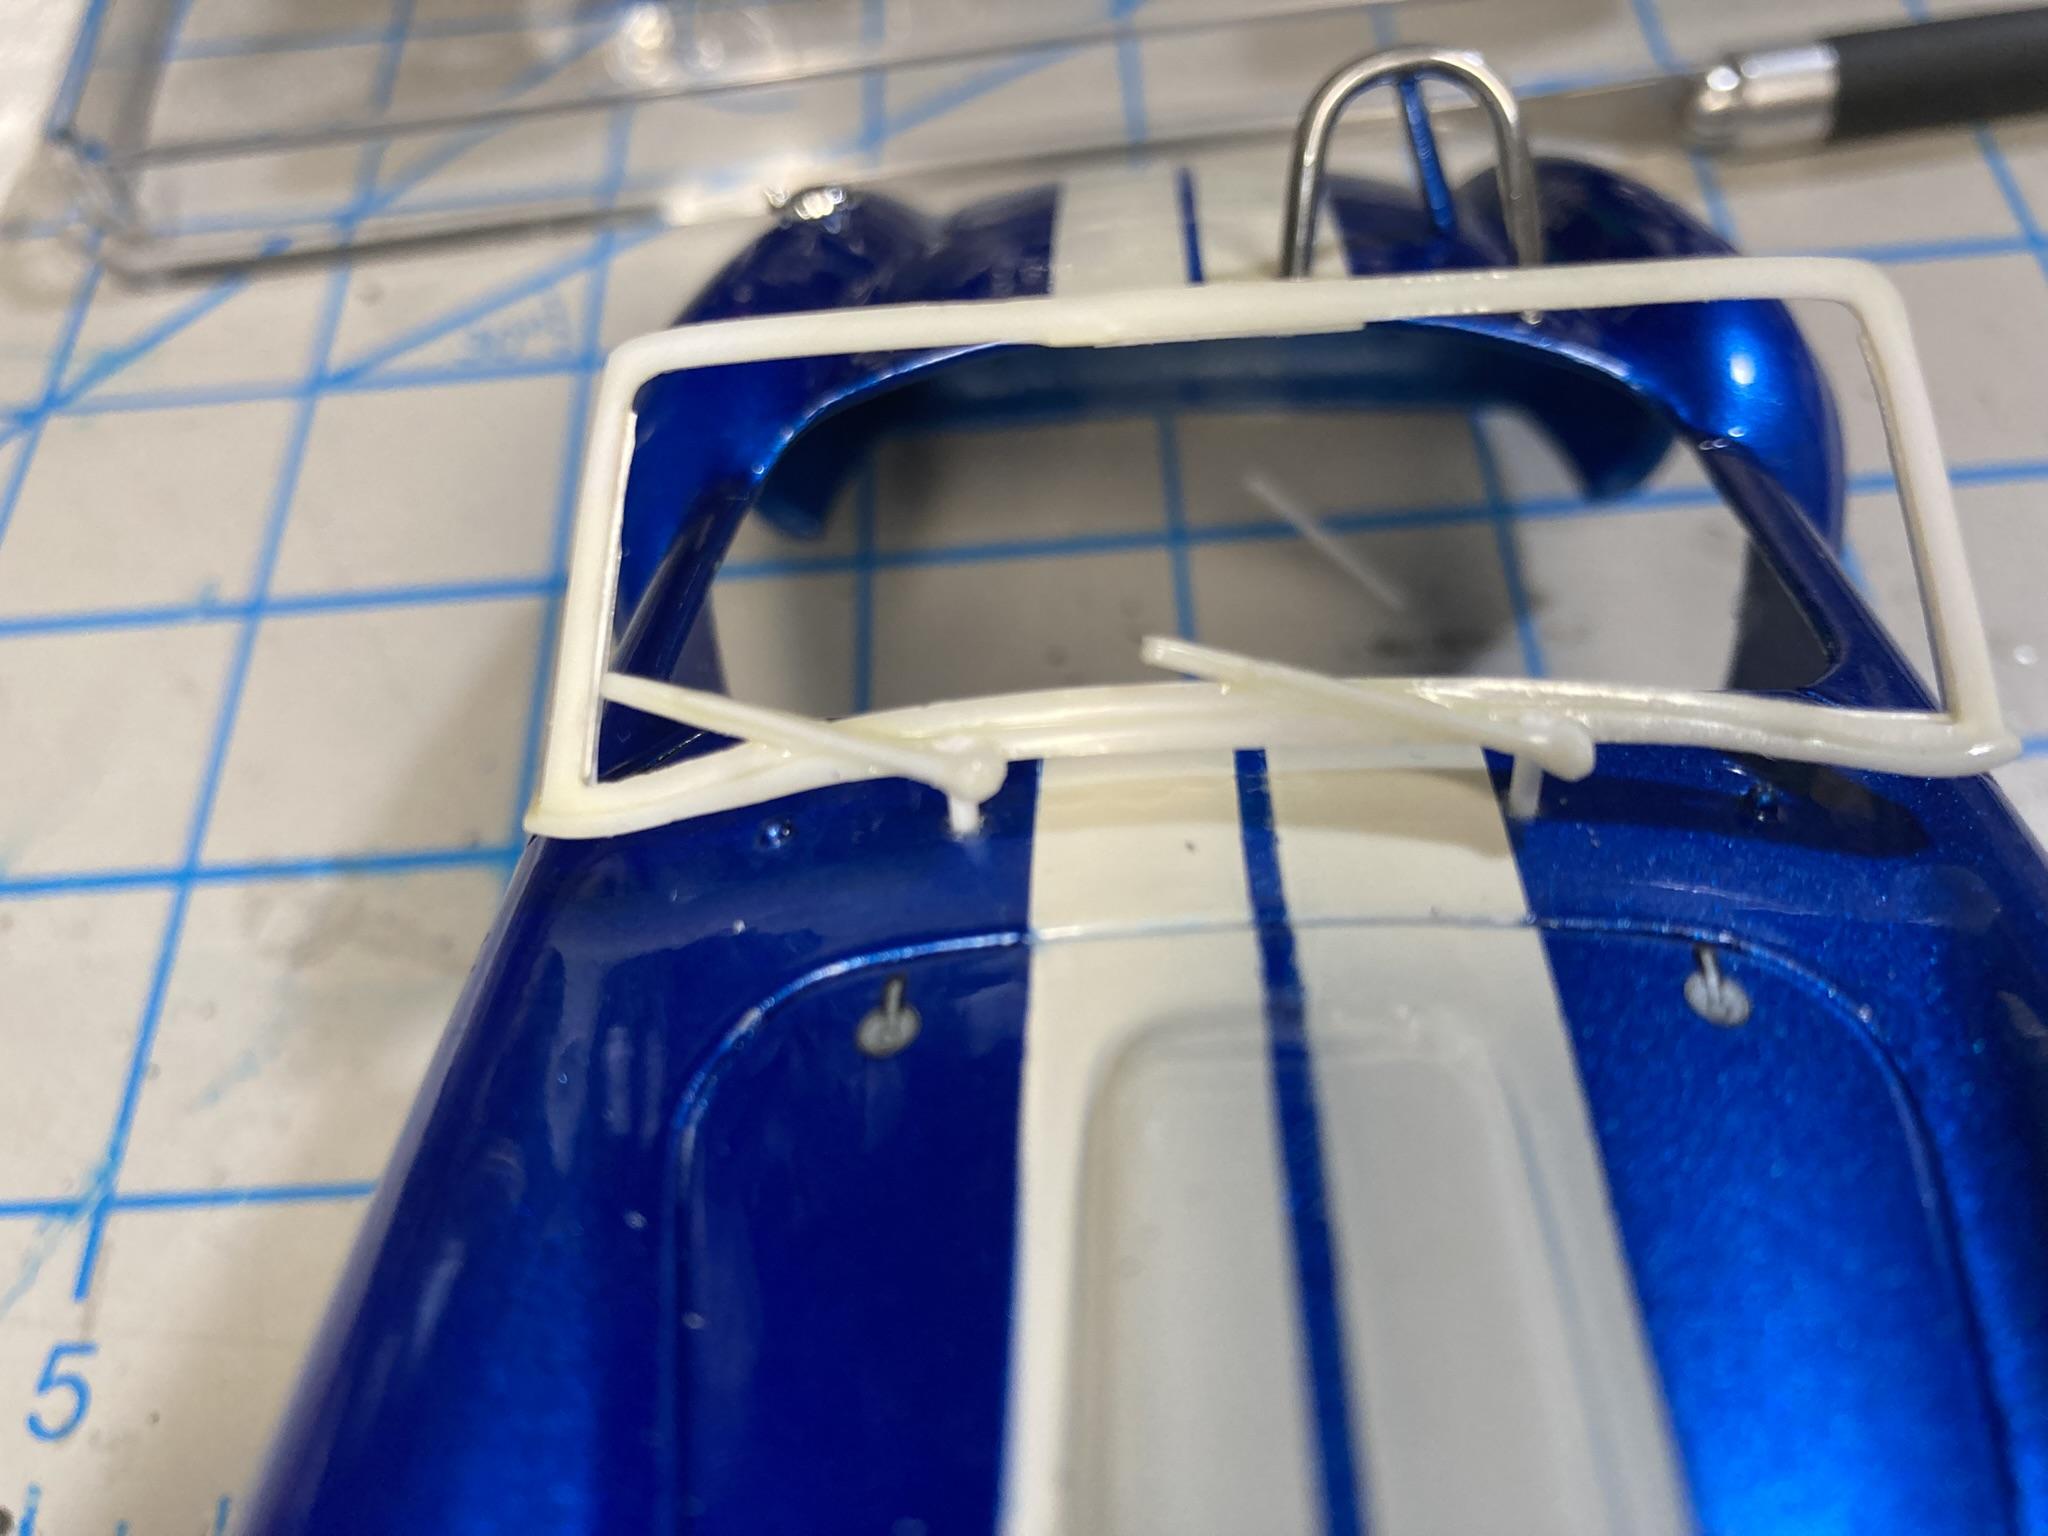
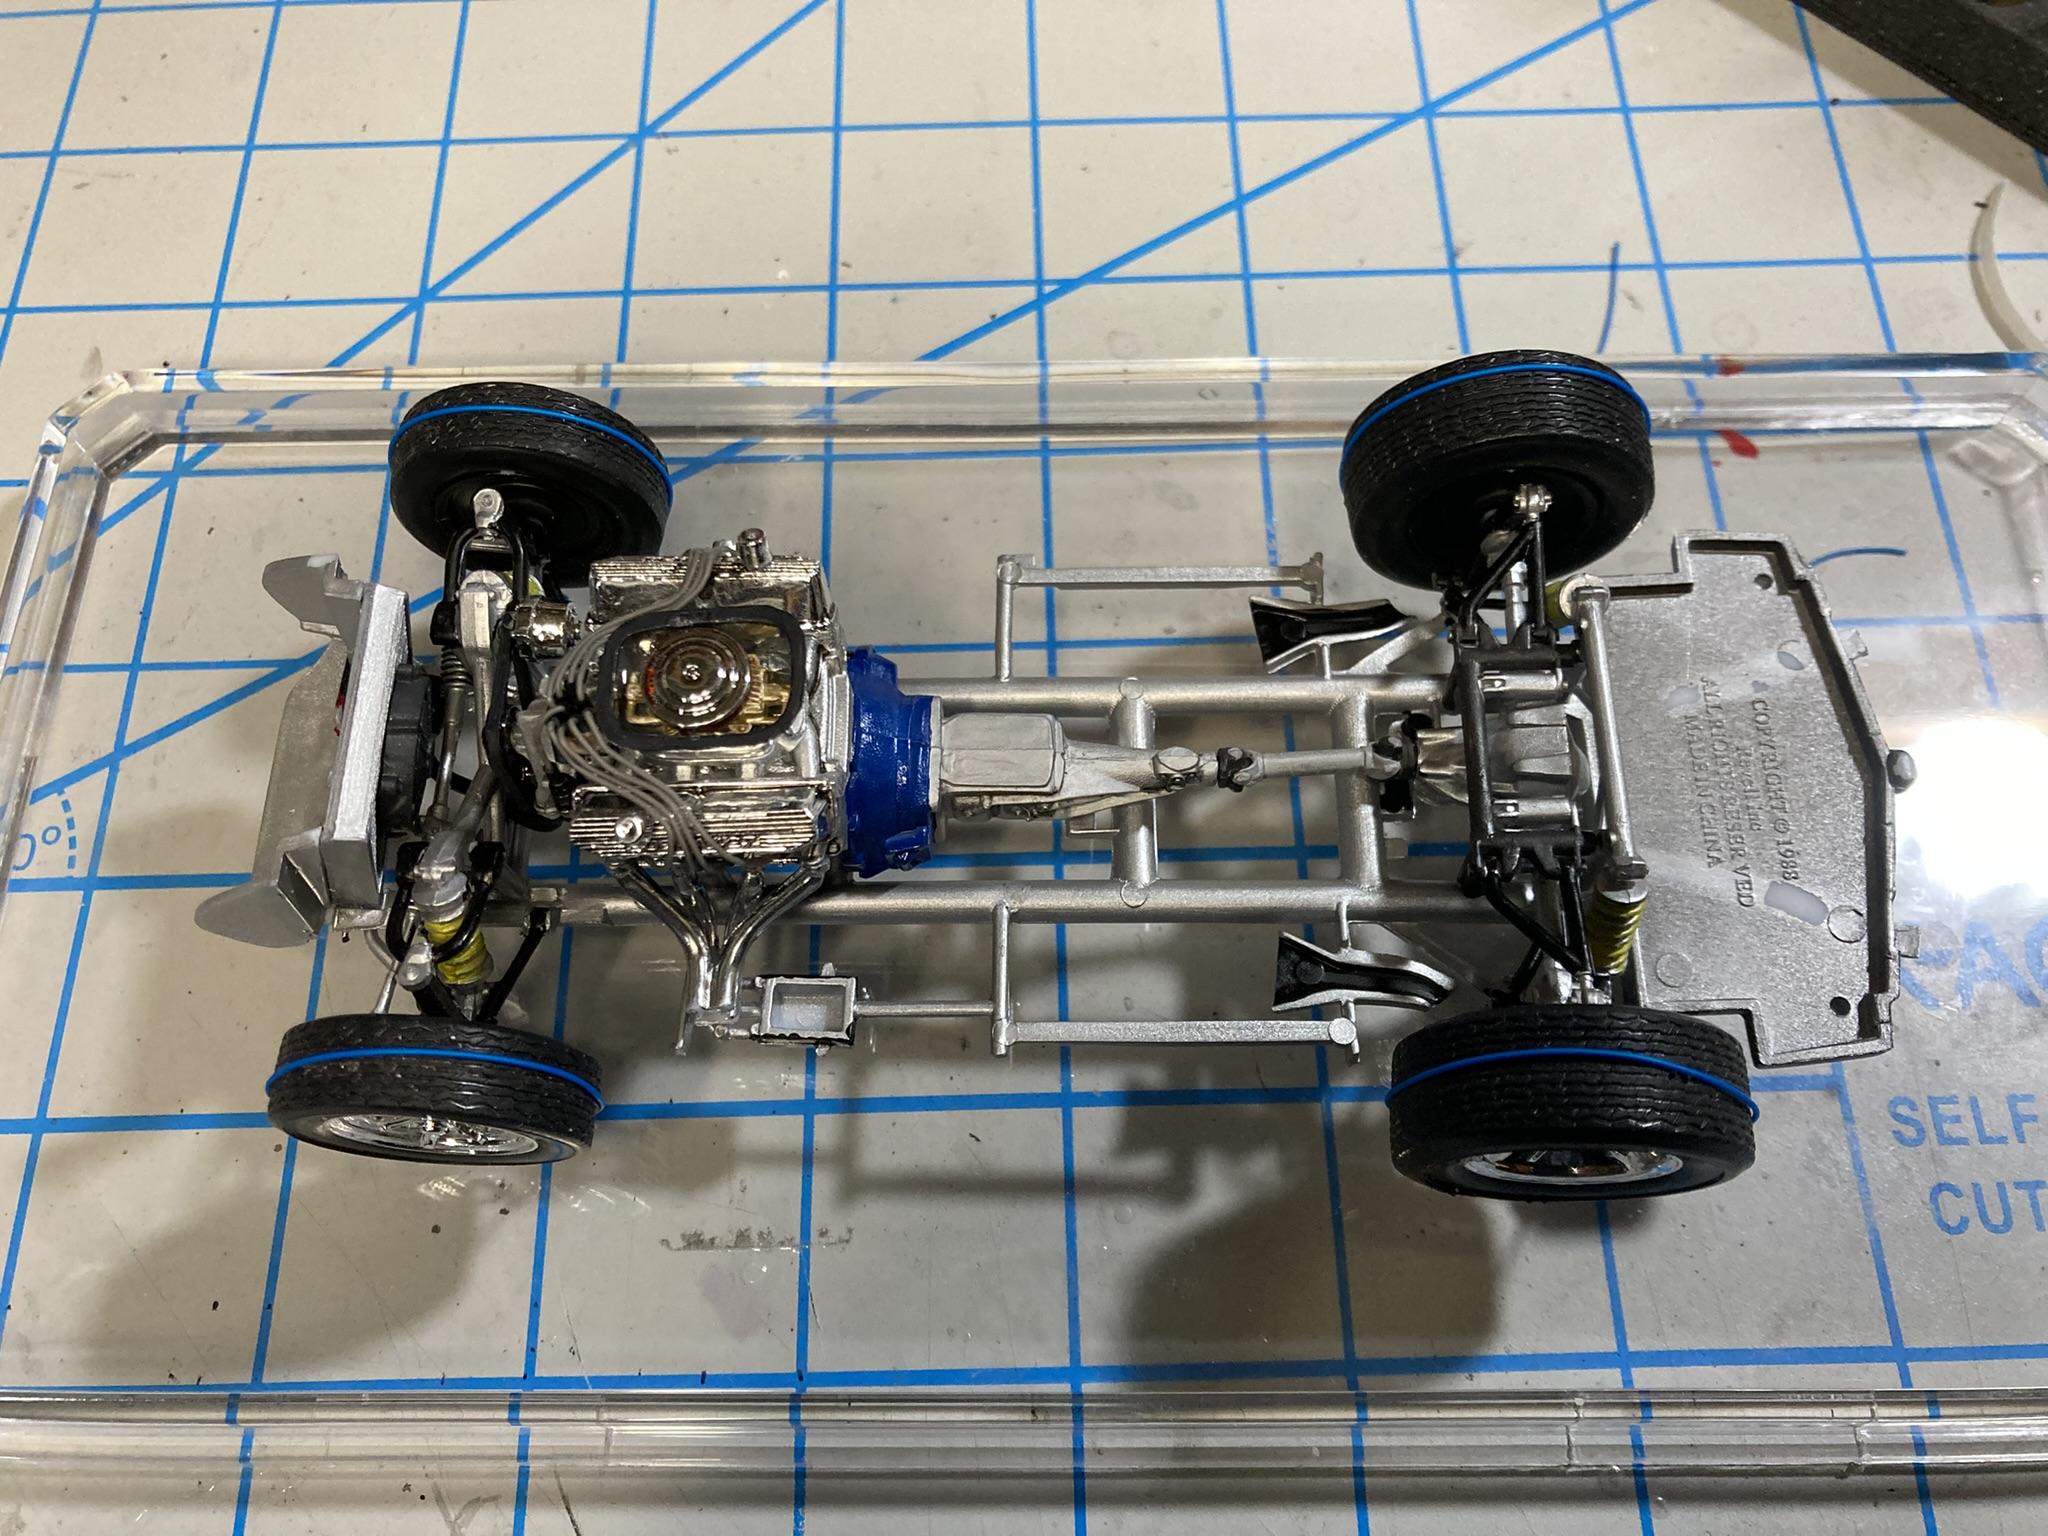
I almost had the Cobra ready to take to the NNL West show last weekend, but I could not get the windshield to co-operate. First problem was getting the windshield to stay in the frame. Second problem was how to get the windshield frame mounted to the body, but was leery of just super gluing it to the body. Plus the chrome had a lot of flash and one of the wing(?) tabs was broken off. I stripped the chrome and got rid of the remaining wing mounts and smoothed out the flash. I glued some very thin strips of .01 Evergreen sheet to the inside bottom of the frame spaced just the thickness of the glass back from the wipers. Then I glued more strips to the sides of the frame and roughed them to the shape of the uprights. I popped the glass into the frame and located the gap between the sun visors for another piece of Evergreen. With all the pieces glued into place, the windshield just pops into place and is locked in pretty solid. To mount the windshield frame to the body, I taped the empty frame into place over the two little nubs on the cowl and drilled a tiny pilot hole through the little trough between each wiper arm, wiper shaft, and the frame, and through the body. Then using gradually larger drill bits worked up to the diameter of some Evergreen rod I had on hand. I smoothed up the frame and painted it with Revell Chrome. I mounted the chassis to the base of a display case with 40 gauge wire wrap wire over each tire and just twisted together underneath the case. Easy to dismount and re-mount to/from the case. The body and interior mount to the frame pretty easily, by inserting the interior into the body and just slipping the nose over the radiator ducts, wiggle everything into it's happy place and then the back of the body snaps over the tab at the rear of the frame. Hopefully my next post will be under glass! Nolan
-
Howdy, I went to the NNL West, my first model car show in 50+ years. Big difference from the shows back in the day in western Kansas! I took a couple of my motorcycle models, the Harley FXST Springer from my WIP and Under Glass threads and my Kawasaki Mach III 500 H1E. It was a great show, made a couple of new friends, scored some old kits I had been looking for, saw many, many fabulous models. The paint jobs on so many of them made me glad I put my junk on the back row of tables! If you saw an old, bald, tall, greybeard....oh wait, that describes 90% of the attendees! I was the one in a Cletus McFarland flannel. 😁 Nolan
-
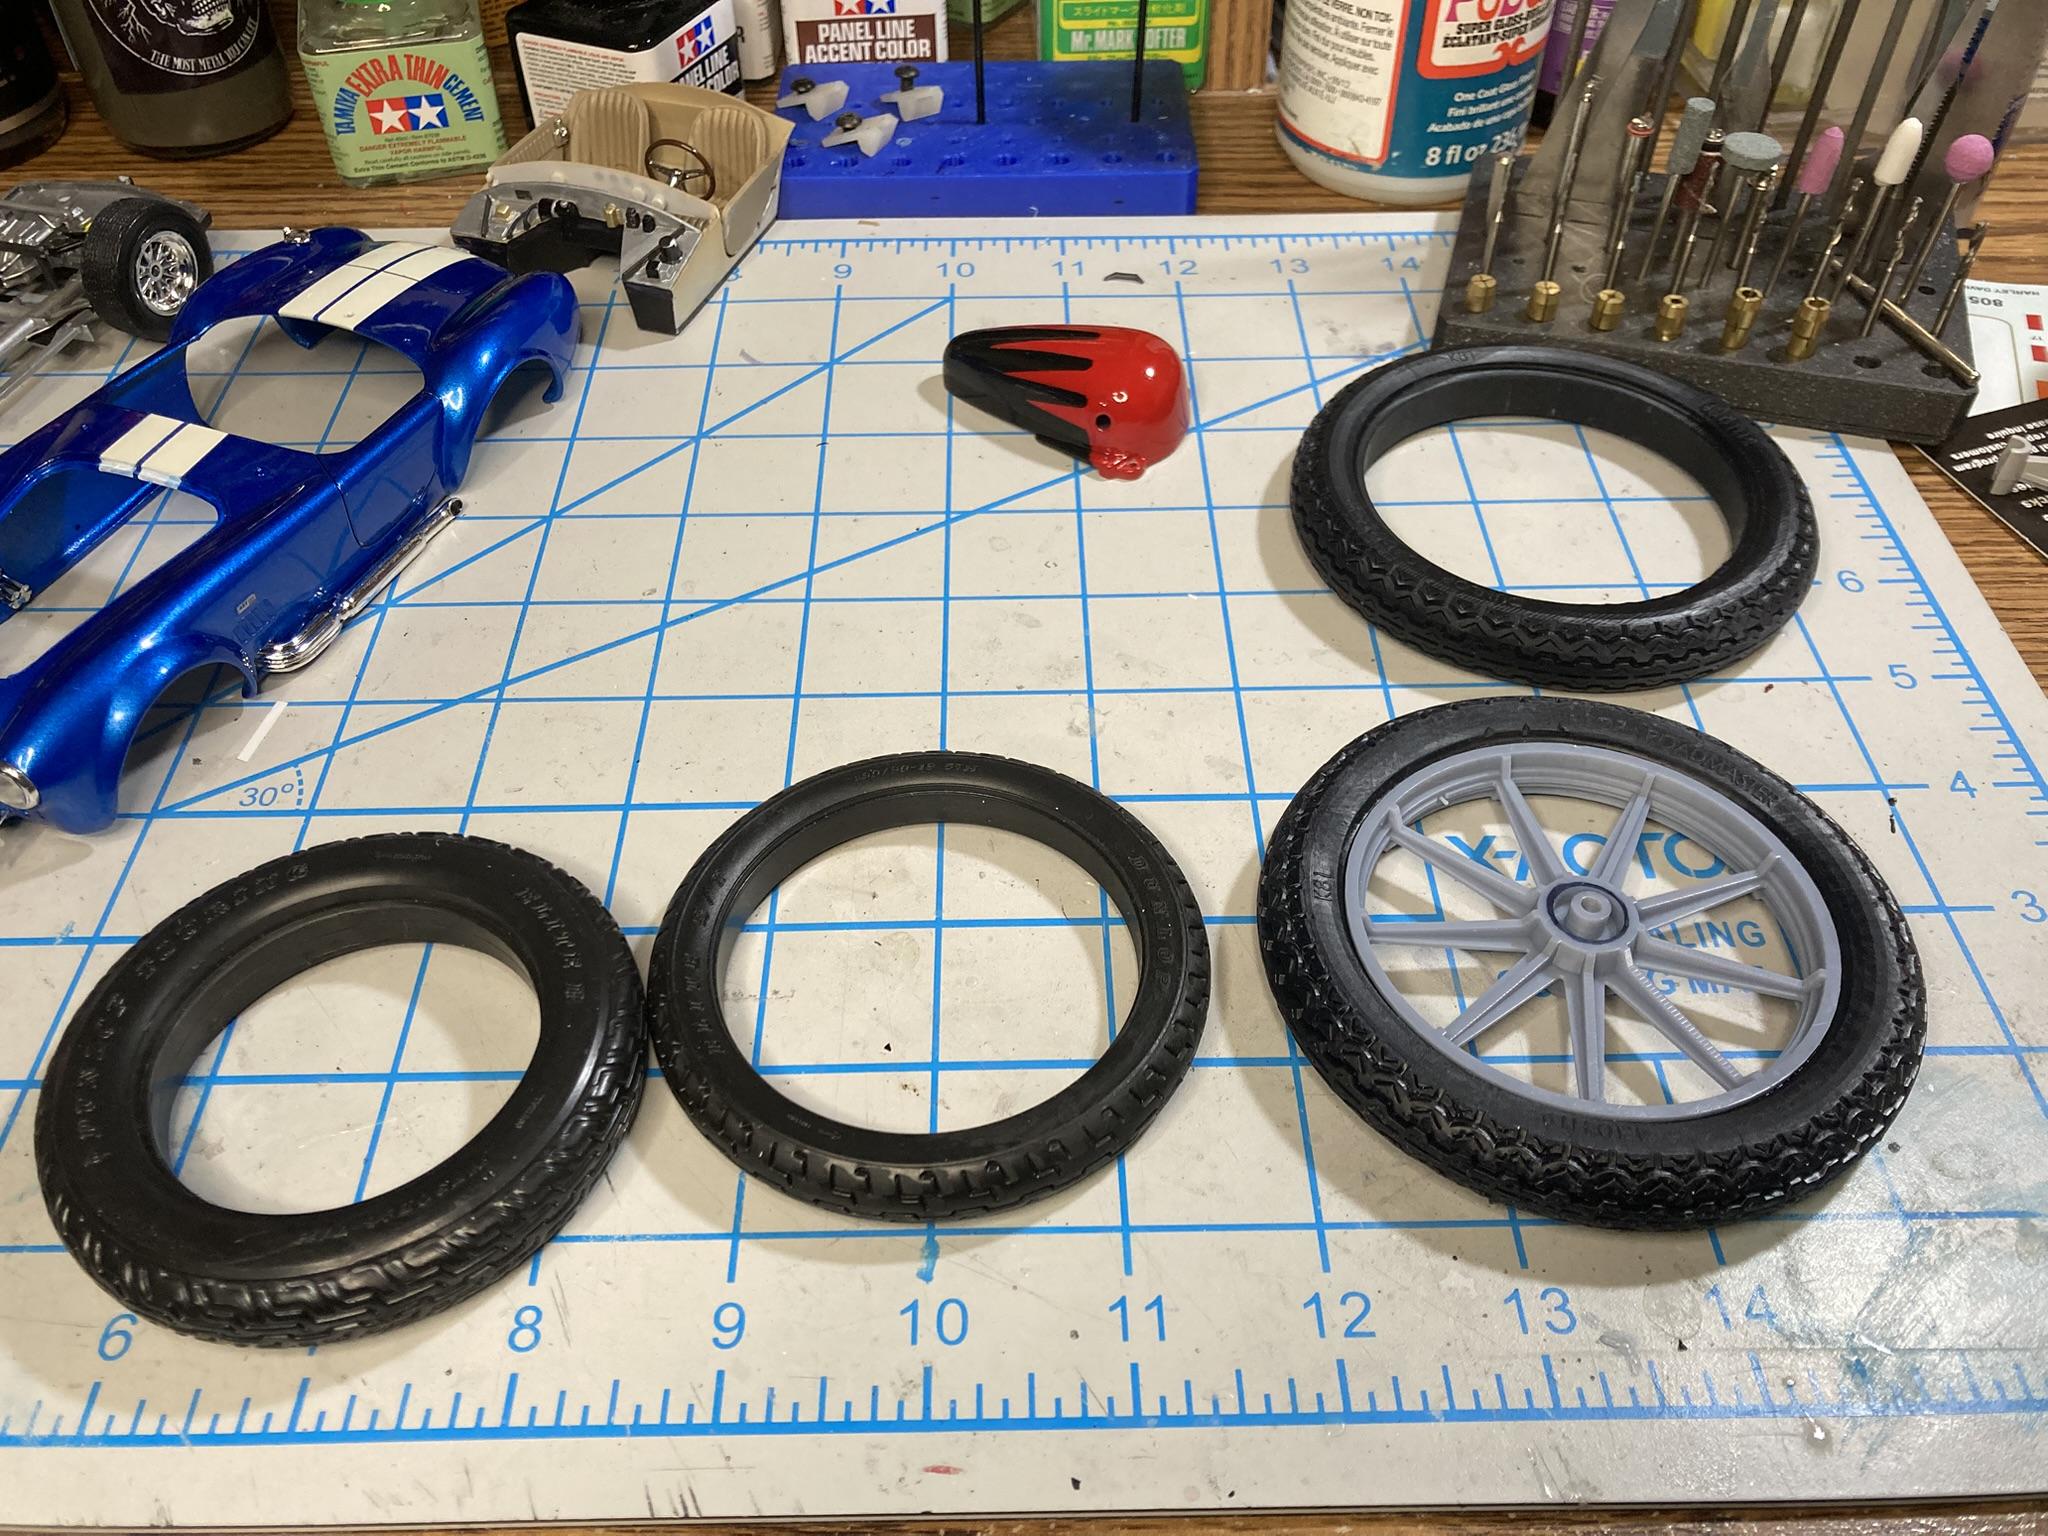
Somebody might be able to 3D print tires, I'm experimenting with soft resin printed tires for some 1/12 and 1/9 scale Harleys I want to build. I've gotten several of the Testors Lincoln Mint 1/9 scale kits from fleabay for cheap that were missing the tires. I don't know if it's because the boxes have end flaps and the tires are getting lost over the years of storage or if they were just missing from the kits from the start. Keep an eye on fleabay, I see tires and parts for some of the big 1/6 scale Tamiya and Testors kits surface occasionally. This looks like a tire for one of the 1/6 Tamiya Hondas. https://www.ebay.com/itm/186636404065 This ebay store (Japan) has parts for the Tamiya 1/6 kits for sale. https://www.ebay.com/str/japanitemstore?_trksid=p4429486.m3561.l170197 My partial success at printing tires and mag wheels for the Revell 1/8 scale Sportster that I'm intermittently working on. The two tires on the left are from the kit and the other two are my prints. Nolan
-
Nice slice, Corn Pop! I'm looking forward to seeing this finished. Nolan
-
My wish list would be for a '73 thru '75 El Camino Classic with chrome side trim. My next wish would be a 1997 thru 2004 Dodge Dakota, even in curbside like the Lindberg 1998 Dodge Dakota Sport. A regular cab would also be nice. Nolan
-
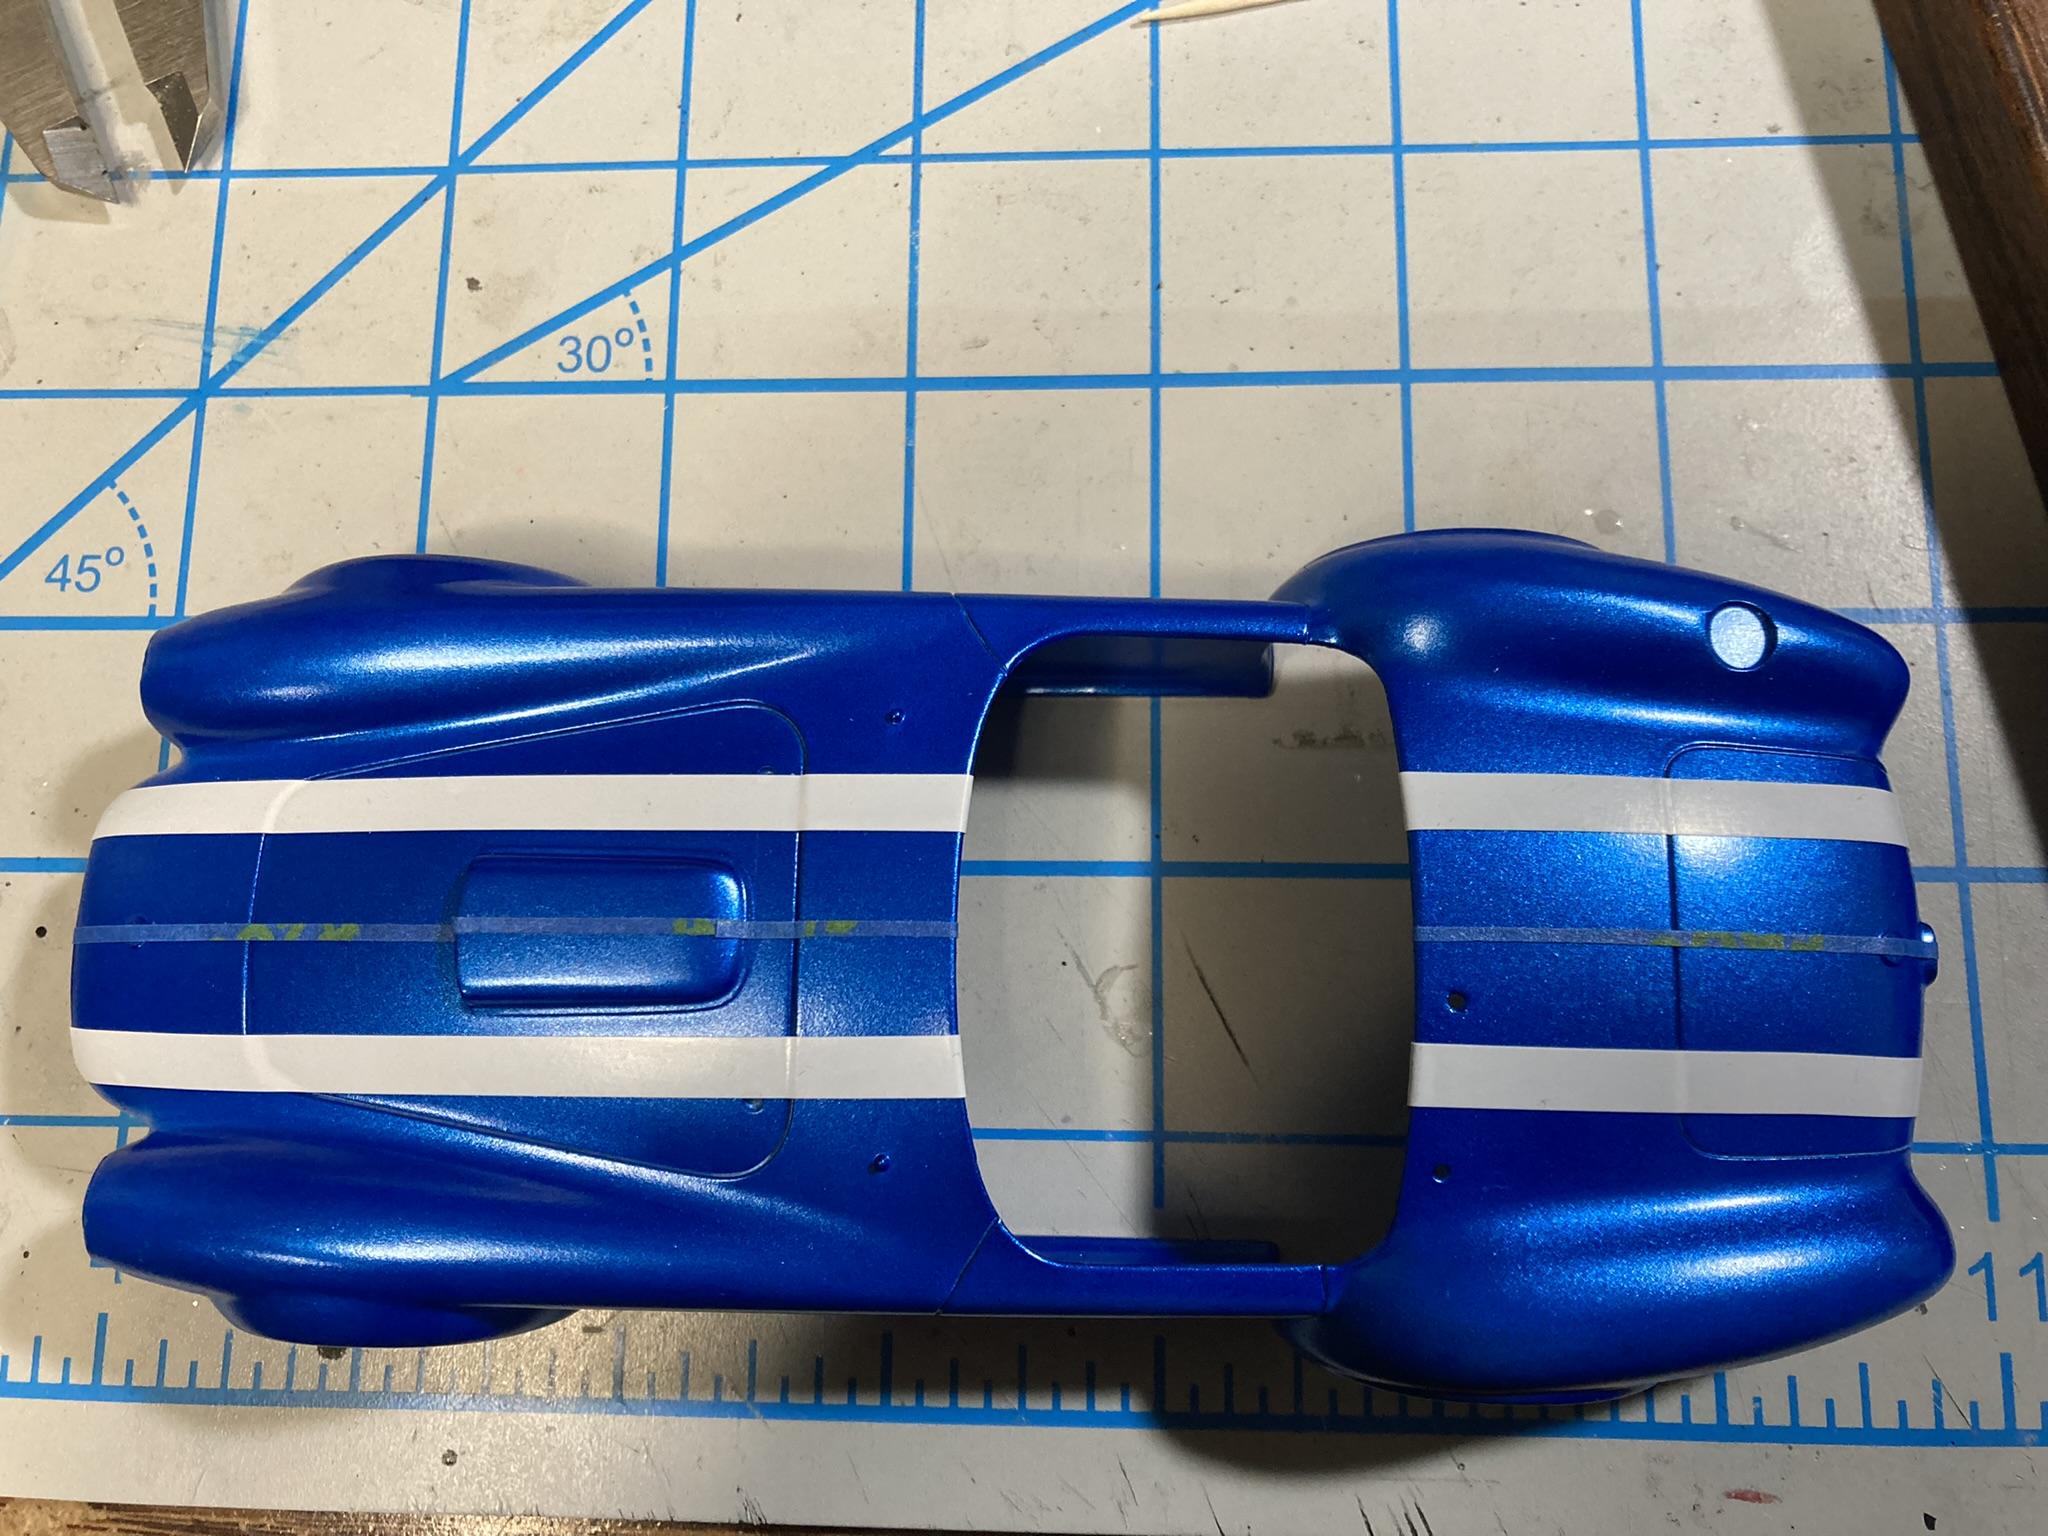
I had a slight change of plans with painting the stripes. My original plan was to paint the body Duplicolor Bright White, mask off the stripes and then paint the body Duplicolor Intense Blue Metallic. I did a test shot of the Blue and realized it would look like a metalflake Bass boat. I also didn't think I was up to getting the masking laid out straight because the edge would be right at the edge of the hood scoop. So painted the entire body Tamiya TS-19 Metallic Blue. I laid out the center line between the stripes and then cut a length of tape to the exact width of the decal sheet stripes. Then I cut the tape into small pieces and used them as guides for laying out the outer edges of the stripes with Nitto (?) vinyl tape. Then repeated for the other stripe. With the body wrapped up in yellow Frog tape, I airbrushed the edges of the tape with some Tamiya Clear in hopes of sealing the tape. I sprayed the stripes in Tamiya TS-27 Matt White, which covered the Blue very nicely. Unfortunately, in my excitement over the success of NO BLEED THRU! I forgot to take any photos. Oh, well. After baking the body for about 4 hours at 113 degrees, and then letting it sit for a couple of days, I knocked down the rough edges on the stripes, then laid on a couple coats of Duplicolor 1K clear. I'll let it cure for a couple more days, then wet sand and polish. Not perfect, but perfectly good enough as a learning process. Nolan
-
Nice, I like the black hood on the white car. Nolan
-
Nice job! That brings back a lot of memories. One of my high school buddies had a 40 Ford coupe and another had an early flathead V8 powered Ford Pickup. Both had that very distinctive Flathead V8 engine smell. None of our other beatermobiles had that engine odor or sound. Nolan
-
Thank you. Now I'm trying to decide whether to build the rigid framed chopped version of the Springer or build the semi-stock version of the Softtail Custom next. I say semi-stock because there is no such thing as a 'stock' Harley two days after a new Harley leaves the dealership, IF it even makes it off the showroom floor without something being changed. I picked up a couple of the Testor Lincoln Mint FXSTC Softtail Custom Kit #7205 on the cheap. Both kits are missing the tires.(?) I'm guessing because the flimsy boxes have end flaps, the tires are getting lost out the end flaps. Tires are pretty easy to 3D model and I found some flexible black resin that I want to try. Nolan


.JPEG.dd5e9ac1944c4acd6d253e986f8e2b03.JPEG)